Cardinal Installation Instructions - 31-32 - ETE3 ... - Cardinal Shower
Cardinal Installation Instructions - 31-32 - ETE3 ... - Cardinal Shower
Cardinal Installation Instructions - 31-32 - ETE3 ... - Cardinal Shower

You also want an ePaper? Increase the reach of your titles
YUMPU automatically turns print PDFs into web optimized ePapers that Google loves.
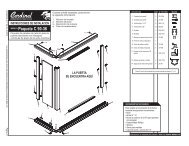
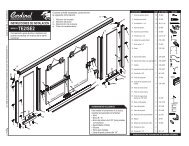
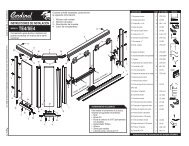
Updated Dec 1, 2012<strong>Cardinal</strong> <strong>Shower</strong> Enclosures are manufactured by Hoskin & Muir, Inc.Page <strong>31</strong>INSTALLATION INSTRUCTIONSMODEL:<strong>ETE3</strong>/ESE3Euro Series Frameless BypassTub/<strong>Shower</strong> Enclosure2222221<strong>32</strong><strong>32</strong>33<strong>32</strong>014242281425<strong>32</strong>28141927141When ordering repair parts, pleaseprovide the following information:1.2.3.4.54Model NumberPart NumberPart DescriptionFinish Color8 4 <strong>31</strong>11511917OUTSIDE PANEL INSIDE PANEL71415101116REQUIRED TOOLS4ATo install your shower enclosure, you willneed the following:Level#<strong>31</strong> Drill Bit3/16" Carbide Drill Bit ( for tile walls)Phillips ScrewdriverSiliconeHack Saw1/4" Box End Wrench5336126222DESCRIPTION QTY PART NO. PICTURE1. Wall Jambs 2 ZTE-120<strong>32</strong>. Wall Anchors 8 ZV-9353. #8x 1-1/4" screws 8 #8X1-1/4"4. Door Bumpers 2 ZV-9344A. Bottom Bumpers 1 ZV-9265. 6-<strong>32</strong> x 1/2" Screw 2 6-<strong>32</strong>X1/26. Bottom Still 1 ZTE-12227. Center Guide - 3” 1 ZV-9208. Header 2 ZTE-16019. Tubular Towel Bar 1 CHG-TB10. Tubular Inside Pull 1 CHG-KSM11. Towel Bar/Pull Fastener 3 ZTE-220512. 3/4” Nylon Towel Bar Washer 6 Washer13. 1/4” Nylon Towel Bar Sleeve 3 Sleeve14. #6 x 3/8” Screw 7 #6X3/815. Roller bracket Assembly 4 ZTE-120916. Inside Glass Panel (1 hole) 117. Outside Glass Panel (2 holes) 118. Door Guide Vinyl with ZTE-1222 1 ZV-91819. 90 Degree Post 2 ZTE-121820. Curb Channel 1 ZD-100621. Wall Channel 1 ZD-100622. Post to Curb Key 2 ZC-18023. Post to Header Clip 1 ZD-9024. Glass Support Block 1 ZV-90225. 90 Degree Glass Panel26. Vertical Seal Vinyl 6 ZV-90927. 90 Degree Header Clip 2 ZA-9028. #6 x 1/4" Screw 1 #6 x 1/4”<strong>ETE3</strong>/ESE3 <strong>Installation</strong> <strong>Instructions</strong>
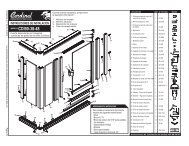
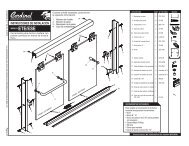
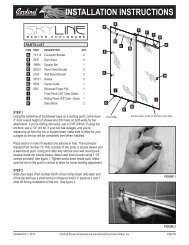
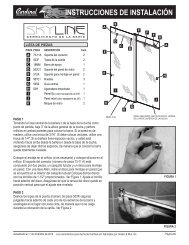
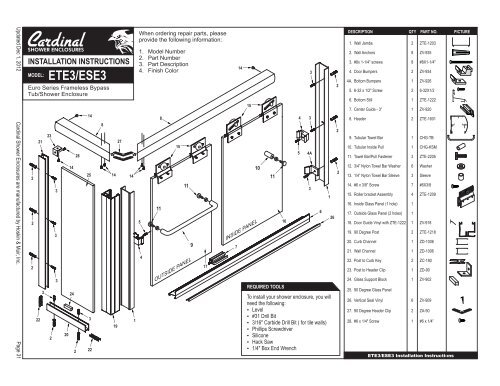
Page <strong>32</strong><strong>Cardinal</strong> <strong>Shower</strong> Enclosures are manufactured by Hoskin & Muir, Inc.Updated Dec 1, 2012Figure 1NOTE: Apply a bead of silicone (GE 1200) into the open channel ofroller bracket before attaching to glass. To assemble roller bracket(15) to glass, tighten screws until surface of roller bracket isdepressed 1/<strong>32</strong>" (28 inch pounds of torque). Allow to cure for 24hours before hanging sliders.1. Using a straight edge, draw a line down the center of the tub rim or pancurb. (The lines should cross in the center of the front corner).2. Set jamb (1) in place on wall, centering bottom of jamb on rim of tub.Hold plumb and mark for screw holes.3. Remove jamb (1) and drill 3/16” holes and insert plastic screw anchors(2).4. Silicone where wall meets the rim of the tub to seal bottom corner ofjamb. Set jamb (1) in place and secure with #8 x 1 1/4” screws (3). Securebottom bumper (4a) on shower head side with bottom jamb screw.5. Measure, on end panel side, from back wall to center of front corner where lines cross. Deduct 3/4”from this measurement and cut curb channel (20) to length. Run a bead of silicone on underside of curbchannel and set curb channel in place on center of curb, (weep holes to inside). Slide post to curb key(22) onto curb channel (20) and move to the wall. Vertical wall channel will key over exposed end.6. Set wall channel (21) on curb channel (20), hold plumb and mark the wall for the screw hole locations.Remove wall channel, drill holes into the wall and insert plastic anchors. Fill curb channel with siliconewhere curb channel meets wall. Set wall channel in place and secure with #8 x 1-1/4” screws (3). Secureheader clip (23) to top inside leg of wall channel with #6 x 1/4” screw (28).Figure 2Apply siliconeon wall channelsApply silicone to underside of sillCenter guide7. Place glass support block (24) in the center ofcurb channel. Set panel (25) into place in curbchannel and into wall channel. Using the verticalseal vinyl (26) into wall channel on both sides ofthe panel.8. Insert clip (22) into curb channel and apply alayer of silicone to curb where 90 degree post willset. Set corner post (19) inplace over edge of panel glassand curb clip, hold plumb andinsert vertical seal vinyl (26)into post and curb on channelon both sides of panel glass.9. Measure from inside of walljamb to inside of 90 degreep o s t a n d u s e t h i smeasurement to cut sill (6) tolength. Run a bead of siliconefull length to underside of silland apply silicone in cornerswhere wall jamb and cornerpost met curb and press guidefirmly into place on curb (SeeFigure 2).10. Assemble header (8) using90 degree clips (23) and #6 x3/8” SMS (14). Measure from both walls to outside corner of corner post (plumb inboth directions) and add 3/8” to this measurement for header length. Cut header tolength and set in place over jamb (1), corner post (19) and wall channel (21). Secureheader to jamb and corner post from INSIDE of shower and to clip (23) attached towall channel with #6 x 3/8” SMS (23).11. To set slider glass in place, hold inside slider panel (16) inside of tub or showerpan, insert rollers up into header and lower into place. The inside slider glass has onlyone hole for the inside pull handle (10) and will close against the wall jamb on theshower head side. Next, insert lower end of outside slider (17) in front of inside sliderby pushing lower ends far enough in, to allow clearance on inside edge of tub or pan.Avoid roller bracket to roller bracket contact while lifting panel into place. The outsideFigure 3slider will close against the jambOutside Door PanelInside Door Panelopposite the shower head.12. Place center guide (7) to centerposition on sill (6). Make sure the centerguide is hooked into the slot position onthe sill then snap center guide to sill.13. Close panels and adjust to align thevertical edge of panels with jamb andpost. Using a 1/4” box-end-wrench,loosen the screws on the rollers, butdon’t remove completely. When screwsare loose, adjust panel by sliding thescrew in the slot. Note: when screws areloose be sure to support panel so it doesnot fall and break. Adjust inside slider aslow as possible to reduce the gapbetween bottom of slider and sill takingcare that the glass does not drag on thetrack or center guide. Adjust for bowedglass by using the slotted hole in the jamb.14. Install bumpers (4) to the jambs and corner post with 6-<strong>32</strong> x 1/2” screw (5). Note: Glass panels closeinto the recessed portion of bumpers (4). The recess is toward the inside of the tub on the shower headjamb and toward the outside on the corner post.15. To install towel bar (9), place nylon towel bar insert sleeves (13) into holes in the glass (17). Next holdthe tubular towel bar (9) against the hole in the glass with the nylon towel bar/pull washer (12) betweenthe glass and the towel bar. Place a nylon towel bar/pull washer on the towel bar/pull screw (11) andsecure towel bar in place on both ends. Install the pull the same way the towel bar was installed. Usehole in fastener to tighten (See Figure 3).16. Silicone inside of shower where jambs meet walls and sill meets rim of tub.ElevationViewHeader Retainer Clip (Optional)RollerBracketAssm.(15)Header (8)RollerBrackets(15)BottomSill (6)CenterGuide (7)#6 x 3/8” (14)Header (8)#6 x 1/4” (28)Clip (23)Vertical Seal Vinyl (26)Glass Support Block (24)Curb Channel (20)90 Degree Post (19)Jamb (1)Plan View<strong>Shower</strong> Head<strong>ETE3</strong>/ESE3 <strong>Installation</strong> <strong>Instructions</strong>Figure 4Wall Channel (21)Bumper (4)Solid Tubular Inside Door Pull (10)Vertical Seal Vinyl (26)Center Guide (7)Bumper (4)Wall Jamb (1)Tubular Towel Bar (9)Bottom Bumper (4a)