Cardinal Installation Instructions - Appendix D ... - Cardinal Shower
Cardinal Installation Instructions - Appendix D ... - Cardinal Shower
Cardinal Installation Instructions - Appendix D ... - Cardinal Shower
- No tags were found...

Create successful ePaper yourself
Turn your PDF publications into a flip-book with our unique Google optimized e-Paper software.
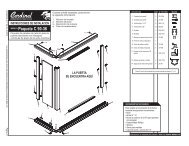
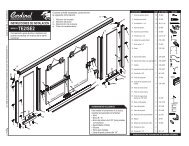
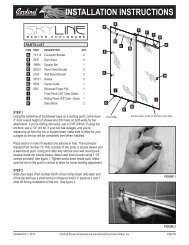
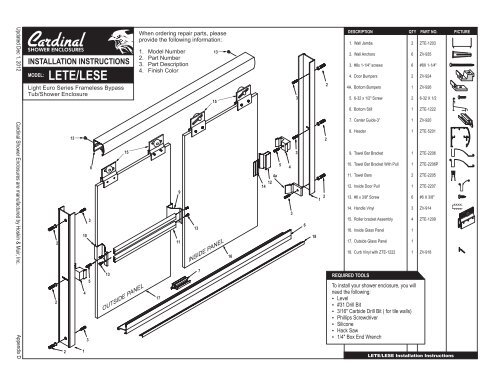
Updated Dec 1, 2012INSTALLATION INSTRUCTIONSMODEL:LETE/LESELight Euro Series Frameless BypassTub/<strong>Shower</strong> EnclosureWhen ordering repair parts, pleaseprovide the following information:1.2.3.4.Model NumberPart NumberPart DescriptionFinish Color131532DESCRIPTION QTY PART NO. PICTURE1. Wall Jambs 2 ZTE-12032. Wall Anchors 6 ZV-9353. #8x 1-1/4" screws 6 #8X 1-1/4"4. Door Bumpers 2 ZV-9244A. Bottom Bumpers 1 ZV-9265. 6-32 x 1/2" Screw 2 6-32 X 1/26. Bottom Still 1 ZTE-12227. Center Guide-3” 1 ZV-920<strong>Cardinal</strong> <strong>Shower</strong> Enclosures are manufactured by Hoskin & Muir, Inc.21310831591113INSIDE PANEL1614 12 4a54336181228. Header 1 ZTE-52019. Towel Bar Bracket 1 ZTE-220610. Towel Bar Bracket With Pull 1 ZTE-2206P11. Towel Bars 2 ZTE-220512. Inside Door Pull 1 ZTE-220713. #6 x 3/8" Screw 6 #6 X 3/8"14. Handle Vinyl 3 ZV-91415. Roller bracket Assembly 4 ZTE-120916. Inside Glass Panel 117. Outside Glass Panel 118. Curb Vinyl with ZTE-1222 1 ZV-918<strong>Appendix</strong> D22543113OUTSIDE PANEL177REQUIRED TOOLSTo install your shower enclosure, you willneed the following:Level#31 Drill Bit3/16" Carbide Drill Bit ( for tile walls)Phillips ScrewdriverSiliconeHack Saw1/4" Box End WrenchLETE/LESE <strong>Installation</strong> <strong>Instructions</strong>
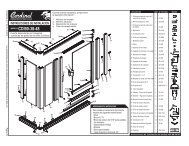
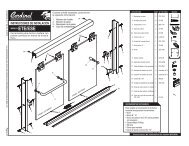
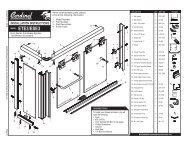
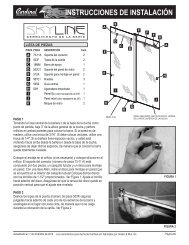
<strong>Appendix</strong> D<strong>Cardinal</strong> <strong>Shower</strong> Enclosures are manufactured by Hoskin & Muir, Inc.Updated Dec 1, 2012NOTE: Apply a bead of silicone (GE 1200) into the open channel ofroller bracket before attaching to glass. To assemble roller bracket (15)to glass, tighten screws until surface of roller bracket is depressed1/32" (28 inch pounds of torque). Allow to cure for 24 hours beforehanging sliders.1. Set wall jambs (1) in place on walls, centering bottom of jambs onrim of tub. Hold plumb and mark walls for screw holes.2. Removes and drill 3/16" diameter holes in walls (use a carbidetipped drill bit for tiles walls). Insert plastic wall anchors (2) into holes.Silicone where the wall meets the rim of the tub to seal the bottom ofFigure 1 jamb. Set jambs in place and secure to the wall with #8 x 1-1/4" screws(3). Secure bottom bumper (4a) on shower head / inside side with the bottom wall jamb screw.3. Cut sill (6) to fit opening between jambs. Run a bead of silicone full length to the underside of sill(See Figure 2) and apply silicone to inside of jamb where jamb meets tub. On the inside of jamb,run a 1/4" bead of silicone 1-1/4" up the outside leg of each wall jamb (See Figure 2). Set curb inplace, then press firmly to rim of tub. Wipe off any excess silicone before curing. Use tape to holdin place until silicone sets.18Figure 261Apply siliconeon wall channels154. Cut header (8) 1/32" to 1/16" less thanopening width and set in place.5. To set slider glass in place, hold inside sliderinside of tub shower pan, insert rollers up intoheader and lower into place. The inside willclose against the wall jamb on the showerhead side. Next, insert lower end of outsideslider in front of inside slider by pushing lowerends far enough in to allow clearance on insideedge of tub or pan. Avoid roller bracket to rollerbracket contact while lifting panel into place.The outside slider will close against the jambopposite the shower head.6. Place center guide (7) to center position onsill (See Figure 2). make sure the center guideis hooked into the slot position on the sill, thensnap center guide to sill.Center guide 7. Close panels and adjust to align the verticaledge of panel with jamb. Using a 1/4" box-endwrench, loosen the screws on the rollers, butApply silicone to underside of silldon't remove completely. When screw areloose, adjust panel by sliding the screw intothe slot. NOTE: When screws are loose be sure to support panel so it does not fall and break.Adjust the inside slider as low as possible to reduce the gap between bottom of slider and silltaking care that the glass does not drag on the track of center guide.8. Set hand vinyl channel (14) in place over edges of outside glass panel (17) with bottom of vinylin line with bottom of bumper. Tap towel bar brackets (9 &10) in place. Bracket with pull should beto jamb side of slider opposite shower head. Assemble towel bars (11) to brackets using #6 x 3/8"screws (13).9. Set handle vinyl (14) in place over edge of inside glass panel (16) with bottom of bumper onedge facing the wall jamb (1). Tap inside door pull (12) in place. Note: Large portion of pull to theFigure 310Outside Door Panelinside of slider. This panel should be atthe shower head / inside side.10. Center hole in jamb is slotted toallow adjusting of jamb to compensatefor bowed glass. After installinghardware, roll both panels into jamb onone side. If edge of glass hits on edgeof jamb, loosen center screw andadjust jamb accordingly. Repeat onopposite side. From INSIDE of unit,drill #31 holes through header and intowall jamb. Secure header to walljambs with two #6 x 3/8" screws (13).131412 11. Secure bumpers (4) in place with 6-Inside Door Panel32 x 1/2" screw (5). NOTE: Glasspanels close into the recessed portionof bumpers. The recess is toward the inside of the tub on the shower head jamb, and toward theoutside on the other jamb.12. Silicone inside of shower where jambs meet walls and sill meets rim of tub.ElevationViewCenter Guide (7)119Header Retainer Clip(Optional)Rollers (15)Header (8)Roller Brackets (15)Bumper (4)Wall Jamb (1)Bottom Sill (6)13Center Guide (7)Towel Bar Bracketwith Pull (10)<strong>Shower</strong> HeadInside Door Pull (12)Towel Bars (11)Plan ViewLETE/LESE <strong>Installation</strong> <strong>Instructions</strong>Figure 4Bumper (4)Towel Bar Bracket (9)Bottom Bumper (4a)
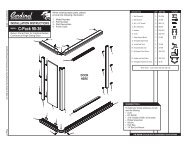
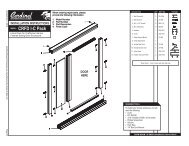
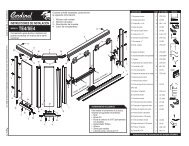
Updated Dec 1, 2012<strong>Cardinal</strong> <strong>Shower</strong> Enclosures are manufactured by Hoskin & Muir, Inc.INSTALLATION INSTRUCTIONSMODEL:LETE/LESE<strong>Cardinal</strong> Series Frameless BypassTub/<strong>Shower</strong> EnclosureFrameless EnclosuresModel TE Tub EnclosureModel SE <strong>Shower</strong> EnclosureModel # Width Height Max. Glass SizeLETE-60 42” to 60” 57 3/8” 30” x 55”LETE-66 60” to 66” 57 3/8” 33” x 55”LETE-72 66” to 72” 57 3/8” 36” x 55”LESE-48 42” to 48” 70 3/8” 24” x 68”LESE-60 54” to 60” 70 3/8” 30” x 68”LESE-66 60” to 66” 70 3/8” 33” x 68”LESE-72 66” to 72” 70 3/8” 36” x 68”Breakdown Chart for SpecialHeight and Width TE & SE UnitsQTY. Part# & Description How to arrive at measurement1 ZTE-5201 Header Unit width minus 1/16”2 ZTE-1203 Side Jambs Unit height minus 1 1/8”1 ZTE-1222 Bottom Track Unit width minus 7/16”1 ZTE-2205 Towel Bars Glass width (see chart above) minus 1/4”Glass2 Slider width Unit width divided by 2height Unit width minus 2 3/8”*Model TE-60 short (56 3/8” high) is available using 30” x 54” glass*Model TE-56 short (55 3/8” high) is available using 28” x 53” glass<strong>Appendix</strong> DLETE/LESE Breakdown Chart
<strong>Appendix</strong> D<strong>Cardinal</strong> <strong>Shower</strong> Enclosures are manufactured by Hoskin & Muir, Inc.This page intentionally left blankUpdated Dec 1, 2012