360 Oil Change Procedure.pdf - Ferrari Life
360 Oil Change Procedure.pdf - Ferrari Life
360 Oil Change Procedure.pdf - Ferrari Life

You also want an ePaper? Increase the reach of your titles
YUMPU automatically turns print PDFs into web optimized ePapers that Google loves.
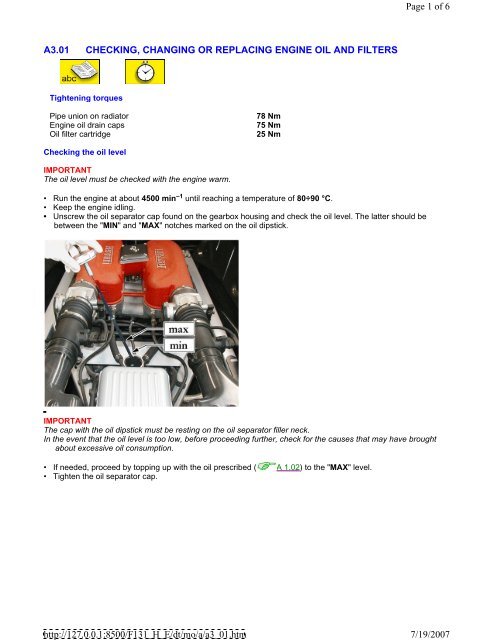
http://127.0.0.1:8500/F131_H_E/dt/mo/a/a3_01.htmPage 1 of 67/19/2007A3.01 CHECKING, CHANGING OR REPLACING ENGINE OIL AND FILTERSTightening torquesPipe union on radiatorEngine oil drain caps<strong>Oil</strong> filter cartridge78 Nm75 Nm25 NmChecking the oil levelIMPORTANTThe oil level must be checked with the engine warm.• Run the engine at about 4500 min –1 until reaching a temperature of 80÷90 °C.• Keep the engine idling.• Unscrew the oil separator cap found on the gearbox housing and check the oil level. The latter should bebetween the "MIN" and "MAX" notches marked on the oil dipstick.IMPORTANTThe cap with the oil dipstick must be resting on the oil separator filler neck.In the event that the oil level is too low, before proceeding further, check for the causes that may have broughtabout excessive oil consumption.• If needed, proceed by topping up with the oil prescribed (• Tighten the oil separator cap.A 1.02) to the "MAX" level.
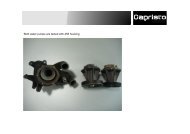
http://127.0.0.1:8500/F131_H_E/dt/mo/a/a3_01.htmPage 2 of 67/19/2007Changing the engine oil and replacing filtersThe engine oil must be changed at regular intervals, as prescribed in the PROGRAMMED MAINTENANCEPLAN, and with the engine warm.• Unscrew the cap (1) on the engine sump and the cap (2) underneath the gearbox housing.• Allow the oil to drain out completely.CAUTIONDo not pollute the environment with the used oil.• In order to allow the oil backed up in the pipes and in the cooling system radiator to drain out, it is advisable toremove the rear part of the underfloor ( M 2.12).• Detach the union (3) on the pipe delivering oil to the radiator and deliver compressed air to the hose.Clean the mesh filter in accordance with the intervals established in the PROGRAMMED MAINTENANCE PLAN.It is found on the right-hand side of the gearbox housing, underneath the differential attachment flange.NOTESFor the sake of clarity, the figure shows the gearbox removed from the car.
http://127.0.0.1:8500/F131_H_E/dt/mo/a/a3_01.htmPage 4 of 67/19/2007• Unscrew the two fastening nuts (4).• Rotate the outer flange slightly and using a flat screwdriver as a lever, slide out the mesh filter.• Remove the O-Rings (5) and proceed with cleaning procedures by immersing the filter in a degreasing solutionand then drying it with compressed air. Special care must be taken to avoid damaging the mesh. If any tearsare found on the filtering part, the entire filter must be replaced.
http://127.0.0.1:8500/F131_H_E/dt/mo/a/a3_01.htmPage 5 of 67/19/2007Reassembly• Insert the O-Rings (5) in the mesh filter seats and lubricate them with MOLYKOTE grease.• Assemble the mesh filter on the gearbox housing and lock the fastening nuts (4).• Lock the union (3) on the pipe delivering oil to the radiator to the prescribed torque.• Carefully clean the caps and replace the gaskets.• Re-assemble them and tighten them to the prescribed torque.
http://127.0.0.1:8500/F131_H_E/dt/mo/a/a3_01.htmPage 6 of 67/19/2007• Apply the USAG D156 tool, cod. 95971560 on the filter cartridge, positioned in front of the oil separator, andunscrew the cartridge out of its seat.• Use PURFLUX LS 925 filter cartridges only and lubricate the rubber gasket with engine oil beforereassembling.• Assemble the cartridge in its seat, screwing it to the prescribed tightening torque.• Proceed with refilling, using oil of the type indicated and the quantity listed in the "Refill servicing table"( A 1.02).NOTESThe quantity of oil to be added may differ slightly from the amount prescribed when dry. This is due tounavoidable build-up inside the system. We advise you to refill gradually, in accordance with the dipstickreference marks.• Re-start the engine and check the level, as described above.• Ensure that there is no leakage from the drain caps (1) and (2), from the filter cartridge and from the union (3).