FERRARI 456 WINDOW MECHANISM REPLACMENT - Ferrari Life
FERRARI 456 WINDOW MECHANISM REPLACMENT - Ferrari Life
FERRARI 456 WINDOW MECHANISM REPLACMENT - Ferrari Life

You also want an ePaper? Increase the reach of your titles
YUMPU automatically turns print PDFs into web optimized ePapers that Google loves.
<strong>FERRARI</strong> <strong>456</strong> <strong>WINDOW</strong><br />
<strong>MECHANISM</strong> <strong>REPLACMENT</strong><br />
OVERVIEW:<br />
‐ This will show the steps needed to replace of an entire <strong>Ferrari</strong> <strong>456</strong> [non‐M series] window,<br />
mechanical, mechanism.<br />
‐ This example replaces the original RIGHT part number 63209500 [but may also be: 63580100,<br />
64092100, or 66219100] with the newer upgraded OEM part number 65267700.<br />
‐ IF you were replacing the LEFT mechanism, your part number would be the NEW Part number<br />
66219000 or older part number 65757600<br />
‐ These part numbers supposedly fit the newer “M” series, but one should research heavily<br />
before purchase.<br />
‐ NEWER OEM Part has improvements for adjusting what is commonly known as the “<strong>456</strong> window<br />
gap” issue. The OLDER OEM part is much more difficult. Later in this document the adjustment<br />
points will be noted.
HISTORY:<br />
Reasons for replacing such a mechanism are numerous but the more compelling reasons are:<br />
a. The Pantograph, to be shown, separates. There is a fix for just that part where another member<br />
basically used three/four sheet metal screws to keep the part together. [Search criteria is for<br />
that fix: “<strong>456</strong> Window : Repair etc.”, user starting thread: “Granucci”]<br />
b. You either do not want to trust or repair the pantograph or other mechanisms and want to<br />
totally replace with a newer part.<br />
TOOLS:<br />
‐ 10 mm wrench<br />
‐ 7 mm socket with screwdriver like ability.<br />
‐ Various HEX wrenches. It is highly recommended that you obtain the ‘ball’ end type.<br />
‐ Phillips screwdriver<br />
‐ One prying tool: Flat head screwdriver, but a small knifelike item is best to prevent scratching. I<br />
used a SWISS pocket screwdriver [see below].<br />
‐ Camera: Very handy to remember how things were situated for re‐assembly.<br />
‐ OPTIONAL:<br />
o Magnetic holding trays. I used two, one for the exterior items and one for interior parts<br />
o Clip/tape: VERY handy to keep parts away and in the order taken off but still on. You’ll<br />
see below.<br />
o Gloves [nitrate etc.] I choose to just use goop‐off afterwards on cleaning my hands of<br />
the white grease.<br />
o BLUE‐TAPE. Like used in painting to cover leather from your invariable greasy hands.<br />
o Small Rust‐blaster product.<br />
o White Grease
QUICK STEPS:<br />
NOTES:<br />
It is not necessary to disconnect the battery or power during this operation and HIGHLY RECOMMENED<br />
not to as you’ll need to reattach switches and motors to position the window during removal and install.<br />
You’ll see, that although somewhat intimidating to play with mechanism while detached, it is the only<br />
way to sometimes position pieces. You will not be successful otherwise. JUST BE careful and move the<br />
window in short movements.<br />
ALSO, in case you are thinking I’m some sort of guru or experienced mechanic, well, I’m NOT. I honestly<br />
was looking forward to the exercise but dreading the possibility that I was over my head: YOU CAN DO<br />
THIS! I’m living testament. NO drinking was involved in this exercise. The man‐cave TV was on sports.<br />
There was the obligatory “yell at me mascot” [two cats, lying idly by snoozing at times, but yelled at nonthe‐less]<br />
when there were “you GOT to be kidding me, tight fit engineering moments”. You’ll see. ;)<br />
‐ Remove the interior door panel:<br />
o 9 attachment points<br />
o 10 min: Most difficult will be the HEX screw<br />
‐ Remove handle connection point from window mechanism:<br />
o 1 attachment points<br />
o 5 min<br />
‐ Remove window mechanism from door interior<br />
o 6 attachment points<br />
o 10 min<br />
‐ Remove mechanism, window, sliders<br />
o 2 attachment points<br />
o 10 min: IF rusted and most likely, some optional rust blaster will help.<br />
‐ Install replacement Mechanism.<br />
o 30‐40 min: Takes some adjusting so time is variable.<br />
‐ Replace interior door panel<br />
o 20‐30 Min: WHY? Because the BLASTED last screw is always the worst: Door Handle.<br />
Total time for me was about a 90 minutes, but I’ve done the process of taking the door interior off<br />
several times before. The actual mechanism was a first for me but found taking off fairly quick but to<br />
put back on [thank goodness for cell cameras] and the adjustment of window gap quite tedious and<br />
time consuming: About 40 min. just for that alone.
The Parts:<br />
There are several part numbers associated with this older <strong>456</strong> GT mechanism, if not per side, then by<br />
modification by <strong>Ferrari</strong> for issue. The oldest mechanism was inadequate from the start, causing what is<br />
commonly known as the ‘window gapping’ problem. The pics below are first, the original, part and<br />
second the upgraded newer part, that almost did away with the problem. The key to the second part is<br />
the adjustment points [see circled screws] that allow for higher placement of the glass if not ability to<br />
alter the aspect of front and/or rear of the glass meeting points.<br />
The adjustments are much better and encouraged for easier and normal use of windows facing a wear<br />
problem. I’ve read/heard and somewhat understood there is a pivot point made of aluminum and some<br />
have replaced such with a stronger stainless steel pin: I cannot address that ‘fix’ and not sure what<br />
point they are referring.
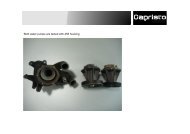
This is what a broken Pantograph looks like before removal.<br />
NEWER PART<br />
View that faces the cockpit. Rear of this faces the glass. Motor faces fwd.
Backside view. Portion that faces towards glass. This is upside down too.<br />
Showing the Pantograph connection/pivot. The pinted object ‘might be’ the aluminum pin everyone<br />
refers and is subsequently replaced by a stainless steel one. Mine separated and this fix, by another<br />
user, was to use screws to hold together: See search link above.
Detailed Steps:<br />
Remove the interior door panel. 9 connection points. Tools,<br />
a. 10 mm wrench,<br />
b. Phillips head screw driver,<br />
c. HEX key, that is 90 o bent or ball‐type end,<br />
d. small blunt pry device/Swiss‐Army‐knife.<br />
e. Box/Tray to keep items.<br />
f. : TAPE to prevent door lock extension adjustment screws from changing<br />
Door interior bottom/underneath, get under and remove three Phillips headed screws and washers<br />
from rug‐like area. Get on your back and look up…no pics for the obvious but this picture might help.
Under the hand rest, remove the large Phillips screw and it’s washer. Once done the arm rest leather<br />
part can be removed and set on the seat.<br />
I used a Swiss knife’s screwdriver to remove the two window switches. Carefully force up one side then<br />
the back side. Once removed, NOTE which switch wires go to which socket! Mark them LEFT and<br />
RIGHT. You will be reattaching the switch later and certainly when finishing up.
Unplug the marked switch backs from the actual button portion: Set aside. Colors may vary.
TAPE!!! The two connection rods used to open the door and locking rod. THESE measurements should<br />
be frozen or you will spend COUNTLESS HOURS getting it right. Don’t fret; just put some nice tape all<br />
about the connection screws [see below circled items].<br />
NOTE: There are two wires that sit in the armrest well when covered by the armrest arm cover: These<br />
are <strong>Ferrari</strong>’s proprietary diagnostic connection points where there is a left and right side series. Just<br />
tape these to the door panel, keeping them out of the way<br />
Using 10mm wrench, unscrew the armrest nut.
Using a Phillips head screw driver unscrew the door handle and pull aside out of the way: Use blue tape<br />
to keep aside. Don’t worry too much about ‘bending’ the connection rods a bit as long as you make no<br />
bends or unscrew the lengths you are good. The ‘tough part’ will be putting this screw back in on finish.
Now the blasted, HEX screw: Undo.
The top, of the arm rest has a bent, rod, which fastens into a notch of the interior. Just remove the<br />
entire armrest at this time and set on seat.<br />
10mm wrench to remove the upper portion of the door covering where the armrest top met. IF you<br />
look in the above pic, that NUT sits right above the Red arrow. It’ll be obvious.<br />
Set the door panel inside the foot well. DO NOT remove the wires behind, but do tape up any loose<br />
wires to the interior side to keep out of the way. This is what parts I took off the exterior to get the door<br />
panel off.
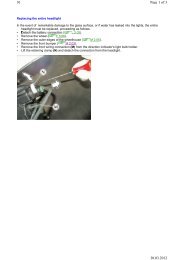
Remove the door handle connection point. 1 connection point. Tools,<br />
a. Phillips head screw driver for a brace.<br />
b. HEX key, which is 90 o bent or ball‐type end. Should be same as used on the panel’s HEX.<br />
c. Box/Tray to keep items.<br />
d. : Take a picture. Note the placement of items, and the aspect of all.<br />
Insert the screwdriver into the hole shown for a brace while using the HEX key to unscrew. There will be<br />
a HEX screw, one washer, silver and one washer small. NOTE placement: Take a picture. NOTE Aspect<br />
of upper and lower rod, connection points to how they were before detachment.
Take off the spring from the window mechanism. Make take some doing. You can see it above.<br />
Move these unscrewed, interior pieces out of the window’s tracks. Tape out of the way if necessary.<br />
Below is the ones I removed from the NEW/REPLACEMENT part, which photographs better here. The<br />
ones you leave inside, will look just like this. You picture taking will help a lot when getting aspects<br />
correct.
Remove window mechanism from door interior. 6 connection points. Tools:<br />
a. 10 mm wrench.<br />
b. Box/Tray to keep items.<br />
c. IMPORTANT: Take a picture. Note the placement of each pair of attachment points. I<br />
found this extremely necessary. NOTE: There are these spring loaded nuts that fit into<br />
the holes of each attachment point. Try not to remove them. [see picture immediately<br />
following on circled items] IF they become loose, just spend time to re‐insert them into<br />
the holes again. I actually got frustrated on one pair and just used them like regular<br />
nuts BUT REVERSED were the spring clips faced away from the surfaces, when<br />
reassembling them and found nothing alarming about doing such. The springs were a<br />
method for the assembly line to have fewer hands needed to hold the nuts.<br />
d. When I removed the bolts, I made sure to place in magnetic tray in SAME<br />
position as in relation from mechanism removal. That is, the top two were in the tray’s<br />
top portion, the left in the tray’s left side and the bottom in the tray’s bottom.<br />
e. There is a water shield of plastic: Carefully remove and set aside as you’ll want to put<br />
back.<br />
Loosen, by sliding the silver locking clamp [see circled item] from the window mechanism motor, and<br />
unplug the power to the motor.<br />
Reattach this window’s switch to the socket removed from the arm rest.<br />
Loosen all six, attachment nuts but don’t remove any. [see below pics, but obvious, for points]<br />
IF the window is too high or too low, adjust it by plugging back in the motor plug and adjusting so you<br />
can get to the two actual, window attachment slider points. There is a track [see pictures] that has two
sliders that connect the pantograph to the window. You will need to just pop them out, which is easy.<br />
So much so, that I actually contemplated leaving them and re‐plugging, back into them, the new<br />
mechanism connection points. Decided to do it right and take out the sliders.
Take off the BOTTOM pair of bolts.<br />
Take off the REAR SIDE pair of bolts.
Take off the TOP pair of bolts<br />
Remove the entire window mechanism assembly. you may need to activate the window<br />
up/down to loosen the mechanism out of the door frame. GUARANTEED!
Remove mechanism, window, sliders. 2 connection points. Tools:<br />
a. 7 mm socket on a long extension: I used a screwdriver type<br />
b. 7/16 mm [?] HEX key.<br />
c. Short blast of RUST‐BLASTER to obvious areas.<br />
d. Box/Tray to keep items.<br />
Once you have removed the window mechanism, you will need to take out the window’s sliders that act<br />
as connection points to actually move the glass up/down to the mechanism. These typically are plastic<br />
and greased well. The forward most slider is actually frozen between two, rubber washers/grommets<br />
and those grommets are between two long screws. You can only remove the sliders going forward and<br />
you must take all the bolts off and grommets out of the channel.
DO NOT REMOVE THE GLASS, unless that is a task you must perform too.<br />
Insert the key to the bolts top end, holding it steady while you unscrew the bottom nut. Remove both<br />
bolts. Using a screwdriver or HEX key inserted into the grommets, slide forward and out of the channel<br />
along with the two sliders.<br />
Clean the channel and the grease the channel making ready for the new sliders.
Install replacement Mechanism. You already know the points and tools<br />
This is where it gets….’interesting’.<br />
SLIDERS FIRST. Bit awkward, and don’t be afraid to smack the mechanism about to wiggle in the sliders<br />
to the channel in the reverse order you extracted.<br />
, after getting in the first slider put in the rear‐most bolt, grommet, slider, then foremost<br />
grommet and bolt. Tighten the bolt’s nuts loosely while you struggle.<br />
Slide in the first slider, insert the rear‐most bolt and rear‐most grommet.<br />
Insert in the remaining, foremost slider, then grommet and remaining, foremost bolt. loosely finger<br />
tighten the nuts to each bolt so they don’t extract easily.<br />
MOVE ON TO NEXT STEP.<br />
You will tighten these nuts last, thus the need for a screwdriver like 7mm socket!!!!
Install replacement Mechanism. You know the points and tools.<br />
I’ll say this: This is a bit tough. You can do it. DO NOT BE SCARED you are making window go<br />
up/down to make this happen, and is necessary to seat connection points. ALSO, I actually used the<br />
mechanism, BRACED against door interior points top/bottom, at times, to force the placement of the<br />
attachment points correctly.<br />
THIS IS WHERE THE PICTURES will help.<br />
Grease accordingly before insertion.<br />
IF a ‘spring nut’ has fallen out of its respective hole and you cannot replace it correctly, just reverse the<br />
nut so the spring clip is facing away from the attachment surface: I found no problem with this.<br />
MAKE SURE TO attach the RIGHT MOST mechanism metal BEHIND the door’s attachment point: See<br />
your picture. Take care to have the BOTTOM attachment points done as picture showed.<br />
Screw in LIGHTLY all bolts, and nuts accordingly.<br />
NOW, run the window up, down, to see if it works smoothly. IF NOT grease a bit more
The remaining pics are for those just wanting more of what is in there. Helpful.
Rear Most slider and one of the up/down channels conneted to the glass. The sliders channels is too.
Document authored by Rik Granucci, <strong>Ferrari</strong><strong>Life</strong>.com, 23 October 2012<br />
<strong>FERRARI</strong> <strong>456</strong> Official Window and Door Improvement Technical Documents<br />
As of 23 Oct. 2012