Printrex 980 Operator's Guide - TransAct
Printrex 980 Operator's Guide - TransAct
Printrex 980 Operator's Guide - TransAct

Create successful ePaper yourself
Turn your PDF publications into a flip-book with our unique Google optimized e-Paper software.
This page intentionally left blankPage ii100-11672 - Rev D
DisclaimerNOTICE TO ALL PERSONS RECEIVING THIS DOCUMENT:The information in this document is subject to change without notice. No partof this document may be reproduced, stored or transmitted in any form or byany means, electronic or mechanical, for any purpose, without the expresswritten permission of <strong>TransAct</strong> Technologies, Inc. ("<strong>TransAct</strong>"). Thisdocument is the property of and contains information that is both confidentialand proprietary to <strong>TransAct</strong>. Recipient shall not disclose any portion of thisdocument to any third party.TRANSACT DOES NOT ASSUME ANY LIABILITY FOR DAMAGESINCURRED, DIRECTLY OR INDIRECTLY, FROM ANY ERRORS,OMISSIONS OR DISCREPANCIES IN THE INFORMATION CONTAINED INTHIS DOCUMENT.<strong>TransAct</strong> cannot guarantee that changes in software and equipment made byother manufacturers, and referred to in this publication, do not affect theapplicability of information in this publication.Copyright© 2013 <strong>TransAct</strong> Technologies, Inc. All rights reserved. Printed in USARevision Level D September 2013TrademarksSome of the product names mentioned herein are used for identificationpurposes only and may be trademarks and/or registered trademarks of theirrespective companies.<strong>TransAct</strong>, <strong>Printrex</strong>, and Atlantek are registered trademarks of <strong>TransAct</strong>Technologies, Inc.Microsoft and Windows are registered trademarks of Microsoft Corporation inthe United States and/or other countries.Adobe and the Adobe logo are trademarks of Adobe Systems, Inc.Page iv100-11672 - Rev D
Paper Loading Procedure (Rear) .................................................................. 48Replacing Ink Tanks ...................................................................................... 54Replacing the Maintenance Cartridge ........................................................... 59Checking the Test Prints ............................................................................... 62Printing and Examining Nozzle Check Pattern .......................................... 62Cleaning Procedure .................................................................................. 65Printing TK-GAP Adjustment Pattern ........................................................ 67Examining and Adjusting TK-GAP ............................................................ 68Printing Slant Adjustment Pattern ............................................................. 71Examining and Adjusting Slant ................................................................. 72Printing Head Position Adjustment Pattern ............................................... 75Examining and Adjusting Printhead Position............................................. 77Action of Relocating Printer ........................................................................... 86<strong>Printrex</strong> ® <strong>980</strong> Specifications and Requirements..............................................................91<strong>Printrex</strong> ® <strong>980</strong> Specifications and Requirements ............................................ 93Standard Features ........................................................................................ 93Physical Printer Specifications ...................................................................... 94Environmental Conditions ......................................................................... 94Electrical Specifications ................................................................................ 95Media Specifications ..................................................................................... 95Paper ....................................................................................................... 95USB Interface ................................................................................................ 95Printer Maintenance ..................................97Cleaning the Printer ...................................................................................... 99Clearing Paper Jams ................................................................................... 104Moving the printer ....................................................................................... 106Shipping the Printer ..................................................................................... 109Troubleshooting ...................................... 111Initial Check Items ....................................................................................... 113Checking the Installation Environment .................................................... 113Checking the Paper ................................................................................ 113Checking Settings .................................................................................. 113Procedures for Operation Failure ................................................................ 114Rear Feeder Sensor Cleaning ................................................................ 114Trailing Edge Sensor Cleaning ............................................................... 115Image Defect Recovery ............................................................................... 116Vertical White Streak (Non-Discharge) ................................................... 116Faint Image (Distortion) .......................................................................... 117Void ........................................................................................................ 118Abnormal Discharge ............................................................................... 119Uneven Image (Cross Feeding Direction) ............................................... 120Uneven Image (Feeding Direction) ......................................................... 121Relative Misregistration in Colors in X or Y Direction .............................. 122Misregistration (Leading edge and side edge) ........................................ 123Blank Image ........................................................................................... 124Paper Skew ............................................................................................ 125Spur Marks (White Dotted Lines) ............................................................ 126Ink Smearing (Due to Printhead Crash) ................................................... 127Page vi100-11672 - Rev D
Spur Marks (Dotted Lines) ...................................................................... 128Ink Adhesion (Ink Dripping) .................................................................... 129Defect Recovery Procedures ....................................................................... 130Adjustment .................................................................................................. 137Adjustment When Replacing Parts ......................................................... 137Head Position Adjustment ...................................................................... 138Print Module Replacement ..................................................................... 139Work at Printhead Replacement ............................................................. 144Work at Purge Unit Replacement ........................................................... 144Work at Transport Unit Replacement ...................................................... 145Work at Rack Unit Replacement ............................................................. 148Rear Feeder Sensor Adjustment ............................................................ 148Work at Stacker Rail and/or Front Tray Unit Replacement ...................... 151Work at Printer Controller PCB Replacement ......................................... 152Work at DC Power Supply PCB Unit Replacement ................................. 153Head Position Adjustment ........................................................................... 154TK-GAP Adjustment ............................................................................... 154Slant Adjustment .................................................................................... 158Head Position Adjustment ...................................................................... 164Backfeed Gap Adjustment ...................................................................... 174Head Position Fine Adjustment ............................................................... 178Error Codes ................................................................................................. 184Service Call Error(Fatal Error) ................................................................ 184Operator Call Error ................................................................................. 207Warning .................................................................................................. 213Installing the Maintenance Tool (Service Utility) .......................................... 215Operation Procedures ................................................................................. 217Start Procedure ...................................................................................... 217Printer Information .................................................................................. 218Head Information .................................................................................... 219Cleaning, User Setting ............................................................................ 220Test Print, Adjustment ............................................................................ 227Head Position Fine Adjustment ............................................................... 249Update, Time Setting .............................................................................. 254History .................................................................................................... 257Self Diagnostics ...................................................................................... 258Troubleshooting ...................................................................................... 259Parts Replacement ................................................................................. 260Test Print .................................................................................................... 274Setting Parameters ................................................................................. 274Nozzle Check Pattern ............................................................................. 275Paper Transport Pattern ......................................................................... 276100% Block Pattern ................................................................................ 276Image Position Pattern ........................................................................... 277Backfeed Pattern .................................................................................... 281Version Upgrade Procedure ........................................................................ 281Other Troubleshooting Issues ..................................................................... 282Power is Off ............................................................................................ 282Printer Does Not Start or Stops During Print Jobs ................................... 282Paper is Not Feeding Correctly ............................................................... 283Status Monitor Does Not Start ................................................................ 283Random, Bizarre Characters Are Printed ................................................ 284100-11672 - Rev D Page vii
Slow To Print .......................................................................................... 284Print Quality Is Poor ................................................................................ 284Appendix A: Ordering Supplies ................. 285Drivers Available ......................................................................................... 285Index ..................................................... 287Page viii100-11672 - Rev D
Chapter 1Introducing your <strong>Printrex</strong> ® <strong>980</strong> Printer100-11672 - Rev D Page 1
This page intentionally left blankPage 2100-11672 - Rev D
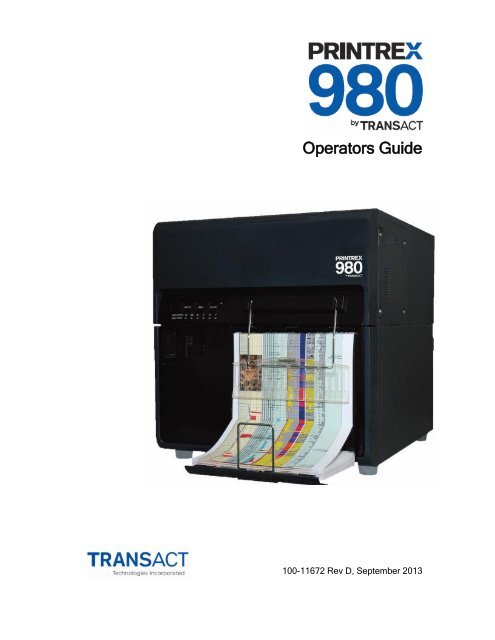
About Your <strong>Printrex</strong> ® <strong>980</strong> PrinterAbout your <strong>Printrex</strong> ® <strong>980</strong> PrinterThe <strong>Printrex</strong> ® <strong>980</strong> printer by <strong>TransAct</strong> ® represents the very latest technologyfor use for high-speed continuous form plotting, specifically designed for theneeds of the oil and gas industry. It builds upon the experience of the <strong>Printrex</strong> ®line of inkjet printers with a host of features specifically designed to improvethe performance of well log printing, including:8 inches per second plot speedNo limitation on plot length, allowing plotting of continuous logsPrint quality enhancement features, including:o Depth Line Accuracy, ensuring accuracy of scaleo Stitching Stream Technology, to ensure no gaps in plotting evenwhen the printer temporarily lacks datao Automatic Image Shifter, to extend print head lifeFour separate ink tanks for easy exchange of individual colorsLow total cost of ownershipThese features and more let you quickly and easily integrate the <strong>Printrex</strong> ® <strong>980</strong>with your oil and gas industry office applications, while giving you the quality,durability and uptime you have come to expect from <strong>Printrex</strong> ® by <strong>TransAct</strong> ®printers.100-11672 - Rev D Page 3
About Your <strong>Printrex</strong> ® <strong>980</strong> PrinterWho Should Read This <strong>Guide</strong>?This document provides information useful for end users who will install,configure, and operate the <strong>Printrex</strong> ® <strong>980</strong> printer in their operations.What Is Included in This <strong>Guide</strong>?This Operators <strong>Guide</strong> includes information on the installation, specifications,and operation of the <strong>Printrex</strong> ® <strong>980</strong> printer. It provides the following informationto support your installation and operational efforts:Warranty and technical support informationSpecifications and functionality descriptionInstallation and operational proceduresConfiguration, testing, and troubleshooting proceduresWe want you to have a trouble-free implementation with your <strong>TransAct</strong> ®printer. For any issues not covered in this guide, quality technical support isavailable on-line at www.Transact-tech.com, or by telephone or fax – consultthe following pages for more details about our support services.Page 4100-11672 - Rev D
About Your <strong>Printrex</strong> ® <strong>980</strong> PrinterTechnical and Sales SupportYour printer is backed by the resources of <strong>Printrex</strong>, a division of <strong>TransAct</strong>Technologies, a global technology firm with dedicated technical support andsales assistance. Here is how we can help you:On-line Technical SupportOur web site at www.Transact-tech.com is your on-line portal to obtainingtechnical assistance with your <strong>Printrex</strong> ® printer. Click on the Support link tofind support information for your <strong>Printrex</strong> ® <strong>980</strong> printer, including online accessto drivers and documentation, or contact us via e-mail at support@transacttech.com.Telephone Technical SupportLive telephone support is available by contacting <strong>Printrex</strong> or one of its regionalaffiliates via the contact information listed in this section. To help us serve youfaster, please have the following information ready when you call:The Model Number and Serial Number of the printer.A list of any other peripheral devices attached to the same port as theprinter.What application software, operating system, and network (if any) you areusing.What happened and what you were doing when the problem occurred.How you tried to solve the problem.Warranty Information<strong>Printrex</strong> ® <strong>980</strong> Printers come with a standard warranty that commences uponshipment from factory, and covers parts and labor. An optional warranty,covering both parts and labor, may be purchased separately.100-11672 - Rev D Page 5
About Your <strong>Printrex</strong> ® <strong>980</strong> PrinterReturn Materials Authorization and Return PoliciesIf a support technician determines that the printer should be serviced at a<strong>Printrex</strong> facility, and you want to return the printer for repair, we will issue youthe Returned Materials Authorization (RMA) number that is required beforereturning the printer. Please prepare the printer being returned for repair asfollows:Pack the printer to be returned in the original packing material.Do not return any accessories unless asked to do so by a supporttechnician.Write the RMA number clearly on the outside of the box.Shipping PrintersNever ship a printer by any means with any ink cartridge installed. Besure to save the packing materials in the event that you need to send theprinter in for servicing. <strong>Printrex</strong> is not responsible for damaged return itemsthat are not packaged in original shipping material.Sales SupportTo order supplies, receive information about other <strong>Printrex</strong> products, or obtaininformation about your warranty, contact our Sales Department at the contacttelephone or fax numbers listed below or visit our web site at www.Transacttech.com.Page 6100-11672 - Rev D
About Your <strong>Printrex</strong> ® <strong>980</strong> PrinterContact InformationUSA<strong>TransAct</strong> Technologies IncorporatedIthaca Facility20 Bomax DriveIthaca, NY 14850 USA<strong>TransAct</strong> TechnologiesWorld Gaming Headquarters& Western Regional Repair Center6700 Paradise RoadSuite DLas Vegas, NV 89119 USATelephone (877) 7ithaca or (607) 257-8901Main fax (607) 257-8922Sales fax (607) 257-3868Technical Support fax (607) 257-3911Web sitewww.transact-tech.comWestern United States: 877.822.8923, Fax: 702.254.7796United Kingdom: 011-44-170-977-2500, Fax: 011-44-170-977-2505R – Associates Inc.6610 Gant RoadHouston, Texas 77066 USATelephone 713.973.1500Fax 713.598.8311Web Site: www.r-associates.comUnited KingdomAVNET Embedded5a Waltham Park, White WalthamMaidenheadBerkshire, SL63TNTelephone +44 1628 518900Web Site: www.adnet-embedded.euCanadaKesh Downhole Measurements, Inc.P.O. Box 246Clyde, Alberta T0G 0P0 CanadaTelephone 780.348.5278Fax 780.348.5731Email: kevindm2@clearwave.ca100-11672 - Rev D Page 7
About Your <strong>Printrex</strong> ® <strong>980</strong> PrinterGermanyElkutec Electronic GmbHPostfach 11 33D-85386 Eching bei MünchenErfurter Straße 31 GermanyTelephone (49)-89-31-90-91-0Fax (49)-89-31-90-91-91Web Site: www.elkutec.deEmail: sales@elkutec.deChinaStar-Luck Enterprises, Inc.Beijing OfficeRoom 328, Grand Vision Business Building,No.2 Jiuxianqiao Road,Chaoyang DistrictBeijing 100015 ChinaTelephone 86-10-51305677Fax 86-10-51305658SingaporeHABS Industries Pte Ltd.2 Kensington Park Drive#04-04Singapore 557320Telephone 65-967 32002 or 65 816 32322Fax 65-234 3158Email: habsindustries@gmail.comPage 8100-11672 - Rev D
Chapter 2Safety Precautions100-11672 - Rev D Page 9
This page intentionally left blankPage 10100-11672 - Rev D
Important Safety PrecautionsGeneral PrecautionsNever place items on the printer such as a flower vase, potted plant,cosmetics, any liquid filled container, or metal fasteners. If such items wereto fall on the printer, this could cause a fire, electrical shock, or damage tothe printer.The electrical contacts inside the printer become extremely hot duringnormal operation. To avoid causing a fire, never store flammablesubstances like alcohol, thinner, etc. near the printer.Never place the printer where it is exposed to open air or high humidity.This could cause a fire, serious electrical shock, or damage to the printer.Also, if the printer is carried into a warm room on a cold day, this couldcause condensation inside the printer. If this happens, allow the printer tosit for at least 1 hour at room temperature to adapt to the ambienttemperature and humidity.Never place the printer on a slanted or unstable stand or table. If theprinter is dropped or slides off, this could cause personal injury. Also,never place a heavy object on top of the printer. If the object is dropped orfalls, this could cause personal injury.Never expose the printer to open air or dust. This could cause a fire,serious electrical shock, or damage to the printer. Also, never locate theprinter near a water faucet or in any other location where it will be exposedto water. This could cause serious electrical shock.Never place the printer where it will be exposed to rapid changes intemperature, such as in direct sunlight, near an air conditioner, on a hotday. This could cause a fire or damage to the printer.Place the printer in a location that meets the specified ranges oftemperature and humidity. If the printer is either too cold or too hot, it maynot operate normally. Operating environment: 15 - 30°C (59 - 86°F) RH 10- 80% (with no condensation).To ensure normal operation of the printer and avoid possible damage,never install the printer near large office equipment or any other type ofelectrical devices that emit strong magnetic fields.Never block the ventilation ports on the printer. A blocked ventilation portcould cause heat to build up inside the printer and cause a fire. Also, placethe printer in an area where you can disconnect the power cordimmediately; keep the area around the power cord connection free fromobstacles. This allows you to unplug the power cord quickly in anemergency.100-11672 - Rev D Page 11
Power Supply and Power CordTo avoid the risk of fire, electrical shock, personal injury, or damage to theprinter:Always use the power cord provided with this printer. To avoid a fire orelectrical shock, do not use an extension cord.Connect the printer power cord to an independent power source that is notshared by other equipment or appliances.Make sure that the power plug is securely and completely inserted into thepower source.Do not cut, damage, or otherwise alter the power cord. Never place aheavy object on the power cord, never expose it to heat, and never pull thecord to disconnect it. If the power cord is damaged in any way(condensation on exposed wires, broken wires, etc.) contact customerservice where you purchased the printer.Never handle the power cord or plug when your hands are wet.Never knot the power cord or wrap it around itself.Disconnect the printer power cord during severe electrical storms.Lightning could cause a fire or severe electrical shock or damage to theprinter.To avoid a fire hazard, occasionally disconnect the power cord from theprinter and the power supply, and use a soft dry cloth to clean the cordconnectors and the connection points. Leaving the cord plugged in and notcleaned for a long period, especially in an area subject to dust, oil, andhigh humidity, could cause the insulation material to deteriorate.Turn off the main power before removing the power plug from the outlet.Check the power plug and cord for any problem (abnormal heat, rust,bend, cracks, scratches, etc.) at least once a month.If any problem is found with the power plug or cord, contact customerservice regarding a replacement cord/Never pull on the power cord to unplug the cord from the power supply.Always grip the plug to remove it from the power supply.If the printer will not be used for a long period, disconnect the power cordfrom the power source.Always keep the area around the power plug free of obstacles so that youcan unplug it easily. This allows you to unplug the power cord quickly in anemergency.Never use any power source other than the one rated for the printer. Thisprinter is designed to be used in the region where you purchased. Also,make sure that the power source can supply sufficient power for theprinter.Supply Voltage:AC 100-240 V, 50/60 HzPower Consumption:640 W (max.)Sleep Mode :41 WPage 12100-11672 - Rev D
Handling the Printer and AccessoriesTo avoid the risk of fire, electrical shock, personal injury, or damage to theprinter:If you find a large ink leak, switch the printer off immediately, disconnectthe power plug from the power source, and call for service.Never clean the printer with water or any flammable liquid (alcohol,benzene, thinner, etc.) either applied directly or with a cloth. If youaccidentally spill liquid on the printer, switch the printer off immediately,disconnect the power plug from the power source, and call for service.If the printer emits smoke, unusual odors, or makes noises, leaving it couldcause a fire or serious electrical shock or damage to the printer. Switch theprinter off immediately, disconnect the power plug from the power source,make sure that the printer has stopped smoking, and call for service. Donot attempt to repair the printer by yourself.Use only a slightly damp cloth, thoroughly wrung out, to clean the printersurfaces. Never use alcohol, thinner or any other flammable liquids, or riskhaving them come into contact with electrical components inside theprinter.There are high voltage points inside the printer. Never attempt todisassemble or repair the printer.Never insert or drop any metal objects into the printer when it is open. Thiscould cause a fire or serious electrical shock, or damage the printer. Ifsomething falls into the printer accidentally, switch the printer offimmediately, disconnect the power plug from the power source and call forservice.If the printer is dropped and damaged, switch the printer off immediately,disconnect the power plug from the power source, and call for service.Never use flammable sprays around the printer.Never remove the cover from the printer.Before cleaning the printer, switch it off and disconnect the power plugfrom the power source. This can prevent personal injury or damage to theprinter if you make a mistake during cleaning.Its is dangerous to put your fingers deep inside the ink cartridge boxes.There are pin-sharp parts which may hurt you; alternatively you may causedamage that could lead to a breakdown.Keep children from touching the power cord, internal parts of the printerwhen it is open, and moving parts inside the printer (gears, belts, rollers,and electrical components). This could cause personal injury or damagethe printer.To prevent machine failures, do not open the ink tank door or maintenancecartridge exchange door, do not turn off the printer, and do not remove thepower plug from the outlet while the printer is printing. If you do so, theprint head protection function is not performed properly, resulting in amachine failure or ink leakage which can soil your clothes and thesurrounding area.Do not apply excessive force or strong shocks to the upper unit. Doing socan result in a machine failure or impair print quality. Be sure to open/closethe upper unit slowly.100-11672 - Rev D Page 13
Do not place the printer close to devices such as televisions, radioreceivers, loudspeakers, etc. The magnetic fields these devices producemay cause the printer to malfunction, and the printer may interfere withTV/radio reception.Note: Be sure to turn off the power switch after the printer has stopped printing. Do not rapidly switch the printer off and on. This could damage the printer.After switching the printer off, wait at least 5 seconds before switching it onagain.Ink Tank and Maintenance CartridgesAlways store these items out of the reach of small children. This preventsaccidents. If a child accidentally swallows ink, seek medical attentionimmediately.If ink gets into your eyes, wash it out with flowing water immediately. Ifirritation persists, consult a physician.If ink comes into contact with your skin, rinse it off with flowing waterimmediately. If irritation persists, consult a physician.Never drop or apply excessive force to an ink tank or the maintenancecartridge. Ink can stain clothing and the work area.Never attempt to disassemble or modify the ink tanks. They contain ink,which may leak out and smear your clothes or things around you.Do not install or remove the ink tank or maintenance cartridge unless itneeds to be replaced. Doing so can accelerate wear of the printercomponents.Page 14100-11672 - Rev D
Chapter 3Step-by-Step Installation Procedures100-11672 - Rev D Page 15
This page intentionally left blankPage 16100-11672 - Rev D
Step-by-Step Installation InstructionsHow to Read This ProcedureWhen Using the Included PartsAfter unpacking this product, check the included parts against the illustrationsshown in “Checking the Included Parts” in this <strong>Guide</strong>.When the parts supplied with this product are required to be used in theinstallation procedure, the following symbol indicating that the parts aresupplied with the product is shown in the illustration. Confirm the symbol anduse the necessary included parts.About the Symbols Used in IllustrationsIn this guide, operations performed frequently are represented by the followingsymbols:100-11672 - Rev D Page 17
Step-by-Step Installation InstructionsSelecting the Installation SiteInstallation requirements are listed below. It is recommended that the user’sinstallation site be checked before delivery of the printer.1) Power Cord of the printer must connectable to the outlet (100V - 240V AC+10%/-15%)Caution: There must be an easily accessible outlet near the printer.2) The installation environment must be as described below. Avoid installingthe printer near a faucet, water heater, humidifier, or refrigerator. Operating temperature range: 5 to 35 degrees celsius Operating humidity range: 10%RH to 90%RH3) Avoid installing the printer near a fire, in a dusty place, or in a place whereammonia gas is generated. When installing the printer in a place exposed todirect sunlight, it is recommended that curtains be hung over the window.4) Any foot of the printer must not be floating above the floor . The printer mustbe kept in a horizontal position.5) The desk or table on which the printer is placed must be sturdy and stableenough to support the weight of the printer.6) Install the printer in a well-ventilated place, excluding the area near the airinlet of the room.7) Install the printer at least 100 mm away from each wall with a sufficient workspace around it.Page 18100-11672 - Rev D
Step-by-Step Installation InstructionsChecking the Installation Space1. The minimum space required for installation and maintenance is shownbelow.100-11672 - Rev D Page 19
Step-by-Step Installation InstructionsInstallation PrecautionsWhen installing the printer, observe the following precautions:1) Condensation can occur when the printer is moved from a low-temperatureplace to a high-temperature installation place. In such a case, leave the printeras it stands for at least 2 hours until it adjusts to the ambient temperature andhumidity, before starting the installation work.2) The printer weighs about 60 kg. At least 3 persons are required to install it.Page 20100-11672 - Rev D
Step-by-Step Installation InstructionsUnpacking Printer and Checking the Components1) Check that the following parts are included:100-11672 - Rev D Page 21
Step-by-Step Installation InstructionsUnpacking the Printer and Removing the FixturesNote: The printer is secured using fixing tape and cushioning materials toprotect it against the vibrations and shocks applied during transportation. Byfollowing the procedure described below, remove all pieces of fixing tape andcushioning materials before installing the printer. Keep the removedcushioning materials for future transportation for relocation or repair of theprinter.1) Remove two bands from the packing carton, and then remove the outercasing.2) Remove the upper pads and the accessory box.Page 22100-11672 - Rev D
Step-by-Step Installation Instructions3) Lift either side of the printer temporarily to remove the 2 lower pads. Next,lift the other side of the printer to remove the remaining 2 lower pads.4) Strip the plastic bag from the top to the bottom.100-11672 - Rev D Page 23
Step-by-Step Installation Instructions5) Holding the handles at the bottom of the printer, lift the printer to take it outfrom the package base.Caution: At least 3 persons are required to lift the printer. Do not hold the front side of the printer.Page 24100-11672 - Rev D
Step-by-Step Installation Instructions6) Place the printer on a horizontal table, and then remove all pieces of fixingtape and cushioning material visible on the exterior of the printer.7) Open Ink Tank Door, and then push Upper Unit Open Lever to open UpperUnit.8) Remove all pieces of fixing tape and cushioning material around thetransport area.Caution: There are Paper Holding Wheel Units in the circle of illustrationabove. Do not remove these units when removing tapes around.100-11672 - Rev D Page 25
Step-by-Step Installation Instructions9) Close Upper Unit and Ink Tank Door.Page 26100-11672 - Rev D
Step-by-Step Installation InstructionsMounting Rear Feeder <strong>Guide</strong>1) Mount the included Rear Feeder <strong>Guide</strong> on Rear Feeder Slot of Printer using2 included screws (TP screws, M4×8).100-11672 - Rev D Page 27
Step-by-Step Installation InstructionsLoading Ink Tanks1) Open Ink Tank Door.2) Open Ink Tank Lever for each color while pushing it downward.3) Take included Ink Tank out of Package, and then remove cushioningmaterial.Page 28100-11672 - Rev D
Step-by-Step Installation Instructions4) Slowly insert Ink Tank as far as it will go.Caution: Ink Tank cannot be loaded properly if it is inserted in the wrong Ink TankSlot. Insert Ink Tank securely and push it all the way as far as it will go.5) Close Ink Tank Lever.6) After checking that all Ink Tanks have been loaded, close Ink Tank Door.100-11672 - Rev D Page 29
Step-by-Step Installation InstructionsInitial Loading of Ink1) Connect the included Power Cord to the printer.2) Connect Power Cord to the outlet.3) Turn on Main Power Switch. Initial ink loading starts automatically whenMain Power Switch is turned on. About 25 minutes are required for initial inkloading. When initial ink loading is completed, the STATUS lamp lights and notblinking. Make sure that the STATUS lamp lights before proceeding to the nextstep.Caution: Do not turn off Main Power Switch during ink loading. If Main Power Switch is turned off during ink loading, Printer stops inkloading. In such a case, turn on Main Power Switch to start ink loadingagain. Restarting the ink loading causes extra waste-ink. Ink loading time might be changed due to the design change.Page 30100-11672 - Rev D
Step-by-Step Installation InstructionsPrinter Part Names and FunctionFront View[1] Upper unitOpen this unit when set paper or removing the paper jammed in the paperfeed path or cleaning inside of the machine. This unit incorporates printmodules, PCBs, and so on.[2] Operation panelThis panel has the key switches necessary for printer operation and the lampsthat indicate printer status.[3] Power switchUse this switch when the printer is scheduled to be unused for a long period oftime or it is relocated.[4] Ink tank doorOpen this door when replacing ink tanks. Ink tank door is locked while theprinter operates.[5] Paper delivery slotPaper is ejected through this slot.[6] Paper retainerThis retainer allows paper to be ejected steadily.[7] Maintenance cartridge doorOpen this door when replacing the maintenance cartridge. Maintenancecartridge door is locked while the printer operates.100-11672 - Rev D Page 31
Step-by-Step Installation Instructions[8] Stacker unitThis unit contains the tray to receive the ejected paper. Draw it out when usingit.Back View[1] LAN portConnect a LAN cable here to connect to the computer.[2] USB portConnect a USB cable here to connect to the computer.[3] Rear feeder slotThis slot is used to feed paper exceeding the paper tray capacity.[4] Rear Feeder <strong>Guide</strong>This component is the paper entrance guide used to feed paper from the rearof printer.[5] Power connectorConnect the power cord here.[6] USB cable clampCable clamps are provided to prevent the USB cable from being disconnectedcarelessly.Page 32100-11672 - Rev D
Step-by-Step Installation InstructionsInside the Printer[1] Upper unit release leverPush this lever up to release the upper unit.[2] Paper trayLoad paper in this tray.[3] Lift button for paper trayPressing this button moves the paper tray up and down.[4] Ink tanksBlack (Bk), Cyan (C), Magenta (M), and Yellow (Y) ink tanks are loaded.[5] Transport unitPaper is fed by this unit. Clean it if soiled by paper dust or ink.[6] Maintenance cartridgeInk used to clean the print head is collected here.100-11672 - Rev D Page 33
Step-by-Step Installation InstructionsOperation Panel[1] Power key/lampTurns power on/off, and wakes the printer up from the sleep mode. Lampstatus are as follows:OnPower-on.OffPower-off.Blinking Sleep mode.[2] RESET keyPressing this key down for about 1 second during printing cancels all jobs toabort printing.[3] FEED keyPressing this key in the offline mode feeds paper.[4] ONLINE keyPressing this key suspends/resumes printing.[5] ONLINE lampOnOffReady to print.Not ready to print.[6] Ink Warning lampOnNo ink or tank.Blinking Low ink.OffSufficient ink.[7] Maintenance Cartridge Warning lampOnFull.Blinking Nearly full.OffSufficient room to collect ink.Page 34100-11672 - Rev D
Step-by-Step Installation Instructions[8] Paper residual quantity lampOnNo paper.Blinking The remaining amount of paper is low. (Only when sheetsare supplied through Feeder Lift Tray. Lamp starts flashingwhen remaining papers become about 100 sheets).OffSufficient paper or during paper feed from rear feeder slot.[9] ERROR lampOnBlinkingOffOperator-call error (can be recovered by user operation).Fatal error.Normal.[10] STATUS lampOnOnline mode.Blinking Data being received (printing, cleaning, initializing,shut-down).OffPrinting is not possible (during error, sleep, pause etc.).Note: Never turn off the main power switch during a print job. This couldcause damage, because the printhead cannot return to the home position.Note: Never attempt to open the Upper unit by force or hit the door. This coulddamage the printer or result in poor print quality. Always open and close theUpper unit slowly.100-11672 - Rev D Page 35
Step-by-Step Installation InstructionsConnecting the Communication CableThe <strong>Printrex</strong> ® <strong>980</strong> is equipped with two interface ports. These interfaces are: USB 2.0 Gigabit EthernetConnect the appropriate communications cable to the printer as shown in thefollowing figures. Cables are provided by your dealer, the system installer orare available through <strong>Printrex</strong>.Connect a USB cableNote: You can disconnect the USB cable even while the printer and computerare on, but do not disconnect the USB cable in the cases described below.This could prevent the printer from operating normally. While the computer is starting up (until the desktop display appears). While the printer is printing. While you install the printer driver.To disconnect the USB cable while the computer and the printer are on,disconnect it at the computer or the USB hub. To reconnect the USB cable,wait at least 5 seconds before you connect it again. If you reconnect itimmediately, the printer may not operate correctly.Note: A USB cable is not provided with the printer. Please prepare a cablethat matches the port on your computer.Connect the USB cable to the printer first, as shown in the figure, and then tothe computer.Page 36100-11672 - Rev D
Step-by-Step Installation InstructionsNote: Whenever connecting a USB cable to the printer, put the USB cable inthe cable clamps as shown in the figure.Connect a LAN cableConnect the LAN cable to the printer, as shown in the figure, and then thecomputer.Note: Please consult your network administrator when connecting to an officeLAN.Note: If a printer driver has not been installed in the computer to which youwant to connect your printer, install it before connecting the USB cable or LANcable.Switching the Printer On and OffSwitching the Printer On1. Turn on the power switch.When the [STATUS] lamp which has been blinking stays lit, the printer isready for printing.100-11672 - Rev D Page 37
Step-by-Step Installation Instructions2. The STATUS lamp stays lit.Note: When the printer is in the sleep mode, press the power key to return theprinter to Online mode. Printer will also wake up from the sleep modeautomatically as soon as it starts receiving a print job.Page 38100-11672 - Rev D
Step-by-Step Installation InstructionsSwitching the Printer Off1. Press the power key for a few seconds more than one second.Power lamp blinks and the printer enters the sleep mode.2. Turn off the power switch.If the printer is already in the sleep mode, just turn off the power switch.100-11672 - Rev D Page 39
Step-by-Step Installation InstructionsPaper Loading Procedure (Inside)This section describes how to load paper.1. Make sure that the Power key lamp on the operation lamp stays lit. If theprinter has been turned off completely, turn on the main power switch. Whenthe printer is in the sleep mode, press the Power key.2. Open the ink tank door.3. Push the upper unit release lever up to open the upper unit.Page 40100-11672 - Rev D
Step-by-Step Installation Instructions4. Open the upper unit.5. Press the lift button for paper tray. The paper tray moves up.100-11672 - Rev D Page 41
Step-by-Step Installation InstructionsNote: Do not touch the lifting mechanism while the paper tray is movingup/down. Your fingers could be caught in the machine and this could causeinjury.6. Draw out the paper tray slowly.Page 42100-11672 - Rev D
Step-by-Step Installation Instructions7. Load paper in the paper tray.Load paper with the black mark located on the tip right side of the back of theprinting surface.100-11672 - Rev D Page 43
Step-by-Step Installation Instructions8. After loading paper, push the paper tray all the way.9. Press the lift button for paper tray to move the paper tray down.Note: Follow the same procedure when replacing paper. When the paper trayhas been set in position, the "lift" button for paper residual quantity lamp.Page 44100-11672 - Rev D
Step-by-Step Installation Instructions10. When the paper tray has moved down completely, draw out the stackerunit, then raise the bar.11. Pull out paper, and then place paper on the stacker unit.100-11672 - Rev D Page 45
Step-by-Step Installation InstructionsNote: When setting paper in transport area, place it against paper guides onthe right side. Set paper such that it is not slackened.Note: Largely slack paper can jam. To prevent this, pull out paper over thetransport unit as straight as possible.12. Close the upper unit and then close the ink tank door.Page 46100-11672 - Rev D
Step-by-Step Installation InstructionsNote: Close the upper unit gently to avoid catching your hands, as this mayresult in personal injury.13. Paper is automatically fed to the printing position.Note: Load paper in printer immediately after unpacking it. Paper remainingafter completion of printing may be held loaded in printer or stored in the paperstorage box. If printer is not used for an extended period of time, be sure tostore paper in the paper storage box.100-11672 - Rev D Page 47
Step-by-Step Installation InstructionsPaper Loading Procedure (Rear)This section describes the method for loading the paper to be fed from the rearof printer.1. Make sure that the Power key lamp on the operation lamp stays lit.If the printer has been turned off completely, turn on the power switch. Whenthe printer is in the sleep mode, press the Power key.2. Open the ink tank door.Note: If there is paper in the paper tray, remove it and then move the papertray down.3 Push the upper unit release lever up to open the upper unit.Page 48100-11672 - Rev D
Step-by-Step Installation Instructions4. Open the upper unit.5. When the paper tray has moved down completely, draw out the stacker unit,then raise the bar.100-11672 - Rev D Page 49
Step-by-Step Installation Instructions6. Insert paper in the feeder slot provided on the back of the printer.Note: When supplying paper from the rear of printer, place the paper storagebox containing paper below Feeder Slot at the back of printer, at a height thatis 100-820 mm lower than Feeder Slot, and then load paper in printer.Note: Place the paper storage box in such a manner that paper is not fed toprinter askew.Page 50100-11672 - Rev D
Step-by-Step Installation Instructions7. Pull out paper from the paper tray.8. Pull out paper, and then place paper on the stacker unit.100-11672 - Rev D Page 51
Step-by-Step Installation InstructionsNote: When setting paper in transport area, place it against paper guides onthe right side. Set paper such that it is not slackened.Note: Largely slack paper can jam. To prevent this, pull out paper over thetransport unit as straight as possible.9. Close the upper unit and then close the ink tank door.Page 52100-11672 - Rev D
Step-by-Step Installation InstructionsNote: Close the upper unit gently to avoid catching your hands, as this mayresult in personal injury.10. Paper is automatically fed to the printing position.Note: Load paper in printer immediately after unpacking it. Paper remainingafter completion of printing may be held loaded in printer or stored in the paperstorage box. If printer is not used for an extended period of time, be sure tostore paper in the paper storage box.100-11672 - Rev D Page 53
Step-by-Step Installation InstructionsReplacing Ink TanksWhen the ink in an ink tank runs low, the Status Monitor displays [XXXX inklow] message to alert you that ink is about to run out. You can continue toprint, and when the ink supply is exhausted, the [Out of XXXX ink] error will bedisplayed.There are four colors of ink cartridges: Black (Bk), Cyan (C), Magenta (M), andYellow (Y).Note: To maintain print head quality, the printer stops operating before it iscompletely out of ink. That is, a small amount of unusable ink remains inthe used ink tank. To get a good printing result, use up each ink tank within six months of firstopening the package. Do not remove an ink tank unless you must replace it. This could shortenthe life of the consumables. Complete the ink tank replacement procedure as quickly as possible. Donot leave the printer with ink tanks removed. An ink tank left in a high-temperature place can deform. However, there isnothing wrong with its functions. It is recommended that ink tanks be stored in a place where thetemperature does not rise to extreme ranges.Note: When a message “XXX ink low” appears, get a new ink tank as soon aspossible. You cannot open the ink tank door while the printer is operating. To maintain the best printing quality, please use only <strong>Printrex</strong> ® <strong>980</strong> inktanks.The positions of the ink tanks are as shown below.The printer is designed so that ink tanks cannot be inserted in wrong ink tankslots. Do not attempt to insert ink tanks in wrong ink tank slots forcibly.Page 54100-11672 - Rev D
Step-by-Step Installation Instructions1. Open the ink tank door.2. Pull the lever down.100-11672 - Rev D Page 55
Step-by-Step Installation Instructions3. Remove the empty ink tank.Note: Do not touch the ink outlet and terminal to prevent soiling of the thesurrounding work area, damage to the ink tank, and poor printing.Note: Never apply excessive force nor drop an ink tank. Ink can stain clothingand the work area.Page 56100-11672 - Rev D
Step-by-Step Installation Instructions4. Slowly insert a new ink tank all the way.5. Close the ink tank lever securely.Note: There are sharp pins in ink tank slots. Never put your fingers into thisarea. This could cause personal injury or damage the printer.100-11672 - Rev D Page 57
Step-by-Step Installation Instructions6. Close the ink tank door.Note: After installing an ink tank, do not remove it unless you must replace it.This could shorten the life of the consumables. Complete the ink tank replacement procedure as quickly as possible. Donot leave the printer with ink tanks removed. Be careful not to stain your clothes and the surrounding work area by theused ink tanks.Page 58100-11672 - Rev D
Step-by-Step Installation InstructionsReplacing the Maintenance CartridgeWhen there remains no maintenance cartridge space to collect ink, an errormessage, “Maintenance Cartridge full,” is displayed on the status monitor, andprinting stops. Replace the maintenance cartridge with a new one.Note: For safety, keep the Maintenance Cartridge out of the reach of children.If ink is accidentally ingested, contact a physician immediately.Note: To prevent ink from leaking from a used Maintenance Cartridge, avoiddropping the cartridge or storing it at an angle. Otherwise, ink may leak and cause stains. Ink adheres to the top of the Maintenance Cartridge after it has been used.Handle the Maintenance Cartridge carefully during replacement. The ink maystain clothing.1. While lifting the eject guide slightly, open the maintenance cartridge door.100-11672 - Rev D Page 59
Step-by-Step Installation Instructions2. Draw out the maintenance cartridge slowly.3. Take out new maintenance cartridge from a box.4. While lifting the eject guide slightly, insert a new maintenance cartridge.Page 60100-11672 - Rev D
Step-by-Step Installation Instructions5. While lifting the eject guide slightly, close the maintenance cartridge door.6. Put the used maintenance cartridge in a bundled plastic bag and dispose ofit.Note: Please dispose the old maintenance cartridge according to federal,state and local laws after being packed in a bundled plastic bag and placed inthe box.100-11672 - Rev D Page 61
Step-by-Step Installation InstructionsChecking the Test PrintsMake the following test prints and confirm that all the print images arecorrectly tuned. Should the image in each test print need to be tuned, take anadjustment procedure corresponding to each test print: Nozzle check pattern TK-GAP adjustment pattern Slant Adjustment Pattern Head Position Adjustment PatternPrinting and Examining Nozzle Check Pattern1) Start the PC.Note: Printer driver must be installed in the PC in advance.2) Connect Printer to the PC using a USB cable.3) Click [Start] > click [Devices and Printers] > right click [<strong>980</strong>] > click [Printerproperties] > click [Utility] > click [Service]Page 62100-11672 - Rev D
Step-by-Step Installation Instructions4) Open the [Test Print, Adjustment] tab of the "<strong>980</strong> Service Utility" dialog box.5) Click [Nozzle Check Pattern] to print the nozzle check pattern.100-11672 - Rev D Page 63
Step-by-Step Installation Instructions6) Check the printed nozzle check pattern. If a non-discharge is detected,perform cleaning with reference to the next section “Cleaning Procedure”.Page 64100-11672 - Rev D
Step-by-Step Installation InstructionsCleaning Procedure1) Open the [Cleaning, User Setting] tab of the "<strong>980</strong> Service Utility" dialog box.2) Select Print Module to be cleaned.100-11672 - Rev D Page 65
Step-by-Step Installation Instructions3) Perform the printhead cleaning according to the table below.ModeTime required for DescriptioncleaningLight CleaningMediumAbout 0.5minutesAbout 3 minutesIf an ink injection problem is detected, perform“Light Cleaning” first. If the problem persists evenafter “Light Cleaning” is performed several times,CleaningStrong Cleaning About 7 minutesperform “Medium Cleaning”. If the problem stillpersists after “Medium Cleaning” is performedseveral times, perform “Strong Cleaning”.Page 66100-11672 - Rev D
Step-by-Step Installation InstructionsPrinting TK-GAP Adjustment Pattern1) Open the [Test Print, Adjustment] tab and click [Adjust TK-GAP] to displaythe "Print TK-GAP" dialog box.2) Click [Print] to print the TK-GAP adjustment pattern.100-11672 - Rev D Page 67
Step-by-Step Installation InstructionsExamining and Adjusting TK-GAP1) Observe the TK-GAP Adjustment Pattern and examine if the TK-GAPadjustment is necessary for Print Modules according to the following. Performthe adjustment, if necessary.Find where the paper perforation is located on the TK-GAP adjustmentpattern scale. If the paper perforation is at the “+2” position on the TK-GAPadjustment pattern scale, the adjustment value is “+2”.Page 68100-11672 - Rev D
Step-by-Step Installation Instructions2) Enter the adjustment values in the TK-GAP adjustment value entry boxes inthe "Print TK-GAP" dialog box.3) After entering the TK-GAP adjustment values, click [Send] to send theadjustment values to Printer.4) If the TK-GAP adjustment pattern is not required to print again for a review,click [NO] and proceed to the step 6).100-11672 - Rev D Page 69
Step-by-Step Installation Instructions5) If the TK-GAP adjustment pattern is desired for reviewing, click [Yes].6) Click [Next] to proceed to the slant adjustment.Page 70100-11672 - Rev D
Step-by-Step Installation InstructionsPrinting Slant Adjustment Pattern1) Open the [Test Print, Adjustment] tab and click [Adjust Slant] to display the"Print Head Slant" dialog box.2) Click [Print] to print the slant adjustment pattern.100-11672 - Rev D Page 71
Step-by-Step Installation InstructionsExamining and Adjusting Slant1) Read values at which Black lines are in line with line of each color (Cyan,Magenta, or Yellow).When a value of A is the same as a value of B:• Example 1: When the value of C1A (+2) is the same as the value of C1B(+2), no adjustment is required for C1 (Cyan Printhead 1).When a value of A is different from a value of B:• Example 2: When the value of Y1A (+2) is different from the value of Y1B(+3), the adjustment has to be made for Y1.Page 72100-11672 - Rev D
Step-by-Step Installation Instructions2) Enter necessary adjustment values in the slant adjustment value entryboxes in the "Print Head Slant" dialog box.3) After entering the slant adjustment values, click [Send] to send theadjustment values to Printer.4)If the slant adjustment pattern is not required to print again for a review, click[NO] andproceed to the step 6).100-11672 - Rev D Page 73
Step-by-Step Installation Instructions5) If the slant adjustment pattern is desired for reviewing, click [Yes].6) Click [Next] to proceed to the head position adjustment.Page 74100-11672 - Rev D
Step-by-Step Installation InstructionsPrinting Head Position Adjustment Pattern1) Open the [Test Print, Adjustment] tab and click [Adjust Position] to displaythe "Print Head Position Adjustment" dialog box.100-11672 - Rev D Page 75
Step-by-Step Installation Instructions2) Click [Print] to print the head position adjustment pattern.Page 76100-11672 - Rev D
Step-by-Step Installation InstructionsExamining and Adjusting Printhead Position1) Module-to-Module AdjustmentThis adjustment is to align the relative print positions of 2 Print Modules toeach other.The relative print positions in the feeding direction can be examined in the"KV" scale.For the example shown in the figure, the 2 elements are in line at "+2". Thus,the adjustment value is "+2".The relative print positions in the cross-feeding direction can be examined inthe "KH" scale. For the example shown in the figure, the 2 elements are in lineat "+2". The adjustment value is therefore "+2".100-11672 - Rev D Page 77
Step-by-Step Installation Instructions2) Head Position AdjustmentThis adjustment is to align the relative color registrations in all the printheads.The relative color registrations in the feeding direction can be examined in the"xxV" scale and the ones in the cross-feeding direction can be examined in the"xxH" scale.Determine at which division of a scale, two color elements are in line for all the12 blocks. For the example in the "M1V" block, the Magenta and Blackelements meet at "+4".Page 78100-11672 - Rev D
Step-by-Step Installation Instructions3) Enter adjustment values in the Module-to-Module adjustment value entryboxes in the "Print Head Position Adjustment" dialog box.100-11672 - Rev D Page 79
Step-by-Step Installation Instructions4) Click [Go to Step 3].Page 80100-11672 - Rev D
Step-by-Step Installation Instructions5) Enter the adjustment values in the Head Position Adjustment value entryboxes.100-11672 - Rev D Page 81
Step-by-Step Installation Instructions6) Click [Go to Step 4].Page 82100-11672 - Rev D
Step-by-Step Installation Instructions7) Enter the adjustment values in the Head Position Adjustment value entryboxes.100-11672 - Rev D Page 83
Step-by-Step Installation Instructions8) Click [Send] to send all the adjustment values to Printer.9) If the head position adjustment pattern is not required to print again for areview, click [NO]and proceed to step 10.10) If the head position adjustment pattern is desired for reviewing, click [Yes].Page 84100-11672 - Rev D
Step-by-Step Installation Instructions11)Press Power Key for at least 1 second to place Printer in the sleep mode(Power Lamp blinks), and then turn off Main Power Switch.100-11672 - Rev D Page 85
Step-by-Step Installation InstructionsAction of Relocating PrinterThe Printer is filled with ink in its Ink Supply System, Imaging System andelsewhere. Implement items suggested below thoroughly and explain tocustomers fully to prevent ink spills in or outside Printer or to avoidunexpected failures when Printer is transported.Caution:Do not incline Printer more than 15° degrees during relocation.Relocating from One Place to Another on Same Floor or in Same BuildingPrinter required to drain (suction) remaining ink in Purge Unit before movingPrinter on the same floor or in the same building. Ink drainage is performedwith service utility .Ink drainage procedure1) Connect PC to Printer, and then start service utility.2) Open the [Cleaning,User Setting] tab, and then click [Moving the printer].Page 86100-11672 - Rev D
Step-by-Step Installation Instructions2) When the following message is displayed, click [Yes] to drain remaining inkin Purge Unit.Note: Ink drainage takes approximately 2 minutes. The time might be changed due to the specification change.Long Distance RelocationPrinter required to return ink from Print Module to Ink Tank and to drain(suction) remaining ink in Purge Unit before shipping Printer long distance. Inkreturning and drainage is performed with service utility.Ink returning and drainage procedure1) Connect PC to Printer, and then start service utility.2) Open the [Cleaning, User Setting] tab, and then click [Shipping the printer].100-11672 - Rev D Page 87
Step-by-Step Installation Instructions3) When the following message is displayed, click [Yes] to start return ink fromPrint Module to Ink Tank, and wait for a while.Note: Ink returning and drainage takes approx. 20 minutes. The time might be changed due to the specification change.4) When the following message is displayed, remove Ink Tanks, and thenclose Ink Tank Door.Page 88100-11672 - Rev D
Step-by-Step Installation Instructions5) When the following message is displayed, turn off Main Power Switch.100-11672 - Rev D Page 89
Chapter 4<strong>Printrex</strong> ® <strong>980</strong> Specifications andRequirements100-11672 - Rev D Page 91
This page intentionally left blankPage 92100-11672 - Rev D
<strong>Printrex</strong> ® <strong>980</strong> Specifications and Requirements<strong>Printrex</strong> ® <strong>980</strong> Specifications and RequirementsStandard FeaturesThe following features are standard for <strong>Printrex</strong> ® <strong>980</strong> printers:Massively parallel bubble jet technology8 inches per second plot speed9.25" wide media, 8.25" (216 mm) print widthPrint head resolution: 1200 dots per inch horizontal, 600 dots per inchverticalNo limitation on plot length, allowing plotting of continuous logsPrint quality enhancement features, including:o Depth Line Accuracy, ensuring accuracy of scaleo Stitching Stream Technology, to ensure no gaps in plotting evenwhen the printer temporarily lacks datao Automatic Image Shifter, to extend print head lifeHigh capacity (240 ml) ink tankso 25,000 standard pages at 5% coverageFour separate ink tanks for easy exchange of individual colorsAutomatic head cleaning cycleUSB 2.0 High Speed and Gigabit Ethernet100-11672 - Rev D Page 93
<strong>Printrex</strong> ® <strong>980</strong> Specifications and RequirementsPhysical Printer Specifications15.5"20.0"19.0"Max DimensionsDimensions ininchesW D H15.5 20.0 19.0Weight:approx. 123 lbs. (56 kg)InterfaceUSB 2.0 High Speed and Gigabit EthernetEnvironmental ConditionsThe <strong>Printrex</strong> ® <strong>980</strong>0 is designed to be placed on a flat, stable surface that cansupport the weight of the printer (about 123 lbs. or 56 kg). Be aware that theenvironmental conditions of the location where you place the printer will havean effect on the printer’s performance and longevity. The printer will run itsbest when stored and operated in an environment that meets the temperatureand humidity conditions described below.Typical operating range: 5°C to 35°C / 50°F to 104°FPage 94100-11672 - Rev D
<strong>Printrex</strong> ® <strong>980</strong> Specifications and RequirementsElectrical Specifications100 VAC - 240 VAC, 50-60 Hz650 watts maximumMedia SpecificationsPaperPaper feed methodPaper widthPaper thicknessFriction feed9.25 inches0.003 - 0.0035 inchesUSB InterfaceThe USB interface is a Version 2.0 interface card is implemented through astandard Series "B" receptacle as defined in the USB Specification. Theprinter is self-powered and does not draw power from the standard Type BUSB interface cable.The standard USB Type B connector has the following pin functions:Pin Signal1 Vbus (+5 V dc) (Not used in the <strong>Printrex</strong> ® <strong>980</strong>)2 Minus data3 Plus data4 GroundNote: The standard USB interface does not have sufficient power to run theprinter.100-11672 - Rev D Page 95
Chapter 5Printer Maintenance100-11672 - Rev D Page 97
This page intentionally left blankPage 98100-11672 - Rev D
How to Operate the <strong>Printrex</strong> ® <strong>980</strong> PrinterCleaning the PrinterAs the printer is used, ink and paper dust will be collected inside the printer. Ifthe interior of the printer becomes dirty, this will cause printouts to becomedirty, affect print quality, or interfere with smooth paper feeding.Clean the printer periodically to keep the printer in optimum working condition.Moisten a clean cloth in a weak solution of water and detergent, wring it outthoroughly, then use it to clean the exterior covers of the printer.Note: Use only a slightly damp cloth, thoroughly wrung out, to clean the printerinterior. Never use alcohol, thinner, benzene or any other flammable liquids. Thiscould cause a fire or serious electrical shock.Note: Before cleaning the printer, switch it off and disconnect the power plugfrom the power source. This can prevent personal injury or damage to theprinter if you make a mistake during cleaning. There are four sharp pins inside the ink tank slots. Never put your fingersinto this area. This could cause personal injury or damage to the printer.1. Press the Power key for a few seconds. The Power lamp will blink, and theprinter will enter sleep mode.100-11672 - Rev D Page 99
How to Operate the <strong>Printrex</strong> ® <strong>980</strong> Printer2. Turn off the main power switch, and then remove the power plug from thewall outlet.3. Open the ink tank door.Page 100100-11672 - Rev D
How to Operate the <strong>Printrex</strong> ® <strong>980</strong> Printer4. Push the upper unit release lever up to open the Upper unit.5. Open the upper unit.100-11672 - Rev D Page 101
How to Operate the <strong>Printrex</strong> ® <strong>980</strong> Printer6. Wipe off ink, dust and paper dust adhered around transport and upper unit’sbottom areas (spur, roller, paper ejection slot) with a cloth dipped in water andtightly wrung out.Note: Do not clean the printer with tissues or paper towels. Torn pieces ofpaper or paper dust may get inside the printer and cause malfunctions.Note: If "Paper length error" or "Paper jam error" has occurred and an errormessage is continuously displayed, the paper detection area may be soiledwith paper dust or the like. Clean the area with a cotton swab.Page 102100-11672 - Rev D
How to Operate the <strong>Printrex</strong> ® <strong>980</strong> Printer7. Close the upper unit and then close the ink tank door.100-11672 - Rev D Page 103
How to Operate the <strong>Printrex</strong> ® <strong>980</strong> PrinterClearing Paper JamsIf the paper jams while the printer is printing, the printer will stop and theStatus Monitor will display a paper jam message. Follow the procedure belowto remove the jammed paper.1. Open the ink tank door, and then push the upper unit release lever up toopen the upper unit.2. Remove the paper jammed on the transport unit.Page 104100-11672 - Rev D
How to Operate the <strong>Printrex</strong> ® <strong>980</strong> Printer3. Cut the paper along the perforation.100-11672 - Rev D Page 105
How to Operate the <strong>Printrex</strong> ® <strong>980</strong> PrinterMoving the printerAfter moving the printer on the same floor or to another floor, install it properlyfollowing the procedure described below.1. Press the Power key to place the printer in the sleep mode. If the printer isalready in sleep mode, go to step 2.2. Press the main power switch below the operation panel to turn the printeroff completely.3. Disconnect the interface cable and power cord.4. Make sure that the upper unit is closed securely.Page 106100-11672 - Rev D
How to Operate the <strong>Printrex</strong> ® <strong>980</strong> Printer5. Move the printer.Note: To move the printer on the same floor or within the same building, the inktanks need not be removed. If the ink tanks are removed before movingthe printer, ink can leak from the needle sections in the ink tank slots,which may stain clothes and/or the surrounding work area. Always hold the printer level and carry it slowly. If ink is spilled inside theprinter while moving it, this could cause a fire or serious electrical shock ordamage the printer. The printer weighs about 123 pounds (57kg). Three persons are alwaysrequired to move the printer. When lifting and moving the printer, theyshould hold the handles at the bottom so that they do not injurethemselves. If they hold other parts of the printer, the printer can bedamaged and/or it can drop and injure people. Do not move the printer with the upper unit, ink tank door, or maintenancecartridge door open. This can damage the printer.6. After moving the printer to the destination, connect the power cord and thenconnect the interface cable.7. Turn on the main power switch.100-11672 - Rev D Page 107
How to Operate the <strong>Printrex</strong> ® <strong>980</strong> Printer8. After completion of the initial operation, the printer is ready for printing.Page 108100-11672 - Rev D
How to Operate the <strong>Printrex</strong> ® <strong>980</strong> PrinterShipping the PrinterWhen transporting printer over a long distance, observe the followingprocedures:Contact <strong>Printrex</strong> technical support for advice before you ship the printer along distance or move the printer via car, truck or airplane. Moving theprinter without proper preparation could subject it to shock and vibration,which could damage the printer and/or cause a fire.Before transporting the printer, be sure to drain the printer of ink. If inktanks are removed before draining the printer of ink, ink leaks from theneedle sections in the ink tank slots could stain your clothes andsurrounding work areas.The printer weighs about 123 pounds (57kg). Three persons are alwaysrequired to move the printer. When lifting and moving the printer, theyshould hold the handles at the bottom so that they do not injurethemselves. If they hold other parts of the printer, the printer can bedamaged and/or it can drop and injure people.Note: Do not move the printer with the upper unit, ink tank door, ormaintenance cartridge door open. This can damage the printer.100-11672 - Rev D Page 109
Chapter 6Troubleshooting100-11672 - Rev D Page 111
This page intentionally left blankPage 112100-11672 - Rev D
Appendix A: Ordering Genuine Ithaca SuppliesInitial Check ItemsChecking the Installation EnvironmentCheck whether the installation place meets the following requirements:1) The power supply voltage must be the rated voltage from -15% to +10%and the power supply frequency must be the rated frequency ±2Hz.2) The printer must be held horizontal.3) The ambient temperature must be held at 15-30 degrees and the humidityat 10-80%.4) Avoid the place where both the temperature and humidity are high (near thefaucet, boiler, or humidifier), the temperature is extremely low, the temperaturechanges greatly. Also avoid placement near fire or flame.5) Avoid dusty locations.6) Avoid the place exposed to direct sunlight. If it is inevitable to install theprinter in such a place, instruct the customer to hang curtains.7) The room must be well-ventilated.Checking the Paper1) Check whether dedicated paper is used.2) Check whether the paper is moist. Unpack new paper, load it in the printer,and check for printing.3) Check whether the paper is curled.Checking SettingsCheck whether the settings made for the printer are suitable for the paperused and other requirements, specifically, in terms of the following:1) Paper settingPaper size (height and width)2) Printing conditionNumber of prints3) Interface settingUSB 2.0 High Speed Function (1ch)Giga Bit Ether Net4) Saving of set conditionsCheck whether settings have been saved properly.100-11672 - Rev D Page 113
Appendix B: Frequently Asked QuestionsProcedures for Operation FailurePaper dust falling from the paper pass on the reflecting plate may reflect thelight to the receiving of Rear Feeder Sensor and/or Trailing Edge Sensor.Those reflecting plates need to be cleaned.Rear Feeder Sensor Cleaning1) Remove Right Cover.("Removing Right Cover" section)2) Remove Left Cover.("Removing Left Cover" section)3) Remove Rear Lower Cover.("Removing Rear Lower Cover" section)4) Remove Rear Feeder Sensor.• 1 Screw• 1 Clamp5) Wipe reflecting plate with the cotton swab.Page 114100-11672 - Rev D
Appendix A: Ordering Genuine Ithaca SuppliesTrailing Edge Sensor Cleaning1) Open Upper Unit.2) Wipe reflecting plate with a cotton swab.100-11672 - Rev D Page 115
Appendix B: Frequently Asked QuestionsImage Defect RecoverySamples of image defects that can be detected through test printing aredescribed below. When an image defect is found, carry out test printing todetermine the image defect type, and then perform an appropriate procedure.Vertical White Streak (Non-Discharge)This is a state in which ink drops cannot be discharged from Printhead nozzlesdue to dust, bubbles, thickened ink, wetting, etc. around Printhead nozzle.Page 116100-11672 - Rev D
Appendix A: Ordering Genuine Ithaca SuppliesFaint Image (Distortion)This is a state in which ink drops cannot be discharged from Printhead nozzlesdue to dust, bubbles, thickened ink, wetting, etc. around Printhead nozzle, or astate in which a condensed ink film is formed on the surfaces of Printheadnozzles, and as a result ink drops are not ejected.100-11672 - Rev D Page 117
Appendix B: Frequently Asked QuestionsVoidThis is a state in which a void is generated due to defective parts of Printhead,Flexible Cable, PCB, etc. or a bad connection.Page 118100-11672 - Rev D
Appendix A: Ordering Genuine Ithaca SuppliesAbnormal DischargeThis is a state in which ink is ejected to an area having no image data due todefective parts of the Printhead, Flexible Cable, PCB, etc. or a badconnection.100-11672 - Rev D Page 119
Appendix B: Frequently Asked QuestionsUneven Image (Cross Feeding Direction)This is a state in which stripes differing in thickness are generated in thelongitudinal direction of the Printhead.Page 120100-11672 - Rev D
Appendix A: Ordering Genuine Ithaca SuppliesUneven Image (Feeding Direction)This is a state in which stripes differing in thickness are generated in thetransport direction.100-11672 - Rev D Page 121
Appendix B: Frequently Asked QuestionsRelative Misregistration in Colors in X or Y DirectionThis is a state in which registration positions of individual colors are deviated,and as a result colors look shifted.Page 122100-11672 - Rev D
Appendix A: Ordering Genuine Ithaca SuppliesMisregistration (Leading edge and side edge)Print image coordinate is not aligned with the paper. The following sampleshows misregistration in the side edge.100-11672 - Rev D Page 123
Appendix B: Frequently Asked QuestionsBlank ImageThis is a state in which the print sheet is ejected with no image printed on it.Page 124100-11672 - Rev D
Appendix A: Ordering Genuine Ithaca SuppliesPaper SkewThis is a state in which an image is printed on a skew in relation to the left andright edges of the print sheet.100-11672 - Rev D Page 125
Appendix B: Frequently Asked QuestionsSpur Marks (White Dotted Lines)This is a state in which pressed Spur marks are made on the print sheet.Page 126100-11672 - Rev D
Appendix A: Ordering Genuine Ithaca SuppliesInk Smearing (Due to Printhead Crash)This is a state in which the print sheet touches the Printhead and is stainedwith ink.100-11672 - Rev D Page 127
Appendix B: Frequently Asked QuestionsSpur Marks (Dotted Lines)This is a state in which ink is transferred to Spur or Spur cleaner due to inkdripping, fixing error, etc. and as a result Spur ink marks are made on the printsheet.Page 128100-11672 - Rev D
Appendix A: Ordering Genuine Ithaca SuppliesInk Adhesion (Ink Dripping)This is a state in which ink collected in Printhead or Purge Unit drips off totransport area, and as a result ink adheres to the front/back surface of the printsheet.100-11672 - Rev D Page 129
Appendix B: Frequently Asked QuestionsDefect Recovery ProceduresVertical White Streak or Faint ImageCause Procedure Check Item ActionInk Supply 1 Carry out Light Cleaning, Medium EndSystemCleaning, and Strong Cleaning 2 or 3times for each cleaning, and then checkthat the defect has been recovered.Ink Supply 2 Carry out Ink Loading, and then check EndSystemthat the defect has been recoveredPrinthead 3 Carry out Printhead face cleaning, andthen check that the defect has beenrecovered.EndPurge Unit 4 Blade, cap, or cap base is contaminatedwith dust or foreign matter, or it isscratched or deformed.Printhead 5 Replace Printhead, and then check thatthe defect has been recovered.Print Module 6 Replace Print Module, and then checkthat the defect has been recovered.PrinterControllerPCB7 Replace Printer Controller PCB, and thencheck that the defect has beenrecovered.Replace PurgeUnit.Void or Abnormal Discharge (Test Printing Result: NG)Cause Procedure Check Item ActionConnection of 1 Proceed reconnection recovery *1, and EndPrinthead toPrintheadRelay PCBthen check that the defect has beenrecovered.FlexibleCable2 The connector of Flexible Cable is notconnected securely.Connect itproperly.3 Flexible Cable has a defect such as ReplacePrintheadRelay PCBdisconnection, crack, or ink adhesion.4 Replace Printhead Relay PCB, and thencheck that the defect has beenrecovered.Printhead 5 Replace Printhead, and then check thatthe defect has been recovered.PrinterControllerPCB6 Replace Printer Controller PCB, and thencheck that the defect has beenrecovered.Print Module 7 Replace Print Module, and then checkthat the defect has been recovered.EndEndEndFlexible CableEndEndEndEndPage 130100-11672 - Rev D
Appendix A: Ordering Genuine Ithaca Supplies*1 Reconnection Recovery Procedure:1) Service Utility > Troubleshooting2) Choose Print Module #1 and/or #23) Click "Head Install Position"4) Turn off the power.5) Remove covers.6) Rotate up Upper Printhead Release Lever until it stops.7) Rotate down Upper Printhead Release Lever until it stops.8) Attach covers.9) Turn on the power.100-11672 - Rev D Page 131
Appendix B: Frequently Asked QuestionsVoid or Abnormal Discharge (Test Printing Result: OK)Cause Procedure Check Item ActionInterfaceCable1 Interface Cable is not connectedsecurely.Connect itproperly.2 The cable has a defect such asdisconnection or crack.Replace thecable.Printer Driver 3 Any setting or stored print data iserroneous.Correct thesetting or printdata.4 Reinstall printer driver, and then check EndPrinterControllerPCBthat the defect has been recovered.5 Replace Printer Controller PCB, and thencheck that the defect has beenrecovered..Uneven Image (Cross Feeding Direction)Cause Procedure Check Item ActionInk Supply 1 Carry out Light Cleaning, Medium EndSystemCleaning, and Strong Cleaning 2 or 3times for each cleaning, and then checkthat the defect has been recovered.Printhead 2 Replace Printhead, and then check that EndPrinterControllerPCBthe defect has been recovered.3 Replace Printer Controller PCB, and thencheck that the defect has beenrecovered.Print Module 4 Replace Print Module, and then checkthat the defect has been recovered.EndEndEndUneven Image (Feeding Direction)Cause Procedure Check Item ActionRegistrationAdjustment1 Carry out registration adjustment, andthen check that the defect has beenEndrecovered.Printhead 2 Printhead Unit is not assembledproperly.3 Unit is not installed properly. Reinstall itproperlyPinch Roller 4 Unit is not installed properly. Reinstall itUnit or SpurproperlyUnitTransportUnit5 Pinch Roller or Spur does not rotatesmoothly.6 Transport Belt is not located at thecorrect position.7 Replace Transport Motor, and thencheck that the defect has beenrecovered.Reassemble itproperlyReplace PinchRoller Unit orSpur UnitMove TransportBelt back to thecorrect position.EndPage 132100-11672 - Rev D
Appendix A: Ordering Genuine Ithaca SuppliesCause Procedure Check Item Action8 Replace Transport Unit, and then check Endthat the defect has been recovered.Printhead 9 Replace Printhead, and then check that Endthe defect has been recovered.Printer 10 Replace Printer Controller PCB, and EndControllerPCBthen check that the defect has beenrecovered.Print Module 11 Replace Print Module, and then checkthat the defect has been recovered.EndRelative Misregistration in Colors in X or Y DirectionCause Procedure Check Item ActionRegistrationAdjustment1 Carry out registration adjustment, andthen check that the defect has beenEndrecovered.Printhead 2 Printhead Unit is not assembledproperly.3 Unit is not installed properly. Reinstall itproperlyPinch Roller 4 Unit is not installed properly. Reinstall itUnit or SpurproperlyUnitTransportUnit5 Pinch Roller or Spur does not rotatesmoothly.6 Transport Belt is not located at thecorrect position.7 Replace Transport Motor, and thencheck that the defect has beenrecovered.8 Replace Transport Unit, and then checkthat the defect has been recovered.Printhead 9 Replace Printhead, and then check thatthe defect has been recovered.PrinterControllerPCB10 Replace Printer Controller PCB, andthen check that the defect has beenrecovered.Print Module 11 Replace Print Module, and then checkthat the defect has been recovered.Reassemble itproperlyReplace PinchRoller Unit orSpur UnitMove TransportBelt back to thecorrect position.EndEndEndEndEnd100-11672 - Rev D Page 133
Appendix B: Frequently Asked QuestionsMisregistration (Leading edge and side edge)Cause Procedure Check Item ActionPaper 1 Dedicated paper is not used. Replace withdedicatedpaper.2 Paper is not loaded properly. Load paperproperly.Paper Setup 3 The type and size of paper used are notset properly.Margin Setup 4 Margins are not set to appropriatevalues.Inter-labelGap and TOFMark SetupImagePositionAdjustment5 The inter-label gap or TOF mark width isnot set to a value suitable for paperused.6 Carry out image position adjustment,and then check that the defect has beenrecovered.TOF Sensor 7 TOF Sensor is contaminated with paper,dust, etc.Properly set thetype and size ofpaper used.Set margins toappropriatevalues.Set the interlabelgap orTOF mark widthto a valuesuitable forpaper used.EndClean TOFSensor.8 TOF Sensor is not operating properly. Replace TOFSensor.Paper SkewCause Procedure Check Item ActionPaper 1 Paper is not loaded properly. Load paperproperly.Roll DriveUnit2 Roll Drive Unit is not installed properly. Reinstall itproperly.<strong>Guide</strong> Unit 3 <strong>Guide</strong> Unit is not installed properly. Reinstall itproperly.Pinch RollerUnit or SpurUnitTransportUnit4 The unit is not installed properly. Reinstall itproperly.5 Pinch Roller or Spur does not rotatesmoothly.Replace PinchRoller Unit or6 Transport Belt is not located at thecorrect positionRoll DriveUnit7 Replace Roll Drive Unit, and then checkthat the defect has been recovered.<strong>Guide</strong> Unit 8 Replace <strong>Guide</strong> Unit, and then check thatthe defect has been recovered.Transport 9 Replace Transport Unit, and then checkUnitthat the defect has been recovered.Spur Unit.Move TransportBelt back to thecorrect position.EndEndEndPage 134100-11672 - Rev D
Appendix A: Ordering Genuine Ithaca SuppliesSpur Marks (White Dotted Lines)Cause Procedure Check Item ActionPaper 1 Dedicated paper is not used. Replace withdedicatedpaper.Spur Unit 2 The unit is not installed properly. Reinstall itproperly.3 Spur does not rotate smoothly. Replace SpurUnit.TransportUnit4 Transport Belt is not located at thecorrect position.5 Replace Transport Unit, and then checkthat the defect has been recovered.Move TransportBelt back to thecorrect position.Ink Smearing (Due to Printhead Crash)Cause Procedure Check Item ActionPaper 1 Paper leading edge is folded or curled. Correct the foldor curl.Pinch RollerUnit or SpurUnitEnd2 The unit is not installed properly. Reinstall itproperly.3 Pinch Roller or Spur does not rotatesmoothly.Replace PinchRoller Unit orSetup 4 The Printhead height adjustment valueand Paper Suction Fan adjustment valueare not set.Ink SupplySystem5 Even when Medium Cleaning is carriedout, waste ink is not sucked from PurgeUnit.Spur Unit.Set Printheadheightadjustmentvalue andPaper SuctionFan adjustmentvalue.After replacingPump Unit,carry outMediumCleaning.Purge Unit 6 Blade, Cap, or Cap Base is deformed. After replacingPurge Unit,carry out LightCleaning,MediumCleaning, andStrongCleaning.Printhead 7 Replace Printhead, and then check thatthe defect has been recovered.End.Print Module 8 Print Module is not installed properly. End.9 Replace Print Module, and then checkthat the defect has been recovered.End.100-11672 - Rev D Page 135
Appendix B: Frequently Asked QuestionsSpur Marks (Dotted Lines)Cause Procedure Check Item ActionPaper 1 Dedicated paper is not used. Replace withdedicatedpaper.Spur Unit 2 Clean Spur and Spur Cleaner, and then End.check that the defect has beenrecovered.3 Spur does not rotate smoothly. Replace SpurUnit.Ink Adhesion (Ink Dripping).Cause Procedure Check Item ActionPrint Module 1 Print Module is not installed properly. End.Ink SupplySystem2 Even when Medium Cleaning is carriedout, waste ink is not sucked from PurgeUnit.After replacingPump Unit,carry outMediumCleaning.Purge Unit 3 Blade, Cap, or Cap Base is deformed. After replacingPurge Unit,carry out LightCleaning,MediumCleaning, andStrongCleaning.Printhead 4 Replace Printhead, and then check thatthe defect has been recovered.Print Module 5 Replace Print Module, and then checkthat the defect has been recovered.End.End.Page 136100-11672 - Rev D
Appendix A: Ordering Genuine Ithaca SuppliesAdjustmentAdjustment When Replacing PartsThis section describes the works to be carried out, as an after-sale service,after parts replacement.Target Parts Adjustment Item Reference section in manualPrint Module Print Modules in "Work at Print Module Replacement"placeInput of various "Print Module Replacement Procedure"adjustment values(*1) (Indicated onlabels)Head position (*2) "Head Position Adjustment"Printhead Head position (*2) "Head Position Adjustment"Purge Unit Blade position "Blade Position Adjustment"Input of Purge Unitwipe position"Consumable Parts ReplacementProcedure"(Indicated on label)Transport Unit Pinch Roller position "Pinch Roller Position Adjustment"Head position (*2) "Head Position Adjustment"Backfeed gap "Backfeed Gap Adjustment"Rack Unit Rack position "Work at Rack Unit Replacement"Lift Unit / RearFeeder sensorStacker Rail /Front TrayUnitPrinterControllerPCBDC PowerSupply PCBRear Feeder sensorFront Tray UnitIn the case data canbe retrieved (Sendthe data to Printer )In the case data canbe retrieved (serialnumber, time, variousadjustment values(*1), Rear FeederSensor, ink ejectpower, Printheadposition, backfeedgap)Ink eject power"Rear Feeder Sensor Adjustment""Work at Stacker Rail and/or Front TrayUnit Replacement""• In the case data can be retrieved fromPrinter Controller PCB to PC.""• In the case data cannot be retrievedfrom Printer Controller PCB to PC.""DC Power Supply Unit ReplacementProcedure"(*1) Printhead wipe position, Printhead capping position, Printhead printposition, and Purge Unit wipe position(*2) T-K gap, slant, and Head position(*3) Use adjustment tool (supplied with service parts).100-11672 - Rev D Page 137
Appendix B: Frequently Asked QuestionsHead Position AdjustmentThis section describes the works to be carried out when adjusting the basicHead position.ItemStandardValueT-K gap 0.5±1.0mmadjustmentHead position ±100μmadjustmentReference"Head Position Adjustment""Head Position Adjustment"Page 138100-11672 - Rev D
Appendix A: Ordering Genuine Ithaca SuppliesPrint Module ReplacementNote: Print Module adjustment procedure must be operate on a flat table. Gap between Print Module and the table must be less than 0.5mm.1) Attach Print Module Joint Plate 1 to Print Module 2 (when replacing PrintModule 2).• 2 screws2) Prefix Print Modules 1 and 2, not tighten fully.• 6 screws100-11672 - Rev D Page 139
Appendix B: Frequently Asked Questions3) Adjust Print Modules in place.Adjustment 1:1) Place two wrenches in a L-shape to adjust the horizontal position. Place theruler against the end face of Print Module.2) Tighten the screws to fix Print Module Joint Plate 1.• 2 screwsPage 140100-11672 - Rev D
Appendix A: Ordering Genuine Ithaca SuppliesAdjustment 2:1) Place a wrench and Print Module Height Fixture B between Print Modules 1and 2..100-11672 - Rev D Page 141
Appendix B: Frequently Asked Questions2) Secure Print Modules 1 and 2.• 4 screws3) Attach Print Module Height Fixture B.• 2 screwsNote: Do not rotate red screw. When attaching Print Module Height Fixture B, place it against the table,and then secure it using the screws.Page 142100-11672 - Rev D
Appendix A: Ordering Genuine Ithaca Supplies4) Attach Print Module Top Plate.• 10 screwsAdjustment Value Input1) Input adjustment Values. ("Print Module Replacement Procedure" section)Head Position Adjustment1) Adjust Head position.("Head Position Adjustment" section)100-11672 - Rev D Page 143
Appendix B: Frequently Asked QuestionsWork at Printhead ReplacementHead Position Adjustment1) Adjust Head position. ("Head Position Adjustment" section)Work at Purge Unit ReplacementBlade Position Adjustment1) Loosen the screw by 1 turn.2) Set the key pins on holder of Blade with Blade Adjustment Tool.Set Blade Adjustment Tool in Print Module.Page 144100-11672 - Rev D
Appendix A: Ordering Genuine Ithaca Supplies3) Tighten the screw.4) Remove Blade Adjustment Tool.● Purge Unit Wipe Position Adjustment1) Enter "Rec wipe P number" that was noted before install the new Purge Unitto "Purge Unit wipe position" using service utility after turning Main PowerSwitch on. ("Consumable Parts Replacement Procedure" section.)Work at Transport Unit ReplacementPinch Roller Position Adjustment1) Print backfeed pattern. ("Backfeed Gap Adjustment"(page 5-92).)2) Observe the backfeed pattern and examine if Pinch Roller adjustment isnecessary according to the following. Perform the adjustment, if necessary.Examination Procedure:If the gray areas of backfeed pattern does not have difference in vertical lineand does not have overlap, adjustment is not necessary.If the second page shifts to right, shift the plate of Pinch Roller to "A" direction.If the second page shifts to left, shift the plate of Pinch Roller to "B" direction.Go to the section below.100-11672 - Rev D Page 145
Appendix B: Frequently Asked QuestionsIf the gray areas of backfeed pattern have overlapped at right side, shift theplate to "A" direction.If the gray areas of backfeed pattern have overlapped at left side, shift theplate to "B" direction. Go to the section below.Adjustment Procedure:1) Remove Top Cover and insert the screwdriver to the hole.Page 146100-11672 - Rev D
Appendix A: Ordering Genuine Ithaca Supplies2) Loosen the screw.Note:Loosen the screw that located at center only. Screws at both side support theplate of Pinch Roller.3) Shift the plate of Pinch Roller all the way and tighten the screw.Head Position Adjustment1) Adjust Head position. ("Head Position Adjustment" section.)Back Feed Gap Adjustment1) Adjust backfeed gap. ("Backfeed Gap Adjustment" section.)100-11672 - Rev D Page 147
Appendix B: Frequently Asked QuestionsWork at Rack Unit Replacement1) Adjust Rack Unit at same position as noted number that was noted whenRack Unit was removed, and then tighten screws.Rear Feeder Sensor Adjustment1) Insert paper in the feeder slot provided on the back of Printer more than 1sheet to cover Rear Feeder Sensor.Page 148100-11672 - Rev D
Appendix A: Ordering Genuine Ithaca Supplies2) Connect PC to Printer, and then start service utility.Open [Parts Replacement] tab, and then click [Adjust] to adjust Rear FeederSensor.3) Confirm that Rear Feeder Sensor is "ON".100-11672 - Rev D Page 149
Appendix B: Frequently Asked Questions4) Remove the paper from feeder slot provided on the back of Printer, andthen confirm that Rear Feeder Sensor is "OFF".Page 150100-11672 - Rev D
Appendix A: Ordering Genuine Ithaca SuppliesWork at Stacker Rail and/or Front Tray Unit Replacement1) Prefix Front Tray Unit using screws.• 2 screws2) Draw out Stacker Rail Until it stops, and then put a bundle of fanfold paperon Front Tray.3) Set Front Tray with the paper edge.100-11672 - Rev D Page 151
Appendix B: Frequently Asked Questions4) Remove the paper from Front Tray Unit.5) Tighten the screws to secure Front Tray Unit that was prefixed in step 1).Work at Printer Controller PCB ReplacementBefore Printer Controller PCB Replacement:1) Connect PC to Printer, and then start service utility.2) Retrieve the date from Printer Controller PCB to PC. ("Printer ControllerPCB Replacement Procedure" section)After Printer Controller PCB Replacement:• In the case data can be retrieved from Printer Controller PCB to PC.3) Send the data from PC to Printer Controller PCB. ("Printer Controller PCBReplacement Procedure" section)• In the case data can not be retrieved from Printer Controller PCB to PC.4) Record 4 adjustment values in the labels on Print Module and Purge Unit.See the following illustrations.Page 152100-11672 - Rev D
Appendix A: Ordering Genuine Ithaca Supplies5) Input Printer serial number. ("Printer Controller PCB ReplacementProcedure" section)6) Set time. ("Time Setting" section)7) Input adjustment values . ("Print Module Replacement Procedure" section)8) Adjust Rear Feeder Sensor. ("Rear Feeder Sensor Adjustment" section)9) Adjust ink eject power. ("DC Power Supply Unit Replacement Procedure"section)10) Adjust Printhead position. ("Head Position Adjustment" section)11) Adjust backfeed gap. ("Backfeed Gap Adjustment" section)Work at DC Power Supply PCB Unit Replacement1) Adjust ink eject power. ("DC Power Supply Unit Replacement Procedure"section)100-11672 - Rev D Page 153
Appendix B: Frequently Asked QuestionsHead Position AdjustmentTK-GAP AdjustmentPrinting TK-GAP Adjustment Pattern1) Connect PC to Printer, and then start service utility.Open the [Test Print, Adjustment] tab and click [Adjust TK-GAP] to display the"Print TK-GAP" dialog box.Page 154100-11672 - Rev D
Appendix A: Ordering Genuine Ithaca Supplies2) Click [Print] to print the TK-GAP adjustment pattern.Examining and Adjusting TK-GAP1) Observe the TK-GAP Adjustment Pattern and examine if the TK-GAPadjustment is necessary for Print Modules according to the following. Performthe adjustment, if necessary.Find where the paper perforation is located on the TK-GAP adjustmentpattern scale.If the paper perforation is at the “+2” position on the TK-GAP adjustmentpattern scale, the adjustment value is “+2”.100-11672 - Rev D Page 155
Appendix B: Frequently Asked Questions2) Enter the adjustment values in the TK-GAP adjustment value entry boxes inthe "Print TK-GAP" dialog box.Page 156100-11672 - Rev D
Appendix A: Ordering Genuine Ithaca Supplies3) After entering the TK-GAP adjustment values, click [Send] to send theadjustment values to Printer.4) If the TK-GAP adjustment pattern is not required to print again for a review,click [No] and proceed to step 6).5) If you wish to review the TK-GAP adjustment pattern, click [Yes].100-11672 - Rev D Page 157
Appendix B: Frequently Asked Questions6) Click [Next] to proceed to the slant adjustment.Slant AdjustmentPrinting Slant Adjustment Pattern1) Connect PC to Printer, and then start service utility.Open the [Test Print, Adjustment] tab and click [Adjust Slant] to display the"Print Head Slant" dialog box.Page 158100-11672 - Rev D
Appendix A: Ordering Genuine Ithaca Supplies2) Click [Print] to print the slant adjustment pattern.100-11672 - Rev D Page 159
Appendix B: Frequently Asked Questions● Examining and Adjusting Slant1) Read values at which Black lines are in line with line of each color (Cyan,Magenta, or Yellow).When a value of A is the same as a value of B:• Example 1: When the value of C1A (+2) is the same as the value of C1B(+2), no adjustment is required for C1 (Cyan Printhead 1).When a value of A is different from a value of B:• Example 2: When the value of Y1A (+2) is different from the value of Y1B(+3), the adjustment has to be made for Y1.Page 160100-11672 - Rev D
Appendix A: Ordering Genuine Ithaca Supplies2) Enter necessary adjustment values in the slant adjustment value entryboxes in the "Print Head Slant" dialog box.100-11672 - Rev D Page 161
Appendix B: Frequently Asked Questions3) After entering the slant adjustment values, click [Send] to send theadjustment values to Printer.4)If the slant adjustment pattern is not required to print again for a review, click[No] and proceed to step 6).5) If you wish to review the slant adjustment pattern, click [Yes].Page 162100-11672 - Rev D
Appendix A: Ordering Genuine Ithaca Supplies6) Click [Next] to proceed to the head position adjustment.100-11672 - Rev D Page 163
Appendix B: Frequently Asked QuestionsHead Position AdjustmentPrinting Head Position Adjustment Pattern1) Connect PC to Printer, and then start service utility.Open the [Test Print, Adjustment] tab and click [Adjust Position] to display the"Print Head Position Adjustment" dialog box.Page 164100-11672 - Rev D
Appendix A: Ordering Genuine Ithaca Supplies2) Click [Print] to print the head position adjustment pattern.100-11672 - Rev D Page 165
Appendix B: Frequently Asked QuestionsExamining and Adjusting Printhead Position1) Module-to-Module AdjustmentThis adjustment is to align the relative print positions of 2 Print Modules toeach other.The relative print positions in the feeding direction can be examined in the"KV" scale.For the example shown in the figure, the 2 elements are in line at "+2". Thus,the adjustment value is "+2".The relative print positions in the cross-feeding direction can be examined inthe "KH" scale. For the example shown in the figure, the 2 elements are in lineat "+2". The adjustment value is therefore "+2".Page 166100-11672 - Rev D
Appendix A: Ordering Genuine Ithaca Supplies2) Head Position AdjustmentThis adjustment is to align the relative color registrations in all Printheads. Therelative color registrations in the feeding direction can be examined in the"xxV" scale and the ones in the cross-feeding direction can be examined in the"xxH" scale.Determine at which division of a scale, two color elements are in line for all the12 blocks. For the example in the "M1V" block, the Magenta and Blackelements meet at "+4".100-11672 - Rev D Page 167
Appendix B: Frequently Asked Questions3) Enter adjustment values in the Module-to-Module adjustment value entryboxes in the "Print Head Position Adjustment" dialog box.Page 168100-11672 - Rev D
Appendix A: Ordering Genuine Ithaca Supplies4) Click [Go to Step 3].100-11672 - Rev D Page 169
Appendix B: Frequently Asked Questions5) Enter the adjustment values in the Head Position Adjustment value entryboxes.Page 170100-11672 - Rev D
Appendix A: Ordering Genuine Ithaca Supplies6) Click [Go to Step 4].100-11672 - Rev D Page 171
Appendix B: Frequently Asked Questions7) Enter the adjustment values in the Head Position Adjustment value entryboxes.Page 172100-11672 - Rev D
Appendix A: Ordering Genuine Ithaca Supplies8) Click [Send] to send all the adjustment values to Printer.9) If the head position adjustment pattern is not required to print again for areview, click [No] and proceed to step 10.10) If you wish to review the head position adjustment pattern, click [Yes].100-11672 - Rev D Page 173
Appendix B: Frequently Asked QuestionsBackfeed Gap AdjustmentPrinting Backfeed Pattern1) Connect PC to Printer, and then start service utility.Open the [Test Print, Adjustment] tab and click [Print] to print the backfeedpattern.Page 174100-11672 - Rev D
Appendix A: Ordering Genuine Ithaca SuppliesExamining and Adjusting Backfeed Gap1) Observe the backfeed pattern and examine if the backfeed gap adjustmentis necessary .Perform the adjustment, if necessary.• If the gray areas of the left and the right end have backfeed gaps more than0.3mm, press the "fill gap" button.100-11672 - Rev D Page 175
Appendix B: Frequently Asked QuestionsIf the gray areas of the left and the right end have overlaps and darken, press the"reduce overlap" button.Page 176100-11672 - Rev D
Appendix A: Ordering Genuine Ithaca SuppliesIf the gray areas of the left and the right end have gap and/or overlap less than0.3mm, adjustment is not required.2) Click [Send] to send the adjustment values to Printer.100-11672 - Rev D Page 177
Appendix B: Frequently Asked Questions3) If the backfeed pattern is not required to print again for a review, click [No]4) If you wish to review the backfeed pattern, click [Yes] and go to step 1).Head Position Fine AdjustmentPrinting Head Position Fine Adjustment Pattern:1) Connect PC to Printer, and then start service utility.Open the [Head Position Fine Adjustment] tab and click [Print] to print HeadPosition Fine Adjustment Pattern.Page 178100-11672 - Rev D
Appendix A: Ordering Genuine Ithaca SuppliesExamining and Adjusting Printhead Position:1) Observe the TK-GAP Fine Adjustment Pattern and examine if the TK-GAPadjustment is necessary for Print Modules according to the following. Performthe adjustment, if necessary.• Find where the paper perforation is located on the TK-GAP FineAdjustment Pattern scale. If the paper perforation is at the “+1”position on the TK-GAP Fine Adjustment pattern scale, theadjustment value is “+1”.100-11672 - Rev D Page 179
Appendix B: Frequently Asked Questions2) Enter the adjustment values in the TK-GAP adjustment value entry boxes.3) Read numerical values of the lines which connected smoothly to magentaline for all the 54 sections (from 1M1 to 2Y9). For example, in the "1M1"section, the Magenta and Black elements meet at "-8".Page 180100-11672 - Rev D
Appendix A: Ordering Genuine Ithaca Supplies4) Find the minimum and maximum numerical values of Black line for eachPrint Module 1 and Print Module 2. For example, minimum numerical value ofPrint Module 1 is "-8", maximum numerical value of Print Module is "+4"5) Enter the minimum and maximum numerical values in the entry boxes.100-11672 - Rev D Page 181
Appendix B: Frequently Asked Questions6) Click [Go to Step 4]7) Find minimum and maximum numerical values of Cyan and Yellow lines foreach Print Module 1 and Print Module 2, and then enter the numerical valuesin the entry boxes.Page 182100-11672 - Rev D
Appendix A: Ordering Genuine Ithaca Supplies8) Click [Send] to send data to Printer.100-11672 - Rev D Page 183
Appendix B: Frequently Asked QuestionsError CodesThis section describes error codes indicated in the case printer has an error.There are 3 categories of error codes.Type of codeService CallError (Fatalerror)Operator CallErrorWarningContentsRecovery operation is restart only without error cancellation.Printer stops action automatically and proceed shut down operation.Printer records some of errors occurred, error cancellation bycustomer engineer can recover the printer.Operator call errors are errors that are recovered by errorcancellation.Printer stops or interrupts printing operation when operator call erroroccurs.Printing operation starts automatically after the factor of the error isexcluded.Warning indicates that printer needs to be some operation eventhough printing.Using printer continually with warning may cause of operator callerror.Service Call Error(Fatal Error)"Service call error" refers to an error that cannot be corrected. The printerautomatically stops operating and performs a shut-down process.Code Detail Code Item Description01: Printer Controller PCB Error01 01 ConditionDetectedFlash ROM errorAction01 02 ConditionDetectedAction01 03 ConditionDetectedAction01 04 ConditionDetectedAction01 05 ConditionDetectedAction1. Rewrite the firmware.2. Replace Printer Controller PCB.SDRAM errorReplace Printer Controller PCB.VRAM errorReplace Printer Controller PCB.AD error1. Replace DC Power PCB Unit.2. Replace Printer Controller PCB.Sensor 3.3V was not turned OFF correctly.1. Replace Printer Controller PCB.If the error persists even after sensor harnessconnector has been disconnected on PrinterController PCB side, Printer Controller PCB isdefective.Page 184100-11672 - Rev D
Appendix A: Ordering Genuine Ithaca SuppliesCode Detail Code Item Description2. Replace Encoder Sensor.3. Replace Operation Panel PCB.4. Replace DC Power PCB Unit.01 07 Condition Motor 24V was not turned OFF correctlyDetectedAction 1. Replace DC Power PCB Unit.2. Replace Printer Controller PCB.01 08 Condition Printhead 5V was not turned OFF correctlyDetectedAction 1. Replace DC Power PCB Unit.2. Replace Printer Controller PCB.01 09 Condition Printhead 24V was not turned OFF correctlyDetectedAction 1. Replace DC Power PCB Unit.2. Replace Printer Controller PCB.01 0A Condition VHTM of the fuse to be blownDetectedAction1. Replace DC Power PCB Unit.2. Replace Printer Controller PCB.01 Remarks For Detail Codes 05 to 09, the occurrence of the error isstored inmemory, so the same error will recur next time Printer starts.Toclear the error, (Service Utility > Parts Replacement > ReleasetheError) and then restart Printer.02: Power Supply Error02 11 ConditionDetectedPrinter Controller PCB 3.3V was not turned ONcorrectly.Replace DC Power PCB Unit.Motor 24V was not turned ON correctlyAction02 13 ConditionDetectedAction Replace DC Power PCB Unit.02 14 Condition Printhead 5V was not turned ONcorrectlyDetectedAction Replace DC Power PCB Unit.02 15 Condition Printhead 24V was not turned ON correctlyDetectedAction Replace DC Power PCB Unit.02 Remarks For Detail Codes 11 to 15, the occurrence of the error isstored in memory, so the same error will recur next timePrinter starts. To clear the error, (Service Utility > PartsReplacement > Release the Error) and then restart Printer.05: Printhead Position Error05 20(MODULE1)A0(MODULE2)ConditionDetectedActionPrinthead position error1. Check Printhead Lifter part movement.2. Replace Print Module.100-11672 - Rev D Page 185
Appendix B: Frequently Asked QuestionsCode Detail Code Item Description05 40(MODULE1) Condition Printhead position errorC0(MODULE2) DetectedAction 1. Check Printhead Lifter part movement.2. Replace Print Module.3. Replace Printer Controller PCB.05 21(MODULE1) Condition Printhead position errorA1(MODULE2) DetectedAction Check Printhead Lifter part movement.05 41(MODULE1) Condition Printhead position errorC1(MODULE2) DetectedAction 1. Check Printhead Lifter part movement.2. Replace Print Module.3. Replace Printer Controller PCB.05 22(MODULE1) Condition Printhead position errorA2(MODULE2) DetectedAction 1. Check Printhead Lifter part movement.2. Replace Print Module.05 42(MODULE1) Condition Printhead position errorC2(MODULE2) DetectedAction 1. Check Printhead Lifter part movement.2. Replace Print Module.3. Replace Printer Controller PCB.05 62(MODULE1) Condition Printhead position errorE2(MODULE2) DetectedAction 1. Check Printhead Lifter part movement.2. Replace Print Module.3. Replace Printer Controller PCB.05 23(MODULE1) Condition Printhead position errorA3(MODULE2) DetectedAction 1. Check Printhead Lifter part movement.2. Replace Print Module.05 43(MODULE1) Condition Printhead position errorC3(MODULE2) DetectedAction 1. Check Printhead Lifter part movement.2. Replace Print Module.3. Replace Printer Controller PCB.05 63(MODULE1) Condition Printhead position errorE3(MODULE2) DetectedAction 1. Check Printhead Lifter part movement.2. Replace Print Module.3. Replace Printer Controller PCB.05 25(MODULE1) Condition Printhead position errorA5(MODULE2) DetectedAction 1. Check Printhead Lifter part movement.2. Replace Print Module.05 45(MODULE1) Condition Printhead position errorC5(MODULE2) DetectedAction 1. Check Printhead Lifter part movement.2. Replace Print Module.3. Replace Printer Controller PCB.Page 186100-11672 - Rev D
Appendix A: Ordering Genuine Ithaca SuppliesCode Detail Code Item Description05 65(MODULE1) Condition Printhead position errorE5(MODULE2) DetectedAction 1. Check Printhead Lifter part movement.2. Replace Print Module.3. Replace Printer Controller PCB.05 26(MODULE1) Condition Printhead position errorA6(MODULE2) DetectedAction 1. Check Printhead Lifter part movement.2. Replace Print Module.05 46(MODULE1) Condition Printhead position errorC6(MODULE2) DetectedAction 1. Check Printhead Lifter part movement.2. Replace Print Module.3. Replace Printer Controller PCB.05 66(MODULE1) Condition Printhead position errorE6(MODULE2) DetectedAction 1. Check Printhead Lifter part movement.2. Replace Print Module.3. Replace Printer Controller PCB.05 27(MODULE1) Condition Printhead position errorA7(MODULE2) DetectedAction 1. Check Printhead Lifter part movement.2. Replace Print Module.05 47(MODULE1) Condition Printhead position errorC7(MODULE2) DetectedAction 1. Check Printhead Lifter part movement.2. Replace Print Module.3. Replace Printer Controller PCB.05 67(MODULE1) Condition Printhead position errorE7(MODULE2) DetectedAction 1. Check Printhead Lifter part movement.2. Replace Print Module.3. Replace Printer Controller PCB.05 29(MODULE1) Condition Printhead position errorA9(MODULE2) DetectedAction 1. Check Printhead Lifter part movement.2. Replace Print Module.05 49(MODULE1) Condition Printhead position errorC9(MODULE2) DetectedAction 1. Check Printhead Lifter part movement.2. Replace Print Module.3. Replace Printer Controller PCB.05 69(MODULE1) Condition Printhead position errorE9(MODULE2) DetectedAction 1. Check Printhead Lifter part movement.2. Replace Print Module.3. Replace Printer Controller PCB.05 2A(MODULE1)AA(MODULE2)ConditionDetectedPrinthead position error100-11672 - Rev D Page 187
Appendix B: Frequently Asked QuestionsCode Detail Code Item DescriptionAction 1. Check Printhead Lifter part movement.2. Replace Print Module.05 4A(MODULE1) Condition Printhead position errorCA(MODULE2) DetectedAction 1. Check Printhead Lifter part movement.2. Replace Print Module.3. Replace Printer Controller PCB.05 6A(MODULE1) Condition Printhead position errorEA(MODULE2) DetectedAction 1. Check Printhead Lifter part movement.2. Replace Print Module.3. Replace Printer Controller PCB.05 2B(MODULE1) Condition Printhead position errorAB(MODULE2) DetectedAction 1. Check Printhead Lifter part movement.2. Replace Print Module.05 4B(MODULE1) Condition Printhead position errorCB(MODULE2) DetectedAction 1. Check Printhead Lifter part movement.2. Replace Print Module.3. Replace Printer Controller PCB.05 6B(MODULE1) Condition Printhead position errorEB(MODULE2) DetectedAction 1. Check Printhead Lifter part movement.2. Replace Print Module.3. Replace Printer Controller PCB.05 2C(MODULE1) Condition Printhead position errorAC(MODULE2) DetectedAction 1. Check Printhead Lifter part movement.2. Replace Print Module.05 4C(MODULE1) Condition Printhead position errorCC(MODULE2) DetectedAction 1. Check Printhead Lifter part movement.2. Replace Print Module.3. Replace Printer Controller PCB.05 6C(MODULE1) Condition Printhead position errorEC(MODULE2) DetectedAction 1. Check Printhead Lifter part movement.2. Replace Print Module.3. Replace Printer Controller PCB.05 2D(MODULE1) Condition Printhead position errorAD(MODULE2) DetectedAction 1. Check Printhead Lifter part movement.2. Replace Print Module.05 4D(MODULE1) Condition Printhead position errorCD(MODULE2) DetectedAction 1. Check Printhead Lifter part movement.2. Replace Print Module.3. Replace Printer Controller PCB.Page 188100-11672 - Rev D
Appendix A: Ordering Genuine Ithaca SuppliesCode Detail Code Item Description05 6D(MODULE1) Condition Printhead position errorED(MODULE2) DetectedAction 1. Check Printhead Lifter part movement.2. Replace Print Module.3. Replace Printer Controller PCB.05 2E(MODULE1) Condition Printhead position errorAE(MODULE2) DetectedAction 1. Check Printhead Lifter part movement.2. Replace Print Module.05 4E(MODULE1) Condition Printhead position errorCE(MODULE2) DetectedAction 1. Close Lower Printhead Release Lever.2. Check Printhead Lifter part movement.3. Replace Print Module.4. Replace Printer Controller PCB.05 2F(MODULE1) Condition Printhead position errorAF(MODULE2) DetectedAction 1. Check Printhead Lifter part movement.2. Replace Print Module.05 4F(MODULE1) Condition Printhead position errorCF(MODULE2) DetectedAction 1. Check Printhead Lifter part movement.2. Replace Print Module.3. Replace Printer Controller PCB.05 6F(MODULE1) Condition Printhead position errorEF(MODULE2) DetectedAction 1. Close Lower Printhead Release Lever.2. Check Printhead Lifter part movement.3. Replace Print Module.4. Replace Printer Controller PCB.05 3D(MODULE1) Condition Printhead position errorBD(MODULE2) DetectedAction 1. Check Printhead Lifter part movement.2. Replace Print Module.05 3E(MODULE1) Condition Printhead position errorBE(MODULE2) DetectedAction Check Printhead Lifter part movement.05 3E(MODULE1)BE(MODULE2)05 5E(MODULE1)DE(MODULE2)06: Purge Unit Position Error06 20(MODULE1)A0(MODULE2)ConditionDetectedActionConditionDetectedActionConditionDetectedPrinthead position errorCheck Printhead Lifter part movement.Printhead position error1. Check Printhead Lifter part movement.2. Replace Print Module.3. Replace Printer Controller PCBPurge Unit position error100-11672 - Rev D Page 189
Appendix B: Frequently Asked QuestionsCode Detail Code Item DescriptionAction 1. Check Purge Unit movement.2. Replace Purge Position Sensor.06 40(MODULE1) Condition Purge Unit was not installed correctlyC0(MODULE2) DetectedAction 1. Check Purge Unit movement.2. Check Purge Position Sensor connection.3. Check Purge Motor connector connection.4. Replace Purge Position Sensor.5. Replace Purge Motor.6. Replace Purge Unit.7. Replace Printer Controller PCB.06 21(MODULE1) Condition Purge Unit position errorA1(MODULE2) DetectedAction Replace Purge Position Sensor.06 41(MODULE1) Condition Purge Unit position errorC1(MODULE2) DetectedAction 1. Check Purge Unit movement.2. Check Purge Position Sensor connection.3. Check Purge Motor connector connection.4. Replace Purge Position Sensor.5. Replace Purge Motor.6. Replace Purge Unit.7. Replace Printer Controller PCB.06 23(MODULE1) Condition Purge Unit position errorA3(MODULE2) DetectedAction 1. Check Purge Unit movement.2. Check Purge Position Sensor connection.06 43(MODULE1) Condition Purge Unit position errorC3(MODULE2) DetectedAction 1. Check Purge Unit movement.2. Replace Purge Motor.3. Replace Purge Unit.4. Replace Printer Controller PCB.06 63(MODULE1) Condition Purge Unit position errorE3(MODULE2) DetectedAction 1. Check Purge Unit movement.2. Replace Purge Position Sensor.3. Replace Purge Motor.4. Replace Purge Unit.5. Replace Printer Controller PCB.06 24(MODULE1) Condition Purge Unit position error(MODULE2) DetectedAction 1. Check Purge Unit movement.2. Replace Purge Position Sensor.06 44(MODULE1) Condition Purge Unit position errorC4(MODULE2) DetectedAction 1. Check Purge Unit movement.2. Replace Purge Motor.3. Replace Purge Unit.4. Replace Printer Controller PCB.Page 190100-11672 - Rev D
Appendix A: Ordering Genuine Ithaca SuppliesCode Detail Code Item Description06 64(MODULE1) Condition Purge Unit position errorE4(MODULE2) DetectedAction 1. Check Purge Unit movement.2. Replace Purge Position Sensor.3. Replace Purge Motor.4. Replace Purge Unit.5. Replace Printer Controller PCB.06 27(MODULE1) Condition Purge Unit position errorA7(MODULE2) DetectedAction 1. Check Purge Unit movement.2. Replace Purge Position Sensor.06 47(MODULE1) Condition Purge Unit position errorC7(MODULE2) DetectedAction 1. Check Purge Unit movement.2. Replace Purge Motor.3. Replace Purge Unit.4. Replace Printer Controller PCB.06 57(MODULE1) Condition Purge Unit position errorE7(MODULE2) DetectedAction 1. Check Purge Unit movement.2. Replace Purge Position Sensor.3. Replace Purge Motor.4. Replace Purge Unit.5. Replace Printer Controller PCB.06 28(MODULE1) Condition Purge Unit position errorA8(MODULE2) DetectedAction 1. Check Purge Unit movement.2. Replace Purge Position Sensor.06 48(MODULE1) Condition Purge Unit position errorC8(MODULE2) DetectedAction 1. Check Purge Unit movement.2. Replace Purge Motor.3. Replace Purge Unit.4. Replace Printer Controller PCB.06 68(MODULE1) Condition Purge Unit position errorE8(MODULE2) DetectedAction 1. Check Purge Unit movement.2. Replace Purge Position Sensor.3. Replace Purge Motor.4. Replace Purge Unit.5. Replace Printer Controller PCB.06 2A(MODULE1) Condition Purge Unit position error(MODULE2) DetectedAction 1. Check Purge Unit movement.2. Replace Purge Position Sensor.06 49(MODULE1) Condition Purge Unit position errorC9(MODULE2) DetectedAction 1. Check Purge Unit movement.2. Replace Purge Motor.3. Replace Purge Unit.100-11672 - Rev D Page 191
Appendix B: Frequently Asked QuestionsCode Detail Code Item Description4. Replace Printer Controller PCB.06 69(MODULE1) Condition Purge Unit position errorE9(MODULE2) DetectedAction 1. Check Purge Unit movement.2. Replace Purge Position Sensor.3. Replace Purge Motor.4. Replace Purge Unit.5. Replace Printer Controller PCB.06 3D(MODULE1) Condition Purge Unit position errorBD(MODULE2) DetectedAction Check Purge Unit movement.06 3E(MODULE1) Condition Purge Unit position errorBE(MODULE2) DetectedAction Check Purge Unit movement.06 5E(MODULE1) Condition Purge Unit position errorDE(MODULE2) DetectedAction 1. Check Purge Unit movement.2. Replace Purge Position Sensor.3. Replace Purge Motor.4. Replace Purge Unit.5. Replace Printer Controller PCB.07: Supply Valve Error07 20(MODULE1) Condition Supply Valve errorA0(MODULE2) DetectedAction 1. Replace Print Module.07 21(MODULE1)A1(MODULE2)07 31(MODULE1)B1(MODULE2)07 71(MODULE1)F1(MODULE2)07 22(MODULE1)A2(MODULE2)07 32(MODULE1)B2(MODULE2)07 73(MODULE1)F2(MODULE2)ConditionDetectedActionConditionDetectedActionConditionDetectedActionConditionDetectedActionConditionDetectedActionConditionDetected2. Replace Printer Controller PCBSupply Valve error1. Replace Print Module.2. Replace Printer Controller PCBSupply Valve error1. Replace Print Module.2. Replace Printer Controller PCBSupply Valve error1. Replace Print Module.2. Replace Printer Controller PCBSupply Valve error1. Replace Print Module.2. Replace Printer Controller PCBSupply Valve error1. Replace Print Module.2. Replace Printer Controller PCBSupply Valve errorPage 192100-11672 - Rev D
Appendix A: Ordering Genuine Ithaca SuppliesCode Detail Code Item DescriptionAction 1. Replace Print Module.2. Replace Printer Controller PCB07 23(MODULE1) Condition Supply Valve errorA3(MODULE2) DetectedAction 1. Replace Print Module.2. Replace Printer Controller PCB07 33(MODULE1) Condition Supply Valve errorB3(MODULE2) DetectedAction 1. Replace Print Module.2. Replace Printer Controller PCB07 73(MODULE1) Condition Supply Valve errorF3(MODULE2) DetectedAction 1. Replace Print Module.2. Replace Printer Controller PCB07 24(MODULE1) Condition Supply Valve errorA4(MODULE2) DetectedAction 1. Replace Print Module.2. Replace Printer Controller PCB07 34(MODULE1) Condition Supply Valve errorB4(MODULE2) DetectedAction 1. Replace Print Module.2. Replace Printer Controller PCB07 74(MODULE1) Condition Supply Valve errorF4(MODULE2) DetectedAction 1. Replace Print Module.2. Replace Printer Controller PCB07 25(MODULE1) Condition Supply Valve errorA5(MODULE2) DetectedAction 1. Replace Print Module.2. Replace Printer Controller PCB07 35(MODULE1) Condition Supply Valve errorB5(MODULE2) DetectedAction 1. Replace Print Module.2. Replace Printer Controller PCB07 75(MODULE1) Condition Supply Valve errorF5(MODULE2) DetectedAction 1. Replace Print Module.2. Replace Printer Controller PCB07 26(MODULE1) Condition Supply Valve errorA6(MODULE2) DetectedAction 1. Replace Print Module.2. Replace Printer Controller PCB07 36(MODULE1) Condition Supply Valve errorB6(MODULE2) DetectedAction 1. Replace Print Module.2. Replace Printer Controller PCB07 76(MODULE1)F6(MODULE2)ConditionDetectedSupply Valve error100-11672 - Rev D Page 193
Appendix B: Frequently Asked QuestionsCode Detail Code Item DescriptionAction 1. Replace Print Module.2. Replace Printer Controller PCB07 27(MODULE1) Condition Supply Valve errorA7(MODULE2) DetectedAction 1. Replace Print Module.2. Replace Printer Controller PCB07 77(MODULE1) Condition Supply Valve errorF7(MODULE2) DetectedAction 1. Replace Print Module.2. Replace Printer Controller PCB07 29(MODULE1) Condition Supply Valve error(MODULE2) DetectedAction 1. Replace Print Module.2. Replace Printer Controller PCB07 79(MODULE1) Condition Supply Valve errorF9(MODULE2) DetectedAction 1. Replace Print Module.2. Replace Printer Controller PCB08: Bubble Removing Valve Error08 20(MODULE1) Condition Bubble Removing Valve errorA0(MODULE2) DetectedAction 1. Replace Print Module.2. Replace Printer Controller PCB08 21(MODULE1) Condition Bubble Removing Valve errorA1(MODULE2) DetectedAction 1. Replace Print Module.2. Replace Printer Controller PCB08 31(MODULE1) Condition Bubble Removing Valve errorB1(MODULE2) DetectedAction 1. Replace Print Module.2. Replace Printer Controller PCB08 71(MODULE1) Condition Bubble Removing Valve errorF1(MODULE2) DetectedAction 1. Replace Print Module.2. Replace Printer Controller PCB08 23(MODULE1) Condition Bubble Removing Valve errorA3(MODULE2) DetectedAction 1. Replace Print Module.2. Replace Printer Controller PCB08 33(MODULE1) Condition Bubble Removing Valve errorB3(MODULE2) DetectedAction 1. Replace Print Module.2. Replace Printer Controller PCB08 73(MODULE1) Condition Bubble Removing Valve errorF3(MODULE2) DetectedAction 1. Replace Print Module.2. Replace Printer Controller PCB08 24(MODULE1)A4(MODULE2)ConditionDetectedBubble Removing Valve errorPage 194100-11672 - Rev D
Appendix A: Ordering Genuine Ithaca SuppliesCode Detail Code Item DescriptionAction 1. Replace Print Module.2. Replace Printer Controller PCB08 34(MODULE1) Condition Bubble Removing Valve errorB4(MODULE2) DetectedAction 1. Replace Print Module.2. Replace Printer Controller PCB08 74(MODULE1) Condition Bubble Removing Valve errorF4(MODULE2) DetectedAction 1. Replace Print Module.2. Replace Printer Controller PCB08 25(MODULE1) Condition Bubble Removing Valve errorA5(MODULE2) DetectedAction 1. Replace Print Module.2. Replace Printer Controller PCB08 35(MODULE1) Condition Bubble Removing Valve errorB5(MODULE2) DetectedAction 1. Replace Print Module.2. Replace Printer Controller PCB08 75(MODULE1) Condition Bubble Removing Valve errorF5(MODULE2) DetectedAction 1. Replace Print Module.2. Replace Printer Controller PCB08 26(MODULE1) Condition Bubble Removing Valve errorA6(MODULE2) DetectedAction 1. Replace Print Module.2. Replace Printer Controller PCB08 36(MODULE1) Condition Bubble Removing Valve errorB6(MODULE2) DetectedAction 1. Replace Print Module.2. Replace Printer Controller PCB08 76(MODULE1) Condition Bubble Removing Valve errorF6(MODULE2) DetectedAction 1. Replace Print Module.2. Replace Printer Controller PCB08 27(MODULE1) Condition Bubble Removing Valve errorA7(MODULE2) DetectedAction 1. Replace Print Module.2. Replace Printer Controller PCB08 37(MODULE1) Condition Bubble Removing Valve errorB7(MODULE2) DetectedAction 1. Replace Print Module.2. Replace Printer Controller PCB08 77(MODULE1) Condition Bubble Removing Valve errorF7(MODULE2) DetectedAction 1. Replace Print Module.2. Replace Printer Controller PCB08 28(MODULE1)A8(MODULE2)ConditionDetectedBubble Removing Valve error100-11672 - Rev D Page 195
Appendix B: Frequently Asked QuestionsCode Detail Code Item DescriptionAction 1. Replace Print Module.2. Replace Printer Controller PCB08 38(MODULE1) Condition Bubble Removing Valve errorB8(MODULE2) DetectedAction 1. Replace Print Module.2. Replace Printer Controller PCB08 78(MODULE1) Condition Bubble Removing Valve errorF8(MODULE2) DetectedAction 1. Replace Print Module.2. Replace Printer Controller PCB09: Suction Pump Error09 10(MODULE1)90(MODULE2)09 12-15(MODULE1)92-95(MODULE2)*109 22-25(MODULE1)A2-A5(MODULE2)*109 32-35(MODULE1)B2-B5(MODULE2)*109 16-19(MODULE1)96-99(MODULE2)*2ConditionDetectedActionConditionDetectedActionConditionDetectedActionConditionDetectedActionConditionDetectedActionInternal state pressure error1. Restart Printer in service mode, and thenload ink.Service Utility > Troubleshooting > Ink Loading2. Check the leakage of ink pass.3. Replace Print Module.4. Replace Printer Controller PCB.Ink Level Sensor does not detect ink1. Restart Printer in service mode, and thenload ink.Service Utility > Troubleshooting > Ink Loading2. Check the leakage of ink pass.3. Replace Print Module.4. Replace Printer Controller PCB.Pressure does not change1. Restart Printer in service mode, and thenload ink.Service Utility > Troubleshooting > Ink Loading2. Check the leakage of ink pass.3. Replace Print Module.4. Replace Printer Controller PCB.Pressure becomes lower too fast1. Restart Printer in service mode, and thenload ink.Service Utility > Troubleshooting > Ink Loading2. Check the leakage of ink pass.3. Replace Print Module.4. Replace Printer Controller PCB.Ink Level Sensor does not detect air1. Restart Printer in service mode, and thenload ink.Service Utility > Troubleshooting > Ink Loading2. Check the leakage of ink pass.Page 196100-11672 - Rev D
Appendix A: Ordering Genuine Ithaca SuppliesCode Detail Code Item Description3. Replace Print Module.09 26-29(MODULE1)A6-A9(MODULE2)*209 36-39(MODULE1)B6-B9(MODULE2)*209 1A(MODULE1)9A(MODULE2)09 2A(MODULE1)AA(MODULE2)09 2B(MODULE1)AB(MODULE2)09 41-4B(MODULE1)C1-CB(MODULE2)*3ConditionDetectedActionConditionDetectedActionConditionDetectedActionConditionDetectedActionConditionDetectedActionConditionDetectedAction4. Replace Printer Controller PCB.Pressure does not change1. Restart Printer in service mode, and thenload ink.Service Utility > Troubleshooting > Ink Loading2. Check the leakage of ink pass.3. Replace Print Module.4. Replace Printer Controller PCB.Pressure becomes higher too fast1. Restart Printer in service mode, and thenload ink.Service Utility > Troubleshooting > Ink Loading2. Check the leakage of ink pass.3. Replace Print Module.4. Replace Printer Controller PCB.Pressure does not become lower1. Restart Printer in service mode, and thenload ink.Service Utility > Troubleshooting > Ink Loading2. Check the leakage of ink pass.3. Replace Print Module.4. Replace Printer Controller PCB.Pressure does not become lower1. Restart Printer in service mode, and thenload ink.Service Utility > Troubleshooting > Ink Loading2. Check the leakage of ink pass.3. Replace Print Module.4. Replace Printer Controller PCB.Pressure does not become higher1. Restart Printer in service mode, and thenload ink.Service Utility > Troubleshooting > Ink Loading2. Check the leakage of ink pass.3. Replace Print Module.4. Replace Printer Controller PCB.Supply Valve status error when driving Pump(dragging)1. Restart Printer in service mode, and thenload ink.Service Utility > Troubleshooting > Ink Loading2. Check the leakage of ink pass.3. Replace Print Module.4. Replace Printer Controller PCB.100-11672 - Rev D Page 197
Appendix B: Frequently Asked QuestionsCode Detail Code Item Description09 51-5B(MODULE1)ConditionDetectedSupply Valve status error when driving Pump(dragging)D1-DB(MODULE2)*3Action 1. Restart Printer in service mode, and thenload ink.Service Utility > Troubleshooting > Ink Loading2. Check the leakage of ink pass.3. Replace Print Module.09 61-6B(MODULE1)E1-EB(MODULE2)*309 71-7B(MODULE1)F1-FB(MODULE2)*3ConditionDetectedActionConditionDetectedAction4. Replace Printer Controller PCB.Bubble Removing Valve status error whendriving Pump (dragging)1. Restart Printer in service mode, and thenload ink.Service Utility > Troubleshooting > Ink Loading2. Check the leakage of ink pass.3. Replace Print Module.4. Replace Printer Controller PCB.Bubble Removing Valve status error whendriving Pump (dragging)1. Restart Printer in service mode, and thenload ink.Service Utility > Troubleshooting > Ink Loading2. Check the leakage of ink pass.3. Replace Print Module.4. Replace Printer Controller PCB.09 Remarks *1: The low-order 4 bits are 2: BK, 3: C, 4: M, 5:Y.*2: The low-order 4 bits are 6: BK, 7: C, 8: M, 9:Y.*3: The low-order 4 bits represent the Pump drive type.1: Driven without sensor detection2: Driven on Ink Level Sensor detection (BK)3: Driven on Ink Level Sensor detection (C)4: Driven on Ink Level Sensor detection (M)5: Driven on Ink Level Sensor detection (Y)6: Driven on Ink Level Sensor detection (BK)7: Driven on Ink Level Sensor detection (C)8: Driven on Ink Level Sensor detection (M)9: Driven on Ink Level Sensor detection (Y)A: Pressure Sensor under detectionB: Pressure Sensor excess detection0F: Printer Overheat0F01-FF(Additionalvalue ofK:01,C:02,M:04,Y:08)(MODULE1),(Additionalvalue ofK:10,C:20,M:40,Y:80)(MODULE2)ConditionDetectedActionPrintheads are overheated. If used further,Printheads will be damaged.Replace Printheads.Page 198100-11672 - Rev D
Appendix A: Ordering Genuine Ithaca SuppliesCode Detail Code Item Description10: Printhead Ink Level Sensor Error10 01-FF(Additionalvalue ofK:01,C:02,M:04,Y:08)(MODULE1),(Additionalvalue ofK:10,C:20,M:40,Y:80)(MODULE2)ConditionDetectedAction11: Printer Subheater Error11 01-FF(Additionalvalue ofK:01,C:02,M:04,Y:08)(MODULE1),(Additionalvalue ofK:10,C:20,M:40,Y:80)(MODULE2))ConditionDetectedAction12: Printhead Connection Error12 01-FF(Additionalvalue ofK:01,C:02,M:04,Y:08)(MODULE1),(Additionalvalue ofK:10,C:20,M:40,Y:80)(MODULE2)13: Printhead Data Error13 01-FF(Additionalvalue ofK:01,C:02,M:04,Y:08)(MODULE1),(Additionalvalue ofK:10,C:20,M:40,Y:80)(MODULE2)ConditionDetectedActionConditionDetectedActionInk Upper Limit Sensor detected while InkLower Limit Sensor did not.1. Replace Printheads.2. Replace Flexible Cable.3. Replace Printhead Relay PCB.4. Replace Printer Controller PCB.Specified temperature is not reached eventhough Subheater is running1. Replace Printheads.2. Replace Flexible Cable.3. Replace Printhead Relay PCB.4. Replace Printer Controller PCB.Printhead connection error1. Reattach Printhead.2. Replace Printheads.3. Replace Flexible Cable.4. Replace Printhead Relay PCB.5. Replace Printer Controller PCB.Printhead EEPROM data error1. Replace Printheads.2. Replace Printer Controller PCB.100-11672 - Rev D Page 199
Appendix B: Frequently Asked QuestionsCode Detail Code Item Description14: Printhead Type Error14 01-FF(Additionalvalue ofK:01,C:02,M:04,Y:08)(MODULE1),(Additionalvalue ofK:10,C:20,M:40,Y:80)(MODULE2)15: Ink LeakingConditionDetectedAction15 01 ConditionDetectedAction17: Purge Unit End of Life17 01 ConditionDetectedAction18: Blade Cleaner End of LifeCorrect Printhead is not installedInstall correct Printhead.Ink is leakingLocate ink leakage and replace Unit inquestion.Purge Unit lifeReplace Purge Unit.18 01 Condition Blade Cleaner lifeDetectedAction Replace Blade Cleaner19: Printhead Temperature Sensor Error19 01-FF(Additionalvalue ofK:01,C:02,M:04,Y:08)(MODULE1),(Additionalvalue ofK:10,C:20,M:40,Y:80)(MODULE2)ConditionDetectedAction1B: Printhead Flexible Cable Connection Error1B01-FF(Additionalvalue ofK:01,C:02,M:04,Y:08)(MODULE1),(Additionalvalue ofK:10,C:20,ConditionDetectedActionPrinthead Temperature Sensor is damaged1. Replace Printheads.2. Replace Flexible Cable.3. Replace Printhead Relay PCB.4. Replace Printer Controller PCB.Printhead Flexible Cable is not connectedcorrectly1. Check Printhead Flexible Cable connection.2. Replace Printheads.3. Replace Printhead Relay PCB.4. Replace Printer Controller PCB.Page 200100-11672 - Rev D
Appendix A: Ordering Genuine Ithaca SuppliesCode Detail Code Item DescriptionM:40,Y:80)(MODULE2)20: Upper Life Limit Sensor Error20 01 ConditionDetectedAction20 02 ConditionDetectedAction21: Lower Life Limit Sensor Error21 01 ConditionDetectedAction21 02 ConditionDetectedAction24: Climate Sensor Not ConnectedFeeder Tray does not move correctly.Feeder Tray Unit moves up and then Upper LiftLimitSensor does not detect.1. Check Upper Lift Limit Sensor connection.2. Check Paper Lift Motor connection.3. Check Lift Unit movement.4. Replace Upper Lift Limit Sensor.5. Replace Paper Lift Motor.6. Replace Lift Unit.7. Replace Printer controller PCB.Feeder Tray does not move correctly.Feeder Tray Unit moves up and then Upper LiftLimitSensor does not detect.1. Check Upper Lift Limit Sensor connection.2. Check Paper Lift Motor connection.3. Check Lift Unit movement.4. Replace Upper Lift Limit Sensor.5. Replace Paper Lift Motor.6. Replace Lift Unit.7. Replace Printer controller PCB.Feeder Tray does not move correctly.Feeder Tray Unit moves up and then Lower LiftLimitSensor does not detect.1. Check Lower Lift Limit Sensor connection.2. Check Paper Lift Motor connection.3. Check Lift Unit movement.4. Replace Lower Lift Limit Sensor.5. Replace Paper Lift Motor.6. Replace Lift Unit.7. Replace Printer controller PCB.Feeder Tray does not move correctly.Feeder Tray Unit moves up and then Lower LiftLimitSensor does not detect.1. Check Lower Lift Limit Sensor connection.2. Check Paper Lift Motor connection.3. Check Lift Unit movement.4. Replace Lower Lift Limit Sensor.5. Replace Paper Lift Motor.6. Replace Lift Unit.7. Replace Printer controller PCB.100-11672 - Rev D Page 201
Appendix B: Frequently Asked QuestionsCode Detail Code Item Description24 01 Condition Climate Sensor is not connected.DetectedAction 1. Check Climate Sensor connection.2. Replace Climate Sensor.3. Replace Printer Controller PCB.25: Paper Suction Fan Error25 01 ConditionDetectedAction26: Power Supply Fan Error26 01 ConditionDetectedAction26 02 ConditionDetectedAction27: Cooling Fan Error27 01 ConditionDetectedAction29: Wipe Valve Error29 20 ConditionDetectedAction29 21 ConditionDetectedActionPaper Suction Fan is faulty or not connected.1. Check for a clogged fan.2. Check Suction Fan connector connection.3. Replace Suction Fan.4. Replace Printer Controller PCB.Power Supply Fan is faulty or not connected1. Check for a clogged fan.2. Check Power Supply Fan connectorconnection.3. Replace Power Supply Fan.4. Replace Printer Controller PCB.Power Supply Fan is faulty or not connected1. Check for a clogged fan.2. Check Power Supply Fan connectorconnection.3. Replace Power Supply Fan.4. Replace Printer Controller PCB.Power Supply Fan is faulty or not connected1. Check for a clogged fan.2. Check Power Supply Fan connectorconnection.3. Replace Power Supply Fan.4. Replace Printer Controller PCB.Wipe Valve position error1. Check Wipe Valve Sensor connectorconnection.2. Check Valve Motor connector connection.3. Replace Wipe Valve Sensor.4. Replace Valve Motor.5. Replace Valve Unit.Wipe Valve position error1. Check Valve Motor connector connection.2. Replace Valve Motor.Page 202100-11672 - Rev D
Appendix A: Ordering Genuine Ithaca SuppliesCode Detail Code Item Description3. Replace Valve Unit.29 22 Condition Wipe Valve position errorDetectedAction 1. Check Wipe Valve Sensor connectorconnection.2. Check Valve Motor connector connection.3. Replace Wipe Valve Sensor.4. Replace Valve Motor.5. Replace Valve Unit.29 23 Condition Wipe Valve position errorDetectedAction 1. Check Wipe Valve Sensor connectorconnection.2. Check Valve Motor connector connection.3. Replace Wipe Valve Sensor.4. Replace Valve Motor.5. Replace Valve Unit.29 7F Condition Wipe Valve position errorDetectedAction 1. Check Wipe Valve Sensor connectorconnection.2. Check Valve Motor connector connection.3. Replace Wipe Valve Sensor.4. Replace Valve Motor.5. Replace Valve Unit.1B: Printhead of the Fuse to Be Blown1B 01-FF(Additionalvalue ofK:01,C:02,M:04,Y:08)(MODULE1),(Additionalvalue ofK:10,C:20,M:40,Y:80)(MODULE2)F0: Software ErrorConditionDetectedActionF0 01 ConditionDetectedActionF0 02 ConditionDetectedActionPrinthead of the fuse to be blownReplace Printer Controller PCB.ASIC bus access timeout error1. Turn off Printer, and then turn on Printer2. Update the firmware.3. Save the printer stored data to a file, andthenreport to manufacturer.Command with invalid parameters sent to printprocessing Unit1. Turn off Printer, and then turn on Printer2. Update the firmware.100-11672 - Rev D Page 203
Appendix B: Frequently Asked QuestionsCode Detail Code Item Description3. Save the printer stored data to a file, andthenreport to manufacturer.F0 03 Condition Unused interrupt handling in print processingDetectedActionF0 04 ConditionDetectedActionF0 05 ConditionDetectedActionF0 06 ConditionDetectedActionF0 07 ConditionDetectedActionF0 08 ConditionDetectedActionF0 09 ConditionDetectedActionUnit1. Turn off Printer, and then turn on Printer2. Update the firmware.3. Save the printer stored data to a file, andthenreport to manufacturer.Could not get interrupt resources1. Turn off Printer, and then turn on Printer2. Update the firmware.3. Save the printer stored data to a file, andthenreport to manufacturer.Could not get OS resources in print processingUnit1. Turn off Printer, and then turn on Printer2. Update the firmware.3. Save the printer stored data to a file, andthenreport to manufacturer.Invalid interruption occurring in print processingUnit1. Turn off Printer, and then turn on Printer2. Update the firmware.3. Save the printer stored data to a file, andthenreport to manufacturer.Invalid paper detection interruption handlingduring print processing1. Turn off Printer, and then turn on Printer2. Update the firmware.3. Save the printer stored data to a file, andthenreport to manufacturer.Invalid processing in ASIC print processing Unit1. Turn off Printer, and then turn on Printer2. Update the firmware.3. Save the printer stored data to a file, andthenreport to manufacturer.Invalid response processing in Print Module1. Turn off Printer, and then turn on Printer2. Update the firmware.3. Save the printer stored data to a file, andPage 204100-11672 - Rev D
Appendix A: Ordering Genuine Ithaca SuppliesCode Detail Code Item Descriptionthenreport to manufacturer.F0 0A Condition Invalid delay occurring during print processingDetectedActionF0 0B ConditionDetectedActionF0 0C ConditionDetectedActionF0 0D ConditionDetectedActionF0 0E ConditionDetectedActionF0 0F ConditionDetectedActionF0 10 ConditionDetectedAction1. Turn off Printer, and then turn on Printer2. Update the firmware.3. Save the printer stored data to a file, andthenreport to manufacturer.Temperature control processing activated whenPrinthead temperature acquisition processingwas not at work.1. Turn off Printer, and then turn on Printer2. Update the firmware.3. Save the printer stored data to a file, andthenreport to manufacturer.Resumption of printing from invalid addressattempted.1. Turn off Printer, and then turn on Printer2. Update the firmware.3. Save the printer stored data to a file, andthenreport to manufacturer.Motor drive command issued to motor driverduring motor drive.1. Turn off Printer, and then turn on Printer2. Update the firmware.3. Save the printer stored data to a file, andthenreport to manufacturer.Printing started while all Printheads weremasked.1. Turn off Printer, and then turn on Printer2. Update the firmware.3. Save the printer stored data to a file, andthenreport to manufacturer.Stepping motor drive parameter error1. Turn off Printer, and then turn on Printer2. Update the firmware.3. Save the printer stored data to a file, andthenreport to manufacturer.Buffer Valve Solenoid has been energized forlonger than specified1. Turn off Printer, and then turn on Printer2. Update the firmware.3. Save the printer stored data to a file, and100-11672 - Rev D Page 205
Appendix B: Frequently Asked QuestionsCode Detail Code Item Descriptionthenreport to manufacturer.F0 12 Condition Invalid address management of USB functionDetectedActionF0 13 ConditionDetectedActionF0 14 ConditionDetectedActionreceive buffer1. Turn off Printer, and then turn on Printer2. Update the firmware.3. Save the printer stored data to a file, andthenreport to manufacturer.Motor drive sequence end interrupt received atASIC stop.1. Turn off Printer, and then turn on Printer2. Update the firmware.3. Save the printer stored data to a file, andthenreport to manufacturer.Motor drive function called while motor handlernotidle.1. Turn off Printer, and then turn on Printer2. Update the firmware.3. Save the printer stored data to a file, andthenreport to manufacturer.Page 206100-11672 - Rev D
Appendix A: Ordering Genuine Ithaca SuppliesOperator Call Error"Operator call error" refers to an error that can be corrected. When an operatorcall error occurs, printing stops and an error message and details on the errorare displayed on the "Printer Status" screen on the PC's monitor. When two ormore errors have occurred, error messages are displayed for individual errors.When the cause of an operator call error has been remedied, printing startsautomatically.The following table summarizes the error messages and corrective actions.Code Detail Code Item Description01: Upper Unit Open01 01 Condition Upper Unit is opened.DetectedAction Close Upper Unit02: Ink Tank Door Open02 01 Condition Ink Tank Door is opened.DetectedAction Close Ink Tank Door03: Maintenance Cartridge Door Open03 01 Condition Maintenance Cartridge Door is opened.DetectedAction Close Maintenance Cartridge Door04: Maintenance Cover Open04 01 Condition Maintenance Cover is opened.DetectedAction Close Maintenance Cover10: No Paper Error10 01 Condition Paper is run out.DetectedAction 1. Load paper.2. Close Paper <strong>Guide</strong>s (error cleared).10 02 Condition Paper is not fed.DetectedAction 1. Load paper.2. Close Paper <strong>Guide</strong>s (error cleared).11: Paper Length Error11 02 Condition Paper length is smaller than loaded print data.DetectedAction13: Paper Jam Error13 01 ConditionDetectedAction1. Load paper of correct size and close Paper<strong>Guide</strong>s (error cleared).2. Cancel the job.Service Utility > Printer Status > Cancel MyPrinting JobTOF Sensor does not detect the trailing edge ofpaper during printing.1. Remove jammed paper around TOF Sensor.100-11672 - Rev D Page 207
Appendix B: Frequently Asked QuestionsCode Detail Code Item Description2. Load paper of correct size.3 Close Paper <strong>Guide</strong> (error cleared).13 02 Condition TOF Sensor does not detect the trailing edge ofDetectedAction13 0A ConditionDetectedAction13 0C ConditionDetectedAction13 E1 ConditionDetectedAction13 E2 ConditionDetectedAction14: Mark Width Error14 01 ConditionDetectedAction19: Paper Loading Error19 01 ConditionDetectedAction19 02 ConditionDetectedpaper during printing.1. Remove jammed paper around TOF Sensor.2. Load paper of correct size.3 Close Paper <strong>Guide</strong> (error cleared).TOF Sensor does not detect the leading edgeof paper during printing.1. Remove paper jammed in Transport Unit.2. Close Upper Unit.3. Close Ink Tank Door.Paper has been fed too fast during printing.1. Clean Transport Belt.2. Adjust pulling speed for the peeler, the takeupdevice and so on.3. Close Paper <strong>Guide</strong>s (error cleared).Only 1% or less of encoder signal is receivedeven if Transport Motor is driven at start ofprinting. (Transport Belts drive is nottransmitted to the encoder.)1. Removed jammed paper in Transport Unit.Set paper.Close Paper <strong>Guide</strong> (error cleared) or2. Replace Transport Sensor 2.Only 90% or less of encoder signal is receivedduring paper transport during printing.(Transport Belts are slipping on shafts.)1. Remove jammed paper in Transport area.Close Paper <strong>Guide</strong>s (error cleared) or2. Replace Encoder Sensor.3. Replace Transport Unit.Mark width of paper is smaller than specifieddata.1. Load paper of correct mark lengths andclose Upper Unit (error cleared).2. Cancel the job.Service Utility > Printer Status > CancelPrinting My JobPaper not detected when paper is loaded.1. Load paper correctly and close Upper Unit(error cleared) or2. Replace TOF SensorAutomatic adjustment of TOF is failed.Page 208100-11672 - Rev D
Appendix A: Ordering Genuine Ithaca SuppliesCode Detail Code Item DescriptionAction1D: Paper Jam Error 21D 01 ConditionDetectedAction1D 02 ConditionDetectedAction1D 03 ConditionDetectedAction1D 10 ConditionDetectedAction1D 11 ConditionDetectedAction1D E1 ConditionDetectedAction1D E2 ConditionDetected20: Ink Tank Empty20 01-FF(Additionalvalueof K:01,C:02,M:04,Y:08)(MODULE1),(Additionalvalueof K:10,C:20,M:40,Y:80)(MODULE2)ActionConditionDetectedAction1. Load paper correctly and close Upper Unit(error cleared) or2. Replace TOF SensorTOF Sensor does not detect the trailing edge ofTOF mark while paper is fed from print pauseposition to print start position.Remove jammed paperTOF Sensor does not detect the trailing edge ofTOF mark while paper is fed from print pauseposition to print start position.Remove jammed paperTOF Sensor does not detect the trailing edge ofTOF mark while paper is fed from print pauseposition to print start position.Remove jammed paperTOF Sensor does not detect TOF mark duringform feeding.1. Remove jammed paper.2. Replace TOF Sensor.TOF Sensor does not detect TOF mark whilepaper is fed forward to print position.1. Remove jammed paper or2. Replace TOF Sensor.Only 1% or less of encoder signal is receivedeven if Transport Motor is driven other thanduring printing. (Transport Belts drive is nottransmitted to the encoder.)1. Removed jammed paper in Transport areaor2. Replace Encoder Sensor.Only 90% or less of encoder signal is receivedduring paper transport other than duringprinting.(Transport Belts are slipping on shafts.)1. Remove jammed paper in Transport area or2. Replace Encoder Sensor.3. Replace Transport Unit.Ink tank is empty.1. Replace with a new Ink Tank.2. Close Ink Door (error cleared).100-11672 - Rev D Page 209
Appendix B: Frequently Asked QuestionsCode Detail Code Item Description21: Ink Tank Installation Error21 01-FF Condition Ink tank is not installed correctly.(Additionalvalueof K:01,C:02,M:04,Y:08)(MODULE1),(Additionalvalueof K:10,C:20,M:40,Y:80)(MODULE2)DetectedAction22: Ink Tank Data Error22 01-FF(Additionalvalueof K:01,C:02,M:04,Y:08)(MODULE1),(Additionalvalueof K:10,C:20,M:40,Y:80)(MODULE2)ConditionDetectedAction23: Maintenance Cartridge Full23 01 ConditionDetected1. Install Ink Tank again, or replace with a newInk Tank.2. Close all doors (error cleared).Ink tank data error.1. Install a new Ink Tank.2. Close all doors (error cleared).Maintenance Cartridge is detected full byLeakage Sensor.Action 1. Replace with a new Maintenance Cartridge.2. Close all doors (error cleared).24: Maintenance Cartridge Installation Error24 01 Condition Maintenance cartridge is not installed correctly.DetectedAction 1. Install Maintenance Cartridge again orreplace with a new Maintenance Cartridge.2. Close all doors (error cleared).25: Maintenance Cartridge Data Error25 01 ConditionDetected26: Ink Tank ID Error26 01-FF(Additionalvalue ofK:01,C:02,M:04,Y:08)(MODULE1),(Additionalvalueof K:10,C:20,ActionConditionDetectedActionPaper length is smaller than loaded print data.1. Replace with a new Maintenance Cartridge.2. Close all doors (error cleared).Correct Ink Tank is not installed.1. Replace with a correct Ink Tank.2. Close all doors (error cleared).Page 210100-11672 - Rev D
Appendix A: Ordering Genuine Ithaca SuppliesCode Detail Code Item DescriptionM:40,Y:80)(MODULE2)27: Ink Tank Type Error27 01-FF(Additionalvalueof K:01,C:02,M:04,Y:08)(MODULE1),(Additionalvalueof K:10,C:20,M:40,Y:80)(MODULE2)ConditionDetectedAction2B: Maintenance Cartridge Full (2)2B 01 ConditionDetectedAction2D: Ink Tank Type Error2D 01-FF(Additionalvalueof K:01,C:02,M:04,Y:08)(MODULE1),(Additionalvalueof K:10,C:20,M:40,Y:80)(MODULE2)ConditionDetectedAction2E: Ink Tank ID Error2E 01-FF Condition(Additional DetectedvalueActionof K:01,C:02,M:04,Y:08)(MODULE1),(Additionalvalueof K:10,C:20,M:40,Y:80)(MODULE2)2F: Maintenance Cartridge Type Error2F 01 ConditionDetectedActionCorrect Ink Tank is not installed.1. Replace with a correct Ink Tank.2. Close all doors (error cleared).Maintenance Cartridge is detected full by dotcount.1. Replace with a new Maintenance Cartridge.2. Close all doors (error cleared).Correct Ink Tank is not installed.1. Replace with a correct Ink Tank.2. Close all doors (error cleared).Correct Ink Tank is not installed.1. Replace with a correct Ink Tank.2. Close all doors (error cleared).Correct Maintenance Cartridge is not installed.1. Replace with a new Maintenance Cartridge.2. Close all doors (error cleared).100-11672 - Rev D Page 211
Appendix B: Frequently Asked QuestionsCode Detail Code Item Description30: Update Error30 01 Condition Firmware update error.DetectedAction 1. Retry the firmware update.2. Replace Printer Controller PCB.30 02 Condition Firmware update error.DetectedAction Send proper update file.30 03 ConditionDetectedUpdater started upon detecting the firmwareerror.Action Retry the firmware update.30 04 ConditionDetectedMedia parameter version not updated to thelatest.Action Update to the latest version of mediaparameter information.31: Data Error31 01 Condition Length of the data received by the host PC isDetectedAction31 02 ConditionDetectedAction35: Temperature Error35 01 ConditionDetectedAction37: Remaining Ink Detection Error37 01-FF(Additionalvalueof K:01,C:02,M:04,Y:08)(MODULE1),(Additionalvalueof K:10,C:20,M:40,Y:80)(MODULE2)ConditionDetectedActionincorrect.Cancel the job.Service Utility > Printer Status > Cancel MyPrinting JobReceived the improper command from the hostPC.Cancel the job.Service Utility > Printer Status > Cancel MyPrinting JobTemperature out of operation warranty isobserved.1. Warm the room to warranty temperature.2. Restart Printer.Ink Tank empty cannot be detected.1. Set proper Ink Tank.2. Close all doors (error cleared).Page 212100-11672 - Rev D
Appendix A: Ordering Genuine Ithaca SuppliesWarning"Warning" refers to indication of occurrence of a condition that does not affectprinting directly but requires some action to be taken. An error message anddetails on the warning are displayed on the "Printer Status" screen on the PC'smonitor. Printing can be performed normally. However, an operator call canresult if the printer is used continuously without correcting the error.The following table summarizes the error messages and corrective actions.Code Detail Code Item Description01: Remaining Ink Warning01 01 Condition Ink running out soon.DetectedAction04: Maintenance Cartridge Warning04 01 ConditionDetectedAction06: Purge Unit Replacement (*Remarks)06 01 ConditionDetectedActionRemarks07: Blade Cleaner Replacement (*Remarks)07 01 ConditionDetectedRemarks08: Paper Near End08 01 ConditionDetected1. Replace with a new Ink Tank.2. Close all doors (warning cleared)Maintenance Cartridge soon full.1. Replace with a new MaintenanceCartridge.2. Close all doors (warning cleared).The time has come to replace the PurgeUnit.1. Replace Purge Unit.2. Restart Printer after replacing PurgeUnit (warningcleared)."Purge Unit Replacement" is issued in advance, if "PurgeUnit Replacement" is expected within 1 month when"Blade Cleaner Replacement" is issued.The time has come to replace the BladeCleaner.Action 1. Replace Blade Cleaner.2. Restart Printer after replacing BladeCleaner (warningcleared)."Blade Cleaner Replacement" is issued in advance, if"Blade Cleaner Replacement" is expected within 1 monthwhen "Purge Unit Replacement" is issued.ActionPaper running out soon.Load new paper.100-11672 - Rev D Page 213
Appendix B: Frequently Asked QuestionsCode Detail Code Item Description09: Remaining Ink Detection Disabled09 01-0F(Additional value ofConditionDetectedRemaining ink detection functiondisabled.K:01,C:02,M:04,Y:08) Action 1. Replace with a new Ink Tank.2. Close all doors (warning cleared).0B: Transport Belt Cleaning0B 01 ConditionDetectedSpecified number of prints since previouscleaning has been reached.Action Clean Transport Belt.0D: RTC Battery Error0D 01 Condition RTC Battery has run out.DetectedAction Replace Printer Controller PCB.Page 214100-11672 - Rev D
Appendix A: Ordering Genuine Ithaca SuppliesInstalling the Maintenance Tool (Service Utility)1) Run the executable program, P<strong>980</strong>DriverInstall.exe2) Click “Install Maintenance Services”.3) If prompted and asked to run the file, click “Run”, then click “Yes” to installthe maintenance tool (Service Utility).4) Click “Yes” to create a shortcut on the desktop.If the shortcut is not required, click “No”100-11672 - Rev D Page 215
Appendix B: Frequently Asked Questions5) Click “OK” to complete installation.Page 216100-11672 - Rev D
Appendix A: Ordering Genuine Ithaca SuppliesOperation ProceduresStart Procedure1) Connect PC and Printer using USB Cable.2) Turn on Printer.3) After starting up PC, start Service Utility by either of the followingprocedure:• Double-click Service Utility icon.• Click [Start] > click [Devices and Printers] > right click [<strong>980</strong>] > click [Printerproperties]> click [Utility] > click [Service].4) Select connecting port and then click "OK".100-11672 - Rev D Page 217
Appendix B: Frequently Asked QuestionsPrinter InformationNo. Item Description[1] Model Model name of connected Printer[2] Serial Number Displays or allows the user to set the serial numberassigned to Printer.[3] ROM Version Displays the version of the firmware incorporated inPrinter.[4] Temperature,Humidity DeviceTemperatureDevice HumidityReads the temperatureinformation inside Printer, anddisplays it.Reads the humidity informationinside Printer, and displays it.[5] Clock Time Standard Time Displays the time (GreenwichMean Time ) indicated by theclock incorporated in Printer.[6] Parts,Total Print PaperCounter (Blade Cleaner,Purge Unit, Total PrintCount)Local TimeDisplays the time (local time)indicated by the clockincorporated in Printer.• The extent of the parts deterioration is displayed.• When Blade Cleaner and/or Purge Unit are replacedusing [Consumable Parts Replacement] menu on the[Parts Replacement] tab, parts counters areautomatically cleared .[7] Read from the printer *1 An operation button for reading information displayedon Service Utility screen from Printer.Page 218100-11672 - Rev D
Appendix A: Ordering Genuine Ithaca Supplies[8] Utility Version*1 Displays the version of running Service Utility.[9] Printer Status*1 A button for displaying Printer status.*1:Items common to all tabs.Head InformationNo. Item Description[1] Head Serial Number Serial number of Printhead for each color.[2] Head Temperature Displays the current temperature of Printhead for eachcolor.100-11672 - Rev D Page 219
Appendix B: Frequently Asked QuestionsCleaning, User SettingNo. Item Description[1] Cleaning Light cleaning Cleaning performed after first occurrence ofnon-discharge.MediumcleaningStrong cleaningCleaning slightly stronger than "Light" cleaning,which is performed when non-discharge stilloccurs after completion of "Light" cleaning.Cleaning stronger than "Medium" cleaning,which is performed when non-discharge stilloccurs after completion of "Medium" cleaning.[2] PreparationbeforeShipping theprinterInk drainage from Printer before shipping it tothe outside of the office.transporting Moving theprinterInk drainage from Printer before moving it withinthe office.[3] User setting Buzzer MuteModeWhen the buzzer mute mode is "ON" (selected),disables Buzzer except when an error occurs.Sleep Timer Sets the time (in minutes) until Printerautomatically enters the sleep mode.Read from theprinterReads the information displayed on ServiceUtility screen from Printer.Load and savethe printerWrites the information displayed on ServiceUtility screen to Printer.Go to sleep Goes to the sleep mode.[4] Transport Belt Cleaning Performs cleaning to clean Transport BeltPage 220100-11672 - Rev D
Appendix A: Ordering Genuine Ithaca SuppliesCleaning Procedure1) Select Print Module requiring cleaning.2) Click [Light Cleaning], [Medium Cleaning], or [Strong Cleaning] to performLight Cleaning, Medium Cleaning, or Strong Cleaning according to the resultof printing.Mode Time DescriptionLight Cleaning 0.5 min. When non-discharge of ink occurs, cleaning startsMedium Cleaning 3 min. with "Light Cleaning". If non-discharge still occursStrong Cleaning 7 min when "Light Cleaning" has been performed 2 or 3times, perform "Medium Cleaning". If non-dischargestill occurs when "Medium Cleaning" has beenperformed 2 or 3 times, perform "Strong Cleaning".Note: Cleaning time may vary due to specification changes.100-11672 - Rev D Page 221
Appendix B: Frequently Asked Questions3) Click [Yes] to start cleaning.This caution is only for Strong Cleaning.4) After completion of cleaning, print a nozzle check pattern again to checkwhether non-discharge of ink still occurs.Page 222100-11672 - Rev D
Appendix A: Ordering Genuine Ithaca SuppliesShipping Printer Procedure1) Click [Shipping the printer].2) When the following message is displayed, click [Yes] to start return ink fromPrint Module to Ink Tank, and wait for a while.NOTE:• Ink returning and drainage takes approx. 20 minutes.• The time may vary due to specification changes.100-11672 - Rev D Page 223
Appendix B: Frequently Asked Questions3) When the following message is displayed, remove Ink Tanks , and thenclose Ink Tank Door.4) When the following message is displayed, turn off Main Power Switch.Page 224100-11672 - Rev D
Appendix A: Ordering Genuine Ithaca SuppliesMoving the Printer Procedure1) Click [Moving the printer ]2) When the following message is displayed, click [Yes] to drain remaining inkin Purge Unit.NOTE:• Ink drainage takes approx. 2 minutes.• The time might be changed due to the specification change.100-11672 - Rev D Page 225
Appendix B: Frequently Asked QuestionsTransport Belt Cleaning1) Click [Transport Belt Cleaning].2) Click [Yes] to start Transport Belt cleaning2) Open Upper Unit.3) Wipe Transport Belt.4) Close Upper Unit.Transport Belt rotates one third when Upper Unit is closed.5) Repeat the procedure from step 2) to step 4) 3 times.Page 226100-11672 - Rev D
Appendix A: Ordering Genuine Ithaca SuppliesTest Print, AdjustmentNo. Item[1] Test Printing SettingParameterNozzle CheckpatternPaperTransportpattern100% Blockpattern[2] Head Position Printing CyanAdjustment Behind YellowWizardAdjust TK-GAPAdjust Slant[3] Backfeed GapAdjustmentAdjust PositionPrintSendDescriptionPrints self-diagnosis/setting valuesPrints a nozzle check patternPrints a paper transport patternPrints a 100% block patternPrints a Cyan background under the Yellowpattern during printing of a Printheadposition adjustment pattern.Performs TK-GAP adjustment.Performs slant adjustment.Performs registration adjustment.Prints a backfeed gap adjustment pattern.Sets setting values for Printer100-11672 - Rev D Page 227
Appendix B: Frequently Asked QuestionsHead Position AdjustmentPrinting TK-GAP Adjustment Pattern:1) Open the [Test Print, Adjustment] tab and click [Adjust TK-GAP] to displaythe [Print TK-GAP] dialog box.2) Click [Print] to print the TK-GAP adjustment pattern.Page 228100-11672 - Rev D
Appendix A: Ordering Genuine Ithaca SuppliesExamining and Adjusting TK-GAP:1) Observe the TK-GAP Adjustment Pattern and examine if the TK-GAPadjustment is necessary for Print Modules according to the following. Performthe adjustment, if necessary.• Find where the paper perforation is located on the TK-GAPadjustment pattern scale. If the paper perforation is at the“+2” position on the TK-GAP adjustment pattern scale, theadjustment value is “+2”.100-11672 - Rev D Page 229
Appendix B: Frequently Asked Questions2) Enter the adjustment values in the TK-GAP adjustment value entry boxes inthe [Print TK-GAP] dialog box.3) After entering the TK-GAP adjustment values, click [Send] to send theadjustment values to Printer.Page 230100-11672 - Rev D
Appendix A: Ordering Genuine Ithaca Supplies4) If the TK-GAP adjustment pattern is not required to print again for a review,click [No] and proceed to the step 6).5) If you wish to review the TK-GAP adjustment pattern, click [Yes].6) Click [Next] to proceed to the slant adjustment.100-11672 - Rev D Page 231
Appendix B: Frequently Asked QuestionsPrinting Slant Adjustment Pattern:1) Click [Adjust Slant] to display the [Print Head Slant] dialog box.2) Click [Print] to print the slant adjustment pattern.Page 232100-11672 - Rev D
Appendix A: Ordering Genuine Ithaca SuppliesExamining and Adjusting Slant:1) Read values at which Black lines are in line with line of each color (Cyan,Magenta, or Yellow).When a value of A is the same as a value of B:Example 1: When the value of C1A (+2) is the same as the value of C1B (+2),no adjustment is required for C1 (Cyan Printhead 1).When a value of A is different from a value of B:Example 2: When the value of Y1A (+2) is different from the value of Y1B (+3),the adjustment has to be made for Y1.100-11672 - Rev D Page 233
Appendix B: Frequently Asked Questions2) Enter necessary adjustment values in the slant adjustment value entryboxes in the [Print Head Slant] dialog box.3) After entering the slant adjustment values, click [Send] to send theadjustment values to Printer.Page 234100-11672 - Rev D
Appendix A: Ordering Genuine Ithaca Supplies4)If the slant adjustment pattern is not required to print again for a review, click[No] and proceed to the step 6).5) If you wish to review the slant adjustment pattern, click [Yes].6) Click [Next] to proceed to the head position adjustment.100-11672 - Rev D Page 235
Appendix B: Frequently Asked QuestionsPrinting Head Position Adjustment Pattern:1) Click [Adjust Position] to display the [Print Head Position Adjustment] dialogbox.Page 236100-11672 - Rev D
Appendix A: Ordering Genuine Ithaca Supplies2) Click [Print] to print the head position adjustment pattern.100-11672 - Rev D Page 237
Appendix B: Frequently Asked QuestionsExamining and Adjusting Printhead Position:1) Module-to-Module AdjustmentThis adjustment is to align the relative print positions of 2 Print Modules toeach other. The relative print positions in the feeding direction can beexamined in the "KV" scale. For example shown in the figure, the 2 elementsare in line at "+2". Thus, the adjustment value is "+2".The relative print positions in the cross-feeding direction can be examined inthe "KH" scale. For the example shown in the figure, the 2 elements are in lineat "+2". The adjustment value is therefore "+2".2) Head Position AdjustmentThis adjustment is to align the relative color registrations in all the printheads.The relative color registrations in the feeding direction can be examined in the"xxV" scale and the ones in the cross-feeding direction can be examined in the"xxH" scale.Page 238100-11672 - Rev D
Appendix A: Ordering Genuine Ithaca SuppliesDetermine at which division of a scale, two color elements are in line for all the12 blocks. For the example in the "M1V" block, the Magenta and Blackelements meet at "+4".100-11672 - Rev D Page 239
Appendix B: Frequently Asked Questions3) Enter adjustment values in the Module-to-Module adjustment value entryboxes in the [Print Head Position Adjustment] dialog box.Page 240100-11672 - Rev D
Appendix A: Ordering Genuine Ithaca Supplies4) Click [Go to Step 3].100-11672 - Rev D Page 241
Appendix B: Frequently Asked Questions5) Enter the adjustment values in the Head Position Adjustment value entryboxes.Page 242100-11672 - Rev D
Appendix A: Ordering Genuine Ithaca Supplies6) Click [Go to Step 4].100-11672 - Rev D Page 243
Appendix B: Frequently Asked Questions7) Enter the adjustment values in the Head Position Adjustment value entryboxes.Page 244100-11672 - Rev D
Appendix A: Ordering Genuine Ithaca Supplies8) Click [Send] to send all the adjustment values to Printer.9) If the head position adjustment pattern is not required to print again for areview, click [No] and proceed to step 10.10) If you wish to review the head position, click [Yes].100-11672 - Rev D Page 245
Appendix B: Frequently Asked QuestionsBackfeed Gap AdjustmentPrinting Backfeed Pattern:1) Open the [Test Print, Adjustment] tab and click [Print] to print the backfeedpattern.Examining and Adjusting Backfeed Gap:1) Observe the backfeed pattern and examine if the backfeed gap adjustmentis necessary . Perform the adjustment, if necessary.If the gray areas of the left and the right end have backfeed gaps, adjust in the[fill gap] direction from the current position.Page 246100-11672 - Rev D
Appendix A: Ordering Genuine Ithaca Supplies• If the gray areas of the left and the right end have overlapsand darken, adjust in the [reduce overlap] direction from thecurrent position.• If the gray area of the left and the right end do not have backfeed gaps andoverlaps, adjustment is not required.100-11672 - Rev D Page 247
Appendix B: Frequently Asked Questions2) Click [Send] to send the adjustment values to the Printer.3) If the backfeed pattern is not required to print again for a review, click [No]4) If you wish to review the backfeed pattern, click [Yes] and go to step 1).Page 248100-11672 - Rev D
Appendix A: Ordering Genuine Ithaca SuppliesHead Position Fine AdjustmentPrinting Head Position Fine Adjustment Pattern:1) Open the [Head Position Fine Adjustment] tab and click [Print] to print HeadPosition Fine Adjustment Pattern.Examining and Adjusting Printhead Position:1) Observe the TK-GAP Fine Adjustment Pattern and examine if the TK-GAPadjustment is necessary for Print Modules according to the following. Performthe adjustment, if necessary.• Find where the paper perforation is located on the TK-GAPFine Adjustment Pattern scale. If the paper perforation is atthe “+1” position on the TK-GAP Fine Adjustment patternscale, the adjustment value is “+1”.100-11672 - Rev D Page 249
Appendix B: Frequently Asked Questions2) Enter the adjustment values in the TK-GAP adjustment value entry boxes.Page 250100-11672 - Rev D
Appendix A: Ordering Genuine Ithaca Supplies3) Read numerical values of the lines which connected smoothly to magentaline for all the 54 sections (from 1M1 to 2Y9). For example, in the "1M1"section, the Magenta and Black elements meet at "-8".4) Find the minimum and maximum numerical values of Black line for eachPrint Module 1 and Print Module 2. For example, minimum numerical value ofPrint Module 1 is "-8", maximum numerical value of Print Module is "+4"100-11672 - Rev D Page 251
Appendix B: Frequently Asked Questions5) Enter the minimum and maximum numerical values in the entry boxes.6) Click [Go to Step 4]Page 252100-11672 - Rev D
Appendix A: Ordering Genuine Ithaca Supplies7) Find minimum and maximum numerical values of Cyan and Yellow lines foreach Print Module 1 and Print Module 2, and then enter the numerical valuesin the entry boxes.8) Click [Send] to send data to Printer.100-11672 - Rev D Page 253
Appendix B: Frequently Asked QuestionsUpdate, Time SettingNo. Item[1] FirmwareUpdateSelect fileSendDescriptionSelects the firmware to be written.Prints a nozzle check pattern[2] Time Setting Read from PC Read the current date and time from the clockincorporated in the PC.Load and Savethe PrinterSets the read date and time for theclockincorporated in a PC.Page 254100-11672 - Rev D
Appendix A: Ordering Genuine Ithaca SuppliesFirmware Update1) Click [Select a File] to select the file to update.2) Click [Send] to send file to Printer.Time Setting1) Click [Read from PC] to read the date and time from PC.100-11672 - Rev D Page 255
Appendix B: Frequently Asked Questions2) Click [Load and save to the printer].Page 256100-11672 - Rev D
Appendix A: Ordering Genuine Ithaca SuppliesHistoryNo. Description[1] Read from the printer Reads the error log stored in Printer, and displays it.Save the history in a fileSaves the contents of the error log in a csv file.100-11672 - Rev D Page 257
Appendix B: Frequently Asked QuestionsSelf DiagnosticsNo. Description[1] Execute diagnostics Executes self-diagnosis and obtains the result.[2] Save the result in a file Saves the result of self-diagnosis in a csv file.[3] Print the result Prints the result of self-diagnosis.Page 258100-11672 - Rev D
Appendix A: Ordering Genuine Ithaca SuppliesTroubleshootingNo. ItemDescription[1] Report toManufacturerCreate a File Displays a dialog for creating a data file to besaved.SaveWrites the data saved in Printer to theselected file.[2] Ink Loading Ink Loading Ink Loading Loads ink to the selectedPrinthead with ink.Position Head Cleaning Moves Printhead to the cleaning position.Change PositionHead Loading Moves Printhead to the install position.PositionPurge Unit Purge Unit Moves Purge Unit to the installposition.Note:• Ink loading takes approx. 25 minutes.• Ink loading time may vary due to specification changes.100-11672 - Rev D Page 259
Appendix B: Frequently Asked QuestionsParts ReplacementNo. Description[1] PCB Replacement Reads/writes data before/after replacement ofPrinter Controller PCB.[2] Print Module Head Control Inputs a Printhead position adjustment value.Replacement PositionAdjustment[3] PowerSupply UnitRelease theErrorClears errors related to DC Power Supply PCBUnit.Replacement Ink Eject Power Adjusts ink ejection power.Adjustment[4] Consumable PartsReplaces consumables.Replacement[5] Rear Feeder SensorReplacementReplace Rear Feeder Sensor.Page 260100-11672 - Rev D
Appendix A: Ordering Genuine Ithaca SuppliesPrinter Controller PCB Replacement ProcedureNo. Description[1] PCBReplacement[2] Printer SerialNumberSettingCreate a FileSaveSelect a FileSendSendCreates a file to which data is written beforereplacement of Printer Controller PCB.Writes data to the selected file.Selects the data to be written after replacementof Printer Controller PCB.Sends data to Printer.Sends the printer serial number to Printer.Before Printer Controller PCB Replacement:1) Open the [Parts Replacement] tab and click [PCB Replacement] to displaythe [PCB Replacement, Serial Setting] tab.2) Click [Create a File] To Create a file to save data from Printer to PC.3) Click [Save] to save the data to the file.After Printer Controller PCB Replacement:1) Click [Select a File] to select a file to send.2) Click [Send] to send the file to Printer. 5100-11672 - Rev D Page 261
Appendix B: Frequently Asked QuestionsPrint Module Replacement ProcedureNo. Description[1] HeadControlPositionAdjustmentHead WipePositionHead CapPositionHead PrintPositionPurge UnitWipe PositionAdjusts the Printhead height before wiping.Adjusts the Printhead height before capping.Adjusts the Printhead height before printing.Adjusts Purge Unit position before capping.Page 262100-11672 - Rev D
Appendix A: Ordering Genuine Ithaca SuppliesAfter Print Module and/or Purge Unit Replacement:1) Open the [Parts Replacement] tab and click [Head Control PositionAdjustment] to display the [Head Control Position Adjustment] tab.2) Enter the adjustment values in the entry boxes in the [Head ControlPosition Adjustment] tab. Adjustment values were recorded before install PrintModule and/or Purge Unit.Note:• Enter value of "wipe_P " to "Head Wipe Position"• Enter value of "Print_P " to "Head Print Position"• Enter value of "Cap_P " to "Head Cap Position"• Enter value of "Rec wipe P " to "Purge Unit Wipe Position"100-11672 - Rev D Page 263
Appendix B: Frequently Asked QuestionsDC Power Supply Unit Replacement Procedure1) Open the [Parts Replacement] tab2) Click [Release the Error] to release the error.3) Click [Ink Eject Power Adjustment] to open the [Ink Ejection PowerAdjustment] tab.4) Click [Print adjustment pattern] to print the adjustment pattern.Page 264100-11672 - Rev D
Appendix A: Ordering Genuine Ithaca Supplies5) Find largest number of print result that printed clearly for each color.Example:When print result next to "12" printed clearly and print result next to "13" hasnon-discharge, largest number is "12".6) Enter the largest number in entry boxes in the [Ink Eject Power Adjustment]tab.7) Click [Send] to send the data to Printer8) Click [Print check pattern]100-11672 - Rev D Page 265
Appendix B: Frequently Asked Questions9) Observe the Print check pattern.• If the print result next to "OK" prints clearly and the printresult next to "NG" has non-discharge, adjustment iscompleted.• If the print result next to "OK" has non-discharge and/or theprint result next to "NG" prints clearly, go to step 4).Consumable Parts Replacement Procedure1) Open the [Parts Replacement] tab and click [Consumable PartsReplacement] to display the [Printer Restart] dialog box.2) Click [Next] to restart Printer in service mode.Page 266100-11672 - Rev D
Appendix A: Ordering Genuine Ithaca Supplies3) Select parts to be replaced and click [Next].4) Click [Next] to start ink draining.(This step is only for Printhead replacement )100-11672 - Rev D Page 267
Appendix B: Frequently Asked Questions5) When the following message is displayed, remove Ink Tanks, and thenclose Ink Tank Door.6) When the following message is displayed, turn off Main Power Switch, andthen click [Next].7) Replace the parts.Follow the displayed instruction to replace the parts.Page 268100-11672 - Rev D
Appendix A: Ordering Genuine Ithaca Supplies8) When the following message is displayed, turn on Main Power Switch, andthen click [next].9) When the following message is displayed, enter the adjustment value in theentry boxes, and then click [Next](This step is only for Purge Unit replacement)100-11672 - Rev D Page 269
Appendix B: Frequently Asked Questions10) Click [Next] to restart Printer in normal mode, and then ink loading startsautomatically.Note: Ink loading is only for Printhead replacement.Page 270100-11672 - Rev D
Appendix A: Ordering Genuine Ithaca Supplies11) When the following message is displayed, click [Complete] to completeparts replacement.100-11672 - Rev D Page 271
Appendix B: Frequently Asked QuestionsRear Feeder Sensor Replacement Procedure1) Insert paper in the feeder slot provided on the back of Printer more than 1sheet to cover Rear Feeder Sensor.2) Click [Adjust] to adjust Rear Feeder Sensor.Page 272100-11672 - Rev D
Appendix A: Ordering Genuine Ithaca Supplies3) Confirm that Rear Feeder Sensor is "ON".4) Remove the paper from feeder slot provided on the back of Printer, andthen confirm that Rear Feeder Sensor is "OFF".100-11672 - Rev D Page 273
Appendix B: Frequently Asked QuestionsTest PrintThis printer has 7 different test patterns to check the head installation position,nozzle status, and internal settings. Using a PC, test patterns can be printedvia the service utility.Setting ParametersThe "setting parameters" result lists the currently set values.Page 274100-11672 - Rev D
Appendix A: Ordering Genuine Ithaca SuppliesNozzle Check PatternThe "nozzle check pattern" is printed to check non-discharged nozzle andlargely displaced dots. Carry out Printhead cleaning as required.100-11672 - Rev D Page 275
Appendix B: Frequently Asked QuestionsPaper Transport PatternThe "paper transport pattern" is printed to check transport accuracy.100% Block PatternThe "100% block pattern is printed to check deference of color density in apage.Page 276100-11672 - Rev D
Appendix A: Ordering Genuine Ithaca SuppliesImage Position PatternThe "image position pattern" is printed to check leading edge position of print,slant of print result, print position relationship between Print Module 1 and 2,and position of dots.Leading Edge Position of Print100-11672 - Rev D Page 277
Appendix B: Frequently Asked QuestionsSlant of Print ResultPage 278100-11672 - Rev D
Appendix A: Ordering Genuine Ithaca SuppliesPrint position relationship between Print Module 1 and 2100-11672 - Rev D Page 279
Appendix B: Frequently Asked QuestionsPosition of DotsPage 280100-11672 - Rev D
Appendix A: Ordering Genuine Ithaca SuppliesBackfeed PatternThe "backfeed pattern" is printed to check accuracy of connection whenpausing print or restarting print.Version Upgrade Procedure1) Select the firmware to update. ("Update, Time Setting" section)2) Send the firmware to Printer. ("Update, Time Setting" section)100-11672 - Rev D Page 281
Appendix B: Frequently Asked QuestionsOther Troubleshooting IssuesPower is OffCheck PointMain power switch is at the off (O)position.Printer power cord unplugged.Power supply not providing power.SolutionPress main power switch to the onposition (|).Make sure that the power cord isplugged in completely.Connect another device to the powersupply to confirm that the outlet isproviding power. If you cannot restorethe printer to normal operation,contact your <strong>Printrex</strong> dealer.Printer Does Not Start or Stops During Print JobsCheck PointUpper unit or ink tank door ormaintenance cartridge door is open.Printer is not connected to thecomputer.An online lamp turns off.Paper is not loaded correctly.The ink tanks are not installedcorrectly.The <strong>980</strong> printer driver is not selectedon the computer.Print data contains an image with alarge capacity.The printer has been printing for along period.The print destination port setting iswrong.SolutionClose the Upper unit or ink tank dooror maintenance cartridge door andmake sure that it is closed tightly.Check cable and make sure that it isconnected to the printer and thecomputer.Push the online key to bring printeronline.Check and load paper.Check the ink tanks and make surethat the are installed correctly.Make sure that the <strong>980</strong> Printer isselected when you start the print job.If you see the STATUS lamp flashing,this means that data is processing.Wait for the processing to finish.If printing continues for a longduration, it will pause to protect thePrinthead from damages, and willstart again after a while.Open the printer driver Properties andmake sure that the port setting iscorrect. If the port setting is notcorrect, shut down Windows, switchoff the computer, then reconnect tothe selected port. To check the portsetting, open the printer driverProperties window and then click thePorts tab. If you are using a USBPage 282100-11672 - Rev D
Appendix A: Ordering Genuine Ithaca SuppliesThe problem is occurring on thecomputer.Lift button does not respond whenswitching paper feeding from the RearFeeder Slot to the Paper Feed Unit.connection, make sure that USBnnn(nnn represents the USB portnumber) is selected for the portsetting.Shut down the computer and switch iton again, then try to print. Be sure tocancel the print job if it remains afterthe computer is restarted.If the Feeder Lift Button Lamp is alsooff, clean the Paper Detection Unitlocated on the Rear Feeder Slot.Paper is Not Feeding CorrectlyCheck PointPaper is not loaded with the correctside up.The edge of the paper is folded orcurled.Paper is not loaded properly in thefeeder lift tray.The transport unit is dirty.SolutionLoad paper so that the black mark islocated at the right leading edge onthe back side of the printing paper.If the leading edge of the paper isfolded or curled it will not feedcorrectly. This could also cause apaper jam.Load paper correctly.If the unit is covered with paper dustor ink splatter, this could cause paperjams and other problems. Clean theprinter periodically.Status Monitor Does Not StartCheck PointThe Status Monitor setting isincorrect.SolutionWith some Status Monitor settings,printer errors will not be displayed andthe Status Monitor will not start. Openthe printer driver Utility tab then clickStart Status Monitor. Set the detailsafter the Status Monitor starts.100-11672 - Rev D Page 283
Appendix B: Frequently Asked QuestionsRandom, Bizarre Characters Are PrintedCheck PointAn Interface cable is disconnected.The <strong>980</strong> printer driver is not selectedon the computer.SolutionCheck a Interface cable and makesure that it is connected to the printerand the computer.Make sure that the <strong>980</strong> printer isselected when you start the print job.Slow To PrintCheck PointPrint speed is set to low speed.SolutionOpen the Printing Preferences tab ofthe Options and set Print Speed.Print Quality Is PoorCheck PointStreaks appear on the printout.White spots due to missing colors.Printout is faint.Misalignment of colors appears.SolutionOpen the Utility tab of the printerdriver and perform Cleaningoperation.Open the Utility tab of the printerdriver and perform Cleaningoperation.Open the Utility tab of the printerdriver and perform Cleaningoperation.Open the Utility tab of the printerdriver and perform Printhead PositionAdjustment operation.Page 284100-11672 - Rev D
Appendix B: Frequently Asked QuestionsAppendix A: Ordering Supplies<strong>Printrex</strong> ® <strong>980</strong> supplies can be ordered easily direct from the Transact website(www.Transact-tech.com) or our telephone number within the US:408.573.1200. When calling by phone, please ask for the Sales Department.See “Contact Information” in the first section of this document for more details.Drivers AvailableDownloads available from www.Transact-tech.com website.100-11672 - Rev D Page 285
IndexIndexCleaning the printer, 99Clearing paper jams, 104Communication cable, 36Connecting communiation cables, 36Contact information, 7Ink Tanks, loading, 28InstallationPrecautions, 20Site, 18Space, 19Maintenance cartridge, replacing, 59Overview, 3Paper loading, 40Part names and function, 31Printer maintenance, 97Product informationShipping printers, 6Warranty information, 5Rear Feeder <strong>Guide</strong>, mounting, 27Relocating printer, 86Replacing ink tanks, 54Return Materials Authorization, 6Safety precautions, 11Shipping the printer, 109SpecificationsElectrical, 95Environmental conditions, 94Interface, 94Media, 95Printer dimensions, 94Specifications and Requirements, 93Supplies, ordering, 285Switching the printer on, 37Technical support, 5Test prints, checking, 62Troubleshooting, 111Unpacking printer, 21100-11672 - Rev D Page 287