Food Safety Terminal Operators Guide - TransAct
Food Safety Terminal Operators Guide - TransAct
Food Safety Terminal Operators Guide - TransAct

Create successful ePaper yourself
Turn your PDF publications into a flip-book with our unique Google optimized e-Paper software.
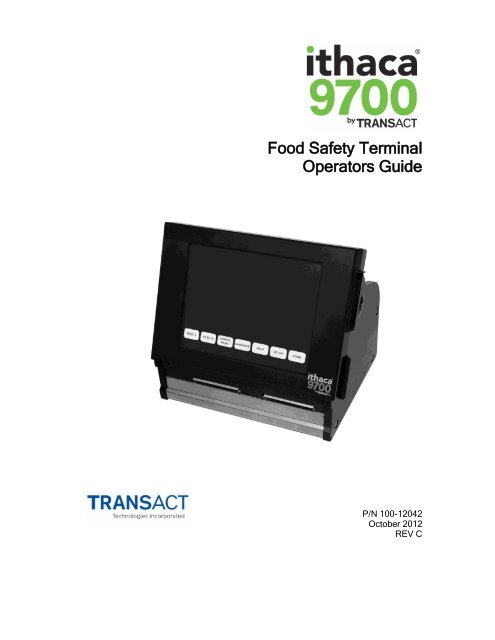
<strong>Food</strong> <strong>Safety</strong> <strong>Terminal</strong><strong>Operators</strong> <strong>Guide</strong>P/N 100-12042October 2012REV C
Change HistoryRev A Initial version August 2012Rev B Edits and revised paper load photos September 5, 2012Rev CAdded generic photographs and revisedformatting for releaseOctober 8, 2012100-12042 - Rev C Page i
This page intentionally left blankPage ii100-12042 - Rev C
Federal Communications Commission RadioFrequency Interference StatementThe Ithaca ® 9700 <strong>Food</strong> <strong>Safety</strong> <strong>Terminal</strong> complies with the limits for a Class Acomputing device in accordance with the specifications in Part 15 of FCCrules. These regulations are designed to minimize radio frequencyinterference during installation; however, there is no guarantee that radio ortelevision interference will not occur during any particular installation.Interference can be determined by turning the equipment off and on while theradio or television is on. If the terminal causes interference to radio ortelevision reception, try to correct the interference by one or more of thefollowing measures:Reorient the radio or television receiving antennaRelocate the terminal with respect to the receiverPlug the terminal and receiver into different circuitsIf necessary, the user should consult their dealer or an experiencedradio/television technician for additional suggestions. The user may find thefollowing booklet prepared by the Federal Communications Commissionhelpful: How to Identify and Resolve Radio/TV Interference Problems. Thisbooklet is available from the US Government Printing Office, Washington, DC20402. Ask for stock number 004-000-00345-4.Canadian Department of Communications RadioInterference StatementThe Ithaca ® 9700 <strong>Food</strong> <strong>Safety</strong> <strong>Terminal</strong> does not exceed Class A limits forradio noise emissions from digital apparatus set out in the Radio InterferenceRegulations of the Canadian Department of Communications.Regulatory ComplianceFCC Class ACE MarkTUVc / TUVus100-12042 - Rev C Page iii
DisclaimerNOTICE TO ALL PERSONS RECEIVING THIS DOCUMENT:The information in this document is subject to change without notice. No partof this document may be reproduced, stored or transmitted in any form or byany means, electronic or mechanical, for any purpose, without the expresswritten permission of <strong>TransAct</strong> Technologies, Inc. ("<strong>TransAct</strong>"). Thisdocument is the property of and contains information that is both confidentialand proprietary to <strong>TransAct</strong>. Recipient shall not disclose any portion of thisdocument to any third party.TRANSACT DOES NOT ASSUME ANY LIABILITY FOR DAMAGESINCURRED, DIRECTLY OR INDIRECTLY, FROM ANY ERRORS,OMISSIONS OR DISCREPANCIES IN THE INFORMATION CONTAINED INTHIS DOCUMENT.<strong>TransAct</strong> cannot guarantee that changes in software and equipment made byother manufacturers, and referred to in this publication, do not affect theapplicability of information in this publication.Copyright© 2012 <strong>TransAct</strong> Technologies, Inc. All rights reserved. Printed in USARevision Level A, August 2012TrademarksSome of the product names mentioned herein are used for identificationpurposes only and may be trademarks and/or registered trademarks of theirrespective companies.<strong>TransAct</strong>, Ithaca, and Printrex are registered trademarks of <strong>TransAct</strong>Technologies, Inc.Microsoft and Windows are registered trademarks of Microsoft Corporation inthe United States and/or other countries.Adobe and the Adobe logo are trademarks of Adobe Systems, Inc.Page iv100-12042 - Rev C
HELP Button ......................................................................................................... 43SETUP Button ...................................................................................................... 45Adjust Date and Time ...................................................................................... 46Set Display Preferences .................................................................................. 47Save/Load Update/Backup ............................................................................. 48System Preferences ........................................................................................ 54Print Settings .................................................................................................. 56Printing Labels ...................................................................................................... 58Troubleshooting ................................................. 63Power is Off .......................................................................................................... 65<strong>Terminal</strong> Does Not Start or Stops during Print Jobs .............................................. 65Paper is Not Feeding Correctly ............................................................................. 65Screen Image is Blank or Touch Screen is Misaligned .......................................... 65Printing is Misaligned on Label ............................................................................. 66Dates are Incorrect ............................................................................................... 66Appendix A: Ordering Supplies ............................. 67Index ................................................................. 69Page vi100-12042 - Rev C
This page intentionally left blankPage 2100-12042 - Rev C
About Your Ithaca ® 9700 PrinterAbout your Ithaca ® 9700The Ithaca ® 9700 <strong>Food</strong> <strong>Safety</strong> <strong>Terminal</strong> by <strong>TransAct</strong> ® represents the verylatest technology in on-demand thermal label printing for food safety andnutrition labeling, specifically designed for the needs of the food serviceindustry. It builds upon the experience of the Ithaca ® line of printers with a hostof features specifically designed to improve the performance of food servicelabeling, including:Large, easy to read 8.4-inch touch screenAvailable in a 1 or 2-printer configurationEasy snap-in/snap-out printer mechanisms for flexibility and serviceabilityAbility to handle a variety of label widths and lengthsSimple PC-based companion utility for quick menu changesEasy drop-in label loadingReal-time clock to generate accurate “prep” and “grab-and-go” labelsThese features and more let you quickly and easily integrate the Ithaca ® 9700with your food service applications, while giving you the quality, durability anduptime you have come to expect from Ithaca ® by <strong>TransAct</strong> ® printers.100-12042 - Rev C Page 3
About Your Ithaca ® 9700 PrinterWho Should Read This <strong>Guide</strong>?This document provides information useful for end users who will install,configure, and operate the Ithaca ® 9700 <strong>Food</strong> <strong>Safety</strong> <strong>Terminal</strong> in theiroperations.What Is Included in This <strong>Guide</strong>?This <strong>Operators</strong> <strong>Guide</strong> includes information on the installation, specifications,and operation of the Ithaca ® 9700 <strong>Food</strong> <strong>Safety</strong> <strong>Terminal</strong>. It provides thefollowing information to support your installation and operational efforts:Warranty and technical support informationSpecifications and functionality descriptionInstallation and operational proceduresWe want you to have a trouble-free implementation with your <strong>TransAct</strong> ®terminal. For any issues not covered in this guide, quality technical support isavailable on-line at www.transact-tech.com, or by telephone or fax – consultthe following pages for more details about our support services.Page 4100-12042 - Rev C
About Your Ithaca ® 9700 PrinterTechnical and Sales SupportYour terminal is backed by the resources of <strong>TransAct</strong> Technologies, a globaltechnology firm with dedicated technical support and sales assistance. Here ishow we can help you:On-line Technical SupportOur web site at www.transact-tech.com is your on-line portal to obtainingtechnical assistance with your Ithaca ® terminal. Click on the Support link tofind support information for your Ithaca ® 9700 <strong>Food</strong> <strong>Safety</strong> <strong>Terminal</strong>, includingonline access to drivers and documentation, or contact us via e-mail atsupport@transact-tech.com.Telephone Technical SupportLive telephone support is available by contacting <strong>TransAct</strong> or one of itsregional affiliates via the contact information listed in this section. To help usserve you faster, please have the following information ready when you call:The Model Number and Serial Number of the terminal.A list of any other peripheral devices attached to the same port as theterminal.What application software, operating system, and network (if any) you areusing.What happened and what you were doing when the problem occurred.How you tried to solve the problem.Warranty InformationIthaca ® 9700 <strong>Food</strong> <strong>Safety</strong> <strong>Terminal</strong>s come with a standard warranty thatcommences upon shipment from factory, and covers parts and labor. Anoptional warranty, covering both parts and labor, may be purchasedseparately.100-12042 - Rev C Page 5
About Your Ithaca ® 9700 PrinterReturn Materials Authorization and Return PoliciesIf a support technician determines that the terminal should be serviced at a<strong>TransAct</strong> facility, and you want to return the terminal for repair, we will issueyou the Returned Materials Authorization (RMA) number that is requiredbefore returning the terminal. Please prepare the terminal being returned forrepair as follows:Pack the terminal to be returned in the original packing material.Do not return any accessories unless asked to do so by a supporttechnician.Write the RMA number clearly on the outside of the box.Shipping <strong>Terminal</strong>sBe sure to save the packing materials in the event that you need to send theterminal in for servicing. <strong>TransAct</strong> is not responsible for damaged return itemsthat are not packaged in original shipping material.Sales SupportTo order supplies, receive information about other Ithaca products, or obtaininformation about your warranty, contact our Sales Department at the contacttelephone or fax numbers listed below or visit our web site at www.transacttech.com.Page 6100-12042 - Rev C
About Your Ithaca ® 9700 PrinterContact InformationUSA<strong>TransAct</strong> Inc.20 Bomax RoadIthaca, NY 14850, USATelephone 607.257.8901Fax 607.257.8922Web Site: www.transact-tech.comEuropean Service Operations7 Wood ViewBroomhouse Lane Industrial EstateEdlington, Doncaster DN12 1EQ UKTelephone 011-44-1709772500Fax 011-44-1709772505Asia<strong>TransAct</strong> Macau OfficeLevel 20, AIA TowerNos 241A-301, Avenida Comercial de MacauMacauRash SulimanTelephone +(853) 6269 6966E-mailrsuliman@transact-tech.com100-12042 - Rev C Page 7
About Your Ithaca ® 9700 PrinterThis page intentionally left blankPage 8100-12042 - Rev C
Chapter 2<strong>Safety</strong> Precautions100-12042 - Rev C Page 9
This page intentionally left blankPage 10100-12042 - Rev C
<strong>Safety</strong> PrecautionsImportant <strong>Safety</strong> PrecautionsGeneral PrecautionsNever place the terminal on a slanted or unstable stand or table. If theterminal is dropped or slides off, this could cause personal injury.Never locate the terminal near a water faucet or in any other locationwhere it will be exposed to water. This could cause serious electricalshock.Place the terminal in a location that meets the specified ranges oftemperature and humidity. If the terminal is either too cold or too hot, itmay not operate normally. Operating environment: 5 - 50°C (41 - 122°F)RH 10 - 90% (with no condensation).Place the terminal in an area where you can disconnect the power cordimmediately; keep the area around the power cord connection free fromobstacles. This allows you to unplug the power cord quickly in anemergency.Power Supply and Power CordTo avoid the risk of fire, electrical shock, personal injury, or damage to theterminal:Always use the power cord provided with this terminal. To avoid a fire orelectrical shock, do not use an extension cord.Connect the terminal power cord to an independent power source that isnot shared by other equipment or appliances.Make sure that the power plug is securely and completely inserted into thepower source.Do not cut, damage, or otherwise alter the power cord. Never place aheavy object on the power cord, never expose it to heat, and never pull thecord to disconnect it. If the power cord is damaged in any way(condensation on exposed wires, broken wires, etc.) contact customerservice where you purchased the terminal.Never handle the power cord or plug when your hands are wet.Never knot the power cord or wrap it around itself.To avoid a fire hazard, occasionally disconnect the power cord from theterminal and the power supply, and use a soft dry cloth to clean the cordconnectors and the connection points. Leaving the cord plugged in and notcleaned for a long period, especially in an area subject to dust, oil, andhigh humidity, could cause the insulation material to deteriorate.Turn off the main power before removing the power plug from the outlet.Check the power plug and cord for any problem (abnormal heat, rust,bend, cracks, scratches, etc.) at least once a month.If any problem is found with the power plug or cord, contact customerservice regarding a replacement cord/100-12042 - Rev C Page 11
<strong>Safety</strong> PrecautionsNever pull on the power cord to unplug the cord from the power supply.Always grip the plug to remove it from the power supply.If the terminal will not be used for a long period, disconnect the power cordfrom the power source.Always keep the area around the power plug free of obstacles so that youcan unplug it easily. This allows you to unplug the power cord quickly in anemergency.Never use any power source other than the one rated for the terminal. Thisterminal is designed to be used in the region where you purchased. Also,make sure that the power source can supply sufficient power for theterminal.Supply Voltage:AC 100-240 V, 50/60 HzHandling the <strong>Terminal</strong> and AccessoriesTo avoid the risk of fire, electrical shock, personal injury, or damage to theterminal:Never clean the terminal with water or any flammable liquid (alcohol,benzene, thinner, etc.) either applied directly or with a cloth. If youaccidentally spill liquid on the terminal, switch the terminal off immediately,disconnect the power plug from the power source, and call for service.If the terminal emits smoke, unusual odors, or makes noises, leaving itcould cause a fire or serious electrical shock or damage to the terminal.Switch the terminal off immediately, disconnect the power plug from thepower source, make sure that the terminal has stopped smoking, and callfor service. Do not attempt to repair the terminal by yourself.Use only a slightly damp cloth, thoroughly wrung out, to clean the terminalsurfaces. Never use alcohol, thinner or any other flammable liquids, or riskhaving them come into contact with electrical components inside theterminal.There are high voltage points inside the terminal. Never attempt todisassemble or repair the terminal.Never insert or drop any metal objects into the terminal when it is open.This could cause a fire or serious electrical shock, or damage the terminal.If something falls into the terminal accidentally, switch the terminal offimmediately, disconnect the power plug from the power source and call forservice.If the terminal is dropped and damaged, switch the terminal offimmediately, disconnect the power plug from the power source, and callfor service.Never use flammable sprays around the terminal.Never remove the cover from the terminal.Before cleaning the terminal, switch it off and disconnect the power plugfrom the power source.Page 12100-12042 - Rev C
<strong>Safety</strong> PrecautionsNote: Do not rapidly switch the terminal off and on. This could damage theterminal. After switching the terminal off, wait at least 5 seconds beforeswitching it on again.100-12042 - Rev C Page 13
<strong>Safety</strong> PrecautionsThis page intentionally left blankPage 14100-12042 - Rev C
Chapter 3Installation and Setup100-12042 - Rev C Page 15
This page intentionally left blankPage 16100-12042 - Rev C
Installation and SetupUnpack the <strong>Terminal</strong>Be sure to save the box and packing materials in case you need to send theterminal in for service. <strong>TransAct</strong> Technologies is not responsible for damagedreturn items that are not packaged in original shipping material. Refer to“Return Materials Authorization and Return Policies”, on page 6 for informationon what to do if you have to return your terminal for repair.Set Up the <strong>Terminal</strong>Make sure that there is sufficient space around the terminal for access to thetouch screen menu, and to open the terminal to replace paper and access theprinter mechanism, the latter of which is described in the Printer Maintenancesection of this manual.Plug the power cord of the terminal into an appropriate electrical outlet. To turnthe terminal on, use the power switch located at the rear of the left side of theterminal, as shown in the figure.Power switch100-12042 - Rev C Page 17
Installation and SetupA startup screen is displayed while the unit is powering up. In the event that atleast one printer mechanism is not connected, an error message is generated.Page 18100-12042 - Rev C
Installation and Setup<strong>Terminal</strong> FeaturesThe diagram below shows the main external features of your Ithaca ® 9700<strong>Food</strong> <strong>Safety</strong> <strong>Terminal</strong>.[1][2][4][3][1] Front terminal door - swings upward to provide access to label rolls andprinter mechanisms.[2] Touch screen display - contains configured food items and categories, aswell as HELP system displays and menu options for SETUP functions.[3] Function buttons - permanent buttons containing main menu functions.Note: Touch screen display and function button functions are described in thesubsequent section Operating Your Ithaca ® 9700.[4] Access door for USB, Ethernet and SD Card ports.[5] Label printing slots: up to two printers supported, with varying media sizes.[5]100-12042 - Rev C Page 19
Installation and SetupLoading Label RollsThe Ithaca ® 9700 <strong>Food</strong> <strong>Safety</strong> <strong>Terminal</strong> features easy, drop-in loading ofthermal label roll media. This section discusses how to load label media.1. Grasp the sides of the display, and rotate it toward the rear of the terminal.2. Rotate the display until it in a horizontal orientation as shown in the figure.Page 20100-12042 - Rev C
Installation and Setup3. Grasp the plastic cover latch as shown and squeeze to release it.4. Rotate the printer mechanism cover to the open position as shown100-12042 - Rev C Page 21
Installation and Setup5. Drop the label roll into the label roll bucket. Note the proper orientation oflabel stock coming off top of roll.Thread label stock under label sensor in printer mechanism as shown. Leavethree or four labels in front of printer mechanism.Label sensorNote that following the insertion of the paper, the label sensor should bepositioned over a label, not the web between labels, as shown in the figure.Page 22100-12042 - Rev C
Installation and Setup6. Close printer mechanism cover as shown. Rotate cover until it latchessecurely. Printer automatically aligns to the next label.100-12042 - Rev C Page 23
Installation and Setup7. Grasp sides of display and rotate forward until it is in closed, latchedposition.8. Label stock may be torn off by either pulling upwards or pulling downwards.Page 24100-12042 - Rev C
Installation and Setup9. To make sure labels are loaded correctly, press the left or right feed buttonon front of the display several times (FEED L or FEED R).Note: The Ithaca ® 9700 supports different sizes of label media. See the nextsection, Changing the Printer Mechanism, for details on installing new printermechanisms to support different label types.100-12042 - Rev C Page 25
Installation and SetupChanging the Printer MechanismThe Ithaca ® 9700 has the capability to quickly and easily load different printermechanisms to support thermal printing of different sizes of labels. Thissection discusses how to change the printer mechanism.1. Turn the power switch on the side of the terminal OFF as shown.Power switchPage 26100-12042 - Rev C
Installation and Setup2. Grasp the sides of the display, and rotate it toward the rear of the terminal.3. Rotate the display until it in a horizontal orientation as shown in the figure.100-12042 - Rev C Page 27
Installation and Setup4. Grasp the front terminal door with both hands, and pull it forward and downas shown.5. Rotate the door to the open position as shown in the figure.Page 28100-12042 - Rev C
Installation and Setup6. Lift and pull the printer mechanism carefully out of the terminal.8. The printer mechanism is now removed.100-12042 - Rev C Page 29
Chapter 4Ithaca ® 9700 Specifications andRequirements100-12042 - Rev C Page 31
This page intentionally left blankPage 32100-12042 - Rev C
Ithaca ® 9700 Specifications and RequirementsIthaca ® 9700 Specifications and RequirementsStandard FeaturesThe following features are standard for Ithaca ® 9700 terminals:8.4-inch touch screen (diagonal measurement) using “hot touch” capabilitywith 7-inch color displayStandard 2.36 inches (60mm) wide direct thermal printer for printing “prep”and “discard by date” informationTop-of-form sensor (also acts as label out sensor)Capable of printing on various direct thermal die cut labelsExternal universal power supply (SEALED) with docking bay in terminal(PowerPocket®)100-12042 - Rev C Page 33
Ithaca ® 9700 Specifications and RequirementsOn-screen editing capabilityPC-Based Companion UtilitySmall terminal footprintReal-time clock (battery backed) to generate “prep” and “discard by” dateand timeTouch screen and terminal capable of multi languages for all areas of theworld (AOW)Self DiagnosticsRemote firmware update through Ethernet or USB thumb driveON/OFF Switch: Accessible but located to minimize spillage susceptibilityEasy label loading“Spill-proof” by designLabel tear-off (both std. and optional) - tear off in both upwards anddownwards directionCapable of printing bar codes, including PDf417Portrait or landscape printingLadder and fence barcode printingInternal counters to track number of hours on, labels completed, lines fed,error conditionsEasy access to print head/platen for cleaningPage 34100-12042 - Rev C
Ithaca ® 9700 Specifications and RequirementsPhysical <strong>Terminal</strong> SpecificationsMax DimensionsW D HDimensions in 10.5 8.06 9.15inchesDimensions in mm 266.7 203.2 232.41Weight:approx. 7.6 lbs. (3.4 kg)Interfaces:USB 2.0 Type A, 10/100 BASE-T Ethernet, SD CardPrinting CharacteristicsPrinting method:Resolution:Print zone:Print speed:Thermal monochrome8 dots/mm (203 DPI)2 inches (51mm) using 2.2 inch (56mm)wide label1 inch (25mm) using 1.2 inch (30mm)wide label4 inches per second (101.6mm per second)(printing labels)100-12042 - Rev C Page 35
Ithaca ® 9700 Specifications and RequirementsEnvironmental ConditionsThe Ithaca ® 9700 is designed to be placed on a flat, stable surface. Be awarethat the environmental conditions of the location where you place the terminalwill have an effect on the terminal’s performance and longevity. The terminalwill run its best when stored and operated in an environment that meets thetemperature and humidity conditions described below.Temperature:Typical Operating:Storage & Shipping:Humidity:Operating:Storage & Shipping:+5 to +50 °C. (41-122 °F)-10 to 50 °C. (14-122 °F)10 to 90% RH (non condensing)10 to 90 % (RH non condensing)Electrical Specifications100 VAC - 240 VAC, 50-60 HzReliabilityPrint Head Life – 50KMMedia SpecificationsLabel thickness:.0065 - .0075 inches thick, including linerLabel Roll Diameter:4.5 inches (114.3mm max)Label Dimensions:1.2 inch wide x 1.1 inch long2.2 inch wide x 1.1 inch long2.2 inch wide x 1.5 inches long2.2 inch x 2.0 inch long (color coded blocks)2.2 inch wide x 3.0 inch long2.2 inch wide x 4.0 inch longAdhesivesPermanentFreezer GradeDissolvableRemovablePage 36100-12042 - Rev C
Ithaca ® 9700 Specifications and RequirementsUSB InterfaceThe USB interface is a Version 2.0 host interface with a standard Series "A"receptacle as defined in the USB Specification.The standard USB Type A connector has the following pin functions:Pin Signal1 Vbus (+5 V dc power for external devices @ 500mA)2 Minus data3 Plus data4 GroundNote: The standard USB interface does not have sufficient power to run theterminal.Regulatory ComplianceFCC Class ACE Mark (1998) Class AEN 60950-1, 2nd edition +A11:2007Energy Star100-12042 - Rev C Page 37
Ithaca ® 9700 Specifications and RequirementsThis page intentionally left blankPage 38100-12042 - Rev C
Chapter 5Operating Your Ithaca ® 9700100-12042 - Rev C Page 39
This page intentionally left blankPage 40100-12042 - Rev C
Operating Your Ithaca ® 9700 PrinterOverviewYour Ithaca ® 9700 <strong>Food</strong> <strong>Safety</strong> <strong>Terminal</strong> is designed to quickly and easily printfood safety and nutrition labels, using simple touch screen menus. Thischapter outlines the operation of these menu functions to program and printlabels in your own food service operation.This device was intentionally designed to keep user programming to aminimum. Primary menu options specific to your food service operation havebeen pre-configured as part of your specific terminals. Individual menu itemscan be added or modified within these categories, together with shelf lifeand/or nutritional data. These items can then easily be selected using thetouch screen to print labels.Home Screen LayoutAll user functions of your Ithaca ® 9700 are accessed through the touch screen.The following figure provides an overview of the Home Screen functions.[4][3][2][1][5][1] Function Buttons: These non-programmable buttons control basic terminalfunctions such as feeding labels from each of two available slots, cancelingprinting, bringing up help menus, and setup functions.[2] Item Category Buttons: These buttons select groups of menu items forprinting or modification. Items selected are color-coded with the same colorbuttons as the category button, for quick identification and verification.Category buttons are automatically resized to fit the screen width and do notscroll. The category names are pre-configured as part of your terminal setupand cannot be changed.100-12042 - Rev C Page 41
Operating Your Ithaca ® 9700 Printer[3] Item Buttons: These buttons select individual items, for the purpose ofeither printing a food safety or nutritional label, or modifying the contents ofthese labels. These item names can be modified, and new items can beadded.[4] Time and Date Display: Shows the time and date, as programmed in theSetup function. It is important to verify that the accurate time and date areshown, as this data is used to generate expiration times and dates for foodsafety labels. The Time and Date display also indicates when the currentlylogged in user will be automatically logged out.[5] Slider Bar: Allows you to use arrow keys or position along the bar to movebetween multiple screens of item buttons.Note: Depending on your configuration settings, you may be prompted toenter a password to enter menu functions. Contact your system administratorto obtain this password if needed.Function ButtonsThe Function Buttons provide access to main terminal functions, as shown.Specific button functions are as follows:FEED L: Advances the label roll stock from the left printer slot.FEED R: Advances the label roll stock from the right printer slot.CANCEL PRINT: This button cancels printing operations. It is used toterminate the printing of multiple labels.LANGUAGE: Toggles the language used to display food menu items andprompts between the default and the alternate language. Data entry ofalternate language labels is documented under the editing of these labels.HELP: Displays help screen, which provides detailed instructions forcontracting <strong>TransAct</strong> Technologies, loading label stock or changing the printermechanism.SETUP: Controls terminal setup functions such as setting the date and time,display preferences, backup and restore, system preferences, and printsettingsHOME: This button returns the touch screen to the default state of displayingcurrent item buttons.Page 42100-12042 - Rev C
Operating Your Ithaca ® 9700 PrinterFunctions for the HELP and SETUP buttons are described in subsequentsections.Note: These buttons are a permanent part of the terminal hardware and arenon-programmable.HELP ButtonThe HELP button brings up the Help Topics screen, which includes <strong>TransAct</strong>contact information and a menu of visual help for terminal operations.Currently there are two help options: how to load a label roll and changing theprinter mechanism. Touch the GO button next to any of these options todisplay the appropriate help screen.Help sections for loading label rolls or changing printer mechanisms bring upannotated graphics showing how to perform these operations, with a samplescreen shown below.100-12042 - Rev C Page 43
Operating Your Ithaca ® 9700 PrinterUse the arrow keys on the touch screen (< and >) to navigate between helpscreens, and use the X button in the upper right hand corner of the screen toreturn to the main help screen.Page 44100-12042 - Rev C
Operating Your Ithaca ® 9700 PrinterSETUP ButtonThe SETUP button produces a menu providing access to terminal setupfunctions, as shown below. If the system is configured with an AdministrativePassword the user is prompted to enter a password when the system is notalready in Manager Mode.Setup functions include the following:Adjust Date and Time: Sets the system date and time.Note: Setting the system date and time correctly is extremely important forprinting accurate food safety labels. Expiration dates and times are calculatedby adding a programmed shelf life interval to the current system date and time.Set Display Preferences: Sets brightness, screen saver settings, and labelbutton size.Save/Load Update/Backup: Allows the save and/or restore of system and/orfood item label data, using a USB stick.System Preferences: Sets password options as well the label print warningparameter.Print Settings: Sets the print layout and printer used for each type of label, byitem category.Details for each of these functions are outlined below. The BACK buttonreturns you to the main items menu on the touch screen.100-12042 - Rev C Page 45
Operating Your Ithaca ® 9700 PrinterAdjust Date and TimeThis function brings up a screen allowing you to set the current date and time,as shown in the figure. For the date and time functions, use the arrow keys onthe touch screen to set the day, month, year, hour, and minute.Other key options include toggling between a 12-hour and 24-hour clockformat (e.g. 1:00 PM versus 13:00), setting the current 12-hour format time toAM or PM, and setting the date format. The BACK button saves changes andreturns you to the Setup menu. Pressing the HOME Function button cancelsdata entry and returns to the Home Screen.Note: Setting the system date and time correctly is extremely important forprinting accurate food safety labels. Expiration dates and times are calculatedby adding a programmed shelf life interval to the current system date and time.Page 46100-12042 - Rev C
Operating Your Ithaca ® 9700 PrinterSet Display PreferencesThis function allows you to set configuration settings for the touch screendisplay. All changes take effect immediately. Options include the following:Brightness: Controls the screen brightness level using the arrow keys.Screen Saver Time Out: Controls the number of minutes before a screensaver is displayed, using the arrow keys, to prevent burn-in of current menuitems on the touch screen display.Note: Screen saver display options are preconfigured as part of your unit.Screen Saver Selection: Toggles between screen saver display modes (Logo,Slide Show, and Clock) using the arrow keys.Label Button Size: Adjusts the relative size of food item label buttons, as apercentage of the default size, using the arrow keys.Two other display functions test the screen saver and calibrate the screen:Test Screen Saver: Temporarily displays the current screen saver selectionCalibrate: This function is used when the touch screen display is misaligned.You will be prompted to touch three points at corners of the screen to calibrateit.100-12042 - Rev C Page 47
Operating Your Ithaca ® 9700 PrinterSave/Load Update/BackupThis function allows you to load and restore either (a) a backup of the labeldata file programmed in to your terminal, or (b) a copy of current systeminformation, using a USB flash memory stick. Such backups can be useful inediting and/or reloading specific label configurations, or in recovering fromhardware errors that may erase the terminal's current configuration.Options include:Save Data File: Saves the label data file (MenuData.xml) to a USB stick forbackup purposes. This file can also be edited on your computer.Load Data File: Loads a previously saved or edited MenuData.xml file from aUSB stick.Update System: Updates your system configuration from one previously savedon a USB stick.Backup System: Backs up your system to a USB stick.Note: The Backup System option requires a clean USB stick with no files onit.Page 48100-12042 - Rev C
Operating Your Ithaca ® 9700 PrinterNote: The port for inserting your USB stick is locating behind a sliding panelon the upper right-hand side of the touch screen display, as shown in thefigure.100-12042 - Rev C Page 49
Operating Your Ithaca ® 9700 PrinterFor copying menu data files to or loading them from a USB stick, you will beprompted to use the SAVE or LOAD buttons to complete the operation. TheCANCEL button will cancel this operation and return to the previous menu.Page 50100-12042 - Rev C
Operating Your Ithaca ® 9700 PrinterAfter proceeding with the SAVE or LOAD operation, a screen confirming thisoperation will appear.In the event a USB stick is not inserted before proceeding, an error messagewill be generated. Otherwise, the operation will proceed and then return to theprevious menu.100-12042 - Rev C Page 51
Operating Your Ithaca ® 9700 PrinterFor saving or restoring your system configuration to a USB stick, you will beprompted to use the BACKUP or UPDATE buttons to complete the operation.The CANCEL button will cancel this operation and return to the previousmenu.Page 52100-12042 - Rev C
Operating Your Ithaca ® 9700 PrinterAfter proceeding with the BACKUP or UPDATE operation, a screen confirmingthis operation will appear.In the case of a BACKUP operation, you will be prompted to insert a cleanUSB stick into the device's USB port as shown above. For both BACKUP andUPDATE operations, an error message will be generated if a USB stick is notinserted before proceeding.100-12042 - Rev C Page 53
Operating Your Ithaca ® 9700 PrinterSystem PreferencesThis menu allows you to set the following system options:Enter ID Required: Use the arrow keys to toggle whether or not to require alogin to use system functions.Label Print Warning At: Use the arrow keys to toggle a warning to bedisplayed when more than the specified number of labels are requested.Admin Password: Select the CHANGE key to change the current administratorpassword.Page 54100-12042 - Rev C
Operating Your Ithaca ® 9700 PrinterNote: For options requiring alphanumeric input, such as the Admin Passwordfunction above, an alphanumeric input screen will appear on the touch screenafter the option is selected. A sample of this keyboard is shown below. Use theDONE key to save your input in the original field or CANCEL to return to theprevious screen.The following special characters are supported while using the keyboard:To select a special character, hold the root letter down until the specialcharacters are displayed (approximately 3 seconds) and the select the desiredalternate character.100-12042 - Rev C Page 55
Operating Your Ithaca ® 9700 PrinterPrint SettingsThis menu selection allows you to set print options for specific labelcategories. When the Print Button Setup screen is accessed using the PrintSettings button in the Setup screen, the category current selected in the MainScreen is edited. The last label viewed is used for the preview. If no label hasbeen viewed the preview is blank.Select the layout type using the PREV and NEXT buttons. Use the arrow keyto select which (of up to 2) printer these labels will print to. The DONE buttonreturns you to the Setup Options menu.Note: The label categories are preconfigured specifically for your system.Layout choices may include food safety labels and/or nutrition labels. Theformer generally use the current system date and time, plus a shelf life value(programmed and edited via the MODIFY button of the item print menus), tocompute the displayed expiration date and time.Note: Make sure the correct label roll stock is loaded for the specified label.Consider printing one or two test labels to verify correct label roll stock andalignment before printing a large number of labels.Page 56100-12042 - Rev C
Operating Your Ithaca ® 9700 PrinterNote: The PRINT SETUP function is also entered by pressing and holdingthe PRINT button in the item printing menus (described in a subsequentsection) for three seconds.100-12042 - Rev C Page 57
Operating Your Ithaca ® 9700 PrinterPrinting LabelsTo print one or more labels for an item, first select the item's category from thebottom row of colored category buttons, then select the item you wish to printlabels for.Page 58100-12042 - Rev C
Operating Your Ithaca ® 9700 PrinterNote: Within a category, use the arrow keys to navigate between groups ofitems, or tap the appropriate category as shown between these arrows.Once the item has been selected, a print menu appears. Enter the number oflabels desired using the numeric keypad. (The CLR button will reset the labelquantity.) Press PRINT to print the labels, PRINT & EXIT to print the labelsand exit the dialog box, or EXIT to exit the dialog box without printing.Note: It is important to verify the expiration date and time shown beforeprinting a food safety label. If this appears incorrect, check the current system100-12042 - Rev C Page 59
Operating Your Ithaca ® 9700 Printerdate and time, and if needed, set it properly using the Adjust Date and Timebutton on the SETUP menu.Note: If the selected print mechanism is open, or the printer is not present,error messages are generated. Ensure the printer is properly installed beforeproceeding.Pressing and holding either PRINT button on the PRINT screen for threeseconds brings up the Print Button Setup screen. The Print Button Setupscreen is used to define which label layout to use and which printermechanism to print with for the selected Category. (See the Print Settingssection of this manual)Page 60100-12042 - Rev C
Operating Your Ithaca ® 9700 PrinterThe MODIFY button of this menu allows you to specify field values and shelflife parameters, as well as delete items. If the system is configured with anAdministrative Password the user is prompted to enter a password when thesystem is not already in Manager Mode. Selecting any of these fields bringsup the alphanumeric keyboard. PAGE UP and PAGE DOWN keys (not shownin figure) will display additional fields where appropriate.Select the SAVE button to save your items settings, or CANCEL to exit thismenu without saving.The DELETE ITEM button can be used to remove this item from its currentitems menu.Note: The shelf life values specified here (in days, hours, and/or minutes) areadded to the current system date and time to produce the expiration date andtime displayed on the label.Note: The edit fields for the items in each category are preconfigured for yourterminal. The example in the image below includes the caption shown on thetouch screen for this item, English and Spanish printed names, an expiremessage, and shelf life values.100-12042 - Rev C Page 61
Operating Your Ithaca ® 9700 PrinterNote: Each menu of items contains a [NEW ITEM] button at the end of thelist. Select this button to create and add a new item to the list. An Edit/Modifymenu for the new item will appear, as shown below.Page 62100-12042 - Rev C
Chapter 6Troubleshooting100-12042 - Rev C Page 63
This page intentionally left blankPage 64100-12042 - Rev C
TroubleshootingPower is OffCheck PointMain power switch is at the off (O)position.<strong>Terminal</strong> power cord unplugged.Power supply not providing power.SolutionPress main power switch to the onposition (|).Make sure that the power cord isplugged in completely.Connect another device to the powersupply to confirm that the outlet isproviding power. If you cannot restorethe terminal to normal operation,contact your <strong>TransAct</strong> dealer.<strong>Terminal</strong> Does Not Start or Stops during Print JobsCheck PointPaper is not loaded correctly.Paper has jammed.SolutionCheck and load paper.Check and re-load paper.Paper is Not Feeding CorrectlyCheck PointPaper is not loaded with the correctside up.The edge of the paper is folded orcurled.Paper is not loaded properly in thefeeder tray.SolutionLoad paper so that label side is facingup as roll exits printer.If the leading edge of the paper isfolded or curled it will not feedcorrectly. This could also cause apaper jam.Load paper correctly.Screen Image is Blank or Touch Screen is MisalignedCheck PointNo screen image.The touch screen is incorrectlycalibrated.SolutionTouch the screen to dismiss thescreen saver. If the screen is stillblank, make sure terminal has power.Press the SETUP button, then selectSet Display Preferences on thescreen, select the Calibrate button,then touch the screen at three pointswhere indicated to calibrate it.100-12042 - Rev C Page 65
TroubleshootingPrinting is Misaligned on LabelCheck PointLabel size is incorrect.Label orientation is incorrect.Print layout is incorrect.SolutionCheck to make sure that label stockdimensions match those specified inPrint Setup menu (Setup -> PrintSetup).Check to see that label ribbon isproperly aligned inside printer.Verify print layout in Print Setup menu(Setup -> Print Setup).Dates are IncorrectCheck PointCurrent date and time is incorrect.Shelf life values are incorrect.SolutionReset current date and time via Setup-> Adjust Date and Time menu ondevice.Check shelf life values for food itemvia Modify button of item menu.Page 66100-12042 - Rev C
Appendix A: Ordering SuppliesAppendix A: Ordering SuppliesIthaca ® 9700 supplies can be ordered easily direct from <strong>TransAct</strong>. We offerconvenient one-stop shopping for all your printer needs, including paper,spare parts, manuals, printer servicing/refurbishment and more. For moreinformation, call us at 1-800-243-8941 or visit www.TRANSACTsupplies.com.100-12042 - Rev C Page 67
IndexIndexAdjust date and time, 46Canadian Radio Interference Statement,iiiChanging the printer mechanism, 26Contact information, 7Copyright, ivDisclaimer, ivFederal Communications CommissionRadio Frequency InterferenceStatement, iiiFunction buttons, 42HELP button, 43Loading label rolls, 20Overview, 3, 41Print settings, 56Printer features, 19Printer operations, 39Printer setup, 17Printing labels, 58Product informationShipping printers, 6Warranty information, 5Regulatory compliance, 37Return Materials Authorization, 6<strong>Safety</strong> precautions, 11Sales Support, 6Set display preferences, 47SETUP button, 45SpecificationsElectrical, 36Environmental conditions, 35, 36Interface, 35Media, 36Printer dimensions, 35Specifications and requirements, 33Standard features, 33Supplies, ordering, 67System preferences, 54Technical support, 5Touch screen menu, 41Trademarks, ivTroubleshooting, 63Unpacking the printer, 17Update and backup, 48USB interface, 37100-12042 - Rev C Page 69