H.264 Network IP Camera Quick Installation Guide - Supercircuits Inc.
H.264 Network IP Camera Quick Installation Guide - Supercircuits Inc.
H.264 Network IP Camera Quick Installation Guide - Supercircuits Inc.

Create successful ePaper yourself
Turn your PDF publications into a flip-book with our unique Google optimized e-Paper software.
<strong>H.264</strong> <strong>Network</strong> <strong>IP</strong> <strong>Camera</strong><br />
<strong>Quick</strong> <strong>Installation</strong> <strong>Guide</strong><br />
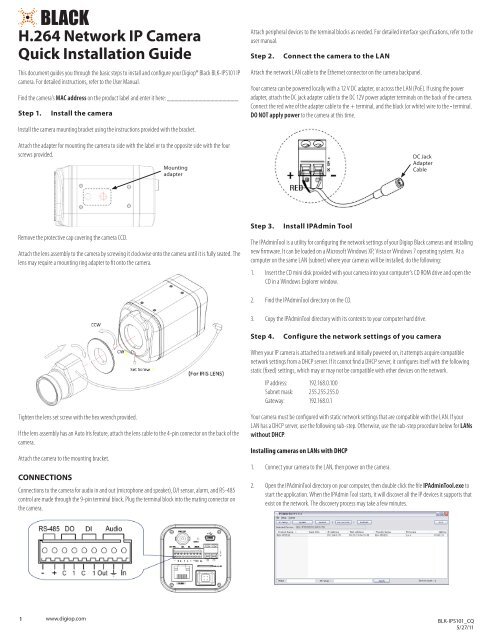
This document guides you through the basic steps to install and configure your Digiop® Black BLK-<strong>IP</strong>S101 <strong>IP</strong><br />
camera. For detailed instructions, refer to the User Manual.<br />
Find the camera’s MAC address on the product label and enter it here: __________________<br />
Step 1. Install the camera<br />
Install the camera mounting bracket using the instructions provided with the bracket.<br />
Attach the adapter for mounting the camera to side with the label or to the opposite side with the four<br />
screws provided.<br />
Remove the protective cap covering the camera CCD.<br />
1 www.digiop.com<br />
Mounting<br />
adapter<br />
Attach the lens assembly to the camera by screwing it clockwise onto the camera until it is fully seated. The<br />
lens may require a mounting ring adapter to fit onto the camera.<br />
Tighten the lens set screw with the hex wrench provided.<br />
If the lens assembly has an Auto Iris feature, attach the lens cable to the 4-pin connector on the back of the<br />
camera.<br />
Attach the camera to the mounting bracket.<br />
CONNECTIONS<br />
Connections to the camera for audio in and out (microphone and speaker), D/I sensor, alarm, and RS-485<br />
control are made through the 9-pin terminal block. Plug the terminal block into the mating connector on<br />
the camera.<br />
Attach peripheral devices to the terminal blocks as needed. For detailed interface specifications, refer to the<br />
user manual.<br />
Step 2. Connect the camera to the LAN<br />
Attach the network LAN cable to the Ethernet connector on the camera backpanel.<br />
Your camera can be powered locally with a 12 V DC adapter, or across the LAN (PoE). If using the power<br />
adapter, attach the DC jack adapter cable to the DC 12V power adapter terminals on the back of the camera.<br />
Connect the red wire of the adapter cable to the + terminal, and the black (or white) wire to the - terminal.<br />
DO NOT apply power to the camera at this time.<br />
Step 3. Install <strong>IP</strong>Admin Tool<br />
DC Jack<br />
Adapter<br />
Cable<br />
The <strong>IP</strong>AdminTool is a utility for configuring the network settings of your Digiop Black cameras and installing<br />
new firmware. It can be loaded on a Microsoft Windows XP, Vista or Windows 7 operating system. At a<br />
computer on the same LAN (subnet) where your cameras will be installed, do the following:<br />
1. Insert the CD mini disk provided with your camera into your computer’s CD ROM drive and open the<br />
CD in a Windows Explorer window.<br />
2. Find the <strong>IP</strong>AdminTool directory on the CD.<br />
3. Copy the <strong>IP</strong>AdminTool directory with its contents to your computer hard drive.<br />
Step 4. Configure the network settings of you camera<br />
When your <strong>IP</strong> camera is attached to a network and initially powered on, it attempts acquire compatible<br />
network settings from a DHCP server. If it cannot find a DHCP server, it configures itself with the following<br />
static (fixed) settings, which may or may not be compatible with other devices on the network.<br />
<strong>IP</strong> address: 192.168.0.100<br />
Subnet mask: 255.255.255.0<br />
Gateway: 192.168.0.1<br />
Your camera must be configured with static network settings that are compatible with the LAN. If your<br />
LAN has a DHCP server, use the following sub-step. Otherwise, use the sub-step procedure below for LANs<br />
without DHCP.<br />
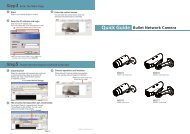
Installing cameras on LANs with DHCP<br />
1. Connect your camera to the LAN, then power on the camera.<br />
2. Open the <strong>IP</strong>AdminTool directory on your computer, then double click the file <strong>IP</strong>AdminTool.exe to<br />
start the application. When the <strong>IP</strong>Admin Tool starts, it will discover all the <strong>IP</strong> devices it supports that<br />
exist on the network. The discovery process may take a few minutes.<br />
BLK-<strong>IP</strong>S101_CQ<br />
5/27/11
Review the list of <strong>IP</strong> devices found by <strong>IP</strong>Admin Tool. You can identify your camera by the MAC<br />
address. If the camera was not found, click the Refresh button every minute until your camera<br />
appears in the list.<br />
3. After finding your camera, right click the entry, then select <strong>IP</strong> Address from the drop-down list. An<br />
<strong>IP</strong> Setup window will open.<br />
2 www.digiop.com<br />
Static Option<br />
4. In the <strong>IP</strong> Setup window, click the Static option bullet. If you have other compatible network<br />
settings you want to apply to the device, enter them in the appropriate locations. Click Setup to<br />
save settings.<br />
5. In the Login window, enter the ID and PW<br />
(password) for your camera, then click Login. The<br />
default administrator values for the ID and PW are<br />
root and pass.<br />
6. In the <strong>IP</strong>Admin Tool window, click Refresh. Verify that the entry representing the camera now<br />
shows the (new) static <strong>IP</strong> address.<br />
7. Continue with procedure Step 5. Setup camera Basic Configuration.<br />
Installing cameras on LANs without DHCP<br />
In networks without a DHCP server, cameras must be powered on and reconfigured one at a time to avoid<br />
addressing conflicts between other cameras, or possibly with another device on the network. Configuring<br />
the network settings of your cameras includes these steps:<br />
— Determine the network settings of your computer.<br />
— Check the network for compatibility with the default static network settings of your camera.<br />
— Find an <strong>IP</strong> address that is not in use and can be assigned to your camera.<br />
— Attach your camera to the network, power it on, and configuring it with new network<br />
settings.<br />
Determine the network settings of your computer<br />
1. At a PC attached to the LAN where your camera will be connected, determine the <strong>IP</strong> address, subnet<br />
mask, and default gateway of your PC. To find this information:<br />
a. Hold down the Windows key and press r to<br />
open the Run dialog box.<br />
b. Type cmd in the entry field, then click OK to<br />
open the Command Prompt window.<br />
c. At the command prompt, enter ipconfig. The response will show the your PC’s network<br />
settings.<br />
d. Record the <strong>IP</strong> Address, Subnet Mask, and Default Gateway for your PC’s Ethernet adapter for<br />
future reference.<br />
NOTE<br />
The Ethernet adapter data you see by using ipconfig will probably be different from that shown<br />
in the example above. If you are using Windows Vista or Windows 7, the <strong>IP</strong> address is identified<br />
as the “<strong>IP</strong>v4 Address.”<br />
Check LAN for default <strong>IP</strong> address compatibility<br />
Before connecting your camera to the LAN, check the network to see if <strong>IP</strong> address 192.168.0.100 is already<br />
in use. At a Microsoft Windows computer attached to the LAN where the camera will be connected, open a<br />
Command Prompt window and enter:<br />
ping 192.168.0.100<br />
The “Request timed out” response indicates that the <strong>IP</strong> address is not in use and the camera can be<br />
connected without causing conflicts. If the response from the ping command received a “Reply..”, the <strong>IP</strong><br />
address is in use. Contact Technical Support for further assistance, if needed.<br />
Find network settings (<strong>IP</strong> addresses) that are not in use<br />
1. At your PC, find an <strong>IP</strong> address on your network that is not in use:<br />
a. Write down the EXACT <strong>IP</strong> address of your PC up to the third/last period. Using the example<br />
shown above, this expression is: 192.168.1. After the third period, include any number<br />
between 1 and 254 that is different from the one in your PC’s <strong>IP</strong> address, 168. As a first try,<br />
let’s choose 200, which will form the <strong>IP</strong> address 192.168.1.200.<br />
b. Next, use the ping command in the Command Prompt window to see if this <strong>IP</strong> address is in<br />
use on your network. Enter:<br />
ping 192.168.1.200.<br />
In the example shown above, the message “Reply from 192.168.1.200: ..” indicates that<br />
your PC can reach a device with that <strong>IP</strong> address, and that address is in use (i.e., you cannot<br />
use it for your camera).<br />
c. Since the ping test showed that 192.168.1.200 is in use, try another number between 1 and<br />
254. Let’s try to ping 192.168.1.201. At the command prompt, enter: ping 192.168.1.201<br />
d. In this test, the message “Request timed out” indicates that your PC cannot reach the<br />
device with that <strong>IP</strong> address, and that address is probably not in use. If this test showed that<br />
this <strong>IP</strong> address is in use, try other <strong>IP</strong> addresses using the steps above until an unused address<br />
is found.<br />
© 2011 DIGIOP, <strong>Inc</strong>. All rights reserved.
Attach your camera to the network, power it on, and configuring it with new network settings<br />
1. Connect the camera to the LAN and apply power to the camera. Wait until the initialization process<br />
completes (2 to 4 minutes) before continuing.<br />
2. Open the <strong>IP</strong>AdminTool directory on your computer, then double click the file <strong>IP</strong>AdminTool.exe to<br />
start the application. When the <strong>IP</strong>Admin Tool starts, it will discover all the <strong>IP</strong> devices it supports that<br />
exist on the network. The discovery process may take a few minutes.<br />
3. In the Product list, find the entry with the same MAC address as the camera you installed. If the<br />
camera is not shown, click Refresh once a minute to update the list.<br />
4. Right click on the entry for your camera and select <strong>IP</strong> Address.<br />
5. In the <strong>IP</strong> Setup window:<br />
a. Select the Static option if it is not selected.<br />
3 www.digiop.com<br />
Static Option<br />
b. Enter the new <strong>IP</strong> address for your camera into the <strong>IP</strong> Address field.<br />
c. Enter the subnet mask of your computer into the Subnet Mask field.<br />
d. Enter the gateway of your computer into the Gateway field.<br />
e. Click SETUP. A Login window will open.<br />
6. In the Login window, enter the ID and PW<br />
(password) for your camera and click Login. The<br />
default administrator values for the ID and PW are<br />
root and pass.<br />
7. In the <strong>IP</strong>Admin Tool window, click Refresh. Verify that the entry representing the camera now<br />
shows the new <strong>IP</strong> address.<br />
Step 5. Setup camera Basic Configuration<br />
To view video images from the camera, at a computer attached to the LAN where the camera is installed,<br />
open Microsoft ® Internet Explorer and go to:<br />
http://<br />
If the <strong>IP</strong> address is 192.168.1.201, enter: http://192.168.1.201<br />
If prompted to install ActiveX controls such as AxAll.cab (publisher Cap Co), AxPTZ, or AxNVC, follow screen<br />
prompts to install the software.<br />
NOTE<br />
To load these ActiveX controls, you may need to adjust the security settings of your browser to<br />
accept add-ins from unknown publishers.<br />
After logging into your camera, if you cannot see live video from the camera and the message: “Can not<br />
Create XMLDOMDocument Install MSXML4.0” appears, download and install the MS XML 4.0 library. This<br />
library can be found at:<br />
http://www.microsoft.com/downloads/details.aspx?familyid=3144B72B-B4F2-46DA-B4B6-<br />
C5D7485F2B42&displaylang=en<br />
After the camera VIEW screen appears, click SETUP and enter the default User name and Password, root<br />
and pass.<br />
In the SETUP window, go to Basic Configuration > Users.<br />
In the User list, click root to highlight it, and then click Modify. Enter a new password and click OK. In the<br />
Users screen, click Apply, and then click OK to restart the server.<br />
Go to Basic Configuration > Date & Time.<br />
On the Date & Time screen, set the Time Zone, Method, and Time Synchronization options. Click Apply.<br />
Click VIEW to exit SETUP mode and return to the web viewing screen.<br />
© 2011 Digiop, <strong>Inc</strong>. All rights reserved.
AIM AND FOCUS THE CAMERA<br />
Set focus and zoom while observing video image from the camera. Video is provided through a web<br />
browser, and by attaching a local video monitor to the LOOP OUT BNC connector on the back of the camera.<br />
Use the documentation provided with your camera mounting bracket and lens to make these adjustments.<br />
Use the documentation provided with your camera mounting bracket and lens to make these adjustments.<br />
4 www.digiop.com<br />
© 2011 Digiop, <strong>Inc</strong>. All rights reserved.