57 09 19 removing and installing lock cylinder
57 09 19 removing and installing lock cylinder
57 09 19 removing and installing lock cylinder

You also want an ePaper? Increase the reach of your titles
YUMPU automatically turns print PDFs into web optimized ePapers that Google loves.
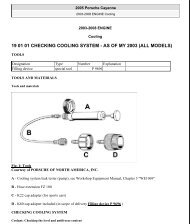
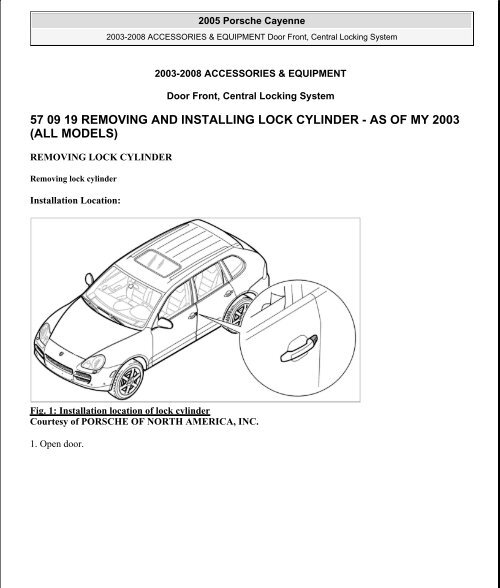
2005 Porsche Cayenne2003-2008 ACCESSORIES & EQUIPMENT Door Front, Central Locking System2003-2008 ACCESSORIES & EQUIPMENTDoor Front, Central Locking System<strong>57</strong> <strong>09</strong> <strong>19</strong> REMOVING AND INSTALLING LOCK CYLINDER - AS OF MY 2003(ALL MODELS)REMOVING LOCK CYLINDERRemoving <strong>lock</strong> <strong>cylinder</strong>Installation Location:Fig. 1: Installation location of <strong>lock</strong> <strong>cylinder</strong>Courtesy of PORSCHE OF NORTH AMERICA, INC.1. Open door.
2005 Porsche Cayenne2003-2008 ACCESSORIES & EQUIPMENT Door Front, Central Locking SystemFig. 3: Slide lower cap downwardCourtesy of PORSCHE OF NORTH AMERICA, INC.
2005 Porsche Cayenne2003-2008 ACCESSORIES & EQUIPMENT Door Front, Central Locking SystemFig. 4: Removing <strong>lock</strong> <strong>cylinder</strong>Courtesy of PORSCHE OF NORTH AMERICA, INC.3. Remove <strong>lock</strong> <strong>cylinder</strong>.3.1. Loosen <strong>and</strong> unscrew fastening screws -2, 3- at the side until the <strong>lock</strong> <strong>cylinder</strong> -4- can be pulled out -arrowC- . See Fig. 4.3.2. Remove the <strong>lock</strong> <strong>cylinder</strong> -4- -arrow D- . See Fig. 4.
2005 Porsche Cayenne2003-2008 ACCESSORIES & EQUIPMENT Door Front, Central Locking SystemFig. 5: Removing <strong>lock</strong> <strong>cylinder</strong> coverCourtesy of PORSCHE OF NORTH AMERICA, INC.4. Unclip <strong>lock</strong> <strong>cylinder</strong> cover.4.1. Unclip cover -5- of <strong>lock</strong> <strong>cylinder</strong> -4- at the <strong>lock</strong>ing tabs -Arrows- <strong>and</strong> remove it -arrow E- . See Fig. 5.INSTALLING LOCK CYLINDERInstalling <strong>lock</strong> <strong>cylinder</strong>Installation Location:
2005 Porsche Cayenne2003-2008 ACCESSORIES & EQUIPMENT Door Front, Central Locking SystemFig. 10: Slide cap upwardsCourtesy of PORSCHE OF NORTH AMERICA, INC.<strong>57</strong> 11 <strong>19</strong> REMOVING AND INSTALLING FRONT DOOR HANDLE - AS OF MY2003 (ALL MODELS)TOOLSDesignation Type Number ExplanationAssembly tool VW-tool T10118TOOLS AND MATERIALSItem Designation Explanation-12- Assembly tool T10118
2005 Porsche Cayenne2003-2008 ACCESSORIES & EQUIPMENT Door Front, Central Locking SystemTECHNICAL VALUESTightening torquesLocation Illustration Thread Tightening torque ftlb.Fastening screw for housing -2- M5 3,5 ± 0.5Fastening screw for <strong>lock</strong> barrel -3- M4 0.5 ± 0.5REMOVING FRONT DOOR HANDLEInstallation Location:Fig. 11: Installation location of front door h<strong>and</strong>leCourtesy of PORSCHE OF NORTH AMERICA, INC.1. Open doors.
2005 Porsche Cayenne2003-2008 ACCESSORIES & EQUIPMENT Door Front, Central Locking SystemFig. 12: Removing lower cap with a plastic wedgeCourtesy of PORSCHE OF NORTH AMERICA, INC.2. Remove cover cap.2.1. Carefully unclip lower cover -1- using a plastic wedge -arrow A- <strong>and</strong> remove downwards -arrow B- . SeeFig. 12 <strong>and</strong> Fig. 13.
2005 Porsche Cayenne2003-2008 ACCESSORIES & EQUIPMENT Door Front, Central Locking SystemFig. 13: Slide lower cap downwardCourtesy of PORSCHE OF NORTH AMERICA, INC.
2005 Porsche Cayenne2003-2008 ACCESSORIES & EQUIPMENT Door Front, Central Locking SystemFig. 14: Removing housing with <strong>lock</strong> barrelCourtesy of PORSCHE OF NORTH AMERICA, INC.3. Removing housing with <strong>lock</strong> barrel.3.1. Loosen fastening screw -3- at the side <strong>and</strong> unscrew by approx. 3 mm ( -arrow E- ). See Fig. 14.3.2. Pull door h<strong>and</strong>le <strong>and</strong> hold in end position.3.3. Loosen fastening screw -2- at the side <strong>and</strong> unscrew until the housing with <strong>lock</strong> barrel -4- can be pulled out.See Fig. 14.3.4. Remove housing including the <strong>lock</strong> <strong>cylinder</strong> -4- ( -arrow C- ). See Fig. 14.
2005 Porsche Cayenne2003-2008 ACCESSORIES & EQUIPMENT Door Front, Central Locking SystemFig. 15: Identifying <strong>lock</strong> actuatorCourtesy of PORSCHE OF NORTH AMERICA, INC.4. Detaching <strong>lock</strong> actuation.4.1. Using a narrow screwdriver -5- lever the <strong>lock</strong> actuation -6- out of the guide on the door h<strong>and</strong>le ( -arrow F-). See Fig. 16, Fig. 15.
2005 Porsche Cayenne2003-2008 ACCESSORIES & EQUIPMENT Door Front, Central Locking SystemFig. 16: Levering <strong>lock</strong> actuation out of guide on door h<strong>and</strong>le using a screwdriverCourtesy of PORSCHE OF NORTH AMERICA, INC.NOTE:For vehicles with Porsche Entry <strong>and</strong> Drive• 1. Remove front door sub-frame. --> <strong>57</strong>30<strong>19</strong> Removing <strong>and</strong> <strong>installing</strong> frontdoor sub-frame - "Removing"• 2. Remove Porsche Entry <strong>and</strong> Drive wiring harness. --> Removing <strong>and</strong> <strong>installing</strong> wiring harness forPorsche Entry <strong>and</strong> Drive system
2005 Porsche Cayenne2003-2008 ACCESSORIES & EQUIPMENT Door Front, Central Locking SystemFig. 17: Detaching door h<strong>and</strong>leCourtesy of PORSCHE OF NORTH AMERICA, INC.5. Detaching door h<strong>and</strong>le.5.1. Pull out door h<strong>and</strong>le -7- slightly ( -arrow G- ) <strong>and</strong> then pull to the rear ( -arrow H- ). This disengages thedoor h<strong>and</strong>le. See Fig. 17.
2005 Porsche Cayenne2003-2008 ACCESSORIES & EQUIPMENT Door Front, Central Locking SystemFig. 18: Pulling out door h<strong>and</strong>leCourtesy of PORSCHE OF NORTH AMERICA, INC.6. Pulling out door h<strong>and</strong>le.6.1. Swivel door h<strong>and</strong>le -7- out by 90° ( -arrow I- ) <strong>and</strong> carefully pull it out ( -arrow K- ). See Fig. 18.6.2. Remove the rubber washers -8- . See Fig. 18.INSTALLING FRONT DOOR HANDLEInstallation Location:
2005 Porsche Cayenne2003-2008 ACCESSORIES & EQUIPMENT Door Front, Central Locking SystemFig. <strong>19</strong>: Installation location of front door h<strong>and</strong>leCourtesy of PORSCHE OF NORTH AMERICA, INC.WARNING: Risk of damage to vehicle doors if door h<strong>and</strong>le is not fitted correctly!--> An incorrectly fitted door h<strong>and</strong>le can result in problems opening the doors both from inside <strong>and</strong> outside.--> Before <strong>installing</strong> the door h<strong>and</strong>le, make sure that the <strong>lock</strong> actuation is <strong>lock</strong>ed in installation position.1. Open doors.
• 2. Install front door sub-frame. --> <strong>57</strong>30<strong>19</strong> Removing <strong>and</strong> <strong>installing</strong> front door sub-frame - "Installing"2005 Porsche Cayenne2003-2008 ACCESSORIES & EQUIPMENT Door Front, Central Locking SystemFig. 20: Checking that the h<strong>and</strong>le receiver is <strong>lock</strong>ed in installation positionCourtesy of PORSCHE OF NORTH AMERICA, INC.2. Checking that the h<strong>and</strong>le receiver is <strong>lock</strong>ed in installation position.2.1. Check that the mounting point -9- was <strong>lock</strong>ed correctly in installation position during removal. If thereceiver is not <strong>lock</strong>ed, it can also be secured afterwards. Refer to 58 11 <strong>19</strong> Removing <strong>and</strong> <strong>installing</strong> rear doorh<strong>and</strong>le - as of MY 2003 (All Models) . See Fig. 20.3. Locking <strong>lock</strong> actuation in installation position3.1. Attach securing spring -10- to <strong>lock</strong> actuation lever using assembly tool T10118. --> Locking <strong>lock</strong>actuation. See Fig. 20.NOTE:For vehicles with Porsche Entry <strong>and</strong> Drive• 1. Install Porsche Entry <strong>and</strong> Drive wiring harness. --> Removing <strong>and</strong><strong>installing</strong> wiring harness for Porsche Entry <strong>and</strong> Drive system
2005 Porsche Cayenne2003-2008 ACCESSORIES & EQUIPMENT Door Front, Central Locking SystemFig. 21: Inserting door h<strong>and</strong>leCourtesy of PORSCHE OF NORTH AMERICA, INC.4. Insert door h<strong>and</strong>le.4.1. Insert rubber washers -8- . See Fig. 21.4.2. Insert door h<strong>and</strong>le -7- , ( -arrow A- ) <strong>and</strong> swivel it inwards by 90° ( -arrow B- ). See Fig. 21.5. Attaching door h<strong>and</strong>le
2005 Porsche Cayenne2003-2008 ACCESSORIES & EQUIPMENT Door Front, Central Locking SystemFig. 22: Pressing door h<strong>and</strong>le inwardsCourtesy of PORSCHE OF NORTH AMERICA, INC.5.1. Press door h<strong>and</strong>le -7- inwards ( -arrow C- ) <strong>and</strong> hook it in behind the receiver -9- ( -arrow D- ). See Fig.22, Fig. 23.
2005 Porsche Cayenne2003-2008 ACCESSORIES & EQUIPMENT Door Front, Central Locking SystemFig. 23: Hooking door h<strong>and</strong>le in behind the receiverCourtesy of PORSCHE OF NORTH AMERICA, INC.
2005 Porsche Cayenne2003-2008 ACCESSORIES & EQUIPMENT Door Front, Central Locking SystemFig. 24: Pressing door h<strong>and</strong>le forward until it engagesCourtesy of PORSCHE OF NORTH AMERICA, INC.5.2. Press door h<strong>and</strong>le -7- forward ( -arrow E- ) until you feel it engage. See Fig. 24.6. Attaching <strong>lock</strong> actuation6.1. Press the <strong>lock</strong> actuation -6- into the guide on the door h<strong>and</strong>le -arrow F- . See Fig. 25, Fig. 26.
2005 Porsche Cayenne2003-2008 ACCESSORIES & EQUIPMENT Door Front, Central Locking SystemFig. 25: Attaching <strong>lock</strong> actuator (1 Of 2)Courtesy of PORSCHE OF NORTH AMERICA, INC.
2005 Porsche Cayenne2003-2008 ACCESSORIES & EQUIPMENT Door Front, Central Locking SystemFig. 26: Attaching <strong>lock</strong> actuator (2 Of 2)Courtesy of PORSCHE OF NORTH AMERICA, INC.
2005 Porsche Cayenne2003-2008 ACCESSORIES & EQUIPMENT Door Front, Central Locking SystemFig. 27: Installing housing with <strong>lock</strong> barrel (driver's door only)Courtesy of PORSCHE OF NORTH AMERICA, INC.7. Installing housing with <strong>lock</strong> barrel - driver's door only .7.1. Insert vehicle key into the housing with <strong>lock</strong> barrel <strong>and</strong> push in the housing -4- ( -arrow G- ) while turningthe vehicle key slightly to the right at the same time. If necessary, loosen fastening screws -2 <strong>and</strong> 3- slightlyuntil the housing with <strong>lock</strong> barrel -4- can be inserted fully. See Fig. 27.7.2. Screw in fastening screws -2 <strong>and</strong> 3- at the side ( -arrow H- ) <strong>and</strong> tighten to the specified torque. --><strong>57</strong>11<strong>19</strong> Removing <strong>and</strong> <strong>installing</strong> door h<strong>and</strong>le - "Technical values". See Fig. 27.
2005 Porsche Cayenne2003-2008 ACCESSORIES & EQUIPMENT Door Front, Central Locking SystemFig. 28: Installing housing (passenger's door only)Courtesy of PORSCHE OF NORTH AMERICA, INC.8. Installing housing - passenger's door only .8.1. Slide in the housing -4- ( -arrow G- ). If necessary, loosen a fastening screw -2 <strong>and</strong> 3- slightly until thehousing -4- can be inserted completely. See Fig. 28.8.2. Screw in fastening screw -2- at the side ( -arrow H- ) <strong>and</strong> tighten to the specified torque. --> <strong>57</strong>11<strong>19</strong>Removing <strong>and</strong> <strong>installing</strong> door h<strong>and</strong>le - "Technical values". See Fig. 28.9. Checking operation of door h<strong>and</strong>le.9.1. --> Function test following assembly work
2005 Porsche Cayenne2003-2008 ACCESSORIES & EQUIPMENT Door Front, Central Locking SystemFig. 29: Installing cover capCourtesy of PORSCHE OF NORTH AMERICA, INC.10. Installing cover cap.10.1. Push cap -1- up on to basic door frame at the side ( -arrow J- ) <strong>and</strong> clip into position ( -arrow I- ). SeeFig. 29, Fig. 30.
2005 Porsche Cayenne2003-2008 ACCESSORIES & EQUIPMENT Door Front, Central Locking SystemFig. 30: Push cap in upward directionCourtesy of PORSCHE OF NORTH AMERICA, INC.11. Close doorsINFORMATIONLocking door h<strong>and</strong>le mounting pointNOTE:• To fit the door h<strong>and</strong>le correctly, the receiver -9- must be secured ininstallation position prior to installation. See Fig. 31.• The receiver is secured automatically during removal. If the receiver is no longer secured or if newcomponents are installed, the receiver can also be secured afterwards in accordance with the instructionsbelow.
2005 Porsche Cayenne2003-2008 ACCESSORIES & EQUIPMENT Door Front, Central Locking SystemFig. 31: Pull receiver towards outer door panelCourtesy of PORSCHE OF NORTH AMERICA, INC.1. Pull receiver -9- towards outer door panel <strong>and</strong> hold in this position ( -arrow C- ). See Fig. 31.
2005 Porsche Cayenne2003-2008 ACCESSORIES & EQUIPMENT Door Front, Central Locking SystemFig. 32: Identifying fastening screwCourtesy of PORSCHE OF NORTH AMERICA, INC.2. Screw in fastening screw -2- ( -arrow A- ) until the receiver can be pulled into installation position. See Fig.32.3. Hold the mounting point -9- in this position. See Fig. 33.
2005 Porsche Cayenne2003-2008 ACCESSORIES & EQUIPMENT Door Front, Central Locking SystemFig. 33: Hold the mounting point in this positionCourtesy of PORSCHE OF NORTH AMERICA, INC.
2005 Porsche Cayenne2003-2008 ACCESSORIES & EQUIPMENT Door Front, Central Locking SystemFig. 34: Identifying fastening screwCourtesy of PORSCHE OF NORTH AMERICA, INC.4. Unscrew fastening screw -2- ( -arrow B- ) until the mounting point -9- is <strong>lock</strong>ed in this position. See Fig. 34,Fig. 33.Fig. 35: Identifying mounting pointCourtesy of PORSCHE OF NORTH AMERICA, INC.Locking <strong>lock</strong> actuation1. Light up inside of door with a lamp.
2005 Porsche Cayenne2003-2008 ACCESSORIES & EQUIPMENT Door Front, Central Locking SystemFig. 36: View of securing spring, <strong>lock</strong> actuation lever <strong>and</strong> door <strong>lock</strong>Courtesy of PORSCHE OF NORTH AMERICA, INC.NOTE:• To fit the <strong>lock</strong> actuation correctly, the securing spring must be hooked intothe <strong>lock</strong> actuation lever before the door <strong>lock</strong> is installed.• The secured position of the <strong>lock</strong> actuation is released automatically when the door h<strong>and</strong>le is first pressed.A clear clicking sound can be heard when the door h<strong>and</strong>le is first pressed.
2005 Porsche Cayenne2003-2008 ACCESSORIES & EQUIPMENT Door Front, Central Locking SystemFig. 37: Installing securing spring to <strong>lock</strong> actuation leverCourtesy of PORSCHE OF NORTH AMERICA, INC.2. Guide the assembly tool T10118 -12- between the securing spring -10- <strong>and</strong> the lever -11- . See Fig. 37.3. The securing spring -10- hooks on to the tool with a rotary movement. See Fig. 37.
2005 Porsche Cayenne2003-2008 ACCESSORIES & EQUIPMENT Door Front, Central Locking SystemFig. 38: Pulling securing spring towards the outside of the door until the spring engagesCourtesy of PORSCHE OF NORTH AMERICA, INC.4. Pull the securing spring -10- towards the outside of the door -arrow L- until the spring engages audibly inthe <strong>lock</strong>ing lug of the lever -13- . See Fig. 38.5. Unhook the tool <strong>and</strong> remove it.NOTE:• Pull carefully on the <strong>lock</strong> actuation to check that it is secured ininstallation position. Repeat the steps listed above if necessary.Removing <strong>and</strong> <strong>installing</strong> wiring harness for Porsche Entry <strong>and</strong> Drive system
2005 Porsche Cayenne2003-2008 ACCESSORIES & EQUIPMENT Door Front, Central Locking SystemFig. 39: View of wiring harness routingCourtesy of PORSCHE OF NORTH AMERICA, INC.1. Releasing wiring harness from the basic door frame.1.1. Unclip the wiring harness -1- from the basic door frame at the marked positions ( -arrows- ). See Fig. 39.
NOTE:• A malfunction occurs only after the vehicle is <strong>lock</strong>ed for the first time. Inother words: if a door h<strong>and</strong>le was fitted incorrectly, the affected door canbe opened <strong>and</strong> closed without difficulty until the vehicle is <strong>lock</strong>ed for thefirst time. After that, the door cannot be opened either from inside oroutside. Given this, it is important to perform a function test before thedoor is closed.2005 Porsche Cayenne2003-2008 ACCESSORIES & EQUIPMENT Door Front, Central Locking SystemFig. 40: Removing wiring harnessCourtesy of PORSCHE OF NORTH AMERICA, INC.2. Removing wiring harness.2.1. Pull out the wiring harness -1- from the door h<strong>and</strong>le base plate -2- . While doing this, press the rubbersleeve -3- together. See Fig. 40.3. Installing wiring harness3.1. Install in reverse order.Function test following assembly work
2005 Porsche Cayenne2003-2008 ACCESSORIES & EQUIPMENT Door Front, Central Locking System1. Do not close vehicle door after <strong>installing</strong> door h<strong>and</strong>le.2. With the door open, use a screwdriver to engage the bolt in the door <strong>lock</strong> fully in the second notch.3. Lock vehicle with the remote control.4. Un<strong>lock</strong> vehicle with the remote control.5. Press door h<strong>and</strong>le on open door.NOTE:• If the bolt in the door <strong>lock</strong> does not open, press the door button to makesure that the individual door opening function is deactivated. If the door<strong>lock</strong> still does not open, the door <strong>lock</strong> was assembled incorrectly.<strong>57</strong> 17 <strong>19</strong> REMOVING AND INSTALLING DOOR LOCK - AS OF MY 2003 (ALLMODELS)TOOLSDesignation Type Number ExplanationH<strong>and</strong> riveting tool for poprivetsspecial tool NR.124-1PRELIMINARY WORKPreliminary work1. Remove front door sub-frame. --> <strong>57</strong>30<strong>19</strong> Removing <strong>and</strong> <strong>installing</strong> front door sub-frame - "Removing".TOOLS AND MATERIALSItem Designation ExplanationH<strong>and</strong> riveting tool for pop rivetsNR.124-1REMOVING DOOR LOCKRemoving door <strong>lock</strong>Installation Location:
2005 Porsche Cayenne2003-2008 ACCESSORIES & EQUIPMENT Door Front, Central Locking SystemFig. 41: Installation location of door <strong>lock</strong>Courtesy of PORSCHE OF NORTH AMERICA, INC.1. Pulling plug off door <strong>lock</strong>
2005 Porsche Cayenne2003-2008 ACCESSORIES & EQUIPMENT Door Front, Central Locking SystemFig. 42: Removing coverCourtesy of PORSCHE OF NORTH AMERICA, INC.1.1. Unclip cover -1- <strong>and</strong> remove it -arrow A- . See Fig. 42.
2005 Porsche Cayenne2003-2008 ACCESSORIES & EQUIPMENT Door Front, Central Locking SystemFig. 43: Releasing <strong>and</strong> pull off connector on door <strong>lock</strong>Courtesy of PORSCHE OF NORTH AMERICA, INC.1.2. Release <strong>and</strong> pull off connector on door <strong>lock</strong> -arrows B, C- . See Fig. 43.
2005 Porsche Cayenne2003-2008 ACCESSORIES & EQUIPMENT Door Front, Central Locking SystemFig. 44: Removing door <strong>lock</strong> (1 Of 6)Courtesy of PORSCHE OF NORTH AMERICA, INC.1.3. Drill out blind rivets -2- . See Fig. 44.2. Removing door <strong>lock</strong>
2005 Porsche Cayenne2003-2008 ACCESSORIES & EQUIPMENT Door Front, Central Locking SystemFig. 45: Removing door <strong>lock</strong> (2 Of 6)Courtesy of PORSCHE OF NORTH AMERICA, INC.2.1. Pull door <strong>lock</strong> -3- with bowden cable -4- out of the door sub-frame -arrow D- . When doing so, push thegrommet -5- out of the door sub-frame. See Fig. 45.
2005 Porsche Cayenne2003-2008 ACCESSORIES & EQUIPMENT Door Front, Central Locking SystemFig. 46: Removing door <strong>lock</strong> (3 Of 6)Courtesy of PORSCHE OF NORTH AMERICA, INC.2.2. Drill out the blind rivet -8- from the rear <strong>and</strong> pull <strong>lock</strong> retaining bracket -7- out of the door <strong>lock</strong> -3- -arrowE- . See Fig. 47, Fig. 46.
2005 Porsche Cayenne2003-2008 ACCESSORIES & EQUIPMENT Door Front, Central Locking SystemFig. 47: Removing door <strong>lock</strong> (4 Of 6)Courtesy of PORSCHE OF NORTH AMERICA, INC.
2005 Porsche Cayenne2003-2008 ACCESSORIES & EQUIPMENT Door Front, Central Locking SystemFig. 48: Removing door <strong>lock</strong> (5 Of 6)Courtesy of PORSCHE OF NORTH AMERICA, INC.2.3. Unclip fastening of bowden cable -6- on door <strong>lock</strong> -3- -arrow F- . See Fig. 48.Fig. 49: Removing door <strong>lock</strong> (6 Of 6)
2005 Porsche Cayenne2003-2008 ACCESSORIES & EQUIPMENT Door Front, Central Locking SystemCourtesy of PORSCHE OF NORTH AMERICA, INC.2.4. Swivel bowden cable -4- by 90° <strong>and</strong> disengage from door <strong>lock</strong> actuating mechanism -arrow G- . See Fig.49.INSTALLING DOOR LOCKInstalling door <strong>lock</strong>Installation Location:Fig. 50: Installation location of door <strong>lock</strong>Courtesy of PORSCHE OF NORTH AMERICA, INC.Installation Location:
2005 Porsche Cayenne2003-2008 ACCESSORIES & EQUIPMENT Door Front, Central Locking SystemFig. 51: Installing door <strong>lock</strong> (1 Of 7)Courtesy of PORSCHE OF NORTH AMERICA, INC.1. Installing door <strong>lock</strong>
2005 Porsche Cayenne2003-2008 ACCESSORIES & EQUIPMENT Door Front, Central Locking SystemFig. 52: Installing door <strong>lock</strong> (2 Of 7)Courtesy of PORSCHE OF NORTH AMERICA, INC.1.1. Engage bowden cable -4- on door <strong>lock</strong> actuating mechanism <strong>and</strong> swivel by 90° -arrow A- . See Fig. 52.Fig. 53: Installing door <strong>lock</strong> (3 Of 7)
2005 Porsche Cayenne2003-2008 ACCESSORIES & EQUIPMENT Door Front, Central Locking SystemCourtesy of PORSCHE OF NORTH AMERICA, INC.1.2. Clip in fastening of bowden cable -6- on door <strong>lock</strong> -3- ( -arrow B- ). See Fig. 53.Fig. 54: Installing door <strong>lock</strong> (4 Of 7)Courtesy of PORSCHE OF NORTH AMERICA, INC.1.3. Fit <strong>lock</strong> retaining bracket -7- -arrow C- . See Fig. 54.
2005 Porsche Cayenne2003-2008 ACCESSORIES & EQUIPMENT Door Front, Central Locking SystemFig. 55: Installing door <strong>lock</strong> (5 Of 7)Courtesy of PORSCHE OF NORTH AMERICA, INC.1.4. Insert blind rivet -8- <strong>and</strong> rivet <strong>lock</strong> retaining bracket -7- to the door <strong>lock</strong> -3- from the rear -arrow D- . SeeFig. 55.
2005 Porsche Cayenne2003-2008 ACCESSORIES & EQUIPMENT Door Front, Central Locking SystemFig. 56: Installing door <strong>lock</strong> (6 Of 7)Courtesy of PORSCHE OF NORTH AMERICA, INC.2. Installing door <strong>lock</strong>2.1. Lay wiring harness -9- as shown. See Fig. 56.2.2. Pass bowden cable -4- through door sub-frame, insert door <strong>lock</strong> -3- -arrow E- <strong>and</strong> fit the grommet -5- . SeeFig. 56.3. Riveting the door <strong>lock</strong>
2005 Porsche Cayenne2003-2008 ACCESSORIES & EQUIPMENT Door Front, Central Locking SystemFig. <strong>57</strong>: Installing door <strong>lock</strong> (7 Of 7)Courtesy of PORSCHE OF NORTH AMERICA, INC.3.1. Insert the blind rivets -2- <strong>and</strong> rivet <strong>lock</strong> retaining bracket to door sub-frame -arrows F- . See Fig. <strong>57</strong>.
2005 Porsche Cayenne2003-2008 ACCESSORIES & EQUIPMENT Door Front, Central Locking SystemFig. 58: Connect electric plug connectionsCourtesy of PORSCHE OF NORTH AMERICA, INC.3.2. Insert electric plug connections -arrows G, H- until they click audibly into place. See Fig. 58.
2005 Porsche Cayenne2003-2008 ACCESSORIES & EQUIPMENT Door Front, Central Locking SystemFig. 59: Installing coverCourtesy of PORSCHE OF NORTH AMERICA, INC.3.3. Position the cover -1- <strong>and</strong> clip it into place -arrow I- . See Fig. 59.SUBSEQUENT WORKSubsequent work1. Install front door sub-frame. --> <strong>57</strong>30<strong>19</strong> Removing <strong>and</strong> <strong>installing</strong> front door sub-frame - "Installing".<strong>57</strong> 26 <strong>19</strong> REMOVING AND INSTALLING FRONT STRIKER PIN - AS OF MY2003 (ALL MODELS)REMOVING FRONT STRIKER PINInstallation Location:
2005 Porsche Cayenne2003-2008 ACCESSORIES & EQUIPMENT Door Front, Central Locking SystemFig. 60: Installation location of front striker pinCourtesy of PORSCHE OF NORTH AMERICA, INC.NOTE:• The counterplate -3- of the striker pin -1- is permanently fixed to the B-pillar structure. After the striker pin has been removed, the counterplateremains in the lower end position on the B-pillar.1. Open door.
2005 Porsche Cayenne2003-2008 ACCESSORIES & EQUIPMENT Door Front, Central Locking SystemFig. 61: Mark installation position of striker pinCourtesy of PORSCHE OF NORTH AMERICA, INC.2. Determining installation position2.1. Determine the position of the striker pin in relation to the B-pillar according to the impression made at thefactory -arrows- <strong>and</strong> mark this on the striker pin. See Fig. 61.
2005 Porsche Cayenne2003-2008 ACCESSORIES & EQUIPMENT Door Front, Central Locking SystemFig. 62: Removing striker pinCourtesy of PORSCHE OF NORTH AMERICA, INC.3. Removing the striker pin3.1. Remove fastening screws -2- from striker pin -1- . See Fig. 62.3.2. Remove the striker pin -1- . See Fig. 62.INSTALLING FRONT STRIKER PINInstalling front striker pinInstallation Location:
2005 Porsche Cayenne2003-2008 ACCESSORIES & EQUIPMENT Door Front, Central Locking SystemFig. 63: Installation location of front striker pinCourtesy of PORSCHE OF NORTH AMERICA, INC.
2005 Porsche Cayenne2003-2008 ACCESSORIES & EQUIPMENT Door Front, Central Locking SystemFig. 64: Installing striker pinCourtesy of PORSCHE OF NORTH AMERICA, INC.1. Installing, adjusting <strong>and</strong> fastening the striker pin1.1. Position striker pin -1- in line with the markings. See Fig. 64.1.2. Screw in fastening screws -2- for the striker pin -1- <strong>and</strong> tighten slightly. See Fig. 64.1.3. Carefully close door <strong>and</strong> check that the striker pin is positioned correctly with respect to the <strong>lock</strong>.1.4. If necessary, adjust the striker pin accordingly.1.5. Tighten fastening screws -2- to the specified tightening torque --> Tightening torque: 15 ftlb. +/-1.5 ftlb. .See Fig. 64.Fig. 65: Removing installation position markings of striker pinCourtesy of PORSCHE OF NORTH AMERICA, INC.2. Remove markings.
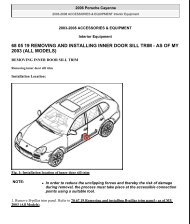
2005 Porsche Cayenne2003-2008 ACCESSORIES & EQUIPMENT Door Front, Central Locking System2.1.3. Close door.<strong>57</strong> 30 <strong>19</strong> REMOVING AND INSTALLING FRONT DOOR SUB-FRAME - AS OFMY 2003 (ALL MODELS)PRELIMINARY WORKPreliminary work1. Remove door h<strong>and</strong>le --> Removing door h<strong>and</strong>le.2. Remove front door trim. Refer to 70 59 <strong>19</strong> Removing <strong>and</strong> <strong>installing</strong> front door trim panel - as of MY2003 (All Models) .3. Remove rear-view mirror. Refer to 66 89 <strong>19</strong> Removing <strong>and</strong> <strong>installing</strong> rear-view mirror - as of MY 2003(All Models) .TECHNICAL VALUESTightening torquesLocation Illustration ThreadTightening torque [Nm](ftlb.)Fastening screw for securing door unitcarrier to basic door frame-9, 11- M8 x 42.5 33 (24) ± 3 (2)Fastening screw for securing door unitcarrier to basic door frame-8- M6 x 16 8 (6) + 2 (1.5)Fastening screw for securing door <strong>lock</strong>to basic door frame-3- M8 x 14 20 (15) - 2 (1.5)Test <strong>and</strong> adjustment valuesNOTE:• The figures showing the gap dimensions can be found in the sectionentitled. Refer to 50 IN Diagram - body gap dimensions - as of MY 2003 (AllModels Except Cayenne S TIO Titan) .Designation Dimension NoteMirror surround to roof trim strip -c- 3 mmDoor window to trim strip or outer sidesection-f- 5 mmREMOVING FRONT DOOR SUB-FRAME
2005 Porsche Cayenne2003-2008 ACCESSORIES & EQUIPMENT Door Front, Central Locking SystemRemoving front door sub-frameInstallation Location:Fig. 66: Installation location of front door sub-frameCourtesy of PORSCHE OF NORTH AMERICA, INC.NOTE:• Close the door window in order to improve accessibility to the door wiringharness when <strong>removing</strong> the front door unit carrier.1. Removing rear assembly opening covers, loosening <strong>lock</strong> mounting <strong>and</strong> KESSY wiring harness - For allvehicles:
2005 Porsche Cayenne2003-2008 ACCESSORIES & EQUIPMENT Door Front, Central Locking SystemFig. 67: Removing top assembly opening coverCourtesy of PORSCHE OF NORTH AMERICA, INC.1.1. Unclip the top <strong>and</strong> bottom assembly opening covers -1- <strong>and</strong> -2- . See Fig. 67, Fig. 68.
2005 Porsche Cayenne2003-2008 ACCESSORIES & EQUIPMENT Door Front, Central Locking SystemFig. 68: Removing bottom assembly opening coverCourtesy of PORSCHE OF NORTH AMERICA, INC.
2005 Porsche Cayenne2003-2008 ACCESSORIES & EQUIPMENT Door Front, Central Locking SystemFig. 69: Removing fastening screws on door <strong>lock</strong>Courtesy of PORSCHE OF NORTH AMERICA, INC.1.2. Unscrew fastening screws -3- on door <strong>lock</strong>. See Fig. 69.2. Also for vehicles with KESSY control module:
2005 Porsche Cayenne2003-2008 ACCESSORIES & EQUIPMENT Door Front, Central Locking SystemFig. 70: Disconnect electric connectorCourtesy of PORSCHE OF NORTH AMERICA, INC.2.1. Release -Arrow A- <strong>and</strong> remove -Arrow B- electric connector. See Fig. 70.
2005 Porsche Cayenne2003-2008 ACCESSORIES & EQUIPMENT Door Front, Central Locking SystemFig. 71: Feed electric cable outwards through openingCourtesy of PORSCHE OF NORTH AMERICA, INC.2.2. Press out rubber sleeve -C- <strong>and</strong> slide cable outwards through the opening. See Fig. 71.3. Removing front assembly opening covers <strong>and</strong> disconnecting electrical connection
2005 Porsche Cayenne2003-2008 ACCESSORIES & EQUIPMENT Door Front, Central Locking SystemFig. 72: Removing top assembly opening coversCourtesy of PORSCHE OF NORTH AMERICA, INC.3.1. Unclip the top <strong>and</strong> bottom assembly opening covers -4- <strong>and</strong> -5- . See Fig. 72.
2005 Porsche Cayenne2003-2008 ACCESSORIES & EQUIPMENT Door Front, Central Locking SystemFig. 73: Removing bottom assembly opening coversCourtesy of PORSCHE OF NORTH AMERICA, INC.
2005 Porsche Cayenne2003-2008 ACCESSORIES & EQUIPMENT Door Front, Central Locking SystemFig. 74: Disconnect electric push-on connectors at A-pillarCourtesy of PORSCHE OF NORTH AMERICA, INC.3.2. Pull off rubber sleeve -7- between the door <strong>and</strong> A-pillar. See Fig. 74.3.3. Release <strong>and</strong> disconnect electric push-on connectors -6- . See Fig. 74.4. Releasing door sub-frame
2005 Porsche Cayenne2003-2008 ACCESSORIES & EQUIPMENT Door Front, Central Locking SystemFig. 75: Removing fastening screws for door sub-frame (1 Of 2)Courtesy of PORSCHE OF NORTH AMERICA, INC.4.1. Unscrew fastening screws for door sub-frame -8, 9- <strong>and</strong> -11- . See Fig. 75, Fig. 76.
2005 Porsche Cayenne2003-2008 ACCESSORIES & EQUIPMENT Door Front, Central Locking SystemFig. 76: Removing fastening screws for door sub-frame (2 Of 2)Courtesy of PORSCHE OF NORTH AMERICA, INC.
2005 Porsche Cayenne2003-2008 ACCESSORIES & EQUIPMENT Door Front, Central Locking SystemFig. 77: Removing wiring harness through door opening <strong>and</strong> door sub-frameCourtesy of PORSCHE OF NORTH AMERICA, INC.4.2. Press rubber sleeve on the wiring harness -10- inwards <strong>and</strong> remove wiring harness -10- through the dooropening <strong>and</strong> the door sub-frame. See Fig. 76.5. Removing door sub-frame
2005 Porsche Cayenne2003-2008 ACCESSORIES & EQUIPMENT Door Front, Central Locking SystemFig. 78: Removing door sub-frame from the basic door frameCourtesy of PORSCHE OF NORTH AMERICA, INC.5.1. Raise the door sub-frame -12- evenly at the front <strong>and</strong> rear until the guide pins -13- <strong>and</strong> -16- are fullyreleased from the holding slots -14- <strong>and</strong> -15- . See Fig. 78, Fig. 79, Fig. 80.
2005 Porsche Cayenne2003-2008 ACCESSORIES & EQUIPMENT Door Front, Central Locking SystemFig. 79: Identifying pins <strong>and</strong> holding slotsCourtesy of PORSCHE OF NORTH AMERICA, INC.
2005 Porsche Cayenne2003-2008 ACCESSORIES & EQUIPMENT Door Front, Central Locking SystemFig. 80: Identifying pins <strong>and</strong> holding slotsCourtesy of PORSCHE OF NORTH AMERICA, INC.
2005 Porsche Cayenne2003-2008 ACCESSORIES & EQUIPMENT Door Front, Central Locking SystemFig. 81: Removing door sub-frame from the basic door frameCourtesy of PORSCHE OF NORTH AMERICA, INC.5.2. Remove the door sub-frame from the basic door frame -17- . See Fig. 81.INSTALLING FRONT DOOR SUB-FRAMEInstalling front door sub-frameInstallation Location:
2005 Porsche Cayenne2003-2008 ACCESSORIES & EQUIPMENT Door Front, Central Locking SystemFig. 82: Installation location of front door sub-frameCourtesy of PORSCHE OF NORTH AMERICA, INC.1. Moving adjustable fastening elements to their home position1.1. Move the three adjustable fastening elements ( -Arrow A, B, C- ) on the door sub-frame to their homeposition. Screw the screw element -<strong>19</strong>- fully into the basic element -18- . See Fig. 83, Fig. 84.
2005 Porsche Cayenne2003-2008 ACCESSORIES & EQUIPMENT Door Front, Central Locking SystemFig. 83: Moving adjustable fastening elements to their home positionCourtesy of PORSCHE OF NORTH AMERICA, INC.NOTE:The screw elements have left-h<strong>and</strong>ed threads.
2005 Porsche Cayenne2003-2008 ACCESSORIES & EQUIPMENT Door Front, Central Locking SystemFig. 84: Screw the screw element -<strong>19</strong>- fully into basic element -18-Courtesy of PORSCHE OF NORTH AMERICA, INC.2. Opening basic door frame3. Engaging door sub-frame on basic door frame
2005 Porsche Cayenne2003-2008 ACCESSORIES & EQUIPMENT Door Front, Central Locking SystemFig. 85: Mounting door sub-frame onto the basic door frameCourtesy of PORSCHE OF NORTH AMERICA, INC.3.1. Mount the door sub-frame -12- on the basic door frame -17- . See Fig. 85.
2005 Porsche Cayenne2003-2008 ACCESSORIES & EQUIPMENT Door Front, Central Locking SystemFig. 86: Insert guide pins into the holding slotsCourtesy of PORSCHE OF NORTH AMERICA, INC.
2005 Porsche Cayenne2003-2008 ACCESSORIES & EQUIPMENT Door Front, Central Locking SystemFig. 87: Insert guide pins into the holding slotsCourtesy of PORSCHE OF NORTH AMERICA, INC.3.2. Insert guide pins -13- <strong>and</strong> -16- into the holding slots -14- <strong>and</strong> -15- . See Fig. 86, Fig. 87.4. Fixing door sub-frame to basic door frame, linking up electrical plug connection <strong>and</strong> tightening <strong>lock</strong>.
2005 Porsche Cayenne2003-2008 ACCESSORIES & EQUIPMENT Door Front, Central Locking SystemFig. 88: Affix door sub-frame to basic door frameCourtesy of PORSCHE OF NORTH AMERICA, INC.4.1. Fix the door sub-frame to the basic door frame by screwing in the fastening screws -9, 11- . Press the doorsub-frame upwards <strong>and</strong> screw in fastening screws slightly. See Fig. 88.
2005 Porsche Cayenne2003-2008 ACCESSORIES & EQUIPMENT Door Front, Central Locking SystemFig. 89: Affix door sub-frame to basic door frameCourtesy of PORSCHE OF NORTH AMERICA, INC.4.2. Push wiring harness -10- from inside through the door sub-frame <strong>and</strong> the door opening <strong>and</strong> press rubbersleeve on the wiring harness -10- from inside into the door opening. See Fig. 89.
2005 Porsche Cayenne2003-2008 ACCESSORIES & EQUIPMENT Door Front, Central Locking SystemFig. 90: Connect electric push-on connector at A-pillarCourtesy of PORSCHE OF NORTH AMERICA, INC.4.3. Connect electric push-on connector -6- . See Fig. 90.
2005 Porsche Cayenne2003-2008 ACCESSORIES & EQUIPMENT Door Front, Central Locking SystemFig. 91: Press on rubber sleeve between the door <strong>and</strong> A-pillarCourtesy of PORSCHE OF NORTH AMERICA, INC.4.4. Press on the rubber sleeve -7- between the doors <strong>and</strong> A-pillar. See Fig. 91.
2005 Porsche Cayenne2003-2008 ACCESSORIES & EQUIPMENT Door Front, Central Locking SystemFig. 92: Install new fastening screws <strong>and</strong> tighten to specified torqueCourtesy of PORSCHE OF NORTH AMERICA, INC.4.5. Screw in new fastening screws -3- on the door <strong>lock</strong> <strong>and</strong> tighten to the specified tightening torque -->Tightening torques. See Fig. 92.5. Adjusting door sub-frame
2005 Porsche Cayenne2003-2008 ACCESSORIES & EQUIPMENT Door Front, Central Locking SystemFig. 93: Adjusting door sub-frame (1 Of 4)Courtesy of PORSCHE OF NORTH AMERICA, INC.5.1. The fastening screw -11- secures the front bearing position (holding slot -15- for guide pin -16- ). Thisbearing point cannot then be adjusted!. See Fig. 93.5.2. Close the door carefully.NOTE:The setting is achieved by bracing the door unit carrier with the basic doorframe using the adjustable fastening elements. If the required jointmeasurements cannot be achieved, it may be necessary to unscrew thefastening screws -9,11- <strong>and</strong> reset the adjustable fastening elements to the basicposition.
2005 Porsche Cayenne2003-2008 ACCESSORIES & EQUIPMENT Door Front, Central Locking SystemFig. 94: Adjusting door sub-frame (2 Of 4)Courtesy of PORSCHE OF NORTH AMERICA, INC.5.3. The window frame (door sub-frame) must be adjusted with respect to the roof frame <strong>and</strong> B-pillar ( -arrowD- ). The pivoting points in this case are the holding slots -14- , -15- <strong>and</strong> the guide pins -13- , -16- . Adjust thegap dimensions on the door sub-frame. See Fig. 94, Fig. 95, Fig. 96.
2005 Porsche Cayenne2003-2008 ACCESSORIES & EQUIPMENT Door Front, Central Locking SystemFig. 95: Adjusting door sub-frame (3 Of 4)Courtesy of PORSCHE OF NORTH AMERICA, INC.
2005 Porsche Cayenne2003-2008 ACCESSORIES & EQUIPMENT Door Front, Central Locking SystemFig. 96: Adjusting door sub-frame (4 Of 4)Courtesy of PORSCHE OF NORTH AMERICA, INC.5.4. --> Test <strong>and</strong> adjustment values
2005 Porsche Cayenne2003-2008 ACCESSORIES & EQUIPMENT Door Front, Central Locking SystemFig. 97: Affix door sub-frame to basic door frameCourtesy of PORSCHE OF NORTH AMERICA, INC.5.5. Tighten fastening screws -9, 11- to the specified tightening torque. --> Tightening torques. See Fig. 97.
2005 Porsche Cayenne2003-2008 ACCESSORIES & EQUIPMENT Door Front, Central Locking SystemFig. 98: Fasten door sub-frame <strong>and</strong> tighten to specified torqueCourtesy of PORSCHE OF NORTH AMERICA, INC.6. Fastening door sub-frame6.1. Screw in fastening screws -8- <strong>and</strong> tighten to the specified tightening torque. --> Tightening torques. SeeFig. 98.Installation Location:
2005 Porsche Cayenne2003-2008 ACCESSORIES & EQUIPMENT Door Front, Central Locking SystemFig. 99: Installation location of covers of front assembly openingsCourtesy of PORSCHE OF NORTH AMERICA, INC.
2005 Porsche Cayenne2003-2008 ACCESSORIES & EQUIPMENT Door Front, Central Locking SystemFig. 100: Installing front bottom assembly opening coverCourtesy of PORSCHE OF NORTH AMERICA, INC.7. Clipping in covers of front assembly openings7.1. Clip in the top <strong>and</strong> bottom assembly opening covers -4- <strong>and</strong> -5- . See Fig. 101, Fig. 100.
2005 Porsche Cayenne2003-2008 ACCESSORIES & EQUIPMENT Door Front, Central Locking SystemFig. 101: Installing front top assembly opening coverCourtesy of PORSCHE OF NORTH AMERICA, INC.
2005 Porsche Cayenne2003-2008 ACCESSORIES & EQUIPMENT Door Front, Central Locking SystemFig. 102: Installing rear bottom assembly opening coverCourtesy of PORSCHE OF NORTH AMERICA, INC.8. Clipping in rear assembly opening covers <strong>and</strong> connecting KESSY wiring harness - For all vehicles:8.1. Clip in the top <strong>and</strong> bottom assembly opening covers -1- <strong>and</strong> -2- . See Fig. 103, Fig. 102.
2005 Porsche Cayenne2003-2008 ACCESSORIES & EQUIPMENT Door Front, Central Locking SystemFig. 103: Installing rear top assembly opening coverCourtesy of PORSCHE OF NORTH AMERICA, INC.
2005 Porsche Cayenne2003-2008 ACCESSORIES & EQUIPMENT Door Front, Central Locking SystemFig. 104: Routing wiring harness in through door openingCourtesy of PORSCHE OF NORTH AMERICA, INC.9. Also for vehicles with KESSY control module:9.1. Pull KESSY wiring harness in through the opening. Install rubber sleeve in the unit carrier until it engagescompletely ( -Arrow A- ). See Fig. 104.9.2. Insert plug into the socket ( -Arrow B- ) until it clicks into place. See Fig. 104.SUBSEQUENT WORKSubsequent work1. Install rear-view mirror. Refer to 66 89 <strong>19</strong> Removing <strong>and</strong> <strong>installing</strong> rear-view mirror - as of MY 2003 (AllModels) .2. Install front door trim. Refer to 70 59 <strong>19</strong> Removing <strong>and</strong> <strong>installing</strong> front door trim panel - as of MY 2003(All Models) .
2005 Porsche Cayenne2003-2008 ACCESSORIES & EQUIPMENT Door Front, Central Locking System3. Install door h<strong>and</strong>le --> Installing door h<strong>and</strong>le.4. Teach power windows. Refer to 90 IN Work instructions after disconnecting the battery - as of MY 2003(All Models Except Cayenne S TIO Titan) .<strong>57</strong> 30 Z2 ASSEMBLING FRONT DOOR SUB-FRAME - AS OF MY 2003 (ALLMODELS)TOOLSDesignation Type Number ExplanationH<strong>and</strong> riveting tool for pop special tool NR.124-1rivetsNozzle tips for h<strong>and</strong> rivetextractorsspecial tool NR.124-2ASSEMBLING FRONT DOOR SUB-FRAMEInstallation Location:Fig. 105: Installation location of front door sub-frameCourtesy of PORSCHE OF NORTH AMERICA, INC.
2005 Porsche Cayenne2003-2008 ACCESSORIES & EQUIPMENT Door Front, Central Locking SystemFig. 106: Affixing foam seal to the rear of the support plateCourtesy of PORSCHE OF NORTH AMERICA, INC.1. Affixing foam seal to the rear of the support plate1.1. Clean marked area -1- on the support plate -2- . The area must be completely free of any greasy residues.See Fig. 106.1.2. Stick self-adhesive foam seal in the marked area -1- . The foam seal must not be deformed or stretched inthe process. See Fig. 106.2. Securing the support plate on the door frame
2005 Porsche Cayenne2003-2008 ACCESSORIES & EQUIPMENT Door Front, Central Locking SystemFig. 107: Place support plate on door frame (1 Of 2)Courtesy of PORSCHE OF NORTH AMERICA, INC.2.1. Place the support plate -2- on the door frame -3- <strong>and</strong> align it roughly. See Fig. 107.
2005 Porsche Cayenne2003-2008 ACCESSORIES & EQUIPMENT Door Front, Central Locking SystemFig. 108: Place support plate on door frame (2 Of 2)Courtesy of PORSCHE OF NORTH AMERICA, INC.
2005 Porsche Cayenne2003-2008 ACCESSORIES & EQUIPMENT Door Front, Central Locking SystemFig. 1<strong>09</strong>: Affix support plate to door frame using four rivetsCourtesy of PORSCHE OF NORTH AMERICA, INC.
2005 Porsche Cayenne2003-2008 ACCESSORIES & EQUIPMENT Door Front, Central Locking SystemFig. 110: Affix support plate to door frameCourtesy of PORSCHE OF NORTH AMERICA, INC.2.2. Fix the support plate to the door frame using four rivets -4- . Rivet the rivets in the sequence -A, B, C, D- .H<strong>and</strong> riveting tool for pop rivets NR.124-1 Nozzle tips for h<strong>and</strong> rivet extractors NR.124-2. See Fig. 1<strong>09</strong>,Fig. 110.
2005 Porsche Cayenne2003-2008 ACCESSORIES & EQUIPMENT Door Front, Central Locking SystemFig. 111: Rivet joint areas between support plate <strong>and</strong> door frame at the side (1 Of 2)Courtesy of PORSCHE OF NORTH AMERICA, INC.2.3. Rivet the joint areas between the support plate -2- <strong>and</strong> door frame -3- at the side -5- . H<strong>and</strong> riveting toolfor pop rivets NR.124-1, Nozzle tips for h<strong>and</strong> rivet extractors NR.124-2. See Fig. 111.
2005 Porsche Cayenne2003-2008 ACCESSORIES & EQUIPMENT Door Front, Central Locking SystemFig. 112: Rivet joint areas between support plate <strong>and</strong> door frame at the side (2 Of 2)Courtesy of PORSCHE OF NORTH AMERICA, INC.Installation Location:
2005 Porsche Cayenne2003-2008 ACCESSORIES & EQUIPMENT Door Front, Central Locking SystemFig. 113: Installation location of front cover capCourtesy of PORSCHE OF NORTH AMERICA, INC.
2005 Porsche Cayenne2003-2008 ACCESSORIES & EQUIPMENT Door Front, Central Locking SystemFig. 114: Installing front cover capCourtesy of PORSCHE OF NORTH AMERICA, INC.3. Installing front cover cap3.1. Attach the front cover cap -6- to the door sub-frame using the <strong>lock</strong>ing tabs <strong>and</strong> clip it in. See Fig. 114.Installation Location:
2005 Porsche Cayenne2003-2008 ACCESSORIES & EQUIPMENT Door Front, Central Locking SystemFig. 115: Installation location of rear cover capCourtesy of PORSCHE OF NORTH AMERICA, INC.4. Installing rear cover cap
2005 Porsche Cayenne2003-2008 ACCESSORIES & EQUIPMENT Door Front, Central Locking SystemFig. 116: Installing rear cover capCourtesy of PORSCHE OF NORTH AMERICA, INC.4.1. Engage rear cover -7- on door sub-frame with <strong>lock</strong>ing tab <strong>and</strong> swivel to end position ( -arrows- ). See Fig.116.
2005 Porsche Cayenne2003-2008 ACCESSORIES & EQUIPMENT Door Front, Central Locking SystemFig. 117: Rivet rear cover to door sub-frameCourtesy of PORSCHE OF NORTH AMERICA, INC.4.2. Rivet the rear cover -7- to the door sub-frame -8- . See Fig. 117.Installation Location:
2005 Porsche Cayenne2003-2008 ACCESSORIES & EQUIPMENT Door Front, Central Locking SystemFig. 118: Installation location of exp<strong>and</strong>ing nutCourtesy of PORSCHE OF NORTH AMERICA, INC.
2005 Porsche Cayenne2003-2008 ACCESSORIES & EQUIPMENT Door Front, Central Locking SystemFig. 1<strong>19</strong>: Installation location of exp<strong>and</strong>ing nutCourtesy of PORSCHE OF NORTH AMERICA, INC.
2005 Porsche Cayenne2003-2008 ACCESSORIES & EQUIPMENT Door Front, Central Locking SystemFig. 120: Inserting exp<strong>and</strong>ing nutsCourtesy of PORSCHE OF NORTH AMERICA, INC.5. Inserting exp<strong>and</strong>ing nuts5.1. Press in the exp<strong>and</strong>ing nuts -9- on the lower edge of the door sub-frame. See Fig. 120.Installation Location:
2005 Porsche Cayenne2003-2008 ACCESSORIES & EQUIPMENT Door Front, Central Locking SystemFig. 121: Installation location of inner window shaft moldingCourtesy of PORSCHE OF NORTH AMERICA, INC.6. Installing inner window shaft molding
2005 Porsche Cayenne2003-2008 ACCESSORIES & EQUIPMENT Door Front, Central Locking SystemFig. 122: Positioning inner window shaft molding in the front area as shownCourtesy of PORSCHE OF NORTH AMERICA, INC.6.1. Position the inner window shaft molding -10- in the front area ( -Arrow A- ). See Fig. 122.
2005 Porsche Cayenne2003-2008 ACCESSORIES & EQUIPMENT Door Front, Central Locking SystemFig. 123: Installing inner window shaft molding to door sub-frameCourtesy of PORSCHE OF NORTH AMERICA, INC.6.2. Center the inner window shaft molding -10- <strong>and</strong> press it evenly onto the door sub-frame over the entirelength ( -Arrow B- ). See Fig. 123.7. Installing the window seal
2005 Porsche Cayenne2003-2008 ACCESSORIES & EQUIPMENT Door Front, Central Locking SystemFig. 124: View of laid out window sealCourtesy of PORSCHE OF NORTH AMERICA, INC.7.1. Lay out window seal -11- as shown <strong>and</strong> fit to the window frame in the top corner. See Fig. 124.
2005 Porsche Cayenne2003-2008 ACCESSORIES & EQUIPMENT Door Front, Central Locking SystemFig. 125: Inserting plastic cover <strong>and</strong> push it against corner area of the window sealCourtesy of PORSCHE OF NORTH AMERICA, INC.7.2. Insert the plastic cover -12- ( -Arrow C- ) <strong>and</strong> push it against the corner area of the window seal ( -ArrowD- ). See Fig. 125.7.3. Attach the window seal to the door frame along the B-pillar, roof rail, <strong>and</strong> A-pillar.8. Turning the component on the assembly table.
2005 Porsche Cayenne2003-2008 ACCESSORIES & EQUIPMENT Door Front, Central Locking SystemFig. 126: Installing the door sealCourtesy of PORSCHE OF NORTH AMERICA, INC.9. Installing the door sealNOTE:As a general rule, a new door seal must be fitted when assembling the door unitcarrier.9.1. Fit door seal -13- to the door sub-frame in the front area. See Fig. 126.9.2. The connection point -14- of the door seal must be in the marked area ( -Arrow E- ). See Fig. 126.9.3. Lay door seal -13- all round the door sub-frame <strong>and</strong> fit it. Take care not to deform or stretch the seal,especially in rounded areas. See Fig. 126.9.4. Check that door seal -13- is seated properly on door sub-frame. See Fig. 126.Installation Location:
2005 Porsche Cayenne2003-2008 ACCESSORIES & EQUIPMENT Door Front, Central Locking SystemFig. 127: Installation location of grommetCourtesy of PORSCHE OF NORTH AMERICA, INC.
2005 Porsche Cayenne2003-2008 ACCESSORIES & EQUIPMENT Door Front, Central Locking SystemFig. 128: Inserting grommetCourtesy of PORSCHE OF NORTH AMERICA, INC.10. Inserting the grommet10.1. Push the grommet -15- into the door frame until it clicks into place. See Fig. 128.11. Installing wiring harness
2005 Porsche Cayenne2003-2008 ACCESSORIES & EQUIPMENT Door Front, Central Locking SystemFig. 129: Route wiring harness on door sub-frame as shownCourtesy of PORSCHE OF NORTH AMERICA, INC.11.1. Lay wiring harness -16- on door sub-frame as shown. See Fig. 128.11.2. Clip wiring harness -16- into the door sub-frame at the marked positions ( -Arrows A to F- ). See Fig.128.
2005 Porsche Cayenne2003-2008 ACCESSORIES & EQUIPMENT Door Front, Central Locking SystemFig. 130: Routing wiring harness through the door sub-frameCourtesy of PORSCHE OF NORTH AMERICA, INC.11.3. Guide front area (transition to A-pillar) of wiring harness through the door sub-frame ( -Arrow G- ) <strong>and</strong>pull it out to the front ( -Arrow H- ). Make sure that the rubber grommet is not twisted when fitted. See Fig.130.Installation Location:
2005 Porsche Cayenne2003-2008 ACCESSORIES & EQUIPMENT Door Front, Central Locking SystemFig. 131: Installation location of door <strong>lock</strong>Courtesy of PORSCHE OF NORTH AMERICA, INC.12. Completing the door <strong>lock</strong>
2005 Porsche Cayenne2003-2008 ACCESSORIES & EQUIPMENT Door Front, Central Locking SystemFig. 132: Installing bowden cable <strong>and</strong> <strong>lock</strong> retaining bracketCourtesy of PORSCHE OF NORTH AMERICA, INC.12.1. Engage bowden cable -18- on door <strong>lock</strong> actuating mechanism <strong>and</strong> swivel by 90° ( -Arrow I- ). See Fig.132.12.2. Clip in bowden cable mount -<strong>19</strong>- on door <strong>lock</strong> -17- ( -Arrow J- ). See Fig. 132.12.3. Fit <strong>lock</strong> retaining bracket -20- ( -Arrow K- ). See Fig. 132.
2005 Porsche Cayenne2003-2008 ACCESSORIES & EQUIPMENT Door Front, Central Locking SystemFig. 133: Rivet <strong>lock</strong> retaining bracket to door <strong>lock</strong>Courtesy of PORSCHE OF NORTH AMERICA, INC.12.4. Rivet the <strong>lock</strong> retaining bracket -20- to the door <strong>lock</strong> -17- from the rear ( -21- ). See Fig. 133.
2005 Porsche Cayenne2003-2008 ACCESSORIES & EQUIPMENT Door Front, Central Locking SystemFig. 134: Clip cable element to lever mechanismCourtesy of PORSCHE OF NORTH AMERICA, INC.13. Clipping in cable element13.1. Clip cable element -22- to lever mechanism -23- ( -Arrow L- ). See Fig. 134.
2005 Porsche Cayenne2003-2008 ACCESSORIES & EQUIPMENT Door Front, Central Locking SystemFig. 135: View of lever mechanismCourtesy of PORSCHE OF NORTH AMERICA, INC.Installation Location:
2005 Porsche Cayenne2003-2008 ACCESSORIES & EQUIPMENT Door Front, Central Locking SystemFig. 136: Installation location of door <strong>lock</strong>Courtesy of PORSCHE OF NORTH AMERICA, INC.
2005 Porsche Cayenne2003-2008 ACCESSORIES & EQUIPMENT Door Front, Central Locking SystemFig. 137: Installing door <strong>lock</strong>Courtesy of PORSCHE OF NORTH AMERICA, INC.14. Installing door <strong>lock</strong>14.1. Lay wiring harness -16- as shown. See Fig. 137.14.2. Guide bowden cable -18- through the door sub-frame <strong>and</strong> insert door <strong>lock</strong> -17- ( -Arrow A- ). See Fig.137.15. Riveting the door <strong>lock</strong>
2005 Porsche Cayenne2003-2008 ACCESSORIES & EQUIPMENT Door Front, Central Locking SystemFig. 138: Connecting electric plug connectionCourtesy of PORSCHE OF NORTH AMERICA, INC.15.1. Insert electric plug connections ( -Arrows B, C- ) until they audibly engage. See Fig. 138.
2005 Porsche Cayenne2003-2008 ACCESSORIES & EQUIPMENT Door Front, Central Locking SystemFig. 139: Rivet door <strong>lock</strong> to the door sub-frameCourtesy of PORSCHE OF NORTH AMERICA, INC.15.2. Insert the rivets -25- ( -Arrows D- ) <strong>and</strong> rivet the door <strong>lock</strong> to the door sub-frame. See Fig. 139.
2005 Porsche Cayenne2003-2008 ACCESSORIES & EQUIPMENT Door Front, Central Locking SystemFig. 140: Installing coverCourtesy of PORSCHE OF NORTH AMERICA, INC.15.3. Position the cover -40- <strong>and</strong> clip it into place ( -Arrow F- ). See Fig. 140.16. Install the power window mechanism.
2005 Porsche Cayenne2003-2008 ACCESSORIES & EQUIPMENT Door Front, Central Locking SystemFig. 141: Ensure power window cables are correctly positionedCourtesy of PORSCHE OF NORTH AMERICA, INC.16.1. Place the power window mechanism on the door frame as shown. Make sure the cables are in the correctposition ( -Arrow E- ). See Fig. 141.
2005 Porsche Cayenne2003-2008 ACCESSORIES & EQUIPMENT Door Front, Central Locking SystemFig. 142: Installing power window gear onto door sub-frameCourtesy of PORSCHE OF NORTH AMERICA, INC.16.2. Clip power window gear -26- in the door sub-frame. See Fig. 142.Fig. 143: Rivet guide rails to door frame
2005 Porsche Cayenne2003-2008 ACCESSORIES & EQUIPMENT Door Front, Central Locking SystemCourtesy of PORSCHE OF NORTH AMERICA, INC.16.3. Fix the guide rails -27- with 2 rivets each -28- <strong>and</strong> rivet to the door frame. See Fig. 143.16.4. Clip retaining clip -29- in the door sub-frame <strong>and</strong> engage the cable. See Fig. 144.Fig. 144: View of cable retaining clipCourtesy of PORSCHE OF NORTH AMERICA, INC.16.5. Apply lubricant (grease) to the guide rails <strong>and</strong> move the sliding pads -30- manually. See Fig. 143.Installation Location:
2005 Porsche Cayenne2003-2008 ACCESSORIES & EQUIPMENT Door Front, Central Locking SystemFig. 145: Installation location of damping materialCourtesy of PORSCHE OF NORTH AMERICA, INC.
2005 Porsche Cayenne2003-2008 ACCESSORIES & EQUIPMENT Door Front, Central Locking SystemFig. 146: Location of damping materialCourtesy of PORSCHE OF NORTH AMERICA, INC.17. Stick on damping material -33- . See Fig. 146.18. Install door glass. Refer to 64 40 <strong>19</strong> Removing <strong>and</strong> <strong>installing</strong> front door window - as of MY 2003 (AllModels) .<strong>19</strong>. Installing the power window drive
2005 Porsche Cayenne2003-2008 ACCESSORIES & EQUIPMENT Door Front, Central Locking SystemFig. 147: Connecting window power motor <strong>and</strong> control unitCourtesy of PORSCHE OF NORTH AMERICA, INC.<strong>19</strong>.1. Connect window power motor -34- <strong>and</strong> control unit -35- <strong>and</strong> clip into place. See Fig. 147.<strong>19</strong>.2. Position the power window drive on the power window gear.
2005 Porsche Cayenne2003-2008 ACCESSORIES & EQUIPMENT Door Front, Central Locking SystemFig. 148: Identifying window power motor fastenersCourtesy of PORSCHE OF NORTH AMERICA, INC.<strong>19</strong>.3. Screw in fastening screws -36- <strong>and</strong> tighten to the specified tightening torque. --> Tightening torque: 3.0(2.0 ftlb.) Nm +/-0.3 (0.2 ftlb.) Nm . See Fig. 148.
2005 Porsche Cayenne2003-2008 ACCESSORIES & EQUIPMENT Door Front, Central Locking SystemFig. 149: Identifying window power electrical push-on connectorsCourtesy of PORSCHE OF NORTH AMERICA, INC.<strong>19</strong>.4. Connect electrical push-on connectors -37- . See Fig. 149.20. Installing the door sub-frame20.1. --> Installing front door sub-frame
2005 Porsche Cayenne2003-2008 ACCESSORIES & EQUIPMENT Door Front, Central Locking SystemFig. 150: Installing loudspeakerCourtesy of PORSCHE OF NORTH AMERICA, INC.21. Installing the loudspeaker21.1. Position the loudspeaker -38- <strong>and</strong> rivet to the door sub-frame at the marked positions ( -arrows- ). SeeFig. 150.21.2. Connect electric plug connection -39- ( -Arrow D- ). See Fig. 150.Removing cover for front window guide
2005 Porsche Cayenne2003-2008 ACCESSORIES & EQUIPMENT Door Front, Central Locking SystemFig. 151: Press bottom seal to one side.Courtesy of PORSCHE OF NORTH AMERICA, INC.1. Press bottom window guide to one side.1.1. Press the window guide at the bottom corner of the cover to one side.
2005 Porsche Cayenne2003-2008 ACCESSORIES & EQUIPMENT Door Front, Central Locking SystemFig. 152: Unclipping bottom coverCourtesy of PORSCHE OF NORTH AMERICA, INC.2. Unclip cover at lower edge from the door sub-frame.
2005 Porsche Cayenne2003-2008 ACCESSORIES & EQUIPMENT Door Front, Central Locking SystemFig. 153: Press top seal to one side.Courtesy of PORSCHE OF NORTH AMERICA, INC.3. Press top window guide to one side.3.1. Press the window guide at the top corner of the cover to one side.
2005 Porsche Cayenne2003-2008 ACCESSORIES & EQUIPMENT Door Front, Central Locking SystemFig. 154: Unclipping top coverCourtesy of PORSCHE OF NORTH AMERICA, INC.4. Unclip cover at top edge from the door sub-frame.
2005 Porsche Cayenne2003-2008 ACCESSORIES & EQUIPMENT Door Front, Central Locking SystemFig. 155: Removing coverCourtesy of PORSCHE OF NORTH AMERICA, INC.5. Remove cover.Installing cover for front window guide
2005 Porsche Cayenne2003-2008 ACCESSORIES & EQUIPMENT Door Front, Central Locking SystemFig. 156: Positioning coverCourtesy of PORSCHE OF NORTH AMERICA, INC.1. Position cover.1.1. Push in cover into the corner of the door sub-frame below the window guides.
Fig. 158: Engaging cover2005 Porsche Cayenne2003-2008 ACCESSORIES & EQUIPMENT Door Front, Central Locking SystemFig. 1<strong>57</strong>: Pushing in cover under window guideCourtesy of PORSCHE OF NORTH AMERICA, INC.
2005 Porsche Cayenne2003-2008 ACCESSORIES & EQUIPMENT Door Front, Central Locking SystemCourtesy of PORSCHE OF NORTH AMERICA, INC.2. Engage cover.2.1. Press in the cover into the corner of the door sub-frame until the cover is felt to engage.2.2. Check that sealing lip is fitted correctly.<strong>57</strong> 37 <strong>19</strong> REMOVING AND INSTALLING INNER DOOR LOCK RELEASE - ASOF MY 2003 (ALL MODELS)PRELIMINARY WORKPreliminary work1. Remove front door sub-frame. --> <strong>57</strong>30<strong>19</strong> Removing <strong>and</strong> <strong>installing</strong> front door sub-frame - "Removing"REMOVING INNER DOOR LOCK RELEASERemoving inner door release for door <strong>lock</strong>Installation Location:Fig. 159: Installation location of inner door release for door <strong>lock</strong>Courtesy of PORSCHE OF NORTH AMERICA, INC.
2005 Porsche Cayenne2003-2008 ACCESSORIES & EQUIPMENT Door Front, Central Locking SystemFig. 160: Release <strong>and</strong> pull off electrical plugs on door <strong>lock</strong>Courtesy of PORSCHE OF NORTH AMERICA, INC.1. Pulling plug off door <strong>lock</strong>1.1. Release <strong>and</strong> pull off plugs on door <strong>lock</strong> -Arrows A, B- ). See Fig. 160.1.2. Drill out pop rivets -1- . See Fig. 161.
2005 Porsche Cayenne2003-2008 ACCESSORIES & EQUIPMENT Door Front, Central Locking SystemFig. 161: Drill out pop rivets from retaining bracketCourtesy of PORSCHE OF NORTH AMERICA, INC.
2005 Porsche Cayenne2003-2008 ACCESSORIES & EQUIPMENT Door Front, Central Locking SystemFig. 162: Removing door <strong>lock</strong>Courtesy of PORSCHE OF NORTH AMERICA, INC.2. Removing door <strong>lock</strong>2.1. Pull door <strong>lock</strong> -2- with inner door <strong>lock</strong> release -3- out of the door sub-frame ( -Arrow C- ). When doing so,push the grommet -4- out of the door sub-frame. See Fig. 162.
2005 Porsche Cayenne2003-2008 ACCESSORIES & EQUIPMENT Door Front, Central Locking SystemFig. 163: Removing inner door <strong>lock</strong> releaseCourtesy of PORSCHE OF NORTH AMERICA, INC.3. Removing inner door <strong>lock</strong> release3.1. Unclip fastening of inner door <strong>lock</strong> release -5- on door <strong>lock</strong> -2- -Arrow D- ). See Fig. 163.3.2. Swivel inner door <strong>lock</strong> release -3- by 90° <strong>and</strong> disengage on door <strong>lock</strong> actuating mechanism ( -Arrow E- ).See Fig. 163.3.3. Remove inner door <strong>lock</strong> release -3- . See Fig. 163.INSTALLING INNER DOOR LOCK RELEASEInstalling inner door release for door <strong>lock</strong>Installation Location:
2005 Porsche Cayenne2003-2008 ACCESSORIES & EQUIPMENT Door Front, Central Locking SystemFig. 164: Installation location of inner door release for door <strong>lock</strong>Courtesy of PORSCHE OF NORTH AMERICA, INC.Fig. 165: Installing inner door <strong>lock</strong> releaseCourtesy of PORSCHE OF NORTH AMERICA, INC.1. Installing inner door <strong>lock</strong> release1.1. Engage inner door <strong>lock</strong> release -3- on door <strong>lock</strong> actuating mechanism <strong>and</strong> swivel by 90° ( -Arrow A- ). See
2005 Porsche Cayenne2003-2008 ACCESSORIES & EQUIPMENT Door Front, Central Locking SystemFig. 165.1.2. Clip in fastening of inner door <strong>lock</strong> release -5- on door <strong>lock</strong> -2- ( -Arrow B- ). See Fig. 165.Installation Location:Fig. 166: Installation location of door <strong>lock</strong>Courtesy of PORSCHE OF NORTH AMERICA, INC.
2005 Porsche Cayenne2003-2008 ACCESSORIES & EQUIPMENT Door Front, Central Locking SystemFig. 167: Installing door <strong>lock</strong>Courtesy of PORSCHE OF NORTH AMERICA, INC.2. Installing door <strong>lock</strong>2.1. Lay wiring harness -6- as shown. See Fig. 167.2.2. Guide inner door <strong>lock</strong> release -3- through door sub-frame, insert door <strong>lock</strong> -2- ( -Arrow C- ) <strong>and</strong> fit thegrommet -4- . See Fig. 167.
2005 Porsche Cayenne2003-2008 ACCESSORIES & EQUIPMENT Door Front, Central Locking SystemFig. 168: Rivet <strong>lock</strong> retaining bracket to door sub-frameCourtesy of PORSCHE OF NORTH AMERICA, INC.3. Riveting the door <strong>lock</strong>3.1. Insert the pop rivets -1- <strong>and</strong> rivet <strong>lock</strong> retaining bracket to door sub-frame ( -Arrows D- ). See Fig. 169.3.2. Insert plug until the <strong>lock</strong>ing tabs engage audibly ( -Arrows E, F- ). See Fig. 169.
2005 Porsche Cayenne2003-2008 ACCESSORIES & EQUIPMENT Door Front, Central Locking SystemFig. 169: Insert electrical plugs onto door <strong>lock</strong>Courtesy of PORSCHE OF NORTH AMERICA, INC.SUBSEQUENT WORKSubsequent work1. Install front door sub-frame. --> <strong>57</strong>30<strong>19</strong> Removing <strong>and</strong> <strong>installing</strong> front door sub-frame - "Installing"<strong>57</strong> 45 <strong>19</strong> REMOVING AND INSTALLING DOOR HANDLE - AS OF MY 2003(ALL MODELS)REMOVING DOOR HANDLERemoving door h<strong>and</strong>leInstallation Location:
2005 Porsche Cayenne2003-2008 ACCESSORIES & EQUIPMENT Door Front, Central Locking SystemFig. 170: Installation location of door h<strong>and</strong>leCourtesy of PORSCHE OF NORTH AMERICA, INC.1. Remove door trim panel cover. Refer to 70 61 <strong>19</strong> Removing <strong>and</strong> <strong>installing</strong> cover for door trim panel - asof MY 2003 (All Models) .
2005 Porsche Cayenne2003-2008 ACCESSORIES & EQUIPMENT Door Front, Central Locking SystemFig. 171: Removing door h<strong>and</strong>leCourtesy of PORSCHE OF NORTH AMERICA, INC.2. Remove door h<strong>and</strong>le.2.1. Pull off plug -3- ( -Arrow A- ). See Fig. 171.2.2. Undo fastening screws -2- . See Fig. 171.
2005 Porsche Cayenne2003-2008 ACCESSORIES & EQUIPMENT Door Front, Central Locking SystemFig. 172: Pull out <strong>and</strong> remove door h<strong>and</strong>leCourtesy of PORSCHE OF NORTH AMERICA, INC.3. Take off door h<strong>and</strong>le.3.1. Pull out <strong>and</strong> remove door h<strong>and</strong>le -1- ( -Arrow B- ). See Fig. 172.INSTALLING DOOR HANDLEInstalling door h<strong>and</strong>leInstallation Location:
2005 Porsche Cayenne2003-2008 ACCESSORIES & EQUIPMENT Door Front, Central Locking SystemFig. 173: Installation location of door h<strong>and</strong>leCourtesy of PORSCHE OF NORTH AMERICA, INC.
2005 Porsche Cayenne2003-2008 ACCESSORIES & EQUIPMENT Door Front, Central Locking SystemFig. 174: Inserting door h<strong>and</strong>le into door trim panelCourtesy of PORSCHE OF NORTH AMERICA, INC.1. Insert door h<strong>and</strong>le.1.1. Insert door h<strong>and</strong>le -1- into the door trim panel ( -Arrow A- ). See Fig. 174, Fig. 175.
2005 Porsche Cayenne2003-2008 ACCESSORIES & EQUIPMENT Door Front, Central Locking SystemFig. 175: Push door h<strong>and</strong>le in fully <strong>and</strong> press into positionCourtesy of PORSCHE OF NORTH AMERICA, INC.1.2. Push door h<strong>and</strong>le -1- in fully <strong>and</strong> press into position ( -Arrow B- ). See Fig. 174.
2005 Porsche Cayenne2003-2008 ACCESSORIES & EQUIPMENT Door Front, Central Locking SystemFig. 176: Installing door h<strong>and</strong>leCourtesy of PORSCHE OF NORTH AMERICA, INC.2. Install door h<strong>and</strong>le.2.1. Screw in -2- fastening screws. See Fig. 176.2.2. Connect plug -3- ( -Arrow C- ). See Fig. 176.3. Install door trim panel cover. Refer to 70 61 <strong>19</strong> Removing <strong>and</strong> <strong>installing</strong> cover for door trim panel - as ofMY 2003 (All Models) .<strong>57</strong> 51 15 ADJUSTING FRONT DOOR - AS OF MY 2003 (ALL MODELSEXCEPT CAYENNE S TIO TITAN)TECHNICAL VALUESTest <strong>and</strong> adjustment values
2005 Porsche Cayenne2003-2008 ACCESSORIES & EQUIPMENT Door Front, Central Locking SystemNOTE:• The figures showing the gap dimensions can be found in the sectionentitled. Refer to 50 IN Diagram - body gap dimensions - as of MY 2003 (AllModels Except Cayenne S TIO Titan) .Designation Dimension NoteDoor window to trim strip or outerside section-f- 5 mmFront door to rear door-k-4.5 ±0.5(3.7±0.5)mm Rear door only lowered (max. 1 mm)Front door to front wing-n-4.5 ±0.5(3.7±0.5)mm Front door only recessed (max. 1 mm)ADJUSTING FRONT DOORAdjusting front doorInstallation Location:Fig. 177: Adjusting front door gapCourtesy of PORSCHE OF NORTH AMERICA, INC.WARNING: Expansion screws are used to fasten the hinge mountings.
2005 Porsche Cayenne2003-2008 ACCESSORIES & EQUIPMENT Door Front, Central Locking System--> To correctly adjust the front door in the B-pillar area, the hinge screw connections on the door must beloosened.--> The fastening screws of the hinge mounting are expansion screws <strong>and</strong> must always be replaced afterloosening.--> For this reason, these screws must only be tightened by h<strong>and</strong> (max. 10 Nm (7.5 ftlb.)) until the doors areadjusted correctly.Fig. 178: View of door hinge areaCourtesy of PORSCHE OF NORTH AMERICA, INC.1. Setting the front door1.1. Unscrew fastening screws -1- , -2- <strong>and</strong> -3- <strong>and</strong> replace them. The new screws must initially be tightened byh<strong>and</strong> only (max. 10 Nm (7.5 ftlb.)). See Fig. 180, Fig. 179.1.2. By moving the door-side hinge halves on the door -4- , -5- vertically <strong>and</strong> horizontally, adjust the contourwith respect to the wing <strong>and</strong> the rear door. Refer to 50 IN Diagram - body gap dimensions - as of MY 2003(All Models Except Cayenne S TIO Titan) . See Fig. 180, Fig. 179.
2005 Porsche Cayenne2003-2008 ACCESSORIES & EQUIPMENT Door Front, Central Locking System1.3. Tighten fastening screws -1- , -2- <strong>and</strong> -3- to the specified tightening torque --> Tightening torque: 20 (15ftlb.) Nm +/-3 (2.0 ftlb.) Nm --> Torque angle: 90 ° . See Fig. 180, Fig. 179.Fig. 179: Setting the front door (1 Of 2)Courtesy of PORSCHE OF NORTH AMERICA, INC.
2005 Porsche Cayenne2003-2008 ACCESSORIES & EQUIPMENT Door Front, Central Locking SystemFig. 180: Setting the front door (2 Of 2)Courtesy of PORSCHE OF NORTH AMERICA, INC.
2005 Porsche Cayenne2003-2008 ACCESSORIES & EQUIPMENT Door Front, Central Locking SystemFig. 181: Setting the rear door by moving the door <strong>lock</strong> strikerCourtesy of PORSCHE OF NORTH AMERICA, INC.2. Setting the rear door2.1. Loosen fastening screws -6- . By moving the door <strong>lock</strong> striker -7- vertically <strong>and</strong> horizontally, adjust contourwith respect to rear side section <strong>and</strong> rear door --> Tightening torque: 20 (15 ftlb.) Nm +/-2 (1.5 ftlb.) Nm .Refer to 50 IN Diagram - body gap dimensions - as of MY 2003 (All Models Except Cayenne S TIOTitan) . See Fig. 181.2.2. Tighten fastening screws -6- to the specified tightening torque. See Fig. 181.
2005 Porsche Cayenne2003-2008 ACCESSORIES & EQUIPMENT Door Front, Central Locking SystemFig. 182: Setting the rear door without built-in door sub-frameCourtesy of PORSCHE OF NORTH AMERICA, INC.3. Setting without built-in door sub-frame3.1. If the door is fitted without a sub-frame, the rear edge of the outer door panel must be installed higher withrespect to the rear door by the dimension -a- (approx. 2 mm). The door is lowered by approximately 2 mmwhen the door sub-frame is installed. See Fig. 182.<strong>57</strong> 51 <strong>19</strong> REMOVING AND INSTALLING FRONT DOOR - AS OF MY 2003(ALL MODELS)TOOLSDesignation Type Number ExplanationSpecial inserts model AB special tool NR.170
2005 Porsche Cayenne2003-2008 ACCESSORIES & EQUIPMENT Door Front, Central Locking SystemAccessory for torquewrench: open ring wrenchinsert a/f 13 + adapterspecial toolNR.98-1TOOLS AND MATERIALSItem Designation ExplanationSpecial inserts model AB NR.170Accessory for torque wrench: openring wrench insert a/f 13 + adapterNR.98-1REMOVING FRONT DOORInstallation Location:Fig. 183: Installation location of front doorCourtesy of PORSCHE OF NORTH AMERICA, INC.1. Removing ignition key
2005 Porsche Cayenne2003-2008 ACCESSORIES & EQUIPMENT Door Front, Central Locking SystemFig. 184: View of door hinge areaCourtesy of PORSCHE OF NORTH AMERICA, INC.2. Removing door
2005 Porsche Cayenne2003-2008 ACCESSORIES & EQUIPMENT Door Front, Central Locking SystemFig. 185: Pull off rubber sleeve between door <strong>and</strong> A-pillarCourtesy of PORSCHE OF NORTH AMERICA, INC.2.1. Pull off rubber sleeve -1- between door <strong>and</strong> A-pillar -Arrow A- . See Fig. 185.2.2. Release <strong>and</strong> disconnect electric push-on connectors -2- . See Fig. 185.
2005 Porsche Cayenne2003-2008 ACCESSORIES & EQUIPMENT Door Front, Central Locking SystemFig. 186: Unscrew fastening nut of upper hinge jointCourtesy of PORSCHE OF NORTH AMERICA, INC.2.3. Unscrew fastening nut of upper hinge joint -3- using the appropriate special tool --> Tools <strong>and</strong> materials.See Fig. 186.
2005 Porsche Cayenne2003-2008 ACCESSORIES & EQUIPMENT Door Front, Central Locking SystemFig. 187: Removing fastening screw on lower hinge mounting located on door sideCourtesy of PORSCHE OF NORTH AMERICA, INC.2.4. Unscrew fastening screw on lower hinge mounting -4- located on the door side using the appropriatespecial tool --> Tools <strong>and</strong> materials. See Fig. 187.
2005 Porsche Cayenne2003-2008 ACCESSORIES & EQUIPMENT Door Front, Central Locking SystemFig. 188: Lift the door up slightly until hinge bolts disengage hinge halvesCourtesy of PORSCHE OF NORTH AMERICA, INC.3. Taking off the door3.1. Lift the door up slightly -arrows- until the hinge bolts are extended out of the hinge halves on the doorside. See Fig. 188.3.2. Take off the door.
2005 Porsche Cayenne2003-2008 ACCESSORIES & EQUIPMENT Door Front, Central Locking SystemFig. 189: View of door hinge bolts extended out of the hinge halvesCourtesy of PORSCHE OF NORTH AMERICA, INC.INSTALLING FRONT DOORInstalling front doorInstallation Location:
2005 Porsche Cayenne2003-2008 ACCESSORIES & EQUIPMENT Door Front, Central Locking SystemFig. <strong>19</strong>0: Installation location of front doorCourtesy of PORSCHE OF NORTH AMERICA, INC.WARNING: Expansion screws are used to fasten the hinge mountings.--> For this reason, the fastening screw of the lower hinge mounting must always be replaced when <strong>installing</strong>the door.NOTE:• Before inserting the door, the upper <strong>and</strong> lower hinge joint must belubricated.
2005 Porsche Cayenne2003-2008 ACCESSORIES & EQUIPMENT Door Front, Central Locking SystemFig. <strong>19</strong>1: Lower door onto hingesCourtesy of PORSCHE OF NORTH AMERICA, INC.1. Inserting the door1.1. Engage the door into the hinge bolts from above -arrows- . See Fig. <strong>19</strong>1.
2005 Porsche Cayenne2003-2008 ACCESSORIES & EQUIPMENT Door Front, Central Locking SystemFig. <strong>19</strong>2: Insert hinge bolts into hinge halvesCourtesy of PORSCHE OF NORTH AMERICA, INC.2. Installing door
2005 Porsche Cayenne2003-2008 ACCESSORIES & EQUIPMENT Door Front, Central Locking SystemFig. <strong>19</strong>3: Install fastening nut of upper hinge mountingCourtesy of PORSCHE OF NORTH AMERICA, INC.2.1. Screw in fastening nut of upper hinge mounting -3- <strong>and</strong> tighten using the appropriate special tool --> Tools<strong>and</strong> materials --> Tightening torque: 30 (22 ftlb.) Nm +/-3 (2 ftlb.) Nm . See Fig. <strong>19</strong>3.
2005 Porsche Cayenne2003-2008 ACCESSORIES & EQUIPMENT Door Front, Central Locking SystemFig. <strong>19</strong>4: Install fastening screw of lower hinge mountingCourtesy of PORSCHE OF NORTH AMERICA, INC.2.2. Screw in fastening screw of lower hinge mounting -4- <strong>and</strong> tighten using the appropriate special tool -->Initial tightening: 20 (15 ftlb.) Nm +/-15 % --> Final tightening: 90 ° . See Fig. <strong>19</strong>4.
Preliminary work2005 Porsche Cayenne2003-2008 ACCESSORIES & EQUIPMENT Door Front, Central Locking SystemFig. <strong>19</strong>5: Connect electric push-on connectorCourtesy of PORSCHE OF NORTH AMERICA, INC.2.3. Connect electric push-on connector -2- . See Fig. <strong>19</strong>5.2.4. Press on rubber sleeve -1- between door <strong>and</strong> A-pillar -Arrow B- . See Fig. <strong>19</strong>5.SUBSEQUENT WORKSubsequent work1. Teach power windows. --> 90 IN Work instructions after disconnecting the battery - as of MY 2003 (AllModels Except Cayenne S TIO Titan) .<strong>57</strong> 51 37 DISASSEMBLING AND ASSEMBLING FRONT DOOR - AS OF MY2003 (ALL MODELS)PRELIMINARY WORK
2005 Porsche Cayenne2003-2008 ACCESSORIES & EQUIPMENT Door Front, Central Locking System1. Remove front door --> <strong>57</strong>51<strong>19</strong> Removing <strong>and</strong> <strong>installing</strong> front door - "Removing".2. Remove front door trim. Refer to 70 59 <strong>19</strong> Removing <strong>and</strong> <strong>installing</strong> front door trim panel - as of MY2003 (All Models) .3. Remove rear-view mirror. Refer to 66 89 <strong>19</strong> Removing <strong>and</strong> <strong>installing</strong> rear-view mirror - as of MY 2003(All Models) .4. Remove cover for front door. Refer to 66 22 <strong>19</strong> Removing <strong>and</strong> <strong>installing</strong> front door cover - as of MY 2003(All Models) .5. Remove front window bay seal. Refer to 64 48 <strong>19</strong> Removing <strong>and</strong> <strong>installing</strong> front window channel seal - asof MY 2003 (All Models) .6. Remove door h<strong>and</strong>le --> <strong>57</strong>11<strong>19</strong> Removing <strong>and</strong> <strong>installing</strong> door h<strong>and</strong>le - "Removing".7. Remove front door sub-frame. --> <strong>57</strong>30<strong>19</strong> Removing <strong>and</strong> <strong>installing</strong> front door sub-frame - "Removing"8. Remove outer rubber seal for front door --> <strong>57</strong>65<strong>19</strong> Removing <strong>and</strong> <strong>installing</strong> outer rubber seal for frontdoor - "Removing".DISASSEMBLING FRONT DOORDisassembling front doorInstallation Location:Fig. <strong>19</strong>6: View of front door assemblyCourtesy of PORSCHE OF NORTH AMERICA, INC.
2005 Porsche Cayenne2003-2008 ACCESSORIES & EQUIPMENT Door Front, Central Locking System1. Removing door h<strong>and</strong>le base plateFig. <strong>19</strong>7: Removing door h<strong>and</strong>le base plate (1 Of 3)Courtesy of PORSCHE OF NORTH AMERICA, INC.1.1. Unscrew fastening screw for securing door h<strong>and</strong>le base plate -1- <strong>and</strong> remove it ( -arrow A- ). See Fig. <strong>19</strong>7.
2005 Porsche Cayenne2003-2008 ACCESSORIES & EQUIPMENT Door Front, Central Locking SystemFig. <strong>19</strong>8: Removing door h<strong>and</strong>le base plate (2 Of 3)Courtesy of PORSCHE OF NORTH AMERICA, INC.1.2. Press together the fastening clips -2- for the door h<strong>and</strong>le base plate -3- ( -arrow B- ) <strong>and</strong> remove doorh<strong>and</strong>le base plate to the rear ( -arrow C- ). See Fig. <strong>19</strong>8, Fig. <strong>19</strong>9.
2005 Porsche Cayenne2003-2008 ACCESSORIES & EQUIPMENT Door Front, Central Locking SystemFig. <strong>19</strong>9: Removing door h<strong>and</strong>le base plate (3 Of 3)Courtesy of PORSCHE OF NORTH AMERICA, INC.Installation Location:
2005 Porsche Cayenne2003-2008 ACCESSORIES & EQUIPMENT Door Front, Central Locking SystemFig. 200: Installation location of rubber padCourtesy of PORSCHE OF NORTH AMERICA, INC.Installation Location:
2005 Porsche Cayenne2003-2008 ACCESSORIES & EQUIPMENT Door Front, Central Locking SystemFig. 201: Installation location of rubber sleeveCourtesy of PORSCHE OF NORTH AMERICA, INC.2. Removing the rubber pads <strong>and</strong> rubber sleeve
2005 Porsche Cayenne2003-2008 ACCESSORIES & EQUIPMENT Door Front, Central Locking SystemFig. 202: Removing rubber padsCourtesy of PORSCHE OF NORTH AMERICA, INC.2.1. Lever the rubber pads -4- out towards the rear using a plastic wedge ( -arrow D- ). See Fig. 202.
2005 Porsche Cayenne2003-2008 ACCESSORIES & EQUIPMENT Door Front, Central Locking SystemFig. 203: Removing rubber sleeveCourtesy of PORSCHE OF NORTH AMERICA, INC.2.2. Remove the rubber sleeve -5- by pulling it towards the rear ( -arrow E- ). See Fig. 203.ASSEMBLING FRONT DOORAssembling front doorInstallation Location:
2005 Porsche Cayenne2003-2008 ACCESSORIES & EQUIPMENT Door Front, Central Locking SystemFig. 204: View of front door assemblyCourtesy of PORSCHE OF NORTH AMERICA, INC.
2005 Porsche Cayenne2003-2008 ACCESSORIES & EQUIPMENT Door Front, Central Locking SystemFig. 205: Location of rubber sleeve <strong>and</strong> rubber padsCourtesy of PORSCHE OF NORTH AMERICA, INC.1. Installing the rubber sleeve <strong>and</strong> rubber padsFig. 206: Installing rubber sleeveCourtesy of PORSCHE OF NORTH AMERICA, INC.1.1. Insert rubber sleeve -5- into the existing opening -Arrow F- . See Fig. 206.
2005 Porsche Cayenne2003-2008 ACCESSORIES & EQUIPMENT Door Front, Central Locking SystemFig. 207: Installing rubber bufferCourtesy of PORSCHE OF NORTH AMERICA, INC.1.2. Insert rubber buffer -4- into the existing opening -Arrow G- . When doing this, make sure the retaining lipsare fitted correctly. See Fig. 207.
2005 Porsche Cayenne2003-2008 ACCESSORIES & EQUIPMENT Door Front, Central Locking SystemFig. 208: Installing the door h<strong>and</strong>le base plate (1 Of 2)Courtesy of PORSCHE OF NORTH AMERICA, INC.2. Installing the door h<strong>and</strong>le base plate2.1. Insert the door h<strong>and</strong>le base plate -3- from the rear ( -Arrow H- ). When doing this, make sure the fasteningclips -2- click into place correctly. See Fig. 208, Fig. 2<strong>09</strong>.2.2. Screw in fastening screw for door h<strong>and</strong>le base plate -1- -Arrow I- <strong>and</strong> tighten to specified torque -->Tightening torque: 4.5 (3.5 ftlb.) Nm +/-0.5 (0.5 ftlb.) Nm . See Fig. 208.
2005 Porsche Cayenne2003-2008 ACCESSORIES & EQUIPMENT Door Front, Central Locking SystemFig. 2<strong>09</strong>: Installing the door h<strong>and</strong>le base plate (2 Of 2)Courtesy of PORSCHE OF NORTH AMERICA, INC.SUBSEQUENT WORKSubsequent work1. Install outer rubber seal for front door --> <strong>57</strong>65<strong>19</strong> Removing <strong>and</strong> <strong>installing</strong> outer rubber seal for frontdoor - "Installing".2. Install front door --> <strong>57</strong>51<strong>19</strong> Removing <strong>and</strong> <strong>installing</strong> front door - "Installing".3. Install front door sub-frame. --> <strong>57</strong>30<strong>19</strong> Removing <strong>and</strong> <strong>installing</strong> front door sub-frame - "Installing"4. Install door h<strong>and</strong>le --> <strong>57</strong>11<strong>19</strong> Removing <strong>and</strong> <strong>installing</strong> door h<strong>and</strong>le - "Installing".5. Install front window bay seal. Refer to 64 48 <strong>19</strong> Removing <strong>and</strong> <strong>installing</strong> front window channel seal - asof MY 2003 (All Models) .6. Install cover for front door. Refer to 66 22 <strong>19</strong> Removing <strong>and</strong> <strong>installing</strong> front door cover - as of MY 2003
2005 Porsche Cayenne2003-2008 ACCESSORIES & EQUIPMENT Door Front, Central Locking System(All Models) .7. Install rear-view mirror. Refer to 66 89 <strong>19</strong> Removing <strong>and</strong> <strong>installing</strong> rear-view mirror - as of MY 2003 (AllModels) .8. Install front door trim. Refer to 70 59 <strong>19</strong> Removing <strong>and</strong> <strong>installing</strong> front door trim panel - as of MY 2003(All Models) .<strong>57</strong> 53 <strong>19</strong> REMOVING AND INSTALLING FRONT DOOR HINGE - AS OF MY2003 (ALL MODELS)TOOLSDesignation Type Number ExplanationM8 multiple-tooth socket special toolNR.29wrench insertPRELIMINARY WORKPreliminary work1. Remove front door --> <strong>57</strong>51<strong>19</strong> Removing <strong>and</strong> <strong>installing</strong> front door - "Removing".2. Remove front side-section trim panel. Refer to 70 24 <strong>19</strong> Removing <strong>and</strong> <strong>installing</strong> front side section trim -as of MY 2003 (All Models) .3. Remove dashboard bracket. Refer to 70 12 <strong>19</strong> Removing <strong>and</strong> <strong>installing</strong> bracket for dashboard - as of MY2003 (All Models) .REMOVING FRONT DOOR HINGERemoving front door hingeNOTE:• To remove <strong>and</strong> adjust the upper door hinges, the instrument panel <strong>and</strong> thecarrier for the instrument panel must be removed.
2005 Porsche Cayenne2003-2008 ACCESSORIES & EQUIPMENT Door Front, Central Locking SystemFig. 210: View of insulation mat fastening clipCourtesy of PORSCHE OF NORTH AMERICA, INC.1. Remove insulation mat on the inside of the A post.1.1. Unclip fastening clips -11- ( -Arrow A- ) <strong>and</strong> push insulating mat -10- aside ( -Arrow B- ). See Fig. 211,Fig. 210.
2005 Porsche Cayenne2003-2008 ACCESSORIES & EQUIPMENT Door Front, Central Locking SystemFig. 211: Removing insulation mat fastening clipCourtesy of PORSCHE OF NORTH AMERICA, INC.
2005 Porsche Cayenne2003-2008 ACCESSORIES & EQUIPMENT Door Front, Central Locking SystemFig. 212: Remove upper door hinge on bodyCourtesy of PORSCHE OF NORTH AMERICA, INC.2. Remove upper door hinge on the body.NOTE:The rear fastening screw is fitted from inside the vehicle.2.1.2.2. Unscrew the fastening screws -1, 2- for the upper door hinge -3- using the special tool <strong>and</strong> remove. M8multiple-tooth socket wrench insert NR.29. See Fig. 212.2.3. Remove upper door hinge -3- . See Fig. 212.
2005 Porsche Cayenne2003-2008 ACCESSORIES & EQUIPMENT Door Front, Central Locking SystemFig. 213: Remove lower door hinge on the body (1 Of 2)Courtesy of PORSCHE OF NORTH AMERICA, INC.3. Remove lower door hinge on the body.NOTE:The rear fastening screw is fitted from inside the vehicle.3.1.3.2. Unscrew the fastening screws -4, 5- for the lower door hinge -6- using the special tool <strong>and</strong> remove. M8multiple-tooth socket wrench insert NR.29. See Fig. 213.3.3. Remove lower door hinge -6- . See Fig. 213.
2005 Porsche Cayenne2003-2008 ACCESSORIES & EQUIPMENT Door Front, Central Locking SystemFig. 214: Remove lower door hinge on the body (2 Of 2)Courtesy of PORSCHE OF NORTH AMERICA, INC.4. Remove lower door hinge on the door.4.1. Unscrew the fastening screw -9- for the lower door hinge -6- using the special tool <strong>and</strong> remove. M8multiple-tooth socket wrench insert NR.29. See Fig. 214.4.2. Remove lower door hinge -6- . See Fig. 214.
2005 Porsche Cayenne2003-2008 ACCESSORIES & EQUIPMENT Door Front, Central Locking SystemFig. 215: Removing upper door hinge at the doorCourtesy of PORSCHE OF NORTH AMERICA, INC.5. Removing upper door hinge at the door5.1. Unscrew the fastening screw -7- for the upper door hinge -3- using the special tool <strong>and</strong> remove. M8multiple-tooth socket wrench insert NR.29. See Fig. 215.5.2. Remove upper door hinge -3- . See Fig. 215.INSTALLING FRONT DOOR HINGEInstalling front door hinge
2005 Porsche Cayenne2003-2008 ACCESSORIES & EQUIPMENT Door Front, Central Locking SystemFig. 216: View of front door hinge areaCourtesy of PORSCHE OF NORTH AMERICA, INC.WARNING: Expansion screws are used to fasten the door hinges.
2005 Porsche Cayenne2003-2008 ACCESSORIES & EQUIPMENT Door Front, Central Locking System--> The fastening screws of the upper <strong>and</strong> lower door hinges are expansion screws <strong>and</strong> must always be replacedafter loosening.--> For this reason, these screws must only be tightened by h<strong>and</strong> until the doors are adjusted correctly.Fig. 217: Fitting upper door hinge onto doorCourtesy of PORSCHE OF NORTH AMERICA, INC.1. Fit the upper door hinge on the door.1.1. Position upper door hinge -3- on the door <strong>and</strong> secure by screwing in the fastening screw -7- . The fasteningscrew must provisionally be tightened by h<strong>and</strong> only. --> Tightening torque:
2005 Porsche Cayenne2003-2008 ACCESSORIES & EQUIPMENT Door Front, Central Locking SystemFig. 218: Fitting lower door hinge onto doorCourtesy of PORSCHE OF NORTH AMERICA, INC.2. Fit lower door hinge on door.2.1. Position lower door hinge -6- on the door <strong>and</strong> secure to the door by screwing in the fastening screws -8, 9- .The fastening screws must provisionally be tightened by h<strong>and</strong> only. --> Tightening torque:
2005 Porsche Cayenne2003-2008 ACCESSORIES & EQUIPMENT Door Front, Central Locking SystemFig. 2<strong>19</strong>: View of door hinge installedCourtesy of PORSCHE OF NORTH AMERICA, INC.
2005 Porsche Cayenne2003-2008 ACCESSORIES & EQUIPMENT Door Front, Central Locking SystemFig. 220: Inserting front door with hingeCourtesy of PORSCHE OF NORTH AMERICA, INC.3. Insert the front door with hinge.3.1. Insert front door using the pre-mounted hinges -Arrows E- <strong>and</strong> carefully close it completely. Note: Whenclosing the door, make sure that the electrical plug connections are not crushed or damaged. If necessary, insertplug <strong>and</strong> press in grommet. See Fig. 220.
2005 Porsche Cayenne2003-2008 ACCESSORIES & EQUIPMENT Door Front, Central Locking SystemFig. 221: Securing upper door hingeCourtesy of PORSCHE OF NORTH AMERICA, INC.4. Secure the upper door hinge.4.1. Secure the upper door hinge -3- by screwing in the fastening screw -2- from inside the vehicle -Arrow F- .The fastening screw must provisionally be tightened by h<strong>and</strong> only. --> Tightening torque:
2005 Porsche Cayenne2003-2008 ACCESSORIES & EQUIPMENT Door Front, Central Locking SystemFig. 222: Securing lower door hingeCourtesy of PORSCHE OF NORTH AMERICA, INC.5. Secure the lower door hinge.5.1. Secure the lower door hinge -6- by screwing in the fastening screw -5- from inside the vehicle -Arrow G- .The fastening screw must provisionally be tightened by h<strong>and</strong> only. --> Tightening torque:
2005 Porsche Cayenne2003-2008 ACCESSORIES & EQUIPMENT Door Front, Central Locking SystemFig. 223: Positioning front door using the upper door hinge -3-Courtesy of PORSCHE OF NORTH AMERICA, INC.6. Set the upper door hinge <strong>and</strong> tighten from the inside of the vehicle.6.1. Position front door correctly using the upper door hinge -3- . See Fig. 223.6.2. Screw in the fastening screw -2- from the inside of the vehicle <strong>and</strong> to the specified tightening torque usingthe special tool, <strong>and</strong> then tighten to the torque angle. M8 multiple-tooth socket wrench insert NR.29 -->Tightening torque: 20 (15 ftlb.) Nm +/-3 (2.0 ftlb.) Nm --> Tightening torque: +90 ° . See Fig. 223.
2005 Porsche Cayenne2003-2008 ACCESSORIES & EQUIPMENT Door Front, Central Locking SystemFig. 224: Positioning front door using the lower door hinge -6-Courtesy of PORSCHE OF NORTH AMERICA, INC.7. Set the lower door hinge <strong>and</strong> tighten from the inside of the vehicle7.1. Position front door correctly using the lower door hinge -6- . See Fig. 224.7.2. Screw in the fastening screw -5- from the inside of the vehicle <strong>and</strong> to the specified tightening torque usingthe special tool, <strong>and</strong> then tighten to the torque angle. M8 Multiple-tooth socket wrench insert NR.29 -->Tightening torque: 20 (15 ftlb.) Nm +/-3 (2.0 ftlb.) Nm --> Tightening torque: +90 ° . See Fig. 224.8. Remove front door.8.1. The front doors must be removed again to allow access to the fastening screws -1- <strong>and</strong> -4- from the outsideof the vehicle. See Fig. 225, Fig. 226.
2005 Porsche Cayenne2003-2008 ACCESSORIES & EQUIPMENT Door Front, Central Locking SystemFig. 225: Installing upper door hinge fastenerCourtesy of PORSCHE OF NORTH AMERICA, INC.9. Tighten the upper door hinge from the outside of the vehicle.9.1. Screw in the fastening screw -1- from the outside of the vehicle -Arrow H- <strong>and</strong> to the specified tighteningtorque using the special tool, <strong>and</strong> then tighten to the torque angle. M8 multiple-tooth socket wrench insertNR.29 --> Tightening torque: 20 (15 ftlb.) Nm +/-3 (2.0 ftlb.) Nm --> Tightening torque: +90 ° . See Fig.225.
2005 Porsche Cayenne2003-2008 ACCESSORIES & EQUIPMENT Door Front, Central Locking SystemFig. 226: Installing lower door hinge fastenerCourtesy of PORSCHE OF NORTH AMERICA, INC.10. Tighten the lower door hinge from the outside of the vehicle.10.1. Screw in the fastening screw -4- from the outside of the vehicle -Arrow I- <strong>and</strong> to the specified tighteningtorque using the special tool, <strong>and</strong> then tighten to the torque angle. M8 Multiple-tooth socket wrench insertNR.29 --> Tightening torque: 20 (15 ftlb.) Nm +/-3 (2.0 ftlb.) Nm --> Tightening torque: +90 ° . See Fig.226.SUBSEQUENT WORKSubsequent work1. Install front door --> <strong>57</strong>51<strong>19</strong> Removing <strong>and</strong> <strong>installing</strong> front door - "Installing".
2005 Porsche Cayenne2003-2008 ACCESSORIES & EQUIPMENT Door Front, Central Locking System2. Adjust front door --> <strong>57</strong>5115 Adjusting front door [9PAAD1 9PAAD7 9PAAE1 9PAAE7 9PAAF<strong>19</strong>PAAJ1].3. Install dashboard bracket. Refer to 70 12 <strong>19</strong> Removing <strong>and</strong> <strong>installing</strong> bracket for dashboard - as of MY2003 (All Models) .4. Install front side-section trim panel. Refer to 70 24 <strong>19</strong> Removing <strong>and</strong> <strong>installing</strong> front side section trim - asof MY 2003 (All Models) .<strong>57</strong> 63 <strong>19</strong> REMOVING AND INSTALLING RUBBER SEAL FOR FRONT DOOR -AS OF MY 2003 (ALL MODELS)REMOVING THE RUBBER SEAL FOR FRONT DOORRemoving rubber seal for front doorInstallation Location:
2005 Porsche Cayenne2003-2008 ACCESSORIES & EQUIPMENT Door Front, Central Locking SystemFig. 227: Installation location of front door rubber sealCourtesy of PORSCHE OF NORTH AMERICA, INC.1. Open front door.2. Remove A-pillar trim. Refer to 70 <strong>57</strong> <strong>19</strong> Removing <strong>and</strong> <strong>installing</strong> A-pillar trim - as of MY 2003 (AllModels) .3. Remove front grab h<strong>and</strong>les. Refer to 68 35 <strong>19</strong> Removing <strong>and</strong> <strong>installing</strong> front h<strong>and</strong>le - as of MY 2003 (AllModels) .4. Remove front side section trim. Refer to 70 24 <strong>19</strong> Removing <strong>and</strong> <strong>installing</strong> front side section trim - as ofMY 2003 (All Models) .
2005 Porsche Cayenne2003-2008 ACCESSORIES & EQUIPMENT Door Front, Central Locking System5. Removing seal.NOTE:The roof cover must be carefully pulled down slightly in the upper area. Makesure that the roof cover does not buckle.5.1. Remove seal -1- all round sheetmetal flange -arrows- . See Fig. 228.Fig. 228: Removing front door sealCourtesy of PORSCHE OF NORTH AMERICA, INC.INSTALLING THE RUBBER SEAL FOR FRONT DOORInstalling rubber seal for front doorInstallation Location:
2005 Porsche Cayenne2003-2008 ACCESSORIES & EQUIPMENT Door Front, Central Locking SystemFig. 229: Installation location of front door rubber sealCourtesy of PORSCHE OF NORTH AMERICA, INC.
2005 Porsche Cayenne2003-2008 ACCESSORIES & EQUIPMENT Door Front, Central Locking SystemFig. 230: Installing front door sealCourtesy of PORSCHE OF NORTH AMERICA, INC.NOTE:The roof cover must be carefully pulled down slightly in the upper area. Makesure that the roof cover does not buckle.
2005 Porsche Cayenne2003-2008 ACCESSORIES & EQUIPMENT Door Front, Central Locking SystemFig. 231: Position new door seal with connection point as indicatedCourtesy of PORSCHE OF NORTH AMERICA, INC.
2005 Porsche Cayenne2003-2008 ACCESSORIES & EQUIPMENT Door Front, Central Locking SystemFig. 232: A-pillar structure with marking for seal connection pointCourtesy of PORSCHE OF NORTH AMERICA, INC.1. Install new seal.1.1. Position new seal for front door -1- with connection point -2- in the area indicated (on A-pillar structure) -Arrow A- of the sheetmetal flange -3- . The seal air vents must face towards the outside of the vehicle. See Fig.230, Fig. 231, Fig. 232.1.2. Press new seal -1- onto sheetmetal flange. See Fig. 230.2. Check whether the installation is correct.2.1. Pay particular attention to the areas near the tight roundings for correct installation; there must be nodeformation or stretching.2.2. Check the air vents; they must not be closed or covered.3. Install front side section trim. Refer to 70 24 <strong>19</strong> Removing <strong>and</strong> <strong>installing</strong> front side section trim - as ofMY 2003 (All Models) .
2005 Porsche Cayenne2003-2008 ACCESSORIES & EQUIPMENT Door Front, Central Locking System4. Install front grab h<strong>and</strong>les. Refer to 68 35 <strong>19</strong> Removing <strong>and</strong> <strong>installing</strong> front h<strong>and</strong>le - as of MY 2003 (AllModels) .5. Install A-pillar trim. Refer to 70 <strong>57</strong> <strong>19</strong> Removing <strong>and</strong> <strong>installing</strong> A-pillar trim - as of MY 2003 (AllModels) .6. Closing front door<strong>57</strong> 65 <strong>19</strong> REMOVING AND INSTALLING OUTER RUBBER SEAL FOR FRONTDOOR - AS OF MY 2003 (ALL MODELS)REMOVING THE OUTER RUBBER SEAL FOR FRONT DOORRemoving outer rubber seal for front doorInstallation Location:Fig. 233: Installation location of front door outer rubber seal
2005 Porsche Cayenne2003-2008 ACCESSORIES & EQUIPMENT Door Front, Central Locking SystemCourtesy of PORSCHE OF NORTH AMERICA, INC.1. Remove front door --> <strong>57</strong>51<strong>19</strong> Removing <strong>and</strong> <strong>installing</strong> front door - "Removing".Fig. 234: Removing cover of front assembly openingCourtesy of PORSCHE OF NORTH AMERICA, INC.2. Removing cover of front assembly opening2.1. Unclip cover of front assembly opening -1- <strong>and</strong> remove it -Arrow A- . See Fig. 234.3. Remove outer rubber seal.
2005 Porsche Cayenne2003-2008 ACCESSORIES & EQUIPMENT Door Front, Central Locking SystemFig. 235: Removing outer rubber seal (1 Of 2)Courtesy of PORSCHE OF NORTH AMERICA, INC.
2005 Porsche Cayenne2003-2008 ACCESSORIES & EQUIPMENT Door Front, Central Locking SystemFig. 236: Removing outer rubber seal (2 Of 2)Courtesy of PORSCHE OF NORTH AMERICA, INC.3.1. Pull out seal end piece at top -5- behind door sub-frame -6- -Arrow B- . See Fig. 235.3.2. Remove rubber seal -2- , starting at top of door flange -3- -Arrow C- . See Fig. 236.INSTALLING THE OUTER RUBBER SEAL FOR FRONT DOORInstalling outer rubber seal for front doorInstallation Location:
2005 Porsche Cayenne2003-2008 ACCESSORIES & EQUIPMENT Door Front, Central Locking SystemFig. 237: Installation location of front door outer rubber sealCourtesy of PORSCHE OF NORTH AMERICA, INC.1. Install outer rubber seal.
2005 Porsche Cayenne2003-2008 ACCESSORIES & EQUIPMENT Door Front, Central Locking SystemFig. 238: Installing outer rubber seal (starting at bottom)Courtesy of PORSCHE OF NORTH AMERICA, INC.1.1. Insert rubber seal -2- into seal of door panel -4- -Arrow A- <strong>and</strong> fit it to the door flange -3- , starting at thebottom -Arrow B- . See Fig. 238, Fig. 239.
2005 Porsche Cayenne2003-2008 ACCESSORIES & EQUIPMENT Door Front, Central Locking SystemFig. 239: Press outer rubber seal onto door flangeCourtesy of PORSCHE OF NORTH AMERICA, INC.
2005 Porsche Cayenne2003-2008 ACCESSORIES & EQUIPMENT Door Front, Central Locking SystemFig. 240: Insert seal end piece at top behind door sub-frameCourtesy of PORSCHE OF NORTH AMERICA, INC.1.2. Insert seal end piece at top -5- behind the door sub-frame -6- -Arrow C- . See Fig. 240.
2005 Porsche Cayenne2003-2008 ACCESSORIES & EQUIPMENT Door Front, Central Locking SystemFig. 241: Pressing retaining lips of rubber seal into opening on door sub-frameCourtesy of PORSCHE OF NORTH AMERICA, INC.1.3. Press retaining lips of rubber seal -7- into opening -8- on door sub-frame -Arrow D- . See Fig. 241.Installation Location:
2005 Porsche Cayenne2003-2008 ACCESSORIES & EQUIPMENT Door Front, Central Locking SystemFig. 242: Installation location of front assembly opening coverCourtesy of PORSCHE OF NORTH AMERICA, INC.
2005 Porsche Cayenne2003-2008 ACCESSORIES & EQUIPMENT Door Front, Central Locking SystemFig. 243: Installing cover of front assembly openingCourtesy of PORSCHE OF NORTH AMERICA, INC.2. Clip in cover of front assembly opening.2.1. Clip in cover of front assembly opening -1- -Arrow E- . See Fig. 243.3. Install front door --> <strong>57</strong>51<strong>19</strong> Removing <strong>and</strong> <strong>installing</strong> front door - "Installing".<strong>57</strong> 78 <strong>19</strong> REMOVING AND INSTALLING CENTRAL LOCKING SWITCH - ASOF MY 2003 (ALL MODELS)REMOVING CENTRAL LOCKING SWITCH
2005 Porsche Cayenne2003-2008 ACCESSORIES & EQUIPMENT Door Front, Central Locking SystemNOTE:• Only the central <strong>lock</strong>ing switches on the rear switch panels can beremoved <strong>and</strong> installed.Fig. 244: Levering out power windowCourtesy of PORSCHE OF NORTH AMERICA, INC.1. Lever out the entire power window switch using a plastic spatula.
2005 Porsche Cayenne2003-2008 ACCESSORIES & EQUIPMENT Door Front, Central Locking SystemFig. 245: Pulling off plugCourtesy of PORSCHE OF NORTH AMERICA, INC.2. Push in electric plug -1 <strong>and</strong> 2- <strong>and</strong> remove both plugs from power window switch -a- . See Fig. 245.
2005 Porsche Cayenne2003-2008 ACCESSORIES & EQUIPMENT Door Front, Central Locking SystemFig. 246: Removing switchCourtesy of PORSCHE OF NORTH AMERICA, INC.3. Use two screwdrivers to press the switch panel housing apart <strong>and</strong> pull out the switch.INSTALLING CENTRAL LOCKING SWITCHInstalling central <strong>lock</strong>ing switchNOTE:• Only the central <strong>lock</strong>ing switches on the rear switch panels can beremoved <strong>and</strong> installed.
2005 Porsche Cayenne2003-2008 ACCESSORIES & EQUIPMENT Door Front, Central Locking SystemFig. 247: Installing switchCourtesy of PORSCHE OF NORTH AMERICA, INC.1. Insert the switch in the switch panel until it clicks into place.
2005 Porsche Cayenne2003-2008 ACCESSORIES & EQUIPMENT Door Front, Central Locking SystemFig. 248: Inserting the connectorsCourtesy of PORSCHE OF NORTH AMERICA, INC.2. Insert the electrical plug connection in the power window switch until it clicks into place.
2005 Porsche Cayenne2003-2008 ACCESSORIES & EQUIPMENT Door Front, Central Locking SystemFig. 249: Installing switch for power windowCourtesy of PORSCHE OF NORTH AMERICA, INC.3. Position the power window switch in the door trim panel <strong>and</strong> press it in.4. Make sure that the power window switch is positioned evenly on the gap.<strong>57</strong> 89 <strong>19</strong> REMOVING AND INSTALLING CONTROL UNIT FOR REARCONVENIENCE SYSTEMS (REAR CONTROL UNIT) - AS OF MY 2003 (ALLMODELS)PRELIMINARY WORKPreliminary work1. Remove right side trim panel for rear luggage compartment. Refer to 70 03 <strong>19</strong> Removing <strong>and</strong> <strong>installing</strong>rear luggage compartment side-trim panel - as of MY 2003 (All Models) .REMOVING CONTROL UNIT FOR REAR CONVENIENCE SYSTEMSRemoving control unit for rear convenience systemsWARNING: Risk of damage <strong>and</strong> injury!
2005 Porsche Cayenne2003-2008 ACCESSORIES & EQUIPMENT Door Front, Central Locking System--> Before <strong>removing</strong> the control unit for rear convenience systems, switch off the ignition <strong>and</strong> remove theignition key.Installation Location:• If care is not taken, electrical <strong>and</strong> electronic components may bedestroyed.Fig. 250: Overview of control unit for rear convenience systemCourtesy of PORSCHE OF NORTH AMERICA, INC.
2005 Porsche Cayenne2003-2008 ACCESSORIES & EQUIPMENT Door Front, Central Locking SystemFig. 251: Unscrewing fastening screwsCourtesy of PORSCHE OF NORTH AMERICA, INC.1. Undo the two fastening screws -Arrows A- <strong>and</strong> pull out control unit to the side. See Fig. 251.
2005 Porsche Cayenne2003-2008 ACCESSORIES & EQUIPMENT Door Front, Central Locking SystemFig. 252: Pulling off plugCourtesy of PORSCHE OF NORTH AMERICA, INC.2. Press <strong>lock</strong>ing tabs of electrical plug connections -Arrows a- <strong>and</strong> pull off plugs from control unit. See Fig.252.INSTALLING CONTROL UNIT FOR REAR CONVENIENCE SYSTEMSInstalling control unit for rear convenience systems
2005 Porsche Cayenne2003-2008 ACCESSORIES & EQUIPMENT Door Front, Central Locking SystemFig. 253: Inserting the connectorsCourtesy of PORSCHE OF NORTH AMERICA, INC.1. Press electric connectors into control unit until they are felt to engage.
• The procedure described here has been structured in general terms; different texts or additions may2005 Porsche Cayenne2003-2008 ACCESSORIES & EQUIPMENT Door Front, Central Locking SystemFig. 254: Positioning <strong>and</strong> screwing down control unitCourtesy of PORSCHE OF NORTH AMERICA, INC.2. Position control unit under the retaining device <strong>and</strong> screw tight with the two fastening screws -B- . See Fig.254.CODING CONTROL UNIT FOR REAR CONVENIENCE SYSTEMSCoding the control unit for rear convenience systemsNOTE:• If the control unit is replaced, it must be coded using the Porsche SystemTester. This is to adapt the control unit to the vehicle <strong>and</strong> equipment.• If possible, before the control module is removed <strong>and</strong> replaced, a read-out of the vehicle data should beobtained using the Porsche System Tester.• During coding, it is essential to guarantee the power supply for the Porsche System Tester. It is essentialto connect a battery charger with a current rating of at least 40 A to the vehicle battery.• Symbol for the Tab key = -->|• The Porsche System Tester instructions take precedence <strong>and</strong> in the event of a discrepancy these are theinstructions that must be followed. Deviations may occur with later software versions.
2005 Porsche Cayenne2003-2008 ACCESSORIES & EQUIPMENT Door Front, Central Locking Systemappear in the Porsche System Tester.1. Connect the Porsche System Tester to the vehicle <strong>and</strong> start the System Tester. Switch on ignition. >>Continue.2. Select vehicle type using the cursor keys.3. Using the -->| key, move from the vehicle type to the control modules.4. Select Rear/doors with the cursor keys <strong>and</strong> press the >> key.5. Select Control unit replacement with the cursor keys <strong>and</strong> press the >> key.6. Select Read out values (codings) <strong>and</strong> press the >> key.7. The message Coding read-out complete will appear on the screen of the Porsche System Tester >>.8. Switch off ignition <strong>and</strong> replace control unit. --> <strong>57</strong>89<strong>19</strong> Removing <strong>and</strong> <strong>installing</strong> control unit for rearconvenience systems (rear control unit) - "Removing" section.9. Switch on ignition. After replacement of the control module, the vehicle data that has been read out istransferred to the new unit using the "Write data" menu option (see Section 6). Press the >> key.10. System Tester displays Coding write-in complete. Press the >> key.11. Quit menu, switch off ignition, <strong>lock</strong> then un<strong>lock</strong> vehicle <strong>and</strong> read out fault memory once more.• If faults are present, proceed in accordance with the appropriate diagnostic test.SUBSEQUENT WORKSubsequent work1. Install right side trim panel for rear luggage compartment. Refer to 70 03 <strong>19</strong> Removing <strong>and</strong> <strong>installing</strong> rearluggage compartment side-trim panel - as of MY 2003 (All Models) .