17 01 17 engine oil and oil filter
17 01 17 engine oil and oil filter
17 01 17 engine oil and oil filter

Create successful ePaper yourself
Turn your PDF publications into a flip-book with our unique Google optimized e-Paper software.
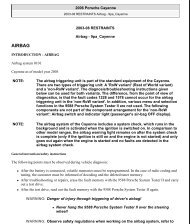
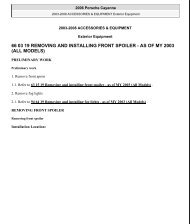
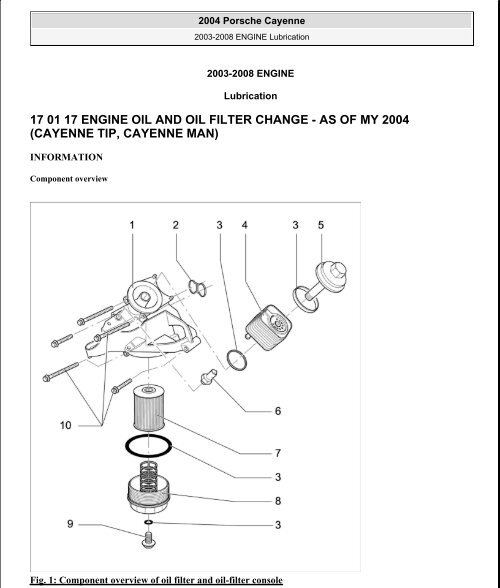
2004 Porsche Cayenne2003-2008 ENGINE Lubrication2003-2008 ENGINELubrication<strong>17</strong> <strong>01</strong> <strong>17</strong> ENGINE OIL AND OIL FILTER CHANGE - AS OF MY 2004(CAYENNE TIP, CAYENNE MAN)INFORMATIONComponent overviewFig. 1: Component overview of <strong>oil</strong> <strong>filter</strong> <strong>and</strong> <strong>oil</strong>-<strong>filter</strong> console
2004 Porsche Cayenne2003-2008 ENGINE LubricationCourtesy of PORSCHE OF NORTH AMERICA, INC.No. Designation Qty. Removal Fitting-1- See Fig. 1.Oil <strong>filter</strong>housing/<strong>engine</strong> 1supporting arm-2- See Fig. 1. Sealing ring 1Replace whenremoving, <strong>oil</strong> lightly-3- See Fig. 1. Sealing ring 3Replace whenremoving, <strong>oil</strong> lightly-4- See Fig. 1. Oil cooler 1Note installationposition-5- See Fig. 1. Cover for <strong>oil</strong> cooler 1-6- See Fig. 1. Oil pressure switch 1-7- See Fig. 1. Oil <strong>filter</strong> element 1-8- See Fig. 1. Oil <strong>filter</strong> cover 1 Drain after removalReplace sealing ringwhen removing, <strong>oil</strong>lightly-9- See Fig. 1.Oil drain plug for <strong>oil</strong><strong>filter</strong> cover1-10- See Fig. 1. Fastening screws 5ENGINE OIL CHANGEEngine <strong>oil</strong> change (without <strong>oil</strong> <strong>filter</strong>)WARNING: Risk of scalding from hot <strong>oil</strong>--> Let the <strong>oil</strong> cool down--> Wear personal protective gear (goggles, gloves)NOTE:The <strong>engine</strong> must be at operating temperature to change the <strong>oil</strong>.NOTE:• Engine <strong>oil</strong> should not be removed by suction as particles of dirt mayremain in the <strong>oil</strong> pan.1. Jack up the vehicle at the points provided. --> 03 Entire vehicle -General2. Remove the underbody panel. Refer to 10 80 19 Removing <strong>and</strong> installing <strong>engine</strong> guard - as of MY 2003(All Models) .
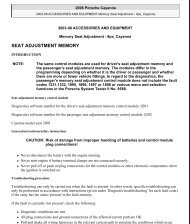
2004 Porsche Cayenne2003-2008 ENGINE LubricationFig. 2: Loosening <strong>oil</strong> drain plugCourtesy of PORSCHE OF NORTH AMERICA, INC.NOTE:• Engine <strong>oil</strong> should not be removed by suction as particles of dirt mayremain in the <strong>oil</strong> pan.3. Loosen <strong>oil</strong> drain plug <strong>and</strong> collect the <strong>engine</strong> <strong>oil</strong> in a disposal container (dripping time approximately 20minutes). Dispose of waste <strong>oil</strong> in accordance with legal requirements.
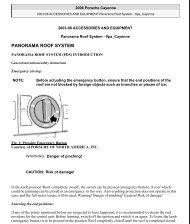
2004 Porsche Cayenne2003-2008 ENGINE LubricationFig. 3: Replacing <strong>oil</strong> drain plugCourtesy of PORSCHE OF NORTH AMERICA, INC.4. Replace <strong>and</strong> fit <strong>oil</strong> drain plug. --> Tightening torque: 22 ftlb.5. Fill in <strong>engine</strong> <strong>oil</strong> of the stipulated viscosity <strong>and</strong> quality. The <strong>oil</strong> change quantity is --> filling capacity: 5.7liter .6. Fit the underbody panel. Refer to 10 80 19 Removing <strong>and</strong> installing <strong>engine</strong> guard - as of MY 2003 (AllModels) .7. Start <strong>engine</strong> <strong>and</strong> check <strong>oil</strong> level. --> <strong>17</strong><strong>01</strong><strong>17</strong> Engine <strong>oil</strong> <strong>and</strong> <strong>oil</strong> <strong>filter</strong> change - chapter on "Checking"Engine <strong>oil</strong> change (with <strong>oil</strong> <strong>filter</strong>)WARNING: Risk of scalding from hot <strong>oil</strong>--> Let the <strong>oil</strong> cool down--> Wear personal protective gear (goggles, gloves)NOTE:• Engine <strong>oil</strong> should not be removed by suction as particles of dirt mayremain in the <strong>oil</strong> pan.
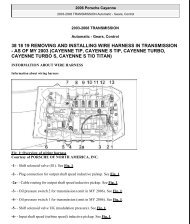
2004 Porsche Cayenne2003-2008 ENGINE Lubrication1. Jack up the vehicle at the points provided. --> 03 Entire vehicle -General2. Remove the underbody panel. Refer to 10 80 19 Removing <strong>and</strong> installing <strong>engine</strong> guard - as of MY 2003(All Models) .Fig. 4: Loosening <strong>oil</strong> drain plugCourtesy of PORSCHE OF NORTH AMERICA, INC.NOTE:• Engine <strong>oil</strong> should not be removed by suction as particles of dirt mayremain in the <strong>oil</strong> pan.3. Loosen <strong>oil</strong> drain plug <strong>and</strong> collect the <strong>engine</strong> <strong>oil</strong> in a disposal container (dripping time approximately 20minutes). Dispose of waste <strong>oil</strong> in accordance with legal requirements.4. Replace <strong>and</strong> fit <strong>oil</strong> drain plug. --> Tightening torque: 22 ftlb.
2004 Porsche Cayenne2003-2008 ENGINE LubricationFig. 5: Loosening the <strong>oil</strong> <strong>filter</strong> coverCourtesy of PORSCHE OF NORTH AMERICA, INC.5. Loosen the <strong>oil</strong> <strong>filter</strong> cover with a socket (a/f 36). Then check the sealing ring <strong>and</strong> coat with new <strong>engine</strong> <strong>oil</strong>.6. Remove the <strong>oil</strong> <strong>filter</strong> housing vertically downwards. Drain the remaining <strong>oil</strong> into a disposal container.7. Remove the <strong>filter</strong> element. Remove the <strong>filter</strong> downwards <strong>and</strong> dispose of in accordance with legalrequirements.NOTE:• Do not remove the O-ring with a sharp object.8. Clean the <strong>oil</strong> <strong>filter</strong> housing <strong>and</strong> replace the O-ring seal. Clean the <strong>oil</strong> <strong>filter</strong> housing thoroughly inside <strong>and</strong>outside <strong>and</strong> replace the O-ring. Carefully lever off the O-ring. The <strong>oil</strong> <strong>filter</strong> housing must not be damagedduring this procedure.9. Insert <strong>filter</strong> element in the housing.• The <strong>oil</strong> <strong>filter</strong> housing contains a cutout via which the O-ring can beremoved.NOTE:• Lightly <strong>oil</strong> the O-ring when installing the <strong>oil</strong> <strong>filter</strong> housing.10. Install <strong>oil</strong> <strong>filter</strong> housing. --> Tightening torque: 19 ftlb. Lightly <strong>oil</strong> the O-ring when doing this.
2004 Porsche Cayenne2003-2008 ENGINE Lubrication11. Fill in <strong>engine</strong> <strong>oil</strong>. The <strong>oil</strong> change quantity is --> filling capacity: 6.3 liter .Fig. 6: Underbody panelCourtesy of PORSCHE OF NORTH AMERICA, INC.12. Fit the underbody panel. Refer to 10 80 19 Removing <strong>and</strong> installing <strong>engine</strong> guard - as of MY 2003 (AllModels) .13. Start <strong>engine</strong> <strong>and</strong> check <strong>oil</strong> level. --> <strong>17</strong><strong>01</strong><strong>17</strong> Engine <strong>oil</strong> <strong>and</strong> <strong>oil</strong> <strong>filter</strong> change - chapter on "Checking"MARKINGS ON THE OIL DIPSTICK (CHECKING ENGINE OIL LEVEL)The vehicle must st<strong>and</strong> horizontally. The <strong>engine</strong> must be switched off <strong>and</strong> at operating temperature. Beforemeasuring, allow <strong>engine</strong> <strong>oil</strong> to flow back into the <strong>oil</strong> pan for approximately 3 minutes.1. Pull out <strong>oil</strong> dipstick <strong>and</strong> wipe it off with a clean, lint-free cloth. Insert dipstick again fully, pull it out again,<strong>and</strong> read off the <strong>oil</strong> level. Correct <strong>engine</strong>-<strong>oil</strong> level if necessary.The <strong>oil</strong> level on the <strong>oil</strong> dipstick must never be below the MIN mark or above the MAX mark.The difference quantity between the marks -1 <strong>and</strong> 2- is --> Filling capacity: 1.5 liter . See Fig. 7.
2004 Porsche Cayenne2003-2008 ENGINE LubricationFig. 7: Markings on the <strong>oil</strong> dipstickCourtesy of PORSCHE OF NORTH AMERICA, INC.NOTE:• After changing the <strong>oil</strong>, the <strong>oil</strong> level must be checked using the dipstick.• The <strong>engine</strong> must have reached its operating temperature.• 1 - max. marking• 2 - min. marking• a - Area above cross-hatched area up to max. mark: no more <strong>oil</strong> must be added.• b - Oil level within cross-hatched area: additional <strong>engine</strong> <strong>oil</strong> can be added.• c - Area from min. mark to cross-hatched area: refill <strong>engine</strong> <strong>oil</strong> up to the cross-hatched area.<strong>17</strong> <strong>01</strong> <strong>17</strong> ENGINE OIL AND OIL FILTER CHANGE - AS OF MY 2003(CAYENNE S TIP, CAYENNE S MAN, CAYENNE TURBO, CAYENNE TURBOS, CAYENNE S TIO TITAN)TOOLSDesignation Type Number Explanation<strong>oil</strong> <strong>filter</strong> spanner special tool P 9204CHANGING ENGINE OIL
2004 Porsche Cayenne2003-2008 ENGINE LubricationChanging the <strong>engine</strong> <strong>oil</strong> (without <strong>oil</strong> <strong>filter</strong>)Fig. 8: OverviewCourtesy of PORSCHE OF NORTH AMERICA, INC.NOTE:• Engine <strong>oil</strong> should not be extracted as particles of dirt may remain in the <strong>oil</strong>pan.1. Jack up the vehicle at the points provided --> 03 Entire vehicle, general information .WARNING: Hot <strong>oil</strong>!--> Wear protective clothing specified!• Danger of scalding!2. Remove <strong>engine</strong> guard . Refer to 10 80 19 Removing <strong>and</strong> installing <strong>engine</strong> guard - as of MY 2003 (AllModels) .
2004 Porsche Cayenne2003-2008 ENGINE LubricationFig. 9: Loosening <strong>oil</strong> drain plugsCourtesy of PORSCHE OF NORTH AMERICA, INC.3. Loosen the 2 <strong>oil</strong> drain plugs <strong>and</strong> collect <strong>engine</strong> <strong>oil</strong> in a disposal container. Dispose of waste <strong>oil</strong> in accordancewith legal requirements.
--> Wear protective clothing specified!2004 Porsche Cayenne2003-2008 ENGINE LubricationFig. 10: Screwing in <strong>oil</strong> drain plug with aluminum sealing ringCourtesy of PORSCHE OF NORTH AMERICA, INC.4. Clean <strong>oil</strong> drain plugs <strong>and</strong> screw in with a new aluminum sealing ring. --> Tightening torque: 37 ftlb.5. Fill in <strong>engine</strong> <strong>oil</strong> of the stipulated viscosity <strong>and</strong> quality. The <strong>oil</strong> change quantity is --> filling capacity: 8.25liter .6. Fit <strong>engine</strong> guard. Refer to 10 80 19 Removing <strong>and</strong> installing <strong>engine</strong> guard - as of MY 2003 (All Models) .Changing the <strong>engine</strong> <strong>oil</strong> (with <strong>oil</strong> <strong>filter</strong>)NOTE:• Engine <strong>oil</strong> should not be extracted as particles of dirt may remain in the <strong>oil</strong>pan.1. Jack up the vehicle at the points provided --> 03 Entire vehicle, general information .2. Remove <strong>engine</strong> guard . Refer to 10 80 19 Removing <strong>and</strong> installing <strong>engine</strong> guard - as of MY 2003 (AllModels) .WARNING: Hot <strong>oil</strong>!• Danger of scalding!
2004 Porsche Cayenne2003-2008 ENGINE LubricationFig. 11: Loosening <strong>oil</strong> drain plugsCourtesy of PORSCHE OF NORTH AMERICA, INC.3. Loosen the 2 <strong>oil</strong> drain plugs <strong>and</strong> collect <strong>engine</strong> <strong>oil</strong> in a disposal container. Dispose of waste <strong>oil</strong> in accordancewith legal requirements.4. Clean <strong>oil</strong> drain plug <strong>and</strong> screw in with new aluminum sealing ring. --> Tightening torque: 37 ftlb.
2004 Porsche Cayenne2003-2008 ENGINE LubricationFig. 12: Loosening <strong>oil</strong> <strong>filter</strong>Courtesy of PORSCHE OF NORTH AMERICA, INC.5. Loosen <strong>oil</strong> <strong>filter</strong> with special tool <strong>oil</strong> <strong>filter</strong> spanner P 9204 <strong>and</strong> unscrew it.6. Remove the <strong>oil</strong> <strong>filter</strong> housing vertically downwards. Drain the remaining <strong>oil</strong> into a disposal container.7. Remove the <strong>filter</strong> element. Remove the <strong>filter</strong> downwards <strong>and</strong> dispose of in accordance with legalrequirements.NOTE:• Do not remove the O-ring with a sharp object.• The <strong>oil</strong> <strong>filter</strong> housing contains a cutout via which the O-ring can beremoved.
2004 Porsche Cayenne2003-2008 ENGINE LubricationFig. 13: Cleaning the <strong>oil</strong>-<strong>filter</strong> housingCourtesy of PORSCHE OF NORTH AMERICA, INC.8. Clean the <strong>oil</strong> <strong>filter</strong> housing <strong>and</strong> replace the O-ring seal. Clean the <strong>oil</strong> <strong>filter</strong> housing thoroughly inside <strong>and</strong>outside <strong>and</strong> replace the O-ring. Carefully lever off the O-ring. The <strong>oil</strong> <strong>filter</strong> housing must not be damagedduring this procedure.9. Install the <strong>filter</strong> element.NOTE:• Lightly <strong>oil</strong> the O-ring when installing the <strong>oil</strong> <strong>filter</strong> housing.10. Install the <strong>oil</strong> <strong>filter</strong> housing <strong>and</strong> tighten using special tool <strong>oil</strong> <strong>filter</strong> spanner P 9204. Lightly <strong>oil</strong> the O-ringwhen doing this. --> Tightening torque: 19 ftlb.11. Fill in <strong>engine</strong> <strong>oil</strong>. The <strong>oil</strong> change quantity is --> filling capacity: 8.75 liter .12. Fit <strong>engine</strong> guard. Refer to 10 80 19 Removing <strong>and</strong> installing <strong>engine</strong> guard - as of MY 2003 (AllModels) .CHECKING ENGINE OIL LEVELThe vehicle must st<strong>and</strong> horizontally. The <strong>engine</strong> must be switched off <strong>and</strong> at operating temperature. Beforemeasuring, allow <strong>engine</strong> <strong>oil</strong> to flow back into the <strong>oil</strong> pan for approximately 3 minutes.1. Pull out <strong>oil</strong> dipstick <strong>and</strong> wipe it off with a clean, lint-free cloth. Insert <strong>oil</strong> dipstick again fully, pull it outagain, <strong>and</strong> read off the <strong>oil</strong> level. Correct <strong>engine</strong>-<strong>oil</strong> level if necessary.The <strong>oil</strong> level on the <strong>oil</strong> dipstick must never be below the MIN mark or above the MAX mark.The difference quantity between the marks is --> Filling capacity: 1.5 liter .NOTE:• After changing the <strong>oil</strong>, the <strong>oil</strong> level must be checked using the dipstick.• The <strong>engine</strong> must have reached its operating temperature.
2004 Porsche Cayenne2003-2008 ENGINE LubricationFig. 14: Oil dipstick min/maxCourtesy of PORSCHE OF NORTH AMERICA, INC.• Max. mark• Min. mark• Range from min up to max. mark: no more <strong>oil</strong> must be added.• Range below Min. mark: refill <strong>engine</strong> <strong>oil</strong> up to Max. mark.<strong>17</strong> 03 <strong>01</strong> CHECKING OIL PRESSURE - AS OF MY 2003 (CAYENNE S TIP,CAYENNE S MAN, CAYENNE TURBO, CAYENNE TURBO S, CAYENNE STIO TITAN)TOOLS AND MATERIALSSpecial tools
2004 Porsche Cayenne2003-2008 ENGINE LubricationFig. 15: Oil-pressure gaugeCourtesy of PORSCHE OF NORTH AMERICA, INC.-A- , See Fig. 15.-B- , See Fig. 15.Item Designation Source ExplanationCHECKING OIL PRESSUREOil pressure tester "OP85" WE1276Test hose (included in set)WARNING: Engine <strong>oil</strong> is toxic.• Danger of poisoning!--> "see WorkshopEquipment Manual,Chapter 3.1.4"--> "see WorkshopEquipment Manual,Chapter 3.1.4"--> Do not consume food or drink while working (danger of mixing).Is used to measure the <strong>engine</strong><strong>oil</strong> pressure; use adapterinsert4 <strong>and</strong> screw in withsuitable sealing ring instead ofthe <strong>oil</strong> pressure sender/switch.--> If swallowed, observe the warning information on the containers, contact a doctor if necessary <strong>and</strong> show theinformation on the containers.WARNING: Danger of scalding from hot <strong>oil</strong>!--> Engine <strong>oil</strong> <strong>and</strong> components of the <strong>oil</strong> circuit can become very hot!
2004 Porsche Cayenne2003-2008 ENGINE Lubrication--> Allow <strong>engine</strong> <strong>and</strong> components to cool down.--> Avoid contact with the skin <strong>and</strong> eyes.--> Wear suitable protective clothing.WARNING: Oil is combustible!• Risk of fire due to <strong>oil</strong> <strong>and</strong> hot components (exhaust manifold, etc.)--> Do not pour <strong>engine</strong> <strong>oil</strong> over very hot components (e. g. turbocharger).--> Never place cloths soaked with <strong>oil</strong> on hot <strong>engine</strong> components.--> In case of fire, use CO 2 or dry powder fire extinguishers.NOTE:• The <strong>oil</strong> pressure may be too low for a number of reasons:• Oil is diluted.• Oil pump is faulty.• Bearing clearance is too large (e. g. crankshaft bearing).• Oil level is too low.• Oil pressure regulating valve is faulty.• Incorrect <strong>oil</strong> has been used. Use only <strong>oil</strong> that has been approved byPorsche for the measurement.NOTE:• The <strong>oil</strong> pressure switch is located on the <strong>oil</strong>-<strong>filter</strong> console to the right (inthe direction of travel) under the generator.
2004 Porsche Cayenne2003-2008 ENGINE LubricationFig. 16: OverviewCourtesy of PORSCHE OF NORTH AMERICA, INC.1. Remove front <strong>engine</strong> guard. Refer to 10 80 19 Removing <strong>and</strong> installing <strong>engine</strong> guard - as of MY 2003 (AllModels) .Fig. <strong>17</strong>: Connector on <strong>oil</strong> pressure sensorCourtesy of PORSCHE OF NORTH AMERICA, INC.
2004 Porsche Cayenne2003-2008 ENGINE Lubrication2. Pull off connector on <strong>oil</strong> pressure sensor. To do this, press on the button.Fig. 18: Unscrewing <strong>oil</strong> pressure switchCourtesy of PORSCHE OF NORTH AMERICA, INC.NOTE:• When the <strong>oil</strong> pressure switch is unscrewed, approx. 0.3 liters of <strong>engine</strong> <strong>oil</strong>escapes.3. Loosen the <strong>oil</strong> pressure switch <strong>and</strong> unscrew it. Collect the emerging <strong>oil</strong> <strong>and</strong> dispose of it in accordance withthe applicable national laws.4. Screw in test adapter 4 with sealing ring in the <strong>oil</strong>-<strong>filter</strong> console <strong>and</strong> tighten by h<strong>and</strong>.
2004 Porsche Cayenne2003-2008 ENGINE LubricationFig. 19: Connecting pressure gaugeCourtesy of PORSCHE OF NORTH AMERICA, INC.5. Connect pressure gauge on the hose <strong>and</strong> tighten it h<strong>and</strong>-tight.NOTE:• The <strong>oil</strong> temperature must range between 80°C <strong>and</strong> 100°C when performingthe measurement.• Check the <strong>oil</strong> temperature using a special thermometer or the PST II tester.6. Start the <strong>engine</strong> <strong>and</strong> move off at the required test speed. Read off the <strong>oil</strong> pressure on the pressure gauge whendoing so.Engine speed [rpm]600 1,<strong>01</strong>500 2,26000 4,5Oil pressure [bar]NOTE:• When the pressure gauge is unscrewed, approx. 0.3 l of <strong>engine</strong> <strong>oil</strong>escapes.7. Remove pressure gauge with test hose. Collect the emerging <strong>engine</strong> <strong>oil</strong> <strong>and</strong> dispose of it in accordance withthe applicable national laws.
2004 Porsche Cayenne2003-2008 ENGINE LubricationFig. 20: Installing the <strong>oil</strong> pressure switchCourtesy of PORSCHE OF NORTH AMERICA, INC.8. Install <strong>oil</strong> temperature switch with new sealing ring. --> Tightening torque: 15 ftlb.
2004 Porsche Cayenne2003-2008 ENGINE LubricationFig. 21: Pushing on electric connectorCourtesy of PORSCHE OF NORTH AMERICA, INC.9. Push electric connector onto <strong>oil</strong> pressure switch. The connector must engage audibly.10. Install front <strong>engine</strong> guard. Refer to 10 80 19 Removing <strong>and</strong> installing <strong>engine</strong> guard - as of MY 2003 (AllModels) .11. Check <strong>oil</strong> level <strong>and</strong> correct if necessary.<strong>17</strong> 03 <strong>01</strong> CHECKING OIL PRESSURE - AS OF MY 2004 (CAYENNE TIP,CAYENNE MAN)TOOLS AND MATERIALSSpecial tools
2004 Porsche Cayenne2003-2008 ENGINE LubricationFig. 22: Oil-pressure gaugeCourtesy of PORSCHE OF NORTH AMERICA, INC.-A- , See Fig. 22.-B- , See Fig. 22.INFORMATIONComponent overviewItem Designation Source ExplanationOil pressure tester "OP85" WE1276Test hose (included in set)--> "see WorkshopEquipment Manual,Chapter 3.1.4"--> "see WorkshopEquipment Manual,Chapter 3.1.4"Is used to measure the <strong>engine</strong><strong>oil</strong> pressure; use adapter insert4 <strong>and</strong> screw in with suitablesealing ring instead of the <strong>oil</strong>pressure sender/switch
2004 Porsche Cayenne2003-2008 ENGINE LubricationFig. 23: Component overview of <strong>oil</strong> <strong>filter</strong> <strong>and</strong> <strong>oil</strong>-<strong>filter</strong> consoleCourtesy of PORSCHE OF NORTH AMERICA, INC.No. Designation Qty. Removal Fitting-1- See Fig. 23.Oil <strong>filter</strong>housing/<strong>engine</strong> 1supporting arm-2- See Fig. 23. Sealing ring 1Replace whenremoving, <strong>oil</strong> lightly-3- See Fig. 23. Sealing ring 3Replace whenremoving, <strong>oil</strong> lightlyNote installation
2004 Porsche Cayenne2003-2008 ENGINE Lubrication-4- See Fig. 23. Oil cooler 1 position-5- See Fig. 23. Cover for <strong>oil</strong> cooler 1-6- See Fig. 23. Oil pressure switch 1-7- See Fig. 23. Oil <strong>filter</strong> element 1-8- See Fig. 23. Oil <strong>filter</strong> cover 1 Drain after removalReplace sealing ringwhen removing, <strong>oil</strong>lightly-9- See Fig. 23.Oil drain plug for <strong>oil</strong><strong>filter</strong> cover1-10- See Fig. 23. Fastening screws 5CHECKING OIL PRESSUREWARNING: Engine <strong>oil</strong> is toxic.• Danger of poisoning!--> Do not consume food or drink while working (danger of mixing).--> If swallowed, observe the warning information on the containers, contact a doctor if necessary <strong>and</strong> show theinformation on the containers.WARNING: Danger of scalding from hot <strong>oil</strong>!--> Engine <strong>oil</strong> <strong>and</strong> components of the <strong>oil</strong> circuit can become very hot!--> Allow <strong>engine</strong> <strong>and</strong> components to cool down.--> Avoid contact with the skin <strong>and</strong> eyes.--> Wear suitable protective clothing.WARNING: Oil is combustible!• Risk of fire due to <strong>oil</strong> <strong>and</strong> hot components (exhaust manifold, etc.)--> Do not pour <strong>engine</strong> <strong>oil</strong> over very hot components (e. g. turbocharger).--> Never place cloths soaked with <strong>oil</strong> on hot <strong>engine</strong> components.--> In case of fire, use CO 2 or dry powder fire extinguishers.
2004 Porsche Cayenne2003-2008 ENGINE LubricationNOTE:• The <strong>oil</strong> pressure may be too low for a number of reasons:• Oil is diluted.• Oil pump is faulty.• Bearing clearance is too large (e. g. crankshaft bearing).• Oil level is too low.• Oil pressure regulating valve is faulty.• Incorrect <strong>oil</strong> has been used. Use only <strong>oil</strong> that has been approved byPorsche for the measurement.NOTE:• The <strong>oil</strong> pressure switch is located in the <strong>oil</strong> <strong>filter</strong> housing/<strong>engine</strong> supportarm.NOTE:• When the <strong>oil</strong> pressure switch is unscrewed, approx. 0.3 litres of <strong>engine</strong> <strong>oil</strong>escapes.Fig. 24: Oil pressure senderCourtesy of PORSCHE OF NORTH AMERICA, INC.1. Remove <strong>oil</strong> pressure switch/sender. --> <strong>17</strong>0419 Removing <strong>and</strong> installing <strong>oil</strong>-pressure sender - section on"Removing"2. Use adapter insert 4 <strong>and</strong> tighten by h<strong>and</strong> with suitable sealing ring instead of <strong>oil</strong> pressure sender/switch.
2004 Porsche Cayenne2003-2008 ENGINE LubricationFig. 25: Pressure gaugeCourtesy of PORSCHE OF NORTH AMERICA, INC.3. Connect pressure gauge to hose.NOTE:• The <strong>oil</strong> temperature must range between 80°C <strong>and</strong> 100°C when performingthe measurement.• Check the <strong>oil</strong> temperature using a special thermometer or the PST II tester.4. Start the <strong>engine</strong> <strong>and</strong> move off at the required test speed. Read off the <strong>oil</strong> pressure on the pressure gauge whiledoing so.Engine speed[rpm]Oil pressure [bar]600 1.02000 3.0 to 5.5up to max. 7.0> 2000 If an <strong>oil</strong> pressure of more than 7 bar is reached, further diagnostics is necessary =>Pressure relief valve in <strong>oil</strong> pump may be faulty => Replace <strong>oil</strong> pumpNOTE:• When the pressure gauge is unscrewed, approx. 0.3 l of <strong>engine</strong> <strong>oil</strong>escapes.
2004 Porsche Cayenne2003-2008 ENGINE Lubrication5. Remove pressure gauge with test hose. Collect the emerging <strong>engine</strong> <strong>oil</strong> <strong>and</strong> dispose of it in accordance withthe applicable national laws.Fig. 26: Oil pressure senderCourtesy of PORSCHE OF NORTH AMERICA, INC.6. Install <strong>oil</strong> temperature switch with new sealing ring. --> <strong>17</strong>0419 Removing <strong>and</strong> installing <strong>oil</strong>-pressuresender - section on "Installing"<strong>17</strong> 04 19 REMOVING AND INSTALLING OIL-PRESSURE SENDER - AS OFMY 2004 (CAYENNE TIP, CAYENNE MAN)COMPONENT OVERVIEW
2004 Porsche Cayenne2003-2008 ENGINE LubricationFig. 27: Component overview of <strong>oil</strong> <strong>filter</strong> <strong>and</strong> <strong>oil</strong>-<strong>filter</strong> consoleCourtesy of PORSCHE OF NORTH AMERICA, INC.No. Designation Qty. Removal Fitting-1- See Fig. 27.Oil <strong>filter</strong>housing/<strong>engine</strong> 1supporting arm-2- See Fig. 27. Sealing ring 1Replace whenremoving, <strong>oil</strong> lightly-3- See Fig. 27. Sealing ring 3Replace whenremoving, <strong>oil</strong> lightlyNote installation
2004 Porsche Cayenne2003-2008 ENGINE Lubrication-4- See Fig. 27. Oil cooler 1 position-5- See Fig. 27. Cover for <strong>oil</strong> cooler 1-6- See Fig. 27. Oil pressure switch 1-7- See Fig. 27. Oil <strong>filter</strong> element 1-8- See Fig. 27. Oil <strong>filter</strong> cover 1 Drain after removalReplace sealing ringwhen removing, <strong>oil</strong>lightly-9- See Fig. 27.Oil drain plug for <strong>oil</strong><strong>filter</strong> cover1-10- See Fig. 27. Fastening screws 5REMOVING OIL-PRESSURE SENDERRemoving <strong>oil</strong>-pressure senderWARNING: Engine <strong>oil</strong> is toxic.• Danger of poisoning!--> Do not consume food or drink while working (danger of mixing).--> If swallowed, observe the warning information on the containers, contact a doctor if necessary <strong>and</strong> show theinformation on the containers.WARNING: Danger of scalding from hot <strong>oil</strong>!--> Engine <strong>oil</strong> <strong>and</strong> components of the <strong>oil</strong> circuit can become very hot!--> Allow <strong>engine</strong> <strong>and</strong> components to cool down.--> Avoid contact with the skin <strong>and</strong> eyes.--> Wear suitable protective clothing.WARNING: Oil is combustible!• Risk of fire due to <strong>oil</strong> <strong>and</strong> hot components (exhaust manifold, etc.)--> Do not pour <strong>engine</strong> <strong>oil</strong> over very hot components (e. g. turbocharger).--> Never place cloths soaked with <strong>oil</strong> on hot <strong>engine</strong> components.--> In case of fire, use CO 2 or dry powder fire extinguishers.
2004 Porsche Cayenne2003-2008 ENGINE LubricationNOTE:• The <strong>oil</strong> pressure may be too low for a number of reasons:• Oil is diluted.• Oil pump is faulty.• Bearing clearance is too large (e. g. crankshaft bearing)• Oil level is too low.• Oil pressure regulating valve is faulty.• Incorrect <strong>oil</strong> has been used. Use only <strong>oil</strong> that has been approved byPorsche for the measurement.NOTE:• The <strong>oil</strong> pressure switch is located on the <strong>oil</strong>-<strong>filter</strong> console to the left underthe generator.1. Remove <strong>engine</strong> guard. Refer to 10 80 19 Removing <strong>and</strong> installing <strong>engine</strong> guard - as of MY 2003 (AllModels) .Fig. 28: Connector on <strong>oil</strong> pressure sensorCourtesy of PORSCHE OF NORTH AMERICA, INC.2. Pull off connector on <strong>oil</strong> pressure sensor. To do this, press on the button.
2004 Porsche Cayenne2003-2008 ENGINE LubricationFig. 29: Oil pressure senderCourtesy of PORSCHE OF NORTH AMERICA, INC.NOTE:• When the <strong>oil</strong> pressure switch is unscrewed, approx. 0.3 litres of <strong>engine</strong> <strong>oil</strong>escapes.3. Loosen the <strong>oil</strong> pressure sender <strong>and</strong> unscrew it. Collect the emerging <strong>oil</strong> <strong>and</strong> dispose of it in accordance withthe applicable national laws.INSTALLING OIL-PRESSURE SENDERInstalling <strong>oil</strong> pressure sender1. Install <strong>oil</strong> pressure sender with new sealing ring. --> Tightening torque: 15 ftlb.
2004 Porsche Cayenne2003-2008 ENGINE LubricationFig. 30: Oil pressure senderCourtesy of PORSCHE OF NORTH AMERICA, INC.2. Push electric connector onto <strong>oil</strong> pressure sender. The connector must engage audibly.3. Install <strong>engine</strong> guard. Refer to 10 80 19 Removing <strong>and</strong> installing <strong>engine</strong> guard - as of MY 2003 (AllModels) .4. Check <strong>oil</strong> level <strong>and</strong> correct if necessary.<strong>17</strong> 04 19 REMOVING AND INSTALLING OIL-PRESSURE SENDER - AS OFMY 2003 (CAYENNE S TIP, CAYENNE S MAN, CAYENNE TURBO, CAYENNETURBO S, CAYENNE S TIO TITAN)REMOVING OIL-PRESSURE SENDERWARNING: Engine <strong>oil</strong> is toxic.• Danger of poisoning!--> Do not consume food or drink while working (danger of mixing).--> If swallowed, observe the warning information on the containers, contact a doctor if necessary <strong>and</strong> show theinformation on the containers.
2004 Porsche Cayenne2003-2008 ENGINE LubricationWARNING: Danger of scalding from hot <strong>oil</strong>!--> Engine <strong>oil</strong> <strong>and</strong> components of the <strong>oil</strong> circuit can become very hot!--> Allow <strong>engine</strong> <strong>and</strong> components to cool down.--> Avoid contact with the skin <strong>and</strong> eyes.--> Wear suitable protective clothing.WARNING: Oil is combustible!• Risk of fire due to <strong>oil</strong> <strong>and</strong> hot components (exhaust manifold, etc.)--> Do not pour <strong>engine</strong> <strong>oil</strong> over very hot components (e. g. turbocharger).--> Never place cloths soaked with <strong>oil</strong> on hot <strong>engine</strong> components.--> In case of fire, use CO 2 or dry powder fire extinguishers.NOTE:• The <strong>oil</strong> pressure may be too low for a number of reasons:• Oil is diluted.• Oil pump is faulty.• Bearing clearance is too large (e. g. crankshaft bearing)• Oil level is too low.• Oil pressure regulating valve is faulty.• Incorrect <strong>oil</strong> has been used. Only use <strong>oil</strong> that has been approved byPorsche for the measurement.NOTE:• The <strong>oil</strong> pressure switch is located on the <strong>oil</strong>-<strong>filter</strong> console to the rightunder the generator.
2004 Porsche Cayenne2003-2008 ENGINE LubricationFig. 31: OverviewCourtesy of PORSCHE OF NORTH AMERICA, INC.1. Remove front underside panel. Refer to 10 80 19 Removing <strong>and</strong> installing <strong>engine</strong> guard - as of MY 2003(All Models) .Fig. 32: Connector on <strong>oil</strong> pressure sensorCourtesy of PORSCHE OF NORTH AMERICA, INC.
2004 Porsche Cayenne2003-2008 ENGINE Lubrication2. Pull off connector on <strong>oil</strong> pressure sensor. To do this, press on the button.Fig. 33: Unscrewing <strong>oil</strong> pressure switchCourtesy of PORSCHE OF NORTH AMERICA, INC.NOTE:• When the <strong>oil</strong> pressure switch is unscrewed, approx. 0.3 liters of <strong>engine</strong> <strong>oil</strong>escapes.3. Loosen the <strong>oil</strong> pressure switch <strong>and</strong> unscrew it. Collect the emerging <strong>oil</strong> <strong>and</strong> dispose of it in accordance withthe applicable national laws.INSTALLING OIL-PRESSURE SENDER<strong>17</strong> 11 19 Removing <strong>and</strong> installing <strong>oil</strong> level sensor - as of MY 2003 (Cayenne S TIP, Cayenne S MAN, Cayenne Turbo,Cayenne Turbo S, Cayenne S TIO Titan)
2004 Porsche Cayenne2003-2008 ENGINE LubricationFig. 34: Installing the <strong>oil</strong> pressure switchCourtesy of PORSCHE OF NORTH AMERICA, INC.1. Install <strong>oil</strong> temperature switch with new sealing ring. --> Tightening torque: 15 ftlb. .
2004 Porsche Cayenne2003-2008 ENGINE LubricationFig. 35: Electric connector on <strong>oil</strong> pressure switchCourtesy of PORSCHE OF NORTH AMERICA, INC.2. Push electric connector onto <strong>oil</strong> pressure switch. The connector must engage audibly.3. Install front underbody panel. Refer to 10 80 19 Removing <strong>and</strong> installing <strong>engine</strong> guard - as of MY 2003(All Models) .4. Check <strong>oil</strong> level <strong>and</strong> correct if necessary.<strong>17</strong> 11 19 REMOVING AND INSTALLING OIL LEVEL SENSOR - AS OF MY2003 (CAYENNE S TIP, CAYENNE S MAN, CAYENNE TURBO, CAYENNETURBO S, CAYENNE S TIO TITAN)REMOVING OIL LEVEL SENSORRemoving <strong>oil</strong> level sensorWARNING: Engine <strong>oil</strong> is toxic.• Danger of poisoning!--> Do not consume food or drink while working (danger of mixing).
2004 Porsche Cayenne2003-2008 ENGINE Lubricationinformation on the containers.WARNING: Danger of scalding from hot <strong>oil</strong>!--> Engine <strong>oil</strong> <strong>and</strong> components of the <strong>oil</strong> circuit can become very hot!--> Allow <strong>engine</strong> <strong>and</strong> components to cool down.--> Avoid contact with the skin <strong>and</strong> eyes.--> Wear suitable protective clothing.WARNING: Oil is combustible!• Risk of fire due to <strong>oil</strong> <strong>and</strong> hot components (exhaust manifold, etc.)--> Do not pour <strong>engine</strong> <strong>oil</strong> over very hot components (e. g. turbocharger).--> Never place cloths soaked with <strong>oil</strong> on hot <strong>engine</strong> components.--> In case of fire, use CO 2 or dry powder fire extinguishers.Fig. 36: OverviewCourtesy of PORSCHE OF NORTH AMERICA, INC.1. Remove underbody panel. Refer to 10 80 19 Removing <strong>and</strong> installing <strong>engine</strong> guard - as of MY 2003 (AllModels) .
2004 Porsche Cayenne2003-2008 ENGINE LubricationFig. 37: Loosening <strong>oil</strong> drain plugsCourtesy of PORSCHE OF NORTH AMERICA, INC.NOTE:• If the <strong>oil</strong> is to be used again, it must be collected in a clean container.2. Undo the 2 <strong>oil</strong> drain plugs <strong>and</strong> collect <strong>engine</strong> <strong>oil</strong> in a container. Dispose of waste <strong>oil</strong> in accordance with legalrequirements.
2004 Porsche Cayenne2003-2008 ENGINE LubricationFig. 38: Screwing in <strong>oil</strong> drain plugsCourtesy of PORSCHE OF NORTH AMERICA, INC.3. Clean <strong>oil</strong> drain plug <strong>and</strong> screw in with new aluminum sealing ring. --> Tightening torque: 37 ftlb.
2004 Porsche Cayenne2003-2008 ENGINE LubricationFig. 39: Electric connector on <strong>oil</strong> level sensorCourtesy of PORSCHE OF NORTH AMERICA, INC.4. Disconnect the electric connector on the <strong>oil</strong> level sensor.Fig. 40: Loosening fastening screws for <strong>oil</strong> level sensorCourtesy of PORSCHE OF NORTH AMERICA, INC.5. Loosen the 3 fastening screws <strong>and</strong> pull the <strong>oil</strong> level sensor out of the <strong>oil</strong> pan.INSTALLING OIL LEVEL SENSORInstalling <strong>oil</strong> level sensor
2004 Porsche Cayenne2003-2008 ENGINE LubricationFig. 41: Tightening fastening screws for <strong>oil</strong> level sensorCourtesy of PORSCHE OF NORTH AMERICA, INC.1. Install the new <strong>oil</strong> level sensor with a new seal. Tighten the 3 fastening screws. --> Tightening torque: 7.5ftlb.
2004 Porsche Cayenne2003-2008 ENGINE LubricationFig. 42: Filling <strong>engine</strong> <strong>oil</strong>Courtesy of PORSCHE OF NORTH AMERICA, INC.2. Fill in <strong>engine</strong> <strong>oil</strong> of the stipulated viscosity <strong>and</strong> quality.
2004 Porsche Cayenne2003-2008 ENGINE LubricationFig. 43: Checking the <strong>oil</strong> levelCourtesy of PORSCHE OF NORTH AMERICA, INC.3. Start the vehicle briefly. Then check the <strong>oil</strong> level. It must be between the MIN <strong>and</strong> MAX markings on thedipstick.4. Install underbody panels. Refer to 10 80 19 Removing <strong>and</strong> installing <strong>engine</strong> guard - as of MY 2003 (AllModels) .<strong>17</strong> 11 19 REMOVING AND INSTALLING OIL LEVEL SENSOR - AS OF MY2004 (CAYENNE TIP, CAYENNE MAN)REMOVING OIL LEVEL SENSORRemoving <strong>oil</strong> level sensorWARNING: Engine <strong>oil</strong> is toxic.• Danger of poisoning!--> Do not consume food or drink while working (danger of mixing).--> If swallowed, observe the warning information on the containers, contact a doctor if necessary <strong>and</strong> show theinformation on the containers.WARNING: Oil is combustible!• Risk of fire due to <strong>oil</strong> <strong>and</strong> hot components (exhaust manifold, etc.)--> Do not pour <strong>engine</strong> <strong>oil</strong> over very hot components (e. g. turbocharger).--> Never place cloths soaked with <strong>oil</strong> on hot <strong>engine</strong> components.--> In case of fire, use CO 2 or dry powder fire extinguishers.1. Remove <strong>engine</strong> guard Refer to 10 80 19 Removing <strong>and</strong> installing <strong>engine</strong> guard - as of MY 2003 (AllModels) .
2004 Porsche Cayenne2003-2008 ENGINE LubricationFig. 44: Oil drain plugCourtesy of PORSCHE OF NORTH AMERICA, INC.WARNING: Danger of scalding from hot <strong>oil</strong>!--> Engine <strong>oil</strong> <strong>and</strong> components of the <strong>oil</strong> circuit can become very hot!--> Allow <strong>engine</strong> <strong>and</strong> components to cool down.--> Avoid contact with the skin <strong>and</strong> eyes.--> Wear suitable protective clothing.2. Undo <strong>oil</strong> drain plug <strong>and</strong> collect the <strong>engine</strong> <strong>oil</strong> in a container. Dispose of waste <strong>oil</strong> in accordance with legalrequirements.
2004 Porsche Cayenne2003-2008 ENGINE LubricationFig. 45: Oil drain plugCourtesy of PORSCHE OF NORTH AMERICA, INC.3. Replace <strong>oil</strong> drain plug. --> Tightening torque: 22 ftlb.
2004 Porsche Cayenne2003-2008 ENGINE LubricationFig. 46: Oil level sensorCourtesy of PORSCHE OF NORTH AMERICA, INC.4. Disconnect the electric connector on the <strong>oil</strong> level sensor (TOC).
2004 Porsche Cayenne2003-2008 ENGINE LubricationFig. 47: Fastening screwsCourtesy of PORSCHE OF NORTH AMERICA, INC.5. Loosen the 3 fastening screws <strong>and</strong> pull the <strong>oil</strong> level sensor out of the <strong>oil</strong> pan.INSTALLING OIL LEVEL SENSORInstalling <strong>oil</strong> level sensorFig. 48: Fastening screwsCourtesy of PORSCHE OF NORTH AMERICA, INC.1. Install the new <strong>oil</strong> level sensor with a new seal. Tighten the 3 fastening screws. --> Tightening torque: 7.5ftlb.2. Fit cable plug.
2004 Porsche Cayenne2003-2008 ENGINE LubricationFig. 49: Oil dipstickCourtesy of PORSCHE OF NORTH AMERICA, INC.3. Fill in <strong>engine</strong> <strong>oil</strong>. Start the vehicle briefly. Then check the <strong>oil</strong> level. This must reach mark -b- on the <strong>oil</strong>dipstick. See Fig. 49.
2004 Porsche Cayenne2003-2008 ENGINE LubricationFig. 50: Mounting <strong>engine</strong> guardCourtesy of PORSCHE OF NORTH AMERICA, INC.4. Mount <strong>engine</strong> guard. Refer to 10 80 19 Removing <strong>and</strong> installing <strong>engine</strong> guard - as of MY 2003 (AllModels) .<strong>17</strong> <strong>17</strong> 19 REMOVING AND INSTALLING GUIDE FOR OIL DIPSTICK - AS OFMY 2003 (CAYENNE S TIP, CAYENNE S MAN, CAYENNE TURBO, CAYENNETURBO S, CAYENNE S TIO TITAN)PRELIMINARY WORKPreliminary work
2004 Porsche Cayenne2003-2008 ENGINE LubricationFig. 51: Cover over the throttle bodyCourtesy of PORSCHE OF NORTH AMERICA, INC.1. Remove throttle body cover. Pull the cover up <strong>and</strong> off. Refer to 10 83 19 Removing <strong>and</strong> installing designcover. - as of MY 2003 (Cayenne S TIP, Cayenne S MAN, Cayenne Turbo, Cayenne Turbo S, Cayenne STIO Titan) .2. Remove Y-shaped pipe. Refer to 24 35 19 Removing <strong>and</strong> installing cowl for throttle housing (Y-shapedpipe) - as of MY 2003 (Cayenne S TIP, Cayenne S MAN, Cayenne S TIO Titan) . Refer to 24 35 19Removing <strong>and</strong> installing cowl for throttle housing (Y-shaped pipe) - as of MY 2003 (Cayenne Turbo,Cayenne Turbo S) .REMOVING AND INSTALLING GUIDE FOR OIL DIPSTICKRemoving <strong>and</strong> installing guide for <strong>oil</strong> dipstick
2004 Porsche Cayenne2003-2008 ENGINE LubricationFig. 52: OverviewCourtesy of PORSCHE OF NORTH AMERICA, INC.1. Loosen the 2 fastening screws.
2004 Porsche Cayenne2003-2008 ENGINE LubricationFig. 53: Fastening screws for <strong>oil</strong> dipstickCourtesy of PORSCHE OF NORTH AMERICA, INC.2. Pull out <strong>oil</strong> dipstick.3. Pull guide tube out of <strong>oil</strong> pan.4. Replace O-ring.5. Insert guide tube into <strong>oil</strong> pan.6. Tighten the 2 fastening screws. First position the two screws. Then tighten the upper fastening screw. -->Tightening torque: 7.5 ftlb. <strong>and</strong> then the lower fastening screw --> Tightening torque: 7.5 ftlb. .
2004 Porsche Cayenne2003-2008 ENGINE LubricationSUBSEQUENT WORKSubsequent work1. Reinstall the Y pipe. Refer to 24 35 19 Removing <strong>and</strong> installing cowl for throttle housing (Y-shaped pipe)- as of MY 2003 (Cayenne S TIP, Cayenne S MAN, Cayenne S TIO Titan) . Refer to 24 35 19 Removing<strong>and</strong> installing cowl for throttle housing (Y-shaped pipe) - as of MY 2003 (Cayenne Turbo, CayenneTurbo S) .Fig. 54: Throttle body coverCourtesy of PORSCHE OF NORTH AMERICA, INC.2. Reinstall throttle body cover. To do this, press the 4 rubber elements on the ball heads.<strong>17</strong> <strong>17</strong> 19 REMOVING AND INSTALLING GUIDE TUBE FOR OIL DIP STICK -AS OF MY 2004 (CAYENNE TIP, CAYENNE MAN)PRELIMINARY WORKPreliminary work
2004 Porsche Cayenne2003-2008 ENGINE LubricationFig. 55: Design coverCourtesy of PORSCHE OF NORTH AMERICA, INC.1. Pull off design cover of <strong>engine</strong>.
2004 Porsche Cayenne2003-2008 ENGINE LubricationFig. 56: Fastening nuts of the sheetmetal holderCourtesy of PORSCHE OF NORTH AMERICA, INC.NOTE:• Before disassembly, measure the <strong>oil</strong> level <strong>and</strong> make a mark of the level onthe dipstick as a check.2. Unscrew fastening nuts of sheetmetal holder -arrows- <strong>and</strong> push sheetmetal holder aside. See Fig. 56.Fig. 57: Fastening screw of guide tubeCourtesy of PORSCHE OF NORTH AMERICA, INC.3. Unscrew the fastening screw of guide tube on intake-air distributor -1- . See Fig. 57.
2004 Porsche Cayenne2003-2008 ENGINE LubricationFig. 58: Cable plug of crankshaft pulse senderCourtesy of PORSCHE OF NORTH AMERICA, INC.4. Push cable plug of crankshaft pulse sender to the cylinder block -arrow- <strong>and</strong> disassemble from guide tube.See Fig. 58.INFORMATIONComponent overview
2004 Porsche Cayenne2003-2008 ENGINE LubricationFig. 59: Component overview for <strong>oil</strong> panCourtesy of PORSCHE OF NORTH AMERICA, INC.-1- - --> Tightening torque: 6 ftlb. See Fig. 59.-2- - Guide tube for <strong>oil</strong> dipstick See Fig. 59.-3- - Oil dipstick See Fig. 59.-4- - Oil check valve, pay attention to direction of installation. See Fig. 59.-5- - Knock sensor; right with <strong>and</strong> left without cable. See Fig. 59.
2004 Porsche Cayenne2003-2008 ENGINE Lubrication-6- - --> Tightening torque: 15 ftlb. See Fig. 59.-7- - --> Tightening torque: 7.5 ftlb. See Fig. 59.-8- - Cover for <strong>oil</strong> pump drive. See Fig. 59.-9- - O-ring; replace. See Fig. 59.-10- - Oil pump drive. See Fig. 59.-11- - Crankcase. See Fig. 59.-12- - Intermediate shaft. See Fig. 59.-13- - Thrust washer. See Fig. 59.-14- - --> Tightening torque: 7.5 ftlb. , use impact bolter as needed; insert screws with screw locking agent.See Fig. 59.-15- - Drive shaft for <strong>oil</strong> pump; pay attention to the assembly of plastic washer See Fig. 59.-16- - Crankshaft reference mark sender. See Fig. 59.-<strong>17</strong>- - Oil pump, observe tightening sequence. See Fig. 59.-18- - --> Tightening torque: <strong>17</strong> ftlb. See Fig. 59.-19- - --> Tightening torque: 6 ftlb. See Fig. 59.-20- - Replacing --> Tightening torque: 22 ftlb. ; See Fig. 59.-21- - Oil pan See Fig. 59.-22- - Oil level sensor See Fig. 59.-23- - Sealing ring; replace See Fig. 59.-24- - --> Tightening torque: 9 ftlb. See Fig. 59.-25- - Sealing ring; replace See Fig. 59.-26- - Engine support arm/<strong>oil</strong> <strong>filter</strong> housing See Fig. 59.-27- - --> Tightening torque: 15 ftlb. See Fig. 59.-28- - To thermostat; replace O-ring. See Fig. 59.
2004 Porsche Cayenne2003-2008 ENGINE Lubrication-29- - --> Tightening torque: 19 ftlb. See Fig. 59.-30- - --> Tightening torque: 19 ftlb. See Fig. 59.-31- - Secondary unit holder. See Fig. 59.-32- - Coolant pipe; replace O-ring. See Fig. 59.-33- - Knock sensor (without cable). See Fig. 59.-34- - Torsional vibration damper. See Fig. 59.-35- - --> Initial tightening: 74 ftlb. --> Final tightening: 90° ; replace screw, See Fig. 59.REMOVING GUIDE TUBE FOR OIL DIP STICKRemoving guide tube for <strong>oil</strong> dip stick1. Pull the guide tube with <strong>oil</strong> dip stick carefully out of the cylinder block. If necessary, carefully turn it back<strong>and</strong> forth. Check if the sealing ring is still on the guide tube or pull the sealing ring out of the bore with a angledwire.INSTALLING GUIDE TUBE FOR OIL DIP STICKInstalling guide tube for <strong>oil</strong> dip stick
2004 Porsche Cayenne2003-2008 ENGINE LubricationFig. 60: Sealing ringCourtesy of PORSCHE OF NORTH AMERICA, INC.NOTE:• The sealing ring of the guide tube is to be replaced.1. Replace sealing ring <strong>and</strong> push until the stop using some grease on the guide tube -arrow- . Remove thedipstick for assembly from the guide tube. See Fig. 60.Fig. 61: Fastening screwCourtesy of PORSCHE OF NORTH AMERICA, INC.NOTE:• Illuminate the installation location well for assembling the guide tube.2. Insert guide tube in the bore of the cylinder block. Align the guide tube <strong>and</strong> position fastening screw tointake-air distributor. Tighten fastening screw. --> Tightening torque: 6 ftlb.SUBSEQUENT WORKSubsequent work1. Check <strong>oil</strong> level with dipstick <strong>and</strong> compare to prepared sketch (used to check if the guide tube was correctlymounted in the cylinder block).
2004 Porsche Cayenne2003-2008 ENGINE LubricationFig. 62: Cable plug of crankshaft pulse senderCourtesy of PORSCHE OF NORTH AMERICA, INC.2. Fit cable connector again.
2004 Porsche Cayenne2003-2008 ENGINE LubricationFig. 63: Sheetmetal holderCourtesy of PORSCHE OF NORTH AMERICA, INC.3. Position sheetmetal holder in the installation position <strong>and</strong> fasten. --> Tightening torque: 6 ftlb.Fig. 64: Design coverCourtesy of PORSCHE OF NORTH AMERICA, INC.4. Press design cover on the <strong>engine</strong> again.<strong>17</strong> 20 19 REMOVING AND INSTALLING OIL PUMP - AS OF MY 2003(CAYENNE S TIP, CAYENNE S MAN, CAYENNE TURBO, CAYENNE TURBOS, CAYENNE S TIO TITAN)PRELIMINARY WORKPreliminary work1. Remove <strong>oil</strong> pan. --> <strong>17</strong>5021 Removing <strong>oil</strong> pan - chapter on "Removing"INFORMATIONComponent overview
2004 Porsche Cayenne2003-2008 ENGINE LubricationFig. 65: OverviewCourtesy of PORSCHE OF NORTH AMERICA, INC.NOTE:• The <strong>oil</strong> pump must not be disassembled <strong>and</strong> reassembled!• When carrying out work on the <strong>oil</strong> circuit, it must be ensured that no dirtgets into the <strong>engine</strong>!NOTE:• The <strong>oil</strong> pump can be replaced while installed.
2004 Porsche Cayenne2003-2008 ENGINE LubricationFig. 66: Oil pumpCourtesy of PORSCHE OF NORTH AMERICA, INC.1 - Rear intake pipe2 - Fastening screw, M6 x 253 - Front intake pipe4 - Fastening screw M6 x 255 - Pin
2004 Porsche Cayenne2003-2008 ENGINE Lubrication6 - Tensioning rail7 - Mounting chain case cover8 - Fastening screw M5 x 209 - Guide rail10 - When reusing drive chain, mark running direction.11 - Drive wheel on the drive chain, pay attention to the feather keyREMOVING OIL PUMPRemoving <strong>oil</strong> pumpFig. 67: Location of timing chain tensionerCourtesy of PORSCHE OF NORTH AMERICA, INC.1. Unscrew chain tensioner of timing chain.
2004 Porsche Cayenne2003-2008 ENGINE LubricationFig. 69: Oil return lineCourtesy of PORSCHE OF NORTH AMERICA, INC.3. Unscrew <strong>oil</strong> return line from the <strong>oil</strong> pump.Fig. 70: Chain cover fastening screwsCourtesy of PORSCHE OF NORTH AMERICA, INC.4. Remove the <strong>oil</strong> pump timing chain cover. To do this, unscrew the 2 fastening screws M5 x 25.
2004 Porsche Cayenne2003-2008 ENGINE LubricationFig. 71: Oil pump fastening screwsCourtesy of PORSCHE OF NORTH AMERICA, INC.5. Release the 3 fastening screws M8 x 50.
2004 Porsche Cayenne2003-2008 ENGINE LubricationFig. 72: Oil pumpCourtesy of PORSCHE OF NORTH AMERICA, INC.6. Tilt the <strong>oil</strong> pump forwards.
2004 Porsche Cayenne2003-2008 ENGINE LubricationFig. 73: Oil pump drive tensioning railCourtesy of PORSCHE OF NORTH AMERICA, INC.7. Push the tensioning rail for the <strong>oil</strong> pump drive aside with a finger. At the same time, raise the <strong>oil</strong> pumpslightly <strong>and</strong> tilt forwards.8. Take the <strong>oil</strong> pump drive chain off the <strong>oil</strong> pump sprocket <strong>and</strong> remove the <strong>oil</strong> pump.9. Unscrew the <strong>oil</strong> suction snorkel from the <strong>oil</strong> pump.INSTALLING OIL PUMPInstalling <strong>oil</strong> pumpNOTE:• In order to make it easier to install the <strong>oil</strong> suction pumps in the CayenneTurbo (M48/50), it should be ensured that the driving slits on the chainsprocket are as horizontal as possible.
2004 Porsche Cayenne2003-2008 ENGINE LubricationFig. 74: Oil pumpCourtesy of PORSCHE OF NORTH AMERICA, INC.1. Position the <strong>oil</strong> pump slanting forwards on the lower section of the crankcase. At the same time, put the drivechain over the chain sprocket.
2004 Porsche Cayenne2003-2008 ENGINE LubricationFig. 75: Oil pump fastening screwsCourtesy of PORSCHE OF NORTH AMERICA, INC.2. Tighten the 3 fastening screws. --> Tightening torque: <strong>17</strong> ftlb.
2004 Porsche Cayenne2003-2008 ENGINE LubricationFig. 76: Oil pump drive tensioning railCourtesy of PORSCHE OF NORTH AMERICA, INC.CAUTION: Risk of damage!--> Ensure that the drive chain is tense!• The tensioning rail can become wedged in!3. Check that the tensioning rail is in the correct position. To do this, use a finger to push the tensioning railaway slightly from the chain. When doing this, the tensioning rail must be under pressure <strong>and</strong> holding the chainunder tension.
2004 Porsche Cayenne2003-2008 ENGINE LubricationFig. 77: Chain sprocket plastic cover fastening screwsCourtesy of PORSCHE OF NORTH AMERICA, INC.4. Mount the plastic cover of the chain sprocket. Tighten the two fastening screws. --> Tightening torque: 4.2ftlb.
2004 Porsche Cayenne2003-2008 ENGINE LubricationFig. 78: Oil return line fastening screwCourtesy of PORSCHE OF NORTH AMERICA, INC.5. Secure the <strong>oil</strong> return line. Tighten fastening screw. --> Tightening torque: 7.5 ftlb.
2004 Porsche Cayenne2003-2008 ENGINE LubricationFig. 79: Oil suction pipe fastening screws on lower part of crankshaft housingCourtesy of PORSCHE OF NORTH AMERICA, INC.6. Attach the four fastening screws for the <strong>oil</strong> suction tube to the lower part of the crankshaft housing. -->Tightening torque: 9.5 ftlb.Fig. 80: Location of timing chain tensionerCourtesy of PORSCHE OF NORTH AMERICA, INC.7. Fit tensioner for the timing chain. For tightening torque, refer to 15 36 19 Removing <strong>and</strong> installing chaintensioner - as of MY 2003 (Cayenne S TIP, Cayenne S MAN, Cayenne Turbo, Cayenne Turbo S,Cayenne S TIO Titan) .SUBSEQUENT WORKSubsequent work1. Check that the timing chain has not jumped over. To do this, turn the <strong>engine</strong> by two turns at the crankshaft.Make sure you can turn the <strong>engine</strong> without any mechanical resistance. Otherwise, set the timing. Refer to 15 0516 Adjusting the timings for the camshafts - as of MY 2003 (Cayenne S TIP, Cayenne S MAN, CayenneTurbo, Cayenne Turbo S, Cayenne S TIO Titan) .2. Reinsert the cleaned <strong>oil</strong> pan. --> <strong>17</strong>5023 Installing <strong>oil</strong> pan (includes sealing) - chapter on "Installing".<strong>17</strong> 20 19 REMOVING AND INSTALLING OIL PUMP - AS OF MY 2004
2004 Porsche Cayenne2003-2008 ENGINE Lubrication(CAYENNE TIP, CAYENNE MAN)INFORMATIONComponent overviewFig. 81: Component overview of <strong>oil</strong> pressure control valveCourtesy of PORSCHE OF NORTH AMERICA, INC.-1- - Drive shaft for <strong>oil</strong> pump drive; component is symmetrical, thus it is not possible to install incorrectly. SeeFig. 81.-2- - Oil pump. See Fig. 81.
2004 Porsche Cayenne2003-2008 ENGINE Lubrication-3- - --> Tightening torque: <strong>17</strong> ftlb. See Fig. 81.-4- - Gear wheels; tooth flank play: 0.20 mm; axial flank play: 0.10 mm. See Fig. 81.-5- - --> Opening pressure: 5.5 bar +/-0.2 bar ; clean intake strainer. See Fig. 81.-6- - --> Tightening torque: 6 ftlb. ; with screw locking agent medium-tight. See Fig. 81.-7- - Oil pressure pipe; insert with sealant. See Fig. 81.-8- - --> Tightening torque: 6 ftlb. See Fig. 81.-9- - Sealing ring; replace if damaged. See Fig. 81.PRELIMINARY WORKPreliminary workRemove <strong>oil</strong> pan. --> <strong>17</strong>5<strong>01</strong>9 Removing <strong>and</strong> installing <strong>oil</strong> pan - chapter on "Removing"REMOVING OIL PUMPRemoving <strong>oil</strong> pumpTo remove the <strong>oil</strong> pump, the <strong>engine</strong> must be removed or supported on the body so that the <strong>engine</strong> carrier can beremoved.
2004 Porsche Cayenne2003-2008 ENGINE LubricationFig. 82: Fastening screwsCourtesy of PORSCHE OF NORTH AMERICA, INC.CAUTION: Danger of injury due to <strong>oil</strong> pump drive shaft falling out!• The drive shaft will fall out when the <strong>oil</strong> pump is removed.--> Secure <strong>and</strong> carefully remove the shaft by h<strong>and</strong> when working over your head.1. Loosen the 2 fastening screws -1- on the <strong>oil</strong> pipe. Then loosen the 2 fastening screws -2- on the <strong>oil</strong> pump.Remove pump. See Fig. 82.
2004 Porsche Cayenne2003-2008 ENGINE LubricationFig. 83: Drive shaftCourtesy of PORSCHE OF NORTH AMERICA, INC.2. Remove drive shaft.INSTALLING OIL PUMPInstalling <strong>oil</strong> pumpNOTE:• Seals must always be replaced.
2004 Porsche Cayenne2003-2008 ENGINE LubricationFig. 84: Oil pump drive shaftCourtesy of PORSCHE OF NORTH AMERICA, INC.1. Insert drive shaft for <strong>oil</strong> pump into the cylinder block. When doing so, make sure that the two plastic washersare in place.2. Fit new seal under the intake manifold.
2004 Porsche Cayenne2003-2008 ENGINE LubricationFig. 85: Fastening screwsCourtesy of PORSCHE OF NORTH AMERICA, INC.3. Position <strong>oil</strong> pump on cylinder block <strong>and</strong> screw in the 2 fastening screws -2- . Then fit a new seal under the <strong>oil</strong>tube. Insert the fastening screws -1- with screw locking agent <strong>and</strong> tighten. --> Tightening torque: 6 ftlb. Thentighten the fastening screws of the <strong>oil</strong> pump. --> Tightening torque: <strong>17</strong> ftlb. See Fig. 85.SUBSEQUENT WORKSubsequent workInstall <strong>oil</strong> pan. --> <strong>17</strong>5<strong>01</strong>9 Removing <strong>and</strong> installing <strong>oil</strong> pan - chapter on "Installing"<strong>17</strong> 22 19 REMOVING AND INSTALLING OIL PUMP DRIVE - AS OF MY 2004(CAYENNE TIP, CAYENNE MAN)INFORMATIONComponent overview
2004 Porsche Cayenne2003-2008 ENGINE LubricationFig. 86: Component overview for <strong>oil</strong> panCourtesy of PORSCHE OF NORTH AMERICA, INC.-1- - --> Tightening torque: 6 ftlb. See Fig. 86.-2- - Guide tube for <strong>oil</strong> dipstick. See Fig. 86.-3- - Oil dipstick. See Fig. 86.-4- - Oil check valve, pay attention to direction of installation. See Fig. 86.-5- - Knock sensor; right with <strong>and</strong> left without cable. See Fig. 86.
2004 Porsche Cayenne2003-2008 ENGINE Lubrication-6- - --> Tightening torque: 15 ftlb. . See Fig. 86.-7- - --> Tightening torque: 7.5 ftlb. . See Fig. 86.-8- - Cover for <strong>oil</strong> pump drive. See Fig. 86.-9- - O-ring; replace. See Fig. 86.-10- - Oil pump drive. See Fig. 86.-11- - Crankcase. See Fig. 86.-12- - Intermediate shaft. See Fig. 86.-13- - Thrust washer. See Fig. 86.-14- - --> Tightening torque: 7.5 ftlb. , use impact bolter as needed; insert screws with screw locking agent.See Fig. 86.-15- - Drive shaft for <strong>oil</strong> pump; pay attention to the assembly of plastic washer. See Fig. 86.-16- - Crankshaft reference mark sender. See Fig. 86.-<strong>17</strong>- - Oil pump, observe tightening sequence. See Fig. 86.-18- - --> Tightening torque: <strong>17</strong> ftlb. See Fig. 86.-19- - --> Tightening torque: 6 ftlb. See Fig. 86.-20- - Replacing --> Tightening torque: 22 ftlb. ; See Fig. 86.-21- - Oil pan See Fig. 86.-22- - Oil level sensor. See Fig. 86.-23- - Sealing ring; replace. See Fig. 86.-24- - --> Tightening torque: 9 ftlb. See Fig. 86.-25- - Sealing ring; replace. See Fig. 86.-26- - Engine support arm/<strong>oil</strong> <strong>filter</strong> housing. See Fig. 86.-27- - --> Tightening torque: 15 ftlb. See Fig. 86.-28- - To thermostat; replace O-ring. See Fig. 86.
2004 Porsche Cayenne2003-2008 ENGINE Lubrication-29- - --> Tightening torque: 19 ftlb. See Fig. 86.-30- - --> Tightening torque: 19 ftlb. See Fig. 86.-31- - Secondary unit holder. See Fig. 86.-32- - Coolant pipe; replace O-ring. See Fig. 86.-33- - Knock sensor (without cable). See Fig. 86.-34- - Torsional vibration damper. See Fig. 86.-35- - --> Initial tightening: 74 ftlb. --> Final tightening: 90 ° ; replace screw. See Fig. 86.Component overview
2004 Porsche Cayenne2003-2008 ENGINE LubricationFig. 87: Component overview of <strong>oil</strong> pressure control valveCourtesy of PORSCHE OF NORTH AMERICA, INC.-1- - Drive shaft for <strong>oil</strong> pump drive; component is symmetrical, thus it is not possible to install incorrectly. SeeFig. 87.-2- - Oil pump. See Fig. 87.-3- - --> Tightening torque: <strong>17</strong> ftlb. . See Fig. 87.-4- - Gear wheels; tooth flank play: 0.20 mm; axial flank play: 0.10 mm. See Fig. 87.-5- - --> Opening pressure: 5.5 bar +/-0.2 bar ; clean intake strainer. See Fig. 87.
2004 Porsche Cayenne2003-2008 ENGINE Lubrication-6- - --> Tightening torque: 6 ftlb. ; with screw locking agent medium-tight. See Fig. 87.-7- - Oil pressure pipe; insert with sealant. See Fig. 87.-8- - --> Tightening torque: 6 ftlb. . See Fig. 87.-9- - Sealing ring; replace if damaged. See Fig. 87.REMOVING OIL PUMP DRIVERemoving <strong>oil</strong> pump driveNOTE:• Please read the most important working regulations <strong>and</strong> warning notes! --> 10 The most important working regulations <strong>and</strong> warning notes.• The components of the <strong>oil</strong> pump drive must be h<strong>and</strong>led carefully.• Set down the disassembled components of the <strong>oil</strong> pump drive on a cleansurface.• The <strong>oil</strong> pump drive should be examined if the <strong>oil</strong> pressure is low. Theshafts <strong>and</strong> transmission parts must be visually inspected for missing teeth<strong>and</strong> wear.Remove <strong>oil</strong> pump drive at the top1. Remove rear exhaust manifold for cyl. 4, 5 <strong>and</strong> 6. For details, refer to 26 <strong>01</strong> 19 Removing <strong>and</strong> installingexhaust system - as of MY 2003 (All Models) .
2004 Porsche Cayenne2003-2008 ENGINE LubricationFig. 88: Oil pump drive coverCourtesy of PORSCHE OF NORTH AMERICA, INC.2. Remove fastening screws of the <strong>oil</strong> pump drive cover. Carefully lever off the <strong>oil</strong> pump drive cover with asmall screwdriver -Arrow- . See Fig. 88.
2004 Porsche Cayenne2003-2008 ENGINE LubricationFig. 89: Removing <strong>oil</strong> pump drive coverCourtesy of PORSCHE OF NORTH AMERICA, INC.3. Remove <strong>oil</strong> pump drive cover --> Removing <strong>oil</strong> pump drive cover . Check sealing ring <strong>and</strong> replace ifnecessary. See Fig. 89.
2004 Porsche Cayenne2003-2008 ENGINE LubricationFig. 90: Oil pump driveCourtesy of PORSCHE OF NORTH AMERICA, INC.4. Pull the <strong>oil</strong> pump drive from the cylinder block with a rotary movement --> Oil pump drive . See Fig. 90.
2004 Porsche Cayenne2003-2008 ENGINE LubricationFig. 91: Drive shaft of <strong>oil</strong> pumpCourtesy of PORSCHE OF NORTH AMERICA, INC.5. Using a suitable tool (e. g. pointed-nose pliers, magnet), pull the drive shaft of the <strong>oil</strong> pump from the cylinderblock --> Drive shaft of <strong>oil</strong> pump . See Fig. 91.Remove <strong>oil</strong> pump drive at rearNOTE:• If you now want to take out the intermediate shaft, you will have to removethe <strong>engine</strong> Refer to 10 <strong>01</strong> 19 Removing <strong>and</strong> installing V6 3.2 l <strong>engine</strong> - as ofMY 2004 (Cayenne TIP, Cayenne MAN) . <strong>and</strong> the timing chains. Refer to 1535 21 Removing timing chains - as of MY 2004 (Cayenne TIP, CayenneMAN) ..• The fastening screws of the intermediate shaft thrust plate will probably bedestroyed during disassembly as they are bonded in.Fig. 92: Thrust plate for intermediate shaftCourtesy of PORSCHE OF NORTH AMERICA, INC.6. Remove fastening screws of the intermediate shaft thrust plate --> Thrust plate for intermediate shaft .Remove thrust plate. See Fig. 92.
2004 Porsche Cayenne2003-2008 ENGINE LubricationFig. 93: Intermediate shaftCourtesy of PORSCHE OF NORTH AMERICA, INC.7. Carefully pull intermediate shaft from the cylinder block --> Intermediate shaft . See Fig. 93.INSTALLING OIL PUMP DRIVEInstalling <strong>oil</strong> pump drive
2004 Porsche Cayenne2003-2008 ENGINE LubricationFig. 94: Component arrangement for <strong>oil</strong> pump driveCourtesy of PORSCHE OF NORTH AMERICA, INC.Component arrangement --> Component arrangement for <strong>oil</strong> pump drive . See Fig. 94.Install <strong>oil</strong> pump drive at rear
2004 Porsche Cayenne2003-2008 ENGINE LubricationFig. 95: Intermediate shaftCourtesy of PORSCHE OF NORTH AMERICA, INC.1. Coat the intermediate shaft with <strong>engine</strong> <strong>oil</strong> <strong>and</strong> carefully guide it into the cylinder block --> Intermediateshaft . See Fig. 95.2. Oil the thrust plate <strong>and</strong> locate in the installation position (fits in only one position because of the bores).
2004 Porsche Cayenne2003-2008 ENGINE LubricationFig. 96: Thrust plate with fastening screwsCourtesy of PORSCHE OF NORTH AMERICA, INC.3. Lightly coat four new fastening screws with medium-tight thread locking compound. Fit the thrust platefastening screws --> Thrust plate with fastening screws . --> Tightening torque: 10 (7.5 ftlb.) Nm See Fig. 96.4. Install timing chains. Refer to 15 35 23 Installing timing chains - as of MY 2004 (Cayenne TIP, CayenneMAN) ..5. Install <strong>engine</strong>. Refer to 10 <strong>01</strong> 19 Removing <strong>and</strong> installing V6 3.2 l <strong>engine</strong> - as of MY 2004 (Cayenne TIP,Cayenne MAN) .Install <strong>oil</strong> pump drive at top6. Insert <strong>oil</strong> pump drive shaft into the bore. The drive shaft is symmetrical <strong>and</strong> cannot be incorrectly installed.
2004 Porsche Cayenne2003-2008 ENGINE LubricationFig. 97: Oil pump driveCourtesy of PORSCHE OF NORTH AMERICA, INC.7. Using rotary movements, engage <strong>oil</strong> pump drive into the teeth of the intermediate shaft <strong>and</strong> slide it onto thedrive shaft --> Oil pump drive . See Fig. 97.
2004 Porsche Cayenne2003-2008 ENGINE LubricationFig. 98: Oil pump drive coverCourtesy of PORSCHE OF NORTH AMERICA, INC.8. Check seal of the <strong>oil</strong> pump drive cover <strong>and</strong> replace if necessary. Oil the cover <strong>and</strong> fit with two fasteningscrews . --> Tightening torque: 8 (6 ftlb.) Nm9. Fit rear exhaust manifold for cyl. 4, 5 <strong>and</strong> 6. For details, refer to 26 10 19 Removing <strong>and</strong> installing exhaustmanifold - as of MY 2004 (Cayenne TIP, Cayenne MAN) .<strong>17</strong> 26 19 REMOVING AND INSTALLING OIL PRESSURE CONTROL VALVE -AS OF MY 2004 (CAYENNE TIP, CAYENNE MAN)INFORMATIONComponent overview
2004 Porsche Cayenne2003-2008 ENGINE LubricationFig. 99: Component overview of <strong>oil</strong> pressure control valveCourtesy of PORSCHE OF NORTH AMERICA, INC.-1- - Drive shaft for <strong>oil</strong> pump drive; component is symmetrical, thus it is not possible to install incorrectly. SeeFig. 99.-2- - Oil pump. See Fig. 99.-3- - --> Tightening torque: <strong>17</strong> ftlb. See Fig. 99.-4- - Gear wheels; tooth flank play: 0.20 mm; axial flank play: 0.10 mm. See Fig. 99.-5- - --> Opening pressure: 5.5 bar +/-0.2 bar ; clean intake strainer. See Fig. 99.
2004 Porsche Cayenne2003-2008 ENGINE Lubrication-6- - --> Tightening torque: 6 ftlb. ; with screw locking agent medium-tight. See Fig. 99.-7- - Oil pressure pipe; insert with sealant. See Fig. 99.-8- - --> Tightening torque: 6 ftlb. See Fig. 99.-9- - Sealing ring; replace if damaged. See Fig. 99.REMOVING AND INSTALLING OIL PRESSURE CONTROL VALVERemoving <strong>and</strong> installing <strong>oil</strong> pressure control valveNOTE:• The complete <strong>oil</strong> pump is replaced if there is a defect in the <strong>oil</strong> pressurecontrol valve.1. Replace <strong>oil</strong> pump, see --> <strong>17</strong>2<strong>01</strong>9 Removing <strong>and</strong> installing <strong>oil</strong> pump.<strong>17</strong> 26 37 DISASSEMBLING AND ASSEMBLING OIL PRESSURE CONTROLVALVE - AS OF MY 2003 (CAYENNE S TIP, CAYENNE S MAN, CAYENNETURBO, CAYENNE TURBO S, CAYENNE S TIO TITAN)DISASSEMBLING OIL PRESSURE CONTROL VALVEFig. 100: OverviewCourtesy of PORSCHE OF NORTH AMERICA, INC.NOTE:• The description only applies when installed.
2004 Porsche Cayenne2003-2008 ENGINE LubricationFig. 1<strong>01</strong>: Component overviewCourtesy of PORSCHE OF NORTH AMERICA, INC.1 - Valve body; pay attention to the installation position2 - Spring3 - Sealing ring; replace4 - M22 screw plug1. Remove <strong>oil</strong> pan. --> <strong>17</strong>5021 Removing <strong>oil</strong> pan - chapter on "Removing"
2004 Porsche Cayenne2003-2008 ENGINE LubricationFig. 102: Screw plug of <strong>oil</strong> pressure control valveCourtesy of PORSCHE OF NORTH AMERICA, INC.NOTE:• When unscrewing the <strong>oil</strong> pressure control valve, ensure that the screwplug is under spring pressure.• Do not let the valve body fall.• Note the installation location of the valve body.• More <strong>oil</strong> can leak out from the opening.2. Unscrew screw plug of <strong>oil</strong> pressure control valve (a/f 19) -arrow- . See Fig. 102.
2004 Porsche Cayenne2003-2008 ENGINE LubricationFig. 103: Valve bodyCourtesy of PORSCHE OF NORTH AMERICA, INC.3. Remove the four components of the <strong>oil</strong> pressure control valve --> Valve body . Always replace sealing ring.See Fig. 103.ASSEMBLING OIL PRESSURE CONTROL VALVE
2004 Porsche Cayenne2003-2008 ENGINE LubricationFig. 104: Valve bodyCourtesy of PORSCHE OF NORTH AMERICA, INC.NOTE:• Ensure that the installation opening of the <strong>oil</strong> pump housing is clean!• Note the installation location of the valve body.• Always replace sealing ring.1. Guide in the valve body with the bores into the <strong>oil</strong> pump housing first --> Valve body . See Fig. 104.NOTE:• Screw in the screw plug by h<strong>and</strong> against the spring pressure.2. Prevent the valve body from falling <strong>and</strong> screw in the spring, new sealing ring <strong>and</strong> screw plug.
2004 Porsche Cayenne2003-2008 ENGINE LubricationFig. 105: Screw plug of <strong>oil</strong> pressure control valveCourtesy of PORSCHE OF NORTH AMERICA, INC.3. Tighten screw plug (a/f 19) -arrow- . --> Tightening torque: 33 ftlb. See Fig. 105.4. Install <strong>oil</strong> pan. --> <strong>17</strong>5023 Oil pan installed (includes sealing) - chapter on "Installing"<strong>17</strong> 30 19 REMOVING AND INSTALLING OIL FILTER - AS OF MY 2003(CAYENNE S TIP, CAYENNE S MAN, CAYENNE TURBO, CAYENNE TURBOS, CAYENNE S TIO TITAN)TOOLSDesignation Type Number Explanation<strong>oil</strong> <strong>filter</strong> spanner special tool P 9204REMOVING AND INSTALLING OIL FILTERWARNING: Engine <strong>oil</strong> is toxic.• Danger of poisoning!--> Do not consume food or drink while working (danger of mixing).
4. Remove the <strong>filter</strong> element. Remove the <strong>filter</strong> downwards <strong>and</strong> dispose of in accordance with legal2004 Porsche Cayenne2003-2008 ENGINE Lubrication--> If swallowed, observe the warning information on the containers, contact a doctor if necessary <strong>and</strong> show theinformation on the containers.WARNING: Danger of scalding from hot <strong>oil</strong>!--> Engine <strong>oil</strong> <strong>and</strong> components of the <strong>oil</strong> circuit can become very hot!--> Allow <strong>engine</strong> <strong>and</strong> components to cool down.--> Avoid contact with the skin <strong>and</strong> eyes.--> Wear suitable protective clothing.1. Remove <strong>engine</strong> guard. Refer to 10 80 19 Removing <strong>and</strong> installing <strong>engine</strong> guard - as of MY 2003 (AllModels) .Fig. 106: Oil <strong>filter</strong>Courtesy of PORSCHE OF NORTH AMERICA, INC.2. Loosen <strong>oil</strong> <strong>filter</strong> with special tool <strong>oil</strong> <strong>filter</strong> spanner P 9204 <strong>and</strong> unscrew it.3. Remove the <strong>oil</strong> <strong>filter</strong> housing vertically downwards. Drain the remaining <strong>oil</strong> into a disposal container.
2004 Porsche Cayenne2003-2008 ENGINE Lubricationrequirements.Fig. 107: Oil-<strong>filter</strong> housing sealing ringCourtesy of PORSCHE OF NORTH AMERICA, INC.NOTE:• Do not remove the O-ring with a sharp object.5. Clean the <strong>oil</strong> <strong>filter</strong> housing <strong>and</strong> replace the O-ring seal. Clean the <strong>oil</strong> <strong>filter</strong> housing thoroughly inside <strong>and</strong>outside <strong>and</strong> replace the O-ring. Carefully lever off the O-ring. The <strong>oil</strong> <strong>filter</strong> housing must not be damagedduring this procedure.6. Install the <strong>filter</strong> element.• The <strong>oil</strong> <strong>filter</strong> housing contains a cutout via which the O-ring can beremoved.NOTE:• Lightly <strong>oil</strong> the O-ring when installing the <strong>oil</strong> <strong>filter</strong> housing.7. Install the <strong>oil</strong> <strong>filter</strong> housing <strong>and</strong> tighten using special tool <strong>oil</strong> <strong>filter</strong> spanner P 9204. --> Tightening torque:19 ftlb. Lightly <strong>oil</strong> the O-ring when doing this.8. Fit <strong>engine</strong> guard. Refer to 10 80 19 Removing <strong>and</strong> installing <strong>engine</strong> guard - as of MY 2003 (All Models) .9. Fill <strong>engine</strong> <strong>oil</strong>, start <strong>engine</strong> <strong>and</strong> check <strong>oil</strong> level. --> <strong>17</strong><strong>01</strong><strong>17</strong> Engine <strong>oil</strong> <strong>and</strong> <strong>oil</strong> <strong>filter</strong> change - chapter on"Checking"<strong>17</strong> 30 19 REMOVING AND INSTALLING OIL FILTER - AS OF MY 2004(CAYENNE TIP, CAYENNE MAN)INFORMATIONComponent overview
2004 Porsche Cayenne2003-2008 ENGINE LubricationFig. 108: Component overview of <strong>oil</strong> <strong>filter</strong> <strong>and</strong> <strong>oil</strong>-<strong>filter</strong> consoleCourtesy of PORSCHE OF NORTH AMERICA, INC.No. Designation Qty. Removal Fitting-1- See Fig. 108.Oil <strong>filter</strong>housing/<strong>engine</strong> 1supporting arm-2- See Fig. 108. Sealing ring 1Replace whenremoving, <strong>oil</strong> lightly-3- See Fig. 108. Sealing ring 3Replace whenremoving, <strong>oil</strong> lightlyNote installation
2004 Porsche Cayenne2003-2008 ENGINE Lubrication-4- See Fig. 108. Oil cooler 1 position-5- See Fig. 108. Cover for <strong>oil</strong> cooler 1-6- See Fig. 108. Oil pressure switch 1-7- See Fig. 108. Oil <strong>filter</strong> element 1-8- See Fig. 108. Oil <strong>filter</strong> cover 1 Drain after removalReplace sealing ringwhen removing, <strong>oil</strong>lightly-9- See Fig. 108.Oil drain plug for <strong>oil</strong><strong>filter</strong> cover1-10- See Fig. 108. Fastening screws 5REMOVING AND INSTALLING OIL FILTERRemoving <strong>and</strong> installing <strong>oil</strong> <strong>filter</strong>WARNING: Risk of scalding from hot <strong>oil</strong>--> Let the <strong>oil</strong> cool down--> Wear personal protective gear (goggles, gloves)1. Jack up the vehicle at the points provided. --> 03 Entire vehicle -General2. Remove the underbody panel. Refer to 10 80 19 Removing <strong>and</strong> installing <strong>engine</strong> guard - as of MY 2003(All Models) .
2004 Porsche Cayenne2003-2008 ENGINE LubricationFig. 109: Loosening the <strong>oil</strong> <strong>filter</strong> coverCourtesy of PORSCHE OF NORTH AMERICA, INC.3. Loosen <strong>oil</strong> <strong>filter</strong> cover with a socket (a/f 36).4. Remove the <strong>oil</strong> <strong>filter</strong> housing vertically downwards. Drain the remaining <strong>oil</strong> into a disposal container.5. Remove the <strong>filter</strong> element. Remove the <strong>filter</strong> downwards <strong>and</strong> dispose of in accordance with legalrequirements.NOTE:• Do not remove the O-ring with a sharp object.6. Clean the <strong>oil</strong> <strong>filter</strong> housing <strong>and</strong> replace the O-ring seal. Clean the <strong>oil</strong> <strong>filter</strong> housing thoroughly inside <strong>and</strong>outside <strong>and</strong> replace the O-ring. Carefully lever off the O-ring. The <strong>oil</strong> <strong>filter</strong> housing must not be damagedduring this procedure.7. Insert <strong>filter</strong> element in the housing.• The <strong>oil</strong> <strong>filter</strong> housing contains a cutout via which the O-ring can beremoved.NOTE:• Lightly <strong>oil</strong> the O-ring when installing the <strong>oil</strong> <strong>filter</strong> housing.8. Install <strong>oil</strong>-<strong>filter</strong> housing. --> Tightening torque: 25 (19 ftlb.) Nm Lightly <strong>oil</strong> the O-ring when doing this.
2004 Porsche Cayenne2003-2008 ENGINE Lubrication9. Correct <strong>engine</strong> <strong>oil</strong> level. First fill in 0.5 litres of <strong>engine</strong> <strong>oil</strong> <strong>and</strong> check it again after starting the <strong>engine</strong>.10. Start <strong>engine</strong> <strong>and</strong> check <strong>oil</strong> level. --> <strong>17</strong><strong>01</strong><strong>17</strong> Engine <strong>oil</strong> <strong>and</strong> <strong>oil</strong> <strong>filter</strong> change - section on "Checking"Fig. 110: Underbody panelCourtesy of PORSCHE OF NORTH AMERICA, INC.11. Fit the underbody panel. Refer to 10 80 19 Removing <strong>and</strong> installing <strong>engine</strong> guard - as of MY 2003 (AllModels) .MARKINGS ON THE OIL DIPSTICK (CHECKING ENGINE OIL LEVEL)The vehicle must st<strong>and</strong> horizontally. The <strong>engine</strong> must be switched off <strong>and</strong> at operating temperature. Beforemeasuring, allow <strong>engine</strong> <strong>oil</strong> to flow back into the <strong>oil</strong> pan for approximately 3 minutes.1. Pull out <strong>oil</strong> dipstick <strong>and</strong> wipe it off with a clean, lint-free cloth. Insert dipstick again fully, pull it out again,<strong>and</strong> read off the <strong>oil</strong> level. Correct <strong>engine</strong>-<strong>oil</strong> level if necessary.The <strong>oil</strong> level on the <strong>oil</strong> dipstick must never be below the MIN mark or above the MAX mark.The difference quantity between the marks -1 <strong>and</strong> 2- is --> Filling capacity: 1.5 liter . See Fig. 111.
2004 Porsche Cayenne2003-2008 ENGINE LubricationFig. 111: Markings on the <strong>oil</strong> dipstickCourtesy of PORSCHE OF NORTH AMERICA, INC.NOTE:• After changing the <strong>oil</strong>, the <strong>oil</strong> level must be checked using the dipstick.• 1 - max. marking• 2 - min. marking• a - Area above cross-hatched area up to max. mark: no more <strong>oil</strong> must be added.• b - Oil level within cross-hatched area: additional <strong>engine</strong> <strong>oil</strong> can be added.• c - Area from min. mark to cross-hatched area: refill <strong>engine</strong> <strong>oil</strong> up to the cross-hatched area.<strong>17</strong> 50 19 REMOVING AND INSTALLING OIL PAN - AS OF MY 2004(CAYENNE TIP, CAYENNE MAN)TOOLSPRELIMINARY WORK• The <strong>engine</strong> must have reached its operating temperature.Designation Type Number Explanationsilicone sealant commerciallyavailable tool000.043.300.39
2004 Porsche Cayenne2003-2008 ENGINE LubricationPreliminary workFig. 112: Engine guardCourtesy of PORSCHE OF NORTH AMERICA, INC.1. Remove <strong>engine</strong> guard . Refer to 10 80 19 Removing <strong>and</strong> installing <strong>engine</strong> guard - as of MY 2003 (AllModels) .2. Support the <strong>engine</strong> on the body. --> 10 Supporting the <strong>engine</strong> on the body3. Remove the front-axle carrier. Refer to 40 06 19 Removing <strong>and</strong> installing front-axle carrier - as of MY2003 (Cayenne TIP, Cayenne MAN) .4. Remove <strong>engine</strong> carrier. Refer to 10 30 19 Removing <strong>and</strong> installing <strong>engine</strong> carrier - as of MY 2004(Cayenne TIP, Cayenne MAN) .
2004 Porsche Cayenne2003-2008 ENGINE LubricationFig. 113: Oil drain plugCourtesy of PORSCHE OF NORTH AMERICA, INC.NOTE:• If the <strong>oil</strong> is to be used again, it must be collected in a clean container.5. Loosen <strong>oil</strong> drain plug <strong>and</strong> collect the <strong>engine</strong> <strong>oil</strong> in a container. Dispose of waste <strong>oil</strong> in accordance with legalrequirements.
2004 Porsche Cayenne2003-2008 ENGINE LubricationFig. 114: Oil drain plugCourtesy of PORSCHE OF NORTH AMERICA, INC.6. Replace <strong>oil</strong> drain plug. --> Tightening torque: 22 ftlb.INFORMATIONComponent overview
2004 Porsche Cayenne2003-2008 ENGINE LubricationFig. 115: Component overview for <strong>oil</strong> panCourtesy of PORSCHE OF NORTH AMERICA, INC.-1- - --> Tightening torque: 6 ftlb. See Fig. 115.-2- - Guide tube for <strong>oil</strong> dipstick. See Fig. 115.-3- - Oil dipstick. See Fig. 115.-4- - Oil check valve, pay attention to direction of installation. See Fig. 115.-5- - Knock sensor; right with <strong>and</strong> left without cable. See Fig. 115.
2004 Porsche Cayenne2003-2008 ENGINE Lubrication-6- - --> Tightening torque: 15 ftlb. . See Fig. 115.-7- - --> Tightening torque: 7.5 ftlb. . See Fig. 115.-8- - Cover for <strong>oil</strong> pump drive. See Fig. 115.-9- - O-ring; replace. See Fig. 115.-10- - Oil pump drive. See Fig. 115.-11- - Crankcase. See Fig. 115.-12- - Intermediate shaft. See Fig. 115.-13- - Thrust washer. See Fig. 115.-14- - --> Tightening torque: 7.5 ftlb. , use impact bolter as needed; insert screws with screw locking agent.See Fig. 115.-15- - Drive shaft for <strong>oil</strong> pump; pay attention to the assembly of plastic washer. See Fig. 115.-16- - Crankshaft reference mark sender. See Fig. 115.-<strong>17</strong>- - Oil pump, observe tightening sequence. See Fig. 115.-18- - --> Tightening torque: <strong>17</strong> ftlb. See Fig. 115.-19- - --> Tightening torque: 6 ftlb. See Fig. 115.-20- - Replacing --> Tightening torque: 22 ftlb. ; See Fig. 115.-21- - Oil pan. See Fig. 115.-22- - Oil level sensor. See Fig. 115.-23- - Sealing ring; replace. See Fig. 115.-24- - --> Tightening torque: 9 ftlb. See Fig. 115.-25- - Sealing ring; replace. See Fig. 115.-26- - Engine support arm/<strong>oil</strong> <strong>filter</strong> housing. See Fig. 115.-27- - --> Tightening torque: 15 ftlb. See Fig. 115.-28- - To thermostat; replace O-ring. See Fig. 115.
2004 Porsche Cayenne2003-2008 ENGINE Lubrication-29- - --> Tightening torque: 19 ftlb. See Fig. 115.-30- - --> Tightening torque: 19 ftlb. See Fig. 115.-31- - Secondary unit holder. See Fig. 115.-32- - Coolant pipe; replace O-ring. See Fig. 115.-33- - Knock sensor (without cable). See Fig. 115.-34- - Torsional vibration damper. See Fig. 115.-35- - --> Initial tightening: 74 ftlb. --> Final tightening: 90 ° ; replace screw. See Fig. 115.REMOVING THE OIL PANRemoving the <strong>oil</strong> panWARNING: Engine <strong>oil</strong> is toxic.• Danger of poisoning!--> Do not consume food or drink while working (danger of mixing).--> If swallowed, observe the warning information on the containers, contact a doctor if necessary <strong>and</strong> show theinformation on the containers.WARNING: Danger of scalding from hot <strong>oil</strong>!--> Engine <strong>oil</strong> <strong>and</strong> components of the <strong>oil</strong> circuit can become very hot!--> Allow <strong>engine</strong> <strong>and</strong> components to cool down.--> Avoid contact with the skin <strong>and</strong> eyes.--> Wear suitable protective clothing.WARNING: Oil is combustible!• Risk of fire due to <strong>oil</strong> <strong>and</strong> hot components (exhaust manifold, etc.)--> Do not pour <strong>engine</strong> <strong>oil</strong> over very hot components (e. g. turbocharger).--> Never place cloths soaked with <strong>oil</strong> on hot <strong>engine</strong> components.
2004 Porsche Cayenne2003-2008 ENGINE Lubrication--> In case of fire, use CO 2 or dry powder fire extinguishers.Fig. 116: Oil level sensorCourtesy of PORSCHE OF NORTH AMERICA, INC.1. Disconnect the electric connector on the <strong>oil</strong> level sensor.2. Loosen fastening screws on <strong>oil</strong> pan. When doing so, start at the front (reverse the sequence shown).
4. Remove any residual sealant on the crankcase with a plastic wedge.2004 Porsche Cayenne2003-2008 ENGINE LubricationFig. 1<strong>17</strong>: Fastening screws on <strong>oil</strong> panCourtesy of PORSCHE OF NORTH AMERICA, INC.3. Remove <strong>oil</strong> pan. If the <strong>oil</strong> pan is stuck, loosen it by gently tapping with a plastic hammer.Fig. 118: Plastic wedgeCourtesy of PORSCHE OF NORTH AMERICA, INC.
2004 Porsche Cayenne2003-2008 ENGINE LubricationFig. 119: Plastic brushCourtesy of PORSCHE OF NORTH AMERICA, INC.5. Clean the <strong>oil</strong> pan thoroughly. Remove silicone residue. A special plastic brush for drills can be used for thispurpose.INSTALLING OIL PANInstalling <strong>oil</strong> pan
2004 Porsche Cayenne2003-2008 ENGINE LubricationFig. 120: SealantCourtesy of PORSCHE OF NORTH AMERICA, INC.CAUTION: Engine damage due to clogged suction line of <strong>oil</strong> pump!--> The bead of sealing compound must not be thicker than 2-3 mm, as otherwise excess sealing compound willenter the <strong>oil</strong> pan <strong>and</strong> can clog the strainer in the intake pipe of the <strong>oil</strong> pump.1. Apply a bead of silicone sealant 000.043.300.39 all around the cleaned <strong>and</strong> degreased <strong>oil</strong> pan. Run the beadof sealant past the screw holes on the inside.2. Press the <strong>oil</strong> pan against the crankcase. Then tighten the fastening screws in the sequence shown. -->Tightening torque: 12 (9 ftlb.) Nm
2004 Porsche Cayenne2003-2008 ENGINE LubricationFig. 121: Oil pan tightening sequenceCourtesy of PORSCHE OF NORTH AMERICA, INC.Fig. 122: Oil dipstickCourtesy of PORSCHE OF NORTH AMERICA, INC.NOTE:• After assembly of <strong>oil</strong> pan, the sealing compound must dry for approx. 30min. Afterwards, fill <strong>engine</strong> <strong>oil</strong>.
2004 Porsche Cayenne2003-2008 ENGINE Lubrication3. Fill <strong>and</strong> check <strong>engine</strong> <strong>oil</strong> of the stipulated viscosity <strong>and</strong> quality. --> <strong>17</strong><strong>01</strong><strong>17</strong> Engine <strong>oil</strong> <strong>and</strong> <strong>oil</strong> <strong>filter</strong> change -chapter on "Checking"SUBSEQUENT WORKSubsequent work1. Install <strong>engine</strong> carrier . Refer to 10 30 19 Removing <strong>and</strong> installing <strong>engine</strong> carrier - as of MY 2004(Cayenne TIP, Cayenne MAN) .2. Install the front-axle carrier. Refer to 40 06 19 Removing <strong>and</strong> installing front-axle carrier - as of MY 2003(Cayenne TIP, Cayenne MAN) .3. Take off the <strong>engine</strong> carrier.4. Fit <strong>engine</strong> guard. Refer to 10 80 19 Removing <strong>and</strong> installing <strong>engine</strong> guard - as of MY 2003 (All Models) .<strong>17</strong> 50 21 REMOVING OIL PAN - AS OF MY 2003 (CAYENNE S TIP, CAYENNES MAN, CAYENNE TURBO, CAYENNE TURBO S, CAYENNE S TIO TITAN)TOOLSDesignation Type Number ExplanationWorkshop equipmentdescriptionspecial toolspecial tool 62-1Dial gaugecommercially NR.136available toolGauge holder special tool P 207spacer ring special tool P 9597/1Assembly driver special tool P 9691PRELIMINARY WORKPreliminary work
2004 Porsche Cayenne2003-2008 ENGINE LubricationFig. 123: Engine guardCourtesy of PORSCHE OF NORTH AMERICA, INC.1. Remove <strong>engine</strong> guard . Refer to 10 80 19 Removing <strong>and</strong> installing <strong>engine</strong> guard - as of MY 2003 (AllModels) .
2004 Porsche Cayenne2003-2008 ENGINE LubricationFig. 124: Draining coolantCourtesy of PORSCHE OF NORTH AMERICA, INC.2. Drain coolant circuit. Refer to 19 38 <strong>17</strong> Draining <strong>and</strong> filling in coolant (includes bleeding) - as of MY2003 (All Models) .
2004 Porsche Cayenne2003-2008 ENGINE LubricationFig. 125: Oil drain plugsCourtesy of PORSCHE OF NORTH AMERICA, INC.NOTE:• If the <strong>oil</strong> does not yet have to be replaced, collect it in a clean container<strong>and</strong> use again.3. Drain <strong>oil</strong>. To do this, loosen <strong>and</strong> unscrew the two <strong>oil</strong> drain plugs.4. Clean <strong>oil</strong> drain plugs <strong>and</strong> screw in with a new sealing ring. --> Tightening torque: 37 ftlb.
2004 Porsche Cayenne2003-2008 ENGINE LubricationFig. 126: Supporting the <strong>engine</strong> on the bodyCourtesy of PORSCHE OF NORTH AMERICA, INC.Fig. 127: Transmission screwsCourtesy of PORSCHE OF NORTH AMERICA, INC.NOTE:• If the transmission is still connected, the 2 lower transmission screwsmust be removed first.
2004 Porsche Cayenne2003-2008 ENGINE Lubrication5. Support the <strong>engine</strong> on the body. --> 10 Supporting the <strong>engine</strong> on the body6. Remove the front-axle carrier. Refer to 40 06 19 Removing <strong>and</strong> installing front-axle carrier - as of MY2003 (Cayenne S TIP, Cayenne S MAN, Cayenne Turbo) . Refer to 40 06 19 Removing <strong>and</strong> installingfront-axle carrier - as of MY 2003 (Cayenne Turbo S, Cayenne S TIO Titan) .7. Remove <strong>engine</strong> carrier. Refer to 10 30 19 Removing <strong>and</strong> installing <strong>engine</strong> carrier - as of MY 2003(Cayenne S TIP, Cayenne S MAN, Cayenne Turbo, Cayenne Turbo S, Cayenne S TIO Titan) .8. Loosen lock carrier (service position). Refer to 50 38 19 Removing <strong>and</strong> installing lock carrier - as of MY2003 (All Models) .9. Remove <strong>oil</strong> dipstick. --> <strong>17</strong><strong>17</strong>19 Removing <strong>and</strong> installing guide for <strong>oil</strong> dipstick - chapter on "Removing"
2004 Porsche Cayenne2003-2008 ENGINE LubricationFig. 128: V8 <strong>engine</strong>sCourtesy of PORSCHE OF NORTH AMERICA, INC.
2004 Porsche Cayenne2003-2008 ENGINE LubricationFig. 129: Oil level sensorCourtesy of PORSCHE OF NORTH AMERICA, INC.10. Disconnect <strong>oil</strong> level sensor. To do this, pull off the connector <strong>and</strong> take the cable out of the fixing clip on the<strong>oil</strong> pan.
2004 Porsche Cayenne2003-2008 ENGINE LubricationFig. 130: Pulley on crankshaftCourtesy of PORSCHE OF NORTH AMERICA, INC.11. Remove pulley from the crankshaft. Refer to 13 76 19 Removing <strong>and</strong> installing crankshaft belt pulley -as of MY 2003 (Cayenne S TIP, Cayenne S MAN, Cayenne Turbo, Cayenne Turbo S, Cayenne S TIOTitan) .The central screw must not be reused.
2004 Porsche Cayenne2003-2008 ENGINE LubricationFig. 131: Fastening screws for <strong>oil</strong>-<strong>filter</strong> consoleCourtesy of PORSCHE OF NORTH AMERICA, INC.12. Remove <strong>oil</strong>-<strong>filter</strong> console. To do this, unscrew the 4 fastening screws (3x M 8 x 70 <strong>and</strong> 1x M 8 x 45). Pull<strong>oil</strong>-<strong>filter</strong> console off forwards. Further details: --> <strong>17</strong>6721 Removing bracket for <strong>oil</strong>-water heat exchanger -chapter on "Removing"TOOLS AND MATERIALSSpecial tools
2004 Porsche Cayenne2003-2008 ENGINE LubricationFig. 132: ToolsCourtesy of PORSCHE OF NORTH AMERICA, INC.Item Designation Source Explanation-A- See Fig. 132. Assembly driver P 9691--> "SeeWorkshopEquipmentManual, ChapterFor installing the <strong>oil</strong>transfer sleeve in the<strong>oil</strong> pan2.2.2 or 2.2.1"-B- See Fig. 132. Gauge holder P 207--> "SeeWorkshopEquipmentManual, Chapter2.2.2 or 2.2.1"-C- See Fig. 132.Dial gauge NR.136--> "SeeWorkshopEquipmentManual, Chapter2.4"-D- See Fig. 132.-E- See Fig. 132. 62-1INFORMATIONWorkshop equipmentdescription--> "SeeWorkshopEquipmentManual, Chapter3. X"--> "See PartsCatalogue in MainGroup X"
2004 Porsche Cayenne2003-2008 ENGINE LubricationComponent overviewFig. 133: Oil pan - overviewCourtesy of PORSCHE OF NORTH AMERICA, INC.1 - Oil pan; plastic feeder must not be removed.2 - Sealant application; remove silicone residues; no more than 5 minutes should pass between the timeapplication begins <strong>and</strong> screwing. Do not smear the sealing bead when putting on the <strong>oil</strong> pan.3 - Fastening screw M6 x 254 - Sealing ring 18 x 24; replace
2004 Porsche Cayenne2003-2008 ENGINE Lubrication5 - Drain plug; clean6 - Oil level sensor (TOC); replace seal7 - Fastening screw M6 x 258 - O-ring, 11.2 x 2.65, replace9 - Oil dipstick10 - Fastening screw with coned half dog M6 x 1611 - O-ring, 23 x 3, replace, grease before assembly12 - Socket; disassembly with spacer ring P 9597/1 <strong>and</strong> internal puller; assembly with assembly driver P 969113 - O-ring, 25; replace, grease before assembly14 - Moulded seal; replaceREMOVING OIL PANRemoving the <strong>oil</strong> panNOTE:• The description only applies when installed.• If the <strong>oil</strong> pan is removed when the transmission is disconnected, the <strong>oil</strong>pan must be aligned with the aid of a dial gauge (see chapter Aligning <strong>oil</strong>pan with a dial gauge).• To remove the <strong>oil</strong> pan, it is not necessary to remove the timing case cover.If the timing case cover is removed while carrying out work later, the <strong>oil</strong>pan must be removed with it.
2004 Porsche Cayenne2003-2008 ENGINE LubricationFig. 134: Oil pan in V8 - <strong>engine</strong>Courtesy of PORSCHE OF NORTH AMERICA, INC.Fig. 135: Oil transfer sleeveCourtesy of PORSCHE OF NORTH AMERICA, INC.
2004 Porsche Cayenne2003-2008 ENGINE LubricationFig. 136: Turbocharger <strong>oil</strong> suction pump fastening screwsCourtesy of PORSCHE OF NORTH AMERICA, INC.NOTE:• In the case of the Cayenne Turbo, the <strong>oil</strong> suction pump of the turbochargermust also be removed. To do this, release screws -1 to 6- one after theother. See Fig. 136.1. Remove <strong>oil</strong> transfer sleeve. To do this, insert internal puller into the opening <strong>and</strong> tighten. While doing this,counter the puller with an open-ended wrench.Fig. 137: Nut on pullerCourtesy of PORSCHE OF NORTH AMERICA, INC.2. Subsequently, tighten the nut on the puller until the sleeve can be pulled out.
2004 Porsche Cayenne2003-2008 ENGINE Lubrication3. Release foot of timing-case cover. Unscrew the 5 lower fastening screws M 6 x 25 with an E10 wrench.4. Release <strong>oil</strong> pan. To do this, unscrew the 24 fastening screws M 6 x 20 with an E10 key.NOTE:• If the <strong>oil</strong> pan is stuck, loosen it by gently tapping with a plastic hammer.5. Remove <strong>oil</strong> pan. Remove the <strong>oil</strong> pan from the crankshaft. At the same time, swing downwards <strong>and</strong> forwards.6. Clean sealing faces. Brush off rest of the sealant with a plastic brush <strong>and</strong> then degrease the sealing face.NOTE:• The black plastic feeder must not be taken out of the <strong>oil</strong> pan.<strong>17</strong> 50 23 INSTALLING OIL PAN (INCLUDES SEALING) - AS OF MY 2003(CAYENNE S TIP, CAYENNE S MAN, CAYENNE TURBO, CAYENNE TURBOS, CAYENNE S TIO TITAN)TOOLS• If this component has been damaged or removed, the entire <strong>oil</strong> pan mustbe removed.Designation Type Number ExplanationWorkshop equipmentdescriptionspecial toolspecial tool 62-1Dial gaugecommercially NR.136available toolGauge holder special tool P 207Assembly driver special tool P 9691TOOLS AND MATERIALSSpecial tools
2004 Porsche Cayenne2003-2008 ENGINE LubricationFig. 138: ToolsCourtesy of PORSCHE OF NORTH AMERICA, INC.Item Designation Source Explanation-A- See Fig. 138. Assembly driver P 9691--> "SeeWorkshopEquipmentManual, ChapterFor installing the <strong>oil</strong>transfer sleeve in the<strong>oil</strong> pan2.2.2 or 2.2.1"-B- See Fig. 138. Gauge holder P 207--> "SeeWorkshopEquipmentManual, Chapter2.2.2 or 2.2.1"-C- See Fig. 138.Dial gauge NR.136--> "SeeWorkshopEquipmentManual, Chapter2.4"-D- See Fig. 138.-E- See Fig. 138. 62-1INSTALLING OIL PANWorkshop equipmentdescription--> "SeeWorkshopEquipmentManual, Chapter3. X"--> "See PartsCatalogue in MainGroup X"
2004 Porsche Cayenne2003-2008 ENGINE LubricationInstalling <strong>oil</strong> panCAUTION: Leaks due to components being at too low a temperature or at differenttemperatures!--> Components must have reached at least <strong>17</strong>°C throughout.--> Components must not be too hot (distortion).• If components that are cold or at different temperatures are sealedtogether by the application of sealant, adhesion problems <strong>and</strong> leakscan arise due to the build-up of condensation water or componentdistortion.--> Spare parts that are stored in the cold or heat (strong sunlight), must be brought to room temperature or thesame temperature as other parts before installation.Fig. 139: Rubber profilesCourtesy of PORSCHE OF NORTH AMERICA, INC.CAUTION: Risk of damage <strong>and</strong> leaks!• If the <strong>oil</strong> pan is not correctly aligned, it can become leaky duringoperation.
2004 Porsche Cayenne2003-2008 ENGINE Lubrication--> Align the <strong>oil</strong> pan extremely accurately in compliance with this description.--> Ensure that there is no dirt between the 2 components.1. Replace the 9 rubber profiles.2. Apply liquid sealant. Apply the sealing agent Dreibond 2210 (000 043 204 58, status 03/06) using the h<strong>and</strong>heldcartridge. The contour of the bead of sealant must comply with the figure shown below. The bead ofsealant should be approx. 1.5 mm high. The <strong>oil</strong> duct in the timing-case cover -A- must remain clear <strong>and</strong> mustnot be obstructed with silicone. See Fig. 139.Fig. 140: Applying liquid sealantCourtesy of PORSCHE OF NORTH AMERICA, INC.NOTE:• If the transmission is removed, the <strong>oil</strong> pan must be aligned with the aid ofa dial gauge. --> <strong>17</strong>5023 Oil pan installed (includes sealing) - chapter on"Fitting"3. Place the <strong>oil</strong> pan on the crankcase <strong>and</strong> push evenly against the transmission cover.4. Screw in a fastening screw on each corner of the <strong>oil</strong> pan <strong>and</strong> tighten them by h<strong>and</strong>.5. Then screw in all fastening screws by h<strong>and</strong>. While doing this, push the <strong>oil</strong> pan towards the transmission.6. Tighten the 29 fastening screws beginning at the transmission flange <strong>and</strong> proceed forwards. --> Tighteningtorque: 10 (7.5 ftlb.) Nm
2004 Porsche Cayenne2003-2008 ENGINE LubricationFig. 141: Transmission flange fastening screwsCourtesy of PORSCHE OF NORTH AMERICA, INC.7. Screw down the timing case cover. Tighten the 5 fastening screws M 6 x 25 with an E10 wrench. -->Tightening torque: 10 (7.5 ftlb.) NmFig. 142: Oil transfer flangeCourtesy of PORSCHE OF NORTH AMERICA, INC.
--> Ensure that there is no dirt between the 2 components.2004 Porsche Cayenne2003-2008 ENGINE LubricationNOTE:• In the Cayenne Turbo (M48/50), the <strong>oil</strong> suction pump of the turbochargermust also be fitted. Further details: --> 218023 23 Installing <strong>oil</strong> suctionpump for turbocharger - chapter on "Installing"8. Install <strong>oil</strong> transfer flange. Replace <strong>and</strong> grease the O-rings of the flange. Then place the connection piece onthe assembly driver P 9691 in such a way that the slightly thicker end points forwards.Fig. 143: SocketCourtesy of PORSCHE OF NORTH AMERICA, INC.9. Insert the socket with the thicker end into the <strong>oil</strong> pan <strong>and</strong> push the assembly m<strong>and</strong>rel all the way by knockingit slightly.ALIGNING THE OIL PAN WITH A DIAL GAUGEFitting the <strong>oil</strong> pan with a dial gaugeCAUTION: Risk of damage <strong>and</strong> leaks!• If the <strong>oil</strong> pan is not correctly aligned, it can become leaky duringoperation.--> Align the <strong>oil</strong> pan extremely accurately in compliance with this description.
2004 Porsche Cayenne2003-2008 ENGINE LubricationPlace the <strong>oil</strong> pan on the crankcase <strong>and</strong> position a fastening screw on each corner.Fig. 144: Dial gaugeCourtesy of PORSCHE OF NORTH AMERICA, INC.NOTE:• The following work steps are only necessary if the transmission isdisconnected at the time the <strong>oil</strong> pan is being installed.1. Insert the dial gauge into the universal dial gauge holder <strong>and</strong> position it such that the dial gauge has a preloadof about 1 mm.
2004 Porsche Cayenne2003-2008 ENGINE LubricationFig. 145: Dial gauge <strong>and</strong> dial gauge holderCourtesy of PORSCHE OF NORTH AMERICA, INC.2. Set dial gauge scale to 0. To do this, place the dial gauge holder on a completely flat surface (e. g. crankcaseflange) <strong>and</strong> turn the dial gauge scale until the pointer is on 0.
2004 Porsche Cayenne2003-2008 ENGINE LubricationFig. 146: Measuring offsetCourtesy of PORSCHE OF NORTH AMERICA, INC.CAUTION: Oil leakage!--> The <strong>oil</strong> pan lid must not project over the crankcase.--> The <strong>oil</strong> pan must not go under 0.1 mm.--> Oil pan must be installed in a straight position.• If the <strong>oil</strong> pan is not correctly aligned, it can become leaky.3. Measure offset. In order to do this, push with the holder starting from the crankcase flange towards the <strong>oil</strong>pan flange (the foot of the dial gauge holder is located on the other component like the dial gauge probe) <strong>and</strong>measure the offset. The <strong>oil</strong> pan must not be set back any more than 0.1 mm. A projection is not permissible.4. Align the <strong>oil</strong> pan by knocking lightly with a rubber hammer.
Fig. 148: Fastening screws2004 Porsche Cayenne2003-2008 ENGINE LubricationFig. 147: Checking the position of the <strong>oil</strong> pan againCourtesy of PORSCHE OF NORTH AMERICA, INC.5. After the <strong>oil</strong> pan has been aligned, tighten the 4 fastening screws. --> Tightening torque: 7.5 ftlb. The checkthe position of the <strong>oil</strong> pan again with the dial gauge.6. Tightening the remaining fastening screws. --> Tightening torque: 7.5 ftlb.
2004 Porsche Cayenne2003-2008 ENGINE LubricationCourtesy of PORSCHE OF NORTH AMERICA, INC.SUBSEQUENT WORKSubsequent workFig. 149: Fastening screws for transmission bell housingCourtesy of PORSCHE OF NORTH AMERICA, INC.1. Tighten the 2 fastening screws of the transmission bell housing. --> Tightening torque: 59 ftlb.
2004 Porsche Cayenne2003-2008 ENGINE LubricationFig. 150: Length-compensating elementCourtesy of PORSCHE OF NORTH AMERICA, INC.2. Install bracket for <strong>oil</strong>-water heat exchanger. --> <strong>17</strong>6723 Installing bracket for <strong>oil</strong>-water heat exchanger
2004 Porsche Cayenne2003-2008 ENGINE LubricationFig. 151: Crankshaft pulleyCourtesy of PORSCHE OF NORTH AMERICA, INC.3. Install crankshaft pulley. Refer to 13 76 19 Removing <strong>and</strong> installing crankshaft belt pulley - as of MY2003 (Cayenne S TIP, Cayenne S MAN, Cayenne Turbo, Cayenne Turbo S, Cayenne S TIO Titan) .Fig. 152: Engine carrierCourtesy of PORSCHE OF NORTH AMERICA, INC.4. Install <strong>engine</strong> carrier. Refer to 10 30 19 Removing <strong>and</strong> installing <strong>engine</strong> carrier - as of MY 2003 (CayenneS TIP, Cayenne S MAN, Cayenne Turbo, Cayenne Turbo S, Cayenne S TIO Titan) .5. Install the suspension subframe (front-axle carrier). Refer to 40 06 19 Removing <strong>and</strong> installing front-axlecarrier - as of MY 2003 (Cayenne S TIP, Cayenne S MAN, Cayenne Turbo) . Refer to 40 06 19 Removing<strong>and</strong> installing front-axle carrier - as of MY 2003 (Cayenne Turbo S, Cayenne S TIO Titan) .6. Remove <strong>engine</strong> bridge. Refer to 10 <strong>01</strong> IN Supporting the <strong>engine</strong> on the body - as of MY 2003 (Cayenne STIP, Cayenne S MAN, Cayenne Turbo, Cayenne Turbo S, Cayenne S TIO Titan) .7. Install <strong>oil</strong> dipstick. --> <strong>17</strong><strong>17</strong>19 Removing <strong>and</strong> installing guide for <strong>oil</strong> dipstick - chapter on "Installing"8. Tighten lock carrier. Refer to 50 38 19 Removing <strong>and</strong> installing lock carrier - as of MY 2003 (AllModels) .9. Fill in <strong>engine</strong> <strong>oil</strong>.
2004 Porsche Cayenne2003-2008 ENGINE Lubrication10. Bleed <strong>and</strong> fill the cooling circuit. Refer to 19 38 <strong>17</strong> Draining <strong>and</strong> filling in coolant (includes bleeding) -as of MY 2003 (All Models) .11. Carry out a check. After a test drive, check to ensure that the <strong>oil</strong> pan is not leaking. Then check the <strong>oil</strong> level.<strong>17</strong> 40 19 REMOVING AND INSTALLING OIL-WATER HEAT EXCHANGER -AS OF MY 2003 (CAYENNE S TIP, CAYENNE S MAN, CAYENNE TURBO,CAYENNE TURBO S, CAYENNE S TIO TITAN)PRELIMINARY WORKPreliminary workFig. 153: Draining cooling systemCourtesy of PORSCHE OF NORTH AMERICA, INC.1. Drain cooling system. Refer to 19 38 <strong>17</strong> Draining <strong>and</strong> filling in coolant (includes bleeding) - as of MY2003 (All Models) .2. Loosen lock carrier. Refer to 50 38 09 Detaching <strong>and</strong> fastening lock mount (service position) - as of MY2003 (All Models) .INFORMATIONComponent overview
2004 Porsche Cayenne2003-2008 ENGINE LubricationNOTE:• The illustrations apply to the Cayenne Turbo (M48/50).Fig. 154: Overview of V8 <strong>engine</strong>Courtesy of PORSCHE OF NORTH AMERICA, INC.
2004 Porsche Cayenne2003-2008 ENGINE LubricationFig. 155: Overview of bracket to <strong>engine</strong>Courtesy of PORSCHE OF NORTH AMERICA, INC.1 - Oil transfer flange2 - 5 O-rings3 - 2 fastening screws4 - Length-compensating element5 - Fastening screw, M8 x 50
2004 Porsche Cayenne2003-2008 ENGINE Lubrication6 - 2 fastening screws, M8 x 70Fig. 156: Overview of bracketCourtesy of PORSCHE OF NORTH AMERICA, INC.1 - Oil <strong>filter</strong> bracket2 - 6 lens-head screws M6 x 20 (only loosen the screws if absolutely necessary)3 - Lids4 - Seal
2004 Porsche Cayenne2003-2008 ENGINE Lubrication5 - 2 seals6 - O-ring7 - Oil <strong>filter</strong> element8 - Oil <strong>filter</strong> housing9 - 4 oval-head screws, M6 x 2<strong>01</strong>0 - Oil-water heat exchanger11 - Screw plug, M26 x 1.512 - Sealing ring, A26 x 3113 - Oil pressure switch (hot <strong>oil</strong> can leak out while removing)REMOVING OIL-WATER HEAT EXCHANGERNOTE:• The illustrations apply to the Cayenne Turbo (M48/50).• If a fault in the <strong>oil</strong>-water heat exchanger has caused <strong>oil</strong> <strong>and</strong> coolant to mix,the <strong>oil</strong> circuit should be checked to see if there is coolant in the <strong>engine</strong> or,if necessary, be cleaned.• If <strong>oil</strong> has entered the coolant circuit, this is to be cleaned after repair .Refer to 19 <strong>01</strong> 29 Cooling system cleaned (after <strong>oil</strong>/coolant mixing) - as ofMY 2003 (All Models) .
1. Replace the 2 sealing rings of the <strong>oil</strong> circuit. When doing this, pay attention to the lugs on the sealing ring.Subsequently, push the <strong>oil</strong>-water heat exchanger from underneath against the bracket <strong>and</strong> tighten the 4 fasteningscrews. --> Tightening torque: 7.5 ftlb.2004 Porsche Cayenne2003-2008 ENGINE LubricationFig. 157: Sprind-b<strong>and</strong> clamps for coolant linesCourtesy of PORSCHE OF NORTH AMERICA, INC.1. Release coolant hoses from <strong>oil</strong>/water heat exchanger. To do this, release the two spring-b<strong>and</strong> clamps <strong>and</strong> pullthe lines upwards.2. Release the 4 fastening screws on the heat exchanger <strong>and</strong> pull the heat exchanger down <strong>and</strong> off. During thisprocess, both <strong>engine</strong> <strong>oil</strong> <strong>and</strong> coolant will leak out. Collect leaking liquids <strong>and</strong> dispose of in accordance withlegal requirements.INSTALLING OIL-WATER HEAT EXCHANGEROl/Wasser-Warmetauscher einbauenNOTE:• The illustrations apply to the Cayenne Turbo (M48/50).• If a fault in the <strong>oil</strong>-water heat exchanger has caused <strong>oil</strong> <strong>and</strong> coolant to mix,the <strong>oil</strong> circuit should be checked to see if there is coolant in the <strong>engine</strong> or,if necessary, be cleaned.• If <strong>oil</strong> has entered the coolant circuit, this is to be cleaned after repair .Refer to 19 <strong>01</strong> 29 Cooling system cleaned (after <strong>oil</strong>/coolant mixing) - as ofMY 2003 (All Models) .
2004 Porsche Cayenne2003-2008 ENGINE LubricationFig. 158: Sprind-b<strong>and</strong> clamps for coolant linesCourtesy of PORSCHE OF NORTH AMERICA, INC.2. Push the coolant hoses onto the connecting flanges <strong>and</strong> secure with the spring-b<strong>and</strong> clamps.SUBSEQUENT WORKSubsequent work1. Fasten lock mount. Refer to 50 38 09 Detaching <strong>and</strong> fastening lock mount (service position) - as of MY2003 (All Models) .
2004 Porsche Cayenne2003-2008 ENGINE LubricationFig. 159: Fastening screws for sheetmatal braceCourtesy of PORSCHE OF NORTH AMERICA, INC.2. Fit the sheetmetal brace under the radiator. To do this, tighten the four fastening screws. --> Tighteningtorque: <strong>17</strong> ftlb.
2004 Porsche Cayenne2003-2008 ENGINE LubricationFig. 160: Fastening screws for front sp<strong>oil</strong>erCourtesy of PORSCHE OF NORTH AMERICA, INC.3. Tighten the front sp<strong>oil</strong>er on the underside.
2004 Porsche Cayenne2003-2008 ENGINE LubricationFig. 161: Engine guardCourtesy of PORSCHE OF NORTH AMERICA, INC.4. Fit <strong>engine</strong> guard. Refer to 10 80 19 Removing <strong>and</strong> installing <strong>engine</strong> guard - as of MY 2003 (All Models) .5. Fill cooling system. Refer to 19 38 <strong>17</strong> Draining <strong>and</strong> filling in coolant (includes bleeding) - as of MY 2003(All Models) .6. Check <strong>oil</strong> level <strong>and</strong> adjust.<strong>17</strong> 40 19 REMOVING AND INSTALLING OIL/WATER HEAT EXCHANGER(OIL COOLER) - AS OF MY 2004 (CAYENNE TIP, CAYENNE MAN)PRELIMINARY WORKPreliminary workFig. 162: Design coverCourtesy of PORSCHE OF NORTH AMERICA, INC.1. Pull the design cover straight up <strong>and</strong> off.2. Remove <strong>engine</strong> compartment cover at the left. Refer to 70 02 19 Removing <strong>and</strong> installing front cover(<strong>engine</strong> compartment) - as of MY 2003 (All Models) ..
2004 Porsche Cayenne2003-2008 ENGINE Lubrication3. Remove air cleaner housing lid <strong>and</strong> air-cleaner element. Refer to 24 25 19 Removing <strong>and</strong> installing aircleaner housing - as of MY 2004 (Cayenne TIP, Cayenne MAN) ..4. Remove <strong>engine</strong> guard. Refer to 10 80 19 Removing <strong>and</strong> installing <strong>engine</strong> guard - as of MY 2003 (AllModels) ..5. Drain coolant. Refer to 19 38 <strong>17</strong> Draining <strong>and</strong> filling in coolant (includes bleeding) - as of MY 2003 (AllModels) ..INFORMATIONComponent overview
2004 Porsche Cayenne2003-2008 ENGINE LubricationFig. 163: Oil <strong>filter</strong> housing <strong>and</strong> heat exchanger, component overviewCourtesy of PORSCHE OF NORTH AMERICA, INC.-1- - Oil <strong>filter</strong> housing/<strong>engine</strong> support arm. See Fig. 163.-2- - Sealing ring. See Fig. 163.-3- - Sealing ring. See Fig. 163.-4- - Oil cooler. See Fig. 163.-5- - --> Tightening torque: 19 ftlb. See Fig. 163.-6- - --> Tightening torque: 15 ftlb. See Fig. 163.-7- - Oil <strong>filter</strong> element. See Fig. 163.-8- - --> Tightening torque: 19 ftlb. See Fig. 163.-9- - --> Tightening torque: 7.5 ftlb. See Fig. 163.-10- - --> Tightening torque: <strong>17</strong> ftlb. See Fig. 163.REMOVING OIL/WATER HEAT EXCHANGER (OIL COOLER)Removing <strong>oil</strong>/water heat exchanger (<strong>oil</strong> cooler)WARNING: Danger of burns from hot <strong>engine</strong> <strong>oil</strong>!--> Allow <strong>engine</strong> to cool down.--> Wear personal protective gear (e. g. safety goggles, gloves).
2004 Porsche Cayenne2003-2008 ENGINE LubricationFig. 164: Fastening nutsCourtesy of PORSCHE OF NORTH AMERICA, INC.1. Remove two fastening nuts for the hose holder <strong>and</strong> press the holder aside -arrows- . See Fig. 164.
2004 Porsche Cayenne2003-2008 ENGINE LubricationFig. 165: Coolant hoses on <strong>oil</strong>/water heat exchangerCourtesy of PORSCHE OF NORTH AMERICA, INC.NOTE:• When opening the <strong>oil</strong>/water heat exchanger, collect emerging fuel (<strong>engine</strong><strong>oil</strong> <strong>and</strong> coolant) with a pan <strong>and</strong> cloth.2. Remove the two coolant hoses from the <strong>oil</strong>/water heat exchanger -arrow- . See Fig. 165.3. Grip the <strong>oil</strong> cooler cover at the hexagon with a suitable tool <strong>and</strong> loosen carefully. Take <strong>oil</strong> cooler cover (banjobolt) out of the <strong>oil</strong>/water heat exchanger <strong>and</strong> remove together with the <strong>oil</strong>/water heat exchanger.4. Observe installation position of both sealing rings. Sealing rings must be replaced.5. Clean sealing faces.INSTALLING OIL/WATER HEAT EXCHANGER (OIL COOLER)Installing <strong>oil</strong>/water heat exchanger (<strong>oil</strong> cooler)NOTE:• Sealing rings must be replaced.1. Place the two sealing rings in installation position.2. Position the <strong>oil</strong>/water heat exchanger on the <strong>oil</strong>-<strong>filter</strong> housing/assembly mount <strong>and</strong> insert the <strong>oil</strong> cooler coverthrough. Screw the <strong>oil</strong> cooler cover (banjo bolt) on h<strong>and</strong>-tight.3. Tighten the <strong>oil</strong> cooler cover (banjo bolt). --> Tightening torque: 19 ftlb. .
2004 Porsche Cayenne2003-2008 ENGINE LubricationFig. 166: Coolant hosesCourtesy of PORSCHE OF NORTH AMERICA, INC.4. Fit the two coolant hoses on the <strong>oil</strong>/water heat exchanger -arrow- . See Fig. 166.
5. Fit the design cover.2004 Porsche Cayenne2003-2008 ENGINE LubricationFig. 167: Fastening nuts for sheetmetal holderCourtesy of PORSCHE OF NORTH AMERICA, INC.5. Place holder in installation position. Fit fastening nuts for the hose holder -arrows- . --> Tightening torque:6 ftlb. . See Fig. 167.SUBSEQUENT WORKSubsequent work1. Install <strong>engine</strong> guard. Refer to 10 80 19 Removing <strong>and</strong> installing <strong>engine</strong> guard - as of MY 2003 (AllModels) ..2. Fill coolant <strong>and</strong> bleed system. Refer to 19 38 <strong>17</strong> Draining <strong>and</strong> filling in coolant (includes bleeding) - as ofMY 2003 (All Models) ..3. Fit air cleaner housing lid <strong>and</strong> air-cleaner element. Refer to 24 25 19 Removing <strong>and</strong> installing air cleanerhousing - as of MY 2004 (Cayenne TIP, Cayenne MAN) ..4. Fit <strong>engine</strong> compartment cover at the left. Refer to 70 02 19 Removing <strong>and</strong> installing front cover (<strong>engine</strong>compartment) - as of MY 2003 (All Models) ..Fig. 168: Design coverCourtesy of PORSCHE OF NORTH AMERICA, INC.
2004 Porsche Cayenne2003-2008 ENGINE Lubrication6. Check <strong>engine</strong>-<strong>oil</strong> level <strong>and</strong> correct if necessary.<strong>17</strong> 67 21 REMOVING BRACKET FOR OIL-WATER HEAT EXCHANGER - ASOF MY 2003 (CAYENNE S TIP, CAYENNE S MAN, CAYENNE TURBO,CAYENNE TURBO S, CAYENNE S TIO TITAN)PRELIMINARY WORKPreliminary workFig. 169: Draining cooling systemCourtesy of PORSCHE OF NORTH AMERICA, INC.1. Drain cooling system. Refer to 19 38 <strong>17</strong> Draining <strong>and</strong> filling in coolant (includes bleeding) - as of MY2003 (All Models) .2. Loosen lock carrier. Refer to 50 38 09 Detaching <strong>and</strong> fastening lock mount (service position) - as of MY2003 (All Models) .
2004 Porsche Cayenne2003-2008 ENGINE LubricationFig. <strong>17</strong>0: Oil drain plugsCourtesy of PORSCHE OF NORTH AMERICA, INC.3. Undo the 2 <strong>oil</strong> drain plugs <strong>and</strong> collect <strong>engine</strong> <strong>oil</strong> in a disposal container.4. Clean <strong>oil</strong> drain plug <strong>and</strong> screw in with new aluminum sealing ring. --> Tightening torque: 37 ftlb.INFORMATIONComponent overviewNOTE:• The illustrations apply to the Cayenne Turbo (M48/50).
2004 Porsche Cayenne2003-2008 ENGINE LubricationFig. <strong>17</strong>1: Overview of V8 <strong>engine</strong>Courtesy of PORSCHE OF NORTH AMERICA, INC.
2004 Porsche Cayenne2003-2008 ENGINE LubricationFig. <strong>17</strong>2: Overview of bracket to <strong>engine</strong>Courtesy of PORSCHE OF NORTH AMERICA, INC.1 - Oil transfer flange2 - 5 O-rings3 - 2 fastening screws4 - Length-compensating element5 - Fastening screw, M8 x 50
2004 Porsche Cayenne2003-2008 ENGINE Lubrication6 - 2 fastening screws, M8 x 70Fig. <strong>17</strong>3: Overview of bracketCourtesy of PORSCHE OF NORTH AMERICA, INC.1 - Oil <strong>filter</strong> bracket2 - 6 lens-head screws M6 x 20 (only loosen the screws if absolutely necessary)3 - Lids4 - Seal
2004 Porsche Cayenne2003-2008 ENGINE Lubrication5 - 2 seals6 - O-ring7 - Oil <strong>filter</strong> element8 - Oil <strong>filter</strong> housing9 - 4 oval-head screws, M6 x 2<strong>01</strong>0 - Oil-water heat exchanger11 - Screw plug, M26 x 1.512 - Sealing ring, A26 x 3113 - Oil pressure switch (hot <strong>oil</strong> can leak out while removing)REMOVING BRACKET FOR OIL-WATER HEAT EXCHANGERFig. <strong>17</strong>4: Oil return lines on <strong>oil</strong> <strong>filter</strong> bracketCourtesy of PORSCHE OF NORTH AMERICA, INC.NOTE:• The following step must only be performed for the M48/50 <strong>engine</strong>.
2004 Porsche Cayenne2003-2008 ENGINE Lubrication1. Undo both <strong>oil</strong> return lines from the turbochargers to the <strong>oil</strong> <strong>filter</strong> bracket. Pull the connections slightly out ofthe bracket.Fig. <strong>17</strong>5: Coolant lines from <strong>oil</strong>-water heat exchangerCourtesy of PORSCHE OF NORTH AMERICA, INC.2. Release coolant lines from <strong>oil</strong>-water heat exchanger. To do this, release the two spring-b<strong>and</strong> clamps <strong>and</strong> pullthe lines upwards.
2004 Porsche Cayenne2003-2008 ENGINE LubricationFig. <strong>17</strong>6: Bracket fastening screwsCourtesy of PORSCHE OF NORTH AMERICA, INC.3. Unscrew the 3 fastening screws on the bracket.--> Proceed carefully when pulling out the bracket.--> Collect escaping fluids.4. Pull off the bracket from the <strong>engine</strong> in a forward direction. If the bracket is stuck very firmly, lever it off verycarefully using a suitable implement.<strong>17</strong> 67 23 INSTALLING BRACKET FOR OIL-WATER HEAT EXCHANGER - ASOF MY 2003 (CAYENNE S TIP, CAYENNE S MAN, CAYENNE TURBO,CAYENNE TURBO S, CAYENNE S TIO TITAN)INFORMATIONCAUTION: Danger of injury!• When pulling the bracket off, even greater amounts of <strong>engine</strong> <strong>oil</strong> canleak out.• If the bracket is stuck, it can loosen abruptly. If this happens, yourfingers could be injured.
2004 Porsche Cayenne2003-2008 ENGINE LubricationComponent overviewNOTE:• The illustrations apply to the Cayenne Turbo (M48/50).Fig. <strong>17</strong>7: Overview of V8 <strong>engine</strong>Courtesy of PORSCHE OF NORTH AMERICA, INC.
2004 Porsche Cayenne2003-2008 ENGINE LubricationFig. <strong>17</strong>8: Overview of bracket to <strong>engine</strong>Courtesy of PORSCHE OF NORTH AMERICA, INC.1 - Oil transfer flange2 - 5 O-rings3 - 2 fastening screws4 - Length-compensating element5 - Fastening screw, M8 x 50
2004 Porsche Cayenne2003-2008 ENGINE Lubrication6 - 2 fastening screws, M8 x 70Fig. <strong>17</strong>9: Overview of bracketCourtesy of PORSCHE OF NORTH AMERICA, INC.1 - Oil <strong>filter</strong> bracket2 - 6 lens-head screws M6 x 20 (only loosen the screws if absolutely necessary)3 - Lids4 - Seal
2004 Porsche Cayenne2003-2008 ENGINE Lubrication5 - 2 seals6 - O-ring7 - Oil <strong>filter</strong> element8 - Oil <strong>filter</strong> housing9 - 4 oval-head screws, M6 x 2<strong>01</strong>0 - Oil-water heat exchanger11 - Screw plug, M26 x 1.512 - Sealing ring, A26 x 3113 - Oil pressure switch (hot <strong>oil</strong> can leak out while removing)INSTALLING BRACKET FOR OIL-WATER HEAT EXCHANGER1. Replace both O-rings in the flange. To do this, carefully lever out the O-rings with a non-abrasive implement(plastic wedge) <strong>and</strong> replace them with new ones.2. Replace the O-rings on the <strong>oil</strong> transfer flange. To do this, lever off the O-rings with a non-abrasive implement(plastic wedge) <strong>and</strong> replace them with new ones.
2004 Porsche Cayenne2003-2008 ENGINE LubricationFig. 180: Allen key in bracketCourtesy of PORSCHE OF NORTH AMERICA, INC.CAUTION: Danger from <strong>oil</strong>-water heat exchanger!• If the compensating element is not screwed in, the bracket can bebraced <strong>and</strong> will break during operation as a result.--> Before installing the bracket, screw the compensating element in completely.3. Screw in length-compensating element. To do this, insert an Allen key through the screw hole into thebracket <strong>and</strong> turn the key anti-clockwise until the compensating element touches the bracket.4. Apply a thin coat of <strong>engine</strong> <strong>oil</strong> to the two transfer flanges <strong>and</strong> position the bracket on the <strong>engine</strong>. Then pushthe bracket hard against the <strong>engine</strong> until the fastening screws can be put into place.Fig. 181: Sleeve <strong>and</strong> fastening screws for the bracketCourtesy of PORSCHE OF NORTH AMERICA, INC.5. The sleeve -1- is screwed in. Position the two fastening screws -arrows- <strong>and</strong> tighten until h<strong>and</strong>-tight. See Fig.181.
2004 Porsche Cayenne2003-2008 ENGINE LubricationFig. 182: Allen key in bracketCourtesy of PORSCHE OF NORTH AMERICA, INC.6. Adjust compensating element. To do this, insert an Allen key -picture- through the screw hole into thebracket <strong>and</strong> turn the key clockwise until the compensating element touches the <strong>engine</strong>. --> Tightening torque:1.5 ftlb. +2 ftlb. See Fig. 182.
2004 Porsche Cayenne2003-2008 ENGINE LubricationFig. 183: Bracket fastening screwsCourtesy of PORSCHE OF NORTH AMERICA, INC.7. Fit the upper fastening screw -arrow- . Insert the screw through the compensating element <strong>and</strong> tighten it. -->Tightening torque: <strong>17</strong> ftlb. Then tighten the 2 other fastening screws. --> Tightening torque: <strong>17</strong> ftlb.
2004 Porsche Cayenne2003-2008 ENGINE LubricationFig. 184: All three fastening screwsCourtesy of PORSCHE OF NORTH AMERICA, INC.Fig. 185: Pushing coolant lines onto connecting piece
2004 Porsche Cayenne2003-2008 ENGINE Lubrication8. Fit coolant lines from <strong>oil</strong>-water heat exchanger. Push both coolant lines onto the socket piece <strong>and</strong> fit thespring-b<strong>and</strong> clamps using the spring-b<strong>and</strong> clamp pliers.Fig. 186: Union nuts for <strong>oil</strong> return linesCourtesy of PORSCHE OF NORTH AMERICA, INC.NOTE:• The following step must only be performed for the M48/50 (V8 Turbo)<strong>engine</strong>.9. Fit <strong>oil</strong> return lines for turbochargers. Insert the lines into the connections <strong>and</strong> align them. Then screw in theunion nuts by h<strong>and</strong> <strong>and</strong> tighten them. --> Tightening torque: 26 ftlb.SUBSEQUENT WORKSubsequent work1. Fasten lock mount. Refer to 50 38 09 Detaching <strong>and</strong> fastening lock mount (service position) - as of MY2003 (All Models) .
2004 Porsche Cayenne2003-2008 ENGINE LubricationFig. 187: Support plate fastening screwsCourtesy of PORSCHE OF NORTH AMERICA, INC.2. Fit the support plate under the radiator. To do this, tighten the 4 fastening screws. --> Tightening torque: <strong>17</strong>ftlb.
2004 Porsche Cayenne2003-2008 ENGINE LubricationFig. 188: Front apron fastening screwsCourtesy of PORSCHE OF NORTH AMERICA, INC.3. Tighten the front apron on the underside.
2004 Porsche Cayenne2003-2008 ENGINE LubricationFig. 189: Engine guardCourtesy of PORSCHE OF NORTH AMERICA, INC.4. Fit <strong>engine</strong> guard. Refer to 10 80 19 Removing <strong>and</strong> installing <strong>engine</strong> guard - as of MY 2003 (All Models) .Fig. 190: Cooling systemCourtesy of PORSCHE OF NORTH AMERICA, INC.5. Fill <strong>and</strong> bleed the cooling system. Refer to 19 38 <strong>17</strong> Draining <strong>and</strong> filling in coolant (includes bleeding) - asof MY 2003 (All Models) .6. Check <strong>oil</strong> level <strong>and</strong> adjust.