47 tw tightening torques for brake hydraulics
47 tw tightening torques for brake hydraulics
47 tw tightening torques for brake hydraulics
- No tags were found...

Create successful ePaper yourself
Turn your PDF publications into a flip-book with our unique Google optimized e-Paper software.
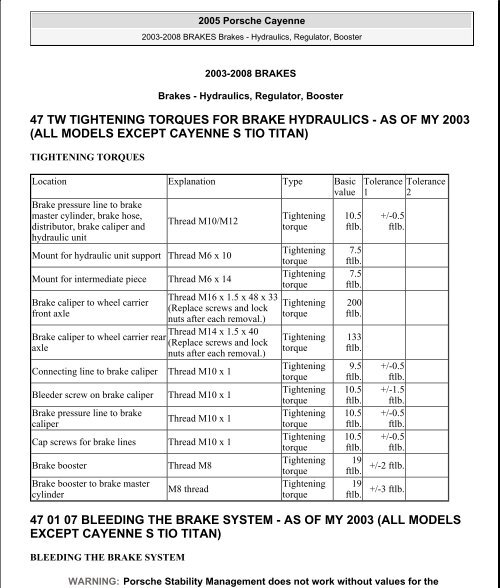
WARNING: Porsche Stability Management does not work without values <strong>for</strong> the2005 Porsche Cayenne2003-2008 BRAKES Brakes - Hydraulics, Regulator, Booster2003-2008 BRAKESBrakes - Hydraulics, Regulator, Booster<strong>47</strong> TW TIGHTENING TORQUES FOR BRAKE HYDRAULICS - AS OF MY 2003(ALL MODELS EXCEPT CAYENNE S TIO TITAN)TIGHTENING TORQUESLocation Explanation Type BasicvalueBrake pressure line to <strong>brake</strong>master cylinder, <strong>brake</strong> hose,Tightening 10.5Thread M10/M12distributor, <strong>brake</strong> caliper andtorque ftlb.hydraulic unitMount <strong>for</strong> hydraulic unit support Thread M6 x 10Mount <strong>for</strong> intermediate piece Thread M6 x 14Brake caliper to wheel carrierfront axleBrake caliper to wheel carrier rearaxle<strong>47</strong> 01 07 BLEEDING THE BRAKE SYSTEM - AS OF MY 2003 (ALL MODELSEXCEPT CAYENNE S TIO TITAN)BLEEDING THE BRAKE SYSTEMThread M16 x 1.5 x 48 x 33(Replace screws and locknuts after each removal.)Thread M14 x 1.5 x 40(Replace screws and locknuts after each removal.)Connecting line to <strong>brake</strong> caliper Thread M10 x 1Bleeder screw on <strong>brake</strong> caliper Thread M10 x 1Brake pressure line to <strong>brake</strong>caliperThread M10 x 1Cap screws <strong>for</strong> <strong>brake</strong> lines Thread M10 x 1Brake boosterBrake booster to <strong>brake</strong> mastercylinderThread M8M8 threadTighteningtorqueTighteningtorqueTighteningtorqueTighteningtorqueTighteningtorqueTighteningtorqueTighteningtorqueTighteningtorqueTighteningtorqueTighteningtorque7.5ftlb.7.5ftlb.200ftlb.133ftlb.9.5ftlb.10.5ftlb.10.5ftlb.10.5ftlb.19ftlb.19ftlb.Tolerance1+/-0.5ftlb.+/-0.5ftlb.+/-1.5ftlb.+/-0.5ftlb.+/-0.5ftlb.+/-2 ftlb.+/-3 ftlb.Tolerance2
2. Connect a bleeding device to the <strong>brake</strong> fluid reservoir. Switch on the bleeding device. Bleeding pressure isapprox. 2.0 bar.2005 Porsche Cayenne2003-2008 BRAKES Brakes - Hydraulics, Regulator, Boostercurrent <strong>brake</strong> pressure.• Danger of personal injury and material damage when the hydraulicunit is not calibrated.--> After assembling the hydraulic unit, a static test and a swap test must be carried out with the Porsche SystemTester.--> After assembly of the <strong>brake</strong> master cylinder or the hydraulic unit, the pressure sensor must be calibratedwith the Porsche System Tester.NOTE:• Observe <strong>brake</strong> fluid quality. Use only new DOT 4 <strong>brake</strong> fluid.1. Open reservoir.• The <strong>brake</strong> fluid change interval is <strong>tw</strong>o years, using Super DOT 4 <strong>brake</strong>fluid.• This <strong>brake</strong> fluid is available under the following part numbers: Containerquantity: 1 liter = 000.043.203.66. 30 liters = 000.043.203.67.Fig. 1: Bleeding device connected to <strong>brake</strong> fluid reservoirCourtesy of PORSCHE OF NORTH AMERICA, INC.
2005 Porsche Cayenne2003-2008 BRAKES Brakes - Hydraulics, Regulator, BoosterNOTE:• Always bleed both bleeder valves on the <strong>brake</strong> caliper.• Bleed the outer bleeder valve first.3. Continue the bleeding procedure at the <strong>brake</strong> calipers. Do so in the following sequence: rear right/rearleft/front right/front left.4. Use a transparent hose and a collecting bottle to check the escaping <strong>brake</strong> fluid is clean and free of airbubbles and to determine the amount of <strong>brake</strong> fluid used.5. Open each bleeder valve until clear, bubble-free <strong>brake</strong> fluid emerges.6. Tighten the bleeder valves to the specified <strong>tightening</strong> torque and remove the bleeder hoses.Fig. 2: Brake fluid reservoirCourtesy of PORSCHE OF NORTH AMERICA, INC.7. Remove bleeding device from <strong>brake</strong> fluid reservoir and screw cap on. The <strong>brake</strong> fluid level in the <strong>brake</strong> fluidreservoir must be be<strong>tw</strong>een the MIN and MAX markings once the vehicle has been filled and bled. Adjust the<strong>brake</strong> fluid level if necessary.8. Generate vacuum in <strong>brake</strong> booster by starting engine. Check <strong>brake</strong>-pedal travel and pedal feel.Checking after bleeding
2005 Porsche Cayenne2003-2008 BRAKES Brakes - Hydraulics, Regulator, BoosterNOTE:• If the pedal travel is too long or the pedal feels too soft when applied, carryout the following procedure.• Two workers are required <strong>for</strong> this.• Also carry out this procedure if the <strong>brake</strong> hydraulic system was largelyempty.Connect a bleeding device to the <strong>brake</strong> fluid reservoir. Switch on the bleeding device. Bleeding pressure isapprox. 2.0 bar.1. Open bleeder valve at rear on right-hand side, then push the <strong>brake</strong> pedal all the way down about 5 times andtap the <strong>brake</strong> caliper gently several times with a rubber hammer during the bleeding process.2. Hold <strong>for</strong> 2 - 3 seconds after each depression, then release pedal slowly. After applying pedal <strong>for</strong> the fifthtime, hold pedal down and close bleeder valve.3. Repeat this procedure in the sequence rear left/front right/front left.4. Tighten the bleeder valves to the specified <strong>tightening</strong> torque and remove the bleeder hoses.5. Remove bleeding device from <strong>brake</strong> fluid reservoir; correct <strong>brake</strong> fluid level is necessary.6. Generate vacuum in <strong>brake</strong> booster by starting engine. Check <strong>brake</strong>-pedal travel and pedal feel.<strong>47</strong> 08 55 CHANGING THE BRAKE FLUID - AS OF MY 2003 (ALL MODELSEXCEPT CAYENNE S TIO TITAN)CHECKING BRAKE FLUID LEVEL
2005 Porsche Cayenne2003-2008 BRAKES Brakes - Hydraulics, Regulator, BoosterFig. 3: Location of <strong>brake</strong> booster, master cylinder and fluid reservoirCourtesy of PORSCHE OF NORTH AMERICA, INC.Visually inspect <strong>brake</strong> fluid level. The <strong>brake</strong> fluid level must be be<strong>tw</strong>een the MAX and MIN markings. The<strong>brake</strong> fluid reservoir is located under the left plenum panel cover -arrow- . See Fig. 3.
2005 Porsche Cayenne2003-2008 BRAKES Brakes - Hydraulics, Regulator, BoosterFig. 4: Brake fluid reservoirCourtesy of PORSCHE OF NORTH AMERICA, INC.NOTE:• The <strong>brake</strong> fluid level must not exceed the MAX mark.CHANGING THE BRAKE FLUID• Observe <strong>brake</strong> fluid quality. Use only new DOT 4 <strong>brake</strong> fluid.• This <strong>brake</strong> fluid is available under the following part numbers: Quantitysupplied: 1 liter = 000.043.203.66; 30 liters = 000.043.203.67.
2005 Porsche Cayenne2003-2008 BRAKES Brakes - Hydraulics, Regulator, BoosterFig. 5: Brake fluid reservoir, cap and level sensorCourtesy of PORSCHE OF NORTH AMERICA, INC.NOTE:• Observe <strong>brake</strong> fluid quality. Use only new DOT 4 <strong>brake</strong> fluid.• The <strong>brake</strong> fluid change interval is <strong>tw</strong>o years using Super DOT 4 <strong>brake</strong> fluid.• This <strong>brake</strong> fluid is available under the following part numbers: Quantitysupplied: 1 liter = 000.043.203.66; 30 liters = 000.043.203.67.• Drain <strong>brake</strong> fluid from every <strong>brake</strong> caliper at both bleeder valves.• Bleed the outer bleeder valve first.1. Open threaded cover of <strong>brake</strong> fluid reservoir -arrow- . See Fig. 5.2. Connect a bleeding device to the <strong>brake</strong> fluid reservoir.3. Switch on the bleeding device. Bleeding pressure is approx. 2.0 bar.4. Continue changing the <strong>brake</strong> fluid at the <strong>brake</strong> calipers. Do so in the following sequence: rear right/rearleft/front right/front left.5. Open every bleeder valve until clear, bubble-free <strong>brake</strong> fluid emerges and until the corresponding changequantity per <strong>brake</strong> caliper is reached (approx. 250 cm 3 ).6. Use a transparent hose and a collecting bottle to check the escaping <strong>brake</strong> fluid accurately <strong>for</strong> cleanliness,
3. Remove cowl panel. Refer to 66 44 19 Removing and installing cowl panel cover - as of MY 2003 (AllModels) .2005 Porsche Cayenne2003-2008 BRAKES Brakes - Hydraulics, Regulator, Boosterfreedom from air bubbles and to determine the <strong>brake</strong> fluid used.7. Tighten the bleeder valves to the specified <strong>tightening</strong> torque --> <strong>47</strong> TW Tightening <strong>torques</strong> <strong>for</strong> <strong>brake</strong><strong>hydraulics</strong> - as of MY 2003 (All Models Except Cayenne S TIO Titan) and remove the bleeder hoses.Fig. 6: Brake fluid reservoirCourtesy of PORSCHE OF NORTH AMERICA, INC.8. Switch off bleeding device and remove the adapter on the <strong>brake</strong> fluid reservoir. The <strong>brake</strong> fluid level in the<strong>brake</strong> fluid reservoir must be be<strong>tw</strong>een the MIN and MAX markings once the vehicle has been filled and bled.Adjust the <strong>brake</strong> fluid level if necessary.<strong>47</strong> 15 19 REMOVING AND INSTALLING BRAKE MASTER CYLINDER (HBZ) -AS OF MY 2003 (ALL MODELS EXCEPT CAYENNE S TIO TITAN)PRELIMINARY WORK1. Remove both wiper arms. Refer to 92 25 19 Removing and installing wiper arm - as of MY 2003 (AllModels) .2. Remove cover in engine compartment. Refer to 70 02 19 Removing and installing front cover (enginecompartment) - as of MY 2003 (All Models) .
Fig. 8: Location of <strong>brake</strong> booster, master cylinder and fluid reservoirCourtesy of PORSCHE OF NORTH AMERICA, INC.2005 Porsche Cayenne2003-2008 BRAKES Brakes - Hydraulics, Regulator, BoosterREMOVING THE BRAKE MASTER CYLINDERInstallation Location:Fig. 7: <strong>brake</strong> master cylinderCourtesy of PORSCHE OF NORTH AMERICA, INC.
2005 Porsche Cayenne2003-2008 BRAKES Brakes - Hydraulics, Regulator, BoosterNOTE:• Be<strong>for</strong>e disconnecting the connector from the <strong>brake</strong> master cylinder(pressure sensor) first wipe off any moisture with a lint-free cloth.• Brake lines are to be sealed with suitable plugs.• In order to catch escaping <strong>brake</strong> fluid, place a cloth under the <strong>brake</strong>booster.NOTE:• In the case of assembly work on the hydraulic connections, the electricalplug connections on the <strong>brake</strong> master cylinder must always be connected.This prevents the plug connections on the <strong>brake</strong> master cylinder and theinside of the plugs being splashed with <strong>brake</strong> fluid or water.• Clean any plug connections that have become dirty or damp duringremoval or fitting with a lint-free cloth.• Brake fluid on electrical contacts (even thinned <strong>brake</strong> fluid) leads tocorrosion and may cause faults in the system.• Remove any escaping <strong>brake</strong> fluid immediately; if necessary, rinse withwater and dry.The <strong>brake</strong> master cylinder is located on the left in the engine compartment, under the cowl panel cover -arrowonthe <strong>brake</strong> booster. See Fig. 8.Fig. 9: Identifying connectorsCourtesy of PORSCHE OF NORTH AMERICA, INC.
2005 Porsche Cayenne2003-2008 BRAKES Brakes - Hydraulics, Regulator, Booster1. Push both connectors -arrows- on the plenum panel (oxygen sensor cable) from the bracket. See Fig. 9.2. Open the cable clip on the plenum panel and loosen the cable.3. Remove left plenum panel partition.Fig. 10: Brake fluid reservoir, cap and level sensorCourtesy of PORSCHE OF NORTH AMERICA, INC.4. Disconnect the connector on the cover of the <strong>brake</strong> fluid reservoir and remove the cover -arrow- . See Fig.10.5. Remove the <strong>brake</strong> fluid from the <strong>brake</strong> fluid reservoir by suction. To do this, use a double-acting hand pump.
2005 Porsche Cayenne2003-2008 BRAKES Brakes - Hydraulics, Regulator, BoosterFig. 11: Brake fluid reservoir lugsCourtesy of PORSCHE OF NORTH AMERICA, INC.6. Bend both lugs on the <strong>brake</strong> fluid reservoir carefully ou<strong>tw</strong>ard and pull off the container upwards. See Fig. 11.7. Loosen the <strong>brake</strong> lines from the <strong>brake</strong> master cylinder.
2005 Porsche Cayenne2003-2008 BRAKES Brakes - Hydraulics, Regulator, BoosterFig. 12: Left front wheel <strong>brake</strong> line clipCourtesy of PORSCHE OF NORTH AMERICA, INC.8. Unclip the <strong>brake</strong> line on the <strong>brake</strong> master cylinder to the left front wheel and remove the fastening clip -arrow- . See Fig. 12.9. Remove the <strong>brake</strong> master cylinder from the <strong>brake</strong> booster.10. Remove the connector of the pressure sensor at the underside of the <strong>brake</strong> master cylinder.INSTALLING THE BRAKE MASTER CYLINDERWARNING: Porsche Stability Management does not work without values <strong>for</strong> thecurrent <strong>brake</strong> pressure.• Danger of personal injury and material damage when the hydraulicunit is not calibrated.--> After assembly of the <strong>brake</strong> master cylinder or hydraulic unit, the pressure sensor must be calibrated withthe Porsche System Tester.--> To do this, calibrate the pressure sensor in the menu >> PSM >> Calibration >> Pressure sensor > PSM >> Actual values >> Security code
2005 Porsche Cayenne2003-2008 BRAKES Brakes - Hydraulics, Regulator, BoosterNOTE:• Cleanliness is essential when installing the <strong>brake</strong> master cylinder so thatdirt does not enter the system. This can cause faults in the system.• Replace worn sealing rings.• Pay attention to <strong>tightening</strong> <strong>torques</strong> --> <strong>47</strong> TW Tightening <strong>torques</strong> <strong>for</strong> <strong>brake</strong><strong>hydraulics</strong> - as of MY 2003 (All Models Except Cayenne S TIO Titan) .Install in reverse order.1. Connect the connector of the pressure sensor to the underside of the <strong>brake</strong> master cylinder.2. Fit the <strong>brake</strong> master cylinder loosely on the <strong>brake</strong> booster. Ensure sealing ring is seated properly be<strong>tw</strong>een the<strong>brake</strong> master cylinder and the <strong>brake</strong> booster. Insert pushrod in the correct position in the <strong>brake</strong> master cylinder.3. Loosely fit <strong>brake</strong> lines of <strong>brake</strong> master cylinder.4. Fit the <strong>brake</strong> master cylinder on the <strong>brake</strong> booster and fit the <strong>brake</strong> lines. Fit the <strong>brake</strong> line of the left fron<strong>tw</strong>heel with the clip to the <strong>brake</strong> master cylinder.Fig. 13: Brake fluid reservoir lugsCourtesy of PORSCHE OF NORTH AMERICA, INC.5. Attach the <strong>brake</strong> fluid reservoir (observe sealing rings) and check <strong>for</strong> correct seating of the lugs.6. First insert the seal of the plenum panel and then slide the plenum panel in from above. Fit the fastening
<strong>47</strong> 39 19 REMOVING AND INSTALLING FRONT BRAKE CALLIPER - AS OFMY 2003 (ALL MODELS EXCEPT CAYENNE S TIO TITAN)2005 Porsche Cayenne2003-2008 BRAKES Brakes - Hydraulics, Regulator, Booster7. Lay the cable and fit into clip on plenum panel.8. Push the <strong>tw</strong>o large connectors into the bracket on the plenum panel.9. Connect the connector to the cover of the <strong>brake</strong> fluid reservoir.SUBSEQUENT WORK1. Fit the right and the rear covers. Refer to 70 02 19 Removing and installing front cover (enginecompartment) - as of MY 2003 (All Models) . and the cowl panel. Refer to 66 44 19 Removing andinstalling cowl panel cover - as of MY 2003 (All Models) .2. Install both wiper arms. Refer to 92 25 19 Removing and installing wiper arm - as of MY 2003 (AllModels) .Fig. 14: Brake fluid reservoirCourtesy of PORSCHE OF NORTH AMERICA, INC.3. Bleed the vehicle --> <strong>47</strong>0107 Bleeding the <strong>brake</strong> system - chapter on "bleeding". After the bleedingoperation, do not top up the <strong>brake</strong> fluid level above -MAX- . See Fig. 14.4. Calibrate the pressure sensor with the Porsche System Tester.
2005 Porsche Cayenne2003-2008 BRAKES Brakes - Hydraulics, Regulator, BoosterTOOLSDesignation Type Number Explanationpiston resetting fixture commercially NR.144(replaces P83)available toolPRELIMINARY WORK1. Raise vehicle --> 40 V0 LIFTING THE VEHICLE - AS OF MY 2003 (CAYENNE TURBO S,CAYENNE S TIO TITAN) or 40 V0 LIFTING THE VEHICLE - AS OF MY 2003 (CAYENNE TIP,CAYENNE MAN, CAYENNE S TIP, CAYENNE S MAN, CAYENNE TURBO) .2. Remove wheel. Refer to 44 05 19 Removing and installing wheel - as of MY 2003 (All Models) .REMOVING FRONT BRAKE CALLIPERInstallation Location:Fig. 15: Front <strong>brake</strong> calliperCourtesy of PORSCHE OF NORTH AMERICA, INC.
2005 Porsche Cayenne2003-2008 BRAKES Brakes - Hydraulics, Regulator, BoosterFig. 16: Pushing <strong>brake</strong> pad away from rotorCourtesy of PORSCHE OF NORTH AMERICA, INC.NOTE:• To gain better access <strong>for</strong> removal of the <strong>brake</strong> caliper, it helps to turn thesteering fully either to the right or the left.1. Push <strong>brake</strong> pad back slightly and evenly with piston resetting fixture (replaces P83) NR.144, seeWorkshop Equipment Manual, Chapter 2.4 -direction arrow- . See Fig. 16.
2005 Porsche Cayenne2003-2008 BRAKES Brakes - Hydraulics, Regulator, BoosterFig. 17: Identifying <strong>brake</strong> line at <strong>brake</strong> caliperCourtesy of PORSCHE OF NORTH AMERICA, INC.2. Release and unclip the plug from the wear indicator -arrow- . Loosen the <strong>brake</strong> line on the <strong>brake</strong> caliper -arrow- and collect <strong>brake</strong> fluid in a suitable container. Close off the line with suitable plugs. See Fig. 17.NOTE:• Never use an impact bolter to loosen and tighten the <strong>brake</strong> calliper on thewheel carrier.3. Remove <strong>brake</strong> calliper from wheel carrier -arrows- . See Fig. 17.INSTALLING FRONT BRAKE CALLIPERNOTE:• Replace screws and lock nuts.The <strong>brake</strong> caliper is installed in reverse order.1. Fit the <strong>brake</strong> caliper.2. Fit the <strong>brake</strong> line to the <strong>brake</strong> caliper.• Never use an impact bolter to loosen and tighten the <strong>brake</strong> calliper on thewheel carrier.• Observe correct <strong>tightening</strong> <strong>torques</strong> --> 40 TW Tightening <strong>torques</strong> <strong>for</strong> frontaxle - chapter on "Technical values".
2005 Porsche Cayenne2003-2008 BRAKES Brakes - Hydraulics, Regulator, Booster3. Clip in the wear indicator connector.SUBSEQUENT WORK1. Bleed the <strong>brake</strong> system --> <strong>47</strong>0107 Bleeding the <strong>brake</strong> system - chapter on "bleeding".2. Mount the wheel. Refer to 44 05 19 Removing and installing wheel - as of MY 2003 (All Models) .<strong>47</strong> 41 19 REMOVING AND INSTALLING REAR BRAKE CALLIPER - AS OFMY 2003 (ALL MODELS EXCEPT CAYENNE S TIO TITAN)TOOLSDesignation Type Number Explanationpiston resetting fixture commercially NR.144(replaces P83)available toolsocket-wrench insert,multiple tooth with pinguidecommerciallyavailable toolNR.33PRELIMINARY WORK1. Raise vehicle --> 40 V0 LIFTING THE VEHICLE - AS OF MY 2003 (CAYENNE TURBO S,CAYENNE S TIO TITAN) or 40 V0 LIFTING THE VEHICLE - AS OF MY 2003 (CAYENNE TIP,CAYENNE MAN, CAYENNE S TIP, CAYENNE S MAN, CAYENNE TURBO) .2. Remove wheel. Refer to 44 05 19 Removing and installing wheel - as of MY 2003 (All Models) .REMOVING REAR BRAKE CALLIPERInstallation Location:
2005 Porsche Cayenne2003-2008 BRAKES Brakes - Hydraulics, Regulator, BoosterFig. 18: Brake caliperCourtesy of PORSCHE OF NORTH AMERICA, INC.
2005 Porsche Cayenne2003-2008 BRAKES Brakes - Hydraulics, Regulator, BoosterFig. 19: Pushing <strong>brake</strong> pads away from rotorCourtesy of PORSCHE OF NORTH AMERICA, INC.1. Push <strong>brake</strong> pad back slightly and evenly with piston resetting fixture (replaces P83) NR.144, seeWorkshop Equipment Manual, Chapter 2.4 -direction arrow- . See Fig. 19.
2005 Porsche Cayenne2003-2008 BRAKES Brakes - Hydraulics, Regulator, BoosterFig. 20: Wear indicator connector and mounting bracketCourtesy of PORSCHE OF NORTH AMERICA, INC.2. Release and unclip the connector from the wear indicator -arrow- . See Fig. 20.3. Remove cable holder <strong>for</strong> the <strong>brake</strong> line and wear indicator -arrow- . See Fig. 20.
2005 Porsche Cayenne2003-2008 BRAKES Brakes - Hydraulics, Regulator, BoosterFig. 21: Identifying Brake line fitting and <strong>brake</strong> calliper fastenersCourtesy of PORSCHE OF NORTH AMERICA, INC.NOTE:• Never use an impact bolter to loosen and tighten the <strong>brake</strong> calliper on thewheel carrier.4. Loosen the <strong>brake</strong> line on the <strong>brake</strong> calliper -arrow- and collect <strong>brake</strong> fluid in a suitable container. Close offthe line with a suitable plug. Remove the <strong>brake</strong> calliper from the wheel carrier using a socket-wrench insert,multiple tooth with pin guide NR.33 -arrows- . See Fig. 21.INSTALLING REAR BRAKE CALLIPERNOTE:• Replace screws and lock nuts.The <strong>brake</strong> caliper is installed in reverse order.1. Fit the <strong>brake</strong> caliper.2. Fit the <strong>brake</strong> line and cable holder.• Never use an impact bolter to loosen and tighten the <strong>brake</strong> calliper on thewheel carrier.• Pay attention to <strong>tightening</strong> <strong>torques</strong> --> 42 TW Tightening <strong>torques</strong> <strong>for</strong> rearaxle - chapter on "Technical values".
2005 Porsche Cayenne2003-2008 BRAKES Brakes - Hydraulics, Regulator, Booster3. Clip in the wear indicator connector.SUBSEQUENT WORK1. Bleed the <strong>brake</strong> system --> <strong>47</strong>0107 Bleeding the <strong>brake</strong> system - chapter on "bleeding".2. Mount the wheel. Refer to 44 05 19 Removing and installing wheel - as of MY 2003 (All Models) .<strong>47</strong> 70 19 REMOVING AND INSTALLING BRAKE BOOSTER - AS OF MY 2003(ALL MODELS EXCEPT CAYENNE S TIO TITAN)TOOLSDesignation Type Number Explanationunlocking tool VW-tool T10189PRELIMINARY WORK1. Switch off the ignition.2. Remove both wiper arms. Refer to 92 25 19 Removing and installing wiper arm - as of MY 2003 (AllModels) .3. Remove cover in engine compartment. Refer to 70 02 19 Removing and installing front cover (enginecompartment) - as of MY 2003 (All Models) .4. Remove cowl panel. Refer to 66 44 19 Removing and installing cowl panel cover - as of MY 2003 (AllModels) .REMOVING BRAKE BOOSTERInstallation Location:
2005 Porsche Cayenne2003-2008 BRAKES Brakes - Hydraulics, Regulator, BoosterFig. 22: Brake boosterCourtesy of PORSCHE OF NORTH AMERICA, INC.Fig. 23: Location of <strong>brake</strong> booster, master cylinder and fluid reservoirCourtesy of PORSCHE OF NORTH AMERICA, INC.NOTE:• During assembly work on hydraulic connections, the electrical plugconnections on the hydraulic unit must always be connected. This
2005 Porsche Cayenne2003-2008 BRAKES Brakes - Hydraulics, Regulator, Boosterprevents the plug connections on the hydraulic unit and the inside of theconnectors being splashed with <strong>brake</strong> fluid or water.• Damp connectors must be wiped dry be<strong>for</strong>e disconnection.• Brake fluid on electrical contacts (even thinned <strong>brake</strong> fluid) leads tocorrosion and may cause faults in the system.The <strong>brake</strong> master cylinder is located on the left in the engine compartment, under the cowl panel cover -arrow-, together with the <strong>brake</strong> booster. See Fig. 23.Fig. 24: Identifying connectorsCourtesy of PORSCHE OF NORTH AMERICA, INC.NOTE:• Brake lines are to be sealed with suitable plugs.• To catch escaping <strong>brake</strong> fluid, place a cloth under the <strong>brake</strong> booster.1. Push both connectors -arrows- on the plenum panel (oxygen sensor cable) from the bracket. See Fig. 24.2. Open the cable clip on the plenum panel and loosen the cable.3. Remove left plenum panel partition.4. Partly remove the <strong>brake</strong> master cylinder (<strong>brake</strong> fluid reservoir) --> <strong>47</strong>1519 Removing and installing <strong>brake</strong>master cylinder - chapter on "removing".
2005 Porsche Cayenne2003-2008 BRAKES Brakes - Hydraulics, Regulator, Booster5. Disconnect the vacuum line on the <strong>brake</strong> booster.Fig. 25: Brake booster distance sensor connectorCourtesy of PORSCHE OF NORTH AMERICA, INC.6. Disconnect the connector from distance sensor of the <strong>brake</strong> booster -arrow- . See Fig. 25.
2005 Porsche Cayenne2003-2008 BRAKES Brakes - Hydraulics, Regulator, BoosterFig. 26: Unclip the cable over the <strong>brake</strong> boosterCourtesy of PORSCHE OF NORTH AMERICA, INC.7. Unclip the cable over the <strong>brake</strong> booster from the holders -arrows- and pull upwards. See Fig. 26.8. Unclip the <strong>brake</strong> line to left front wheel out of the bracket underneath the relay carrier.9. Remove the <strong>brake</strong> master cylinder --> <strong>47</strong>1519 Removing and installing <strong>brake</strong> master cylinder - chapteron "removing".
2005 Porsche Cayenne2003-2008 BRAKES Brakes - Hydraulics, Regulator, BoosterFig. 27: Location of M6 screws on lower closing panelCourtesy of PORSCHE OF NORTH AMERICA, INC.10. Loosen <strong>tw</strong>o M6 screws on the lower closing panel -arrows- (upper screw head covered) (shown here whenfitting the <strong>brake</strong> booster, relay carrier removed). See Fig. 27.
2005 Porsche Cayenne2003-2008 BRAKES Brakes - Hydraulics, Regulator, BoosterFig. 28: Relay carrierCourtesy of PORSCHE OF NORTH AMERICA, INC.NOTE:• If the rubber bushes stick to the holders in the plenum panel whenremoving the relay carrier, these must be fitted in the openings providedbe<strong>for</strong>e being inserted again.11. Release the relay carrier in the plenum panel and hinge it to one side. To do this, unclip the six plugs in therear section of the relay carrier ( -arrow- and right marking). See Fig. 28.12. Remove the cover under the dashboard on the driver's side in the passenger compartment. Refer to 70 02 19Removing and installing front cover (engine compartment) - as of MY 2003 (All Models) .
2005 Porsche Cayenne2003-2008 BRAKES Brakes - Hydraulics, Regulator, BoosterFig. 29: Stop light switch connector and holderCourtesy of PORSCHE OF NORTH AMERICA, INC.13. Pull off connector of stop light switch -arrow- and remove the complete holder. Refer to 94 36 19Removing and installing <strong>brake</strong> light switch - as of MY 2003 (All Models) . See Fig. 29.
2005 Porsche Cayenne2003-2008 BRAKES Brakes - Hydraulics, Regulator, BoosterFig. 30: Brake booster pushrod (<strong>brake</strong> pedal side)Courtesy of PORSCHE OF NORTH AMERICA, INC.NOTE:• When loosening the pushrod of the <strong>brake</strong> booster with the unlocking toolT10189 from the pushrod of the pedal, the tool must first be inserted andthen the <strong>brake</strong> pedal pulled out into the passenger compartment.14. Release <strong>brake</strong> pedal from pushrod -arrow- of <strong>brake</strong> booster with unlocking tool. Refer to 46 05 19Removing and installing <strong>brake</strong> pedal - as of MY 2003 (All Models Except Cayenne S TIO Titan) . See Fig.30.
2005 Porsche Cayenne2003-2008 BRAKES Brakes - Hydraulics, Regulator, BoosterFig. 31: Unlocking tool T10189Courtesy of PORSCHE OF NORTH AMERICA, INC.15. To do this, insert the unlocking tool T10189 from below into the bush on the <strong>brake</strong> pedal -arrow- . SeeFig. 31.16. Remove the four M8 lock nuts on the <strong>brake</strong> booster in the passenger compartment.17. Remove front left wheel housing liner.
2005 Porsche Cayenne2003-2008 BRAKES Brakes - Hydraulics, Regulator, BoosterFig. 32: Front left wheel housing <strong>brake</strong> lineCourtesy of PORSCHE OF NORTH AMERICA, INC.18. Disconnect the <strong>brake</strong> line in the wheel housing on the intermediate piece -arrow- and seal with suitableplugs. See Fig. 32.19. Remove both clips <strong>for</strong> the air-conditioning lines in the plenum panel.
2005 Porsche Cayenne2003-2008 BRAKES Brakes - Hydraulics, Regulator, BoosterFig. 33: Brake booster and bootCourtesy of PORSCHE OF NORTH AMERICA, INC.20. Pull the <strong>brake</strong> lines to the <strong>brake</strong> master cylinder and left front wheel carefully <strong>for</strong>ward and press the airconditioninglines down. Make sure that the boot on the <strong>brake</strong> booster -arrow- does not get stuck in the duct tothe passenger compartment. See Fig. 33.
2005 Porsche Cayenne2003-2008 BRAKES Brakes - Hydraulics, Regulator, BoosterFig. 34: Removing <strong>brake</strong> boosterCourtesy of PORSCHE OF NORTH AMERICA, INC.21. Carefully pull out the <strong>brake</strong> booster -direction arrow- to the front. See Fig. 34.INSTALLING BRAKE BOOSTERWARNING: Porsche Stability Management does not work without values <strong>for</strong> thecurrent <strong>brake</strong> pressure.• Danger of personal injury and material damage when the hydraulicunit is not calibrated.--> After assembly of the <strong>brake</strong> master cylinder or hydraulic unit, the pressure sensor must be calibrated withthe Porsche System Tester.--> To do this, calibrate the pressure sensor in the menu >> PSM >> Calibration >> Pressure sensor > PSM >> Actual values >> Security code
2005 Porsche Cayenne2003-2008 BRAKES Brakes - Hydraulics, Regulator, Booster• Calibrate the vehicle with the Porsche System Tester.• Bleed the vehicle according to the plan to ensure full operation of the<strong>brake</strong> system.• When inserting the <strong>brake</strong> booster, make sure the <strong>brake</strong> pushrod and bootare guided correctly.• Pay attention to <strong>tightening</strong> <strong>torques</strong> --> <strong>47</strong> TW Tightening <strong>torques</strong> <strong>for</strong> <strong>brake</strong><strong>hydraulics</strong> - as of MY 2003 (All Models Except Cayenne S TIO Titan) .1. Carefully pull the <strong>brake</strong> lines of the <strong>brake</strong> master cylinder and left front wheel <strong>for</strong>ward and press the airconditioninglines downward.Fig. 35: Insert <strong>brake</strong> boosterCourtesy of PORSCHE OF NORTH AMERICA, INC.2. Carefully insert the <strong>brake</strong> booster -direction arrow- . See Fig. 35.
2005 Porsche Cayenne2003-2008 BRAKES Brakes - Hydraulics, Regulator, BoosterFig. 36: Brake booster pushrodCourtesy of PORSCHE OF NORTH AMERICA, INC.3. Guide the pushrod of the <strong>brake</strong> booster through the opening in the passenger compartment. Ensure the boot isseated correctly. See Fig. 36.4. Fit the <strong>brake</strong> booster with four M8 fastening nuts.5. Press the <strong>brake</strong> pedal <strong>for</strong>ward until the ball socket engages in the mounting point.
2005 Porsche Cayenne2003-2008 BRAKES Brakes - Hydraulics, Regulator, BoosterFig. 37: Stop light switch connector and holderCourtesy of PORSCHE OF NORTH AMERICA, INC.6. Fit the holder <strong>for</strong> the stop light switch and connect the connector -arrow- . Refer to 94 36 19 Removing andinstalling <strong>brake</strong> light switch - as of MY 2003 (All Models) . See Fig. 37.7. Fit the cover on the driver's side. Refer to 70 02 19 Removing and installing front cover (enginecompartment) - as of MY 2003 (All Models) .8. Fit the clamps of the air-conditioning lines.
2005 Porsche Cayenne2003-2008 BRAKES Brakes - Hydraulics, Regulator, BoosterFig. 38: Relay carrierCourtesy of PORSCHE OF NORTH AMERICA, INC.NOTE:• If the rubber bushes stick to the holders in the plenum panel whenremoving the relay carrier, these must be fitted in the openings providedbe<strong>for</strong>e being inserted again.9. Install relay carrier in the plenum panel. To do this, fit the six connectors in the rear section of the relaycarrier ( -arrow- and right marking). See Fig. 38.
2005 Porsche Cayenne2003-2008 BRAKES Brakes - Hydraulics, Regulator, BoosterFig. 39: Location of M6 screws on lower closing panelCourtesy of PORSCHE OF NORTH AMERICA, INC.10. Join the closing panel using the <strong>tw</strong>o M6 screws -arrows- (shown here when fitting the <strong>brake</strong> booster - relaycarrier removed). See Fig. 39.
2. Install both wiper arms. Refer to 92 25 19 Removing and installing wiper arm - as of MY 2003 (AllModels) .2005 Porsche Cayenne2003-2008 BRAKES Brakes - Hydraulics, Regulator, BoosterFig. 40: Front left wheel housing <strong>brake</strong> lineCourtesy of PORSCHE OF NORTH AMERICA, INC.11. Join the <strong>brake</strong> line in the front left wheel housing (remove sealing plugs).12. Install front left wheel housing liner.13. Clip the <strong>brake</strong> line to left front wheel in the bracket underneath the relay carrier in the plenum panel.14. Connect the plug on the distance sensor of the <strong>brake</strong> booster.15. Connect vacuum pipe to the <strong>brake</strong> booster.16. Fit <strong>brake</strong> master cylinder --> <strong>47</strong>1519 Removing and installing <strong>brake</strong> master cylinder - chapter on"installing".17. Fit left plenum panel partition.SUBSEQUENT WORK1. Fit the right and the rear covers. Refer to 70 02 19 Removing and installing front cover (enginecompartment) - as of MY 2003 (All Models) and the cowl panel. Refer to 66 44 19 Removing and installingcowl panel cover - as of MY 2003 (All Models) .
2005 Porsche Cayenne2003-2008 BRAKES Brakes - Hydraulics, Regulator, Booster3. Bleed the vehicle --> <strong>47</strong>0107 Bleeding the <strong>brake</strong> system - chapter on "bleeding".4. Calibrate the pressure sensor with the Porsche System Tester.