Create successful ePaper yourself
Turn your PDF publications into a flip-book with our unique Google optimized e-Paper software.
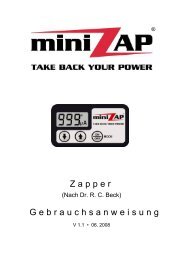
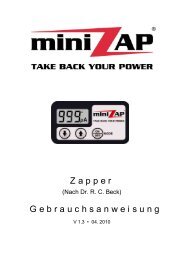
5. Device overview<br />
1. Piezo-buzzer<br />
Depending on the mode of operation<br />
the <strong>miniZAP</strong> ® makes<br />
different sounds, see „8. Acoustic<br />
signals“.<br />
2. LCD-display<br />
With the LCD-display different<br />
operating parameters as current,<br />
output voltage, acutal running<br />
time and error messages<br />
are displayed. See „7. LCDdisplay“<br />
and „10. Error messages<br />
and -fixing“.<br />
3. Output socket Ausgangsbuchse<br />
The electrode cable is connected<br />
to this socket.<br />
Operating <strong>manual</strong> V1.0<br />
1. Piezo-<br />
buzzer<br />
(internal)<br />
2. LCD-display<br />
7. Current adjustment<br />
buttons<br />
3. Output socket<br />
6. ON / OFF-<br />
button<br />
4. Velcro fastening<br />
(back side)<br />
5. Notch for battery<br />
change<br />
4. Velcro fastening TEXTfsdfdsgfdsgfdsgfdsgfdsgfdsgfdsgd FÜR. . . . . . . . ABSTANDS-E<br />
On its back side the <strong>miniZAP</strong> ® has a velcro field with which it can be easily attached to<br />
the wristband.<br />
5. Notch for opening battery case tesdateest, test ,test, test test test test test test ttes<br />
This notch makes opening the enclosure for battery change very easy (see „12. Battery<br />
change“).<br />
6. ON / OFF-button<br />
With this button the <strong>miniZAP</strong> ® is switched on and off, the 5 min break-timer is started /<br />
stopped, and the two hour signal is switched on / off. These and more functions are<br />
described at „6. Button functions“.<br />
7. Current adjustment buttons test test test test test test test test test test test test test tes<br />
With this buttons the current, which flows through the gold electrodes in your body, can<br />
be adjusted. Higher current with the arrow-up-button „�“, lower current with the arrowdown-button<br />
„�“. Further hints at „6.3 Current adjustment“.<br />
www.zapper.com 5