Electro Pressure Brake Bleeder BOY/BSF-10 - Power Probe
Electro Pressure Brake Bleeder BOY/BSF-10 - Power Probe
Electro Pressure Brake Bleeder BOY/BSF-10 - Power Probe
- No tags were found...

You also want an ePaper? Increase the reach of your titles
YUMPU automatically turns print PDFs into web optimized ePapers that Google loves.
Instruction Manual<strong>Electro</strong> <strong>Pressure</strong><strong>Brake</strong> <strong>Bleeder</strong><strong>BOY</strong>/<strong>BSF</strong>-<strong>10</strong>
Safety Instructions1. The following safety instructions should be observed at all times when openingthe ^jneaus * <strong>Brake</strong> Bleeding Equipment.2. Perform a visual inspection before every use. In the event of defects or damage,do not use! Have your equipment repaired by an authorized ^nsnss" ServiceCenter.3. The jjtiemis * <strong>Brake</strong> Bleeding Equipment is to be used only in accordance with thewritten instruction booklet.4. The ciHerius® <strong>Brake</strong> Bleeding Equipment is to be used only for the maintenanceand repair of hydraulic brake fluid and clutch systems.5. Fill the sjsnss* <strong>Brake</strong> Bleeding Equipment with BRAKE FLUID ONLY! Useeither DOT 3, DOT 4 or DOT 5. Do not mix the different DOT standardstogether. Never fill the bleeder with gasoline, cleaners, motor oil, or any otherliquid other than BRAKE FLUID!6. Follow all instructions from the <strong>Brake</strong> Fluid Manufacturer. Read all cautionsfrom the container. Use proper precautions when coming into contact with brakefluid.7. Keep your ^m-nus® <strong>Brake</strong> Bleeding Equipment clean. Wipe your bleeder with aclean rag and non flammable solvent. Wipe all residue of flammables from thebleeder before use. For instance if gasoline is spilled on it, wipe it off to avoidhazards.8. Do not put oil, or gasoline, soaked rags on the bleeder unit because of firehazard.9. Use only manufacturer recommended adapters and accessories.<strong>10</strong>. Always follow the vehicle manufacturers service and maintenance instructions.For reliable problem free performance from your bleeder, we recommend regularservice from an authorized service center.For proper disposal of used brake fluid we recommend using a sealed brake fluiddisposal system.For the authorized service center nearest you, call ^nanus * at (714) 990-9443.
Instruction Manual- <strong>Electro</strong> <strong>Pressure</strong> <strong>Brake</strong> <strong>Bleeder</strong> <strong>BOY</strong>/<strong>BSF</strong>-<strong>10</strong><strong>Brake</strong> fluid capacity (2,5 gal./lO liters)Congratulations on your new ownership of the^r/wHos® <strong>Brake</strong> <strong>Bleeder</strong>. The jmeaos*brake bleeder uses the newest technical developments in the maintenance ofhydraulic brake and clutch systems. It is advised that only professional mechanicsperform brake system maintenance.jMsaus" brake bleeding equipment has been designes to be used with all hydraulicbrake systems including Anti Lock <strong>Brake</strong>s., The 2,5 gal./lO liters <strong>Electro</strong> model issealed which eliminates the probability of brake fluid contamination.The simplicity of our pressure bleeders make it easy for the mechanic to operatewithout special training.The large capacity (2,5 gal./lO liters) reservoir allows you to perform multiplebrake bleedings without frequent refilling.The JHBMBS-* brake bleeders have been thorougly tested and certified for functionand safety.The ^menus'* <strong>Pressure</strong> <strong>Brake</strong> Bleeding System can be operated without the assistanceof another person.
Why should the <strong>Brake</strong> system be flushed?Contaminated brake fluid can cause a hydraulic brake system failure. For thisreason, only brake fluid from its original should be used in the ±mems" brakebleeders.<strong>Brake</strong> fluid is hygroscopic meaning it can absorb moisture from the air resulting ina dangerous reduction of it's boiling point. Water contaminated brake fluid underrepeated working pressure boils and dreates air bubbles. Under severe conditionsthis can result in complete brake failure.Water contaminated brake fluid causes electrolysis to occur inside the brakesystem. The air contained in the water droplets causes oxidation.<strong>Electro</strong>lysis and oxidation corrodes the hydraulic master cylinders and wheelcylinders, and steel brake lines from the inside.<strong>Pressure</strong> bleeding has been proven, the most effective method in flushing andbleeding hydraulic brake systems.Expensive repairs can be avoided by flushing the brake system annually or every<strong>10</strong>,000 miles.Operating Instructions1. Remove the fill cap from the Menus'" brake bleeder and fill with 2,5 gal./lO litersof new brake fluid. Do not remove the fill inlet screen because it filters debriswhich can clog the pump's pick-up filter. You can observe the fluid level bylooking at the level indicator tube at the side of the unit. (Location # 9). Replacethe fill cap finger tight only.2. Plug the power cord into electrical outlet.3. Install the proper cylinder reservoir adapter and connect the pressure hosecoupling.
4. Turn the power switch to the ON position and check for leaks at the mastercylinder adapter.5. Adjust the pressure regulator until the gage reads 30 P.S.I. 72,0 bar.6. Bleed the brake system according to automobile manufacturer's procedure.7. When finished, turn the power switch to the OFF position. This relives thepressure in the fluid hose allowing a clean disconnection from the mastercylinder adapter.8. Reinstall the original master cylinder cover.NOTE: If the <strong>Pressure</strong> <strong>Bleeder</strong> does not operate when the switch is in the ONposition, check the fuse mounted in the top of the unit.Replace if necessary or contact your Clams'" Service Center.Practical tips for effective hydraulic brake and clutch bleedingAfter installing the correct master cylinder reservoir adapter and connecting the^menus'" <strong>Electro</strong> <strong>Brake</strong> Bleeding System you can begin the bleeding process. Openone bleeder nipple at a time until the brake fluid flows clean and free from bubbles.To better observe the brake fluid flow and insure cleanliness of the shop werecommend using the ^imiTuf recovery measuringbottle. It will:1. help you to see the fluid when it clears up2. help you to keep your shop floor clean3. allow easy disposal of brake fluid4. give you the proper indication for invoicing the customer.
After a complete hydraulic brake system overhaul we recommend that all bleedersbe opened simultaneously so the air can escape by the path of least resistance. Thisprocess eliminates back pressure and the possibility of the new fluid, mixing withcontaminated brake fluid remaining in the system. When the fluid flows clean andfree from bubbles close the bleeder nipples and tighten them one after the other anddouble check tightness.We recommend during this pressure bleeding process to slowly press the brake orclutch pedal a few times to insure complete purging of air and fluid between theprimary and secondary master cylinder chamber.Fixed calipers can be equipped with several bleeder valves which can require alarger than normal volume of brake fluid for bleeding these systems. Each andevery bleeder valve must be bled one after anether../ ' • ' • •In brake systems with load sensitive brake force regulators, the hydraulicconnection to the wheel cylinders connected to the regulator can be blocked whenthe a_xles are unloaded (ie. Axle hanging from lift). In-this case, the axles must beput under load (see instructions of the vehicle manufacturer) for proper bleeding orbrake fluid replacement.Attention:In brake systems with a hydraulic brake booster, the brake circuits work on brakefluid and the hydraulic booster circuit on hydraulic oil. The two fluids must not beinterchanged!Bleeding hydraulic clutch systems.When bleeding hydraulic clutch systems, we recommend using the clutch bleedinghose # 67. This hose is attached to the bleeder valve at the slave cylinder. Removethe old fluid from the master cylinder reservoir. Then bleed the system from bottomto top (from the slave to the master).The dust covers must be replaced on the bleeder valves after the bleeding orbrake fluid replacement operation!
GeneralIf the brake/clutch pedal travel or hand brake is excessive after a bleeding or fluidreplacement operation, or if the pressure build-up is too weak (pedal spongy),repeat the bleeding operation after having vigorously operated the brake or clutchsystem several times.Adjusting the <strong>Bleeder</strong> to the correct operating pressureThe pressure regulator is adjusted to 30 PSI/2 bar at the factory to preventdeforming the master cylinder reservoir and possibly causing the secondary seal toleak. Under certain conditions, it may be recommended that the bleeding pressurebe reduced. This can be done by simply turning the regulator knob counter clockwiseuntil the proper pressure is reached.If more than the factory adjusted 3(5 PSI/2 bar is needed the lock nuts must beloosened and the knob turned clockwise'until the desired pressure is reached. Whenmore than 30 PSI/2 bar is used, we recommend using the # 67 bleeder hose byconnecting to a bleeder valve at the wheel cylinder and bleeding from bottom to top(from wheel cylinder to master cylinder). 'Bleeding in special cases via a bleeder valveOpen one bleeder valve; then fix the brake or clutch pedal in the full operationalposition (to the floor) by means of a pedal depressor bar. Connect coupler of thefilling hose (<strong>10</strong>) to the extension hose. Connect the extention hose to the openbleeder valve and turn the bleeder unit ON.Using the recovery bottle, open each bleeder valve until clear brake fluid, free ofair bubbles, flows out. After having completed the bleeding operation, the extensionhose stays on the bleeder valve which is still open, and the brake pedal is releasedslowly until the level of brake fluid in the master cylinder reservoir has reacted the,,MAX" mark. Only now can the bleeder valve be closed and then the bleeder unitbe turned off.Note:After bleeding with higher or lower pressure than 30 PSI/2 bar, return the pressureregulator back to the original setting of 30 PSI/2 bar.
Low <strong>Pressure</strong> System TestingLow pressure system testing can be carried out with the siSfius" <strong>Electro</strong> <strong>Pressure</strong><strong>Bleeder</strong>.Test procedure:Fill the master cylinder reservoir to the top edge with brake fluid. Connect the unitsecurely to the master cylinder reservoir with the appropriate bleeder adaptor andfilling hose. All bleeder valves in the system must be closed. •Turn unit on. The brake system is now under working pressure. Close the regulatorby rotating the hand wheel (12) counter clockwise until no more resistance is felt.The pressure regulator is now closed. The pressure indicated on the gage (6) shouldnot fall over a period of 5 minutes.If the pressure falls during this period, the system is leaking. After completing thetest, siphon off the excess brake fluid above the ,,MAX" mark level, or remove it byoperating the brake pedal, making sure that the bleeder valve is open.When does the <strong>Bleeder</strong> Unit need to be filled with brake fluid?The ^jtienus® <strong>Electro</strong> <strong>Pressure</strong> bleeder will shut off automatically when the fluidlevel reaches below 0,5 liters. This insures that no air be injected into the brakesystem. Durcing shut off the low level warning light (11) will illuminate and thebuzzer will sound alerting you to the low fluid level condition. At this time turn theunit off and refill with new brake fluid while observing the level indicator on theside of the bleeder unit. Fill to the 15 liter mark. Note: do not remove the filterscreen from the fill inlet while filling.
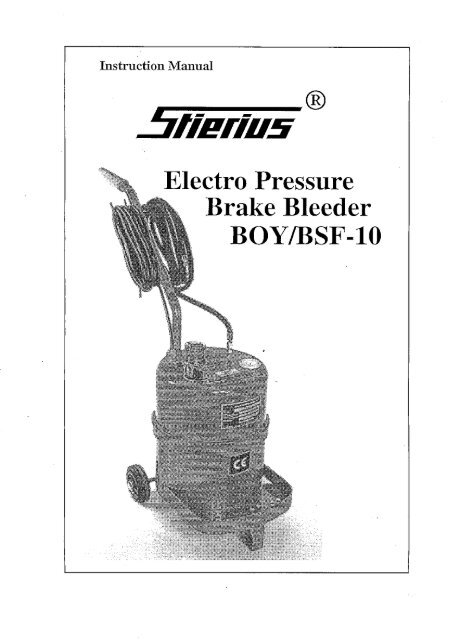
8 11 3Parts List for the<strong>Bleeder</strong> <strong>BOY</strong>/<strong>BSF</strong>-<strong>10</strong>2,5 gal./<strong>10</strong> liters <strong>Electro</strong> <strong>Brake</strong>No. Part.1. Fill inlet cap2. Fluid pressure hose3. Fuse4. <strong>Power</strong> cord5. Roller wheels6. Ruid pressure gage7. Fluid pressure regulator8. <strong>Power</strong> on/off switch9. Fluid level indicator<strong>10</strong>. Hose coupling11. Low level warning light12. Fluid pressure regulator wheel
Notes:
Warranty:The saunas* <strong>Electro</strong> <strong>Pressure</strong> <strong>Bleeder</strong> is guaranteed to be free of defects in parts andworkmanship for one year from the date of purchase. This guarantee becomes validafter reciept of a dated guarantee by our company.This guarantee is limited to the parts and labor necessary for repair.Any missuse or abuse of the ±aamus* <strong>Electro</strong> <strong>Pressure</strong> <strong>Bleeder</strong> will void theguarantee.Shipping costs are the customers responsibility. Any attempt to repair the ^mena**<strong>Electro</strong> <strong>Pressure</strong> <strong>Bleeder</strong> by anyone other than our authorized service center willvoid the guarantee.