SDIKTM ProcessControl2TM Setup Guide - Fishman® Corporation
SDIKTM ProcessControl2TM Setup Guide - Fishman® Corporation
SDIKTM ProcessControl2TM Setup Guide - Fishman® Corporation
- No tags were found...

Create successful ePaper yourself
Turn your PDF publications into a flip-book with our unique Google optimized e-Paper software.
3 Fishman <strong>Corporation</strong> USA Toll Free 1-800-433-2115
2.0 Unpack your SmartDispenser Integration Kit System2.1 Remove all items from the box.2.2 Use the checklist provided to confirm that allcomponents are present.3.0 Activate your SmartDispenser Integration Kit Warrantyonline3.1 Click the Warranty icon located on theSmartDispenser Home screen, fill out the formand submit to activate your extended two-yearno-fault warranty over the internet.6 Fishman <strong>Corporation</strong> USA Toll Free 1-800-433-2115
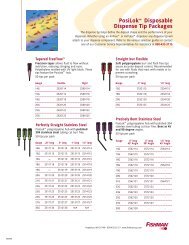
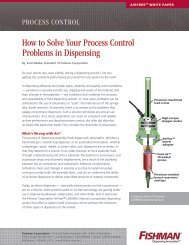
4. Hook up your SmartDispenser Integration Kit componentsSmartDispenser Integration Kit ComponentsA. LDS TM Push-to-Connect TMDispense GunB. Gun ConnectorC. Finger switchD. Ethernet PortE. USB connectorsF. Cisco WirelessConnectivity DeviceG. Video CameraH. Power CordI. Universal Power SupplyJ. Power Supply ConnectorGBEJDFNetworkAIHCInternational +00 1 508-435-2115 www.fishmancorp.com 87
4.1 Refer to the diagram to connect all componentsand peripheral devices to the SmartDispenserIntegration Kit.4.2 Plug SmartDispenser Integration KitLDS Push-to-Connect dispense gun A intogun connector B located on the back of theSmartDispenser Integration Kit.4.3 Finger switches allow the operator to easilyactuate the dispense cycle with the press ofa fingertip. Attach to the syringe, C eachswitch easily adjusts upward or downward toaccommodate different hand sizes.4.4 Connect your SmartDispenser Integration Kitto an Ethernet network using the Ethernet portD found on the back of the unit. If you have awireless network, install the supplied wirelessconnectivity device F in one of the USB connectorsE located on the back of the unit.4.5 Plug the supplied video camera G into one of thetwo USB connectors E located on the front andback of the SmartDispenser Integration Kit.4.6 Connect the power cord H to the universal powersupply I.4.7 Connect the universal power supply I to thepower supply connector J on the back of theSmartDispenser Integration Kit.8 Fishman <strong>Corporation</strong> USA Toll Free 1-800-433-2115
5. Startup and Logon theProcessControl 2TM Modeof SmartDispenser Integration Kit 5.1 SDIK Start-up – Method #1Connect an external keyboard and mouse to theavailable USB ports. Connect an external monitorvia a DVI cable. Connect the power cord to theuniversal power supply. Connect the universalpower supply to the power supply connector onthe SDIK TM . Plug the power cord into a poweroutlet, and the start-up process will begin.(Use of an Ethernet cable is optional.)International +00 1 508-435-2115 www.fishmancorp.com 9
Network5.2 SDIK Start-up – Method #2Connect the Ethernet cable. Connect the powercord to the universal power supply. Connectthe universal power supply to the power supplyconnector on the SDIK TM . Plug the power cordinto a power outlet, and the start-up processwill begin.Go to a desktop or laptop with an Ethernetconnection. Go to LogMeIn and enter name andpassword. Locate unit by name and click on it.When the pop-up box appears type in “Admin”under name and enter the password (as shipped,the default setting is “1234”) and select “RemoteControl” to provide you with access to theSDIK TM . Once you have control of the SDIK TM clickon the Admin Icon and type in your password.The SDIK TM will continue its start-up process.When you are done using this LogMeIn featuresimply select the “Disconnect” option to returnthe control of the SDIK TM unit back to a local user.Fishman <strong>Corporation</strong> USA Toll Free 1-800-433-211510 Fishman <strong>Corporation</strong> USA Toll Free 1-800-433-2115
5.3 The system software will now begin to boot upand in approximately 1 minute the Windows 7Logon screen will display.5.4 Login as User, Supervisor or Administrator.(Default Supervisor and Administrator passwordis 1234)International +00 1 508-435-2115 www.fishmancorp.com 11
5.5 In a few moments, you will be requiredto fill a Genius syringe and pistonwith your assembly fluid. Refer tosyringe filling videos for proper fillinginstruction. Click Video icon. On the leftnavigation panel, click “Videos” and selectone of the listed syringe filling videos.5.6 On home screen click on thePControl2 mode icon.Note: You can toggle between pages on the homescreen by using the F1 and F2 keys on a keyboard12 Fishman <strong>Corporation</strong> USA Toll Free 1-800-433-2115
5.7 On SmartDispenser Integration Kit Logonscreen select Administrator or Supervisor fromdrop down menu. Click password 1234, click“OK”, click Logon button.International +00 1 508-435-2115 www.fishmancorp.com 13
6. LDS Push-to-Connect Gun Assembly6.1 The LDS Push-to-Connect dispense gunare available in differentconfigurations.• LDAV (Large DotAny Viscosity)• MDAV (Medium DotAny Viscosity• SDAV (Small DotAny Viscosity)The gun connectorsare identical for easyhook-up to the LDSPush-to-Connectdispense gun.SurLokRetainingRing CoverGeniusTip CapGenius SyringeGenius PosilokPistonPiston HubLead ScrewLDAV, MDAVor SDAV GunFishman <strong>Corporation</strong> USA Toll Free 1-800-433-211514 Fishman <strong>Corporation</strong> USA Toll Free 1-800-433-2115
7.0 Attach the Genius Syringeto LDS Push-to-Connect Dispense Gun7.1 Verify the AUTO(Manual) button isset to MANUAL(Auto). Verify theEXTEND(Retract) button is set toEXTEND(Retract).Note: Gun is shipped fully retracted, however if gunhas been used before this setup that may no longerbe the case. Verify this by selecting MANUAL(Auto)and RETRACT(Extend), pressing finger switch untillead screw stops.MANUAL(Auto)EXTEND(Retract)International +00 1 508-435-2115 www.fishmancorp.com 15
7.2 Remove the seal from theGenius syringe pre-filledwith your assembly fluid.7.3 Holding the dispensing gunwith the piston hub pointedupward, place the syringeover the piston hub of thedispensing gun.7.4 Holding both syringe andLDS TM dispense gun loosely,press finger switch until thesyringe ears are raised atleast 1/4” (6.35 mm) abovethe plate.1/4”7.5 Manually twist the syringein a clockwise direction untilthe luer lock connector isfinger tight and the ears ofthe syringe are flush againstthe retaining plate.16 Fishman <strong>Corporation</strong> USA Toll Free 1-800-433-2115
CAUTION:Do not over-tighten the syringe. It is only necessary tomake a loose connection to bring the syringe flush.The retaining ring holds the syringe in place.TIP:It may be necessary to click theEXTEND(Retract) button to RETRACT(Extend)and press the finger switch to bring theears completely flush to the retaining plate.If you set the switch to RETRACT(Extend),be sure it is set back to EXTEND(Retract)before proceeding.EXTEND(Retract)RETRACT(Extend)7.6 Slide the retaining ring coverover the Genius syringe andalign the legs with the openslots of the adapter plate.7.7 Rotate the retaining ring coverin a clockwise direction untilit locks in place. The syringe isnow firmly connected to thedispenser gun.International +00 1 508-435-2115 www.fishmancorp.com 17
8.0 Prime the Genius FreeFlow Dispense Tip8.1 Remove tip cap from the syringe by twistingcounter-clockwise and pulling. Attach the 18Ggreen Genius FreeFlow Tapered Tip providedin the Dispense Tip kit.8.2 Hold the dispense tip over the provided dot chartas shown, press the finger switch intermittentlyuntil the fluid begins to flow towards the end ofthe Genius FreeFlow tip.Goal: To stop the fluid when flush with the end of the GeniusFreeFlow tip with no air pockets.Tip:Genius all plastic FreeFlow tips work best. There aremultiple size tips indicated by color. To find the tip that worksbest increase or decrease gauge size. If a stainless steeldispense tip is necessary always use .25” length tip.8.3 If too little fluid: Continue to presson the finger switch intermittentlycausing the fluid to flow to the tip.18 Fishman <strong>Corporation</strong> USA Toll Free 1-800-433-2115
8.4 If too much fluid: On thecontrol panel, click theEXTEND(Retract) buttonto RETRACT(Extend).8.5 Press the finger switch insmall short pulses until thefluid stops flowing from the tip.EXTEND(Retract)RETRACT(Extend)Goal: To stop the forward motion of the fluid byretracting the piston and sucking the fluid back.8.6 Clean the tip so it appears as pictured.Note: If the material continues to ooze,repeat step 8.4 to 8.5.8.7 On the control panel, click theRETRACT(Extend) button toEXTEND(Retract).RETRACT(Extend)8.8 Click MANUAL(Auto) button toAUTO(Manual).8.9 Click the arrow next to Barrel Sizeto drop down menu and select thesize of the syringe you are using.EXTEND(Retract)MANUAL(Auto)AUTO(Manual)8.10 Click OK on the pop-up message.International +00 1 508-435-2115 www.fishmancorp.com 19
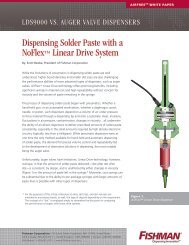
9.0 Set-up a ProcessControl 2 Mode Program9.1 If dispensing a bead, proceed to 9.3.9.2 If dispensing a dot proceed to 9.4.9.3 Select the length/width closest to your targetdispense size on the 9A Bead Chart below.Review information on pages 22-23 and thenproceed to 9.5.9.4 Select the dot size closest to your target dispensesize on the 9B Dot Chart to the right. Reviewinformation on pages 22-23 and then proceedto 9.5.9A Bead ChartLENGTHWidth1/64(0.396mm) 1/32(0.795mm) 1/16(1.59mm) 3/32(2.38mm)0.1” 0.00030 cc 0.00126 cc 0.00500 cc 0.01130 cc1” 0.00310 cc 0.01261 cc 0.05030 cc 0.11300 cc2” 0.00630 cc 0.02522 cc 0.10050 cc 0.22600 cc3” 0.00940 cc 0.03783 cc 0.15080 cc 0.33899 cc4” 0.01250 cc 0.05044 cc 0.20110 cc 0.45199 cc5” 0.01570 cc 0.06304 cc 0.25140 cc 0.56499 cc6” 0.01880 cc 0.07565 cc 0.30160 cc 0.67799 cc7” 0.02190 cc 0.08826 cc 0.35190 cc 0.79099 cc8” 0.02510 cc 0.10087 cc 0.40220 cc 0.90398 cc9” 0.02820 cc 0.11348 cc 0.45250 cc 1.01698 cc10” 0.03130 cc 0.12609 cc 0.50270 cc 1.12998 cc11” 0.03450 cc 0.13870 cc 0.55300 cc 1.24298 cc12” 0.03760 cc 0.15131 cc 0.60330 cc 1.35598 cc20 Fishman <strong>Corporation</strong> USA Toll Free 1-800-433-2115
9C Anatomy9D Dot AnatomyLengthDWidthVolume = D 3 D x 0.5236 / 2*(*1/2 the volume of a sphere)Note: There are three methods of programming numbers inSmartDispenser Integration Kit, using the mouseto click the arrows, to program parameter input boxes.1) Click the input box, left/right arrows will appear.Click either arrow to increase or decrease the number.2) Click a second time to get the arrows to separate revealinga slide bar. Click either arrow to increase/decrease thenumber or click and hold grey slider rectangle sliding ineither direction for rapid number change.22 Fishman <strong>Corporation</strong> USA Toll Free 1-800-433-2115
3) Click and hold a third time and keypad will appear.Click “CLR” button and input the desired number.Click “Enter” button. Upon click of “Enter” button thekeypad will automatically move to the next dispenseparameter.Tip:Use the four arrow keys to move up and down from onedispense parameter to another.Also, use four left/right arrow keys to increase and decreaseprogram parameter number.Click anywhere outside the key pad to close.International +00 1 508-435-2115 www.fishmancorp.com 23
9.5 Click Dispense Volume (cc) and input selectedvolume from the 9A Bead or 9B Dot Chart usingone of the input methods explained on pages 22and 23.9.6 Click Speed (cc per sec) and input the dispenserate using one of the input methods explainedon pages 22 and 23.9.7 Click Back-off (steps) and enter “10” as a startingpoint using one of the input methods, explainedon pages 22 and 23.9.8 Holding the dispense gun over testsheet press the finger switch once toactivate the dispense cycle andobserve fluid flow. Wait until thefluid comes to a complete stopbefore starting another dispense. It’s imperativeto be in AUTO(Manual) and EXTEND(Retract).24 Fishman <strong>Corporation</strong> USA Toll Free 1-800-433-2115
9.9 If fluid is flush at the end of the dispense tipproceed to 9.19.9.10 If fluid is oozing proceed to 9.11. If fluid isrecessed proceed to 9.15.9.11 Click the AUTO(Manual)button to MANUAL(Auto)and then click theEXTEND(Retract) buttonto RETRACT(Extend).AUTO(Manual)MANUAL(Auto)EXTEND(Retract)RETRACT(Extend)9.12 Press the finger switch as manytimes as needed to stop thefluid flow. If you go too farand suck fluid into the tipclick RETRACT(Extend) toEXTEND(Retract) and repeatuntil fluid is settled at the tip.9.13 Click Back-off (steps) increasing by 5 steps usingone of the input methods on pages 22 and 23.9.14 Return to procedural step 9.8, increasing anddecreasing Back-off (steps) until your dispense tipis flush at the end of dispense.RETRACT(Extend)EXTEND(Retract)9.15 Click the AUTO(Manual)button to MANUAL(Auto) andmake sure EXTEND(Retract)button is set toEXTEND(Retract).AUTO(Manual)MANUAL(Auto)EXTEND(Retract)RETRACT(Extend)International +00 1 508-435-2115 www.fishmancorp.com 25
9.16 Press the finger switch as many timesas needed to bring the fluid flush withthe tip. If you go too far and the fluidbegins to ooze click EXTEND(Retract) toRETRACT(Extend) press the finger switchas many times as needed to stop the fluid flow.Repeat until fluid is settled at the tip.9.17 Click Back-off (steps) decreasing by 5 steps usingone of the input methods on pages 22 and 23.9.18 Return to procedural step 9.8, increasing anddecreasing Back-off steps until your dispense tip isflush at the end of dispense. Do not save at this point.9.19 Click the AUTO(Manual)AUTO EXTENDbutton to MANUAL(Auto) (Manual) (Retract)and make sureEXTEND(Retract) button isset to EXTEND(Retract).9.20 Hold the dispense gun over a test cup.9.21 Press and hold finger switch purging fluidto approximately quarter way downthe syringe.MANUAL(Auto)EXTEND(Retract)RETRACT(Extend)RETRACT(Extend)9.22 Click Save Program buttonto save.9.23 Click Yes to pop-up message.9.24 Click OK to pop-up message.SaveProgram26 Fishman <strong>Corporation</strong> USA Toll Free 1-800-433-2115
Note: If oozing, let fluid settle until ooze stops. If oozingcontinues refer to steps 9.11 - 9.12 to stop ooze,returning to 9.25.9.25 Click MANUAL(Auto) button toAUTO(Manual)MANUAL(Auto)AUTO(Manual)9.26 Hold dispense gun over test sheet at 45ºangle and dispense several test dots.Watch the fluid flow coming outof the dispense tip, fluid shouldnot retract into the dispensetip. The fluid should beperfectly flush with theend of the tip after each dispense cycle.9.27 If fluid is retracted into the dispense tip proceedto 9.28. If fluid is flush with the end of thedispense tip proceed to 9.30.Note: If oozing, let fluid settle until ooze stops. If oozing continuesrefer to steps 9.11 - 9.12 to stop ooze, returning to 9.25.9.28 Click Back-off (steps) input box and decreaseback-off by 5 steps.Note: Check to make sure AUTO/Manual is set to AUTO/Manualand EXTEND/Retract is set to EXTEND/Retract.9.29 Repeat steps 9.26 to 9.27 until you have a newback-off setting where fluid doesn’t ooze and isperfectly flush with the end of the tip aftereach dispense.International +00 1 508-435-2115 www.fishmancorp.com 27
9.30 Repeat 9.19 - 9.29 as many times asneeded until the syringe is empty.9.31 Remove the syringe and clickYes to the pop-up message.9.32 Click OK to the pop-up messagesthat follow.9.33 Attach a new syringe(refer steps 7.1 to 7.7)9.34 Verify MANUAL(Auto) button is setto AUTO(Manual)9.35 Verify the SETUP(Run) is set to(RUN)<strong>Setup</strong> so run is activated.MANUAL(Auto)AUTO(Manual)Note: You have just created a chain dispenseprogram that will keep your diameterthrough the whole syringe.YOU ARE NOW READY TO DISPENSE.28 Fishman <strong>Corporation</strong> USA Toll Free 1-800-433-2115
10.0 <strong>Setup</strong> Done ButtonThe <strong>Setup</strong> Done button is a short cut tocomplete a ProcessControl 2TM program chain. Werecommend using this shortcut when you’vedispensed between a quarter and a third of thesyringeand it is clear no further changes to back-off(reverse motion) will be needed.10.1 Click <strong>Setup</strong> Done button.10.2 Click Yes to pop-up message.10.3 Click Yes to pop-up message.10.4 Click OK to pop-up message.10.5 Remove syringe from the dispense gun.10.6 Click MANUAL(Auto) button toAUTO(Manual)<strong>Setup</strong>DoneMANUAL(Auto)AUTO(Manual)10.7 Click EXTEND(Retract) button toRETRACT(Extend).10.8 Activate the SmartDispenser byfinger switch or PLC.EXTEND(Retract)RETRACT(Extend)International +00 1 508-435-2115 www.fishmancorp.com 29
11.0 Clear SavedProcessControl 2 Program11.1 The SmartDispenser only saves one chaineddispense program at a time. Return to theFishman Home Screen.11.2 Click PControl2 mode icon.11.3 From the drop down menu selectAdministrator.11.4 Enter the password (default is 1234)11.5 Click Logon button.11.6 Click Admin Tab.11.7 Click Clear ProcessControl 2TM Programs button.11.8 Click OK.11.9 Click ProcessControl 2TM tab.30 Fishman <strong>Corporation</strong> USA Toll Free 1-800-433-2115
Meets applicable CE requirements.Administrator and Supervisor ManualTraditional Mode <strong>Setup</strong> <strong>Guide</strong> | Version 1This manual is for the express and sole use of FishmanSmartDispenser users and purchasers, and no portion of thismanual may be reproduced in any form.Fishman, SmartDispenser, Genius, AirFree, Integration Kit,SDIK, PosiLok, FreeFlow, SafeLok, SurLok, DripFree,LDS Push-to-Connect, LDS9000 and ProcessControl 2 are all trademarks of Fishman <strong>Corporation</strong>.PTC Connector, Syringe Filler, PC2 Program, Syringe condom·andVirtualDispenser have Patents Pending to Fishman <strong>Corporation</strong>.© 2011 Fishman <strong>Corporation</strong>Windows is a registered trademark of Microsoft <strong>Corporation</strong> in theUnited States and other countries.
Fishman <strong>Corporation</strong>192 South StreetUS & Canada: 800-433-2115Hopkinton, MA 01748 United Kingdom: 1905 456008United StatesEurope: +441905 456008www.fishmancorp.comWorldwide: 1-508-435-2115Fishman <strong>Corporation</strong> USA Toll Free 1-800-433-2115