e30 Heated Seats.pdf - Brian David Bernard
e30 Heated Seats.pdf - Brian David Bernard
e30 Heated Seats.pdf - Brian David Bernard
- No tags were found...

You also want an ePaper? Increase the reach of your titles
YUMPU automatically turns print PDFs into web optimized ePapers that Google loves.
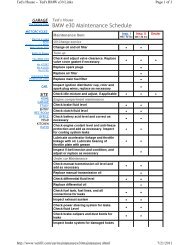
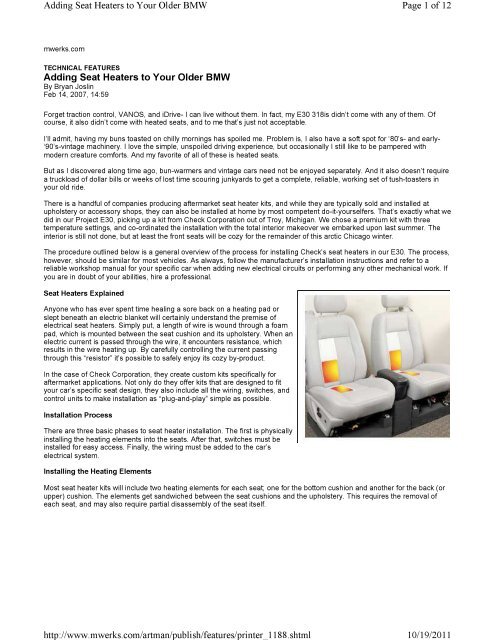
Adding Seat Heaters to Your Older BMWhttp://www.mwerks.com/artman/publish/features/printer_1188.shtmlPage 1 of 1210/19/2011mwerks.comTECHNICAL FEATURESAdding Seat Heaters to Your Older BMWBy Bryan JoslinFeb 14, 2007, 14:59Forget traction control, VANOS, and iDrive- I can live without them. In fact, my E30 318is didn’t come with any of them. Ofcourse, it also didn’t come with heated seats, and to me that’s just not acceptable.I’ll admit, having my buns toasted on chilly mornings has spoiled me. Problem is, I also have a soft spot for ‘80’s- and early-‘90’s-vintage machinery. I love the simple, unspoiled driving experience, but occasionally I still like to be pampered withmodern creature comforts. And my favorite of all of these is heated seats.But as I discovered along time ago, bun-warmers and vintage cars need not be enjoyed separately. And it also doesn’t requirea truckload of dollar bills or weeks of lost time scouring junkyards to get a complete, reliable, working set of tush-toasters inyour old ride.There is a handful of companies producing aftermarket seat heater kits, and while they are typically sold and installed atupholstery or accessory shops, they can also be installed at home by most competent do-it-yourselfers. That’s exactly what wedid in our Project E30, picking up a kit from Check Corporation out of Troy, Michigan. We chose a premium kit with threetemperature settings, and co-ordinated the installation with the total interior makeover we embarked upon last summer. Theinterior is still not done, but at least the front seats will be cozy for the remainder of this arctic Chicago winter.The procedure outlined below is a general overview of the process for installing Check’s seat heaters in our E30. The process,however, should be similar for most vehicles. As always, follow the manufacturer’s installation instructions and refer to areliable workshop manual for your specific car when adding new electrical circuits or performing any other mechanical work. Ifyou are in doubt of your abilities, hire a professional.Seat Heaters ExplainedAnyone who has ever spent time healing a sore back on a heating pad orslept beneath an electric blanket will certainly understand the premise ofelectrical seat heaters. Simply put, a length of wire is wound through a foampad, which is mounted between the seat cushion and its upholstery. When anelectric current is passed through the wire, it encounters resistance, whichresults in the wire heating up. By carefully controlling the current passingthrough this “resistor” it’s possible to safely enjoy its cozy by-product.In the case of Check Corporation, they create custom kits specifically foraftermarket applications. Not only do they offer kits that are designed to fityour car’s specific seat design, they also include all the wiring, switches, andcontrol units to make installation as “plug-and-play” simple as possible.Installation ProcessThere are three basic phases to seat heater installation. The first is physicallyinstalling the heating elements into the seats. After that, switches must beinstalled for easy access. Finally, the wiring must be added to the car’selectrical system.Installing the Heating ElementsMost seat heater kits will include two heating elements for each seat; one for the bottom cushion and another for the back (orupper) cushion. The elements get sandwiched between the seat cushions and the upholstery. This requires the removal ofeach seat, and may also require partial disassembly of the seat itself.
Adding Seat Heaters to Your Older BMWhttp://www.mwerks.com/artman/publish/features/printer_1188.shtmlPage 2 of 1210/19/2011In the case of our Project E30, we were in the process of reupholstering the seats, so they were already removed from the carand disassembled. For many DIY-ers, this step may be unfamiliar territory, but it shouldn’t be a daunting task. Most seats areassembled using simple hand tools (screwdrivers, Torx wrenches, etc). The only unusual tool you will likely need is a pair of
Adding Seat Heaters to Your Older BMWhttp://www.mwerks.com/artman/publish/features/printer_1188.shtmlPage 3 of 1210/19/2011hogring pliers, which you may find at some hardware stores, or pick them up from a restoration source like Eastwood.The keys to successfully disassembling seats are to work slowly to avoid breaking any trim or hardware and to take lots ofdigital pictures to document each step of the process. It also helps to do one seat at a time so you always have an assembledseat for reference. The first time I attempted to disassemble a seat, I also had the help of the Automotive UpholsteryHandbook, by Don Taylor. It’s available at most bookstores for about $20 and will prove a valuable addition to your shoplibrary.With the seats out and disassembled (including the removal of the upholstery), we began installing the heating pads. Check’spads are adhesive-backed; simply remove the backing paper, position the heating element properly on the seat cushion, andpress in place. Once the pad was in place, we reinstalled the seat cover and reassembled the seat. Caution was used tocarefully position the wiring harness in such a way that it wouldn’t catch on anything when it was re-installed in the car. At thispoint, however, the seat remained out of the car until the wiring was completed.Installing the SwitchesCheck has done an excellent job of sourcing high-quality switches that look like factory hardware. How and where you decideto mount these will determine how “factory original” the installation looks. Our kit included a pair of 1” circular rocker switches,and we decided to locate them on the rear corners of the shifter console. Depending on your vehicle, you may be able toinstall them in the dashboard, and if you need to get really tricky with mounting the switches, Check also offers 6’ extensionharnesses.
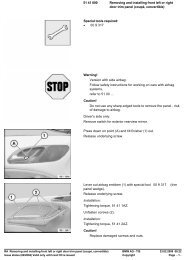
Adding Seat Heaters to Your Older BMWhttp://www.mwerks.com/artman/publish/features/printer_1188.shtmlPage 4 of 1210/19/2011Placing tape on the area where the switches would be, we marked the drilling locations symmetrically on each side. Theinstructions called for a 51/64” drill bit, but we used a 3/4” (48/64”) bit and trimmed off the locating tabs on the plastic switchwith a utility blade. It made for a snug fit, which is what we wanted. It should be noted that we used a step-type drill bit, calledUni-bit, to drill these holes. Uni-bits are designed for drilling clean holes in sheet materials like plastic and metal. Aconventional large-diameter drill bit would most likely gouge the console and make for a messy hole. Consider buying a Uni-bitto do this job and you’ll have an invaluable tool for less than $25.Once the holes had been cleanly drilled, we checked the switches for fitment. Now we were ready to wire them up.
Adding Seat Heaters to Your Older BMWhttp://www.mwerks.com/artman/publish/features/printer_1188.shtmlPage 5 of 1210/19/2011
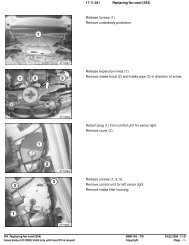
Adding Seat Heaters to Your Older BMWhttp://www.mwerks.com/artman/publish/features/printer_1188.shtmlPage 6 of 1210/19/2011Running the WiringThere are two wiring harnesses for each seat; the first runs supply power from a positive, ignition-switched source and thesecond runs from the switch. Both harnesses are joined at the heater control unit, which also gets connected to the heatingpads. All of this comes together under each seat, so it makes sense to run the wiring under the carpet and exit through thesame opening the factory uses. To do this in our E30, we had to remove the sill plates and the rear seatbelt anchor so the rearsection of the carpet could be lifted.
Adding Seat Heaters to Your Older BMWhttp://www.mwerks.com/artman/publish/features/printer_1188.shtmlPage 8 of 1210/19/2011The switch harnesses were routed under the carpet from the center console back to about the parking brake, then dropped toeach side accordingly. The power supply harnesses were routed under the carpet, and for the sake of simplicity, thepassenger’s side harness was routed over the driveshaft tunnel and joined with the driver’s side supply harness, then bothharnesses were run together along the driver’s side door sill toward the firewall.
Adding Seat Heaters to Your Older BMWhttp://www.mwerks.com/artman/publish/features/printer_1188.shtmlPage 9 of 1210/19/2011In order to get power to the seat heaters, they had to be tapped into the car’s existing electrical system. Not only that, but theseat heaters needed to be wired so that they only come on with the ignition. Even though they have a 1-hour safety shutoff, it’sbest not to have them drawing battery power with the engine off. The safest way to tap into switched power is to piggy-back anexisting switched circuit in the fuse box.
Adding Seat Heaters to Your Older BMWhttp://www.mwerks.com/artman/publish/features/printer_1188.shtmlPage 10 of 1210/19/2011Before we could make any connections in the fuse box, we had to get the wiring harnesses to the fuse box. Since the fuse boxin the E30 is under the hood, that meant passing the harness through the firewall. We followed factory harnesses and found arubber plug with available pass-through space. We opened the hole in the rubber block and used a coat hanger to pull thewiring from the passenger compartment to the engine compartment. After drilling a small hole in the side of the fuse box, weplugged it with a rubber grommet and ran our two positive leads through the small aperture.
Adding Seat Heaters to Your Older BMWhttp://www.mwerks.com/artman/publish/features/printer_1188.shtmlPage 11 of 1210/19/2011We used a device called Add-a-Fuse that allowed us to tap into a circuit by simply plugging it into the designated fuse location.The original fuse was then inserted into the lower slot on the Add-a-Fuse, and the new circuit’s fuse (in this case 7.5 amps)was installed in the upper slot. The new circuit was made by butt-splicing the wiring harness’s positive lead (red) to the Add-a-Fuse tail. One fuse was required for each seat heater. The circuits were completed by joining the two ground wires (black) at aring terminal and then securing it to good ground location. We used the through-bolt on the hood latch plate next to the fusepanel.Once all of the wiring was complete, we double-checked our routing and made sure nothing was rubbing or interfering with anyof the wiring harnesses. Next we reinstalled the carpet and interior trim. Before re-installing the seats, we thoroughlyvacuumed the carpets. There were plenty of shavings from drilling the console, and you’d be amazed at what shakes loosewhen you start moving all that trim and carpet. With the carpet now clean, we connected the seat heater control units (alreadyconnected to the power supply and switch harnesses) to the seat heater harnesses. The last step was to bolt the seats back inand test the heaters.
Adding Seat Heaters to Your Older BMWhttp://www.mwerks.com/artman/publish/features/printer_1188.shtmlPage 12 of 1210/19/2011Call me superstitious, but I like to test new electrical equipment outside of the garage. If something does wrong and I catch thecar on fire, I’d rather not take the house down with it. In the case of the seat heaters, our brutally cold winter was reasonenough to take the car for a spin and actually test the effectiveness of the heaters. I’m happy to report that not only is the carstill intact, but the heaters work just like all the new cars I drive.Adding seat heaters to your older car is a fairly straightforward task for most able-bodied enthusiasts. More importantly, thereward is a much more enjoyable driving experience, something that’s always appreciated in an older car.Additional ResourcesCHECK CORPORATIONEASTWOOD COMPANYAUTOMOTIVE UPHOLSTERY HANDBOOKFor more discussion on this story,click on the link to our discussionforums to the left.For more photos of the car in thisstory, click on the link to ourgallery at the right.© Copyright 2003 by mwerks.com