BMW E36 Auxiliary Fan Replacement DIY - Brian David Bernard
BMW E36 Auxiliary Fan Replacement DIY - Brian David Bernard
BMW E36 Auxiliary Fan Replacement DIY - Brian David Bernard
- No tags were found...

Create successful ePaper yourself
Turn your PDF publications into a flip-book with our unique Google optimized e-Paper software.
Doug's Domain :: <strong>BMW</strong> <strong>E36</strong> <strong>Auxiliary</strong> <strong>Fan</strong> <strong>Replacement</strong> <strong>DIY</strong>http://www.dvatp.com/bmw/diy/aux_fan/Page 1 of 65/3/2011Tuesday, May 03, 2011• Home• About◦ The Author◦ Contact◦ Donations◦ Advertising◦ Privacy◦ Site TOS◦ Site Info◦ Site Design◦ No Images?• Aviation◦ Maintenance◦ Travelogues◦ Reviews◦ Miscellaneous◦ Instruction◦ Checklists◦ Links• <strong>BMW</strong>◦ 328is Blog■ 2011■ 2010■ 2009■ 2008■ 2007■ 2006■ 2005■ 2004■ 2003■ 2002■ 2001■ 2000■ 1999■ 1998◦ 330ci Blog■ 2010■ 2009■ 2008■ 2007■ 2006◦ <strong>DIY</strong> Procedures◦ Articles• Gallery• Archive• LoginHome » <strong>BMW</strong> » <strong>DIY</strong> » Aux <strong>Fan</strong><strong>BMW</strong> <strong>E36</strong><strong>Auxiliary</strong> <strong>Fan</strong> <strong>Replacement</strong> <strong>DIY</strong>
Doug's Domain :: <strong>BMW</strong> <strong>E36</strong> <strong>Auxiliary</strong> <strong>Fan</strong> <strong>Replacement</strong> <strong>DIY</strong>http://www.dvatp.com/bmw/diy/aux_fan/Page 2 of 65/3/2011Contrary to what its name might imply, an auxiliary fan is an essential part of the<strong>BMW</strong> cooling and air conditioning systems.IntroductionDisclaimerI'm not a <strong>BMW</strong> technician. This article is provided freely for entertainment purposes only and is not intended to beinstructional in nature. Use of the information in this article is entirely at your own risk. See my site's Terms of Servicefor more information regarding the usage of content provided by this site.<strong>BMW</strong> <strong>E36</strong> and some E46 models (usually ones with automatic transmissions) have two fans. One fan attaches to thewater pump and is driven by the engine through a viscous clutch. This fan resides behind the radiator and pulls airthrough it. The second fan is an electric unit (two speed on the <strong>E36</strong>, variable speed on the E46) that mounts in front ofthe radiator and pushes air through it. This article concerns itself with the latter fan, which is otherwise known as the"auxiliary fan", or "aux fan" for short. This article specifically outlines the procedure to troubleshoot and replace a fanon the <strong>E36</strong>. Many of the principles should apply to the E46 as well.BackgroundThe aux fan serves two purposes. It forces air through the engine coolant radiator and automatically turns on at a lowspeed if the temperature of the coolant rises above a certain level. If that is insufficient to dissipate the heat beinggenerated by the engine the fan speed increases if a higher temperature threshold is exceeded. The second purpose of theaux fan is to force air through the air conditioning condenser (mated to the engine coolant radiator) when the airconditioning system ("snowflake" button) is on.
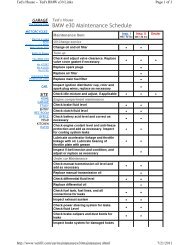
Doug's Domain :: <strong>BMW</strong> <strong>E36</strong> <strong>Auxiliary</strong> <strong>Fan</strong> <strong>Replacement</strong> <strong>DIY</strong>http://www.dvatp.com/bmw/diy/aux_fan/Page 3 of 65/3/2011Most people don't give the aux fan much thought. When it turns on at low speed it's practically inaudible, and as long asthe engine driven fan is doing half a job in temperate conditions while the car is moving the coolant rarely reaches ahigh enough temperature to turn it on in the first place.The first sign that the aux fan has failed may be warmer than expected air from the interior vents when the airconditioning is on and the car is at a standstill or in stop-and-go traffic. Still another sign is a rattling noise coming fromthe air conditioning compressor located at the front lower right section of the engine bay. This is caused by a pressurebuildup in the air conditioning system that is a direct result of insufficient airflow through the condenser. Running theair conditioning without a functioning aux fan can damage the compressor, the replacement of which costs over $1000.In high ambient temperatures, another possible indication of an aux fan problem is a rise in the coolant temperatureneedle beyond the usual 12 o'clock position. Regular readers of my site know I've said it many times -- you do not wantto overheat a <strong>BMW</strong> engine. The result is usually a very costly top-end repair.TroubleshootingFortunately, the failure modes of the auxilliary fan are pretty obvious so troubleshooting is relatively easy.To check for proper aux fan operation, simply turn on the air conditioning (snowflake button) with the engine idling andwalk around to the front of the car and look into the grills. The aux fan should be running and eventually cycling on andoff without any undue noise. The fan should also coast to a stop quietly over a period of 5 seconds or more. If it makesstrange noises or grinds to a halt, replace the fan. If the fan does not run at all and you hear the A/C compressorchattering, turn off the air conditioning and prepare for some additional troublesooting.First of all, check the fuse (30A) and replace it if necessary. Fuses don't wear out...they only blow in response to a shortor overload. This is most likely to occur in this context if the fan's bearings are shot and the fan takes far longer thanusual to spool up. If the fuse blows again in short order and the, replace the fan. Do not install a larger fuse in an attemptto make it work, even temporarily, or you will learn first hand what an electrical fire in a <strong>BMW</strong> smells like.If the fuse is in good shape or it's been replaced and the fan still refuses to run, turn the ignition to postion 2 (run) andpull the electrical connector off the coolant temperature sensor located on the right side of the radiator. With a piece ofsolid wire of appropriate gauge, carefully short the middle terminal with either of the outer terminals. One of the outerterminals will close the low speed relay and cause the fan to run at the lower of its two speeds, while the other outerterminal will close the high speed relay and cause the fan to run at a noticeably higher (and louder) speed. If the fan runsat one speed but not the other the most likely cause is a failed relay.If the fan runs continuously without the key in the ignition, the culprit is usually a stuck low or high speed relay. Sincethis condition will quickly result in a dead battery, the aux fan fuse should be removed until a new relay can be installed.Be advised that running the car in hot weather with the aux fan disabled in this manner may cause the engine tooverheat.Note: While troubleshooting the E46 aux fan is outside the scope of this document, I'll point out that the E46 designreplaced the individual relays with a speed controller integrated with the fan. If the fan runs erratically, continuouslywith the key removed from the ignition or not at all (and the fuse is good), the speed controller has failed and the entirefan must be replaced. That's progress for you.Prerequisites<strong>Replacement</strong> of the <strong>E36</strong> auxiliary fan requires the following:• Electric pusher fan and frame, <strong>BMW</strong> part number 64508364093• 3/8" drive ratchet• 3/8" drive, 12" extension• 3/8" drive, 10mm six or twelve point socket• 3/8" drive, 8mm six or twelve point socket• Philips screwdriver• A few cable ties (ty-wrap or similar)• 1 hour of your day
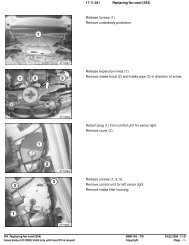
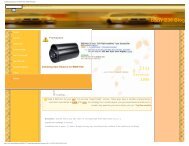
Doug's Domain :: <strong>BMW</strong> <strong>E36</strong> <strong>Auxiliary</strong> <strong>Fan</strong> <strong>Replacement</strong> <strong>DIY</strong>http://www.dvatp.com/bmw/diy/aux_fan/Page 4 of 65/3/2011<strong>BMW</strong> charges a bunch of money for this repair, but for once the reason is not the cost of labor -- it's the cost of the auxfan or what <strong>BMW</strong> calls the "pusher fan" in its parts inventory. This part retailed for the astonishingly high amount of$642 in early 2008.Normally I buy all OE parts but I've learned some valuable lessons about the automotive parts industry that has led meto save a bunch of money over the last couple years. I applied those lessons here and managed to get a replacement fanand frame for a mere $250 including shipping. Note that I'm not advocating throwing a generic electric fan on the car.While that might work, I'm content with using parts specifically designed for the <strong>BMW</strong>, even if the part doesn't have a<strong>BMW</strong> label on it. The part I obtained from Koala Motorsport looks every bit like the <strong>BMW</strong> OE part, and it's quitepossible that the very same vendor makes the part for <strong>BMW</strong>, but I don't know for sure. All I do know is that I saved$400 on the part alone.Based on my experience, I strongly advocate replacement of the fan with a non OE part simply because this is not afinely tuned proprietary suspension component that will never quite perform like the OE parts. It's a stinking two speedfan. In short, I recommend buying the fan from a reputable parts vendor.ProcedureRemoving the old fanThe fan is installed in a frame that helps duct the airflow over the radiator assembly. The <strong>BMW</strong> TIS notes that it ispossible to replace just the fan or the fan and frame as a unit.Based on a comment from the parts supplier the fan and frame are ideally replaced as a unit because the frame is madeof a plastic that typically becomes brittle with age and the frame may not survive the installation of the new fan. Afterseeing the 10 year old part I agree.The TIS further advocates removal of the front bumper cover (below the grills) to pull the fan and frame assembly out ofthe car. Based on my experience this is not necessary. Here's what I did instead:1. Remove the black plastic cover located on top of the radiator. This cover ducts air to the alternator and is attachedto the radiator support and surrounding area by four screws and two plastic fasteners on the far left and right side.2. Jack up the front of the car. I jacked the car up slightly higher than usual so I would have a bit of extra room topull the fan assembly out of the car from below.3. Remove the covers protecting the fog lamps. The fog lamp covers are installed to the underside of the bumpercover on the far left and right sides and have a vertical protrusion in them. You'll need 8mm or 5/16" sockets toremove 3 of the fasteners, and (at least on my car), a philips screwdriver to remove one of them. Not sure why, butit may have something to do with the fact that the front of the car has been disassembled several times.4. Remove the cover protecting the underside of the radiator / air conditioning condenser assembly. This is held inplace with two 8mm screws on either side. Once those screws are removed, the cover is removed by pulling downand aft, taking care not to damage the pipes leading to the condenser.5. Remove the fan/frame assembly. It is held in place by six (6) 10mm screws. The top two screws are accessedthrough the grills by the use of a 12" extension. The middle two screws are best accessed from beneath the vehicleusing either a deep socket or a shallow socket with a 2-3" extension. These are the most difficult to reach, but notoutside the grasp of one's limited patience. The bottom two screws (which were missing on my installation) areeasily accessible on the bottom of the fan assembly. After all screws are removed, disconnect the power connectorand then pull the fan assembly downward. It may not want to come out at first, but be persistent. Just make surethat you don't damage the condenser when yanking on it.6. If available, use compressed air to blow out any dirt or debris that has wedged itself in the bottom of thecondenser.Installing the new fan1. Prepare the fan. Mine came with the power connector wiring ty-wrapped in such a way that the connector wouldnot reach the hole in the frame designed to accept it, so I clipped the tie wrap, installed the connector on the frameand then put a new tie wrap on the wiring so it wouldn't flop around and rub against anything. I should also pointout that the design of the connector was not identical to the OE with respect to how it mounted on the frame.Fortunately, the mating and keying of the connectors were identical, and that's all that really matters.
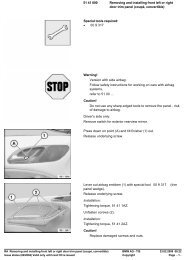
Doug's Domain :: <strong>BMW</strong> <strong>E36</strong> <strong>Auxiliary</strong> <strong>Fan</strong> <strong>Replacement</strong> <strong>DIY</strong>http://www.dvatp.com/bmw/diy/aux_fan/Page 5 of 65/3/20112. Mate the power connector plug (car) with the receptacle (fan). Just before I reinstalled the fan I mated the powerconnector and receptacle. I used a pair of channel lock pliers to fully seat the connector, but noticed that the plug'sretaining clips did not mate as well with the receptacle due to deterioration of the plastic on the 10 year old plug.To prevent accidental (and invisible) disconnection of the power connector I used another ty-wrap to compress theretaining clips around the connector base.3. Reinstall the fan and test it. Make sure the screws are tight and all tools are clear of the engine driven fan, and thenstart the engine (yes, with the car still jacked up). Then it the snowflake button to turn on the air conditioning andwalk around to the front of the car. You should notice your fan purring nicely. If the fan is not operating, checkthe power connector at the base of the fan and make sure it's seated. If this still fails to turn on the fan, I suggestyou turn off the engine for now and consider troubleshooting other aspects of the cooling fan electrical systemincluding the low speed fan relay. While troubleshooting these aspects of the system are outside the scope of this<strong>DIY</strong>, some are covered elsewhere on this site.4. Reinstall the covers and put the front of the car back on the ground. You're done!HighlightsThe job starts by removing the coverthat provides access to the top of thefan. This is mostly for convenience. Itis technically possible to do the jobwithout removing it.Next, the fog lamp covers on eitherside of the car must come off to allowaccess to the fasteners holding thelower condenser cover to the car.The condenser cover is fastened to thevehicle with two screws on each side.This is the left side.Here's the other side of the condensercover. Just remove those screws andthe cover should pull off.Make sure the ignition key is out of theignition and then pull the electricalplug out of the receptacle in the fanassembly.Access to the top two fasteners holdingthe aux fan in is through the grills. Youdon't need to remove them. Just use along (12 inch) extension as shown.
Doug's Domain :: <strong>BMW</strong> <strong>E36</strong> <strong>Auxiliary</strong> <strong>Fan</strong> <strong>Replacement</strong> <strong>DIY</strong>http://www.dvatp.com/bmw/diy/aux_fan/Page 6 of 65/3/2011The aftermarket frame appears betterbuilt than the original. Not only does ithave extra stiffeners, the stiffeners arecurved to minimize air turbulence andthereby reduce noise and increaseefficiency.The new fan comes with the receptacleand wire loose. Before you caninstalled the unit you have to slide thereceptacle into the frame. I recommendinstalling a ty wrap around theresulting wire loop to prevent anydamage to it from vibration.The new fan is installed and fits like aglove (well, that is after giving it agood shove to push it home the lastfew inches). Rest assured, this fanspools freely and does not grind to ahalt.I inserted the plug into the receptacleand secured it with a ty wrap before Islid the frame into place so I could beassured that the plug would notaccidentally unlatch.I just had to see what was wrong withthe old motor before I threw it in the With a new fan to keep her cool, I hadcircular file. If you look closely, you to give her a bath to make her lookcan see cracks in the magnets lining the cool too!circumference of the motor casing.ConclusionOf all the work I've done on this car I must admit that this was one of the most rewarding simply because of the costsavings involved.I advise anyone who is looking to replace their aux fan to use the aftermarket part provided by Koala Motorsport.If your fan is not working and the cause is not obvious, check the electrical connector at the base of the fan. Sure,accessing it requires some work to remove the three covers, but based on the quality of the connection and the nature ofthe latches on the electrical connector I can see this coming loose with the vibration of the fan. This explains why Ifastened it tightly with a ty wrap.Home » <strong>BMW</strong> » <strong>DIY</strong> » Aux <strong>Fan</strong>Contact | Terms of Service | Privacy Policy | XHTML 1.0 | CSS© 1995-2011 Doug Vetter | Rendered in 0.0163 secondsPowered by Saiph Networks