BMW E36 11 button obc to 18 button OBC conversion - Brian David ...
BMW E36 11 button obc to 18 button OBC conversion - Brian David ...
BMW E36 11 button obc to 18 button OBC conversion - Brian David ...
- No tags were found...

Create successful ePaper yourself
Turn your PDF publications into a flip-book with our unique Google optimized e-Paper software.
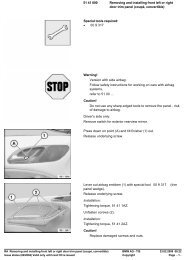
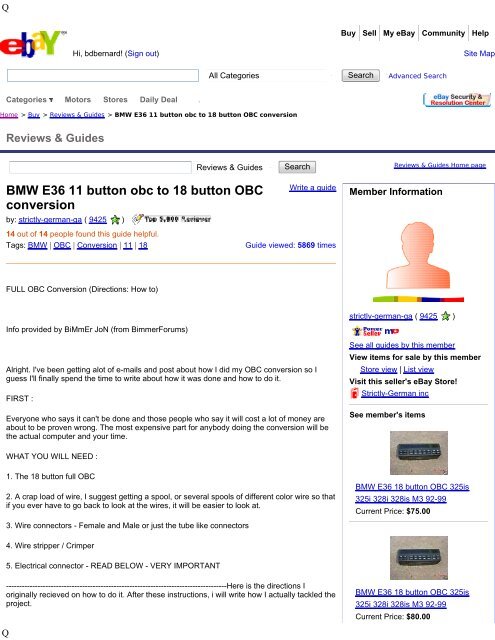
QBuy Sell My eBay Community HelpHi, bdbernard! (Sign out)Site MapAll CategoriesSearchAdvanced SearchCategories Mo<strong>to</strong>rs S<strong>to</strong>res Daily Deal .Home > Buy > Reviews & Guides > <strong>BMW</strong> <strong>E36</strong> <strong>11</strong> <strong>but<strong>to</strong>n</strong> <strong>obc</strong> <strong>to</strong> <strong>18</strong> <strong>but<strong>to</strong>n</strong> <strong>OBC</strong> <strong>conversion</strong>Reviews & GuidesReviews & Guides Search Reviews & Guides Home page<strong>BMW</strong> <strong>E36</strong> <strong>11</strong> <strong>but<strong>to</strong>n</strong> <strong>obc</strong> <strong>to</strong> <strong>18</strong> <strong>but<strong>to</strong>n</strong> <strong>OBC</strong><strong>conversion</strong>by: strictly-german-ga ( 9425 )Write a guideMember Information14 out of 14 people found this guide helpful.Tags: <strong>BMW</strong> | <strong>OBC</strong> | Conversion | <strong>11</strong> | <strong>18</strong>Guide viewed: 5869 timesFULL <strong>OBC</strong> Conversion (Directions: How <strong>to</strong>)Info provided by BiMmEr JoN (from BimmerForums)Alright. I've been getting alot of e-mails and post about how I did my <strong>OBC</strong> <strong>conversion</strong> so Iguess I'll finally spend the time <strong>to</strong> write about how it was done and how <strong>to</strong> do it.FIRST :Everyone who says it can't be done and those people who say it will cost a lot of money areabout <strong>to</strong> be proven wrong. The most expensive part for anybody doing the <strong>conversion</strong> will bethe actual computer and your time.strictly-german-ga ( 9425 )See all guides by this memberView items for sale by this memberS<strong>to</strong>re view | List viewVisit this seller's eBay S<strong>to</strong>re!Strictly-German incSee member's itemsWHAT YOU WILL NEED :1. The <strong>18</strong> <strong>but<strong>to</strong>n</strong> full <strong>OBC</strong>2. A crap load of wire, I suggest getting a spool, or several spools of different color wire so thatif you ever have <strong>to</strong> go back <strong>to</strong> look at the wires, it will be easier <strong>to</strong> look at.<strong>BMW</strong> <strong>E36</strong> <strong>18</strong> <strong>but<strong>to</strong>n</strong> <strong>OBC</strong> 325is325i 328i 328is M3 92-99Current Price: $75.003. Wire connec<strong>to</strong>rs - Female and Male or just the tube like connec<strong>to</strong>rs4. Wire stripper / Crimper5. Electrical connec<strong>to</strong>r - READ BELOW - VERY IMPORTANT------------------------------------------------------------------------------------Here is the directions Ioriginally recieved on how <strong>to</strong> do it. After these instructions, i will write how I actually tackled theproject.<strong>BMW</strong> <strong>E36</strong> <strong>18</strong> <strong>but<strong>to</strong>n</strong> <strong>OBC</strong> 325is325i 328i 328is M3 92-99Current Price: $80.00Q
Q------------------------------------------------------------------------------------Just work accurate and checkyou're wiring and connections before you start (do you have all the right connections yousupposed <strong>to</strong> have already, can you find the colours named in the instructions?? things likethat)Items from eBay sellersand check you're connections again before connecting the battery again! Good luck.So here it goes:You got <strong>to</strong> have at least the clock/date/temp-module and preferable the checkcontrol orcheckcontrol+temp.Start with disconnecting the battery!!<strong>BMW</strong> <strong>18</strong> BUTTON <strong>OBC</strong>Current Price: $35.00View similar items. ..The connec<strong>to</strong>rs:X1070 = black connec<strong>to</strong>r on the <strong>OBC</strong> = it's the same as the clock/date/temp-module and up.X1071 = white connec<strong>to</strong>r on the <strong>OBC</strong>X17 = blue connec<strong>to</strong>r on you're Instrument-panel.X16 = white connec<strong>to</strong>r on you're Instrument-panel.Power:<strong>BMW</strong> <strong>E36</strong> OEM <strong>18</strong> But<strong>to</strong>n <strong>OBC</strong>Onboard Computer M3 328isCurrent Price: $98.95View similar items. ..move X1070-pin<strong>18</strong> (+30) <strong>to</strong> X1071-pin8.move X1070-pin17 (ground) <strong>to</strong> X1071-pin13.Check that X1070-pin14 (+15) has power +12V with the ign. key in position 1&2! (it should bethere already)X1070-pin9 needs power with ign. key in position 2 only. Get it from X16-pin13 on you'reInstrument-panel.X1070-pin16 is for the lighting and should be there already.<strong>BMW</strong> <strong>E36</strong> <strong>18</strong> <strong>but<strong>to</strong>n</strong> <strong>OBC</strong> ONBOARD TRIP COMPUTER 325328 M3Current Price: $70.00View similar items. ..The rest:X1070-pin12 is for the Temp. sensor and already there.X1070-pin10 & pin<strong>11</strong> are for the gong (audible signal) and already connected.X1070-pin4 is for the 'menu-step switch' in the turn signal handle (this ofcourse needs ahandle with that option).X1070-pin14 is for the connection <strong>to</strong> X607-pin4 (preheater-relais) (this ofcourse only in caseyou have the preheater option)<strong>BMW</strong> <strong>OBC</strong> <strong>18</strong> But<strong>to</strong>n On BoardComputer <strong>E36</strong> 323 323i 323isCurrent Price: $85.00View similar items. ..X1070-pin6 needs a wire <strong>to</strong> X17-pin26 in the Instrument-panel and it lights the 'check' lightwich has <strong>to</strong> be added if you did not have Check Control before. If you had Check Controlbefore, just check it.X1071-pin6 needs a wire <strong>to</strong> X16-pin21 on the Instrument panel.X1070-pin13 & pin15 are wired (keep them like that).X1071-pin9 needs a wire <strong>to</strong> X17-pin10 on the Instrument panel.X1070-pin8 needs a wire <strong>to</strong> the fusebox in the engine compartment where you connect it <strong>to</strong>the black/green wire (Central Locking Module) and in case you have Central Body ElectronicsQ<strong>BMW</strong> <strong>OBC</strong> <strong>18</strong> But<strong>to</strong>n On BoardComputer <strong>E36</strong> 325 325i 325isCurrent Price: $85.00View similar items. ..
Qyou can connect the same wire <strong>to</strong> X10<strong>18</strong>2-pin12 (black connec<strong>to</strong>r on the CBE-module).Connect X1071-pin7 <strong>to</strong> a white/yellow wire somewhere around the foot area on the driversside.View more items on eBay...Connect X1071-pin5 <strong>to</strong> a white/violette (kinda light purple) wire, also around that same driversside area. (there should be a free connection point for both).Connect X1071-pin1 <strong>to</strong> connec<strong>to</strong>r X1659-pin15 from the Electronic Car Alarm/Immobiliser(<strong>BMW</strong> name in German = EWS) (in case you don't have the ECA/I system connect X1071-pin1 <strong>to</strong> a black/violette wire on the passenger side.If you already have Check Control, check the next connections:X1070-pin3 (white/blue wire) <strong>to</strong> X1074-pin5 (Check Control Mod.)X1070-pin4 (white/green wire) <strong>to</strong> X1074-pin7 (CCM).X1070-pin5 (white/gray wire) <strong>to</strong> X1074-pin3 (CCM).Congratulations, you're On Board Computer should work now!! and you're grass will be a lotgreener <strong>to</strong>o.(if the battery is connected of course)If however, everthings works except the Check Control, you're <strong>OBC</strong> needs <strong>to</strong> be re-configuredfor you're car. That can be done at you're local <strong>BMW</strong> dealer.------------------------------------------------------------------------------------WHAT I DID :*****Very Important*****You must go <strong>to</strong> a junkyard that has <strong>BMW</strong>’s. The most important part and I can’t stress thisenough is getting the other electrical connec<strong>to</strong>r that the <strong>18</strong> <strong>but<strong>to</strong>n</strong> <strong>OBC</strong> uses. If you do yourhomework, you will see that your existing TEMP/CHECK control computer only has 1 harnessgoing in<strong>to</strong> it. The full <strong>18</strong> <strong>but<strong>to</strong>n</strong> <strong>OBC</strong> has 2 harnesses. That’s only part of the bad s<strong>to</strong>ry. Thesecond part is that the you have <strong>to</strong> cut wires from your original harness and re-tap them <strong>to</strong> thenew harness and then run wires from different parts of the car <strong>to</strong> the new harness. (DON’TFLIP OUT YET, THAT’S NOT TO HARD). Making your own connec<strong>to</strong>r would be very hard andyou always run the risk or shorting out something so I strongly suggest getting the harness ou<strong>to</strong>f another junked <strong>BMW</strong>.------------------------------------------------------------------------------------Step 1 :Don’t start taking apart your car immediately. What I did was sit down with those instructions Iput up before and deciphered them. I drew an electrical diagram of of both connec<strong>to</strong>rs anddrew wires coming from each pin and labeled where each wire went I the car. THIS HELPEDA LOT. I lost a couple of the diagrams but I have no idea how I would post up these diagrams Idrew. But I suggest doing that. Here is a sample of what I did. Label what the function of thewire does <strong>to</strong> incase you ever need <strong>to</strong> refer back <strong>to</strong> it later on.QPIN 1 -------------------------------------- GOES TO PIN 23(DOES THIS)PIN 2 -------------------------------------- GOES TO PIN 39(DOES THIS)PIN 3 -------------------------------------- GOES TO WHEREVER (DOES THIS)PIN 4 -------------------------------------- GOES SOMEWHERE (DOES THIS)
QPIN 5 -------------------------------------- GOES HERE (DOES THIS)PIN 6 -------------------------------------- GOES THERE (DOES THIS)PIN 7 -------------------------------------- AND (DOES THIS)PIN 8 -------------------------------------- YOU (DOES THIS)PIN 9 -------------------------------------- GET THE POINT (DOES THIS)Understand the directions :X1070 – When you see this, it is referring <strong>to</strong> the Black connec<strong>to</strong>r that your car should alreadyhave. This connec<strong>to</strong>r should have <strong>18</strong> pins on it.X1071 – When you see this, it is referring <strong>to</strong> the WHITE connec<strong>to</strong>r that you will need <strong>to</strong> getfrom a junkyard. It should also have <strong>18</strong> pins.X17 – when you see this, it is referring <strong>to</strong> the BLUE connec<strong>to</strong>r that is attached <strong>to</strong> theinstrument clusterX16 – When you see this it is referring <strong>to</strong> the WHITE connec<strong>to</strong>r on the back of the instrumentcluster.Step 2 :Print the original directions on <strong>to</strong>p and then read the rest. I am going <strong>to</strong> explain how <strong>to</strong> readthis guys directions .Step 3 :Remove your instrument cluster. This is done by removing the 2 screw at the <strong>to</strong>p of the clusterand wedging it out between the steering wheel and the dash. Once this is done, disconnect allthe connec<strong>to</strong>rs from the back of the cluster. This will make it a lot easier.Step 4 :Ok, I’m looking at the section that says POWER.Its really self explana<strong>to</strong>ry from here. If you followed my directions and drew a wire diagram therest of these directions will be super easy. Just move the wires it says and attach the wires itsays <strong>to</strong> wherever it says.You have <strong>to</strong> fish wires from the instrument cluster down <strong>to</strong> the computer. They went downfairly easy for me hopefully it will for you.GOOD LUCK.HOPE IT WORKS. I’M NOT TAKING ANY RESPONSIBILITY FOR YOU MESSIN UPMASSIVE AMOUNTS OF STUFF ON YOUR CAR. I’D ONLY TRY IT IF YOU HAVE SOMEKNOWLEDGY IN ELECTRICAL STUFF. DON’T DO IT UNLESS YOUR CONFIDENT YOUCAN. IF YOU HAVE ANY DOUBTS, DON’T EVEN TRY.Guide created: 10/12/07 (updated 05/12/09)Guide ID: 10000000004562977Was this guide helpful?Yes NoReport this guideQ
QReady <strong>to</strong> share your knowledge with others? Write a guideMore guides written by: strictly-german-ga ( 9425 )• How <strong>to</strong> remove a OEM <strong>BMW</strong> RADIO E34,E30,E32,<strong>E36</strong>,E38• How <strong>to</strong> remove a <strong>E36</strong> Door panel• <strong>BMW</strong> Chassis Series What "E" is your <strong>BMW</strong>?• Remove <strong>BMW</strong> Seat• eBay DSR Ratings and feedback changesRelated tags: <strong>BMW</strong> | eBay feedback | <strong>OBC</strong> | E34 <strong>E36</strong> E32 E38 | seller buyer | Front Seat | <strong>18</strong> |Conversion | Code | ratings | Remove | <strong>11</strong> | Radio | DSRS DSR | Chassis | Cross Reference |Door Panel | Removal | Body | E39 E46 X5 X3 M3Related categories:• eBay Mo<strong>to</strong>rs > Parts & Accessories > Car & Truck Parts > Lighting & Lamps >Xenon Lights• eBay Mo<strong>to</strong>rs > Parts & Accessories > Car & Truck Parts > Wheels, Tires & Parts >Wheels > <strong>18</strong>''• eBay Mo<strong>to</strong>rs > Parts & Accessories > Car & Truck Parts > Computer, Chip, CruiseControl > OthereBay Pulse | eBay Reviews | eBay S<strong>to</strong>res | Half.com | Reseller Marketplace | Austria | France | Germany | Italy | Spain | United Kingdom |opular SearchesKijiji | PayPal | ProS<strong>to</strong>res | Apartments for Rent | Shopping.com | Skype | TicketsAbout eBay | Announcements | Security Center | Resolution Center | eBay Toolbar | Policies | Government Relations | Site Map | HelpCopyright © 1995-2009 eBay Inc. All Rights Reserved. Designated trademarks and brands are the property of their respective owners. Use of this Web siteonstitutes acceptance of the eBay User Agreement and Privacy Policy.eBay official timeQ