TM-L90 Instruction Memory Switch Settings For LAN ... - Novopos
TM-L90 Instruction Memory Switch Settings For LAN ... - Novopos
TM-L90 Instruction Memory Switch Settings For LAN ... - Novopos
- No tags were found...

You also want an ePaper? Increase the reach of your titles
YUMPU automatically turns print PDFs into web optimized ePapers that Google loves.
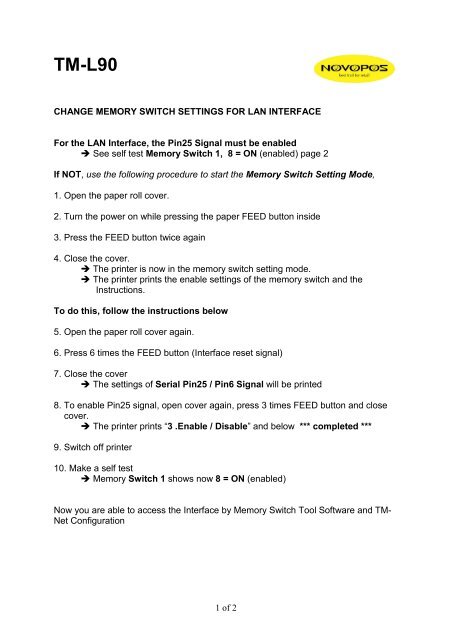
<strong>TM</strong>-<strong>L90</strong>CHANGE MEMORY SWITCH SETTINGS FOR <strong>LAN</strong> INTERFACE<strong>For</strong> the <strong>LAN</strong> Interface, the Pin25 Signal must be enabled See self test <strong>Memory</strong> <strong>Switch</strong> 1, 8 = ON (enabled) page 2If NOT, use the following procedure to start the <strong>Memory</strong> <strong>Switch</strong> Setting Mode,1. Open the paper roll cover.2. Turn the power on while pressing the paper FEED button inside3. Press the FEED button twice again4. Close the cover. The printer is now in the memory switch setting mode. The printer prints the enable settings of the memory switch and the<strong>Instruction</strong>s.To do this, follow the instructions below5. Open the paper roll cover again.6. Press 6 times the FEED button (Interface reset signal)7. Close the cover The settings of Serial Pin25 / Pin6 Signal will be printed8. To enable Pin25 signal, open cover again, press 3 times FEED button and closecover. The printer prints “3 .Enable / Disable” and below *** completed ***9. <strong>Switch</strong> off printer10. Make a self test <strong>Memory</strong> <strong>Switch</strong> 1 shows now 8 = ON (enabled)Now you are able to access the Interface by <strong>Memory</strong> <strong>Switch</strong> Tool Software and <strong>TM</strong>-Net Configuration1 of 2
8.10.2012 Fe<strong>Novopos</strong> AG2 of 2