Arduino Inventor's Guide - Oomlout
Arduino Inventor's Guide - Oomlout
Arduino Inventor's Guide - Oomlout
- No tags were found...

You also want an ePaper? Increase the reach of your titles
YUMPU automatically turns print PDFs into web optimized ePapers that Google loves.
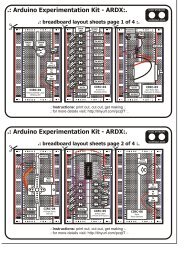
CIRC-01.:Getting Started:..:(Blinking LED):.WHAT WE’RE DOING:LEDs (light emitting diodes) are used in all sorts of clever thingswhich is why we have included them in this kit. We will start offwith something very simple, turning one on and off, repeatedly,producing a pleasant blinking effect. To get started, grab the partslisted below, pin the layout sheet to your breadboard and then plugeverything in. Once the circuit is assembled you'll need to upload the program. To do this plug the<strong>Arduino</strong> board into your USB port. Then select the proper port in Tools > Serial Port > (thecomm port of your <strong>Arduino</strong>). Next upload the program by going to File > Upload to I/OBoard (ctrl+U). Finally, bask in the glory and possibility that controlling lights offers.If you are having trouble uploading, a full trouble shooting guide can be found here: http://ardx.org/TRBLTHE CIRCUIT:Parts:CIRC-01Breadboard Sheetx12 Pin Headerx45mm Yellow LEDx1Wire330 Ohm ResistorOrange-Orange-Brownx1Schematic<strong>Arduino</strong>pin 13+longer leadLED(light emitting diode)resistor (330ohm)(orange-orange-brown)gnd(ground) (-)The Internet.:download:.breadboard layout sheethttp://ardx.org/BBLS01S.:view:.assembly videohttp://ardx.org/VIDE0108