Beginning QuoData Admiss - Cornell College
Beginning QuoData Admiss - Cornell College
Beginning QuoData Admiss - Cornell College
- No tags were found...
Create successful ePaper yourself
Turn your PDF publications into a flip-book with our unique Google optimized e-Paper software.
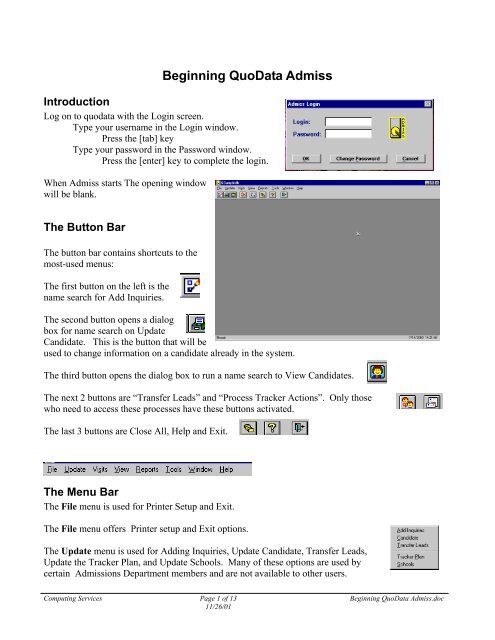
<strong>Beginning</strong> <strong>QuoData</strong> <strong>Admiss</strong>IntroductionLog on to quodata with the Login screen.Type your username in the Login window.Press the [tab] keyType your password in the Password window.Press the [enter] key to complete the login.When <strong>Admiss</strong> starts The opening windowwill be blank.The Button BarThe button bar contains shortcuts to themost-used menus:The first button on the left is thename search for Add Inquiries.The second button opens a dialogbox for name search on UpdateCandidate. This is the button that will beused to change information on a candidate already in the system.The third button opens the dialog box to run a name search to View Candidates.The next 2 buttons are “Transfer Leads” and “Process Tracker Actions”. Only thosewho need to access these processes have these buttons activated.The last 3 buttons are Close All, Help and Exit.The Menu BarThe File menu is used for Printer Setup and Exit.The File menu offers Printer setup and Exit options.The Update menu is used for Adding Inquiries, Update Candidate, Transfer Leads,Update the Tracker Plan, and Update Schools. Many of these options are used bycertain <strong>Admiss</strong>ions Department members and are not available to other users.Computing Services Page 1 of 13 <strong>Beginning</strong> <strong>QuoData</strong> <strong>Admiss</strong>.doc11/26/01
<strong>Beginning</strong> Quodata <strong>Admiss</strong> – Page 2The Visits menu includes Visit Scheduling, Update Counselor Schedule, UpdateFaculty/Staff Schedule and Update Tour Schedule. This information is maintainedby certain staff members and is not available to other users.The View menu allows for two options, View Candidates and Executive Summary.The Executive Summary is a report that gives a brief overview by school year. Itmay take come time to generate the report, and anyone using it should update whenit is opened to get the latest information. This report may be printed or viewed.The Reports menu offers several report options. The Ad Hoc item is onlyaccessable for those who have Crystal Reports installed on their computer.The Totals By report activates Excel crosstab reports and will displaytotals based on the criteria in place. A user may select the “Cycle”and the program. To view a chart, click the Chart button and to exit,click the Exit button.(Note: if it appears that Excel or <strong>Admiss</strong> is locked, it is possible theconnection was somehow lost – and in order to continue, you mayneed to End Task on Qdb or even log off the computer).When finished, click the Disconnect button in the dialog box after exiting:The Time Frame reports offer some other options for viewing data. Totals by Entry Term, PrimaryFactor, Inquiry Source, Counselor and State are available.When opening such a report, the options appear similar to that shown below:Select the criteria desired in the windows andclick the Retrieve button.Wait while the report is generated.Computing Services Page 2 of 13 <strong>Beginning</strong> <strong>QuoData</strong> <strong>Admiss</strong>.doc11/26/01
<strong>Beginning</strong> Quodata <strong>Admiss</strong> – Page 3The Timeframe Details By… is similar to that above. The twooptions here are Entry Term and Counselor.The Comparison Totals By offer the options of Entry Term, PrimaryMajor, Primary source, Region and State. This is another group ofInfomaker Reports. Output options may be selected as shown below:The Tracker Plan report will produce a report of the entire tracker plan.Run the Candidate Profile report by selecting thereport, and in the dialog box window that appears,click on the Query button.Type in the information desired in the Advanced Findwindow (as if running Advanced Find on a candidate).Click the Retrieve button to retrieve the search criteria.The results will appear in the next window.Providing the results are correct, click theOK button and wait to return the CandidateProfile Sheet. Print this sheet if desired toretain a “hard” copy.Computing Services Page 3 of 13 <strong>Beginning</strong> <strong>QuoData</strong> <strong>Admiss</strong>.doc11/26/01
<strong>Beginning</strong> Quodata <strong>Admiss</strong> – Page 4The Tools menu is only available to a select group of users. It contains suchitems as Tracker Action Processing, Labels from Leads, Load SAT Scores, LoadStudent Search, Load ACT Scores, Delete Marked Candidates, ArchiveCandidates, Update Code Tables, and Saved Report Views. These options areonly available to select <strong>Admiss</strong>ions staff.The Window menu allows one to change the view of the window.The final item on the menu bar is Help which lists the help topics as well as theversion and license of the <strong>Admiss</strong> product.SearchUnder Update Candidate the following window will appear. Type in a Last Name and/or First Nameand press Enter or the Search button. Names meeting the criteria are displayed below.Use variable criteria by searchingfor the beginning of the last nameor first name by typing the firstfew letters followed by a %.(Fe%)Also searches may be made fortwo possibilities (i.e. type in theLast Name Jones and the FirstName Kathy or Cathy. Thereturns will be both spellings ofKathy/Cathy with the last nameJones.Advanced SearchUse the Advanced Search feature to specifycriteria not available in the first window (i.e.Person_id, Social Security No. etc.). From themain Search window select the Advancedbutton.The following box appears: Type theinformation in the column and click Retrieve.Computing Services Page 4 of 13 <strong>Beginning</strong> <strong>QuoData</strong> <strong>Admiss</strong>.doc11/26/01
<strong>Beginning</strong> Quodata <strong>Admiss</strong> – Page 5Data inputCertain items must be included when entering a new candidate or updating a current candidate.Begin at the opening Update Candidate screen. Search to locate and select the candidate or click theNew button to enter a new candidate.Note: It is best to run a “Search” before entering a new candidate to verify the candidate is notalready in the system.The Personal Tab window as that on the left isthe first displayed – when using a currentcandidate, information that has been input aboutthat candidate is displayed. The window at theleft shows the display of a New candidate.The First Name and Last name must becompleted. Other items on this tab are importantbut not imperative.Click the Address tab to complete the address for acandidate.The New button must be selected in order to enter anew address. Note that the E-mail address also isincluded on this tab.When creating a new address, please note the upper leftcorner indicates whether this is the Priority mailingaddress (used for Tracker Actions) or a Parent mailing.If neither box is checked, it is another type of address.Please select the address type in the Address Typedropdown list.A Name must be selected or typed for the person toreceive the mail at this address and the street, City, State,Zip and Country should also be included. Whenfinished, click the OK button.Computing Services Page 5 of 13 <strong>Beginning</strong> <strong>QuoData</strong> <strong>Admiss</strong>.doc11/26/01
<strong>Beginning</strong> Quodata <strong>Admiss</strong> – Page 7The first screen is the Enrollment tab. It is herethat the folder type must be input for a newcandidate and should be selected with the dropdownarrow.Defaults have been set, and if the defaults are notcorrect, changes must be made on this screen.The counselor will be automatically assignedbased on the candidate’s region and entry type.Note the box in the lower left corner. Currentlyif it is checked, documents are not being sent tothis candidate as they have expressed that they are not interested in <strong>Cornell</strong> <strong>College</strong>.The Folder Items tab displays items that maybe included, with required items indicated byan arrow on the left. The status as well as thedate received is also indicated. These areautomatically input once the enrollment tab hasbeen completed (i.e. Folder Type and EntryType).Item status is maintained by select personnel inthe <strong>Admiss</strong>ions Department.The Track/Stage tab is where the specificTrack and Strategy is set.The Application Source and DecisionCode are also entered here.The Admitted State is currentlymaintained by the IT staff at <strong>Cornell</strong>but will be automatically input in the future.Computing Services Page 7 of 13 <strong>Beginning</strong> <strong>QuoData</strong> <strong>Admiss</strong>.doc11/26/01
<strong>Beginning</strong> Quodata <strong>Admiss</strong> – Page 8When entering a new candidate, once the track andstrategy are set, click the Apply button for thecurrent stage to appear in the upper right corner.The list of stages for that track appears on theright, with check marks and date fields in view.As a candidate proceeds through the system, thedates of progression are viewable on this screen.If entering a new candidate click Apply a secondtime for the Counselor’s name to appear, provideda priority address has been entered on the Addresstab in the beginning set of tabbed screens.The Action Queue tab lists the actions thecandidate should receive based on their track,stage and strategy. The dates the actions are tobe sent are indicated under the Date column andthe specific action is listed under the Actioncolumn. These actions with “days between” areset in the tracker plan.The Track History tab will displayactions that have taken place and liststhe action along with the date that itwent.Actions that were manually set andexecuted are displayed in white text.Information on this tab is maintainedby the actions being executed by selectmembers of the <strong>Admiss</strong>ions Staff.Computing Services Page 8 of 13 <strong>Beginning</strong> <strong>QuoData</strong> <strong>Admiss</strong>.doc11/26/01
<strong>Beginning</strong> Quodata <strong>Admiss</strong> – Page 9The Sources tab is where the InquirySource and How Heard fields may be setusing the drop-down menus.The Region is automatically populatedbased on the Priority Address Zip Code.A new source is entered by clicking the New button. Select thecorrect “Contacted By” contact as well as the “contact Type”using the drop-down arrows to the right of the window.A summary may be entered as well as comments.This entry is made by select members of the <strong>Admiss</strong>ionsDepartment.The Visits tab is one that many will viewbut few will edit or enter information.Scheduling may be done on this tab as wellas setting the Rating.Those who enter vists would click New toenter a new visit and use the drop-downmenus to complete the window.Click OK when finished.Computing Services Page 9 of 13 <strong>Beginning</strong> <strong>QuoData</strong> <strong>Admiss</strong>.doc11/26/01
<strong>Beginning</strong> Quodata <strong>Admiss</strong> – Page 10The Scholarship tab is another that ismaintained by select members of the<strong>Admiss</strong>ions staff. New scholarships areentered as they are awarded.Other Quodata users may view thisinformation but they may not edit it.The following Misc #1 and MISC. #2 tabsare currently not in use at <strong>Cornell</strong> at thistime and the titles are not viewable whenupdating or viewing candidates. These areincluded for possible future expansion.Click the OK button to return to the Update Candidate set of screens.The last tab to view here is the Noel Levitz tab.This information is maintained by the ITdepartment here at <strong>Cornell</strong>. Scores may be viewedby most <strong>Admiss</strong>ion staff.When finished, click OK and continue if more than one OK is needed until the screen returns to theSearch window. This will assure that any changes or entries will take effect.Click OK to return to a blank window.(Note: If your computer becomes locked while making an entry, once the database has been unlocked,you should immediately re-enter the candidate’s information to verify that information entered orchanged has been retained.)Computing Services Page 10 of 13 <strong>Beginning</strong> <strong>QuoData</strong> <strong>Admiss</strong>.doc11/26/01
<strong>Beginning</strong> Quodata <strong>Admiss</strong> – Page 12The following window displays the paramaters that have been pre-set into the report.The first tab in this particular report is the Counselor.Click on the arrow to the right of the Value window and selectthe value(s) desired.Click Add after each value selected in order to have yourselection take effect. The values selected must appear in thelower window.If you have selected a value you do not wish to keep, select thatvalue in the lower window and click the Delete button.Select the next tab (Term) in order to continue the selectionprocess.Click on the arrow to the right of the Value window andselect the value(s) desired. Remember to click Add aftereach value selected in order to have your selection takeeffect. The values selected must appear in the lowerwindow.Once values are entered and if you note that you haveselected a value you do not wish to keep, select that valuein the lower window and click the Delete button.Continue this selection process through all the tabs.Click OK when finished.Wait for the report to appear.Depending on the complexity of the report andactivity on the network, it may take a fewminutes for the report to appear. When it does,it will look somewhat like that displayed on theleft:Computing Services Page 12 of 13 <strong>Beginning</strong> <strong>QuoData</strong> <strong>Admiss</strong>.doc11/26/01
<strong>Beginning</strong> Quodata <strong>Admiss</strong> – Page 13At this point you may view the report and move from page to page with the arrows at the top left 1/3 ofthe page.• The first button moves to the first page.• The second button moves to the previous page first next page view indicator next last• The center number indicates which page is beingviewed.• The third button moves to the next page.• The fourth button moves to the last page.The Print button will allows to sending the document to your default printer.The Export button allows exporting the document to another application such as Excel. Thiscould be handy for further sorting and data manipulation or merges.To Export the file, click the button and an Export dialog box will appear.• Choose the format Excel 8.0 (XLS).• Note that the destination is a Disk File.• Click OK.Select the folder in which the file is to be saved.(Note: for class purposes, we will go to thedesktop and select the Workshop folder).Click the Save button.Open the exported report with Excel and work with the exported report.Wait for the file to be exported and saved - thismay take a bit of time.Close the Crystal Report with the X in the upperright of the dialog box.Any questions on the above may be directed to Joanie Sizer in <strong>Admiss</strong>ions or Judy Westergren in theOffice of Computing Services x 4357.Computing Services Page 13 of 13 <strong>Beginning</strong> <strong>QuoData</strong> <strong>Admiss</strong>.doc11/26/01


