e30 Limited Slip Differential Swap.pdf - Brian David Bernard
e30 Limited Slip Differential Swap.pdf - Brian David Bernard
e30 Limited Slip Differential Swap.pdf - Brian David Bernard
- No tags were found...

Create successful ePaper yourself
Turn your PDF publications into a flip-book with our unique Google optimized e-Paper software.
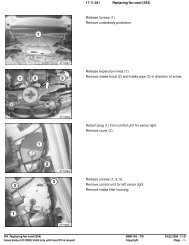
Pelican Technical Article: BMW E30 3 Series <strong>Limited</strong> <strong>Slip</strong> <strong>Differential</strong> <strong>Swap</strong>http://www.pelicanparts.com/bmw/techarticles/JF-Tech/BMW_E30_3_Series_<strong>Limited</strong>_Sli...Page 2 of 68/21/2011have punctured the floorboards. A handy reference is Wayne’s article on jacking up your BMW. Thisarticle is specific to the E36 series, however, the same principles apply to the E30 as well.http://www.pelicanparts.com/bmw/techarticles/E36-Jacking_Up/E36-Jacking_Up.htmOnce the car is firmly secured on jack stands, the next step is to remove the lug bolts on therear wheels and take the wheels off. Now, look at where the drive axles are bolted onto thedifferential. We will need to separate the axle shafts from the differential in order to remove thedifferential. There are six internal Allen head bolts that hold each axle to the differential. Before youremove them, it’s a really good idea to clean them off to get any dirt of grease out of the boltheads. Any good brake cleaner should work perfectly. We don’t have to get them spotless, howeverjust enough to where we won’t have the Allen key from popping out. It’s also a good idea to hit thebolts with WD-40 or good penetrating oil. Typically, I like to let the spray sit overnight, to let the oilwork itself into the threads. This will make it much easier to remove the bolts, not to mentionpreventing stripping and seizing when you hit them with the wrench. Put the car in gear if it’s amanual gearbox. This will lock the rear end and allow you to loosen the bolts. Now remove all thebolts. The drive axles will now be free of the differential. Use a piece of rope or stiff wire to hang thedrive axles to the car and keep them from crashing downward.Now look at the front of the differential. You will see the mounting flange for the driveshaft.There are four bolts that hold the driveshaft to the mounting flange. Put the car in gear to lock thedriveshaft in place, and then use and open-end wrench to hold the nut on the end of each bolt. Nowremove the bolt. Put the car in neutral and rotate the driveshaft so that you have enough clearanceto remove the next bolt. Now put the car in gear again and repeat the procedure. Repeat thesesteps until all the bolts are removed. Now use some wire or rope to suspend the driveshaft in placeto prevent stress on the centering bearing.Now move towards the rear of the differential and remove the electrical connector from thespeedometer sensor. I forgot to do this one time and ended up ripping the wires off the ends of theconnector. Nothing was damaged to badly, but I did end up having to splice the wires backtogether.Now we have to remove the mounting bolts for the differential. I’ve found that using WD-40 oranother good penetrant spray on the bolt will help loosen things up. I’d recommend that you sprayit on all the differential mounting bolts and let it sit overnight to soak in. The next morning, itshould be a lot easier to get these loose. I have found that in some cases, using a torch to heat upthe bolts also helps to get the bolts turning. If you decide to do this, use EXTREME caution as youare directly in front of the fuel tank. Gas vapors and a torch = explosion. Just use enough flame toheat the bolt up slightly. This will cause the threads inside to expand and free up.Next, put a jack under the differential to support it’s weight. Trust me, you don’t want thedifferential falling on you while you are under the car. Now we have to remove the two rear uppermounting bolts. These are located at the top of the differential. You will need to use an open endwrench to get these off. You may also need to use a “cheater bar” to loosen the bolts. A cheater baris essentially a large piece of pipe fitted over the wrench. The extended length of the wrenchprovides you more leverage. Just like you learned in basic physics. A longer lever equals less forcerequired to move it.Now remove the two front mounting bolts. They are located at the very front of the differentialon either side of the driveshaft. Once again, you may have to use the cheater bar in order to getthem loose. Now remove these bolts. Lastly, remove the nut and bolt for the rubber mountingbushing. Use an open-end wrench on the nut to hold it in place while you loosen the bolt.Now we will be able to lower and remove the differential. Keep in mind that the differential isvery heavy, so use caution and while pulling the differential back, lower the jack. The differentialwill come out of the car.Once out, take the old differential off the jack and place the new L.S.D. differential on the jack.Now position the new diff in roughly the position it would fit in the car, but slightly to the rear. Wewill need to do this in order to angle the diff into position. Now start to raise the jack. As you bringthe diff into position, push it slightly forward to line the driveshaft up with the input flange on thefront of the differential. Once, there, slide a bolt through to hold it in place.Now, use the jack to carefully lift or lower the diff until the mounting holes line up. This maytake a few tries, as the diff is very heavy. Once you have it correctly positioned, slide the frontmounting bolts through the mounting holes and torque the bolts to 59ft/lbs. each. Now re-installthe rear upper mounting bolts and torque them to 59 ft./lbs.