Auto Security System - Ready Remote
Auto Security System - Ready Remote
Auto Security System - Ready Remote

Create successful ePaper yourself
Turn your PDF publications into a flip-book with our unique Google optimized e-Paper software.
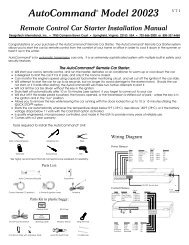
V 4.1<strong>Auto</strong> <strong>Security</strong> <strong>System</strong>Installation ManualModel #s 20630, 20930For Use On Vehicles With 12 Volt (Negative Ground) Electrical <strong>System</strong>s20630 / 20930 Page 1
Instructions forFirst Defense ® AlarmCongratulations on your purchase of our First Defense ® , the firstcar alarm designed to protect both You and Your Car.First Defense ® Protects Your Car:Built-in 8 stage ceramic crystal shock sensor allows the user toadjust from feather light to rock hard sensitivity, using the remotecontrol.If your car is lightly bumped, First Defense ® sounds a 3-secondpulse to ward off potential thieves.If someone hits the car or climbs through a broken window, thefull alarm is triggerd.Starter Kill prevents your vehicle from being started when thealarm is armed. Many insurance companies provide a discountto insurers whose vehilce is equipped with an ignition or starterkill. Check with your insurance company.The current sensor activates the alarm immediately when a door,trunk or hood is opened (if these openings trigger a light) whileFirst Defense is armed.Choose your own unique piercing 108dB siren sound from 8different possiblilities.First Defense ® Protects You:Panic Alarm lets you activate the siren and flash your vehicle'slights to call for help or scare off would-be attackers.<strong>Remote</strong> Light Control lets you remotely turn on your vehicle'slights to light your way for 30 seconds.Car Locator lets you quickly locate your car in crowded malls,stadiums or other large parking lots.Anti-Carjacking sounds the alarm after you are a safe distanceaway from the carjacker.TransmitterYour First Defense ® Transmitteroperates as follows:The light on the transmitter will turn Green when button#1 is pressed, Red with button #2 and Yellow withbutton #3 when it is transmitting.Button One:Press once for 1 second: Arm alarm / Siren chirpsonce, lights flash oncePress again for 1 second:Disarm alarm / Siren chirps twice, lightsflash twiceButton Two:Press for 1 second:Note: if alarm has been triggered, you willhear 4 chirps during disarm)Carfinder® (siren sounds for 2 secondsand lights come on for 2 seconds)Hold down for 3-4 seconds: Panic Alarm (flashing lights and siren)for 45 seconds.Button Three:Press once (1 second): Turn headlights on for 30 secondsThe First Defense ® is fully user programmable from the remotetransmitter for choosing shock sensitivity and your choice of 8 differentsiren sounds.Page 2 20630 / 2093020630 / 20930 Page 3
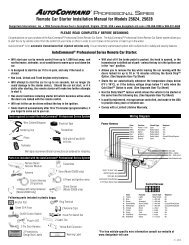
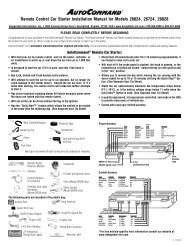
Before You Get StartedContents:1 First Defense ® siren module1 3-Button transmitter (comes with long-life lithium battery)2 Blue Scotch-Lock wire connectors4 Cable ties (4" long) for wires1 Spare blue 15 amp fuse2 Screws & lock washers for mounting bracket2 "Warning: Protected by DesignTech" window decals1 Antenna ClipWire Functions:REDBLACKYELLOWBLUEORANGEVIOLETBLACK ANTENNATools Needed:• Drill• Pliers• Phillips Head Screwdriver+12 Volts ("+" positive)Ground ("-" negative)Headlights ControlCurrent Sense Disable - OptionalSee Step #3Ignition Sense (Only necessary ifCurrent Sense is disabled)Starter KillCoaxial Antenna WireInstallation InstructionsWARNING: Never install this product with the engine runningand be certain to keep the alarm's wires away from movingparts.Warning: When working around the car battery, never allowany metal tools to short across the two battery terminals orfrom +12 Volts to ground!Step 1 - Mounting the Alarm andConnecting the GroundMount the Siren under the hood as near to the front of the vehicle aspossible. The siren must be securely screwed into the metal frameof the vehicle to pick up the shock vibrations during an intrusion orforced entry. First, unscrew the mounting bracket from the siren.Secure the bracket tightly to the frame of your vehicle with the twoself-tapping screws provided. Then secure the siren to the bracket.ALWAYS MOUNT THE SIREN SO THE WIRES ARE HANGINGDOWNWARD FROM THE CASE - this will prevent any water buildupin the siren case.Be sure to keep the siren and wires away from any moving parts.For best results, mount the siren in the best location that allows thesounds to emanate from the siren with the least amount ofobstruction.The BLACK ground wire must be connected to the negative (-)terminal of the vehicle's battery or another suitable ground locationon the vehicle's chassis.• Small Adjustable (Crescent) WrenchPage 4 20630 / 2093020630 / 20930 Page 5
Step 2 - Red +12 Volt WireConnect the RED wire with its in-line fuse holder and 15 amp fuse tothe +12 volt ("+") side of the battery terminal, using our eyeletconnecter. To do so, simply unscrew the battery terminal connectornut and then slip the eyelet over the bolt and retighten the nut.How To Use The Scotch-LockConnectorThe diagram below shows how to use the blue Scotch-Lockwire connectors to tap into the desired wires. This exampleis for the parking light connection.Step 3 - Blue Current Sense DisableWire1) Slip the connector overthe wire you want toattach to.2) Push the First Defense ®alarm's wire (unstripped)as far as it willgo into the open end ofthe connector.3) Use pliers to press themetal blade into thewires.4) Close the plastic coverover until it clicks.This optional wire will shut off the current sensing feature of thisalarm. This needs to be done if the vehicle's fan motor stays on afterthe engine has been shut off on a hot day. Addtionally, some newervehicles will have electronic modules that come on and off periodicallyafter the engine has shut down. If the siren periodically activatesfor no explanation after your car was recently parked, then youmay need to connect this wire to shut off the current sense feature.To disable the current sense feature, connect the Blue wire to a constant+12 volt source. To enable ignition sense, see Step 5.Your Car'sParking/HeadlightWireYellowWireStep 4-Yellow Lights WireThis wire can power up either the headlights or the parking lights ofyour vehicle. You cannot connect both. Connect the Yellow wire to thelight wire that shows +12 volts whenever the lights are turned on. Thisoutput is a +12 volt relay output. This output will flash the lights forpanic alarm & car finder features, plus let you turn on your lights to lightyour way at night.Step 5-Orange Ignition Sense WireThis wire will is only needed if you have connected the Blue currentsense disable wire in Step 3. This wire will sense the ignition of thevehilce being turned on and therefore sound the alarm should theignition be turned on while the alarm is armed. Connect this wire toa wire that measures +12 volts whenever the ignition is turned on.We recommend that you connect the YELLOW wire tothe parking light wire that measures +12 volts when theparking lights are on. This will give a visual indicationfrom both the front and the rear of the vehicle.Page 6 20630 / 2093020630 / 20930 Page 7
Step 5 - Violet Starter Kill WireThe VIOLET wire is a transistor ground output that is active wheneverthe system has been armed by the transmitter. This output is usedto engage a starter kill relay (optional and not included with this alarm)to prevent the vehicle from starting whenever the alarm system isarmed. Follow the wiring diagram and instructions below if desired:Connect the VIOLET wire to pin # 86 of a standard "Bosch" styleSPDT (Single Pole Double Throw) 30 Amp relay. Connect pin # 85to a wire that provides +12 volts whenever the ignition key is in the"Run" position. You may find this wire either behind the key area orunder the hood at the ignition coil/module. Locate the vehicle's starterwire coming off of the ignition key area or under the hood before it getsto the starter solenoid. This will be a wire that provides +12 volts onlywhile the key is in the "Start" position. Cut this wire in half. Connectone side of the cut starter wire to pin # 30 of the relay. Connect theother side of the cut starter wire to pin # 87a (the middle pin) of therelay. Tie up the relay and wrap any exposed wires with electrical tapeto protect them from moisture and the elements. Make sure that allwires are out of the way of moving or hot parts.Step 6 - Coaxial Antenna WireRoute the black Antenna Wire to the front of the grille of the car. Thethick triangular section of the wire is the actual antenna and must beexposed and not positioned behind metal. This will allow for maximumtransmitter range. Secure the antenna to the front grille of the vehicleusing 2 cable ties. The more exposed the antenna, the better therange. No antenna cable should remain coiled up - this will greatlydecrease range.Step 7 - Quick Operational TestAt this point your alarm should be working. Before going on, test itby pressing the middle (red) button for 1 second to get the CarFinder ®feature. If this feature is working, your alarm should be totallyfunctional. If you get no response from this test, go on to step 8. Ifthe quick operational test works, go straight to step 9.Step 8 - Teaching Transmitters/SensorsFirst Defense ® comes with the transmitter pre-coded to the receiver.If your alarm does not respond to the transmitter or you are addingthe optional Wireless Alarm Sensor, then do the following:1) Pull out the 15 amp fuse for a few seconds, then replace it. Thelights will flash 4 times and the siren will chirp once confirming the unit isin code learning mode.2) Within 5 seconds of the first step, press button #1 (green) on yourtransmitter until the lights flash once (usually hold the button for about5 seconds), signifying that it has learned the code. If you haveadditional transmitters, teach the receiver these by pressing thesecond transmitter's button #1 (green) within 5 seconds of thereceiver learning the first transmitter code. (If you are adding aWireless Sensor, separate the magnet from the switch until thereceiver chirps once indicating that it has learned the sensor's code.)3) After programming the last transmitter/sensor, wait 5 seconds forthe 4 exit light flashes. Your alarm is now ready to use! Follow thesesteps again to relearn new transmitters, if necessary, in the future.Page 8 20630 / 2093020630 / 20930 Page 9
Step 9 - Adjusting Shock SensitivityYou can program the shock sensitivity level of your First Defense ® tomaximize sensitivity while reducing false alarms.TO ENTER PROGRAMMING MODE:1) Press button #3 for 10 seconds and then let go of the button onlyafter you have seen the confirmation light flashes or you will not enterthe programming mode! Once you have seen the confirmation lightflashes, you are ready to program your shock sensitivity.2) By pressing button #1(GREEN) buttonagain you can scroll through the differentlevels of shock. There are 8 levels of shockand 8 corresponding tones. The higher thenumber of flashes, the more sensitive thealarm is to shock. Remember, you aresimulating the shock which the car wouldfeel if someone were tampering with yourvehicle). Be very careful when using level7 or 8 as these are the most sensitve levelsof shock protection and this may cause yourunit to false alarm due to loud noises orminor vibrations produced by large truckspassing by, heavy machinery or heavy rainand thunder.Press button 3 for a 10seconds, to enterprogramming modeStep 10 - Choosing A Siren ToneYou can personalize your alarm's sound by selecting one of eightdifferent siren sounds.TO ENTER PROGRAMMING MODE:1) Press button #1 for 10 seconds and thenlet go of the button only after you have heardthe siren sound.2) By pressing the GREEN button #1 in thesiren sound selection mode, you can scrollthrough the various siren sounds until you findone you like (you will hear 2 seconds of theselected siren sound each time you scroll to asound).3) When you have settled on a favorite sound,simply press button #2 (RED) to exitprogramming mode and save the last soundplayed. If you don't press any buttons for 5seconds, you will automatically exit theprogramming mode.Press button 1 for a10 seconds, toenter programmingmode3) When you have settled on a proper sensitivity level, simply pressbutton #2 (RED) to exit programming mode and save this sensitivitylevel. If you don't press any buttons for 5 seconds, you willautomatically exit the programming mode with the setting of the lastnumber of flashes.Page 10 20630 / 2093020630 / 20930 Page 11
Step 11 - Trying Out the AlarmNow everything is complete and it is time to try out the system.• Press button #3 (yellow) and the headlights should comeon. They will turn off in 30 seconds or you can turn them offby pressing the YELLOW button again.• Press button #2 (red) for 1-2 seconds to get the CarFinder ®feature. The siren will sound for 1-2 seconds and the lightswill flash.• Press and hold button #2 (red) for 3 seconds to get the Panicmode. The alarm will sound and the lights will flash for 30seconds. You can turn off the alarm by pressing the REDbutton again.• Press button #1 (green) for 1 second. You will hear one chirpsignifying that the alarm is now armed. Open the car doorand the current draw caused by the interior dome light comingon will set off the car alarm. Hold down button #1 (green) for2 seconds to turn off the alarm. Push the left button again torearm the system. This time, hit the vehicle with your fist tosimulate a thief breaking into your car - and test out the shocksensor mode. Again, turn off the alarm by pressing button #1(GREEN) for 2 seconds.• Please note that any radio frequency type product is subjectto many conditions including interference from other products."Line-of-sight" range should be up to 400 feet in front of thevehicle, but will be less from different angles of the vehicleand under other conditions (such as being inside a buildingor other structure, or being in a high radio interference area).• The shock sensor and warn away have a zone bypass. If theshock is triggered 4 times within a 12 hour period, then theshock sensor zone will be bypassed for 12 hours. (Note:Wireless sensors do not have a zone bypass).Step 12 - Using with a Wireless SensorFirst Defense ® is capable of working with Wireless Alarm Sensor,models 20615 or 20915 (not included). The Wireless Alarm Sensoris a small device that will monitor a door like those on the back ofpickup trucks, truck caps, Tonneau covers or those on a tool box. Itallows the user to have multiple alarm trigger sources without theextra expense and hassle of hardwiring them to the alarm module.First Defense ® will work with up to any combination of up to eighthandheld transmitters or sensors. So, for example if you have twohandheld transmitters that you are using with the alarm, then themaximum number of sensors that can be added are six for a total ofeight. The unit is powered by an included lithium battery, which has alifespan of 1 - 3 years.The sensor consists of three pieces. The larger piece is the actualsensor and built-in transmitter that transmits its status to the alarmmodule. It is hardwired to a smaller piece that is a magnetic reedswitch. The other smaller piece is a magnet. The two smaller piecesmust be mounted next to each other using the self adhesive stripsthat come with the sensor or small screws. The hardwired pieceneeds to be mounted on a stationary portion or door frame, right nextto the other smaller piece which needs to be mounted on the piecethat swings open (i.e. the door). When the two are next to each otherthe magnet piece will hold the reed switch piece closed. When themagnet moves away from the reed switch, then the reed switch willsend a signal to the transmitter through the wires contected to it andthe larger transmitter piece will transmit a signal to the alarm that willcause it to trigger.The alarm will respond to a wireless sensor in one of three differentways depending on whether the alarm is armed or disarmed andwhether the Wireless Sensor battery is low or not:Unit is unarmed and the Wireless Sensor is triggered, then the alarmmodule will flash the lights one time.Unit is unarmed and the Wireless Sensor is triggered and the batteryPage 12 20630 / 2093020630 / 20930 Page 13
The alarm is armed and the Wireless Sensor is triggered, then thealarm will sound the siren and flash the lights to indicate an intrusionor break in attempt.Sensors must be coded to the alarm module just like a transmitterusing the Step 8 of the instructions on page 9.TroubleshootingAccessoriesDesignTech's Universal <strong>Remote</strong> Control Garage Door Opener system makesa great add-on to First Defense ® . The Garage Door Opener can learn yourtransmitter's code, allowing you to open your garage using the First Defense ®remote which is already on your key chain. For greater convenience, you canadd up to 4 remote transmitters so all the drivers in your family can have along-range, convenient remote control garage door opener.This is a perfect add-on for those who:• Can't find a replacement for their old garage door opener remoteNothing Happens At All: Be sure that the fuse is securely in theRed wire coming from the siren body and that power is reaching theunit (test by using a voltage tester on the Red wire to find +12 Volts).Also, review transmitter learning. Refer to step 8.The Fuse Blows Every Time: Disconnect the Yellow wire and tryagain. If the fuse doesn't blow with the Yellow wire disconnected,then the only problem is that you are not on the low beam wire comingoff the back of the head lamp. Refer to step 4.If The Headlights Don't Work: Using a Voltmeter or test light, makesure the Yellow wire is Scotch-Locked to the low-beam headlightwire that is "hot" (+12 volts) when the low beams are on. Refer tostep 4.General MaintenanceThis product should provide years of service.Remember to replace the battery in the transmitter every 4-5 years.The battery type is CR2032 lithium. Most camera stores carry thistype of battery or they can be ordered from DesignTech.For any questions concerning usage or installation of this product,please call 1-800-337-4468.• Want longer range from their remote (this unit has up to 300 ft.range).• Want to get rid of that clunky old remote control and replace it witha miniature, lightweight remote transmitter.• Need more transmitters than came with the original garage dooropener system.Note that the Universal <strong>Remote</strong> Control Garage Door Opener does not displaceyour existing garage door controller. Rather, this system enables youto use both your old and your new transmitters to control your garage dooropener. Please call your local DesignTech sales outlet or call DesignTech at1-800-337-4468 for more information.Description Part # PriceExtra lithium battery for transmitter 20059 $7.95<strong>Remote</strong> Control Garage Door Opener Module 30021 $49.95Extra 3 Button Transmitter 20069 $49.95Wireless Alarm Sensor 20615 $49.95Prices are in U.S. dollars and include shipping and handling.This device complies with Part 15 of the FCC Rules. Operation is subject to the following two conditions:(1) this device may not cause harmful interference, and (2) this device must accept any interferencereceived, including interference that may cause undesired operation.FCC ID: ELGDIY2 & ELGWASDOC: _____________User is cautioned that changes or modifications not expressly approved by DesignTechcould void the user's authority to operate this equipment.Covered under US Patent Number: 5,783,9887955 Cameron Brown Ct.; Springfield, Virginia USA 22153Tel: (703) 866-2000 or (800) 337-4468www.designtech-intl.comPage 14 20630 / 2093020630 / 20930 Page 15
LIMITED WARRANTYDesignTech International, Inc. Warrants to the original consumer/purchaser that this productshall be free of defects in material and workmanship under normal use and circumstancesfor a period of two (2) years from the date of original purchase for use. When the originalconsumer/purchaser returns the product to DesignTech International Inc., 7955 CameronBrown Court, Springfield, Virginia 22153, USA within the warranty period, and if the productis defective DesignTech International, Inc. will at its option repair or replace such.This warranty shall constitute the sole liability of DesignTech International, Inc. concerningthe product. DesignTech International, Inc. expressly disclaims all other warranties INCLUD-ING, WITHOUT LIMITATION, THE WARRANTIES OF MERCHANT ABILITY AND FITNESS FOR APARTICULAR PURPOSE. NO PERSON, FIRM , OR CORPORATION IS AUTHORIZED TO AS-SUME FOR DESIGNTECH INTERNATIONAL, INC. ANY OTHER LIABILITY IN CONNECTIONWITH THE SALE AND USE OF THE PRODUCT. DesignTech International, Inc. and agents anddistributors will bear no liability whatsoever for incidental or consequential damages orcharges of any kind.Some states do not allow the exclusion or limitation of incidental or consequential damages,so the above disclaimer regarding incidental or consequential damages may not apply toyou.Please complete the warranty registration card below and mail with proof of purchase to:DesignTech International, Inc., 7955 Cameron Brown Court, Springfield, Virginia 22153-2809, USA within ten (10) days after date of purchase.This warranty is void if the product or has been damaged or tampered with or if the productor any such parts have been opened. In all cases of damage during shipment, a claim mustbe filed with the shipping carrier and not with DesignTech International, Inc.This warranty gives you specific legal rights; you may also have other rights which varyfrom state to state.OUT OF WARRANTY REPAIRSDesignTech International, Inc. will at its option either (1) replace this product with a functionallysimilar (but not necessarily visually identical) refurbished product or (2) repair theoriginal product and return it to the original consumer/purchaser C.O.D. covering all reasonablerepair or replacement charges if the product is returned prepaid to DesignTech International,Inc., 7955 Cameron Brown Court, Springfield, VIRGINIA 22153, USA, after the twoyear warranty period has expired.__________________________________________________________________________Please return this registration card within ten (10) days of purchase.NAME_________________________________________________User's Age___________ADDRESS________________________________________________________________________________________________________________________________________City State ZipPLACE OF PURCHASE_________________________DATE OF PURCHASE____________Product Purchased: FIRST DEFENSE ® #20630/20930Purchased for : __________YOURSELF _________SPOUSE__________OTHER FAMILY MEMBER _________FRIENDWho installed this alarm?Where did you learn about this product?__________________________________________Vehicle Make:__________________Vehicle Model:________________Year:_______________________Please send me FREE information on other innovative DesignTech products.Page 16 20630 / 20930