Installation Guide and Tips - Metal Deck/Fire Proofed ... - BlazeFrame
Installation Guide and Tips - Metal Deck/Fire Proofed ... - BlazeFrame
Installation Guide and Tips - Metal Deck/Fire Proofed ... - BlazeFrame
- No tags were found...

You also want an ePaper? Increase the reach of your titles
YUMPU automatically turns print PDFs into web optimized ePapers that Google loves.
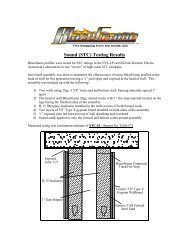
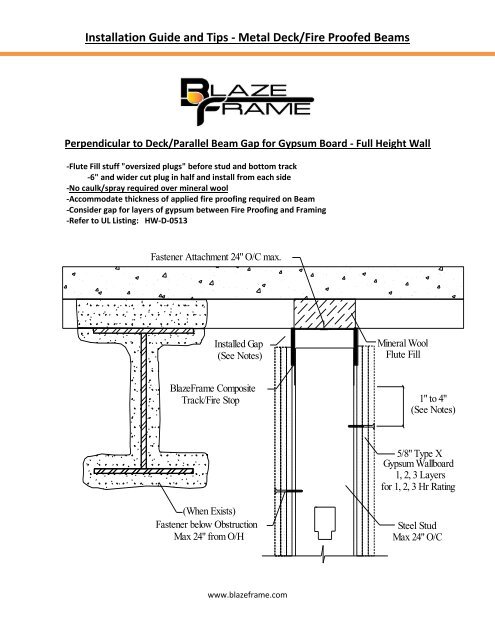
<strong>Installation</strong> <strong>Guide</strong> <strong>and</strong> <strong>Tips</strong> - <strong>Metal</strong> <strong>Deck</strong>/<strong>Fire</strong> <strong>Proofed</strong> BeamsPerpendicular to <strong>Deck</strong>/Parallel Beam Gap for Gypsum Board - Full Height Wall-Flute Fill stuff "oversized plugs" before stud <strong>and</strong> bottom track-6" <strong>and</strong> wider cut plug in half <strong>and</strong> install from each side-No caulk/spray required over mineral wool-Accommodate thickness of applied fire proofing required on Beam-Consider gap for layers of gypsum between <strong>Fire</strong> Proofing <strong>and</strong> Framing-Refer to UL Listing: HW-D-0513Fastener Attachment 24" O/C max.Installed Gap(See Notes)Mineral WoolFlute Fill<strong>BlazeFrame</strong> CompositeTrack/<strong>Fire</strong> Stop1" to 4"(See Notes)5/8" Type XGypsum Wallboard1, 2, 3 Layersfor 1, 2, 3 Hr Rating(When Exists)Fastener below ObstructionMax 24" from O/HSteel StudMax 24" O/Cwww.blazeframe.com
<strong>Installation</strong> <strong>Guide</strong> <strong>and</strong> <strong>Tips</strong> - <strong>Metal</strong> <strong>Deck</strong>/<strong>Fire</strong> <strong>Proofed</strong> BeamsParallel Underneath Beam - Offset Leg Profile Option-Use <strong>BlazeFrame</strong> offset leg profile-Install prior to fire proofing (no z-clips required)-Order “upper leg” of track to thickest <strong>Fire</strong> Proofing required – (one size fits all)-Scrape fire proofing materials away to top of intumescent-Refer to UL Listing: HW-D-0502<strong>Metal</strong> Pan <strong>Deck</strong><strong>Fire</strong> Proofing(Thickness by Others)Structural Steel SupportFastener Attachment24" O/C max.Installed Gap(See Notes)<strong>BlazeFrame</strong> CompositeTrack/<strong>Fire</strong> Stop"OL" - Series1" to 4"(See Notes)5/8" Type XGypsum WallboardSteel StudMax 24" O/Cwww.blazeframe.com
<strong>Installation</strong> <strong>Guide</strong> <strong>and</strong> <strong>Tips</strong> - <strong>Metal</strong> <strong>Deck</strong>/<strong>Fire</strong> <strong>Proofed</strong> BeamsParallel Cantilevered Under Beam-14ga Angle or Flat Stock Outrigger with <strong>BlazeFrame</strong> Offset Leg profile-Assemble Outrigger to Offset Leg profile on ground-Attach Outrigger/Offset Leg assembly to underside of Beam before fire proofing-<strong>Fire</strong> proof beam filling area above Outrigger/Offset leg assembly- Scrape fire proofing materials away to top of intumescent-Refer to UL Listing: HW-D-0502<strong>Metal</strong> Pan <strong>Deck</strong><strong>Fire</strong> Proofing(Thickness by Others)Structural SteelSupportMin. 14ga strap/anglefastened to web <strong>and</strong>opposing offset legFastener Attachment16" O/C max.Installed Gap(See Notes)<strong>BlazeFrame</strong> CompositeTrack/<strong>Fire</strong> Stop"OL" - Series1" to 4"(See Notes)5/8" Type XGypsum WallboardSteel StudMax 24" O/Cwww.blazeframe.com
<strong>Installation</strong> <strong>Guide</strong> <strong>and</strong> <strong>Tips</strong> - <strong>Metal</strong> <strong>Deck</strong>/<strong>Fire</strong> <strong>Proofed</strong> BeamsParallel Under Beam - Z-Clips <strong>and</strong> St<strong>and</strong>ard Profile Option-Use Z-Clips <strong>and</strong> st<strong>and</strong>ard <strong>BlazeFrame</strong> profile-Fill <strong>and</strong> seal all voids above <strong>BlazeFrame</strong> with additional fire proofing or caulking materials-Refer to UL Listing: HW-D-0502<strong>Metal</strong> Pan <strong>Deck</strong><strong>Fire</strong> Proofing(Thickness By Others)Structural Steel SupportZ-Clip Attachment Clips(16" O/C)Installed Gap(See Notes)<strong>BlazeFrame</strong> CompositeTrack/<strong>Fire</strong> StopFastener Attachment intoZ-Clips 16" O/C1" to 4"(See Notes)5/8 Type XGypsum WallboardSteel StudMax 24" O/Cwww.blazeframe.com
<strong>Installation</strong> <strong>Guide</strong> <strong>and</strong> <strong>Tips</strong> - <strong>Metal</strong> <strong>Deck</strong>/<strong>Fire</strong> <strong>Proofed</strong> BeamsParallel Under Beam - Attach through <strong>Fire</strong> Proofing Option-<strong>Fire</strong> Proofing less than 1" - attach through <strong>Fire</strong> Proofing st<strong>and</strong>ard <strong>BlazeFrame</strong> profile-Fastener attachment <strong>and</strong> load capacity per fastener manufacturer- Fill <strong>and</strong> seal all voids above <strong>BlazeFrame</strong> with additional fire proofing or caulking<strong>Metal</strong> Pan <strong>Deck</strong><strong>Fire</strong> Proofing(Thickness By Others)Structural Steel SupportZ-Clip Attachment Clips(16" O/C)Installed Gap(See Notes)<strong>BlazeFrame</strong> CompositeTrack/<strong>Fire</strong> StopFastener Attachment intothrough <strong>Fire</strong> Proofing1" to 4"(See Notes)5/8 Type XGypsum WallboardSteel StudMax 24" O/Cwww.blazeframe.com
<strong>Installation</strong> <strong>Guide</strong> <strong>and</strong> <strong>Tips</strong> - <strong>Metal</strong> <strong>Deck</strong>/<strong>Fire</strong> <strong>Proofed</strong> BeamsBeam Penetration - "Horse shoe" Framing around Beam-<strong>Fire</strong> proofing or mineral wool "beam pocket fill"-Square cut drywall around beam-See Additional Install Framing Methods/Options:-Appendix A - Offset Leg Assembly - <strong>Fire</strong> Proofing Flute Fill - (Install Pre-<strong>Fire</strong> Proofing)-Appendix B - Snipped Single Track - Mineral Wool Flute Fill - (Install Post <strong>Fire</strong> Proofing)-Appendix C - Tabbed Track Assembly - Mineral Wool Flute Fill - (Install Post <strong>Fire</strong> Proofing)<strong>Metal</strong> Pan <strong>Deck</strong>Angle or Z-clipattached to beam orSteel Track Frame<strong>BlazeFrame</strong>CompositeTrack/<strong>Fire</strong> Stop<strong>Fire</strong> Proofing orMineral Wool onlyencompass angle or z-clipSteel StudMax 24" O/C5/8 Type XGypsum Wallboardwww.blazeframe.com
<strong>Installation</strong> <strong>Guide</strong> <strong>and</strong> <strong>Tips</strong> - <strong>Metal</strong> <strong>Deck</strong>/<strong>Fire</strong> <strong>Proofed</strong> BeamsParallel to Flute - Flute Cover (No Mineral Wool Required)-Install <strong>BlazeFrame</strong> FC (flute cover) over fluted areas-No wool required above-Fasten <strong>BlazeFrame</strong> Profile to Flute Cover-Open end conditions "cap" with min 4” length of Mineral Wool compressed 33%Fastener Attachment 16" O/C max.Fastener Attachment 24" O/C max.Installed Gap(See Notes)<strong>BlazeFrame</strong> CompositeTrack/<strong>Fire</strong> Stop<strong>BlazeFrame</strong> (FC)Flute Cover(Continuous)1" to 4"(See Notes)5/8 Type XGypsum WallboardSteel StudMax 24" O/CMin. 4 pcf Mineral WoolCompress min. 33%Concrete FillExtend min. 4" inwardinto flute above Flute CoverMin. 4 pcf Mineral WoolCompress min. 33%Extend min. 4" inwardinto flute above Flute CoverInstalled Gap(See Notes)<strong>BlazeFrame</strong> CompositeTrack/<strong>Fire</strong> Stop5/8 Type XGypsum WallboardMax 24" O/CSteel Studwww.blazeframe.com
<strong>Installation</strong> <strong>Guide</strong> <strong>and</strong> <strong>Tips</strong> - <strong>Metal</strong> <strong>Deck</strong>/<strong>Fire</strong> <strong>Proofed</strong> BeamsInstall Exterior Corner - ECA (End Cap Angle) ClipsSingle, Chase, <strong>and</strong> Shaft Wall (Head, Vertical, & Bottom Joint Protection)--Keep track ends butted-Exposed "finished look" gaps in substrate apply bead of black caulk (no daylight pass through)Install Exterior Corner - use ECA (End Cap Angle) ClipsTop ViewInsert ECA into trackTop ViewSide ViewInsert ECA into trackECA inside trackattached with fastenerIntersecting wall<strong>BlazeFrame</strong> buttedagainst intumescentDrywall <strong>Installation</strong> - Notch or slot "slider sheet " corner to accommodate intersecting tracksNotched Drywall "Corner Void""Slot Accomodate Track leg"Depth ofTrack LegDepth ofTrack LegWidth ofTrack ProfileWidth ofTrack Legwww.blazeframe.com
<strong>Installation</strong> <strong>Guide</strong> <strong>and</strong> <strong>Tips</strong> - <strong>Metal</strong> <strong>Deck</strong>/<strong>Fire</strong> <strong>Proofed</strong> BeamsInstall "Offset Jog" in wall layoutTop ViewInsert ECA into trackTop ViewIntumescent of oppsing ECAProfiles in "butted" contactInstall "Large Offset Jog" in wall layoutTop View<strong>BlazeFrame</strong> ECA(End Cap Angle)<strong>BlazeFrame</strong> OSA or IANFSpan outer leg to outer leg<strong>BlazeFrame</strong> OSA or IANFSpan inner leg to inner leg<strong>BlazeFrame</strong> ECA(End Cap Angle)<strong>BlazeFrame</strong> TrackProfilewww.blazeframe.com
<strong>Installation</strong> <strong>Guide</strong> <strong>and</strong> <strong>Tips</strong> - <strong>Metal</strong> <strong>Deck</strong>/<strong>Fire</strong> <strong>Proofed</strong> BeamsBypass Framing for "Cast in Place" or Vertical Cavity Obstructions eliminate Web Cut OutsOption A - Inside Angle BypassISAF (Slotted Vertical Leg) ProfileIANF (Solid Vertical Leg) Profile1.25"1.25"(L)(I)(S)(L)(I)I = Intumescent Strip Width - (to Match Opposing Track Profiles)Side ViewTop View Cast in Place BypassConcreteWall Cavity Penetration(i.e. conduit/pipe)<strong>BlazeFrame</strong> Profile<strong>BlazeFrame</strong> ISAF orIANF ProfileVertical Floor Penetrations(i.e. conduit/pipe)<strong>BlazeFrame</strong> Profile<strong>BlazeFrame</strong> "ISAF" or"IANF" Profile<strong>BlazeFrame</strong> Profilewww.blazeframe.com
<strong>Installation</strong> <strong>Guide</strong> <strong>and</strong> <strong>Tips</strong> - <strong>Metal</strong> <strong>Deck</strong>/<strong>Fire</strong> <strong>Proofed</strong> BeamsOption B - Utilize FSP (flat strap patch) to patch "leg cut out"Top ViewSide View<strong>BlazeFrame</strong> FSP(Flatstrap Patch)Fasten FSP to outersurface of track legOption C - Utilize pre-punched SKAB (Service Knockout Bridge) profiles from <strong>BlazeFrame</strong>"Service Knockouts in SKB Profile"www.blazeframe.com