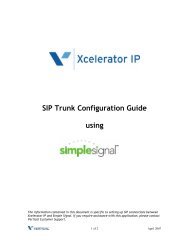
Application Note – LAN Configuration Scenarios – IP ... - Vertical
Application Note – LAN Configuration Scenarios – IP ... - Vertical
Application Note – LAN Configuration Scenarios – IP ... - Vertical

Create successful ePaper yourself
Turn your PDF publications into a flip-book with our unique Google optimized e-Paper software.
<strong>Application</strong> <strong>Note</strong> <strong>–</strong> <strong>LAN</strong> <strong>Configuration</strong> <strong>Scenarios</strong> <strong>–</strong> <strong>IP</strong> Addressing<br />
Xcelerator <strong>IP</strong> 07008<br />
This <strong>Application</strong> <strong>Note</strong> covers two scenarios for applying <strong>IP</strong> addresses to Xcelerator <strong>IP</strong> and <strong>IP</strong>2007<br />
phones on the internal <strong>LAN</strong> side of Xcelerator <strong>IP</strong>.<br />
The first scenario we are going to look at is a site that already has a cable modem or DSL modem<br />
with a built-in router. For this type of installation the best solution would be to have a cable or DSL<br />
modem minus the router portion. You would install the Xcelerator <strong>IP</strong> off the cable/DSL modem<br />
and let Xcelerator <strong>IP</strong> handle the voice and data routing. If that is not an option, what needs to be<br />
done is to make sure that the <strong>LAN</strong> side of the Cable/DSL modem with the built in router is not<br />
using the same subnet as the <strong>LAN</strong> side of Xcelerator <strong>IP</strong>. If they are both in the same <strong>LAN</strong> subnet<br />
no routing will take place.<br />
The second scenario we will discuss is when installing the device within an existing network with<br />
a file server/DHCP server that the end user wants use to assign <strong>IP</strong> addresses for their computers.<br />
In this case we will need to mesh the Xcelerator <strong>IP</strong> into the existing data network environment.<br />
There are two ways this can be accomplished.<br />
The first method would be to make the <strong>LAN</strong> side of the Xcelerator <strong>IP</strong> a static <strong>IP</strong> address that the<br />
IT dept. has taken out of its DHCP pool. You will need one <strong>IP</strong> address for the Xcelerator <strong>IP</strong> <strong>LAN</strong><br />
address, and one <strong>IP</strong> address for each of the <strong>IP</strong>2007 phones.<br />
The second method would be to let the file server/DHCP server hand out the <strong>IP</strong> addresses to the<br />
phones and the IT dept. pull one <strong>IP</strong> address out of the DHCP pool that can be assigned statically<br />
on the <strong>LAN</strong> side of the Xcelerator <strong>IP</strong>. Then, all that is required is to log into the phone, and under<br />
the S<strong>IP</strong> configuration page, set the S<strong>IP</strong> Proxy Server to be the <strong>LAN</strong> address of the Xcelerator <strong>IP</strong>,<br />
and setup the subscriber information.<br />
Lets discuss the second method first. It will be less time consuming, considering that in the first<br />
method you have to statically assign an <strong>IP</strong> address to each of the phones, whereas in the second<br />
method you let the phones get their <strong>IP</strong> address from existing DHCP server.<br />
For this example, the IT Dept. set aside an <strong>IP</strong> address of 192.168.10.200 with a subnet mask of<br />
255.255.255.0 (/24) to be used as the statically assigned <strong>LAN</strong> <strong>IP</strong> address of the Xcelerator <strong>IP</strong>.<br />
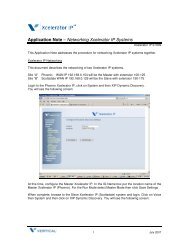
After obtaining the address, setup the Static <strong>LAN</strong> <strong>IP</strong> address on the Xcelerator <strong>IP</strong>. To do this, log<br />
into the Xcelerator <strong>IP</strong> and on the left side of the screen click on Advanced then click on <strong>LAN</strong>. You<br />
will see the screen below.<br />
1 of 7 July 2007
The default <strong>LAN</strong> <strong>IP</strong> address is 192.168.1.1 with a subnet mask of 255.255.255.0 (/24). Change<br />
the default <strong>IP</strong> address to the one given to you by the IT Dept (192.168.10.200 /24) to configure<br />
the <strong>LAN</strong> address as shown in the next screenshot.<br />
The <strong>LAN</strong> <strong>IP</strong> address has now been changed to 192.168.10.200 . The subnet mask remains the<br />
same as default and the option to disable the DHCP server has been chosen. Scroll down to the<br />
bottom of the page and click on Save. You will get a pop up message telling you that you should<br />
reboot the system before settings are valid.<br />
2 of 7 July 2007
Click OK, then scroll down the page again and click Reboot. You will see the following screen<br />
This screen advises you to “Close the Xcelerator <strong>IP</strong> configuration window and wait 2 min. before<br />
reopening you web browser. If necessary, reconfigure your PC’s <strong>IP</strong> address to match you new<br />
configuration”. And since we changed the <strong>LAN</strong> <strong>IP</strong> address we will need to release and renew our<br />
<strong>IP</strong> address on the PC that is being used to configure the Xcelerator <strong>IP</strong>.<br />
Now that we have a static <strong>IP</strong> address assigned to the <strong>LAN</strong> side of the Xcelerator <strong>IP</strong> and released<br />
and renewed our <strong>IP</strong> address of the machine, we will need to log into the Xcelerator <strong>IP</strong> and on the<br />
left side of the screen we need to click on Voice then Phone and then click on Phone Extension.<br />
You will see the following screen:<br />
3 of 7 July 2007
This page allows you to configure the Authentication for S<strong>IP</strong> Clients (stations). Here we can enter<br />
the extension numbers and the password used for Authentication. To simplify the process, we are<br />
going to use the same password for all extensions connected to the system. Assuming we have<br />
extensions 100-110, and starting at No. 1, enter the first extension number and its password.<br />
Continue to input the data for all extensions up to 110. See the following screen shot for<br />
clarification.<br />
4 of 7 July 2007
When all extensions and passwords have been entered scroll to the bottom of the page and click<br />
“Save Settings”<br />
We can now start configuration of the <strong>IP</strong>2007 phones. Plug the <strong>IP</strong>2007 phones into the local area<br />
network and let them pull an <strong>IP</strong> address from the local networks File/DHCP server. If the phones<br />
pull an <strong>IP</strong> address from the DHCP server the phones should come up looking like they are<br />
working, but they will have the wrong time and date and they all say they are ext. 1001. This is<br />
normal.<br />
At one of the phones press the softkey labeled Config in the screen. Using the arrow keys or the<br />
volume up/down key to navigate, scroll down to “ 5. Info”. Press the checkmark key and scroll<br />
down to the <strong>IP</strong> address of the phone and write it down. Do this for all the <strong>IP</strong>2007 phones and<br />
assign an extension number to each of the <strong>IP</strong> addresses so that when you go to configure the<br />
phone you will know which extension will be assigned to the phone that you logged into.<br />
This concludes the process for manually configuring a static <strong>IP</strong> address scheme for the <strong>IP</strong>2007<br />
phones..<br />
The next section will cover configuring the <strong>IP</strong>2007 phones that have pulled an <strong>IP</strong> address from<br />
the File/DHCP server on the local network.<br />
From a browser on a PC connected to the local network we can configure the phones to work<br />
with the Xcelerator <strong>IP</strong>.<br />
Assume that the 10 <strong>IP</strong> 2007 phones that we put on the network pulled <strong>IP</strong> addresses that started<br />
with 192.169.10.26 thru 192.168.10.36. From your browser put the <strong>IP</strong> address of the first phone<br />
you wish to configure in the address bar of your. Lets start with the phone with the <strong>IP</strong> address of<br />
192.168.10.26. We will be making this address station 100. When you get to the login screen<br />
enter the username: admin, and the password: 1234. You will get to this screen. (This is not the<br />
actual screen shot, the <strong>IP</strong> address for the phone is not correct. It is for demonstration purposes<br />
only).<br />
5 of 7 July 2007
Across the top of the screen towards the left you will see a tab called S<strong>IP</strong>, click on it and you will<br />
get to the next screen.<br />
Here is where we tell the phone where the S<strong>IP</strong> Server is (Xcelerator <strong>IP</strong>).<br />
6 of 7 July 2007
Here you can see what was changed.<br />
• S<strong>IP</strong> Proxy Server was changed to 192.168.10.200.<br />
• Registrar Server has been changed to 192.168.10.200<br />
• Under Subscriber information, the Phone Number was changed to 100<br />
• Authorized ID was changed to 100<br />
• Authorized Password was changed to 1234.<br />
After all changes have been made scroll to the bottom of the page and click on the Save Setting<br />
button. You do not need to reboot the phone after making these changes. The <strong>IP</strong>2007 phone will<br />
go out and find the Xcelerator <strong>IP</strong> and put the phone into service.<br />
At this point look at the Phone, there is a small icon of a phone on the right side of the screen, if<br />
the phone has an x in the corner of it, the <strong>IP</strong>2007 did not register correctly and you should verify<br />
all settings. If the phone icon is solid with no x in the corner the <strong>IP</strong>2007 phone registered properly<br />
and is communicating with the Xcelerator <strong>IP</strong>.<br />
Complete this process for the remainder of the phone connected to the system.<br />
This completes the process for configuring <strong>IP</strong>2007 phones using DHCP server for assigning the<br />
<strong>IP</strong> address to the <strong>IP</strong>2007 phone.<br />
If you have any questions, please contact <strong>Vertical</strong> Customer Support.<br />
7 of 7 July 2007