Einbauanleitung PM03 english - Dectane
Einbauanleitung PM03 english - Dectane
Einbauanleitung PM03 english - Dectane
- No tags were found...

Create successful ePaper yourself
Turn your PDF publications into a flip-book with our unique Google optimized e-Paper software.
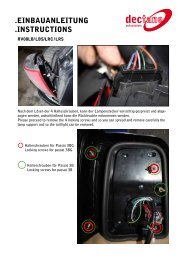
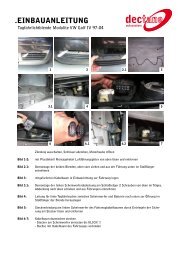
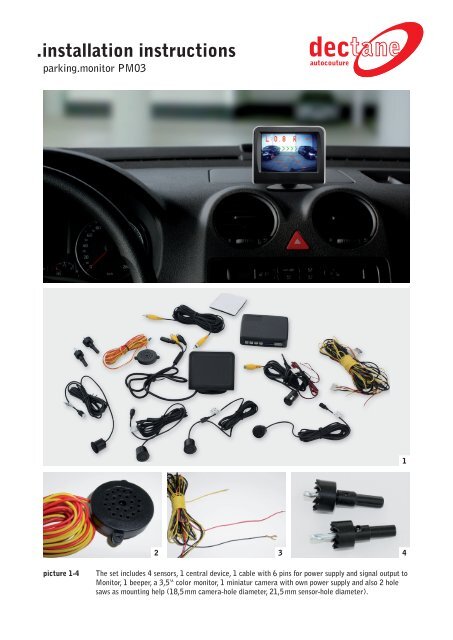
. installation instructionsparking.monitor <strong>PM03</strong>autocouture123 4picture 1-4The set includes 4 sensors, 1 central device, 1 cable with 6 pins for power supply and signal output toMonitor, 1 beeper, a 3,5“ color monitor, 1 miniatur camera with own power supply and also 2 holesaws as mounting help (18,5 mm camera-hole diameter, 21,5 mm sensor-hole diameter).
. installation instructionsparking.monitor <strong>PM03</strong>autocouture5 6 78 9 101112 13picture 5-6picture 7-9picture 10-13Begin with drilling the holes in the bumper on backside of car for the sensors.Therefore such the middle of the cars bumper and divide the lenght in 4 equal distance.Between the middled 4 points are more or less ca.400mm dependent of car type.Marking the needed points and begin to drill the holes with the delivered hole saw (21,5 mm diameter).Put the sensor cables into this holes of bumper and fit the sensors close into the holes.Take care of sensors order, begin from left to right with L,M,M1,R (see on cable stickers).Dismantle the bumper and also all car parts you have to remove for mounting the cables and centraldevice inside the car.Search a good, dry and easy recoverble place to fit the central device inside of car.Use the tape on backside of cenrtal device to fix them. Be advised the maximum length of sensorcable is 2450 mm.
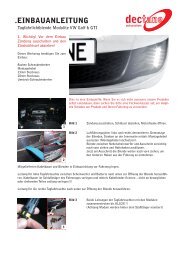
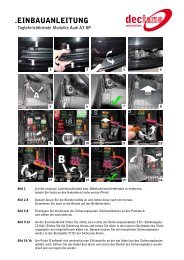
. installation instructionsparking.monitor <strong>PM03</strong>autocoutureignition (+12 V plus)reverse light(+12 V plus)ground (-minus)14 151617 181920 2122picture 14-17Connect the blue 2-pin connector for beeper into the central device and the white 6-pin forsignal output to display and power supply also into the central device. Use the tape on backside ofbeeper to fix them.Put the signal cable (cinch) along into car up to dashboard where the monitor will be mounted.Used the tape under monitors feed to fit them.Connect the black cable of power supply direct with ground (- minus) of car and the red cable withreverse light (+12 V plus), or direct with reverse gear switch (+12 V plus) to get signal input to turnon the parking.monitor function. The yellow cable have to be connected with ignition plus (+12 V) ofcar.picture 18-22For miniature-camera is needed a minimum mounting level of 500 mm from ground base.Use therefore the delievered hole saw of 18,5 mm or remove the lock cylinder from tailgate in caseof the car have central locking to build in the miniature-camera (for example Volkswagen Caddy,Volkswagen T5 and many more).
. installation instructionsparking.monitor <strong>PM03</strong>autocouturereverse light(+12 V plus)ground (-minus)2324 2526 27 28picture 23-26 Connect the black cable to ground (-minus) of car and red cable of miniature-camera power supplydirectly with with reverse light (+12 V plus), or direct with reverse gear switch (+12 V plus).Use the ca. 6 m long cinch-cable between the miniature-camera and monitor to transfer the videosignal.Please be advised of the different cable plans of each car type while connecting the cables.If you be uncertain please contact the workshop or car dealer they do you trust.After all is connected and the cable are fixed and fitted, take care that the cables can not be rubbed or cutted while driving.Do a function test of all:1. Put in the reverse gear -> signal is beeping 1x & monitor switch on2. it shows the picture of miniature-camera on monitor display with adjustment signs and distancemessuring on it.3. drive slowly backward to a obstacle/subject to proof the beep signal and distance messuring,if it will beep faster when you come closer and distance messuring is working.ATTENTION! Take care that no person is in backside of car while testing.4. Drive slowly closer to obstacle/subject and check the function on monitor. Distance have to beshowed on display (1.2 m) also it have be showed the picture with adjustment signs.picture 27-28 In backside of monitor are 3 buttons to adjust saturation, brightness, contrast and more optionsfor monitor.Press „M“ for menu and selections. Press „^“ for increasing and „v“ for decreasing the wishedadjustments.