Einbauanleitung RO26LL - Dectane
Einbauanleitung RO26LL - Dectane
Einbauanleitung RO26LL - Dectane
- No tags were found...

You also want an ePaper? Increase the reach of your titles
YUMPU automatically turns print PDFs into web optimized ePapers that Google loves.
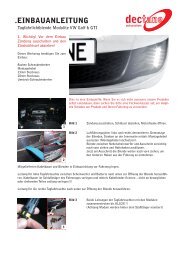
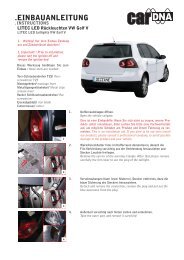
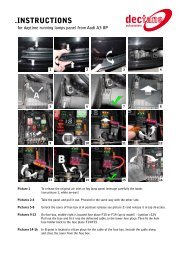
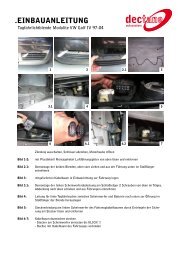
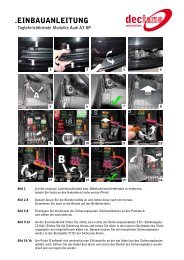
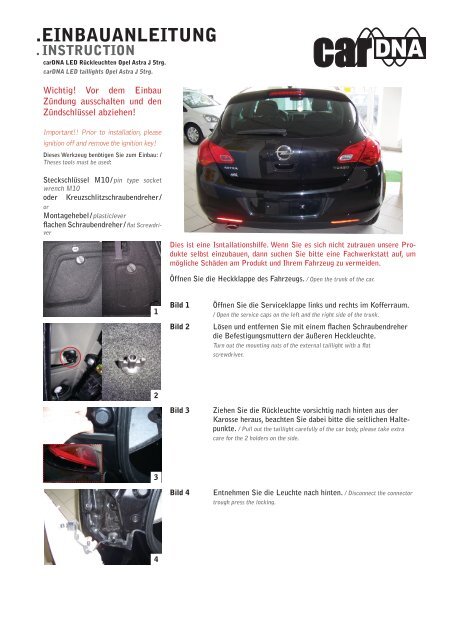
. EINBAUANLEITUNG. INSTRUCTIONcarDNA LED Rückleuchten Opel Astra J 5trg.carDNA LED taillights Opel Astra J 5trg.Bild 5Stecker an der Originalrückleuchte durch Drücken der Verriegelungentfernen.Push the locking nose in the connector and disconnect the connectorof the original taillight.5Bild 6Lösen Sie die 3 Steckverbindungen der Controlbox vom Außenteil./ Build out the control boxes of the outside parts ( 3 holders )6Bild 7Entfernen Sie die Gummitülle aus der Karosse zur Durchführungder Leitungen der Controlbox und verlegen Sie diese inden Innenraum. / Remove the rubber pad out of the car body and laythem through the cable in the car.7Bild 7Setzen Sie nun die neue Leuchte in die Karosse ein.Jetzt schließen Sie die Steckverbindungen am Kabelbaum desFahrzeuges an, verbinden 3 Stecker der Controlbox und klebendiese an die Controlbox fest. / Build in the new taillight in the car bodyand connect the connectors of the car with the connectors of the taillight andconnect the control box and stick these on the control box.7Bild 8Entfernen Sie die Gummiabdeckungen an der Heckklappe./ Remove the rubber pad on the tailgate.8Bild 9Öffnen Sie die Serviceklappen an der Heckklappe. / Open theservice caps on the tailgate.9
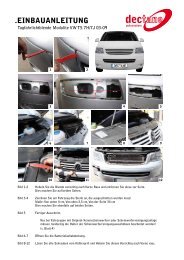
. EINBAUANLEITUNG. INSTRUCTIONcarDNA LED Rückleuchten Opel Astra J 5trg.carDNA LED taillights Opel Astra J 5trg.10Bild 10 Lösen und entfernen Sie die 3 Befestigungsschrauben M10./ Build out the 3 screws on the trunk piece and take out the taillight.Bild 11Entnehmen Sie das Innenteil nach außen. / Remove the inner part.11Bild 12Entfernen Sie durch Entriegeln der Spange den Stecker desInnenteils. / Build out the clip on the connector and disconnect it.12Bild 13Entfernen Sie die Controlbox des neuen Innenteils und führenSie die Leitung durch die Heckklappe nach Innen. / Remove thecontrol box of the new trunk piece and lay in the wires in the tailgate.13Bauen Sie das Innenteil in umgekehrter Reihenfolge wiederein. / Build in the taillight in the same way you build it out.Verbinden Sie nun noch die Leitungen der Controlbox und desFahrzeuges mit denen der Leuchte. / Connect the connectors of thecontrol box and of the car to the connectors of the taillight.Führen Sie immer einen Funktionstest vor der ersten Fahrt durch!Always perform a functional test before the first run through!Fertig! <strong>Dectane</strong> wünscht gute Fahrt!Ready! <strong>Dectane</strong> wishes a safe journey!