Installation InstructionsBuilding Design and ConstructionIn order to ensure the anticipated per<strong>for</strong>mance and longevity,protect metal panels from potentially corrosive situations and materials.When treated lumber will be in direct contact with metal panels or flashingsplease note the following: Galvanized steel is compatible with theCCA (Chromated Copper Arsenate) pressure-treated lumber that waspredominantly used be<strong>for</strong>e 2004, but not with the older Penta treatedlumber or the new ACQ (Alkaline Copper Quartenary), CA (CopperAzole), or CBA (Copper Boron Azole). Stainless steel or other specialtreated fasteners should be used into these non-compatible pressuretreated lumbers. Aluminum must be separated from contact with alltreated wood since the soluble copper in the preservative is corrosive toaluminum. Likewise, dissimilar metals also require a protective barrierbetween them to prevent galvanic corrosion. Request FABRAL TechnicalBulletins #803, 106, and 107 <strong>for</strong> more in<strong>for</strong>mation on treated lumberand dissimilar metals.Plastic, builders’ felt, bituminous paint, caulking, or gasketmaterial may be used to separate panels from treated woodand dissimilar metals. When using aluminum panels in direct contactwith steel, use a separator as described above and fasten with StainlessSteel screws.Fertilizer, lime, acids, feeds, manure, soils, and many othercompounds also cause corrosion in metal panels. Contact betweenmetal panels and any potentially corrosive materials should be prevented.Porous insulation materials may absorb and retain moisture,and should not be used in direct contact with metal panels. Use a vaporbarrier such as polyethylene plastic or 30-lb felt to prevent moisturefrom contacting both the insulation and the metal panel.FABRAL’s translucent panels are intended <strong>for</strong> siding applicationsonly. In all situations, foot traffic should be avoided on translucentpanels. Translucent panels used in roofing applications will break downin a short time and cause staining and premature corrosion of the metalpanels below. If used on roofs, apply butyl caulking to separate thefiberglass panels from the metal. Translucent panels should be cleanedand sealed regularly, as recommended by the translucent panel manufacturer.Purlins, Girts and Roof DeckThe substructure to which the metal panels are fastened mustbe properly spaced and sufficiently thick to provide a roof or wall systemable to meet required design loads.A 2” nominal lumber thickness provides the maximum pulloutvalues <strong>for</strong> both screws and nails when the fasteners penetrate aminimum of 1” into the wood. Since 1” nominal lumber and solid deckingare thinner, they provide somewhat lower pullout values. When usingpurlins, FABRAL recommends a maximum spacing of 24” on-center(note that 5V requires solid decking). Pullout values decrease if thefasteners protrude completely through the purlins. Kiln-dried softwoodis recommended <strong>for</strong> purlins or decking (pine, fir, hemlock, and spruce).Hardwoods are difficult to fasten into without splitting and contain tannicacids that are corrosive to metal panels. Green (non-kiln-dried) lumbermay warp, twist, and shrink as the wood seasons fully, causing wavinessin the panels as well as loosening and leaking of the fasteners.Solid decking is highly recommended <strong>for</strong> all residential applications.When usingsolid decking or sheathing, always use 30-lb feltor underlayment and plan on using closerfastener spacing and larger diameter #14 screws. (Refer to the tableson page 31).On re-roofing projects where the condition of the old deckingis in question, or where existing shingles will be left in place, new 2x4purlins should be fastened through the decking and into the rafters. Thiswill provide a solid framework <strong>for</strong> attaching the metal panels. For moredetailed in<strong>for</strong>mation on Re-roofing applications, consult FABRAL TechnicalBulletin #721, Re-<strong>Roofing</strong> With <strong>Metal</strong>. Load tables are available <strong>for</strong>all FABRAL panels; contact FABRAL <strong>for</strong> additional in<strong>for</strong>mation.<strong>Roofing</strong>Panel sidelaps should face away from wind driven rain. Toaccomplish this, begin by installing the first sheet square with theeave and gable at the down wind end of the roof, farthest away fromthe source of prevailing winds.In applications requiring a panel endlap, please refer to thedetailed instructions in this booklet. For best results, lap panels asshown and install in the indicated sequence. All endlaps require sealant.When weather-tightness is critical, use sealant tape in all sidelaps.To provide a drip edge, allow an overhang of 1 to 2 inches atthe eave. At the gable edge, use a gable or sidewall flashing. This willkeep weather out, prevent lifting in high winds, and provide a neat, finishedappearance. The trim and roofing sheet should be fastened every12 to 24 inches along the gable edge.Roof PitchThe metal roofing panels shown in this manual require a minimumslope of 2½” per foot to ensure proper drainage. Refer to the raincarryingtable in this booklet <strong>for</strong> the maximum allowable panel length perslope that will provide adequate drainage. For longer slopes and lowerroof pitches, contact FABRAL <strong>for</strong> other suitable profiles.Bending and BowingAluminum roofing and siding sheets are roll<strong>for</strong>med from hardened,tempered metal <strong>for</strong> maximum strength. If a sheet must be bent,a gentle 90-degree bend is the maximum recommended. <strong>Metal</strong> shouldnot be re-bent once it has been <strong>for</strong>med, nor should it be folded back onitself. When a metal roofing sheet must be installed on a curved roof,screws should be installed at every overlapping rib at the sheet endsto resist the natural tendency of the metal to spring back. The standardfastening pattern is permitted over the rest of the sheet. When installingthe metal panels shown in this booklet over a curved arch, the minimumradius of the arch is 18’ <strong>for</strong> aluminum panels and 24’ <strong>for</strong> steel panels.Use sealant tape or butyl caulking at all sidelaps and endlaps.Additional care and fasteners must be provided when securing the topand bottom purlins on an arched rafter building to prevent the curvedpanels from pulling the purlins loose from the rafters. Ring-shank polebarn nails, heavy wood screws, lag screws, or bolts are often used <strong>for</strong>attaching these purlins.<strong>Siding</strong><strong>Siding</strong> should be installed using the standard fastening andoverlap patterns to ensure optimum per<strong>for</strong>mance. For strong, neat cornersuse hemmed corner flashings. Do not run siding sheets all theway to the ground. Instead, provide a protective base of concrete,masonry, treated wood, or similar material and terminate the sidingsheets 6” above grade.2
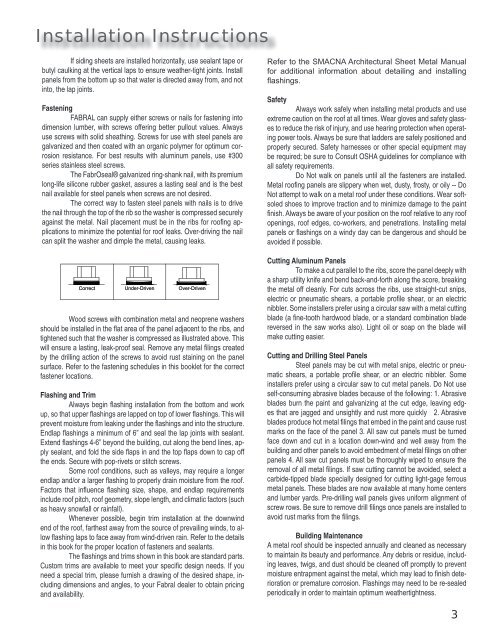
Installation InstructionsIf siding sheets are installed horizontally, use sealant tape orbutyl caulking at the vertical laps to ensure weather-tight joints. Installpanels from the bottom up so that water is directed away from, and notinto, the lap joints.FasteningFABRAL can supply either screws or nails <strong>for</strong> fastening intodimension lumber, with screws offering better pullout values. Alwaysuse screws with solid sheathing. Screws <strong>for</strong> use with steel panels aregalvanized and then coated with an organic polymer <strong>for</strong> optimum corrosionresistance. For best results with aluminum panels, use #300series stainless steel screws.The FabrOseal® galvanized ring-shank nail, with its premiumlong-life silicone rubber gasket, assures a lasting seal and is the bestnail available <strong>for</strong> steel panels when screws are not desired.The correct way to fasten steel panels with nails is to drivethe nail through the top of the rib so the washer is compressed securelyagainst the metal. Nail placement must be in the ribs <strong>for</strong> roofing applicationsto minimize the potential <strong>for</strong> roof leaks. Over-driving the nailcan split the washer and dimple the metal, causing leaks.Correct Under-Driven Over-DrivenWood screws with combination metal and neoprene washersshould be installed in the flat area of the panel adjacent to the ribs, andtightened such that the washer is compressed as illustrated above. Thiswill ensure a lasting, leak-proof seal. Remove any metal filings createdby the drilling action of the screws to avoid rust staining on the panelsurface. Refer to the fastening schedules in this booklet <strong>for</strong> the correctfastener locations.Flashing and TrimAlways begin flashing installation from the bottom and workup, so that upper flashings are lapped on top of lower flashings. This willprevent moisture from leaking under the flashings and into the structure.Endlap flashings a minimum of 6” and seal the lap joints with sealant.Extend flashings 4-6” beyond the building, cut along the bend lines, applysealant, and fold the side flaps in and the top flaps down to cap offthe ends. Secure with pop-rivets or stitch screws.Some roof conditions, such as valleys, may require a longerendlap and/or a larger flashing to properly drain moisture from the roof.Factors that influence flashing size, shape, and endlap requirementsinclude roof pitch, roof geometry, slope length, and climatic factors (suchas heavy snowfall or rainfall).Whenever possible, begin trim installation at the downwindend of the roof, farthest away from the source of prevailing winds, to allowflashing laps to face away from wind-driven rain. Refer to the detailsin this book <strong>for</strong> the proper location of fasteners and sealants.The flashings and trims shown in this book are standard parts.Custom trims are available to meet your specific design needs. If youneed a special trim, please furnish a drawing of the desired shape, includingdimensions and angles, to your Fabral dealer to obtain pricingand availability.Refer to the SMACNA Architectural Sheet <strong>Metal</strong> Manual<strong>for</strong> additional in<strong>for</strong>mation about detailing and installingflashings.SafetyAlways work safely when installing metal products and useextreme caution on the roof at all times. Wear gloves and safety glassesto reduce the risk of injury, and use hearing protection when operatingpower tools. Always be sure that ladders are safely positioned andproperly secured. Safety harnesses or other special equipment maybe required; be sure to Consult OSHA guidelines <strong>for</strong> compliance withall safety requirements.Do Not walk on panels until all the fasteners are installed.<strong>Metal</strong> roofing panels are slippery when wet, dusty, frosty, or oily -- DoNot attempt to walk on a metal roof under these conditions. Wear softsoledshoes to improve traction and to minimize damage to the paintfinish. Always be aware of your position on the roof relative to any roofopenings, roof edges, co-workers, and penetrations. Installing metalpanels or flashings on a windy day can be dangerous and should beavoided if possible.Cutting Aluminum PanelsTo make a cut parallel to the ribs, score the panel deeply witha sharp utility knife and bend back-and-<strong>for</strong>th along the score, breakingthe metal off cleanly. For cuts across the ribs, use straight-cut snips,electric or pneumatic shears, a portable profile shear, or an electricnibbler. Some installers prefer using a circular saw with a metal cuttingblade (a fine-tooth hardwood blade, or a standard combination bladereversed in the saw works also). Light oil or soap on the blade willmake cutting easier.Cutting and Drilling Steel PanelsSteel panels may be cut with metal snips, electric or pneumaticshears, a portable profile shear, or an electric nibbler. Someinstallers prefer using a circular saw to cut metal panels. Do Not useself-consuming abrasive blades because of the following: 1. Abrasiveblades burn the paint and galvanizing at the cut edge, leaving edgesthat are jagged and unsightly and rust more quickly 2. Abrasiveblades produce hot metal filings that embed in the paint and cause rustmarks on the face of the panel 3. All saw cut panels must be turnedface down and cut in a location down-wind and well away from thebuilding and other panels to avoid embedment of metal filings on otherpanels 4. All saw cut panels must be thoroughly wiped to ensure theremoval of all metal filings. If saw cutting cannot be avoided, select acarbide-tipped blade specially designed <strong>for</strong> cutting light-gage ferrousmetal panels. These blades are now available at many home centersand lumber yards. Pre-drilling wall panels gives uni<strong>for</strong>m alignment ofscrew rows. Be sure to remove drill filings once panels are installed toavoid rust marks from the filings.Building MaintenanceA metal roof should be inspected annually and cleaned as necessaryto maintain its beauty and per<strong>for</strong>mance. Any debris or residue, includingleaves, twigs, and dust should be cleaned off promptly to preventmoisture entrapment against the metal, which may lead to finish deteriorationor premature corrosion. Flashings may need to be re-sealedperiodically in order to maintain optimum weathertightness.3