Download (5.6 MB) - Prolyte Group
Download (5.6 MB) - Prolyte Group
Download (5.6 MB) - Prolyte Group
- No tags were found...

Create successful ePaper yourself
Turn your PDF publications into a flip-book with our unique Google optimized e-Paper software.
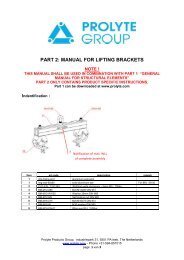
Assembly Manual <strong>Prolyte</strong> Roof and outdoor structuresRead this manual carefully and understand all of it’s contents before you assemble the <strong>Prolyte</strong> Roof and outdoor structures1.1 part list and their positionsARC STAGE 10x8No: Qty Code Description1 8 H30V-L200 200cm length towers2 2 H30V-L129 129cm length3 4 H30V-L200 200cm length4 2 ARC-C017/2 T-joint with 2x eye5 1 ARC-C003/L 2way corner for arc-stage left6 1 ARC-C003/R 2way corner for arc-stage right7 1 ARC-C012/L 3-way special for arc-stage left8 1 ARC-C012/R 3-way special for arc-stage right9 4 ARC-C017 3-way T-joint for arc-stage10 4 MPT-004 Steel tower base section11 16 MPT-011 Shortoutrigger12 112 CCS6-600 Conical coupler13 152 CCS6-603 Conical spigot for CCS6-60014 136 CCS6-604 Conical spigot with M8 nut for CCS6-60015 152 CCS6-605 Safety R-spring for CCS6-60316 12 ARC-R1000-20 H30D arched truss + Kedar, R=1000cm, 20dgr.17 16 CCS6-S50 Spacer 50mm18 8 CCS6-S50-K Spacer + kedar19 9 T-60-48-PRESS-L242,5 Canopy support tube with special attachment20 1 CAN-ARC-TOP/F-10x8 Canopy top front21 2 CAN-ARC-TOP/B/M-10x8 Canopy top back and middle22 18 RA-2T-200OE Ratchet, 1 ton endless, L=20023 2 T-51-OE442SP Tube 51x2 L=342, spigoted24 2 T-51-OE400OE Tube 51x2 L=300, non spigotedRigging set25 6 RA-2T-1100HH Ratchet set 1T, 0,5m + 10.50m + hooks back26 14 RA-2T-500HH Ratchet set 1T, 0,5m + 4.5m + hooks top27 6 SS-2T-200 Softsteel 2 ton L=100cm28 6 RI-SH3,2T Shackle 3,2 tonCanopy for side / backwallQty Qty Code Description29 1 CAN-ARC-1008/B CAN-ARC-0806 backwall 50%30 2 CAN-ARC-1008/S CAN-ARC-0806 sidewall 50%31 142 CAN-BUNGY/20 Rubber Bungy cord L=20cm + hook32 4 T-51-OE342SP Tube 51x2 L=342, spigoted33 3 T-51-OE229OE Tube 51x2 L=229, open endRigging set for German marketQty Qty Code Description34 2 SW-10-1000EH Steelwire 6x19x10mm with eye/hook L=10.0m. back35 4 SW-10-700EH Steelwire 6x19x10mm with eye/hook L=7.0m. Side36 14 SW-10-300EH Steelwire 6x19x10mm with eye/hook L=3.0m. Top37 20 CH-07-200HCSH Chain + spanner + shortener L=2,00 + 2x hook38 6 RI-SH3,2T Shackle 3,2 ton39 6 SS-2T-200 Soft steel 2ton WL=200cm blackPROLYTE PRODUCTS GROUP © 2009<strong>Prolyte</strong> has made every effort to ensure the accuracy of this manual, no liability will be accepted for errors.<strong>Prolyte</strong> reserves the right to change or alter their products or manuals without prior notice.No part of this manual may be reproduced in any form or by any means without prior written permission.PROLYTE PRODUCTS GROUP - phone +31 (0)594 85 15 15 - fax +31 (0)594 85 15 16 - www.prolyte.compage 3
Assembly Manual <strong>Prolyte</strong> Roof and outdoor structuresRead this manual carefully and understand all of it’s contents before you assemble the <strong>Prolyte</strong> Roof and outdoor structuresBase Distance UnitNo: Qty Code Description40 6 MPR-030 Connection piece Base Distance Unit41 7 H30V-L300 300cm length42 2 H30V-L049 49cm lenght43 1 H30V-L043,4 43,4 cm lenght44 52 CCS6-600 Conical coupler45 52 CCS6-603 Conical spigot for CCS6-60046 52 CCS6-604 Conical spigot with M8 nut for CCS6-60047 52 CCS6-605 Safety R-spring for CCS6-603page 4PROLYTE PRODUCTS GROUP © 2009<strong>Prolyte</strong> has made every effort to ensure the accuracy of this manual, no liability will be accepted for errors.<strong>Prolyte</strong> reserves the right to change or alter their products or manuals without prior notice.No part of this manual may be reproduced in any form or by any means without prior written permission.PROLYTE PRODUCTS GROUP - phone +31 (0)594 85 15 15 - fax +31 (0)594 85 15 16 - www.prolyte.com
Assembly Manual <strong>Prolyte</strong> Roof and outdoor structuresRead this manual carefully and understand all of it’s contents before you assemble the <strong>Prolyte</strong> Roof and outdoor structures1.2 ASSE<strong>MB</strong>LING INSTRUCTIONS ARC-ROOF 10x81) Assemble both up-downstage spans out of square H30V-trussing on the left and right sides ofthe construction (fig. 1).8397339246939245(fig 1)2) Assemble the arches. Make sure you put spacers (item no: 17 ) in between the joint of each arch.A special spacer with keder (item no: 18) is supplied for those chords which hold a keder.3) After the arches are assembled mount them between the side spans. Make sure that the keder profile onthe front arch sits on the outside. For the arches in middle and back the keder profile should sit at the backchord of the truss (fig. 2).2x17+ 1x18 2x17+ 1x1816161616(fig 2)PROLYTE PRODUCTS GROUP © 2009<strong>Prolyte</strong> has made every effort to ensure the accuracy of this manual, no liability will be accepted for errors.<strong>Prolyte</strong> reserves the right to change or alter their products or manuals without prior notice.No part of this manual may be reproduced in any form or by any means without prior written permission.PROLYTE PRODUCTS GROUP - phone +31 (0)594 85 15 15 - fax +31 (0)594 85 15 16 - www.prolyte.compage 5
Assembly Manual <strong>Prolyte</strong> Roof and outdoor structuresRead this manual carefully and understand all of it’s contents before you assemble the <strong>Prolyte</strong> Roof and outdoor structures4) Then mount the canopy support tubes (item no 19) as shown in fig 3.191919(fig 3)5) Take the ratchet-straps (item no 19) or steel wires and spanners (item no 35 + 36) and attach them to theeyes, which are welded in the corners and on the middle of each arch (see detail 1 & 2 below). Put themslightly and simultaneously under tension, t.i about 50 daN (= 50 kgf).c-c holes4436mmc-c holes4276mm26 or36+37Detail 1Detail 2Detail 1Detail 2(fig 4)page 6PROLYTE PRODUCTS GROUP © 2009<strong>Prolyte</strong> has made every effort to ensure the accuracy of this manual, no liability will be accepted for errors.<strong>Prolyte</strong> reserves the right to change or alter their products or manuals without prior notice.No part of this manual may be reproduced in any form or by any means without prior written permission.PROLYTE PRODUCTS GROUP - phone +31 (0)594 85 15 15 - fax +31 (0)594 85 15 16 - www.prolyte.com
Assembly Manual <strong>Prolyte</strong> Roof and outdoor structuresRead this manual carefully and understand all of it’s contents before you assemble the <strong>Prolyte</strong> Roof and outdoor structures6) Pull the canopy through the keder profiles on top of the arches. Make sure this is done evenly and with care.To facilitate this processes use some Teflon spray on a regular basis. Also make sure that the keder profile ismaintained. Burrs, damages or sharp edges will damage the canopy and reduce the life span dramatically.Canopy 21Canopy 20(fig 5)7) Put the tubes through the sleeve in the canopy and attach the ratchets as shown in fig. 4.Put the ratchet slightly under tension, not exceeding 50kgf per ratchet. There is no need to transfer thecanopy into a drum skin.Canopy 20 and 21Tube 23 and 24(fig 6)SleeveRatchet 22PROLYTE PRODUCTS GROUP © 2009<strong>Prolyte</strong> has made every effort to ensure the accuracy of this manual, no liability will be accepted for errors.<strong>Prolyte</strong> reserves the right to change or alter their products or manuals without prior notice.No part of this manual may be reproduced in any form or by any means without prior written permission.PROLYTE PRODUCTS GROUP - phone +31 (0)594 85 15 15 - fax +31 (0)594 85 15 16 - www.prolyte.compage 7
Assembly Manual <strong>Prolyte</strong> Roof and outdoor structuresRead this manual carefully and understand all of it’s contents before you assemble the <strong>Prolyte</strong> Roof and outdoor structures12) Put the base distance frames in place as per fig 10. These trusses prevent horizontal displacement ofindividual legs and reduce therefore the required ballast loading with +/-50%. Their function can also bereplaced by a decent stage structure.4040(fig 10)4141414240414143404141424013) Attach the ratchet sets (items no 25, 27 and 28 ). Use a soft steel (item 27 with a shackle (item 28) toconnect the ratchet to the baseNOTE ! When built in Germany items 35, 37, 38 and 39 should be used for the side walls and items no35, 37, 38 and 39 for the backwall.14) Now the stage can be built underneath the roof. Connect the legs to the stage, this can safe considerablyin the total amount of ballast needed.15) Ballast must be placed aside the base sections (see figures 11.1, 11.2, 11.3) to prevent uplifting of theroof by wind forces. All additional loading, such as scaffolding or stage-elements fixed to the corner legsor the base sections, can be subtracted from the amount of counterweight needed.Following examples can be used as ballast – depending on the local building codes and regulations:- Water tanks connected to the towers / base sections.- In case of a complete rigid stage structure (like a scaffolding stage), the total weight of the stage may betaken in account as ballast when connected properly to the towers.- Ground anchors.- Concrete blocks.- Canvas bags filled with sand, rubble.- Steelpage 10PROLYTE PRODUCTS GROUP © 2009<strong>Prolyte</strong> has made every effort to ensure the accuracy of this manual, no liability will be accepted for errors.<strong>Prolyte</strong> reserves the right to change or alter their products or manuals without prior notice.No part of this manual may be reproduced in any form or by any means without prior written permission.PROLYTE PRODUCTS GROUP - phone +31 (0)594 85 15 15 - fax +31 (0)594 85 15 16 - www.prolyte.com
Assembly Manual <strong>Prolyte</strong> Roof and outdoor structuresRead this manual carefully and understand all of it’s contents before you assemble the <strong>Prolyte</strong> Roof and outdoor structuresDetails arc 10x89164 5A25 or 35116726 or36+37+383(fig 11.1)B116439C2(fig 11.2)25 or35+37127 or 2811D10(fig 11.3)PROLYTE PRODUCTS GROUP © 2009<strong>Prolyte</strong> has made every effort to ensure the accuracy of this manual, no liability will be accepted for errors.<strong>Prolyte</strong> reserves the right to change or alter their products or manuals without prior notice.No part of this manual may be reproduced in any form or by any means without prior written permission.PROLYTE PRODUCTS GROUP - phone +31 (0)594 85 15 15 - fax +31 (0)594 85 15 16 - www.prolyte.compage 11
Assembly Manual <strong>Prolyte</strong> Roof and outdoor structuresRead this manual carefully and understand all of it’s contents before you assemble the <strong>Prolyte</strong> Roof and outdoor structurespage 12PROLYTE PRODUCTS GROUP © 2009<strong>Prolyte</strong> has made every effort to ensure the accuracy of this manual, no liability will be accepted for errors.<strong>Prolyte</strong> reserves the right to change or alter their products or manuals without prior notice.No part of this manual may be reproduced in any form or by any means without prior written permission.PROLYTE PRODUCTS GROUP - phone +31 (0)594 85 15 15 - fax +31 (0)594 85 15 16 - www.prolyte.com