Symmetrical Optical Project - 7th grade - Deerlake Middle School
Symmetrical Optical Project - 7th grade - Deerlake Middle School
Symmetrical Optical Project - 7th grade - Deerlake Middle School
- No tags were found...

You also want an ePaper? Increase the reach of your titles
YUMPU automatically turns print PDFs into web optimized ePapers that Google loves.
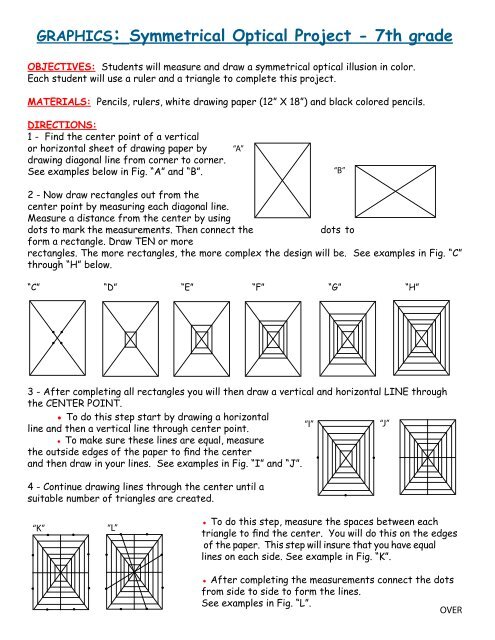
GRAPHICS: <strong>Symmetrical</strong> <strong>Optical</strong> <strong>Project</strong> - <strong>7th</strong> <strong>grade</strong>OBJECTIVES: Students will measure and draw a symmetrical optical illusion in color.Each student will use a ruler and a triangle to complete this project.MATERIALS: Pencils, rulers, white drawing paper (12” X 18”) and black colored pencils.DIRECTIONS:1 - Find the center point of a verticalor horizontal sheet of drawing paper bydrawing diagonal line from corner to corner.See examples below in Fig. “A” and “B”.“A”“B”2 - Now draw rectangles out from thecenter point by measuring each diagonal line.Measure a distance from the center by usingdots to mark the measurements. Then connect thedots toform a rectangle. Draw TEN or morerectangles. The more rectangles, the more complex the design will be. See examples in Fig. “C”through “H” below.“C” “D” “E” “F” “G” “H”3 - After completing all rectangles you will then draw a vertical and horizontal LINE throughthe CENTER POINT.● To do this step start by drawing a horizontalline and then a vertical line through center point.● To make sure these lines are equal, measurethe outside edges of the paper to find the centerand then draw in your lines. See examples in Fig. “I” and “J”.“I”“J”4 - Continue drawing lines through the center until asuitable number of triangles are created.“K”“L”● To do this step, measure the spaces between eachtriangle to find the center. You will do this on the edgesof the paper. This step will insure that you have equallines on each side. See example in Fig. “K”.● After completing the measurements connect the dotsfrom side to side to form the lines.See examples in Fig. “L”.OVER
5 - Now you are to add additional lines to your drawing. There are many ways you can addlines. There are five methods listed below with examples. Pick ONE to use.METHOD ONE -Start by drawing lines extending from one ofthe sides to the center of each triangle on the other side.See example “ONE A”.Now go to the opposite side of drawing and draw linesextending to the center of each of these triangle.See example “ONE B”.“ONE A” “ONE B”“TWO A” “TWO B”METHOD TWO -Start by drawing lines extending from thebottom of the drawing in to the center of each triangle.See example “TWO A”.Now go the top of the drawing and draw lines extending tothe center of each triangle. See example “TWO B”.METHOD THREE -Combine methods one and two to make method three.METHOD FOUR -Draw lines in a pyramid shape. Start by drawing lines extending fromthe middle of a triangle and go to point then back down to the centerof the adjoining triangle. See example “FOUR A”.“FOUR A”METHOD FIVE -Start by drawing zigzag lines that start at the outside center lineand go up and down around the art work “FIVE A”. Your lines maybe as long as you want but need to touch a line.“FIVE A”AFTER ALL LINES ARE CREATED -You will now need to pick your colors. Make sure to have TWO of each colorthat you are using on project. Complete a color plan before adding ANYCOLOR to the project.Use light pencil lines to make dots on the spaces you arecoloring dark...........REMEMBER TO ALTERNATE YOUR COLOR WITH WHITE.See student examples on share point site.9/08