How To: INSTALL A LAMINATE FLOOR - Lowe's
How To: INSTALL A LAMINATE FLOOR - Lowe's
How To: INSTALL A LAMINATE FLOOR - Lowe's
Create successful ePaper yourself
Turn your PDF publications into a flip-book with our unique Google optimized e-Paper software.
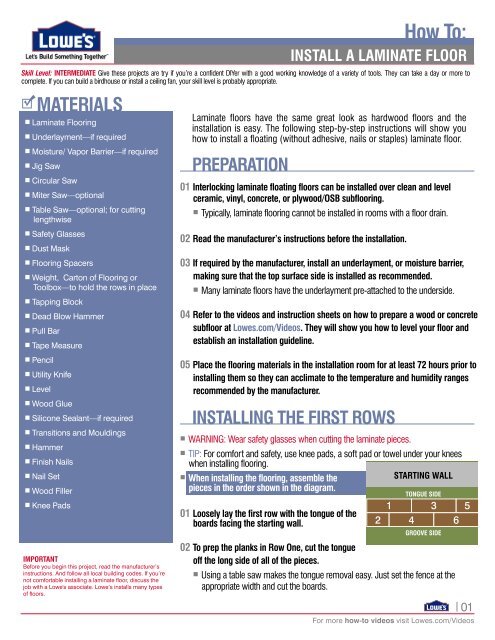
<strong>How</strong> <strong>To</strong>:<strong>INSTALL</strong> A <strong>LAMINATE</strong> <strong>FLOOR</strong><strong>INSTALL</strong>ING THE FIRST ROWS (cont.)11 A tapping block may be needed when a plank can’t be rotated, such as under a doorframe.• Position the board as close as possible to its finished location under the doorframe.• Follow the manufacturer’s instructions for using the tapping block. Typically, youposition it along the groove side of the plank, then use a dead blow hammer to tap theplank into place, locking the joint.12 Once the first two rows are assembled, slide them into position against thestarting wall.• Be sure to maintain the manufacturer’s recommended expansion gap with flooring spacers.<strong>INSTALL</strong>ING THE REST OF THE <strong>FLOOR</strong>01 Continue installing the laminate flooring, staggering the joints at least 12" and maintaining the expansion gap.• TIP: Use cut pieces to start rows, making sure the joints are staggered properly.02 When laying the flooring around obstructions, like floor vents, cabinets or columns,cut the flooring to fit with a jig saw.• <strong>To</strong> install the flooring around pipes, you may need to use a jig saw and wood glue tomake the planks fit properly.1. Cut a notch in the flooring to fit around the pipe.2. With the smaller excess piece, cut it to fit on the other side of the pipe.3. Set the smaller piece in place and attach it to the larger plank with wood glue along the cut line(s).03 Check the manufacturer’s instructions for applying silicone sealant in areas with high moisture levels, such as abathroom or kitchen. Excess moisture under the planks can damage the flooring.• When installing around a bathtub or sink, apply silicone sealant to create a watertight seal.• You’ll need to take some special steps when installing around a toilet.1. Remove the toilet.2. Cut the flooring to fit around the drain. Remember to account for themanufacturer’s required expansion gap.3. Install the flooring.4. Apply silicone sealant in the expansion gap.These "<strong>How</strong>-<strong>To</strong>'s" are provided for informational purposes only. The information contained in <strong>Lowe's</strong> "<strong>How</strong>-<strong>To</strong>" videos is intended to providegeneral guidance to simplify jobs around the house. Because tools, products, materials, techniques, building codes and local regulations5. Allow sealant to dry, then reinstall the toilet.are continually changing, <strong>Lowe's</strong> assumes no responsibility for the accuracy of the information contained herein and disclaims any liabilityfor • omissions, Also check errors the manufacturer’s or the outcome of instructions any project. for It is applying the responsibility sealant along of the kitchen viewer to ensure compliance with all applicable laws,rules, codes and regulations for a project. The viewer must always take proper safety precautions and exercise caution when taking onany project.cabinetsIfthattherehouseis anyaquestiondishwasheror doubtorinrefrigerator.regards to any element of a project, please consult with a licensed professional.03For more how-to videos visit Lowes.com/Videos
<strong>How</strong> <strong>To</strong>:<strong>INSTALL</strong> A <strong>LAMINATE</strong> <strong>FLOOR</strong><strong>INSTALL</strong>ING THE REST OF THE <strong>FLOOR</strong> (cont.)04 For the last row, you may have to cut the pieces to fit.• Measure the width needed for the last row and subtract the manufacturer's expansion gap.• Measure to the board surfaces (excluding the tongue) and rip (cut lengthwise) the lastboards along the groove edge.• Some flooring products have a small plastic tongue in the short side groove of the plankswhich helps lock the pieces together. Be sure to remove the plastic tongue before cuttingthe length of the board.05 Use a pull bar and hammer to lock the last row in place.FINISHING UP01 Install transition strips at entries and where the floor meets other types of flooring, following manufacturer's instructions.02 Remove the wall spacers once the transitions are in place.03 If you installed a separate underlayment, cut the excess.04 When installing in a bathroom, kitchen, laundry room or along an exterior door, apply silicone sealant in the expansionspace around the perimeter of the floor. This should be done once the entire floor is in place.05 Install the baseboards and shoe moulding to the walls as needed.• Attach the trim and shoe moulding to the walls. Do not attach them to the flooring.06 Keep 1-2 cartons of your laminate flooring so you can fix any potential problems inthe future, like a damaged board.Now you can enjoy your beautiful and durable laminate floor for many years.For other flooring installations, as well as other home improvement projects,visit Lowes.com/Videos.These "<strong>How</strong>-<strong>To</strong>'s" are provided for informational purposes only. The information contained in <strong>Lowe's</strong> "<strong>How</strong>-<strong>To</strong>" videos is intended to providegeneral These "<strong>How</strong>-<strong>To</strong>'s" guidance are to simplify provided jobs for around informational the house. purposes Because only. tools, The information products, materials, contained techniques, in <strong>Lowe's</strong> "<strong>How</strong>-<strong>To</strong>" building videos codes is and intended local regulations to provideare general continually guidance changing, to simplify <strong>Lowe's</strong> jobs assumes around the no house. responsibility Because for tools, the accuracy products, of materials, the information techniques, contained building herein codes and disclaims and local regulations any liabilityfor are omissions, continually errors changing, or the <strong>Lowe's</strong> outcome assumes of any no project. responsibility It is the for responsibility the accuracy of of the information viewer to ensure contained compliance herein and with disclaims all applicable any liability laws,rules, for omissions, codes and errors regulations or the outcome for a project. of any The project. viewer It must is the always responsibility take proper of the safety viewer precautions to ensure and compliance exercise with caution all applicable when taking laws, onany rules, project. codes If and there regulations is any question for a project. or doubt The in regards viewer must to any always element take of a proper project, safety please precautions consult with and a exercise licensed caution professional. when taking onany project. If there is any question or doubt in regards to any element of a project, please consult with a licensed professional.04For more how-to videos visit Lowes.com/Videos


