
Create successful ePaper yourself
Turn your PDF publications into a flip-book with our unique Google optimized e-Paper software.
<strong>MASTER</strong> <strong>YOUR</strong> <strong>DEVICE</strong>
Conventions used in this guideIn this user guide, we use the following symbols to indicate useful andimportant information:This is a note. A note often gives additional information, such as whathappens on your phone when you choose to do or not to do a certainaction. A note also provides information that may only be applicable tosome situations.This is a tip. A tip gives you an alternative way to do a particular step orprocedure, or lets you know of an option that you may find helpful.This indicates that something is very important. Important information issomething that you need to do in order to accomplish a certain task or toget a phone feature to work properly.This provides safety precaution information, that is, information that youneed to be careful about to prevent potential problems when using yourphone.
ContentsBasics 20Inside the box..................................................................................................................... 20Your phone ............................................................................................................................21Front panel..................................................................................................................21Right panel.................................................................................................................22Back panel..................................................................................................................23Back cover ............................................................................................................................24Removing the back cover...................................................................................24Replacing the back cover...................................................................................24SIM card..................................................................................................................................25Inserting the SIM card...........................................................................................25Removing the SIM card........................................................................................27Battery....................................................................................................................................28Inserting the battery..............................................................................................29Charging the battery............................................................................................ 30Removing the battery............................................................................................31Storage card.........................................................................................................................32Inserting the storage card..................................................................................32Removing the storage card...............................................................................33Removing the storage card while the phone is on ................................33Switching your phone on or off................................................................................. 34Switching your phone on................................................................................... 34Switching your phone off.................................................................................. 34Finger gestures...................................................................................................................35
Getting started 36Setting up your phone for the first time................................................................36Home screen........................................................................................................................37Extended Home screen .......................................................................................37Using Leap view......................................................................................................38Status and notifications..................................................................................................39Status icons ...............................................................................................................39Notification icons...................................................................................................40Notification LED......................................................................................................42Notifications panel............................................................................................................42Opening the Notifications panel.....................................................................42Switching between recently-opened apps............................................... 43Closing the Notifications panel....................................................................... 44Connecting your phone to a computer................................................................. 44Copying files to or from the storage card................................................. 46Searching your phone and the Web........................................................................47Setting your phone’s search options ........................................................... 48Quickly looking up information on the Web............................................ 49Translating words to other languages......................................................... 50Adjusting the volume...................................................................................................... 50Adjusting the ringer volume...............................................................................51Adjusting the media volume..............................................................................51Adjusting the earpiece volume for phone calls ........................................51Adjusting the volume via settings...................................................................51Sleep mode...........................................................................................................................52Switching to Sleep mode....................................................................................52Waking up from Sleep mode............................................................................52Unlocking the screen ............................................................................................53
Personalizing 54Making your phone truly yours.................................................................................. 54Personalizing your phone with scenes................................................................... 54Using a preset scene.............................................................................................55Creating a new scene............................................................................................56Renaming a scene..................................................................................................56Deleting scenes........................................................................................................56Changing your wallpaper...............................................................................................57Applying a new skin.........................................................................................................58Personalizing your Home screen with widgets ..................................................59Adding a widget......................................................................................................59Changing the settings of a widget................................................................60Adding icons and other shortcuts on your Home screen ..............................61Adding folders on your Home screen .....................................................................62Creating a new folder and adding items to it...........................................62Renaming a folder..................................................................................................62Rearranging or removing widgets and icons on your Home screen........63Moving a widget or icon......................................................................................63Removing a widget or icon............................................................................... 64Rearranging the Home screen................................................................................... 64Changing your ringtones and alarms ......................................................................65Choosing a preset sound set............................................................................65Creating a sound set............................................................................................ 66Customizing a sound set.................................................................................... 66Deleting sound sets.............................................................................................. 68Rearranging or hiding application tabs................................................................. 68Putting back the tabs you’ve removed....................................................... 69
Phone calls 70Making calls......................................................................................................................... 70Making a call on the Phone dialer screen .................................................. 70Using Speed dial ......................................................................................................71Calling a phone number in a text message................................................72Calling a phone number in an email..............................................................72Making an emergency call..................................................................................73Using Assisted Dialing..........................................................................................74Receiving calls.....................................................................................................................75Answering or rejecting an incoming call.....................................................75HTC Caller ID........................................................................................................................77Using in-call options.........................................................................................................78Putting a call on hold............................................................................................78Switching between calls......................................................................................78Setting up a three-way conference call.......................................................79Turning the speakerphone on or off during a call..................................79Muting the microphone during a call........................................................... 80Ending a call............................................................................................................. 80Using Call history................................................................................................................81Checking a missed call..........................................................................................81Checking calls in the call history......................................................................81Adding a new phone number to your contacts from call history...82Clearing the call history list................................................................................82Call services..........................................................................................................................83Visual Voice Mail................................................................................................................ 84Setting up Visual Voice Mail............................................................................. 84Using Visual Voice Mail ........................................................................................85Turning Airplane mode on or off ............................................................................. 86
People 87About People.......................................................................................................................87People screen...........................................................................................................87Setting up My contact card......................................................................................... 88Ways of getting contacts into your phone.......................................................... 89Adding a new contact......................................................................................... 89Importing contacts from your SIM card.....................................................90Importing a contact from an Exchange ActiveSync account............91Merging contact information........................................................................................91Accepting matched contacts suggestions ................................................92Viewing a list of all your linked contacts.....................................................93Manually merging contact information........................................................93Breaking the contact information link between contacts ..................93Your contacts list.............................................................................................................. 94Filtering your contacts list................................................................................. 96Searching for a contact...................................................................................... 96Backing up your contacts to the storage card ........................................97Importing contacts from the storage card.................................................97Deleting contacts....................................................................................................97Contact information and conversations................................................................ 98Editing a contact’s information....................................................................... 99Sending contact information as a vCard ................................................. 100Contact groups..................................................................................................................101Creating a group....................................................................................................101Editing a contact group......................................................................................101Sending a message or email to a group....................................................102Rearranging your contact groups................................................................103Rearranging the members of a contact group......................................103Deleting a group ...................................................................................................103
Creating a slideshow........................................................................................... 122Resuming a draft message......................................................................................... 123Viewing and replying to a message ....................................................................... 123Viewing a message.............................................................................................. 124Replying to a message....................................................................................... 124Replying to another phone number of the contact............................. 125Viewing and saving an attachment from a multimedia message. 126Viewing push messages.................................................................................... 126Managing message conversations.......................................................................... 127Protecting a message from deletion........................................................... 127Copying a message to your SIM card......................................................... 127Deleting a single message................................................................................ 128Deleting several messages within a conversation................................ 128Deleting a conversation..................................................................................... 129Deleting several conversations....................................................................... 129Setting message options.............................................................................................130Accounts and sync 134Synchronizing with online accounts.......................................................................134About online accounts.......................................................................................134Synchronizing with a Google Account....................................................... 135Adding a social <strong>net</strong>work account.................................................................136Managing your online accounts..................................................................... 137Synchronizing with your computer........................................................................ 138Installing HTC Sync..............................................................................................139Setting up HTC Sync to recognize your phone.....................................140Setting the Music sync options......................................................................142Setting the Gallery sync options...................................................................143Setting Calendar sync options.......................................................................144Setting People sync options ...........................................................................144Setting Bookmarks sync options..................................................................145
10Setting Documents sync options..................................................................146Setting Maps sync options............................................................................... 147Synchronizing your phone...............................................................................148Installing apps from your computer to your phone.............................149Synchronizing another phone with your computer.............................150Social 151Facebook for HTC Sense.............................................................................................. 151Tweeting on your phone.............................................................................................. 153Using Peep...............................................................................................................154Sending a tweet..................................................................................................... 155Searching for Twitter users to follow.......................................................... 155Sending a direct message................................................................................156Setting Peep options ..........................................................................................156About the Twitter widget................................................................................. 157Friend Stream.................................................................................................................... 157Updating your status.......................................................................................... 159Commenting on and liking Facebook posts............................................160Checking notifications from your social <strong>net</strong>works................................ 161About the Friend Stream widget................................................................... 161Chatting in Google Talk................................................................................................ 162Chatting with friends .......................................................................................... 162Accepting chat invitations ............................................................................... 163Changing your online status and picture.................................................. 163Adding and managing friends........................................................................164Changing the settings and signing out......................................................165Email 166Using Gmail.........................................................................................................................166Viewing your Gmail Inbox.................................................................................166Sending a new message....................................................................................168
Reading your messages ....................................................................................169Replying to or forwarding an email message.........................................170Searching and organizing your emails........................................................ 171Changing Gmail settings................................................................................... 173Getting help............................................................................................................. 175Using Mail............................................................................................................................ 176Adding a POP3/IMAP email account.......................................................... 176Adding a Microsoft Exchange ActiveSync account ............................ 176Checking your Mail inbox.................................................................................. 177Managing email messages ................................................................................ 181Switching to other mail folders...................................................................... 182Sending an email message............................................................................... 182Reading and replying to an email message.............................................184Setting the priority for an email message................................................ 185Working with Exchange ActiveSync email ..............................................186Changing email account settings ................................................................. 187Calendar 188About Calendar................................................................................................................188Creating calendar events.............................................................................................189Inviting guests to your event (Google Account only)........................190Sending a meeting request using Calendar (Exchange ActiveSynconly) ............................................................................................................................. 191Changing calendar views............................................................................................. 192Month view............................................................................................................... 192Day and Agenda views ...................................................................................... 193Week view................................................................................................................194Managing calendar events.......................................................................................... 195Viewing an event................................................................................................... 195Editing an event.....................................................................................................196Deleting an event..................................................................................................19611
12Sharing an event (vCalendar).........................................................................196Calendar event reminders........................................................................................... 197Dismissing or snoozing event reminders .................................................. 197Displaying and synchronizing calendars..............................................................198Showing or hiding calendars...........................................................................198Choosing which Google Calendars are synchronized on yourphone..........................................................................................................................198Changing Calendar settings.......................................................................................199Reminder settings ................................................................................................199Calendar view settings..................................................................................... 200About the Calendar widget........................................................................................201Clock and Weather 202About the HTC Clock widget....................................................................................202About the Clock app.....................................................................................................203Using Desk Clock........................................................................................................... 204Using World Clock .........................................................................................................206Setting your home city .....................................................................................206Setting the time zone, date, and time................................................... 207Adding a city to the World Clock screen.................................................208Setting the alarm clock................................................................................................208Setting an alarm...................................................................................................209Deleting an alarm.................................................................................................209Changing alarm sound settings.....................................................................210Checking weather............................................................................................................. 211Adding a city to the Weather screen.......................................................... 212Changing the order of cities on the Weather screen.......................... 213Deleting cities from the Weather screen .................................................. 213Changing weather options............................................................................... 213About the Weather widget.........................................................................................214
Inter<strong>net</strong> connections 215Data connection............................................................................................................... 215Checking the data connection you are using ........................................ 215Turning the data connection on or off....................................................... 215Creating a new access point........................................................................... 216Enabling data roaming....................................................................................... 216Wi-Fi ................................................................................................................................... 217Turning Wi-Fi on and connecting to a wireless <strong>net</strong>work................... 217Connecting to a Wi-Fi <strong>net</strong>work with EAP-TLS security .................... 218Checking the wireless <strong>net</strong>work status........................................................ 218Connecting to another Wi-Fi <strong>net</strong>work....................................................... 219Adding connection widgets....................................................................................... 219Connecting to a virtual private <strong>net</strong>work (VPN)...............................................220Setting up secure credential storage.........................................................220Adding a VPN connection................................................................................ 221Connecting to a VPN.......................................................................................... 221Disconnecting from a VPN............................................................................... 221Using your phone as a modem (Inter<strong>net</strong> Connection Mode)................... 222Connecting your phone to the Inter<strong>net</strong> through a computer (Inter<strong>net</strong>Pass-through)........................................................................................................... 223Using your phone as a mobile hotspot................................................................224Web browser 225Using your phone’s web browser........................................................................... 225Going to a webpage........................................................................................... 225Setting your home page ..................................................................................226Changing the screen orientation..................................................................226Browsing full versions of all websites........................................................226Choosing when to show Flash content.....................................................226Navigating on a webpage ............................................................................... 227Zooming in or out on a webpage................................................................ 22713
14Selecting a link in a webpage........................................................................ 227Selecting an address or phone number in a webpage...................... 228Opening a new browser window................................................................. 228Switching between browser windows....................................................... 228Downloading applications from the web.................................................229Copying text, looking up information, and sharing .......................................230Finding text within a webpage .....................................................................230Selecting text.......................................................................................................... 231Copying and pasting text ................................................................................. 231Searching or translating text.......................................................................... 232Pasting text in a new message or social <strong>net</strong>work status update. 232Viewing bookmarks and previously visited pages......................................... 233Bookmarking a webpage................................................................................. 233Opening a bookmark......................................................................................... 233Editing a bookmark ............................................................................................ 233Viewing a previously visited page............................................................... 233Clearing the list of previously visited pages...........................................234Viewing a page that you often visit............................................................234Clearing the list of most visited pages......................................................234Changing the view of bookmarks or most visited pages................234Setting browser options..............................................................................................234Bluetooth 235Bluetooth basics ............................................................................................................. 235Turning Bluetooth on or off............................................................................ 235Changing the phone name.............................................................................. 235Connecting a Bluetooth headset or car kit........................................................236Reconnecting a headset or car kit.............................................................. 237Disconnecting or unpairing from a Bluetooth device .................................. 237Disconnecting a Bluetooth device .............................................................. 237Unpairing from a Bluetooth device.............................................................238
Sending information using Bluetooth...................................................................238Where sent information is saved..................................................................240Receiving information using Bluetooth................................................................ 241Adding the Bluetooth received folder to the Home screen ...........243Camera 244Camera basics..................................................................................................................244Viewfinder screen................................................................................................245Using the front camera.....................................................................................246Zooming...................................................................................................................246Taking a photo ................................................................................................................. 247Auto focusing........................................................................................................248Recording video..............................................................................................................249Adding effects................................................................................................................... 251After capturing................................................................................................................. 251Changing camera settings......................................................................................... 252Photos, videos, and music 254Browsing your Gallery..................................................................................................254About the Gallery app.......................................................................................254Selecting an album.............................................................................................. 255Viewing photos.....................................................................................................256Viewing videos......................................................................................................258Editing your photos............................................................................................258Sending your photos and videos.................................................................260Sending photos or videos using Bluetooth ............................................. 261Sharing your photos and videos on the Web......................................... 261Listening to music..........................................................................................................266Flipping through your albums.......................................................................268Browsing music in the Library.......................................................................269Creating a playlist................................................................................................27015
16Setting a song as ringtone............................................................................... 271Sharing music using Bluetooth..................................................................... 274Finding music videos in YouTube................................................................ 275About the Music widget................................................................................... 275Sharing media on your home <strong>net</strong>work ................................................................ 275Maps and location 278Turning on location services ..................................................................................... 278Using Google Maps........................................................................................................ 278About Google Maps ........................................................................................... 278Getting around maps......................................................................................... 279Searching for a location....................................................................................280Searching for a place of interest near you .............................................. 282Adding a place to search................................................................................. 282Getting directions................................................................................................283Finding your friends with Google Latitude(available by country)........................................................................................284Using HTC Footprints.............................................................................................285Adding a location as a footprint ..................................................................285Revisiting a footprint..........................................................................................286Editing or deleting a footprint.......................................................................286Sharing your footprints.....................................................................................286Deleting multiple footprints ...........................................................................286Exporting your footprints................................................................................286Importing footprints........................................................................................... 287Using Car Panel...............................................................................................................288Using VZ Navigator.......................................................................................................289More apps 290Watching videos on YouTube...................................................................................290Searching for videos ........................................................................................... 291
Sharing a video link.............................................................................................. 291Capturing a video and sharing it on YouTube........................................ 291Reading news feeds......................................................................................................292Subscribing to news channels.......................................................................293Reading a story.....................................................................................................293Manually checking for new stories..............................................................294Starring a story.....................................................................................................294Adding a keyword...............................................................................................294Changing update schedule and content settings................................295Adding the News widget.................................................................................295Working on documents, spreadsheets, and presentations........................296Viewing a document, spreadsheet, or presentation...........................296Editing a document or worksheet............................................................... 297Creating a new document or worksheet.................................................. 297Keeping track of your stocks....................................................................................298Adding a stock quote or stock market index ........................................299Changing the stock list order .......................................................................299Deleting stock quotes and indices..............................................................299Manually updating stock information........................................................299Changing update schedule and color settings .....................................299About the Stocks widget................................................................................ 300Listening to FM Radio...................................................................................................301Tuning in to an FM station...............................................................................302Closing or turning off FM Radio...................................................................303Adding the FM Radio widget.........................................................................303Recording your voice....................................................................................................303Sharing a voice clip............................................................................................ 304Setting a voice clip as a ringtone................................................................ 304Renaming a voice clip....................................................................................... 304Using Flashlight...............................................................................................................30517
18Finding and installing apps from Android Market......................................... 306Finding and installing an app........................................................................ 306Creating a Google Checkout account...................................................... 308Opening an installed app................................................................................ 308Uninstalling an app ............................................................................................ 309Getting help........................................................................................................... 309Sharing games and apps........................................................................................... 309Security 312Protecting your SIM card with a PIN...................................................................... 312Restoring a SIM card that has been locked out..................................... 312Protecting your phone with a screen lock.......................................................... 313Changing your screen lock .............................................................................. 313Forgot your screen lock pattern?.................................................................314Settings 315Settings on your phone................................................................................................ 315Changing display settings........................................................................................... 318Adjusting the screen brightness manually............................................... 318Adjusting the time before the screen turns off...................................... 318Turning automatic screen rotation off........................................................ 318Recalibrating the G-sensor ..............................................................................319Keeping the screen on while charging the phone................................319Switching animation effects on or off........................................................319Changing sound settings............................................................................................320Switching between silent, vibration, and normal modes .................320Enabling or disabling audible selection....................................................320Choosing the notification sound..................................................................320Turning on or off automatic ring volume adjustment......................... 321Switching to speakerphone automatically............................................... 321Changing the phone language................................................................................. 322
Optimizing your phone’s battery life.................................................................... 322Checking the power usage of applications ........................................... 323Managing memory......................................................................................................... 323Checking how much phone memory is available for use ................ 323Checking the available storage card space ............................................ 323Clearing application cache and data.......................................................... 323Uninstalling third-party applications..........................................................324Moving applications to or from the storage card................................324Checking information about your phone............................................................ 325Back up, update and reset 326Backing up your contacts ..........................................................................................326Setting up Backup Assistant..........................................................................326Changing the backup schedule....................................................................326Manually backing up your contacts............................................................ 327Updating the phone software.................................................................................. 327Checking for phone system software updates manually.................328Restarting or factory resetting your phone.......................................................328Restarting your phone (soft reset).............................................................328Performing a factory reset (hard reset) ...................................................329Trademarks and copyrights 330Index 33219
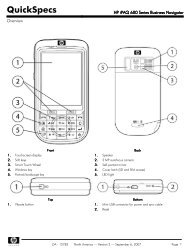
Your phoneBasics 21Front panel11 POWER/LOCK2982 Notification LED3 MENU4 HOME347655 SEARCH6 BACK7 Touch screen8 Earpiece9 1.3 megapixel front camera
22 BasicsRight panel11 VOLUME UP22 VOLUME DOWN
Back panel1271 8 megapixel main camera2 Dual LED flashBasics 233 Back cover34 Kickstand (flip out to revealthe audio speakers)5 Microphone466 USB connector7 3.5mm headset jack5
24 BasicsBack coverRemoving the back coverRemove the back cover to access the battery compartment andstorage card and SIM card slots.1.2.With the phone switched off, hold your phone securely with thefront facing down.With your thumb or finger, lift the back cover off from the notchon the top of your phone.Replacing the back cover1. Align the tabs of the back cover with the slots at the back of thephone.2.Push the back cover towards the phone. You’ll hear a click whenthe back cover is locked in place.
SIM cardBasics 25The 4G SIM card provided to you by Verizon Wireless contains yourphone number, service details, and phonebook/message memory.It enables you to make calls and access the Inter<strong>net</strong> using a 4G LTE<strong>net</strong>work. While you’re abroad, you could also connect to a CDMA<strong>net</strong>work.The Verizon Wireless 4G SIM card is compatible with any VerizonWireless 4G certified device. You can move the 4G SIM card from onedevice to another and your wireless service will work seamlessly aslong as you have a compatible device and service plan. To see whichdevices are compatible with the Verizon Wireless 4G SIM card, visitverizonwireless.com/certifieddevice.Inserting the SIM card1. Take the back cover off.See “Removing the back cover”.2. If the battery is installed, take the battery off.See “Removing the battery”.3. Slide out the SIM card holder.
26 Basics4. With the SIM card’s gold contacts facing down and its cut-offcorner facing out, insert the SIM card into the SIM card slot.
Removing the SIM cardBasics 27Make sure to switch off your phone before removing your SIM card.Otherwise, the phone will automatically turn off when you remove the SIMcard.1. Take the bottom cover off.See “Removing the bottom cover”.2. Take the battery off.See “Removing the battery”.3. With your thumb, slide out the SIM card slot and carefully lift theSIM card.Remember to reinsert the SIM card in your wireless device for you touse Verizon Wireless services.
28 BasicsShould your SIM card be lost or damaged, visit verizonwireless.com/myverizon to order a replacement SIM. You can also call 1-800-922-0204 tospeak with a Customer Service Representative. For toll-free support outsideof the U.S. call +1-908-559-4899 for 24/7 global support. For additionalinformation about 4G SIM cards, visit verizonwireless.com/4GSISIM.BatteryYour phone uses a rechargeable battery. Please use only originalbatteries and accessories that came with your phone or replacementsthat we recommend.How long the battery can last before it needs recharging depends onhow you use your phone. Among these are the phone features andaccessories you use (for example, leaving your Bluetooth connectionalways on uses more power). Long phone calls and frequent webbrowsing use up much battery. Also, consider your location: poorsignal strength from your mobile <strong>net</strong>work and extreme temperaturemake the battery work harder.
Inserting the batteryInsert the battery (with its exposed copper contacts first) into thebattery compartment. Then gently push the battery into place.Basics 29
30 BasicsCharging the batteryThe battery is partially charged when shipped. Before you turn onand start using your phone, it is recommended that you chargethe battery. Some batteries perform best after several full charge/discharge cycles.• Only the power adapter and USB sync cable provided with yourphone must be used to charge the battery.• Do not remove the battery from the phone while you are charging itusing the power or car adapter.1. Plug the power adapter into the USB connector of your phone.2. Plug in the power adapter to an electrical outlet to start chargingthe battery.As the battery is being charged, the notification LED shows a solid redlight. The light turns to solid green when the phone is fully charged.
When you charge the battery while the phone is on, the chargingbattery icon ( ) is displayed in your phone’s status bar. After thebattery has been fully charged, the charging battery icon turns to afull battery icon ( ).Basics 31As a safety precaution, the battery stops charging when it overheats.Removing the battery1. Take the back cover off.See “Removing the back cover”.2. Lift out the battery from the small opening on the bottom side ofthe battery compartment.
32 BasicsStorage cardUse the microSD card to store your photos, videos, and music. You’llfind the microSD card already inserted in your phone.Inserting the storage card1. Take the back cover off.See “Removing the back cover”.2. Take the battery off.See “Removing the battery”.3. Insert the microSD card into the storage card slot with its goldcontacts facing down and push it until it clicks into place.
Removing the storage card1. Take the back cover off.See “Removing the back cover”.2. Take the battery off.See “Removing the battery”.3. Push the storage card in to eject it from its slot.4. Slide the storage card out from its slot.Basics 33Removing the storage card while the phone is onWhen you need to remove the storage card while the phone is on,unmount the storage card first to prevent corrupting or damaging thefiles in the storage card.1.2.Press HOME> MENU, and then tap Settings.Scroll down the screen, and then tap SD & phone storage.3. Tap Unmount SD card.4.Remove the storage card by following the steps in “Removing thestorage card”.
34 BasicsSwitching your phone on or offSwitching your phone onPress and hold the POWER button for a few seconds until the screenturns on.When you turn on the phone for the first time, you’ll need to set it up. Seethe Getting started chapter for details.Switching your phone off1. If the display is off, press the POWER button to turn it backon, then unlock the screen by sliding down the bar on the lockscreen.See “Unlocking the screen” in the Getting started chapter fordetails.2. Press and hold the POWER button for a few seconds.3. When the Power options menu appears, tap Power off.
Finger gesturesBasics 35TapPress andholdSwipe orslideDragFlickRotatePinchWhen you want to type using the keyboard, select itemsonscreen such as application and settings icons, or pressonscreen buttons, simply tap them with your finger.To open the available options for an item (for example, acontact or link in a web page), simply press and hold the item.To swipe or slide means to quickly drag your finger verticallyor horizontally across the screen.Press and hold your finger with some pressure before youstart to drag. While dragging, do not release your finger untilyou have reached the target position.Flicking the screen is similar to swiping, except that youneed to swipe your finger in light, quicker strokes. This fingergesture is always in a vertical direction, such as when flickingthe contacts or message list.For most screens, you can automatically change the screenorientation from portrait to landscape by turning the phonesideways. When entering text, you can turn the phonesideways to bring up a bigger keyboard.In some apps, like Gallery or the web browser, you can “pinch”the screen using two fingers (for example, thumb and indexfinger) to zoom in or zoom out when viewing a picture or aweb page.
Getting startedSetting up your phone for the first timeWhen you switch on your phone for the first time, you’ll be asked toset up your phone. You can choose your language and whether youwant your current location to be automatically detected.Just follow the onscreen instructions and you’ll be up and runningwith your phone in no time.Some features that need to connect to the Inter<strong>net</strong> such as location-basedservices and auto-sync of your online accounts may incur extra data feesfrom Verizon Wireless. Don’t worry. You can enable or disable them in yourphone’s settings as you go along later on. To find out how, see the Settingschapter.
Home screenGetting started 37Your Home screen is where you make your phone your own. It comeswith a weather clock widget that shows the time and weather inyour current location. You can also add your favorite apps, shortcuts,folders and widgets so they’re always just a tap away.To find out how, see the Personalizing chapter.Extended Home screenAs you start to do more things with your phone, you might find thatone Home screen is not enough. No problem. You can use up to sixextra screens. It should be plenty.Slide your finger horizontally to the left or right and you’ll discovermore space for adding icons, widgets, and more.Press HOME to return to the main Home screen (that is, the centerhome screen).
38 Getting startedUsing Leap viewTo jump straight to the screen that you want, press HOME while onthe main Home screen or pinch the screen to show the Leap view. Itreveals all seven Home screens as thumbnails.Just tap the one you want and you’ll leap right there.
Status and notificationsGetting started 39Status iconsYou can tell a lot about your phone by checking the icons in its statusbar. Here’s what each one means:Signal strengthLTE connectedLTE in use3G connected3G in use1xRTT connected1xRTT in useRoamingNo signalNo SIM card installedData synchronizingBattery is fullBattery is chargingBattery is low (20% remaining)Battery is very low (10% remaining)Bluetooth is onConnected to a Bluetooth deviceConnected to a Wi-Fi <strong>net</strong>workAirplane modeSilent modeVibrate modePhone microphone is mute
40 Getting startedNetwork sharing is onGPS is offGPS is onSpeakerphone onWired microphone headsetconnectedWired headset connectedAlarm is setNotification iconsA busy life means a busy phone. Notification icons on the status barmake it easy for you to keep on top of your messages, calendar eventsand alarms. Here’s what each one means:New Gmail messageNew Microsoft ExchangeActiveSync or POP3/IMAP emailProblem with email deliveryNew SMS/MMSProblem with SMS/MMS deliveryNew Google Talk instantmessageNew voicemailCall in progressMissed callCall on holdCall forwarding onMessage forwarding onThe phone is connected to acomputer via USB cableWi-Fi is on and wireless <strong>net</strong>worksare available
Getting started 41Upcoming eventNew updates from your social<strong>net</strong>worksNew tweetMatched contacts suggestionNew push messageBluetooth pairing requestPhone software update availableTV outSong is playingFM Radio app in useVoice recording is onPortable Wi-Fi Hotspot is onUploading data (animated)Downloading data (animated)Waiting to uploadDownloaded Android Market appinstalled successfullyUpdate available for an appdownloaded from Android MarketStorage card is safe to remove orstorage card is being preparedNo storage card installed on thephoneStorage card is low on free spaceGeneral notificationMore (not displayed) notificationsCompass needs orientation
42 Getting startedNotification LEDThe notification LED shows a:• Solid green light when the phone is connected to the poweradapter or a computer and the battery is fully charged.• Flashing green light when you have a pending notification.• Solid red light when the battery is being charged.• Flashing red light when the battery level reaches very low.Notifications panelWhen you get a new notification, you can open the Notifications panelto see the message, reminder or event notification. The Notificationspanel also lets you switch between recently-opened apps as quickly aspossible.Opening the Notifications panelPress and hold the status bar, then slide your finger downward toopen the Notifications panel.
Getting started 43If you have several notifications, you can scroll down the screen to seethem all.You can also open the Notifications panel on the Home screen by pressingMENU and then tapping Notifications.Switching between recently-opened appsOn the Notifications panel, you can easily access up to eight apps youjust recently opened.1. Press and hold the status bar, then slide your finger downward toopen the Notifications panel.2. In the Recent apps section, slide your finger left or right to seerecently-opened apps.
44 Getting started3. Tap an app to open it.You can also go to the Recent apps screen when you press and holdHOME .Closing the Notifications panelPress and hold the bottom bar of the Notifications panel, then slideyour finger up the screen. Or just press BACK .Connecting your phone to a computerWhenever you connect your phone to a computer using the USBcable, the Connect to PC screen opens and lets you choose the typeof USB connection. Select one of the following choices, and then tapDone:Charge onlyHTC SyncSelect this option if you only want to charge the battery whileyour phone is connected to your computer.Select this option to synchronize contacts, calendar, and otherinformation between your computer and your phone. For moreinformation, see “Synchronizing with your computer” in theAccounts and sync chapter.
Getting started 45Disk driveInter<strong>net</strong>ConnectionModeInter<strong>net</strong> passthroughThis mode is available only when there’s a microSD card on yourphone. Select this mode when you want to copy files between yourphone’s storage card and your computer. For more information,see “Copying files to or from the storage card” in this chapter.When Disk drive mode is enabled while your phone is connectedto the computer, you will not be able to use apps on your pho<strong>net</strong>o access the storage card.When you do not have Inter<strong>net</strong> connection on your computer,you can select this mode to share your phone’s mobile dataconnection with your computer. For more information, see “Usingyour phone as a modem (tethering)” in the Inter<strong>net</strong> connectionschapter.If you don’t have a data plan for your phone or you don’t haveaccess to a Wi-Fi <strong>net</strong>work, you can select this mode to shareyour computer’s Inter<strong>net</strong> connection with your phone. For moreinformation, see the Inter<strong>net</strong> connections chapter.You can also change the type of USB connection on-the-fly, withouthaving to disconnect and reconnect your phone. Slide open theNotifications panel, and then tap the notification that says “Select tochange USB connection type” to open the Connect to PC screen again.To change the default connection type or choose between showing andhiding the Connect to PC screen, press MENU from the Home screen, andthen tap Settings > Connect to PC.
46 Getting startedCopying files to or from the storage cardYou can copy your music, photos, and other files to your phone’sstorage card.1. Connect your phone to your computer using the supplied USBcable.2. On your phone’s Connect to PC screen, tap Disk drive, and thentap Done.On your computer, the connected phone is recognized as aremovable disk.3. Navigate to the removable disk and open it.4. Do one of the following:• Copy the files from the computer to the phone’s storagecard’s root folder.• Copy the files from the phone’s storage card to a folder inyour computer.5. After copying the files, unmount the removable disk (that is, theconnected phone) as required by your computer’s operatingsystem to safely remove your phone.6. Do one of the following:• Disconnect the phone from the computer.• If you want to keep the phone connected to the computer butwant the phone to be able to access the storage card, openthe Notifications panel, tap Disk drive, select an option exceptDisk drive, and then tap Done.
Searching your phone and the WebGetting started 47Find all types of information on your phone and the Web. SearchAnywhere sifts through different files, information, and apps on yourphone. You can also choose to search the Web using your favoriteweb search service.Simply press SEARCH from the Home screen. Then enter the firstfew letters of what you want to search for. Matching items will beshown as you type.12431 This icon ( ) indicates that your phone will search for all types ofinformation.Tap it if you want to choose and search only for one type of item, forexample, Mail.
48 Getting started2 Type in what you want to search for.3 Matching search suggestions and results. You can:•••Scroll down to see more search results.Tap to see more results for a particular category.Tap a search result item to open its app.4 After entering a word or phrase in the search box, tap to search the Webusing your favorite search service. To find out how to select a searchservice to use, see “Setting your phone’s search options”.Setting your phone’s search options1. From the Home screen, press SEARCH .2.When the search box appears, press MENU, and then tapSettings.3. Tap any of the following:Web search engineSelect areas tosearchChoose a web search service you want to use.Choose the types of items or apps to include inthe search. You can also press and hold andarrange items according to search priority.
Getting started 49Quickly looking up information on the WebQuick Lookup helps you learn about something right on the spot.When you enter a new word or phrase, you can readily look it up inpopular websites or search services such as Wikipedia, Google Search,YouTube, Google Translate, and Google Dictionary.1. Press HOME , and then tap > Quick Lookup.2. If the onscreen keyboard is open, press BACK to close it firstso you’ll see the bottom tabs.3. Slide across the tabs to pick where you want to look upinformation. Then in the search box, enter what you want tosearch for.If, for example, you’ve found the information you were looking forin one tab such as Wikipedia, you can switch to the other tabs toautomatically search the same item in Google Search on the Web,watch related videos in YouTube, or look up translations and meaningsin Google Translate and Google Dictionary.
50 Getting startedTranslating words to other languages1. Press HOME , and then tap > Quick Lookup.2. Press BACK to hide the onscreen keyboard first, then slide tothe Google Translate tab.3. Under From language, choose the original language, then enterthe word or phrase you want to translate.4. Under To language, choose from the languages available fortranslation.5. Tap Translate.Adjusting the volumeAdjusting the ringer volume changes the volume level of the phoneringtone, while adjusting the media volume changes the volume levelof sound notifications and music or video playback.
Getting started 51Adjusting the ringer volume• Press the VOLUME UP or VOLUME DOWN button on the rightpanel of the phone to adjust the ringer volume to your desiredlevel. The Ringer volume window appears on the screen todisplay the volume levels.• While in the lowest ringer volume level (Silent mode), pressVOLUME DOWN once to set your phone to Vibrate mode. Thephone vibrates and the vibrate mode icon (status bar.) appears in the• While in Vibrate mode, press VOLUME UP once to switch to silentmode. The speaker mute icon () displays in the status bar.Adjusting the media volumeWhen playing music or watching video, press the VOLUME UP orVOLUME DOWN button on the right panel of the phone to adjust themedia volume. The Media volume window appears on the screen todisplay the volume level.Adjusting the earpiece volume for phone callsDuring a phone call, press the VOLUME UP or VOLUME DOWN button.Adjusting the volume via settings1. Press HOME > MENU, and then tap Settings > Sound >Volume.2. Drag the volume sliders to the left or right to adjust the volumelevels of your phone’s ringtone, media playback, alarms, andnotifications.Your phone briefly plays a sample tone with the volume beingadjusted as you drag a slider.
52 Getting started3. If you want the same volume for your ringtone and notifications,select Use incoming call volume for notifications.4. When you’re done, tap OK.Sleep modeSleep mode saves battery power by putting your phone into a lowpower state while the display is off. It also stops accidental buttonpresses when the phone’s in your bag or pocket. You’ll still receivemessages and calls though.To change the delay before your screen turns off, see “Adjusting the timebefore the screen turns off” in the Settings chapter.Switching to Sleep modeQuickly press the POWER button to turn off the display and switchyour phone to Sleep mode. Your phone also automatically goes intoSleep mode when it’s idle for a while.Waking up from Sleep modeYour phone automatically wakes up when you have an incomingcall. To wake it up manually, press the POWER button. You’ll need tounlock the screen.
Getting started 53Unlocking the screenPress the bar on the lock screen and then slide your finger down tounlock the screen or answer an incoming call.If you have set up a screen unlock pattern, pin, or password, you will beasked to draw the pattern on the screen or enter the PIN or passwordbefore it unlocks. See “Protecting your phone with a screen lock” in theSecurity chapter for details.
PersonalizingMaking your phone truly yoursMake your phone look and sound just the way you want it. Personalizeyour phone with a different wallpaper, skin, ringtone, and notificationsound for events such as incoming text, email, and calendar reminders.Tap the Personalize button (started.) right on the Home screen to getPersonalizing your phone with scenesYour phone becomes multiple phones in one when you use scenes.Scenes are personalized Home screen layouts that you can quicklyapply to your phone. By switching between scenes, you instantly turnyour phone into your perfect weekend phone, travel phone, workphone, or pure play phone.Everytime you add or modify something on the Home screen, your phoneautomatically saves your changes to the current scene selected.
Personalizing 55Using a preset sceneYour phone features preset scenes, each preconfigured with adifferent wallpaper and collection of widgets that reflect differentmoments in your life. You can choose a scene that is suitable for work,play, travel, or your social life.1.2.Press HOME , and then tap > Scene.Slide your finger on the screen from right to left to select thescene you want.3. Tap Apply.
56 PersonalizingCreating a new sceneYou’ll start with an empty Home screen when you create a new scene.1.2.Press HOME , and then tap > Scene.Press MENU, then tap New.3. Enter a new scene name, then tap Done.4.Personalize the scene by adding widgets and other elements,arranging the Home screen layout, and changing the skin orwallpaper. All of your changes will be automatically saved to thisscene.Renaming a scene1. Press HOME , and then tap > Scene.2.Slide your finger on the screen from right to left to select thescene you want to rename.3. Press and hold a scene thumbnail, then tap Rename.4. Enter a new scene name, then tap Done.Deleting scenes1. Press HOME , and then tap > Scene.2.3.Press MENU, then tap Delete.Slide your finger on the screen from right to left to browsethrough scenes, then tap one or more scenes you want to delete.4. Tap Delete.
Changing your wallpaperPersonalizing 57Personalizing your wallpaper with your favorite photo is a quick andeasy way to change the feel of your phone and give it a fresh look.Browse the collection of wallpapers included in your phone or choosefrom photos that you have taken with the camera. You can alsochange your Home screen to use an animated wallpaper.1.Press HOME , and then tap > Wallpaper.2. Tap one of the following:HTC wallpapersLive wallpapersGalleryChoose a preset wallpaper, then tap Preview > Apply.Choose from preset animated wallpapers. TapPreview to view the animation, and then tap Apply.Choose a photo that you have taken using thecamera or copied to your storage card. Crop thephoto and then tap Save.
58 PersonalizingApplying a new skinPersonalize beyond the Home screen by applying a new skin. Skins areset to give a different look and feel to most of your phone’s onscreenbuttons, application screens, option menus, and other items.1.2.Press HOME , and then tap > Skin.Slide your finger on the screen from right to left to select the skinyou want.3. Tap Apply.
Personalizing your Home screen with widgetsPersonalizing 59Widgets put at-a-glance important information and media contentup front on your Home screen. Some widgets are already added toyour Home screen for your convenience. You can add more from theavailable selections of widgets, or download more widgets.Adding a widget1. Go to a part of the Home screen where there’s space to add anew widget.2.Tap> Widget.3. Select a widget that you want.4.Most HTC widgets are available in a variety of designs and sizes tosuit your needs. Slide your finger on the screen from right to leftto view the different styles, and then tap Select to choose one.You can also add widgets that allow you to quickly switch on oroff certain settings of your phone, such as Wi-Fi, Mobile Network,Bluetooth, and more. Scroll down the widgets list, tap Settings, andthen tap the widget that you want.
60 PersonalizingChanging the settings of a widgetBasic settings of some widgets (for example, the People and Mailwidgets) can be modified from the Home screen.1. Press and hold a widget on the Home screen.The phone vibrates and you’ll see a colored box around thewidget. Don’t lift your finger just yet.2. Drag the widget to the Edit button (if it’s enabled).The relevant screen where you can change some settings for thiswidget then opens.3. Customize the widget settings.
Personalizing 61Adding icons and other shortcuts on your HomescreenPlace app icons on your Home screen to open apps quicker. Youcan also add shortcuts to settings and specific information such asa bookmarked webpage, someone’s phone number, a music playlist,route directions, and many other items, to your Home screen.The shortcuts available depend on the apps that are installed on yourphone.1.2.Go to a part of the Home screen where there’s space to add anew icon or shortcut.Tap, then do one of the following:• To add an app icon, tap App and then select one from theAdd app shortcut list.• To add a shortcut to a setting or information, tap Shortcut andthen select the type of information or setting.To add an app icon on the Home screen, you can also press HOME , tap, and then press and hold an app icon. Without lifting your finger, dragthe icon to an empty area on the Home screen, and then release it.
62 PersonalizingAdding folders on your Home screenUse folders to group related apps and other shortcuts to keep yourHome screen tidy and organized. You can also add information foldersthat show up-to-date information such as Bluetooth received files,your Facebook phonebook, and more.Creating a new folder and adding items to it1. Go to a part of the Home screen where there’s space to add anew folder.2.Tap> Folder.3. Tap New Folder.4.Press and hold an app icon or a shortcut that you want to moveto the folder. The phone then vibrates. Don’t lift your finger justyet.5. Drag the app icon or shortcut and drop it on top of the folder.Simply tap the folder to open it so you can access the apps andshortcuts inside the folder.Renaming a folder1. Tap the folder to open it.2. Press and hold the folder window’s title bar.3. Enter a new folder name and then tap OK.
Personalizing 63Rearranging or removing widgets and icons onyour Home screenRearrange the widgets and icons on your Home screen to give roomfor adding more items to the Home screen. You can also removewidgets and icons that you don’t frequently use.Moving a widget or icon1. Press and hold the widget or icon you want to move.The phone vibrates and you’ll see a colored box around thewidget or icon. Don’t lift your finger just yet.2. Drag the widget or icon to a new location on the screen.You can pause at the left or right edge of the screen to drag thewidget or icon onto another Home screen panel.3. When the widget or icon is where you want it, lift your finger.
64 PersonalizingRemoving a widget or icon1. Press and hold the widget or icon you want to remove.The phone vibrates and you’ll see a colored box around thewidget or icon. Don’t lift your finger just yet.2. Drag the widget or icon to the Remove button.3. When the widget or icon also turns red, lift your finger.Rearranging the Home screenReorder your Home screen panels in any way that fits how you usethe Home screen. For example, move the panels with frequently-usedwidgets, shortcuts, and folders closer to the main Home screen.1. Pinch the Home screen to show the Leap view.2. Press and hold the thumbnail of the home screen you want to move.The phone then vibrates. Don’t lift your finger just yet.3. Drag the thumbnail to its new position, and then lift your finger.
Personalizing 65The center thumbnail in Leap view is always the main Home screen.Changing your ringtones and alarmsSelect, create, and download sound sets (different collections ofringtone, notification sounds, and alarm) so that you can instantlychange from subtle ringtone and notification sounds while you’re inthe office into something fun when you’re out with friends.Choosing a preset sound set1. Press HOME , and then tap > Sound set.2. On the Sound sets screen, tap a sound set name.
66 Personalizing3. You can tap to hear sample tones of the assigned ringtone,notification sounds, and alarm for that sound set.4. Tap Apply.Creating a sound set1. Press HOME , and then tap > Sound set.2.On the Sound sets screen, tap New sound set.3. Enter a new sound set name, then tap Done.The newly created sound set is then added to your phone’s list ofsound sets. To find out how to assign different tones to the soundset, see “Customizing a sound set”.Customizing a sound setYou can customize a sound set by applying your personal choiceof ringtone, notification sounds, and alarms that may be from yourphone’s preset selection or your storage card (except for notificationsounds).To find out how to copy files to your storage card, see the Gettingstarted chapter.Be sure to choose the correct sound set before changing the ringtone,notification sounds, and alarm since your phone automatically saves yourchanges to the current sound set selected.
Changing the ringtone1. Press HOME , and then tap > Ringtone.Personalizing 672. Scroll through the available ringtones and tap the ringtone youwant to use.The ringtone briefly plays when selected.3. If the audio file is on your storage card, tap New ringtone, selectthe item you want to import to the Ringtones list, then tap OK.4. Tap Apply.Changing the notification sounds1. Press HOME , and then tap > Notification sound.2. Choose the type of notification that you want to change.3. Scroll through the available tones and tap the item you want touse.A sample tone briefly plays when selected.4. Tap Apply.Changing the alarm sound1. Press HOME , and then tap > Alarm.2. Scroll through the available tones and tap the item you want touse.A sample tone briefly plays when selected.3. If the audio file is on your storage card, tap New alarm, select theitem you want to import to the Alarms list, then tap OK.4. Tap Apply.
68 PersonalizingDeleting sound sets1. Press HOME , and then tap > Sound set.2.3.4.Press MENU, and then tap Delete.Tap one or more sound sets you want to delete.Tap Delete.Rearranging or hiding application tabsYou can rearrange the tabs at the bottom of some of your phone’sapps to prioritize the types of information you frequently use orremove the tabs you don’t really need.1. Open an app that has the usual tabs at the bottom of its screen(for example, the contact details screen in People).2. Press and hold a tab. When the screen changes and shows youan empty area, lift your finger.3. Do any of the following:Move a tabRemove a tab4. When you’re done, press BACK .Press and hold the tab you want to move, and thendrag it to its new position.Press and hold a tab you want to hide, then drag itup. When you see a colored box, lift your finger.You cannot hide the tab if it’s grayed out.
Personalizing 69Putting back the tabs you’ve removed1. Open the app that you’ve previously removed some of its tabs.2. Press and hold a tab. When the screen changes and shows yousome of your hidden tabs, lift your finger.3. Press and hold the tab you want to show, then drag it down towhere you want to position it again.4. When you’re done, press BACK .
Phone callsMaking callsMaking a call on the Phone dialer screenYou can either dial a number directly, or use the Smart dial feature tosearch and call a stored contact or a number from your call history.1. Press HOME , then tap Phone.2. Begin entering the first few digits of a phone number orcharacters of a contact name on the phone keypad.The Phone dialer screen then displays a list of matching numbersand names.If you enter a wrong digit or letter, tapentire entry, press and hold .to delete it. To erase the3. Tap to close the phone keypad and to see if there are morematching numbers or contacts. To browse through the filteredlist, flick through the list or slide your finger up or down the listslowly.4. To place a call, do one of the following:• Tap a phone number or contact from the list.• After entering a complete number, tap Call.• To call a different phone number associated with the contact,you can tap at the right side of the contact name. On thecontact details screen, tap the number you want to call.
Phone calls 71While dialing or when the call is in progress, the status bar displays theCall in progress icon ( ) and its color changes to pulsing green.What is Smart dial?The phone dialer’s Smart Dial feature makes it quick and easy for youto place a call. Simply enter the phone number or first few letters ofthe person’s name you want to call. Smart Dial automatically searchesand filters your contacts list (stored on your phone, SIM card, andonline accounts such as Google Account and Exchange ActiveSync)and the phone numbers from the call history.Using Speed dialUse Speed dial to call a phone number with a single tap. For example,if you assign a contact’s number to the number 2 key, you can simplypress and hold this key on the Phone dialer keypad to dial thatnumber.Assigning a speed dial key1. Press HOME , then tap Phone.2.3.4.Press MENU, and then tap Speed dial > Add new.Enter the name of the contact you want to add. When the namecomes up in the list, tap the name.On the Speed dial screen, choose the phone number of thecontact to use, and a speed dial key to assign.5. Tap Save.Calling a speed dial number1. Press HOME , then tap Phone.2. On the phone keypad:
72 Phone calls• The number 1 key is generally reserved for your voicemail.Press and hold this key to call voicemail and retrieve yourvoicemail messages.• Press and hold the key that is associated with the contact youwant to call.Calling a phone number in a text message1. Press HOME , and then tap> Messages.2.Tap the number or name of the person who sent you the textmessage.3. Tap the phone number within the message.4. Edit the phone number if needed, and then tap Call.To call the message sender, press and hold the sender or the receivedmessage, and then tap Call on the options menu.To find out more about text messaging, see the Messages chapter.Calling a phone number in an email1. Press HOME , and then tap> Mail.2.3.In your email account’s inbox, tap the email that contains thephone number to call.In the email body, tap the phone number. A selection menu thenpops up and the phone number is highlighted.
Phone calls 73The phone will recognize a number as a phone number if thenumber has a minimum of 5 digits and have at least one of thefollowing:• Numbers starting with a plus sign (+). For example, +1-987-654-321 or +1987654321.• Numbers starting with an area or country code enclosed in aparenthesis. For example, (02)987654321 or (02)987-654-321.• Numbers separated by dashes. For example, (02)-987-654-321or 0987-654-321.4. Tap Call.5. When the phone dialer screen opens with the phone numberalready entered, tap Call.To find out more about using email on your phone, see the Emailchapter.Making an emergency callYou can make emergency calls from your phone even if you don’t havea SIM card installed or your SIM card has been blocked.1.2.Press HOME, then tap Phone.Dial the international emergency number for your locale (forexample, 000), and then tap Call.Additional emergency numbers may be included in your SIM card. Contactyour Verizon Wireless for details.If you’ve enabled but forgotten your lock screen password, lockpattern, and/or the SIM lock, you can still make emergency calls bytapping Emergency call on the screen.
74 Phone callsUsing Assisted DialingAssisted Dialing allows you to easily dial international calls whileroaming in another country.Turning Assisted Dialing on1. Press HOME > MENU, and then tap Settings > Call > AssistedDialing.2.3.Select the Enable Assisted Dialing check box.Under Reference Country, select the country that you want tocall.Editing a country’s international call settings1. Press HOME > MENU, and then tap Settings > Call > AssistedDialing...4.5.Under Reference Country, select the country whose settings youwant to edit.Press MENU and then tap Edit.Edit the Country Code, IDD Prefix (International Direct Dial),NDD Prefix (National Direct Dial), Area/City Code and NationalNumber Length (length of phone number).Tap Save.Resetting the Reference Country to the default1. Press HOME > MENU, and then tap Settings > Call > AssistedDialing..Under Reference Country, select the country whose settings youwant to set to default values.. Press MENU and then tap Set Default.
Receiving callsPhone calls 75When you receive a phone call from a contact, the Incoming callscreen appears and displays the caller ID icon, name, and phonenumber of the calling party.When you receive a phone call from someone who is not stored inPeople, only the default caller ID icon and phone number appear onthe Incoming call screen.You can use your phone’s polite ringer and pocket mode features forreceiving calls. To find out how, see “Turning on or off automatic ringvolume adjustment” in the Settings chapter.Answering or rejecting an incoming callIf To answer the call To reject the callDisplay is on Tap Answer. Tap Decline.
76 Phone callsIf To answer the call To reject the callDisplay is offWhen the Lock screen appears,drag the bar that shows the callername or number downward.Drag the bar upward.Or, press MENU and thentap Decline.You can also do one of the following to reject an incoming call:• Press the POWER button twice.• To reject the call and send a text message, press MENU, and thentap Send message.Changing the text message to send out for rejected calls1. On the Phone dialer screen, press MENU.2.Tap Settings > Edit default message.3. Enter the new message, and then tap OK.Muting the ringing sound without rejecting the callDo one of the following:• Press the VOLUME DOWN or VOLUME UP button.• Press the POWER button.• Place the phone face down on a leveled surface.If the phone is already facing down, the phone will still ring when there aresubsequent incoming calls.
HTC Caller IDPhone calls 77Everytime you make a call or your friend gives you a ring, you getto see your friend’s latest status update from social <strong>net</strong>works likeFacebook or Twitter right on the call screen.You also won’t miss people’s birthdays. You’ll see a birthday reminder,if your friend’s birthday will occur sometime within the next seven days.
78 Phone callsUsing in-call optionsWhen a call is in progress, use the buttons onscreen to mute orunmute the microphone or to turn on or off the speakerphone. Youcan also press MENU and choose whether to add a call, place the callon hold, mute the microphone, and more.Putting a call on holdPress MENU and then tap Hold to put the call on hold. When you puta call on hold, the status bar displays the Hold call icon ( ) and itscolor changes to pulsing red. Press MENU, and then tap Unhold toresume the call.Switching between callsIf you’re already on a call and accept another call, you can choose toswitch between the two calls.1. When you receive another call, tap Answer to accept the secondcall, and to put the first call on hold.2. To switch between the calls, tap the person you want to talk toon the screen.3. To end the current call and return to the other call, tap End call.
Phone calls 79Setting up a three-way conference callConference calling with your friends, family, or co-workers is easy.Make the first call (or accept a call), and then simply dial eachsubsequent call to add to the conference.1.2.Make a call to the first conference call participant.When connected, press MENU, tap Add call, and then dial thenumber of the second participant. The first participant is put onhold when you dial the second participant.3. When connected to the second participant, tap(merge).When you want to talk to a person in the conference call inprivate, tap , and then select Private call on the options menu.4. When finished, tap End call.Turning the speakerphone on or off during a callTo turn the speakerphone on, you can do any of the following:• Flip your phone over during a call (be sure that Flip for speaker isselected in HOME > MENU > Settings > Sound).• On the call screen, tap .The speakerphone icon (speakerphone is on.) appears in the status bar when theTo turn the speakerphone off, just flip the phone over again, facing itup. Or tap again.To decrease potential damage to your hearing, do not hold your phoneagainst your ear when the speakerphone is on.
80 Phone callsMuting the microphone during a callOn the call screen, tap to toggle between turning themicrophone on or off. When the microphone is turned off, the Muteicon ( ) appears in the status bar.Ending a callDo one of the following to end the call:• On the call screen, tap End call.If the phone display is off, press POWER to turn on the screen so you cantap End call.• Slide open the Notifications panel, then tap .• If you are using the provided wired headset, press the button toend the call.If the phone number of the person who called is not in your contactslist, you can choose to save the number to your contacts list after youhang up.
Using Call historyPhone calls 81Use the Call history to check missed calls, your dialed numbers andreceived calls.Checking a missed callYou will see the missed call iconcall.in the status bar when you miss a1. Slide open the Notifications panel to check who the caller is.2. To return the call, tap the missed call notification. Then tap thecaller’s name or number on the Call history screen.Checking calls in the call history1. Press HOME , and then tap> Call history. You can alsotap on the Phone dialer screen.2.On the Call history screen, you can:• Tap a name or number in the list to call.• Press and hold a name or number in the list to display theoptions menu where you can select to check the call historydetails, view contact information (if the number is storedin your contacts list), send a text message, delete from callhistory, or block the caller.• Tapto check only the call history of a particular contact.• Press MENU, then tap View to display just a particular type ofcalls such as Missed calls or Outgoing calls.You can also access Call history from the People app. For details, see thePeople chapter.
82 Phone callsAdding a new phone number to your contacts from callhistory1. On the Call history screen, press and hold a phone number thatyou want to save to your contacts, and then tap Save to People.2. Choose whether to create a new contact or to save the numberto an existing contact on your phone.3. Do any of the following:• When creating a new contact, enter the contact name, contacttype, and other information in the blank contact record thatappears. The phone number is automatically added to theMobile field in the Phone section.To store it as another type of number, for example a homenumber, tap the Mobile button.• When saving the number to an existing contact, tap a contactstored on your phone, and then select the number type.4. Tap Save.To find out how to add new contacts or edit the contact information, seethe People chapter.Clearing the call history listOn the Call history screen, you can do the following:• To remove one name or number from the list, press and holdthe name or number, and then tap Delete from call history.• To clear the entire list, press MENU, and then tap Delete all.
Call servicesPhone calls 83Your phone can directly link to the mobile phone <strong>net</strong>work, and enableyou to access and change the settings of various phone services foryour phone. Call services may include call forwarding, call waiting,voicemail, and more. Contact Verizon Wireless to find out about theavailability of call services for your phone.To open call services, press MENU from the Home screen, and thentap Settings > Call.Fixed DialingNumbersVoicemail serviceVoicemail settingsClear voicemailnotificationPhone settingsCell broadcastCell broadcastsettingsRestrict outgoing calls to a fixed set of numbers. Toenable this feature, you must know your SIM card’s PIN2code.Shows the current voicemail service being used.Specify another voicemail number aside from the voicemail number on your SIM card.If you have a notification of a new voicemail, you canclear the notification with this option.Edit the call reject message, choose whether to openthe message editor when you reject a call with amessage, and choose whether to allow automatic savingof an unknown contact number when a call with thatnumber ends.Enable or disable receipt of cell broadcast messagesfrom your service provider.Configure channels and language for cell broadcastmessages.
84 Phone callsCall forwardingCall barringsettingsAdditional callsettingsSelect how you want your phone to handle busy,unanswered, and unreachable calls. You can also set thecall forwarding option for all incoming calls.Choose whether to block various categories of incomingand outgoing call.Enable or disable operator services such as caller ID andcall waiting.Visual Voice MailVisual Voice Mail allows the management of voice mail directlyfrom the phone rather than accessing your voice mail via traditionalmethods. Visual Voice Mail displays a list of messages and allows theuser to choose which message to listen to or erase, without havingto dial into their mailbox, listen to voice instructions, or listen to priormessages.Setting up Visual Voice MailYou must be a Verizon Wireless subscriber before continuing.1. Press HOME , and then tapVisual Voice Mail.> Voice Mail >2. When prompted, enter your basic voice mail password.3. Read the terms of use statement and then tap Subscribe tocontinue.4. Tap Exit and wait 5 minutes before using Visual Voice Mail.
Using Visual Voice Mail1. Press HOME , and then tap> Voice Mail.Phone calls 85The first time you run Visual Voice Mail after setting it up, you areprompted to read the terms of use statement.2. After reading the terms of use statement, scroll down and tapAccept to continue.3. On the Voicemail screen, you can:• Tap Compose voicemail to record and send a voice mail.• View a list of received Visual Voice Mail messages.• Tap MENU and sort and delete voice mails, call your voice mailbox, configure voice mail settings, and more. You can also synchwith the Visual Voice Mail server to refresh the Visual Voice Maillist.• Visual Voice Mail is only available in the National EnhancedServices Coverage Area and only on select devices. Specificterms, conditions and monthly charges apply. Basic Voice Mailis required and V Block must be removed to use Visual VoiceMail.• Anyone in possession of this device can access voice mail. Tolimit unauthorized access to voice mail, consider locking thephone when not in use.
86 Phone callsTurning Airplane mode on or offIn many countries, you are required by law to turn off the phone whileon board an aircraft. A way to turn off the phone function is to switchyour phone to Airplane mode. When you enable Airplane mode,all wireless radios on your phone are turned off, including the callfunction, data services, Bluetooth, and Wi-Fi.To turn Airplane mode on or off, you can:• Press and hold POWER, and then tap Airplane mode.• From the Home screen, press MENU. Tap Settings > Wireless &<strong>net</strong>works, and then select or clear the Airplane mode check box.When enabled, the Airplane mode icon (bar.) is displayed in the statusWhen you disable Airplane mode, the call function is turned back on andthe previous state of Bluetooth and Wi-Fi is restored.
PeopleAbout PeopleWith the People app, you can sync your phone with contacts fromyour Google Account, computer, and Facebook. You can also syncwith work contacts from the Exchange ActiveSync Server in yourworkplace. To find out how, see “Ways of getting contacts into yourphone”.Per contact, link the person’s information from all these differentsources as one so you won’t have duplicated entries in your contactslist. To find out how to link, see “Merging contact information”.And that’s not all. You can manage your communications with yourcontacts via phone, messaging, and email without the need to jumpfrom one app to another. After you’ve linked contacts to their social<strong>net</strong>work accounts like Facebook, Twitter, and Flickr, you’ll also seetheir updates and events from these accounts all in one place.People screenThe People screen has the following tabs:1 2 3 4
88 People1 All tab Gives you access to all contacts on your phone, includingGoogle contacts, Exchange ActiveSync contacts, Phonecontacts, contacts stored on your SIM card, and Facebookcontacts. You can also use this tab to open or update Mycontact card. For more information, see “Setting up Mycontact card” in this chapter.2 Groups tab Lets you assign contacts to groups so you can easily sendan SMS, MMS, or email message to a whole group. Formore information, see “Contact groups” in this chapter.3 Onlinedirectoriestab4 Call historytabView your friends list in your social <strong>net</strong>work accounts. Youcan also search for contacts in your Exchange ActiveSyncaccount to copy to your phone.Lists all your dialed numbers and received and missedcalls. See “Using Call history” in the Phone calls chapter.Setting up My contact cardMy contact card provides a convenient way to store your personalcontact information so that you can easily send it via SMS, MMS, email,or Bluetooth.1.Press HOME , and then tap > People.2. On the All tab of the People screen, tap Me.If you are logged in to your Facebook account through Facebook for HTCSense, instead of Me, you will see the name you use in Facebook. Tap yourname. Then press MENU and tap Edit.3. Enter your name and contact details.4. Tap Save.
Ways of getting contacts into your phonePeople 89GmailFacebookPhone contactsSIM cardExchangeActiveSync ServerContacts on yourcomputerGoogle contacts are imported to your phone after yousign in to your Google Account.You can also create more Google contacts right fromyour phone. To find out how, see “Adding a new contact“in this chapter.See “Adding a social <strong>net</strong>work account” in the Accountsand sync chapter for details.See “Adding a new contact“ in this chapter.See “Importing contacts from your SIM card” in thischapter.See “Adding a Microsoft Exchange ActiveSync account”in the Email chapter.See “Synchronizing with your computer” in the Accountsand sync chapter.Adding a new contact1. Press HOME , and then tap > People.2. On the All tab, tap Add contact.3. Select the Contact type, for example Google or MicrosoftExchange ActiveSync. This determines which account thecontact will sync with. For more information, see “Ways ofgetting contacts into your phone” in this chapter.Some fields may not be supported when you’re adding contacts to yourSIM card.
90 People4. In the Name field, enter the first and last name of the contact,then tap OK.5. Enter the contact information in the fields provided.Press BACK if you want to close the onscreen keyboard firstand easily scroll through the other fields.6. Tap Save.Importing contacts from your SIM cardYou can copy all your SIM contacts to your phone. You can importthem as Phone contacts, Google contacts, or Exchange ActiveSynccontacts, if you have set up the relevant accounts.1.2.3.Press HOME , and then tap > People.On the All tab, press MENU, and then tap Import/Export >Import from SIM card.If you have Google or Exchange ActiveSync accounts set up onyour phone, tap the type for the imported contacts.4. Do one of the following:• To import all contacts, press MENU, and then tap Select all.• To import a contact, tap the contact.5. Tap Save.
Importing a contact from an Exchange ActiveSyncaccountYou can search for a work contact from your Exchange ActiveSyncaccount, and then copy it to your phone.People 91You need to have your Exchange ActiveSync account set up onyour phone first. To find out how, see “Adding a Microsoft ExchangeActiveSync account“ in the Email chapter.1.2.Press HOME , and then tap > People.On the Online directories tab, tap Company directory.3. Enter the name, and then tap .4.In the list, tap the name of the contact you want to copy to yourphone.5. Tap Save to People.Merging contact informationIf you have stored contacts with the similar contact information suchas name, email address, or mobile number in your phone and onlineaccounts, your phone will try to link them as one automatically orcreate a list of matched contact suggestions. If it doesn’t, you canmanually link them so that you won’t have duplicated entries in yourcontacts list.Also link your contacts with other social <strong>net</strong>work accounts such asTwitter and Flickr. You’ll then see their updates and events from theseaccounts all in one place.
92 PeopleAccepting matched contacts suggestionsWhen your phone finds contact information that can be merged, you’llsee the Matched contact suggestions icon ( ) in the notificationarea of the status bar.1.Slide down the Notifications panel, and then tap Matchedcontacts suggestion. Your phone displays all suggested contactsthat you can merge.2. Review the suggested links.3. When there are contacts you don’t want to merge, tap tobreak the contact information link.4. Tap OK.If you don’t want to merge any of your contacts, tap Dismiss all.
Viewing a list of all your linked contacts1. Press HOME , and then tap > People.2.On the All tab, press MENU, then tap More > Linked contacts.People 93The All linked contacts list then opens where you can check theaccount types and information merged. You can choose to tapbeside an account type to break the link.3. When you’re done, tap OK.Manually merging contact information1. Press HOME , and then tap > People.2.3.On the All tab, tap the name of the contact (not the icon orphoto) you want to link.On the upper-right corner of the screen, tap or (if thereare suggested links).4. On the screen, you can:• Under Suggest links, tapaccount.to link the contact to an• Under Add contact, tap one of the options to link to anothercontact.5. Tap Done.Breaking the contact information link between contacts1. Press HOME , and then tap > People.2.On the All tab, tap the name of the contact (not the icon orphoto) whose contact information link you want to break.
94 People3. On the upper-right corner of the screen, tap .4. Under the Linked contacts section, tap beside an account5.type to break the link.Tap Done.Your contacts listThe All tab of the People screen shows all your contacts, includingGoogle contacts, Exchange ActiveSync contacts, Phone contacts,contacts stored on your SIM card, and Facebook contacts.If you signed in to your Google Account and Facebook account when youfirst set up the phone, your contacts from those accounts will appear in thecontacts list when you open People.1237 8465
People 951 Create a new contact.2 Tap to edit your My contact card.3 This icon appears when the contact:• Has sent you a new text or email message, or tried to call you but youmissed the call.• Has updated his or her Facebook profile or has added photos on Flickror Facebook.• Has upcoming Facebook events or birthday.4 Your SIM card contact.5 Tap to open the contact details screen for that contact.6 Online status of a contact whom you are friends with in Google Talk.Online status icons are displayed if you’re signed in to Google Talk usingyour Google Account. For details, see “Chatting in Google Talk” in theSocial chapter.7 Instant status update appears when you’ve linked the contact to his or hersocial <strong>net</strong>work account.8 Tap the photo or icon to open a menu where you can quickly choose howto communicate with the contact. Depending on the contact informationstored, you can call, send a message or email, see the contact’s Facebookprofile, and map his/her address in Google Maps.
96 PeopleFiltering your contacts listYou can choose to display contacts of a particular type only, forexample Google contacts or Facebook contacts.1.2.3.Press HOME , and then tap > People.On the All tab, press MENU, then tap View.Select the types of contacts you want to show in your contactslist.You can also choose how you want to display and sort your contacts.4. Tap Done.Searching for a contact1. Press HOME , and then tap > People.2. Press SEARCH , then enter the first few letters of a contact’sfirst or last name, email, or company name.You can also type in the first few digits of your contact’s phonenumber. Matching contacts are displayed.
People 973. Tap the contact to open his or her contact details screen. See“Contact information and conversations” in this chapter for details.Backing up your contacts to the storage card1. Press HOME , and then tap > People.2.Press MENU, and then tap Import/Export > Export to SD card.3. Select an account or type of contacts to export, then tap OK.Importing contacts from the storage card1. Press HOME , and then tap > People.2.Press MENU, and then tap Import/Export > Import from SD card.You can only import contacts that were exported to the storage card usingthe Export to SD card feature on the phone. See “Backing up your contactsto the storage card”.3. If you have Google or Exchange ActiveSync accounts set up onyour phone, tap the type for the imported contacts.Deleting contacts1. Press HOME , and then tap > People.2.On the All tab, press MENU, and then tap Delete.3. Select the contacts you want to delete, and then tap Delete.4. When prompted, tap OK.
98 PeopleContact information and conversationsWhen you tap a contact on the People screen, the contact detailsscreen opens, showing you the information stored for that contact,exchanged messages and phone calls with that contact, updates andevents from social <strong>net</strong>works, and more.The contact details screen has the following tabs:12345 61 Details tab Shows the information you have stored for the contact,and allows you to get in touch with the contact directlyby tapping any of the displayed methods. For example,if the contact has a stored work phone number, tap Callwork to call that number.2 Messages tab Shows your exchanged SMS messages with the contact.You can reply to the contact’s message directly from thistab. To send a new message, press MENU, and then tapNew message. See the Messages chapter for details.3 Mail tab Shows all the email you have received from the contact.Tap an email to view it. To send a new email, tap Newmail. To find out more about sending email, see the Emailchapter.
4 Updates andevents tabShows the contact’s updates and events from social<strong>net</strong>work accounts like Facebook, Twitter, and Flickr.You’ll be able to see updates such as posted statusmessages, uploads, and profile changes from all theseaccounts. To find out more about Facebook for HTCSense, see the Social chapter.People 995 Gallery tab Shows the contact’s Facebook and Flickr photo albums.Tap an album to look at the photos in the album.You need to be logged in to the same social <strong>net</strong>works onyour phone to see the updates and events. If you are notlogged in, tap the relevant link on the screen to sign in.6 Call historytabLists all your incoming, outgoing, and missed calls to andfrom the contact. Tap a list item to call the contact usingthe displayed number.Editing a contact’s information1. Press HOME , and then tap > People.2.On the All tab, press and hold the contact, and then tap Editcontact.You cannot edit the contact information of a Facebook friend.3. Enter the new information for the contact.4. Tap Save.
100 PeopleSending contact information as a vCardShare the contact information on your phone in different ways such asa text or multimedia message, email, and Bluetooth. To find out abouthow to send through Bluetooth, see the Bluetooth chapter.Sending someone’s contact information1. Press HOME , and then tap > People.2.On the All tab, press and hold the name of the contact (not theicon or photo) whose contact information you want to send, andthen tap Send contact as vCard.You cannot send contact information that’s from your Facebook account.3. Choose how you want to send it.4. Select the contact details you want to share, and then tap Send.Sending your contact information1. Press HOME , and then tap > People.2.3.4.On the All tab, tap [Your name] My contact card.Press MENU, then tap Send my contact info.Choose how you want to send it.5. Select the contact details you want to share, and then tap Send.
Contact groupsPeople 101Assign contacts to groups so you can easily send a message or emailto a whole group. You can also sync groups on your phone with thegroups in your Google account, accessible via your computer’s webbrowser.We’ve also added the Frequent group as a special group type thatautomatically stores the contacts you dial or get calls from the most.Creating a group1. Press HOME , and then tap > People.2.On the Groups tab, tap Add group.3. Enter a name for the group, and then tap Add contact to group.4.Select the contacts you want to add to the group, and then tapSave.If your contacts list is long, you can use the search bar to search forcontacts quickly, or press BACK to hide the onscreen keyboard andscroll through the list.5. Tap to select a photo for the group.6. Tap Save.Editing a contact group1. Press HOME , and then tap > People.2.On the Groups tab, press and hold the group, and then tap Editgroup.
102 People3. You can:• Tap the group name to change the name. You can only changethe name for groups that you have created.• Tap the icon to the left of the group name to change orremove the group photo.• To add contacts to the group, tap Add contact to group,select the contacts you want to add, and then tap Save.• To remove a contact from the group, tapof the contact name.4. Tap Save.Sending a message or email to a groupat the right sideYou will be charged by your mobile provider for each message sent. Forexample, if you send a message to a group of five people, you will becharged for five messages.1.2.Press HOME , and then tap > People.On the Groups tab, tap the group you want to send a message oremail to.3. Go to the Group action tab, and then do one of the following:• Tap Send group message to send a message to the group. Forinformation about composing and sending messages, see theMessages chapter.• Tap Send group mail to send an email to the group. Forinformation on composing and sending email, see the Emailchapter.
People 103Rearranging your contact groups1. Press HOME , and then tap > People.2. On the Groups tab, press MENU, and then tap Rearrange.3. Press and hold at the end of the group name you want tomove. When the row is highlighted, drag it to its new position.4. Tap Save.Rearranging the members of a contact group1. Press HOME , and then tap > People.2.On the Groups tab, tap the group to see its members.3. Press MENU, and then tap Rearrange.4. Press and hold at the end of the contact’s name you want tomove. When the row is highlighted, drag it to its new position.5. Tap Save.Deleting a group1. Press HOME , and then tap > People.2.On the Groups tab, press and hold the group you want to delete,and then tap Delete group.You can only delete groups that you have created.
104 PeoplePeople widgetPut the group of people you contact most right on the Home screenof your phone by adding them as the People widget. Using the Peoplewidget, you can instantly place a call, send a message, or view detailsof a favorite contact with a single tap.Adding People widgetsStay in touch with different circles of friends or colleagues in yourlife. You can add several People widgets on the Home screen, with adifferent group of contacts on each widget.1.2.Press HOME , and then tap > Widget > People.Choose the widget style, and then tap Select.3. Select the group you want to add as a widget.4.Drag the widget to a blank space on a Home screen. When thewidget is where you want it, lift your finger.5. Repeat the above steps to add another People widget.Setting the default communication method1. On the Home screen, go to the People widget.2.3.Tap a contact on the widget.On the Select default action screen, tap the communicationmethod you want for the contact.Changing the default communication method1. On the Home screen, go to the People widget.2.Tap the name of a contact on the widget to open the person’scontact card.
3. Press MENU, and then tap More > Set widget action.4.On the Select default action screen, tap the communicationmethod you want for the contact.Getting in touch with a contact1. On the Home screen, go to the People widget.2.People 105Tap a contact (photo not the name) on the widget. The defaultcommunication method will be performed.If you have not set a default communication method, you needto choose one first. See “Setting the default communicationmethod”.Tap the name of the contact to open the contact details screen for thatcontact.
KeyboardUsing the onscreen keyboardWhen you start an app or select a field that requires text or numbers,the onscreen keyboard becomes available.After entering your text, you can tap or press BACK to close theonscreen keyboard.Selecting a keyboard layoutYou can choose from three different keyboard layouts to suit yourtyping style.1. On the onscreen keyboard, tap the Language key (for example,tap if you’re currently using the English onscreen keyboard).Then on the International keyboard options menu, tap Settings.If tapping the Language key doesn’t display the Internationalkeyboard menu, press HOME > MENU, and tap Settings >Language & keyboard > Touch Input.2. Tap Keyboard types, and then select the keyboard layout thatyou want to use. Choose one from the following:QWERTYPhone KeypadCompactQWERTYThis layout is similar to a desktop computer keyboard.This is the default keyboard layout.This layout resembles the traditional mobile phone keypad.This layout features two letters on each key. The keysize is slightly bigger than on the full QWERTY layout.
Keyboard 107Entering textUse the following keys while entering text using the onscreen keyboard:Press and hold keys with gray characters at the top to enter numbers,symbols, or accented letters. The gray character displayed on the keyis the character that will be inserted when you press and hold thatkey. Some keys have multiple characters or accents associated withthem.Shift key. Tap to enter an uppercase letter. Tap twice to turn on capslock.Tap to switch to the numeric and symbol keyboard.Enter key. Tap to create a new line.Tap the Up, Down, Left, or Right key to move the text cursor in the directionthat you want while you are entering or editing text.Backspace key. Tap to delete the previous character.Language key. The key you see depends on the keyboard languageyou are currently using. Tap to switch to another keyboard language(see “Enabling multiple keyboard languages”). You can also accessonscreen keyboard settings.Tap to toggle between Multitap and XT9 predictive modes whenusing the Compact QWERTY or Phone keypad layout. For moreinformation, see “Entering words with predictive text”.Tap to hide the onscreen keyboard.
108 KeyboardEnabling multiple keyboard languagesIf there are multiple keyboard languages available on your phone, youcan choose which languages to enable in the onscreen keyboard sothat you can switch to these languages and use them to enter text.1. On the onscreen keyboard, tap the Language key (for example,tap if you’re currently using the English onscreen keyboard).Then on the International keyboard options menu, tap Settings.If tapping the Language key doesn’t display the Internationalkeyboard menu, press HOME > MENU, and tap Settings >Language & keyboard > Touch Input.2. Tap International keyboard.3. Choose the languages that you want.Available languages depend on the region where you purchasedthe phone.Changing to the landscape onscreen keyboardWhen entering text, you can choose to use the landscape orientationof the onscreen keyboard. Turn your phone sideways to use a largerkeyboard for easy typing.• The Auto-rotate screen check box in HOME > MENU > Settings >Display needs to be selected for the screen orientation to automaticallychange.• The landscape orientation keyboard is not supported in all apps.
Entering words with predictive textKeyboard 109The onscreen keyboard has predictive text to help you type quicklyand accurately. Predictive text input is enabled by default, and wordsuggestions are displayed as you type.To enter a word in predictive mode, do any of the following:• If you see the word you want highlighted in green or orange, youcan simply tap the space bar to insert the word into your text.• If you see the word you want shown in the suggestions beforeyou have finished typing the entire word, tap the word to insert itinto your text.• If an arrow is shown to the right of the suggestion list, tap thearrow to see more suggestions.Setting a second language for the keyboardAside from the keyboard language you are currently using, you canset the predictive text to be bilingual. As you type, you’ll get wordsuggestions in two languages that you’ve selected.1. On the onscreen keyboard, tap the Language key (for example,tap if you’re currently using the English onscreen keyboard).Then on the International keyboard options menu, tap Settings.If tapping the Language key doesn’t display the Internationalkeyboard menu, press HOME > MENU, and tap Settings >Language & keyboard > Touch Input.
110 Keyboard2. Tap Bilingual prediction, and then choose the language you want.Adding a word to the predictive text dictionaryYour phone comes with a list of words that it references for predictivetext suggestions. Sometimes you may need to add a word to thepredictive text dictionary, for example a name or a specializedtechnical word.While entering text using the QWERTY keyboard layout, if you tap anyword on the suggestion list, it is automatically added to the predictivetext dictionary if it was not in the dictionary already.You can also add a word to the list manually:1.2.From the Home screen, press MENU, and then tap Settings >Language & keyboard > Touch Input.Tap Personal dictionary > Edit personal dictionary > Add new.3. Enter the word to add, and then tap OK.Editing or deleting a word in the predictive text dictionaryYou can edit or remove words that you previously added to thepredictive text dictionary.1.2.From the Home screen, press MENU, and then tap Settings >Language & keyboard > Touch Input.Tap Personal dictionary > Edit personal dictionary.• To edit a word, tap the word itself.• To delete words from the dictionary, press MENU and tapDelete. Then choose the words to remove and tap OK.
Keyboard 111Backing up your personal dictionary to your storage cardYou can use your storage card to back up the new words you’veadded to the predictive text dictionary.1.2.From the Home screen, press MENU, and then tap Settings >Language & keyboard > Touch Input.Tap Personal dictionary > Sync personal dictionary > Copy tostorage card.3. When prompted, tap OK.Importing your personal dictionary from your storagecard1. From the Home screen, press MENU, and then tap Settings >Language & keyboard > Touch Input.2.Tap Personal dictionary > Sync personal dictionary > Restorefrom storage card.3. When prompted, tap OK.
112 KeyboardEntering text by speakingNo time to type? Try speaking the words to enter it in most text fieldsthat let you use the onscreen keyboard.Simply press and hold the Language key. When your phone cues youto “Speak now”, tell your phone what you want to be typed in.• First make sure to select the language you’ll be using in the Voice input &output settings. See “Setting the voice input language”.• Since your phone uses Google’s speech-recognition service, you need tobe connected to the Inter<strong>net</strong> to enter text by speaking.Setting the voice input language1. From the Home screen, press MENU, then tap Settings > Voiceinput & output > Voice recognizer settings.2. Tap Language, then choose the language you want.Available languages depend on the voice input languagessupported by Google.Editing textYou can select, copy, or cut the text you enter using the onscreenkeyboard, then paste it in another text field within or across apps.Some apps may offer their own way of selecting or copying text.
Keyboard 113Selecting textHighlight a portion of a text or select all that you want to copy or cut.1.Press and hold the text field that contains the text to select. Don’tlift your finger just yet to display the magnifier.2. Drag your finger to move the text cursor to a letter within thetext that you want to select. It should be easy since the magnifiergives you a bigger view of the text.3. After positioning the text cursor, lift your finger. The textselection menu then pops up.4. Do one of the following:• Tap Select text. When the word where you’ve placed the textcursor is highlighted, drag the start and end markers to selectthe text you want.• Tap Select all to select everything in the text field.
114 KeyboardCopying and pasting text1. After you have selected the text you want to copy, tap Copy orCut.The selected text is then copied to the clipboard.2. Within the same or another app, press and hold a text fieldwhere you want to paste the text. Don’t lift your finger just yet todisplay the magnifier.3. Drag your finger to move the text cursor to where you want topaste the text.4. After positioning the text cursor, lift your finger. The textselection menu then pops up.5. Tap Paste.Adjusting touch input settingsOpen the Touch Input settings by doing one of the following:• On the onscreen keyboard, tap the Language key (for example,tap if you’re currently using the English onscreen keyboard).Then on the International keyboard options menu, tap Settings.• Press HOME , and then tap MENU and then tap Settings >Language & keyboard > Touch Input.Touch Input settingsKeyboard typesInternationalkeyboardSelect the keyboard layout to use. You can choosefrom QWERTY, Phone Keypad, or Compact QWERTY.Add or remove languages from the onscreenkeyboard language list.
Keyboard 115Bilingual predictionText inputTutorialPersonal dictionarySelect a secondary keyboard language to use. See“Setting a second language for the keyboard”.Set text input options when entering text, calibratethe keyboard, and set a sound and/or vibrationfeedback whenever you tap a key. See “Text input”for details.Learn how to use the onscreen keyboard with thisinteractive tutorial.Add, edit or remove words in the predictive textdictionary. See “Entering words with predictive text”.Text inputQWERTYPredictionSpell correctionSelect to enable the word prediction feature whichprovides a list of possible words that reflect thecharacters of the keys you have tapped as well ascharacters of nearby keys.Select to correct typographical errors by selectingfrom a list of possible words that reflect thecharacters of the keys you have tapped as well ascharacters of nearby keys.Phone keypad & compact QWERTYSpell correctionSelect to correct typographical errors by selectingfrom a list of possible words that reflect thecharacters of the keys you have tapped as well ascharacters of nearby keys.
116 KeyboardPhone keypad & compact QWERTYWord completionWhen using the Compact QWERTY or Phone keypad,lets you select from a list of possible combinationsbased on the characters that appear on the keys thatyou tapped.Other settingsSound feedbackVibrate when typingSelect to hear a clicking sound whenever you tap akey on the keyboard.Select to enable vibration feedback whenever youtap a key on the keyboard.Finger touch precisionCalibration toolReset calibrationTap to re-calibrate the keyboard touch accuracy. Recalibratethe keyboard if you feel that the keyboardkeys are not responding accurately to your taps.Tap to reset the calibration back to factory default.
MessagesAbout MessagesKeep in touch with important people in your life. Use the Messages appto compose and send text (SMS) and multimedia messages (MMS).Press HOME , and then tap > Messages.On the All messages screen, all your sent and received messages areneatly grouped into conversations, by contact name or phone number.You can:• Scroll up or down the list of conversations by swiping your fingeron the screen.
118 Messages• Tap a contact name or number to view the exchange ofmessages.• Tap the photo or icon to open a menu where you can quicklychoose how to communicate with the contact.You can also view your messages on the Home screen with theMessages widget. If this widget is not there already, you can add it byfollowing the steps in “Personalizing your Home screen with widgets”in the Personalizing chapter.Sending a text message (SMS)If you exceed the limit on the number of characters for a single textmessage, your text message will be delivered as one but will be billedas more than one message.1.2.Press HOME , and then tap > Messages.On the All messages screen, tap Compose message.3. Fill in one or more recipients. You can:• Enter the first few letters of a contact name or starting digitsof a mobile number. As you type, matching names with phonenumbers from your stored contacts are displayed. Tap a nameor one of the contact’s number.
Messages 119• Tap the icon, and then select the phone numbers of thecontacts to whom you want to send the message. You canalso select contact groups as recipients.When you have selected all the message recipients, tap Done.• Enter the complete phone numbers directly in the To field.4. Tap the box that says “Tap to add text”, and then enter yourmessage.5. Tap Send.Or press BACK to save it as a draft. To open and edit a draftmessage, see “Resuming a draft message”.Your text message automatically becomes a multimedia message when youenter an email address as the recipient, add a message subject, attach anitem, or compose a very long message.
120 MessagesSending a multimedia message (MMS)To compose a multimedia message, start by creating a new textmessage. Then choose the type of attachment to include in yourmessage.1.2.Press HOME , and then tap > Messages.On the All messages screen, tap Compose message.3. Fill in one or more recipients. You can:• Enter the first few letters of a contact name or starting digitsof a mobile number. As you type, matching names with phonenumbers and email addresses from your stored contacts aredisplayed. Tap a contact’s number or email address.Email addresses will be displayed when Show email addressis selected in Recipient list settings. To find out more aboutmessage settings, see “Setting message options”.• Tap the icon, and then select the phone numbers of thecontacts to whom you want to send the message. You canalso select contact groups as recipients.When you have selected all the message recipients, tap Done.• Enter the complete phone numbers or email address directlyin the To field.4. To add a subject line, press MENU and then tap Add subject.5. Tap the box that says “Tap to add text”, and then enter yourmessage.6. Tap and then choose the type of attachment.PictureSelect Camera to take a photo and attach it, orGallery to attach a photo from your storage card.
Messages 121VideoAudioApprecommendationLocationContact (vCard)Appointment(vCalendar)SlideshowSelect Camcorder to capture a video and attach it,or Videos to attach a video from your storage card.Select Voice Recorder to make a voice recordingand attach it, or Music & sounds to attach a musicfile or voice recording from your storage card.Choose an app you’ve installed from AndroidMarket that you want to share with others. The URLfrom which the app can be downloaded will beinserted to your message.Add your current location (requires GPS to beturned on), or a location you pick on a map to yourmessage. See the Maps and location chapter formore details.Select a contact, and then select the information toattach.Select the calendar event you want to attach.See “Creating a slideshow” for details.7. To make changes to your attachment, tap or (dependingon the type of file you’ve attached).You can also press MENU, then tap Remove to start over.8. Tap Send.Or press BACK to save it as a draft. To open and edit a draftmessage, see “Resuming a draft message”.
122 MessagesCreating a slideshowIn a multimedia message, you can add slides, each containing a photo,video, or audio.1.2.In the multimedia message you’re composing, tap >Slideshow.On the Edit slideshow screen, tap Add slide.3. Tap Slide 1.4. To compose your slideshow, do any of the following:Add a pictureAdd a videoAdd music or avoice recordingAdd a captionAdd a new slideView the next orprevious slidePreview yourslideshowTap Insert picture.Press MENU, and then tap Add video (you cannotadd both a picture and a video on the same slide).Press MENU, and then tap Add audio.Tap the box that says “Add text”.Tap Add slide.Tap or .Press MENU, and then tap Preview.For more options, press MENU, and then tap More.5. When finished, tap Done to attach the slideshow to yourmessage.6. Tap Send.Or press BACK to save it as a draft. To open and edit a draftmessage, see “Resuming a draft message”.
Resuming a draft messageMessages 1231.2.On the All messages screen, press MENU, and then tap Drafts.Tap the message to resume editing it.3. When you finish editing the message, tap Send.Viewing and replying to a messageDepending on your notification settings, the phone plays a ringtone,vibrates, or displays the message briefly in the status bar when youreceive a new message. A new message icon is also displayed inthe status bar.You can change the notification for new messages. See “Setting messageoptions”.
124 MessagesViewing a messageTo open and read your received messages, you can:• Press and hold the status bar, and then slide your finger downto open the Notifications panel. Then tap the new messagenotification.• Open the Messages app to access and read the message.While reading the message, you can:Call or save a phonenumber contained in themessageOpen a link in the messageSend to or save an emailaddress contained in themessageForward a messageCheck message detailsTap the phone number. Then choose whether to dialthe number or add it to your contacts.Tap the link to open it in the web browser.Tap the email address. Then choose whether to sendan email, send a multimedia message, or save theemail address to your contacts.Press and hold the message to open the optionsmenu, and then tap Forward.Press and hold the message to open the optionsmenu, and then tap View message details.Replying to a message1. On the All messages screen, tap a contact (or phone number) todisplay the exchange of messages with that contact.2. To reply to the message, tap the text box at the bottom of thescreen, then enter your reply message.You can also reply with a multimedia message. See “Sending amultimedia message (MMS)” for details.3. Tap Send.
Messages 125Replying to another phone number of the contactWhen a contact has multiple phone numbers stored on your phone,you’ll see the particular phone number used within the message.There’s also a bold letter before the phone number to indicate thenumber type (for example, M stands for Mobile).Keep in mind that your response will be sent to the phone number ofthe latest message you’ve received from this contact.If you want to change the phone number before you send out yourreply, press MENU, then tap More > Recipient phone number. Selectanother phone number of this contact, and then tap OK.
126 MessagesViewing and saving an attachment from a multimediamessageIf you are concerned about the size of your data downloads, check themultimedia message size first before you download it.When Auto-retrieve in MMS settings is disabled, only the message header isdownloaded. To download the entire message, tap the Download button atthe right side of the message. To find out more about message settings, see“Setting message options”.• If there’s a media attachment such as a photo or video in areceived message, tap it to view the content.• If the attachment is a contact (vCard), tap it to view the contactinformation, then tap Save to add to your contacts.Open the People app to view the contact. See the Peoplechapter.• If the attachment is an appointment or event (vCalendar), tap itand then choose the calendar where to save it. Tap Import.Open the Calendar app to view the appointment or event. Seethe Calendar chapter.• To save the attachment to your storage card, press and hold themultimedia message, and then tap Save [attachment type] onthe options menu.Viewing push messagesPush messages contain a web link. Often, the link will be to downloada file that you have requested, for example a ringtone.When you receive a push message, a notification iconin the status bar.is displayed
Messages 127Opening and reading a new push message1. Press and hold the status bar, and then slide the status bar downto open the Notifications panel.2.Tap the new message.3. Tap Visit website.Viewing all your push messages1. Press HOME , and then tap > Messages.2.Press MENU, and then tap Push messages.Managing message conversationsProtecting a message from deletionYou can lock a message so that it will not be deleted even if youdelete the other messages in the conversation.1.2.On the All messages screen, tap a contact (or phone number) todisplay the exchange of messages with that contact.Press and hold the message that you want to lock.3. Tap Lock message on the options menu.A lock icon () is displayed at the right hand side of the message.Copying a message to your SIM card1. On the All messages screen, tap a contact (or phone number) todisplay the exchange of messages with that contact.2. Press and hold a message, and then tap Copy to SIM.A SIM card icon (message.) is displayed at the right hand side of the
128 MessagesDeleting a single message1. On the All messages screen, tap a contact (or phone number) todisplay the exchange of messages with that contact.2.3.Press and hold the message that you want to delete.If the message is locked, tap Unlock message on the optionsmenu, and then press and hold the message to display theoptions menu again.4. Tap Delete message on the options menu.5. When prompted to confirm, tap OK.Deleting several messages within a conversation1. On the All messages screen, tap a contact (or phone number) todisplay the exchange of messages with that contact.2.Press MENU and then tap More > Delete.3. Tap Delete by selection.You can also tap Delete by phone number if the contact used multiplephone numbers throughout the conversation and you want to delete themessages sent from a particular number.4. Select the messages you want to delete and then tap Delete.
Messages 129Deleting a conversation1. On the All messages screen, press and hold a contact (or phonenumber) whose messages you want to delete, and then tapDelete.While looking at the exchange of messages in a conversation,you can also press MENU and then tap More > Delete > Deletethread.Any locked messages in the conversation thread will not bedeleted unless you select the Delete locked messages check box.2. When prompted to confirm, tap OK to delete the entire thread.Deleting several conversations1. On the All messages screen, press MENU, and then tap Delete.2.Select the conversation threads you want to delete.3. Tap Delete.Any locked messages will not be deleted.
130 MessagesSetting message optionsOn the All messages screen, press MENU and then tap Settings. You’llfind several groups of settings.Received messagesReceived notificationPlay notificationsoundNotification soundVibrateReceive a notification in the status bar when a newmessage arrives.Set your phone to play a sound when a new messagearrives.Choose a sound that will play when you receive amessage.Set your phone to vibrate when a new messagearrives.Sent messagesSent notificationFailure notificationPlay notificationsoundNotification soundVibrateReceive a notification in the status bar when amessage is sent successfully.Receive a notification in the status bar when amessage is not sent successfully.Set your phone to play a sound when a sent or failurenotification is received.Choose a sound that will play when there’s a sent orfailure notification.Set your phone to vibrate when a new messagearrives.
Messages 131Display message onscreenSet your phone to show pop-up notifications (notjust in the status bar) when your messages are sentsuccessfully or not. You can also select None todisable this option.Storage settingsDelete old messagesText message limitMultimedia messagelimitAutomatically delete older messages, except forlocked messages, when the set limits are reached.Choose the maximum number of text messagesto store in each conversation thread (this does notinclude locked messages).Choose the maximum number of MMS messagesto store in each conversation thread (this does notinclude locked messages).Recipient list settingsShow email addressSearch and display the email addresses of storedcontacts when you’re adding message recipients.SMS settingsDelivery reportsPriority settingSend callbacknumberReceive a report on the delivery status of yourmessage.Set the message priority of SMS messages sent.Divert return calls to another phone number.
132 MessagesCallback numberManage SIM cardmessagesSet the phone number to be used for diverted calls.View text messages stored on your SIM card. You canalso delete or copy these messages to your phone’smemory.MMS settingsDelivery reportsRead reportsAuto-retrieveRoaming autoretrievePriority settingMaximum messagesizeReceive a report on the delivery status of yourmessage.Receive a report whether each recipient has read themessage or deleted it without reading.Automatically retrieve all your MMS messagescompletely. When selected, the MMS messageheader plus the message body and attachments willautomatically download to your phone. If you clearthis check box, only the MMS message header will beretrieved and shown on the All messages screen.Automatically retrieve all your MMS messagescompletely when roaming. This may incur significantphone charges.Set the message priority of MMS messages sent.Set the maximum file size of an MMS message. TheMMS message will not be sent out if it exceeds thefile size set here.
Voicemail notification settingsMessages 133Play notificationsoundNotification soundVibrateSet your phone to play a sound when a sent or failurenotification is received.Choose a sound that will play when there’s a sent orfailure notification.Set your phone to vibrate when a new voicemailarrives.
Accounts and syncSynchronizing with online accountsAbout online accountsThese are some of the types of information your phone can sync withyour online accounts:• Gmail and Exchange ActiveSync email.• Google and Exchange ActiveSync contacts, as well as yourfriends’ contact information in Facebook® and their Twitterprofiles. For information on contacts, see the People chapter.• Calendar events from your Google accounts, from ExchangeActiveSync, and from your Facebook account. For information onusing Calendar, see the Calendar chapter.• Status updates and links shared by your friends and yourself onsocial <strong>net</strong>works such as Facebook and Twitter. For details, seethe Social chapter.• Flickr and Facebook photo uploads. For information on viewingphotos, see the Photos, videos, and music chapter.You can set up an Exchange ActiveSync account on your phone either inthe Mail app or the Accounts & sync setting.To set it up in the Mail app, see “Adding a Microsoft Exchange ActiveSyncaccount” in the Email chapter.
Accounts and sync 135Synchronizing with a Google AccountSigning in to your Google Account lets you sync Gmail and yourGoogle contacts and calendars between your phone and the Web.You also need to sign in to a Google Account to use Google apps suchas Google Talk and Android Market.If you skipped signing in to a Google Account when you first set up yourphone, you may encounter problems when using some Google apps. Ifthese problems persist, you may need to factory reset your phone andenter your Google Account details when you set up the phone again. Tofactory reset your phone, see “Restarting or factory resetting your phone”in the Update and reset chapter.Adding more Google AccountsYou can add more than one Google Account on your phone. However,subsequent Google Accounts can only sync contacts, emails, andcalendar events. Other Google services use the first Google Accountyou added.1.2.3.Press HOMEsync.Tap Add account > Google.> MENU, and then tap Settings > Accounts &Follow the onscreen instructions to sign in to an account orcreate a new account.Forgot your Google Account password?If you have forgotten your Google Account password, you can try torecover it by going to the Google website.1.2.On your phone or computer, open your web browser and go tohttps://www.google.com/accounts/ForgotPasswd.Enter the email address or username that you use to sign in toyour Google Account.
136 Accounts and sync3.Complete the word verification process. Enter the characters thatyou see onscreen and click Submit.An email will be sent to the alternate email address you providedwhen you created your Google Account. Follow the instructions in theemail to reset your password.If you don’t have an alternate email address or cannot access theemail account you used to create your Google Account, you canreset your Google Account after 24 hours by answering the securityquestion for password recovery.Adding a social <strong>net</strong>work accountIf you skipped setting up your social <strong>net</strong>work account (such asFacebook, Twitter, or Flickr) when you first turned on and set up yourphone, you can still sign in to these accounts through your phone’ssettings.1.2.3.Press HOMEsync.> MENU, and then tap Settings > Accounts &Tap Add account, and then tap the account type you want toadd.Follow the onscreen instructions to enter your accountinformation.Your social <strong>net</strong>work account will be added to the list on the Accounts& sync screen.
Accounts and sync 137Managing your online accountsChanging general sync settings1. Press HOME > MENU, and then tap Settings > Accounts &sync.2. Select or clear the following:BackgrounddataAuto-syncIf this is selected, apps can send and receive onlineaccount information even if you are not currently usingthem.If this is selected, apps can use the sync schedule definedin the account settings. If this is cleared, you will need tosync accounts manually. For instructions on doing this,see “Synchronizing an account manually”.Synchronizing an account manually1. Press HOME > MENU, and then tap Settings > Accounts &sync.2.Tap the account that you want to sync.3. Tap Sync now.Changing account settingsYou can change settings such as the sync frequency and the types ofinformation synchronized, the kinds of notification you receive, andthe way that account information is displayed.1.2.On the Accounts & sync screen, tap the account that you want toedit.Tap the type of information you want to sync or select an item toedit its settings.
138 Accounts and syncRemoving an accountYou can remove an account to delete it and all information associatedwith it from your phone, for example messages, contacts, or settings.Removing an account does not delete information from the onlineservice itself.You cannot remove some accounts, such as the first Google Account yousigned into on the phone, except by deleting all personal information fromyour phone with a hard reset. For instructions on doing this, see “Restartingor factory resetting your phone” in the Update and reset chapter.1.2.3.Press HOMEsync.> MENU, and then tap Settings > Accounts &Tap the account that you want to remove.Tap Remove account, and then confirm that you want to removethe account.Synchronizing with your computerYou have your new vacation photos on your phone while yourbusiness calendar is on your computer. Why not make these types offiles and information available on both devices? With HTC Sync, youcan:• Sync your contacts between your Microsoft® Outlook®, Outlook®Express or Windows Contacts on your computer and your phone.• Sync your calendar events between the Outlook or WindowsCalendar on your computer and your phone.• Bring your photos, videos, documents, songs, and playlists fromyour computer to your phone and enjoy them on the go.
Accounts and sync 139• Easily import your captured photos and videos from your pho<strong>net</strong>o your computer.• Sync bookmarks inside the “HTC Bookmarks” favorites folder onyour computer and all bookmarks stored on your phone’s webbrowser.• Download maps and useful add-on services for your phone’sLocations app to your computer first, and then sync them to yourphone.• Install third-party mobile phone apps (not downloaded fromAndroid Market) from your computer.You need a microSD card inserted into your phone to be able to syncmultimedia files, maps, and documents.Installing HTC SyncVisit our support website (www.htc.com/support) for downloadingHTC Sync.• The HTC Sync can be installed on a computer running Windows 7,Windows Vista, or Windows XP.• HTC Sync requires USB 2.0 on your computer to connect and sync withyour phone.• For trouble-free installation, first quit all running programs andtemporarily exit from your anti-virus program before you start installingHTC Sync.
140 Accounts and sync1. Copy HTCSync.exe to your computer.2. On your computer, double-click HTCSync.exe and follow theonscreen instructions to install HTC Sync.After installing HTC Sync, the HTC Sync icon ( ) is added toyour computer’s system tray (check the bottom-right side of yourcomputer screen). You can double-click this icon to open HTC Sync.Setting up HTC Sync to recognize your phoneAfter installing, set up HTC Sync to recognize your phone.1. Connect your phone to your computer using the supplied USBcable.2. On your phone’s Connect to PC screen, tap HTC Sync, and thentap Done.On your computer, wait for HTC Sync to recognize your phone.3. When the Device setup screen opens, enter a name for yourphone, and then click Save.The Device panel then opens.
4Accounts and sync 1413211 Click a category of items to see its sync options on the right section ofthe Device panel.Click Overview to see your phone’s basic software information andstorage card usage, change the phone name, or install third-party appsto your phone.2 Shows the available sync options for the category you’ve selected.3 Click to start synchronization.4 Estimated storage usage bar. When there are new items to besynchronized and added to your phone, this bar shows the estimatedstorage card space that will be used.
142 Accounts and syncSetting the Music sync optionsBring the music tracks and songs you play on your computer to yourphone. If you have playlists created in iTunes® or Windows Media®Player, you can sync these too and enjoy them on the go.You can sync audio files in these formats:*.aac, *.amr, *.m4a, *.mid, *.midi, *.mp3, *.ogg, *.wav, and *.wma.1. On the Device panel, click Music, and then click the On button.Turning Music sync on means you want this category includedevery time you sync your computer and phone.2. Select Sync music files from, and then click Add.3. Choose the folder that contains your audio files, and then clickOK.All supported audio files added to this folder will also be copiedto your phone’s storage card during synchronization.4. Select Sync music files from iTunes and Windows Media Player ifyou’re using any of these apps on your computer. Then, chooseone of the following:All songs andplaylistsSelected playlistsChoose to sync all songs and playlists from iTunesand Windows Media Player.Choose to select only your favorite playlist titles.
Accounts and sync 143Setting the Gallery sync optionsYou can choose to automatically copy your phone camera shots toyour computer. At the same time, when you select a folder from yourcomputer, the photos and videos stored in it are also synchronized onyour phone’s storage card.You can sync photos and videos in these formats:• Photos: *.bmp, *.gif, *.jpeg, *.jpg, and *.png.• Videos: *.3gp, *.3g2, *.mp4, and *.wmv.1.On the Device panel, click Gallery, and then click the On button.Turning Gallery sync on means you want this category includedevery time you sync your computer and phone.2. To automatically import your camera shots to your computerduring synchronization, select Copy device Camera Shots to PC.Photos and videos from your storage card will be saved to the\My Photos\Device Camera Shots folder on your computer.3. Select Sync PC photos & videos from, and then click Add.4. Choose the folder on your computer that contains yourmultimedia files, and then click OK.All supported image and video files added to this folder will alsobe copied to your phone’s storage card during synchronization.
144 Accounts and syncSetting Calendar sync optionsYour phone can sync appointments and events with your calendar inOutlook (Outlook XP, Outlook 2003 or Outlook 2007) or WindowsCalendar (for Windows Vista).1.On the Device panel, click Calendar, and then click the Onbutton.Turning Calendar sync on means you want this category includedevery time you sync your computer and phone.2. Select the app you want to sync calendar events with.3. Choose the number of days of calendar events to sync. You canchoose One week ago, Two weeks ago, or One month ago.4. In cases when conflicting information are found on both thephone and computer, choose which information you want tokeep.You can only sync the following calendar event details: Event name, Eventdate, Start time, End time, Event location, Description, Reminder, andRepetition.Setting People sync optionsSync your phone contacts with your Outlook (Outlook XP, Outlook2003 or Outlook 2007), Outlook Express, or Windows Contacts (forWindows Vista).If you have contacts to sync from your SIM card, you have to importthese first to your phone storage.1. On the Device panel, click People, and then click the On button.Turning People sync on means you want this category includedevery time you sync your computer and phone.
2. Choose the app you want to sync your contacts with.Accounts and sync 1453. In cases when conflicting information are found on both thephone and computer, choose which information you want tokeep.Only the contact fields supported on your phone will be synchronized.Setting Bookmarks sync optionsSync the bookmarks inside the “HTC Bookmarks” favorites folder inyour computer’s web browser with the bookmarks stored on yourphone’s web browser.1. On the Device panel, click Bookmarks, and then click the Onbutton.Turning Bookmarks sync on means you want this categoryincluded every time you sync your computer and phone.2. Choose the web browser that stores the bookmarks to sync withyour phone.• Only the web page title and URL information are synchronized.• If you are using Firefox® and have selected it to sync with your phone,make sure to close all Firefox browser windows before you beginsynchronization.• When conflicting information are found on both the phone andcomputer, HTC Sync keeps the information from your computer.
146 Accounts and syncSetting Documents sync optionsYou can sync files and documents from your computer to your phone.Make sure that your phone has the app needed to open or view suchfiles and documents.Usually, your phone can open and view these file types: MicrosoftOffice 2003 and 2007 Word (.doc), Excel (.xls), and PowerPoint (.ppt),PDF files (.pdf), Text files (.txt).You can also sync email attachments that you stored on your phone’sstorage card to your computer.To sync email attachments stored on your phone’s storage card to yourcomputer, you must set up an Exchange ActiveSync or POP3/IMAP emailaccount on your phone using Mail. For more information on how to do this,see the Email chapter.1. On the Device panel, click Documents, and then click the Onbutton.Turning Documents sync on means you want this categoryincluded every time you sync your computer and phone.2. To sync email attachments that you’ve stored on your phone’sstorage card, select Copy all download Mail documents to PC.When you sync the phone with your computer, emailattachments will be saved to the \My Documents\Devicedocuments\ folder on your computer.3. To sync files and documents from your computer to your phone’sstorage card, select Sync PC documents from, and then clickAdd.4. Choose a folder that contains the files you want to sync withyour phone, and then click OK.
Accounts and sync 147When you sync the phone with your computer, the files anddocuments from your computer will be saved to the \MyDocuments\Documents\ folder on your phone’s storage card.Setting Maps sync optionsBefore going on a trip to another city or country, you can downloadthe maps you need using HTC Sync on your computer, then sync it toyour phone. Aside from different maps, you can also purchase licensesfor other useful data such as driving and walking navigation, safetycamera map views, and more.To find out how you can use the downloaded content on your phone,see the Maps and location chapter for more information.1. On the Device panel, click Maps, and then click the On button.Turning Maps sync on means you want this category includedevery time you sync your computer and phone.2. Choose one of the following:All Maps and LicensesSelect Maps and LicensesChoose to sync all maps and licensesbetween your computer and your phone.Choose to sync only the maps and licensesyou want.3. If you want to purchase and download more maps and otherdata, click Get more Maps and Licenses.The Maps feature will be available in the next release of HTC Sync. Youcan use it to download maps, voices, and add-on services for your phone’sLocations app to your computer first, and then sync them to your phone.Visit our support website (www.htc.com/support) from time to time tocheck for updates and more information.
148 Accounts and syncSynchronizing your phoneWhen you are done setting up synchronization for your selectedcategories, click the Sync now button.After synchronization is complete, click Disconnect and safely removeyour phone as required by your computer’s operating system. Thenext time you connect your phone to your computer, synchronizationautomatically begins based on your sync options.Always check the estimated file size of new items that you want tosynchronize with your phone. You will see a warning icon beside theestimated storage usage bar when there isn’t enough space left on yourstorage card.
Accounts and sync 149Installing apps from your computer to your phoneIf you have app (*.apk files) on your computer, you can use HTC Syncto install them to your phone. We strongly recommend that you installonly app that you trust.Before you begin, make sure that your phone is set to allow app fromyour computer to be installed to your phone. To do this, press MENUfrom the Home screen, tap Settings > Applications, and then selectthe Unknown sources check box.1. Connect your phone to the computer with the supplied USB cable.2. On your phone’s Connect to PC screen, tap HTC Sync and thentap Done.HTC Sync automatically starts on your computer.3. On the Device panel of HTC Sync, click Application installer.4. Locate the app on your computer, and then click Open.5. Click Done. The installation process starts on your phone.6. Check your phone’s screen to see if there are additionalinstructions to complete the installation.7. After installation is complete, you can click Disconnect and safelyremove your phone as required by your computer’s operatingsystem.
150 Accounts and syncSynchronizing another phone with your computerHTC Sync can synchronize up to three phones with your computer,making your favorite music, videos, photos, and files always availableto you.Make sure that all the phones you connect with your computer andsynchronize using HTC Sync are running on Android 2.1 or later.1. Connect the other phone to your computer using the suppliedUSB cable.2. On the phone’s Connect to PC screen, tap HTC Sync, and thentap Done.3. On your computer, wait for HTC Sync to recognize the otherphone. When the Device setup screen opens, enter a name forthe phone, and then click Save.4. You can separately customize your sync settings for this phone.To switch between the connected phones, click Devices on thetop left corner of the Device panel, and then click the phone’sname or image.
SocialFacebook for HTC SenseIf you signed in to your Facebook account when you turned on andset up your phone for the first time, that means your Facebookaccount is linked to Facebook for HTC Sense on your phone. (If youdid not do this, see the Accounts and sync chapter to find out how tosign in to Facebook for HTC Sense.)With Facebook for HTC Sense, you can:• See all your Facebook contacts and their instant status updatesin People.When you tap a contact on the People screen, slideto the Updates and events tab to see updates suchas posted status messages, uploads, and profilechanges.When there is a notification of the contact’s birthday,you can tap the notification to call the contactdirectly or send a message greeting.
152 Social• See Facebook photos right on the Gallery app.You can also upload one or more photos from yourstorage card to Facebook, then tag and add captionsthat go with it.When you’re viewing the albums of a Facebookfriend, you can also share a link to a particular album,or comment on the album photos.To know more about viewing Facebook photos, seethe Photos, videos, and music chapter.• Check your friends’ Facebook status updates in Friend Stream.See “Friend Stream” to find out the things you can do on theFriend Stream app.• Add your Facebook events and your friends’ birthdays to theCalendar app. See the Calendar chapter for details.
Tweeting on your phoneSocial 153You can post and read tweets, send and receive direct messages,search for new Twitter users to follow using the Peep app. Peep is aTwitter client that lets you enjoy “tweeting” on your phone.You can also link your contacts in People to their Twitter profiles(if you’re following them). To find out how, see “Merging contactinformation” in the People chapter.If you did not sign in to your Twitter account when you first turned onthe phone, you can do one of the following:• Sign in to your Twitter account from Peep. Press HOME , andthen tap > Peep, then follow the onscreen instructions.• Add the Twitter for HTC Sense account in Settings > Accounts &sync. To find out how, see “Adding a social <strong>net</strong>work account” inthe Accounts and sync chapter.Twitter for HTC Sense and Peep share the same login credentials. Thismeans that when you use Peep on your phone for tweeting, you can alsolink your contacts to their Twitter profiles via Twitter for HTC Sense.
154 SocialUsing PeepPress HOME , and then tap > Peep. Peep opens in the Alltweets tab.12345 6 7 81 Tap in this area to compose and send a tweet.2 Tap a person’s name to check profile details and all of his or her tweets.3 If you have linked the contact in People, tap the photo or icon to opena menu where you can quickly choose how to communicate with thecontact.4 Press and hold a tweet to open an options menu to reply, send a directmessage, retweet, and more.5 All tweets tab. View all the tweets from people you follow and tweets thatyou have posted.
Social 1556 Mentions tab. View all tweets that mention your username using the“@[your username]” convention.7 Direct message tab. View all private/direct messages that you havereceived or sent.8 Favorites tab. View tweets that you have marked as favorites.Sending a tweet1. On the All tweets tab, tap the box that says “What’s happening?”.2.Type your tweet.3. Add a picture or location to your tweet.• Tap to post a picture from Gallery or Camera to yourdefault photo hosting site and add the link to the picture inyour tweet.• Tap to insert your location into the tweet. You can chooseto add a map link, insert your location name, or insert yourposition coordinates.4. Tap Update.Searching for Twitter users to follow1. On the Peep screen, press the SEARCH2. Type a Twitter name in the search box.button.You can also narrow down the search when you tap3. Tap .4. In the list of search results, tap the Twitter user you want tofollow.5. Press MENU, and then tap Follow.> Users.
156 SocialUnfollowing a Twitter user1. On the Peep screen, tap the name of the Twitter user you want tostop following.2.Press MENU, and then tap Unfollow.Sending a direct messageYou can only send a direct message to someone who is following you.1.On the Peep screen, press MENU, and then tap New message.2. Tap the To field, and then enter the name. As you entercharacters, the names of the Twitter users that match thecharacters you enter will appear. Tap the name when you see it.3. Enter your message, and then tap Update.You can also send a direct message when you press and hold a tweetof the person you want to send the direct message to, and then tapSend direct message on the options menu.Setting Peep optionsOn the Peep screen, press MENU, and then tap More > Settings. Youcan set these options:Account settingsGeneral settingsSend & receiveServicesNotification settingsSign out of your Twitter account.Choose whether to show the screen name or the realname of the people you follow.Set the frequency to check for new tweets and set thenumber of tweets to download.Set your photo hosting site, photo quality, locationoptions, and URL shortening host.Select when and how you want to be notified.
Social 157About the Twitter widgetUse the Twitter widget to send and follow your tweets right on yourHome screen.To find out how to add a widget to the Home screen, see “Personalizingyour Home screen with widgets” in the Personalizing chapter.Friend StreamFriend Stream connects you to your social <strong>net</strong>works. Share andget updates from friends in popular <strong>net</strong>works like Facebook andTwitter in a single feed. With Friend Stream, you can easily track yourfriends’ status messages, photo uploads, notifications, and more — orcomment and post your own.• You must be signed in to at least one social <strong>net</strong>work account touse Friend Stream. To find out how, see “Adding a social <strong>net</strong>workaccount” in the Accounts and sync chapter.• To use your Facebook account on Friend Stream, you need to besigned in via Facebook for HTC Sense. See “Facebook for HTCSense” in this chapter.
158 Social123451 Tap in this area to compose and send a status update.2 If you have linked the contact in People, tap the photo or icon to opena menu where you can quickly choose how to communicate with thecontact.3 When you tap someone’s status update, you can:•••Open Peep and view all tweets. See “Tweeting on your phone” in thischapter.Write a comment. Like or unlike someone’s Facebook posts.Look at someone’s album photos.4 When you tap someone’s name, you can:•••Check the person’s profile details.Look at the person’s Facebook wall.Check the person’s posted tweets.5 Slide to the other tabs to view social <strong>net</strong>work updates grouped as statusupdates only, photo uploads, links, updates from members of yourFacebook list, or social <strong>net</strong>work notifications.
Social 159Updating your statusYou can update your status simultaneously on all the social <strong>net</strong>workaccounts you are signed in to.1.2.Press HOME , and then tap > Friend Stream.On the All updates tab, tap the box that says “What’s on your mind?”.3. Enter your status update.4. If you do not want to send the status update to all your social<strong>net</strong>work accounts, tap and clear the check boxes of thesocial <strong>net</strong>works to exclude.5. Tap and then choose what you want to attach to your tweetor status update.ApprecommendationPictureChoose an app you’ve installed from AndroidMarket that you want to share with others. The URLfrom which the app can be downloaded will beinserted to your status.To find out more about sharing app, see “Sharinggames and apps” in the More apps chapter.Select From Camera to take a photo and attachit or From Gallery to attach a photo from yourstorage card.
160 SocialLocationAdd your current location or a location you pickon a map. See the Maps and location chapter fordetails.6. Tap Share.Commenting on and liking Facebook postsAfter tapping someone’s status update on the All updates tab, youcan do the following:1321 Tap a photo or the album name shown in the status update to view andcomment on the album photos using the Gallery app. See the Photos,videos, and music chapter.2 Type what you think about the person’s status update.3 Like or unlike the person’s status update.
Social 161Checking notifications from your social <strong>net</strong>worksSlide to the Notifications tab to easily see a single feed of yournotifications from different social <strong>net</strong>works. It can be a comment onyour Facebook post, a mention or direct message in Twitter, a taggedphoto of you, and more.About the Friend Stream widgetUse the Friend Stream widget so you can easily update your statusand view other people’s status updates right on the Home screen.If you don’t have this widget on your Home screen, see “Personalizingyour Home screen with widgets” in the Personalizing chapter to findout how to add it to the Home screen.
162 SocialChatting in Google TalkGoogle Talk is Google’s instant messaging program. It lets youcommunicate with other people that also use Google Talk.If you signed in to your Google Account when you first set up thephone, you are already signed in to Google Talk.Chatting with friends1. Press HOME , and then tap > Talk.2.3.Tap a friend in the Friends list.Enter your message in the text box. You can also insert a smileyby pressing MENU, and then tapping More > Insert smiley.4. Tap Send.5. While chatting, press MENU and then tap any of these options:Chat off recordSwitch chatsFriends listAdd chatEnd chatMoreYour Google Talk messages are stored in the Chatsfolder of your Gmail account. Tap this option if youdon’t want to store your chat messages.If you have more than one chat going, tap this toswitch chat with another friend.Return to the Friends list.Add another friend to your chat. The friend youinvited and the friend your currently chatting withreceive an invitation to a group chat. Each one whoaccepts the invitation joins the group chat.End your current chat.Clear the chat history, insert a smiley or view yourfriend’s contact details.
Social 163Accepting chat invitationsWhen a friend sends you a Google Talk message, you receive anotification. Their entry in the Friends list turns white and displays themessage.Do one of the following:• In the Friends list, tap the friend who sent you the invitation tochat.• Open the Notifications panel, and then tap the chat notification.See “Opening the Notifications panel” in the Getting startedchapter.Changing your online status and picture1. Press HOME , and then tap > Talk.2.In the Friends list, tap your name to open the Set Status screen.3. Enter your new status message, or press BACKcustom status from the list.4.5.to choose aTap the online status beside your picture, and then select thestatus you want on the menu.Tap your picture, and then tap Remove to remove your photo, orChange to select another picture on the storage card. Note that ifyou’ve selected a big picture, you will be asked to crop it.6. Tap Done.Your online status, message, and picture appear in your contact’sFriends lists and in other apps where your Google Talk status aredisplayed.
164 SocialAdding and managing friendsThe Friends list is where you add and manage your friends in GoogleTalk.1.Press HOME , and then tap > Talk.2. In the Friends list, do any of the following.Invite a friend 1. Press MENU, and then tap Add friend.2. Enter the Google Talk instant messaging ID orGmail address of the friend you want to add.3. Tap Send invitation.View allfriendsMake a friendpopularBlock a friendUnblock afriendInitially, only those friends that you often chat with— the most popular — are shown in the Friends list.To view all your friends, press MENU, and then tap Allfriends. To view only friends that you often chat with,press MENU, and then tap Most popular.1. Press MENU, and then tap All friends.2. Press and hold a friend’s name, and then tapAlways show friend.You can block a friend from sending you messages.When blocked, your friend is removed from the Friendslist and is added to the blocked friends list.1. Press MENU, and then tap All friends.2. Press and hold a friend’s name, and then tap Blockfriend.1. Press MENU, and then tap More > Blocked.2. Tap the name of the blocked friend, and then tap OK.View allinvited friendsPress MENU, and then tap More > Invites. Friends whohave not yet accepted your invitation are listed in thescreen.
Changing the settings and signing out1. Press HOME , and then tap > Talk.2.In the Friends list, press MENU and then tap:• Settings to change the app and notification settings.• Sign out to sign out from Google Talk.Social 165
EmailUsing GmailGmail is Google’s web-based email service. When you first set up yourphone, make sure you sign into your Google Account so you can sendand receive Gmail messages. If you didn’t do so, go to the Accounts &sync setting to sign in.You can also set up more than one Google Account on your phone,and then switch between accounts in Gmail. To find out how to set upseveral Google Accounts, see “Adding more Google Accounts” in theAccounts and sync chapter.Viewing your Gmail InboxThe Inbox conversations list is your default Gmail view. All yourreceived emails are delivered to your Inbox.Gmail groups each message you send with all the responses youreceive. This conversation list continues to grow as new replies arrive,so you can always see your messages in context. A new messageor a change to the subject of a current message will begin a newconversation.1. Press HOME , and then tap > Gmail.Your inbox appears.
Email 1672. Do any of the following:View more emailmessagesRead a new emailmessageSelect messagesand conversationsDisplay messagesand conversationsof another labelIf the Inbox is full, swipe your finger up the screento view more messages and conversations.Tap the unread message or the conversation withan unread message (just arrived items display inbold). For more information, see “Reading yourmessages”.Tap the box ( ) before the email or conversation.Then tap the onscreen buttons at the bottom tochoose what to do with the selected messages orconversations.Tap Inbox at the top left of the screen, andthen tap another label (such as Sent, Drafts, oryour created label) to view its messages andconversations.
168 EmailSwitch to yourother GmailaccountRefresh the InboxTap the current account at the top right of thescreen, and then tap another account you want toswitch to.Press MENU, and then tap Refresh.Sending a new message1. Press HOME , and then tap > Gmail.2. In the Inbox, press MENU and then tap Compose.3. If you’ve set up multiple Google Accounts on your phone, choosewhich Gmail address you want to use for sending your email.Tap the box that shows your current Gmail address, and then tapanother address that you want to use for sending.4. Enter the message recipient’s email address in the To field. If youare sending the email to several recipients, separate the emailaddresses with a comma.As you enter email addresses, any matching addresses from yourcontacts list are displayed. Tap a match to enter that addressdirectly.If you want to send a carbon copy (Cc) or a blind carbon copy (Bcc) of theemail to other recipients, press MENU and then tap Add Cc/Bcc.5. Enter the email subject, and then compose your email.6. If you want to attach a picture, press MENU and then tap Attach.Locate and then tap the picture you want to attach.7. After composing your message, tap .
Email 169• While composing the message, tap to save it as a draft. Or press theBACK button to discard the message.• To view your draft email messages, in the Inbox, tap Inbox at the top leftof the screen and then tap Drafts.• To view your sent messages, in the Inbox, tap Inbox at the top left of thescreen and then tap Sent.Reading your messagesDepending on your notification settings, the phone plays a ringtone orvibrates when you receive a new email. A new email icon ( ) alsoappears on the notifications area of the status bar to tell you that youhave a new email. For more information on email notification settings,refer to “Changing Gmail settings” later in this chapter.1. Press and hold the status bar, and then slide down your finger onthe screen to open the Notifications panel.2. Tap the new email.3. In the Inbox, tap the unread email or the conversation with theunread email to view it.4. On the email message or conversation, do any of the following:• Scroll through the messages in the conversation by swipingyour finger up or down the screen.• If you have two or more email messages in the conversation,tapto expand all message headers in theconversation.• Tap the star ( ) to star the message. See “Searching andorganizing your emails” for more information.
170 Email• If the sender is a friend in Google Talk, check the button ( )before the star in the message header to know your friend’sonline status.• Tap Archive to remove the conversation from your Inbox andtransfer it to the All mail folder in your Google Account.• Tap Delete to delete the conversation from your Inbox.• If you’ve archived or deleted a conversation by accident, tap Undo at thetop of the conversations list. The conversation is returned to your Inbox.• To view your archived or deleted messages, in the Inbox, tap Inbox at thetop left of the screen and then tap All Mail (for archived messages) orTrash (for deleted messages).• Tap or to see the previous or next conversation inyour Inbox.• Press MENU to see more options.Replying to or forwarding an email message1. Press HOME , and then tap > Gmail.2. In the Inbox, tap the email message or conversation.If the email message is long, swipe your finger up the screen.3. To reply to the sender, tap . Or, tap and choose whether toReply all or Forward.4. Do one of the following:• If you selected Reply or Reply to all, enter your reply message.• If you selected Forward, specify the message recipients.Tap Respond inline if you want to interleave your new message with thereceived email. But this removes any attachments or formatting in theoriginal email.5. Tap tap .
Searching and organizing your emailsEmail 171Searching for messagesYou can search for messages that contain one or more words in theircontents or in their addresses, subjects, labels, and so on. When yousearch for messages, all of the messages in your Gmail account on theweb are included (except those labeled Trash or Spam), not just thosethat you’ve synchronized onto your phone.1. Press HOME , and then tap > Gmail.2. In the Inbox, press SEARCH.3. Enter the word or words to search for.4. Tap , or tap the Enter key on the onscreen keyboard.A conversation list opens, displaying all of the conversations withmessages that contain the words you searched for. The words yousearched for are displayed below the status bar. You work with theconversations in this list just as you would with the conversations inyour Inbox or any other conversation list.Starring an email message or conversationYou can star an important message or a conversation so that you caneasily find it again. To view just starred messages or conversationswith starred messages, see “Filtering conversations” in this chapter.1. Press HOME , and then tap > Gmail.2. Do one of the following:• In the Inbox, tap the star ( ) to the right of the conversationsubject to star the latest message in the conversation.Conversations with starred messages are displayed with a starin your Inbox and in other conversation lists.
172 Email• In the inbox, tap a conversation and then go to the messagethat you want to star. Touch the star ( ) in the messageheader.To unstar a message or conversation, touch its star again. You canalso tap a star in a conversation list to unstar all messages in thatconversation.Labeling conversationsYou can organize conversations by labeling them. Gmail has severalpreset labels you can use, and you can also add your own labels, usingGmail on the web.1. Press HOME , and then tap > Gmail.2. Select the check boxes of the conversations that you want tolabel.3. Tap Labels at the bottom of the screen.4. Select the labels that you want to assign to the conversation, andthen tap OK.Filtering conversationsYou can choose to display conversations that have the same label oronly those that are starred.1. Press HOME , and then tap > Gmail.2. When viewing your Inbox or another conversation list, tap thename of the current label at the top left of the screen to open thelabels selection screen.3. Tap a label to view a list of conversations bearing that label.The conversation list resembles your Inbox, but the label replaces“Inbox” below the status bar. You work with labeled conversations listsin the same way as with your Inbox.
Cleaning up your InboxYou can clean up your Inbox by archiving, deleting, or mutingconversations. You can also report a conversation as spam to stopreceiving any future messages from that sender.1. Press HOME , and then tap > Gmail.Email 1732. In the Inbox, tap the box ( ) before the conversations you wantto work on, and then do any of the following:DeleteArchiveMuteReportas spamTap Delete.If you’ve deleted the conversation by accident, tap Undo atthe top of the screen to move the conversation back to theInbox.Tap Archive.If you’ve archived the conversation by accident, tap Undo atthe top of the screen to move the conversation back to theInbox.Press MENU, and then tap Mute.If you ‘mute’ a conversation, you will not receive any futuremessages for that conversation.Press MENU, and then tap Report spam.The Gmail webmail service works hard to prevent spam(unwanted and unsolicited “junk” mail) from reaching yourInbox. But when spam makes it through, you can helpimprove the service by reporting the conversation as spam.Changing Gmail settings1. Press HOME , and then tap > Gmail.2. In the Inbox, press MENU and then tap More > Settings.3. Set the following options:
174 EmailSignatureConfirm actionsReply allAuto-advanceMessage text sizeBatch operationsClear searchhistoryLabelsEmailnotificationsSelect ringtoneVibrateNotify onceEnter a signature that automatically appears at theend of your email messages.Show a confirmation box when you archive, deleteor send a conversation.Select this check box if you want to replace theReply button ( ) in message headers with theReply all button ( ), so you don’t need to tap thearrow ( ) to access it.Select which conversation to display after youdelete or archive a conversation.Adjust the size of text in your email messages.When selected, this adds a check box to the left ofeach conversation so you can add it to a batch.Remove the searches you have performed.Set how many days and which Gmail labels tosynchronize.See “Changing Gmail synchronization settings” inthis chapter.Show a notification icon on the status bar whenyou receive a new email.Choose a notification sound for new emailmessages.Make your phone vibrate when you receive a newemail message.When cleared, you are notified every time youreceive a new email message.
Changing Gmail synchronization settings1. Press HOME , and then tap > Gmail.Email 1752. In the Inbox, press MENU, and then tap More > Settings > Labels.3. To set the number of days to synchronize, tap Number of days tosync.4. To set synchronization for a particular message label, tap thelabel, and then select whether you want messages bearingthat label to sync according to the default number of days youselected earlier, sync all, or sync none of them.Getting helpTo find out more about using Gmail, press MENU, and then tap More >Help. The web browser will take you to the Google Mobile Help site.
176 EmailUsing MailUse the Mail app to add your webmail and other POP3 or IMAP emailaccounts. You can also set up and use your Exchange ActiveSyncemail on your phone.Adding a POP3/IMAP email account1. Press HOME , and then tap > Mail.2.Do one of the following:• If this is your first time to add an email account in Mail, tapOther (POP3/IMAP) on the Choose a mail provider screen.• If you’ve already added an email account in Mail, press MENU,and then tap More > New account. If the Choose a mailprovider screen is displayed, tap Other (POP3/IMAP).3. Enter the email address and password for your email account andthen tap Next.4. If the account type you want to set up is not in the phonedatabase, you’ll be asked to enter more details.5. Enter the account name and your name and then tap Finishsetup.Adding a Microsoft Exchange ActiveSync accountYou can add one or more Microsoft Exchange ActiveSync accountson your phone. You can sync with Microsoft Exchange Server 2003Service Pack 2 (SP2) or later.You can add up to 15 Exchange ActiveSync accounts on your phone.
1.2.Press HOME , and then tap > Mail.Do one of the following:Email 177• If this is your first time to add an email account in Mail, tapMicrosoft Exchange ActiveSync on the Choose a mail providerscreen.• If you’ve already added an email account in Mail, pressMENU, and then tap More > New account. If the Choose amail provider screen is displayed, tap Microsoft ExchangeActiveSync.3. Enter the Exchange ActiveSync account details, and then tapNext. Your corporate Exchange Server must support auto-detectfor the phone to automatically set up the Exchange ActiveSyncaccount. If your corporate Exchange Server does not supportauto-detect, you’ll need to enter your Exchange Server settingsafter you tap Next. Ask your Exchange Server administrator fordetails.4. Choose the types of information you want to sync. Also choosehow often you want to update and sync email to your phone.5. Enter your account name, then tap Finish setup.Checking your Mail inboxWhen you open the Mail app, it displays the inbox of one of your emailaccounts that you’ve set up on your phone. To switch between emailaccounts, tap the bar that shows the current email account, and thentap another account.
178 EmailViewing the unified inbox of all your email accountsYou can view email from all your accounts just in one place withouthaving to switch to different accounts.Just tap the bar that shows the current email account, and then tapAll accounts.Email messages are color coded so you can easily distinguish whichemail accounts they belong to.Up to 15 email accounts can be shown in the unified inbox.
Email 179Different views of your inboxIf you have lots of email messages, it may take you some time tobrowse through the long list and find a single email or related emailmessages. To skim through your email messages easier, tap one of thefollowing tabs to change the view of your inbox:Received. Displays email messages as individual items.Conversations. Displays email messages as conversations, groupedaccording to the subject line. Tap a subject in the list to show the emailconversation.Favorites. Displays all email messages from a contact group. To choosewhich contact group to display, press MENU, tap View, and then selecta group.To find out more about working with contact groups, see “Contactgroups” in the People chapter.Unread. Displays unread messages.Marked (Exchange ActiveSync only). Displays all flagged messages.Meeting invitations (Exchange ActiveSync only). Displays meetinginvitations which you have not yet accepted or declined.Attachments. Displays all messages that have attachments.You can rearrange the tabs to the order that you want. To find out how, see“Rearranging or hiding application tabs” in the Personalizing chapter.
180 EmailRefreshing your email accountWhatever your automatic synchronization settings are, you can alsosynchronize your sent and received emails manually at any time.• While in the account you want to sync, press MENU, and then tapRefresh.• If you have several email accounts, you can refresh them all at thesame time. Go to the unified inbox first. Then press MENU andtap Refresh.To find out how to display the unified inbox, see “Viewing theunified inbox of all your email accounts”.Sorting email messagesYou can sort email messages by date received, priority, subject,sender, or size.On the inbox, press MENU, tap Sort, and select from the sortingoptions.Quickly browsing your inboxIf you have a long list of email messages in your inbox, it may not beeasy to browse the list and find an email that you want.You can quickly browse through your inbox by using finger gestures.1.2.Choose a sorting order for displaying your email messages. See“Sorting email messages”.Press and hold your two fingers on any email message, and thenslightly drag downward without lifting your fingers.
Email 181Your screen then jumps to the next or previous set of email messagesbased on your chosen sorting order. For instance:• If your email messages are arranged by date, your screen jumpsto the email messages received on the previous or next date,depending on your sorting order.• If your email messages are arranged alphabetically by sendername or subject, your screen jumps to the previous or nextsender or subject, depending on what’s your sorting order.Managing email messagesDeleting an email message1. On the inbox, press and hold the message you want to delete.2.On the options menu, tap Delete.Selecting several email messages1. Tap the check boxes of email messages to select them.2.Choose what you want to do with the selected messages: Markunread, Delete, or Move to another folder.
182 EmailYou cannot move email messages when you’re in the unified (All accounts)inbox.Moving several email messages to another folder1. Switch to the email account you want to use.2.Go to the Received tab or any other tab (except for theConversations tab).3. Tap the check boxes of email messages you want to move.4.Tap Move to, and then tap the folder where to move the emailmessages.Moving an email message after readingIn the open message, press MENU, and then tap More > Move to.Deleting all messages1. First tap the check box of any email message.2.Press MENU, and then tap Select all.3. Tap Delete.Switching to other mail folders1. Press MENU, and then tap Folders.2.Tap the mail folder whose messages you want to view.Sending an email message1. Press HOME , and then tap > Mail.2.Switch to the email account that you want to use for sendingemail.3. On the email account inbox, tap Compose mail.
Email 1834. Fill in one or more recipients. You can:• Enter email addresses directly in the To field, separating themwith a comma. As you enter email addresses, any matchingaddresses from your contacts list are displayed. Tap a matchto enter that address directly.• Tap the icon, and then choose the contacts to whom youwant to send the message. You can also select contact groupsas recipients, or search and add contacts from the companydirectory if you have set up an Exchange ActiveSync accounton your phone. When you have selected all the messagerecipients, tap Done.If you want to send a carbon copy (Cc) or a blind carbon copy (Bcc) of theemail to other recipients, press MENU, and then tap Show Cc/Bcc.5. Enter the subject, and then compose your message.6. To add an attachment, press MENU, tap Attach, and choose fromthe following options:PictureVideoAudioApprecommendationSelect Camera to take a photo and attach it, orGallery to attach a photo from your storage card.Select Camcorder to capture a video and attach it,or Videos to attach a video from your storage card.Select Voice Recorder to make a voice recordingand attach it, or Files to attach a music file or voicerecording from your storage card.Choose an app you’ve installed from Android Marketthat you want to tell other people about. The URLfrom which the app can be downloaded will beinserted in your email. See “Sharing games andapps” in the More apps chapter.
184 EmailLocationDocumentContact (vCard)Appointment(vCalendar)FileYou can attach location information. Send yourcurrent location (requires GPS to be turned on) ora location you pick on a map. For more information,see the Maps and location chapter.Attach a PDF file or an Office document such as atext file or a spreadsheet.Attach someone’s contact information.Attach a calendar event.Attach any file from your storage card.7. Tap Send to send the message immediately, or tap Save as draftto send it later.If there’s no Wi-Fi or data connection available or Airplane mode is onwhen you send your email, the email will be saved to the Outbox folder.Once there’s Wi-Fi or data connection available, the saved email will be sentautomatically next time your phone syncs.Resuming a draft email message1. In the email account inbox, press MENU, and then tap Folders >Drafts.2.Tap the message.3. When you finish editing the message, tap Send.Reading and replying to an email message1. Press HOME , and then tap > Mail.2.Switch to the email account you want to use.3. On the email account inbox, tap the email you want to read.
4.Do any of the following:Email 185Reply to the messageForward the messageDelete the messageMark the message asunreadTap Reply or Reply all.Press MENU, and then tap More > Forward.Press MENU, and then tap Delete.Press MENU, and then tap Mark unread.Setting the priority for an email messageYou can set the priority for an email message that you send.1.2.While composing the message, press MENU.Tap Set priority.3. Select the priority for the message.If you selected High or Low priority, the priority appears below thesubject line of the message.
186 EmailWorking with Exchange ActiveSync emailIf you sync your phone with your work Exchange ActiveSync account,you can read, reply, send, and manage email in the same easy wayas with a POP3/IMAP account. In addition, you can also use somepowerful Exchange features.To find out how you can set up your Exchange ActiveSync account,see “Adding a Microsoft Exchange ActiveSync account” in this chapter.Flagging an emailWhile viewing the inbox, tap the white flag iconthe right of an email message. The icon turns redthe email.that appears onafter you flaggedWhile reading an email, you can also tap the flag icon in the email.Setting out of the office statusYou can set your out of office status and auto-reply message rightfrom your phone.1.2.Switch to your Exchange ActiveSync account.Press MENU and then tap More > Out of the office.3. Tap the box, and then select Out of the office.4.Set the dates and times for the period when you will be out ofthe office.5. Enter the auto-reply message.6. Tap Save.Sending a meeting request1. Switch to your Exchange ActiveSync account.2.Go to the Meeting invitations tab, and then tap New meetinginvitation.
3.4.Enter the meeting details.Tap Send.Email 187Changing email account settings1. Switch to the email account whose settings you want to change.2. Press MENU and then tap More > Settings.3. Select from the following:Account settingsGeneral settingsSend & ReceiveNotificationsettingsDelete accountChange the email account settings such as the name,email address, password, and description.Set the font size when reading emails, enable,disable or set the signature, set the account as thedefault email account, and set where to save emailattachments.Set the maximum email file size limit when receivingand frequency to check for new emails and howmany to check for. You can also set to have emailsthat you send bcc’d to yourself.Set email notification settings.Tap to delete the email account.4. Press BACK to save your changes.Deleting an email account1. Switch to the email account you want to delete.2. Press MENU, and then tap More > Settings > Delete account.
CalendarAbout CalendarNever miss an important date again. Use your phone’s Calendar toschedule your events, meetings, and appointments.You can set up your phone to stay in sync with the following types ofcalendars:• On your phone, sign in to your Google Account so you’ll be ableto sync your phone’s Calendar with your Google Calendar online.You can add multiple Google accounts. If you have not signed into your Google Account yet, see the Accounts and sync chapterto find out how to sign in.• If you’re using Microsoft Outlook on your computer, you can setup HTC Sync on your computer to sync Outlook Calendar withyour phone’s Calendar. See “Synchronizing with your computer”in the Accounts and sync chapter.• If you have a Microsoft Exchange ActiveSync account andyou have added it on your phone, you can sync your phone’sCalendar with your Exchange ActiveSync calendar events. Seethe Email and Accounts and sync chapters for details.If you’ve signed in to your social <strong>net</strong>work accounts such as Facebook,birthdays and events of friends from your social <strong>net</strong>works will appearin Calendar. To find out how to sign in to your social <strong>net</strong>works, see“Adding a social <strong>net</strong>work account” in the Accounts and sync chapter.
Creating calendar eventsCalendar 189You can create events that appear on your phone only, as well asevents that sync with your Google Calendar, your computer’s OutlookCalendar, or Exchange ActiveSync calendar.1. Press HOME , and then tap , and then tap Calendar.2. On any Calendar view, press MENU and then tap New event.When you are in the Month or Agenda view, you can also tapbottom-right of the screen to create a new event.at the3. If you have more than one calendar, select a calendar in which toadd the event:• Select your Google Account to create a Google Calendarevent. If you have several Google Calendars on the Web, selectone in which to add your event.• Select PC Sync to create calendar events on your phone.You can sync them with your computer using HTC Sync. Fordetails, see the Accounts and sync chapter.• Select your Exchange ActiveSync account to create anExchange ActiveSync calendar event.4. Enter a name for the event.5. To specify the date and time of the event, do one of thefollowing:• If there is a time frame for the event, tap the From and To dateand time to set them.• If it is a special occasion such as a birthday or a whole-dayevent, set the From and To date, then select the All day checkbox.
190 Calendar6. Enter the event location and description.7. Set the reminder time.You can add another reminder time in a Google Calendar event. PressMENU and then tap Add reminder.8. If the event occurs on a regular basis, tap the Repetition box andthen choose how often the event occurs.9. Tap Save.Inviting guests to your event (Google Account only)If you want to invite guests to your event, you need to create and addthe event in your Google Calendar. An invitation email will be sent toyour guests using your Google Account.1. Open Calendar and create a new event. Tap the Calendar fieldand then select your Google Account (or one of your otherGoogle Calendars). For the steps, see “Creating calendar events”.2. Add details about the event, such as date and time, location, andmore.3. In the Guests field, enter the email addresses of everyone youwant to invite to the event. Separate multiple addresses withcommas ( , ).If the people to whom you send invitations use Google Calendar,they’ll receive an invitation in Calendar and by email.4. Tap Save to add the event to your Google Calendar.
Calendar 191Sending a meeting request using Calendar (ExchangeActiveSync only)If you have an Exchange ActiveSync account set up on your phone,you can use Calendar to create a meeting appointment and senda meeting request email to the people you want to invite to yourmeeting.1. Open Calendar and create a new event. Tap the Calendar fieldand then select your Exchange ActiveSync account. For thesteps, see “Creating calendar events”.2. Add details about the meeting, such as date and time, location,and more.3. Press MENU and then tap Meeting Invitation.4. Tap and choose attendees from your contacts or Companydirectory.5. Enter your message and then tap Send.
192 CalendarChanging calendar viewsWhen you open Calendar, it displays the Month view by default.You can also display the Calendar in Agenda, Day, or Week view. Tochange between calendar views, press MENU, and then choose thetype of view that you want.Month viewIn Month view, you’ll see markers on days that have events.When in Month view:• Tap on the bottom left of the screen to switch to Agendaview. Tap on the bottom right to create a new event.• Tap a day to view the events of that day.• Press and hold a day to open an options menu from which you canalso choose to create an event or switch to either Day or Agenda view.• Slide your finger up or down the screen to view earlier or latermonths.
Calendar 193Day and Agenda viewsDay view displays a list of the events of one day and also showsweather information at the bottom of the screen when you’re viewingevents of the current day. Agenda view shows a list of all your eventsin chronological order.The color bars on the left side of the events indicate the type ofcalendar in which the event is part of. To find out what each colorrepresents, press MENU and then tap More > Calendars.When in Day view, slide left or right across the screen to view earlieror later days.• In Day view, the weather information appears only if the event is withinthe five-day forecast of the Weather app.• Weather information does not appear in Day view when you changeDay view to display as a time list. See “Changing Calendar settings” fordetails.
194 CalendarWeek viewWeek view displays a chart of the events of one week.When in Week view:• You can press and hold on a time slot to create a new event atthat time.• Tap an event to view its details.• Slide left or right across the screen to view earlier or later weeks.
Managing calendar eventsCalendar 195You can view, edit, delete, or share events that you created. You canalso view and share event invitations that other people sent to you.Viewing an event1. Press HOME , and then tap , and then tap Calendar.2. In Month view, tap the day when the event takes place, and thentap the event to open it.The Event details screen then opens and shows the summary ofthe event.3. When viewing the event summary, you can do the following:• Find the event’s location in Maps.• Call any phone number included in the event location ordescription.• Check the participants of the event you sent or are invited to.• Respond whether you’ll attend the event you’re invited to.• If it’s an Exchange ActiveSync calendar event, reply by emailto the organizer or to all the guests. Press MENU, and theneither tap Reply or Reply all.• Select any text and look it up on the web. To learn more, see“Selecting text” in the Keyboard chapter and “Quickly lookingup information on the Web” in the Getting started chapter.• Tap the reminder time to change it. Press BACKchanges.to save
196 CalendarEditing an event1. While viewing an event, press MENU, and then tap Edit event.2. Make your changes to the event.3. When you’re done editing, tap Save.Deleting an eventThere are a number of ways to delete an event.• While viewing the summary of an event on the Event detailsscreen, press MENU and then tap Delete event.• In Day, Agenda or Week view, press and hold an event andthen tap Delete event.• When editing an event, scroll down to the bottom of screenand then tap Delete.If the event repeats, you’ll be asked whether you want to deletejust that occurrence, this and all future occurrences, or all pastand future occurrences in your Calendar.Sharing an event (vCalendar)You can share a calendar event as a vCalendar to someone’s phoneusing Bluetooth or by sending it as a file attachment with your emailor message.1.2.While viewing an event, press MENU, and then tapShare vCalendar.Do one of the following:• Tap Bluetooth. you’ll be asked to turn on Bluetooth on yourphone and connect to the receiving Bluetooth device. Followthe steps in “Sending information using Bluetooth” in theBluetooth chapter.
Calendar 197• Tap Mail. A new message window opens and automaticallyincludes the vCalendar as an attachment. Your default emailaccount that’s selected in the Mail app will be used to send.For more information, see the Email chapter.• Tap Message. A new message window opens andautomatically includes the vCalendar as a multimediaattachment. For more information, see the Messages chapter.Calendar event remindersIf you have set at least one reminder for an event, the upcoming eventicon will appear in the notifications area of the status bar to remindyou of the upcoming event.Dismissing or snoozing event reminders1. Tap the status bar, then slide your finger down the screen toopen the Notifications panel.2. Do one of the following:• Tap Clear to dismiss event reminders and all othernotifications. Other types of notifications such as newmessages and missed calls will also be deleted.• After sliding open the Notifications panel, tap the calendarevent reminder. You’ll then see a list of all pending eventreminders. Tap Snooze all to snooze all event reminders forfive minutes, or tap Dismiss all to dismiss all event reminders.• Press BACK to keep the reminders pending in thenotifications area of the status bar.
198 CalendarDisplaying and synchronizing calendarsYou can select which calendars to show or hide on your phone’sCalendar, and which ones to keep synchronized.Showing or hiding calendarsIn any Calendar view, press MENU , tap More > Calendars, and thenselect or clear a calendar to show or hide it. Tap All calendars todisplay all calendars.The calendars are kept synchronized on your phone, whether or notyou hide them.Choosing which Google Calendars are synchronized onyour phoneYou can choose which Google Calendars to keep synchronized onyour phone or which ones to stop synchronizing.Stop synchronizing a Google Calendar1. In any Calendar view, press MENU and then tap More > Calendars.2.3.Press MENU again and then tap Remove calendars.Select a Google Calendar to remove from your calendars list, andthen tap OK.4. Press BACK to update Calendar with the new changes andreturn to the Calendar view you were viewing.The calendars that you remove from your calendars list will no longerbe synchronized on your phone, but you remain subscribed to themand can work with them in Google Calendar on the Web.
Calendar 199Adding a Google Calendar to sync withOnly the calendars that you’ve created or subscribed to on the Web,but previously removed from your calendars list, are shown in the listof calendars that you can add.1.2.3.In any Calendar view, press MENU and then tap More > Calendars.Press MENU again and then tap Add calendars.Select a Google Calendar to add to your calendars list, and thentap OK.4. Press BACK to update Calendar with the new changes andreturn to the Calendar view you were viewing.Changing Calendar settingsYou can change Calendar settings to specify how it displays eventsand how it notifies you of upcoming events. In any Calendar view, pressMENU and then tap More > Settings to access Calendar’s settings.Reminder settingsChoose how you want Calendar to issue event reminders when thereare upcoming events.All calendarsSet alerts ¬ificationsDefault remindertimeSelect this check box to use the same event remindersettings for all types of calendars. If you clear this checkbox, you can set different reminder settings for eachcalendar.Configure event reminders to open an alert, send you anotification, or turn off event notifications on your phone.Choose how soon before an event you want to benotified.
200 CalendarSelect ringtoneVibrateHide declinedeventsChoose a ringtone to sound when you receive an eventreminder.Choose whether you want your phone to vibrate whenyou receive an event notification.Choose whether to show or hide events to which you’vedeclined invitations.Calendar view settingsChoose what appears in Calendar when opened and what’s shown inDay, Week, and Month views.Start inDay viewsFirst day of weekInclude weatherCityChoose the default Calendar view that is displayed whenyou open Calendar.Choose whether to display Day view in the form of anevent list or time list.Set the Month and Week views to start on a Sunday orMonday.Make sure this check box is selected so that weatherinformation is shown in Day view’s event list.By default, Day view displays your current location’sweather. You can change it to display the weather ofanother city.
About the Calendar widgetCalendar 201There’s a Calendar widget available that you can add to your Homescreen, and it comes in different calendar views. Tapping a day orevent on the widget brings you to the Calendar app. To find out howyou can add a widget, see “Personalizing your Home screen withwidgets” in the Personalizing chapter.
Clock and WeatherAbout the HTC Clock widgetUse the HTC Clock widget to see your current date, time, and location.It’s added by default on your Home screen. Tap the weather imageto open the Weather app and check for more weather forecasts. See“Checking weather” for details.If you want to show the time of another city, just add another clockwidget to the extended Home screen. Select from a variety of looksand designs. To find out how you can add a widget, see “Personalizingyour Home screen with widgets” in the Personalizing chapter.
About the Clock appClock and Weather 203Get more from the Clock app than just the regular date and time. Useyour phone as a desk clock complete with weather information. Or letit serve as a night clock or a screensaver. As a world clock, see whattime it is in several cities across the globe. You could also use it as analarm clock, stopwatch, and countdown timer.To open the Clock app, you can:• Tap the HTC Clock widget on the Home screen.• Press HOME , and then tap > Clock.Tap the tabs at the bottom row or slide your finger across the tabs toswitch between the different functions of the Clock app.1 2 3 4 5
204 Clock and Weather1 Desk Clock tab2 World Clock tab3 Alarms tab4 Stopwatch tab5 Timer tabUsing Desk ClockOpening the Clock app brings you directly to the Desk Clock screen.The Desk Clock displays the current date, time, and weather. It alsohas an alarm clock indicator and a battery charging indicator. You candim the screen to show only the time and date on the Desk Clock.1524 3
Clock and Weather 2051 Shows whether the alarm clock is on or off. To find out how to turn on andset the alarm clock, see “Setting the alarm clock”.2 Shows the weather information of your current location. Tapping it bringsyou to the Weather app where you can see weather forecasts of thenext few days. See “Checking weather” for more information about theWeather app.3 Shows the battery charge level. You’ll see it only when your phone isplugged with the power adapter or connected to your computer.4 Tap to dim the screen and display only the time and date on the DeskClock. To light up the screen again, tap anywhere on the screen or pressthe BACK button on your phone.5 Tap to dim the screen and go into screensaver mode. When in screensavermode, the time and date will change position on the screen after everyfew minutes. To light up the screen again, tap anywhere on the screen orpress the BACK button on your phone.You can change the Desk Clock screen to display the date and time ofanother time zone. To find out how to select a different time zone, see“Setting the time zone, date, and time”.
206 Clock and WeatherUsing World ClockUse the Clock app’s World Clock screen to check the current time inseveral places around the globe simultaneously. You can also set yourhome city, add more cities to the world clock list, and manually setyour time zone, date, and time.Setting your home city1. Tap the HTC Clock widget on the Home screen.2.Tap the World Clock tab.3. Press MENU and then tap Home settings.4.Enter your home city’s name. As you enter letters, the list isfiltered to show matching cities and countries.5. Scroll through the list and tap your home city.
Clock and Weather 207Setting the time zone, date, and timeTo set the time zone, date, and time on your phone manually, you needto turn off auto time synchronization first.1.2.3.Tap the HTC Clock widget on the Home screen.Tap the World Clock tab.Press MENU and then tap Local time settings to open the Date &time settings screen.4. Clear the Automatic check box.5.6.7.8.9.Tap Select time zone. Scroll through the list and then tap thetime zone that you want.To change the date, tap Set date. Adjust the date by rolling theday, month, and year scroll wheels onscreen and then tap OK.To change the time, tap Set time. Adjust the time by rolling thehour and minute scroll wheels onscreen and then tap OK.Tap the Use 24-hour format check box to toggle between using a12-hour or a 24-hour time format.Tap Select date format then select how you want dates to bedisplayed. (The selected date format also applies to the datedisplayed in the alarm clock.)You can also press HOME > MENU and then tap Settings >Date & time to open the Date & time settings screen.
208 Clock and WeatherAdding a city to the World Clock screenAdd more cities to the World Clock screen so you can instantly checkthe date and time in these cities. In addition to the current and homecities, the World Clock screen can display up to 15 cities.1.2.3.4.Tap the HTC Clock widget on the Home screen.Tap the World Clock tab.Tap Add city. Enter the city name you want to add. As you enterletters, the list is filtered to show matching cities and countries.Scroll through the matching list and tap the city that you want toadd.Setting the alarm clockYou can use the Clock app’s Alarms screen to set up one or morewake-up alarms.
Setting an alarm1. Tap the HTC Clock widget on the Home screen.2. Tap the Alarms tab.Clock and Weather 2093. Select the check box of an alarm. and then tap that alarm.4. On the Set alarm screen, drag your finger up or down to roll thetime scroll wheels and set the alarm time.5. Scroll through the Set alarms screen to see all the available alarmoptions. You can:• Enter the alarm Description and choose the Alarm sound touse.• Tap Repeat. Select what days of the week to sound the alarmand then tap OK.• Select the Vibrate check box if you want your phone to alsovibrate when the alarm goes off.6. When you’ve finished setting the alarm, tap Done.• To turn off an alarm, tap (clear) the check box of that alarm.• If you need to set more than three alarms, press MENU while you’re onthe Alarms screen and then tap Add alarm.Deleting an alarm1. Tap the HTC Clock widget on the Home screen.2. Tap the Alarms tab.3. On the Alarms screen, press MENU and then tap Delete.4. Select the alarms you want to delete and then tap Delete.
210 Clock and WeatherChanging alarm sound settingsIf you’ve set one or more alarms, you can change their settings suchas the alarm volume, how long to snooze the alarm, and more.1.2.3.Tap the HTC Clock widget on the Home screen.Tap the Alarms tab.On the Alarms screen, press MENU and then tap Settings. Youcan change the following settings:Alarm in silentmodeAlarm volumeSnoozedurationSide buttonbehaviorSelected by default, this option allows the alarm tosound even when your phone’s volume is set to silentmode. Clear this check box if you want to silence thealarm when the volume is in silent mode.Set the volume level that you want for the alarm.Set how long to snooze between alarms.Choose what happens to the alarm when pressing theside button (VOLUME UP/DOWN) of your phone. Youcan set the button to snooze, dismiss the alarm, ordisable the button.The side button works only when the phone’s screenis not locked. While on the lock screen, tap theonscreen Snooze button to snooze, or slide down thescreen to dismiss the alarm.
Checking weatherClock and Weather 211If you consented to turn location service on when you were settingup your phone for the first time, you’ll see the weather of your currentlocation right on the HTC Clock widget of your Home screen.You can also check the current weather and weather forecasts forthe next four days of the week. In addition to your current location’sweather, this app also displays the weather forecasts of other citiesaround the globe.If you declined to turn location service on during first-time setup of yourphone, turn location service on in your phone’s settings so that you’ll beable to check your current location’s weather on the HTC Clock widget,Weather app, and the Weather widget. Press HOME > MENU, and thentap Settings > Location, and then select the Use wireless <strong>net</strong>works checkbox.1. Connect to the Inter<strong>net</strong> using your phone’s Wi-Fi or dataconnection. To find out how, see the Inter<strong>net</strong> connectionschapter.2. Press HOME , and then tap > Weather.3. On the Weather screen, you’ll first see your current location’sweather. To check the weather in other cities, swipe your fingerup or down the screen.
212 Clock and Weather4. The Weather app automatically downloads and displays thelatest weather updates. Tap to update the informationanytime.5. To see more weather details on the Web, tap Weather at thebottom center of the Weather screen.Adding a city to the Weather screenAdd more cities to the Weather screen so you can instantly check theweather forecasts in these cities. In addition to your current location,the Weather screen can display up to 15 cities.1.2.On the Weather screen, tap .Enter the location you want to add. As you type, the list is filteredto show the possible locations based on the letters you entered.3. Tap the desired city to select it.
Clock and Weather 213Changing the order of cities on the Weather screen1. On the Weather screen, press MENU and then tap Rearrange.2. Press and hold at the end of the item you want to move.When the row is highlighted in green, drag it to its new position,then release.3. Tap Done.Deleting cities from the Weather screen1. On the Weather screen, press MENU and then tap Delete.2.Select the cities you want to remove and then tap Delete.Changing weather options1. On the Weather screen, press MENU and then tap Settings.2. You can change the following weather settings:Update whenopenedUpdateautomaticallyUpdate scheduleTemperature scaleSelect this check box to refresh weatherupdates every time you open the Weather app.Select this check box to automaticallydownload weather updates.Set an auto update schedule.Choose whether to display weather in Celsius orFahrenheit.
214 Clock and WeatherAbout the Weather widgetUse the Weather widget to instantly check weather forecasts of yourcurrent location and other cities without having to open the Weatherapp. The Weather widget comes in different looks and styles.You can add this widget to the Home screen, if it’s not yet added. Tofind out how you can add a widget, see “Personalizing your Homescreen with widgets” in the Personalizing chapter.
Inter<strong>net</strong> connectionsData connectionYour phone will be automatically set up to use the Verizon Wirelessdata <strong>net</strong>work when you turn on your phone (if the SIM card isinserted) for the first time.Checking the data connection you are using1. Press HOME > MENU, and then tap Settings.2.Tap Wireless & <strong>net</strong>works > Mobile <strong>net</strong>works > Network operatorsor Access Point Names.Turning the data connection on or offTurning your data connection off can help save battery life and savemoney on data charges. However, if you don’t have data connectionturned on and you’re also not connected to a Wi-Fi <strong>net</strong>work, youwon’t receive automatic updates to your email, social <strong>net</strong>workaccounts, and other synchronized information.1.2.3.Press HOMETap Wireless & <strong>net</strong>works.> MENU, and then tap Settings.Select the Mobile <strong>net</strong>work check box to turn on the dataconnection; clear the check box to turn off the data connection.
216 Inter<strong>net</strong> connectionsCreating a new access pointBefore you add another data connection on your phone, have theaccess point name and settings (including username and password ifrequired) from Verizon Wireless ready.1.2.Press HOME> MENU, and then tap Settings.Tap Wireless & <strong>net</strong>works > Mobile <strong>net</strong>works > Access PointNames.3. On the APNs screen, press MENU and then tap New APN.4.On the Edit access point screen, enter the APN settings. Tap theAPN setting item to edit it.5. Press MENU and then tap Save.Enabling data roamingData roaming lets you connect to Verizon Wireless’s partner <strong>net</strong>worksand access data services when you’re out of Verizon Wireless’scoverage area.1.Using data services while roaming will be costly. Check with VerizonWireless for data roaming rates before you use data roaming.2.Press HOME> MENU, and then tap Settings.Tap Wireless & <strong>net</strong>works > Mobile <strong>net</strong>works, and then select theData roaming check box.Select the Data roaming sound check box if you’d like yourphone to play a sound so you’ll know when it’s connecting to aroaming <strong>net</strong>work.
Wi-FiInter<strong>net</strong> connections 217To use Wi-Fi on your phone, you need access to a wireless accesspoint or “hotspot”. The availability and strength of the Wi-Fi signal willvary depending on objects, such as buildings or simply a wall betweenrooms, the Wi-Fi signal has to pass through.Turning Wi-Fi on and connecting to a wireless <strong>net</strong>work1. Press HOME > MENU, and then tap Settings.2.3.4.Tap Wireless & <strong>net</strong>works, and then select the Wi-Fi check boxto turn Wi-Fi on. The phone then scans for available wireless<strong>net</strong>works.Tap Wi-Fi settings. The <strong>net</strong>work names and security settings ofdetected Wi-Fi <strong>net</strong>works are displayed in the Wi-Fi <strong>net</strong>workssection.If the wireless <strong>net</strong>work you want to connect to is not in the listof detected <strong>net</strong>works, scroll down the screen, and then tap AddWi-Fi <strong>net</strong>work. Enter the wireless <strong>net</strong>work settings, and then tapSave.5. Tap the Wi-Fi <strong>net</strong>work you want to connect to.• If you selected an open <strong>net</strong>work, you’ll be automaticallyconnected to the <strong>net</strong>work.• If you selected a <strong>net</strong>work that is secured with WEP, enter thekey and then tap Connect.Depending on the <strong>net</strong>work type and its security settings, you may alsoneed to enter more information or choose a security certificate.
218 Inter<strong>net</strong> connectionsWhen your phone is connected to a wireless <strong>net</strong>work, the Wi-Fi iconappears in the status bar and tells you the approximate signalstrength (number of bands that light up).The next time your phone connects to a previously accessed securedwireless <strong>net</strong>work, you won’t be asked to enter the key or othersecurity information again, unless you reset your phone to its factorydefault settings.Connecting to a Wi-Fi <strong>net</strong>work with EAP-TLS securityYou may need to install a <strong>net</strong>work certificate (*.p12) to yourphone before you can connect to a Wi-Fi <strong>net</strong>work with EAP-TLSauthentication protocol.1.2.Save the certificate file to the root folder of the storage card.Press HOME> MENU, and then tap Settings.3. Tap Security > Install from SD card.4.5.Select the <strong>net</strong>work certificate needed to connect to the EAP-TLS<strong>net</strong>work.Follow the steps in the previous section to connect to the Wi-Fi<strong>net</strong>work.Checking the wireless <strong>net</strong>work status1. Press HOME > MENU, and then tap Settings.2.3.Tap Wireless & <strong>net</strong>works.On the Wireless & <strong>net</strong>works screen, tap Wi-Fi settings, and thentap the wireless <strong>net</strong>work that the phone is currently connectedto.A message box is then displayed showing the Wi-Fi <strong>net</strong>work name,status, speed, signal strength, and more.
Inter<strong>net</strong> connections 219If you want to remove the wireless <strong>net</strong>work settings on your phone, tapForget. You’ll need to enter the settings again if you want to connect to thiswireless <strong>net</strong>work.Connecting to another Wi-Fi <strong>net</strong>work1. Press HOME > MENU, and then tap Settings.2.3.Tap Wireless & <strong>net</strong>works > Wi-Fi settings. Detected Wi-Fi<strong>net</strong>works are displayed in the Wi-Fi <strong>net</strong>works section.To manually scan for available Wi-Fi <strong>net</strong>works, on the Wi-Fisettings screen, press MENU and then tap Scan.4. Tap another Wi-Fi <strong>net</strong>work to connect to it.Adding connection widgetsAdd the Mobile Network and Wi-Fi widgets or the Data dashboardwidget to the Home screen to make it faster for you to turn on or offthese connections. Tap the widget or icon on the dashboard to turnon or off the connection.To find out how to add widgets, see “Adding a widget” in thePersonalizing chapter.
220 Inter<strong>net</strong> connectionsConnecting to a virtual private <strong>net</strong>work (VPN)Add, set up, and manage virtual private <strong>net</strong>works (VPNs) so you canconnect and access resources inside a secured local <strong>net</strong>work, such asyour corporate <strong>net</strong>work.Depending on the type of VPN you’re using at work, you may beasked to enter your login credentials and install security certificatesbefore you can connect to your company’s local <strong>net</strong>work. You can getthis information from your <strong>net</strong>work administrator.Also, your phone must first establish a Wi-Fi or data connectionbefore you can start a VPN connection. For information about settingup and using these connections on your phone, see “Data connection”and “Wi-Fi” in this chapter.Setting up secure credential storageIf your <strong>net</strong>work administrator tells you to download and install securitycertificates, you must first set up the phone’s secure credential storage.1.2.Press HOMETap Security > Set password.> MENU, and then tap Settings.3. Enter a new password for the credential storage.4. Scroll down and confirm the password, and then tap OK.5. Select the Use secure credentials check box.You can then download and install the certificates needed to accessyour local <strong>net</strong>work. Your <strong>net</strong>work administrator can tell you how to dothis.
Adding a VPN connection1. Press HOME > MENU, and then tap Settings.2.Tap Wireless & <strong>net</strong>works > VPN settings.Inter<strong>net</strong> connections 2213. Tap Add VPN, and then tap the type of VPN you want to add.4.Tap the VPN settings and set them up according to the securitydetails your <strong>net</strong>work administrator gave you.5. Press MENU, and then tap Save.The VPN is then added to the VPNs section of the VPN settingsscreen.Connecting to a VPN1. Press HOME > MENU, and then tap Settings.2.Tap Wireless & <strong>net</strong>works > VPN settings.3. In the VPNs section, tap the VPN that you want to connect to.4. When asked, enter your log in credentials, and then tap Connect.When you’re connected, the VPN connected icon appears inthe notification area of the title bar.You can then open the web browser to access resources such as yourcorporate <strong>net</strong>work intra<strong>net</strong>.Disconnecting from a VPN1. Press and hold the title bar, and then slide down your finger toopen the Notifications panel.2.Tap the VPN connection to return to the VPN settings screen,and then tap the VPN connection to disconnect from it.When your phone has disconnected from the VPN, the VPNdisconnected icon is displayed in the notification area of the title bar.
222 Inter<strong>net</strong> connectionsUsing your phone as a modem (Inter<strong>net</strong>Connection Mode)No Inter<strong>net</strong> connection available for your computer? No problem. Useyour phone’s data connection to connect to the Inter<strong>net</strong> using yourcomputer.You need your SIM card inserted on your phone to use the dataconnection. To find out how to set up and use the data connection,see “Data connection” earlier in this chapter.Before you can use your phone as a modem, be sure to install HTCSync on your computer first. To find out how to install HTC Sync, see“Synchronizing with your computer” in the Accounts and sync chapter.1.2.3.Make sure your phone’s data connection is turned on. See“Turning the data connection on or off” earlier in this chapter tofind out how to turn on the phone’s data connection.Connect the phone to the computer using the provided USB cable.On the Connect to PC screen, select Inter<strong>net</strong> Connection Mode,and then tap Done.
Inter<strong>net</strong> connections 223Connecting your phone to the Inter<strong>net</strong> through acomputer (Inter<strong>net</strong> Pass-through)If you don’t have a data plan for your phone or you don’t have accessto a Wi-Fi <strong>net</strong>work, you can still go online on your phone by usingyour computer’s Inter<strong>net</strong> connection.Before you can use your computer as a modem, be sure to installHTC Sync on your computer first. To find out how to install HTC Sync,see “Synchronizing with your computer” in the Accounts and syncchapter.1.Make sure your computer is connected to the Inter<strong>net</strong>.Two things to check for your computer’s Inter<strong>net</strong> connection. One, werecommend that you turn off your local <strong>net</strong>work’s firewall. Two, if yourcomputer connects to the Inter<strong>net</strong> via PPP (e.g. Dial UP, xDSL, or VPN),Inter<strong>net</strong> Pass-through will only support TCP protocol.2. Connect the phone to the computer using the provided USBcable.3. On the Connect to PC screen, select Inter<strong>net</strong> Pass-through, andthen tap Done.4. On the message window, tap OK.
224 Inter<strong>net</strong> connectionsUsing your phone as a mobile hotspotShare your data connection with other devices by turning your phoneinto a wireless router. Make sure your phone’s data connection isturned on before you use it as a wireless router. To find out how toturn on your phone’s data connection, see “Data connection” earlier inthis chapter.1.Press HOME> MENU, and then tap Settings.2. Tap Wireless & <strong>net</strong>works > Mobile hotspot settings.The first time you open Portable Wi-Fi hotspot, a brief introductiondescribing the application is displayed. Tap OK.3. Enter a name in Router name (SSID), or use the default routername.4. Choose the type of Security and set the Password (key) for yourwireless router. If you selected None in Security, you don’t needto enter a password.The password is the key other people need to enter on their deviceso they can connect and use your phone as a wireless router.5. Select the Mobile Hotspot check box to turn on your phone’swireless router.Your phone is ready to be used as a wireless router when you see onthe status bar. Up to eight devices can connect to your phone’s wirelessrouter at a time.
Web browserUsing your phone’s web browserYou must have an active data connection or Wi-Fi connection to access theInter<strong>net</strong>.Do one of the following to open the web browser and start surfing theWeb:• On the Home screen, tap Inter<strong>net</strong>.• Press HOME , and then tap > Inter<strong>net</strong>.Going to a webpage1. On the browser screen, press MENU and then tap the URL fieldon top of the screen.2. Enter the webpage address using the keyboard. As you enter theaddress, matching webpage addresses will appear on the screen.Tap an address to go directly to that webpage or continueentering the webpage address.3. Tap the Enter key on the onscreen keyboard.
226 Web browserSetting your home page1. From the browser screen, press MENU, and then tap More >Settings > Set home page.2.On the Set home page screen, select the home page you want to use.Changing the screen orientationThe phone automatically changes the screen orientation dependingon how you’re holding your phone.Turn your phone sideways to display the web browser in landscapeorientation.If the screen orientation doesn’t change automatically, please switchautomatic screen orientation on. Press HOME > MENU, tap Settings >Display, and then select the Auto-rotate screen check box.Browsing full versions of all websitesSome websites display a mobile version of their pages on phone webbrowsers. You can choose to view the full version of all pages, even forthese sites.From the browser screen, press MENU, tap More > Settings, and thenclear the Mobile view check box.Choosing when to show Flash contentChoose which Flash® content you want to see by switching to Ondemand. By switching to On demand, you decide when Flash contentappear on a webpage.1.From the browser screen, press MENU, and then tap More >Settings > Enable plugins.2. Tap On demand.After switching to On demand, you can show the Flash content bytapping on the web page.
Web browser 227Navigating on a webpageYou can swipe your finger on the screen to navigate and view otherareas of the webpage.Zooming in or out on a webpageTap the screen twice quickly to zoom in, then tap the screen twicequickly again to zoom out. You can also use your fingers to spread orpinch the screen to zoom in and out.Selecting a link in a webpageYou can tap a link with your finger to open it, or press and hold a linkfor more options.LinkWebpage address(URLs)Email addressWhat to do••••Tap the link to open the webpage.Press and hold the link to open a menu that allowsyou to open, bookmark, copy to the clipboard, orshare the link via email or your social <strong>net</strong>works.Tap to send an email message to the email address.Press and hold, then tap Copy on the menu to copythe email address to the clipboard. You can paste theemail address later when creating a new contact orsending a new email message.
228 Web browserSelecting an address or phone number in a webpageYou can map an address or call a phone number on a webpage.LinkLocation addressPhone numberWhat to doTap the address to copy it or map it using Google Maps.Tap the phone number to copy, call, send a text messageto that number, or save the number to a contact in People.Opening a new browser windowOpen multiple browser windows to make it easier for you to switchfrom one website to another. You can open up to 4 browser windows.1. While viewing a webpage, press MENU and then tap Windows.2. Tap .A new browser window opens and goes to the home page that is set.Switching between browser windows1. While viewing a web page, do one of the following:• Press MENU and then tap Windows.• Pinch the screen (zoom out) until you see the other browserwindows.2. Select the browser window you want to view by sliding yourfinger on the screen from right to left.
You can also do the following:Web browser 229211 Tap a webpage to display it in full screen.2 Tap to close a webpage.Downloading applications from the webAll downloaded applications are saved to the storage card. Before youdownload an application from the web, make sure that you have installeda storage card on your phone. For information on how to install a storagecard, refer to the Basics chapter.Before you can download applications from the web, you must firstenable downloading from the phone settings.1.2.Press HOME> MENU, and then tap Settings.Tap Applications, and then select the Unknown sources check box.3. When the Attention dialog box opens, tap OK.Applications downloaded from the web can be from unknown sources. Toprotect your phone and personal data, download applications only fromtrusted sources such as Android Market. Refer to “Finding and installingapps from Android Market” in the More apps chapter for details.Viewing your downloadsWhile viewing a webpage, press MENU and then tap More > Downloads.
230 Web browserCopying text, looking up information, and sharingYou can select text and then:• Copy it.• Search it using Google Search.• Look it up on Wikipedia, YouTube, or Google Dictionary.• Get a translation of the text from Google Translate.• Share the text in a new email, text, or multimedia message or inyour status update on a social <strong>net</strong>work.Finding text within a webpage1. While viewing a webpage, press MENU and then tap More > Findon page.2.Enter what you want to search for. As you enter characters,matching characters will be highlighted. Tap the left or rightarrow to go to the previous or next matching item.
Selecting text1. Press and hold on a word.Web browser 2312. Drag the start and end markers to highlight the surrounding textyou want to select.11 Start and end markers. Drag to increase or decreasethe text selection area.To select text in a link, press and hold the link, and then tap Copy link URL.Copying and pasting text1. After you have selected the text you want to copy, tapselected text is then copied to the clipboard.2.. TheIn a text entry field (for example while composing a message),press and hold at the point where you want to paste the text.3. Tap Paste.
232 Web browserSearching or translating text1. After you have selected the text you want to search or translate,tap .2. Tap one of the following tabs:Wikipedia. Look for related information on Wikipedia, based onthe text that you selected.Google Search. Look for related information using GoogleSearch, based on the text that you selected.YouTube. Look for videos on YouTube, based on the text thatyou selected.Google Translate. Translate the text to another language.Google Dictionary. Look up the selected text in the dictionary.Pasting text in a new message or social <strong>net</strong>work statusupdate1. After you have selected the text you want to share, tap .2. Select an option to paste the selected text in a new email, text ormultimedia message or in your status update on a social <strong>net</strong>worksuch as Twitter. See the Email, Messages, and Social chapters formore information on using these features.
Web browser 233Viewing bookmarks and previously visited pagesYou can store as many bookmarks as you want on your phone. Youcan also access a convenient History list of the sites you have visited,or quickly view the pages that you access most often.Bookmarking a webpage1. While viewing a webpage, press MENU, and then tap Addbookmark.2.Edit the bookmark name if needed, and then tap Add.Opening a bookmark1. While viewing a webpage, press MENU, and then tap Bookmarks.2. On the Bookmarks tabto open, and then tap it., navigate to the bookmark you wantEditing a bookmark1. While viewing a webpage, press MENU, and then tap Bookmarks.2.On the Bookmarks tab3. Tap the bookmark you want to edit.4. Enter your changes, and then tap Edit., press MENU and then tap Edit.Viewing a previously visited page1. While viewing a webpage, press MENU, and then tap Bookmarks.2. On the History tab , navigate to the page you want to viewand then tap the page.
234 Web browserClearing the list of previously visited pages1. While viewing a webpage, press MENU, and then tap Bookmarks.2.On the History tab, press MENU, and then tap Clear history.Viewing a page that you often visit1. While viewing a webpage, press MENU, and then tap Bookmarks.2. On the Most visited tab , navigate to the page you want toview, and then tap the page.Clearing the list of most visited pages1. While viewing a webpage, press MENU, and then tap Bookmarks.2.On the Most visited tab, press MENU, and then tap Clear all.Changing the view of bookmarks or most visited pages1. While viewing a webpage, press MENU, and then tap Bookmarks.2.On the Bookmarks tab or the Most visited tab , pressMENU, and then tap Thumbnails, List, or Grid to change the view.For example, if you are in Thumbnails view and you want to viewbookmarks in a grid, press MENU > List, and then press MENU >Grid.Setting browser optionsCustomize the web browser to suit your browsing lifestyle. Set display,privacy, and security options when using the web browser.From the browser screen, press MENU, and then tap More > Settings.
BluetoothBluetooth basicsTurning Bluetooth on or off1. Press HOME > MENU, and then tap Settings > Wireless &<strong>net</strong>works.2.Select or clear the Bluetooth check box.An even easier way to turn Bluetooth on or off is with the Bluetoothwidget or Bluetooth setting shortcut on the Home screen. To findout how to add widgets and shortcuts to the Home screen, see thePersonalizing chapter.Turn off Bluetooth when not in use to save battery power, or in placeswhere using a wireless device is prohibited, such as on board an aircraft andin hospitals.Changing the phone nameThe phone name identifies your phone to other devices.1.2.Press HOME > MENU, and then tap Settings > Wireless &<strong>net</strong>works > Bluetooth settings.If the Bluetooth check box is not selected, select it to turnBluetooth on.3. Tap Device name.4.Enter the name for your phone in the dialog box, and then tapOK.
236 BluetoothConnecting a Bluetooth headset or car kitYou can listen to music over a Bluetooth stereo headset, or havehands-free conversations using a compatible Bluetooth headset or carkit. It’s the same procedure to set up stereo audio and hands-free.• For you to listen to music with your headset or car kit, theheadset or car kit must support the A2DP Bluetooth profile.• Before you connect your headset, you need to make itdiscoverable so your phone can find it. You can find out howto do this by referring to your headset manual.1. Press HOME > MENU, and then tap Settings > Wireless &<strong>net</strong>works > Bluetooth settings.2. If the Bluetooth check box is not selected, select it to turnBluetooth on.3. Make sure that the headset is discoverable.4. Tap Scan for devices. Your phone will start to scan for Bluetoothdevices within range.5. When you see the name of your headset displayed in theBluetooth devices section, tap the name. Your phone thenautomatically tries to pair with the headset.6. If automatic pairing fails, enter the passcode supplied with yourheadset.The pairing and connection status is displayed below the handsfreeheadset or car kit name in the Bluetooth devices section. Whenthe Bluetooth headset or car kit is connected to your phone, theBluetooth connected icon is displayed in the status bar. Dependingon the type of headset or car kit you have connected, you can thenstart using the headset or car kit to listen to music and/or make andreceive phone calls.
Bluetooth 237Reconnecting a headset or car kitNormally, you can easily reconnect your headset by switching onBluetooth on your phone, and then turning on the headset. However,you might have to connect manually if your headset has been usedwith another Bluetooth device.1.2.Press HOME > MENU, and then tap Settings > Wireless &<strong>net</strong>works > Bluetooth settings.If the Bluetooth check box is not selected, select it to turnBluetooth on.3. Make sure that the headset is discoverable.4. Tap the headset’s name in the Bluetooth devices section.5.If prompted to enter a passcode, try 0000 or 1234, or consult theheadset/car kit documentation to find the passcode.If you still cannot reconnect to the headset or car kit, follow theinstructions in “Unpairing from a Bluetooth device”, and then followthe steps under “Connecting a Bluetooth headset or car kit”.Disconnecting or unpairing from a BluetoothdeviceDisconnecting a Bluetooth device1. Press HOME > MENU, and then tap Settings > Wireless &<strong>net</strong>works > Bluetooth settings.2.In the Bluetooth devices section, press and hold the device todisconnect.3. Tap Disconnect.
238 BluetoothUnpairing from a Bluetooth deviceYou can make your phone forget its pairing connection with anotherBluetooth device. To connect to the other device again, you may needto enter or confirm a passcode again.1.2.Press HOME > MENU, and then tap Settings > Wireless &<strong>net</strong>works > Bluetooth settings.In the Bluetooth devices section, press and hold the device tounpair.3. Tap Disconnect & unpair.Or, tap Unpair if the Bluetooth device is currently not connectedto your phone.Sending information using BluetoothYou can use Bluetooth to send information from your phone toanother Bluetooth enabled device such as a phone or notebookcomputer. You can send the following types of information, dependingon the device you are sending to:• Photos and videos• Calendar events• Contacts• Audio filesBefore you begin, set the receiving device to discoverable mode. Youmay also need to set it to “Receive Beams” or “Receive Files”. Refer tothe device’s documentation for instructions on receiving informationover Bluetooth.
Bluetooth 239The first time you transfer information between your phone andanother device, you need to enter or confirm a security passcode.After that, your phone and the other device are paired, and you willnot need to exchange passcodes to transfer information in the future.1. On your phone, open the app that contains the information or fileyou want to send.2. Follow the steps for the type of item you want to send:Capturedphoto or videoPhotos orvideosAfter capturing, on the Camera preview screen, tapthe Share button , and then tap Bluetooth.1. On the Albums tab of the Gallery app,choose an album.2. Tap the Share button , and then tap Bluetooth.3. Choose the photos and videos you want to share,and then tap Next.Contact 1. On the All tab of the People app, press andhold a contact, and then tap Send contact as vCard.2. Tap the down arrow icon, and then selectBluetooth from the displayed list.Calendar eventMusic trackVoice recordingIn Day view, Agenda view, or Week view, press andhold the event, and then tap Share vCalendar >Bluetooth.With the track displayed on the Music app’s Nowplaying screen, press MENU, and then tap Share >Bluetooth.On the main Voice Recorder screen, tap the Sharebutton , and then tap Bluetooth.
240 Bluetooth3. Turn on Bluetooth if you’re asked to do so.4. If you haven’t paired with the receiving device before, tap Scanfor devices.5. Tap the name of the receiving device.6. If prompted, accept the pairing request on your phone and thereceiving device.Also enter the same passcode on both your phone and the otherdevice, or confirm the auto-generated passcode.7. On the receiving device, accept the file.Where sent information is savedWhen you send information from your phone using Bluetooth, thelocation where it’s saved depends on the type of information and thereceiving device.If you send a calendar event or contact, it is normally added directlyto the corresponding app on the receiving device. For example, if yousend a calendar event to a compatible phone, the event is shown inthat phone’s calendar app.If you send another file type to a Windows computer, it is normally savedin the Bluetooth Exchange folder within your personal document folders.• On Windows XP, the path may be:C:\Documents and Settings\[your username]\My Documents\Bluetooth Exchange• On Windows Vista, the path may be:C:\Users\[your username]\Documents• On Windows 7, the path may be:C:\Users\[your username]\My Documents\Bluetooth ExchangeFolder
Bluetooth 241If you send a file to another device, the saved location may depend onthe file type. For example, if you send an image file to another mobilephone, it may be saved in a folder named “Images”.Receiving information using BluetoothYour phone is capable of receiving a wide variety of file types withBluetooth, including photos, music tracks, and documents such asPDFs.The first time you transfer information between your phone andanother device, you need to enter or confirm a security passcode.After that, your phone and the other device are paired, and you willnot need to exchange passcodes to transfer information in the future.To receive files using Bluetooth, you need to have a microSD card onyour phone.1.2.Press HOME > MENU, and then tap Settings > Wireless &<strong>net</strong>works > Bluetooth settings.If the Bluetooth check box is not selected, select it to turnBluetooth on.3. Select the Discoverable check box.4.On the sending device, send one or more files to your phone.Refer to the device’s documentation for instructions on sendinginformation over Bluetooth.5. If prompted, accept the pairing request on your phone and thereceiving device.Also enter the same passcode on both your phone and the otherdevice, or confirm the auto-generated passcode.
242 BluetoothA Bluetooth authorization request is then displayed on yourphone.6. If you want to automatically receive files from the sending devicein the future, select the Always check box.7. Tap Accept or OK.8. When your phone receives a file transfer request notification,slide down the Notifications panel, tap the incoming filenotification, and then tap Accept.9. When a file is transferred, a notification is displayed. To open thefile immediately, slide down the Notifications panel, and then tapthe relevant notification.When you open a received file, what happens next depends onthe file type:• Media files and documents are usually opened directly in acompatible app. For example, if you open a music track, itstarts playing in the Music app.
Bluetooth 243• For a vCalendar file, choose the calendar where you want tosave the event, and then tap Import. The vCalendar is addedto your Calendar events. For information on using Calendar,see the Calendar chapter.• For a vCard contact file, if there are multiple vCard files onyour storage card, you can choose to import one, several, orall of those contacts to your contacts list.Adding the Bluetooth received folder to the Home screenYou can add a folder to the Home screen that shows all files you havereceived with Bluetooth.1.2.3.Press HOME, and then tap .On the Personalize screen, tap Folder > Bluetooth received.Press and hold the Bluetooth received folder icon, and drag it tothe Home screen position you want.To view the folder contents, tap the folder icon. To open a file, tap thefile name.
CameraCamera basicsWhether traveling for business or fun, enjoy taking photos and videosof your trip and encounters with your phone’s camera.Be sure to plug in your microSD card before you use your phone’s camera.Photos and videos captured with the camera will be stored onto yourmicroSD card.If you have not yet inserted your microSD card to your phone, follow thesteps in “Inserting the storage card” in the Basics chapter to insert it.• To open the camera in photo mode and take photos, tapfrom the Home screen, and then tap Camera.• To open the camera directly in video mode so you canimmediately start capturing videos, tap from the Homescreen, and then tap Camcorder.
Camera 245Viewfinder screenWhen you’re in photo mode and you turn your phone left or right, thecamera onscreen controls automatically rotate to how you hold thephone. You’ll find the following onscreen controls on the Viewfinderscreen:12765431 Auto focus indicator See “Auto focusing”.2 Zoom bar See “Zooming”.3 Gallery button See the “Photos, videos, and music” chapter.4 Effects button See “Adding effects”.5 Shutter release/Record button Tap to take a photo or start capturing video.6 Flash button See “Taking a photo” and “Recording video”.7 Mode button Tap to switch between photo and videomodes.
246 CameraUsing the front cameraIt’s easy taking photos and videos of yourself. While on the Viewfinderscreen, tap MENU > Switch Camera.Some camera features are not available while you’re using the front camera,such as auto focusing, zooming, and using flash and face detection.ZoomingBefore taking a photo or video, you can first use the onscreen zoombar to zoom in or out of your subject.Simply slide your finger across the zoom bar to zoom in or out.When you’re recording video, the zoom bar is always shown onscreen.You can freely zoom in or out while recording.If you choose 720p HD resolution for video recording, there’s no zoomingavailable.
Taking a photoCamera 2471. Press HOME , and then tap > Camera.2. Before taking the photo, you can zoom in or out first on yoursubject. To find out how, see “Zooming”.3. Tap the Flash button repeatedly to choose a flash modedepending on your lighting conditions.Auto flash Flash on Flash off4. Choose the resolution and other camera settings you want touse. See “Changing camera settings” for details.5. You can choose an effect to apply to your photo. See “Addingeffects” for details.6. Point the camera and focus on your subject. See “Auto focusing”for details. Then tap to take the photo.You can also set the camera to automatically take a photowithout the need for you to tap the shutter release button. See“Auto capturing” for details.7. Choose what you want to do with the photo you’ve just taken.See “After capturing“ for details.
248 CameraAuto focusingWhenever you point the camera at a different subject or location, itshows the auto focus indicator at the center of the Viewfinder screen.Let the camera auto focus on the center of the screen. Or you can tapanother area on the screen that you want to focus on.Face detectionIf you turn Face detection on in the camera settings, the camera willautomatically recognize faces and adjust the focus when you’re takingphotos of people. When you see boxes on people’s faces, tap totake the photo.
Recording videoCamera 2491. Press HOME , and then tap > Camcorder.2. Choose the video quality and other camera settings you want touse. See “Changing camera settings” for details.To record video in HD, set video quality to HD 720P. Or forsharing on the Web, select Online (HD).3. You can choose an effect to apply to your video. See “Addingeffects” for details.4. Frame your subject on the Viewfinder screen.5. Tap to start recording.6. You can freely zoom in or out while recording video. To find outhow, see “Zooming”.7. You can change focus to a different subject or area by justtapping it on the Viewfinder screen.8. Tap the Flash button to switch the camera light on or off duringrecording.Light onLight off9. To stop recording, tap again.10. Choose what you want to do with the video you’ve just recorded.See “After capturing“ for details.
250 CameraCamera flash doesn’t turn on?The camera flash uses much battery power. To save battery power, thecamera disables it (even when it’s set on) when one of the followingoccurs:You have an incoming callThe camera flash will be disabled temporarily when you have anincoming call. After the call ends, you’ll be able to use it again.If you have set the flash to Auto flash or Flash on in photo mode orLight on in video mode, it turns back on after you answer and end thecall.Your phone’s battery level reaches 15% or lowerRecharge the battery so that the camera can have enough batterypower to use the flash.Cold weather may lower battery performance whichaffects the flashTo make sure the camera has enough battery life to power up the flash,keep your phone warm. When not in use, put the phone inside yourjacket to keep it warm, and try to avoid sudden temperature changesthat may affect battery performance.
Adding effectsCamera 251Want to make your photos look more interesting? Easy. Use theavailable camera effects to make your photos look like they’ve beentaken through special lenses and filters. You can also add certaineffects to videos.Choose an effect first before you start taking a photo or video. Just tap. Then scroll through the available effects and tap one that you like.When you choose certain photo effects such as depth of field,distortion, or vig<strong>net</strong>te, drag the bar that appears on the right side ofthe screen to adjust the intensity of the effect.After capturingAfter capturing a photo or video, the Review screen will display thephoto or the starting image of the video that you have just captured.Tap the onscreen buttons to choose what you want to do next.Camera. Return to the Viewfinder screen.Delete. Delete the photo or video.Share. Send the photo or video to another phone or your computerusing Bluetooth, send it by email, or select a social <strong>net</strong>work where youwant to upload it to.Set as. Choose how you want to use the photo, such as to use it asyour wallpaper.Play. Watch the video.
252 CameraChanging camera settingsOpen the menu panel to access and change camera settings. To openit, just press MENU.Scroll through the menu panel and choose the settings that you want.Some camera features are not available while you’re using the front camera,such as auto focusing, zooming, and using flash and face detection.Switch cameraSelf-timer(photo mode only)Image adjustmentsWhite balanceResolution/VideoqualityISO (photo modeonly)Review durationLets you switch between using your phone’s maincamera or front camera.If you need to take a group photo or your ownphoto, you can set a time delay before your cameraautomatically takes the photo.Slide your finger across each of the slider bars to adjustthe exposure, contrast, saturation, and sharpness.White balance enables the camera to capture colorsmore accurately by adjusting to your current lightingenvironment. White balance settings include: Auto,Incandescent, Fluorescent, Daylight, and Cloudy.Choose a photo or video resolution to use.You can choose an ISO level or set it back to Auto.Higher ISO numbers are better for taking pictures inlow light conditions.Set the time for a captured photo or video to bedisplayed on the Review screen before the camerachanges back to the Viewfinder screen.
Camera 253Widescreen(photo mode only)Geo-tag photos(photo mode only)Auto focusFace detection(photo mode only)Shutter soundGrid (photo modeonly)Mirror mode (frontcamera only only)When this check box is selected (default), photoresolutions available for selection are in 5:3 ratio andyou can use the entire Viewfinder screen to frame yoursubject. When not selected, photo resolutions availablefor selection are in standard 4:3 ratio.Select this check box when you want to store GPSlocation in your captured photos.This option enables or disables centered auto focus.Auto focus is enabled by default.This option allows the main camera to automaticallyrecognize faces and adjust the focus when you takepeople photos. Face detection will be turned off if youdisable auto focus.Select or clear this check box, depending on whetheryou want the camera to play a sound when you pressthe shutter release or record button.Select this check box when you want to display a gridon the Viewfinder screen so you can easily frame andcenter your subject before taking the photo.When this check box is selected (default), you couldview your self-portrait as in a mirror.Record with audio(video mode only)Reset to defaultSelect or clear the check box, depending on whetheryou want to record audio when capturing videos.Change the camera back to default settings.
Photos, videos, andmusicBrowsing your GalleryAbout the Gallery appRelive the fun while viewing photos and videos of your latest travels oryour pet’s newest tricks. Get an audience by tagging your Facebookand Flickr friends. You can even play your media on a TV screen.To start using Gallery, check first if you have photos or videos copied onyour storage card. To find out how to copy files, see “Copying files to orfrom the storage card” in the Getting started chapter.What’s more, you can edit and add effects to your photos. You can alsoeasily turn a photo as your contact icon, location icon, or wallpaper.
Selecting an albumPress HOME , and then tap > Gallery.Photos, videos, and music 255The Gallery app opens in the Albums screen where your photos andvideos are organized by albums for easy viewing.The following are preset albums:• Camera shots lets you view photos and videos that are stored inthe camera’s folder.• Photos and videos that you set as your favorites will be groupedunder My favorites.• All photos lets you view all photos that are stored in all thefolders on the storage card.• All videos lets you view all videos that are stored in all the folderson the storage card.• All downloads lets you view photos and videos that youdownloaded.
256 Photos, videos, and musicFolders in your storage card that contain photos and videos will alsobe treated as albums and will be listed below the preset albums. Theactual folder names will be used as the album names.Simply tap an album to view the photos and/or videos in that album.If there are photos or videos under the root path of your storage card (thatare not contained in folders), they will be grouped under the Other album.Viewing photosAfter you’ve selected an album, you can browse through your photosand videos. Depending on how you hold your phone, the screenautomatically switches to either grid view or filmstrip view:• While in grid view, slide your finger up or down to scroll throughthe thumbnails. Tap a photo or video to view it in full screen.
Photos, videos, and music 257• While in filmstrip view (when you turn your phone sideways),slide your finger left or right across the screen to go throughyour photos and videos. Tap a photo or video to view it in fullscreen.Zooming in or out on a photoThere are two ways you can zoom in or out of a photo:• Tap the screen twice quickly to zoom in, then tap the screentwice quickly again to zoom out.• You can also use pinch zooming. Press your thumb and indexfinger on the screen and then spread your fingers apart to zoomin. Pinch your fingers together to zoom out.
258 Photos, videos, and musicViewing videosVideo is always displayed in landscape mode when you play it. Use theonscreen controls to play, pause, or stop the video. For an enhancedaudio experience, tap to turn on SRS. Tap to toggle betweenfull and best-fit screens.• SRS enhancement is not available when you’re using a Bluetooth stereoheadset.• Another way to easily get to your videos is to tapscreen, and then tap Videos.from the HomeEditing your photosDo basic editing tasks on your photos such as rotate and crop. Youcan also enhance your photos by applying effects such as highcontrast, vintage, and more.Rotating a photo1. On the Gallery app’s Albums screen, tap an album.2.3.Press and hold on the photo that you want to rotate.In the menu that opens, tap Edit, and then tap either Rotate leftor Rotate right.
Cropping a photo1. On the Gallery app’s Albums screen, tap an album.2.3.Press and hold on the photo that you want to crop.Photos, videos, and music 259In the menu that opens, tap Edit, and then tap Crop. You’ll see acrop box around the photo.4. To adjust the crop box size, press and hold the edge of the box.When directional arrows appear, drag your finger inward to oroutward to resize the crop box.5. To move the crop box to the part of the photo that you want tocrop, drag the crop box to the desired position.6. Tap Save to keep the changes.The cropped photo is saved in the storage card as a copy. Theoriginal photo remains unedited.Adding effects1. On the Gallery app’s Albums screen, tap an album.2. Press and hold on the photo that you want to add effects to.3. In the menu that opens, tap Edit, and then tap Effects. On thepanel that opens, you’ll see options available to you.4. Tap an effect to apply on the photo.
260 Photos, videos, and music5. Tap Save to keep the changes.The enhanced photo is saved in the storage card as a copy. Theoriginal photo remains unedited.Sending your photos and videosSend photos and videos via email or MMS. You can also send them toanother phone or your computer using Bluetooth.Sending photos or videos by emailYou can send several photos, videos, or both in an email message.They are added as file attachments in your email.1.2.Press HOME , and then tap > Gallery.Tap the album where the photos or videos you want to share arein.3. Tap, and then tap Gmail or Mail.4. Select the photos or videos you want to share and then tap Next.5. Compose your message and then tap Send.If you selected Mail and you have multiple email accounts, the default emailaccount will be used.Sending a photo or video by MMS1. Press HOME , and then tap > Gallery.2.Tap the album where the photo or video you want to share is in.3. Tap, and then tap Messages.4. Tap the photo or video you want to send.5. The photo or video is automatically added into the MMS message.
Photos, videos, and music 261If you want to add more photos to your slideshow attachment,tap Add slide, and then tap Insert picture. When finished, tapDone.6. Compose your message and then tap Send.Sending photos or videos using BluetoothYou can select several photos, videos, or both and send them tosomeone’s phone or your computer using Bluetooth.1.2.Press HOME , and then tap > Gallery.Tap the album where the photos or videos you want to share arein.3. Tap, and then tap Bluetooth.4. Select the photos or videos you want to share and then tap Next.5.In the next few steps, you’ll be asked to turn on Bluetooth onyour phone and connect to the receiving Bluetooth device so thefiles can be sent. Follow the steps in “Sending information usingBluetooth” in the Bluetooth chapterSharing your photos and videos on the WebUsing the Gallery app, you can share photos and videos on your social<strong>net</strong>works, as well as post videos on YouTube.You can also use the Camera or Camcorder app to share a photo orvideo right after you’ve captured it. See the Camera chapter.
262 Photos, videos, and musicSharing photos or videos on FacebookYou need to be logged in to your Facebook account to be able toupload photos or videos.1.2.Press HOME , and then tap > Gallery.Tap the album where the photos or videos you want to share arein.3. Tap, and then tap Facebook for HTC Sense.4. Select the photos or videos you want to share and then tap Next.5. Enter a different caption on each photo or video.You can also tag friends on your photos. Tap Tag this photo, andthen tap the part where your friend is. From the list that shows,select who you want to tag.6. Slide to the left to go to the next photo or video.7. Tap Upload.
Photos, videos, and music 2638. Select which album to upload to and set privacy settings for theuploaded photos or videos.9. Tap Done.Sharing photos or videos on FlickrYou need to be logged in to your Flickr account to be able to uploadphotos or videos.1.2.Press HOME , and then tap > Gallery.Tap the album where the photos or videos you want to share arein.3. Tap, and then tap Flickr.4. Select the photos or videos you want to share and then tap Next.5. Enter a different title and description on each photo or video.You can also tag friends on your photos. Tap Tag this photo, andthen tap the part where your friend is. From the list that shows,select who you want to tag.6. Slide to the left to go to the next photo or video.
264 Photos, videos, and music7. Tap Upload.8. Select which album to upload to and set privacy settings for theuploaded photos or videos.9. Tap Done.Sharing photos on PicasaYou need to be signed in to a Google Account to be able to uploadphotos to the Picasa photo organizing service.1.2.Press HOME , and then tap > Gallery.Tap the album where the photos you want to share are in.3. Tap, and then tap Picasa.4. Select the photos you want to share and then tap Next.5. Enter a caption for the photos you’re uploading.6.7.Select the online album where you want to upload the photos, ortap to create a new album.Tap Upload.You can view the photos online at http://picasaweb.google.com.Sharing videos on YouTubeYou can share your videos by uploading them to YouTube. Pleasesign in to your YouTube or Google Account, if you’re asked to do so.1.2.Press HOME , and then tap > Gallery.Tap the album where the videos you want to share are in.3. Tap, and then tap YouTube.4. Select the videos you want to share and then tap Next.5. Enter a title for the videos you’re uploading.6. Tap More details and enter the prompted information, such as
7.description and tags, and select a privacy option.Tap Upload.Photos, videos, and music 265Viewing photos in your social <strong>net</strong>worksRight on the Gallery app, check what you and your friends haveuploaded to your social <strong>net</strong>works (Facebook and Flickr only).Viewing photos on FacebookYou need to be logged in to your Facebook account to view Facebookphotos.1.2.3.Press HOME , and then tap > Gallery.Tap the Facebook tab.Tap your account name or your friend’s account on the list toview the photos in the account.You can view photos in your online albums the same way as howyou view photos in your storage card.Viewing photos on FlickrYou need to be logged in to your Flickr account to view Flickr photos.1. Press HOME , and then tap > Gallery.2. Tap the Flickr tab.You may be asked to give authorization for the app to connect tothe Flickr website. If this happens, you need to give authorizationto access your Flickr account.3. Tap your account name or your friend’s account on the list toview the photos in the account.You can view photos in your online albums the same way as howyou view photos in your storage card.
266 Photos, videos, and musicCommenting photos in your social <strong>net</strong>worksAdd comments to your uploaded photos as well as your friends’.1. Do one of the following:• While browsing online albums, press and hold a photo andthen tap Add comment.• While viewing a photo in full screen, tap anywhere on thescreen, and then tap .2. Tap the box that says “Write a comment”.3. Enter your text, and then tap Comment.Listening to musicEnjoy listening to songs and music on your phone using the Musicapp.You need to copy music files to your storage card first to use the Music appto play music. To find out how to copy files, see “Copying files to or fromthe storage card” in the Getting started chapter.Press HOME , and then tap > Music.The Music app opens in the Playback screen. Tap the onscreen iconsto control music playback, select a song to play, repeat songs, andmore.
Photos, videos, and music 2671982374 5 61 Turn shuffle on or off.(Shuffle is off when button is gray.)2 Press and drag your finger across the progress bar to jump to any part ofthe song.3 Go to the Library.4 Go to the previous song in the Now playing list.5 Play, pause, or resume playing the song.6 Go to the next song in the Now playing list.7 Switch between showing the Now playing list and Playback screen. Youcan rearrange songs in the Now playing list.8 Enjoy listening to music with SRS. Or, if you’re using a wired headset, youcan also choose from various preset equalizer settings. (SRS and equalizerare not available when you’re using a Bluetooth stereo headset.)9 Cycle through the repeat modes: Repeat all songs, Repeat current song,and Don’t repeat.
268 Photos, videos, and musicWhen you’re listening to music and the screen turns off, press POWERto turn the screen back on and control the music playback directly onthe Lock screen.If you don’t see the playback controls on the Lock screen, tapanywhere on the screen to display them.You can also pause music playback right from the Notifications panel.To find out how to open the Notifications panel, see the Gettingstarted chapter.Flipping through your albumsSwipe your finger left or right across the screen to go to the next orprevious music album.When you turn your phone sideways to the left, you get a wider viewof your screen and can skim through your albums with more ease.
Photos, videos, and music 269• If you have lots of albums, flick left or right across the screen toquickly skim through them.• To look at one album at a time, slide your finger left or right.• Tapto see the song list of the current album.Browsing music in the LibraryTap on the Music app’s Playback screen or Now playing list to goto the Library.In the Library, your music is organized by categories such as Artistsand Albums. Choose a category by tapping one of the tabs at thebottom of the screen.When you tap a song in a category to play it, the Now playing list isupdated with the song list from your selected category.You can add, remove, or rearrange the tabs in the Library. To find out how,see “Rearranging or hiding application tabs” in the Personalizing chapter.
270 Photos, videos, and musicCreating a playlistPersonalize your music experience by creating music playlists. Makea playlist containing just your favorite songs or create one to matchyour mood for the day. You can make as many playlists as you like.1.2.3.Press HOME , and then tap > Music.Tapto go to the Library.In the Library, tap or slide your finger on the bottom row to go tothe Playlists category.4. Tap Add playlist.5. Enter a playlist name, and then tap Add songs to playlist.6.7.Choose a category. If you go to the Songs category, you can seea complete list of songs on your storage card.Select the check boxes of songs you want to add to the playlistand then tap Add.8. Tap Save.Playing the songs in a playlist1. In the Library, tap or slide your finger on the bottom row to go tothe Playlists category.2.Tap a playlist to open it.3. Tap the first song or any song in the playlist.When you tap a song in the list to play it, the Now playing list isupdated with the songs from your playlist.Managing playlistsAfter creating a playlist, you can add more songs to it, rearrange theirorder, and more.1.In the Library, tap or slide your finger on the bottom row to go to
2.3.Photos, videos, and music 271the Playlists category.Tap a playlist to open it.Press MENU, and then choose what you want to do:Add moresongs to aplaylistRearrangesongsDelete songsfrom a playlistChange playlistname1...1.Tap Add songs.Go to the Songs category or any other category.Select the songs you want to add to the playlistand then tap Add.Tap Change order.. Press and hold at the end of the song titleyou want to move. When the row is highlighted,drag it to its new position, then release..1..Tap Done.Tap Remove songs.Select the songs you want to delete and then tapRemove.Tap Rename playlist.Deleting playlists1. In the Library, tap or slide your finger on the bottom row to go tothe Playlists category.2.Press MENU and then tap Delete playlists.3. Select the playlists to delete and then tap Delete.Setting a song as ringtoneYou can choose a song from the Music app’s Library and set it as yourphone’s ringtone or a ringtone for a certain contact.
272 Photos, videos, and music1.2.3.4.5.6.Press HOME , and then tap > Music.Tapto go to the Library.In the Library, choose the song that you want to use as ringtoneand then play it back.On the Playback screen, press MENU and then tap More > Set asringtone.If you chose an MP3 song, you can trim it first and set thepart that you trimmed as the ringtone. See “Trimming an MP3ringtone”.In the Set as ringtone options menu, tap Phone ringtone orContact ringtone.If you select Contact ringtone, you need to choose the contactsyou want to associate the song with in the next screen.
Photos, videos, and music 273Trimming an MP3 ringtoneThe Music app has a built-in ringtone trimmer. You can trim an MP3song and set a part of it as your ringtone.1. On the Playback screen, press MENU, and then tap More > Set asringtone > Trim the ringtone.2. Use the onscreen controls to trim your ringtone.5142 31 Trim sliders2 Left button3 Right button4 Play/Pause button5 Markers. (These show where the ringtone starts and ends.)
274 Photos, videos, and musicTo trim, you can:• First drag the two trim sliders approximately to the part whereyou want the ringtone to begin and end.• Then tap the right and left arrow buttons to more precisely setthe start and end points of the ringtone.3. After you’ve finished trimming, tap Set as. Then choose whetherto set the trimmed song as your Phone ringtone or Contactringtone.Checking if the song was added as a ringtone1. Press HOME > MENU, and then tap Settings.2.On the Settings screen, tap Sound > Phone ringtone. The songshould be in the ringtone list and selected.Sharing music using BluetoothYou can choose a song from the Music app’s Library and send it tosomeone’s phone or your computer using Bluetooth.1.2.Press HOME , and then tap > Music.Tapto go to the Library.3. In the Library, tap the song that you want to share.4.5.On the Playback screen, press MENU and then tap Share >Bluetooth.In the next few steps, you’ll be asked to turn on Bluetooth onyour phone and connect to the receiving Bluetooth device sothe music can be sent. Follow the steps in “Sending informationusing Bluetooth” in the Bluetooth chapter.
Photos, videos, and music 275Finding music videos in YouTubeYou can find music videos of the song you’re listening to in YouTube.It’s simple. On the Playback screen, just press MENU and then tap Findvideos.About the Music widgetYou can use the Music widget to play music right from your Homescreen. To find out how you can add this widget to your Homescreen, see “Personalizing your Home screen with widgets” in thePersonalizing chapter.Sharing media on your home <strong>net</strong>workSharing photos, videos, and music with a bigger circle of friendsis easy on your home <strong>net</strong>work. Simply connect your phone to the<strong>net</strong>work and instantly show your captured photos and videos on a bigTV, or start streaming your favorite music tracks on hi-fi speakers — allvia DLNA®. For more information about DLNA, visit www.dlna.org.Before you share media through the <strong>net</strong>work:• Connect your phone to the <strong>net</strong>work via Wi-Fi. To find out how toconnect to a Wi-Fi <strong>net</strong>work, see the Inter<strong>net</strong> chapter.• Connect the TV or speakers to the <strong>net</strong>work. Check thedocumentation that came with your TV or speakers to know how.
276 Photos, videos, and music1. Open the Gallery or Music app.2. Locate the media that you want to share, and then tap it.3. While viewing the photo or playing the video or music, pressMENU, and then tap Select player.4. Choose the device on your <strong>net</strong>work where you want to play themedia.5. Once connected to the other device, your phone opens up theController screen where you can tap:ControlsToPlay the media on the other device.Pause the music or video playback.Play the previous photo or music track.Play the next photo or music track.Shuffle your music playlist.
Photos, videos, and music 277ControlsToSelect a repeat mode for photos or music tracks.Show available media that you can share.View the media information such as the file name, title,and duration.Connect to another photo/video player on the <strong>net</strong>work.Connect to another music player on the <strong>net</strong>work./Adjust the volume of the video or music you’re playing onthe other device. You can also drag the volume slider toadjust the volume.While playing a media on another device, you can press BACK and doother things on your phone. To return to the Controller screen, slide openthe Notifications panel, and then tap the device you’re connected to.6. To stop sharing your media, tap to disconnect your phonefrom the other device.Until you disconnect the phone from the other device, other media that youopen from the Gallery or Music app are shared on the other device.
Maps and locationTurning on location servicesIn order to find your location on your phone, you need to enablelocation sources.1.2.Press HOME> MENU, and then tap Settings > Location.Under Location ON Settings, tap the location services you wantto use.Using Google MapsAbout Google MapsGoogle Maps lets you track your current location, view real-time trafficsituations, and receive detailed directions to your destination. It alsoprovides a search tool where you can locate places of interest or anaddress on a map, or view locations at street level.• You need an active mobile data or Wi-Fi connection to use Google Maps.• To find your location with Google Maps, you need to enable locationsources. To learn how, see “Turning on location services” in this chapter.• The Google Maps application does not cover every country or city.
Maps and location 279Getting around mapsWhen you open Google Maps, you can easily find your location on themap or check out nearby places by panning and zooming in and outon the map.To find your location with Google Maps, you need to enable locationsources. See “Turning on location services” in this chapter to learnhow.1.2.Press HOME , and then tap > Maps.Tap to show your current location. The blue marker showsyour location on the map.3. Do any of the following on the map:Move aroundZoom inZoom outViewinformationfor a randomlocationSwipe your finger to any direction on the screen toview nearby places on the map.•••Place your thumb and index fingers on top of thearea that you want to zoom in, and then spreadyour fingers across the map.Tap .Double-tap the area on the map that you want tozoom in.• Pinch your thumb and index finger on the map tozoom out.• Tap .1. Press and hold a location on the map. A balloonopens over the location, with the address and athumbnail from street view (if available).2. Tap the balloon to see more information.You can get directions to the location, check fornearby places of interest, and more.
280 Maps and locationSearching for a locationIn Google Maps, you can search for a location, such as an address or atype of business or establishment (for example, museums).1.2.Press HOME , and then tap > Maps.Enter the place you want to search in the search box.As you enter the location to look for, suggested matches fromyour contacts, the web, and previously searched items aredisplayed.3. Tap to search for the location you entered or tap a suggestedsearch item.The search results are displayed as markers on the map.4. Do any of the following:• If the first search result ( ) is what you’re looking for, tapthe balloon. Otherwise, tap to go to the next search resultuntil you find the location you’re searching for, and then tap itsballoon.• Tap to show the search results as a list, and then tap thelocation.Details about the selected location displays on the screen.
Maps and location 2816. Do any of the following:• Tap the onscreen buttons to view the location on a map, getdirections, view the location in Street View, if available, andmore. Scroll down the screen to view more options.• Swipe left or right across the screen to view the informationfor the next or previous search result.Clearing the mapAfter you’ve search on a map, you can clear away the various markersdrawn on it by pressing MENU, and then tapping More > Clear Map.
282 Maps and locationSearching for a place of interest near youUse Places to find places of interest near your current location. Placesuses Google Maps to search common places that you would want tofind, such as the nearest gas station or ATM kiosk.Before you use Places, you need to enable location sources. See“Turning on location services” in this chapter to learn how.1.2.Press HOME , and then tap > Places.Tap the place you want to search.3. Do any of the following:• When one or two places of interest are found, the searchresults are displayed as markers on the map. You can tap themarker, and then tap the balloon to view more informationabout the place.• When several places are found, the search results display in alist. Tap a place to show its location on a map, and then tap itsballoon to view more information about the place.See “Searching for a location” in this chapter to learn what youcan do on the location information screen.Adding a place to searchIn Places, you can add other places of interest that you frequentlysearch for, such as a church or a pizza restaurant.1.2.3.Press HOME , and then tap > Places.Tap Add.Enter the place you want to add to Places’ search items, and thentap Add. The place is added as a button on the Places’ screen.
Maps and location 283Getting directionsGet detailed directions to your destination. Google Maps can providedirections for travel by foot, public transportation, or car.1.2.3.Press HOME , and then tap > Maps.While viewing a map, press MENU, and then tap Directions.Use your current location as the starting point, or enter alocation from where to start in the first text box. Then enter yourdestination in the second text box.Or tap to select an address from your contacts, starredplaces, or a point that you tap on a map.4. Choose how you want to get to your destination by tapping thecar, public transit, or walk button.5. Tap Go.6. If the place you’ve set as your destination has several locationsavailable, choose which one to go to.The next screen displays the directions to your destination in a list.7. Tap an item to view the directions on the map.8. Tap the arrow buttons on the map to follow the directions.When you’re finished viewing or following the directions, press MENUand then tap More > Clear Map to reset the map. Your destination isautomatically saved in the Google Maps history.
284 Maps and locationFinding your friends with Google Latitude (available bycountry)Google Latitude user location service lets you and your friends sharelocations and status messages with each other. It also lets you sendtext and email messages, make phone calls, and get directions to yourfriends’ locations.Your location is not shared automatically. You must join Latitude,and then invite your friends to view your location or accept theirinvitations. Only friends that you have explicitly invited or acceptedcan see your location.To learn more about Latitude, visit Google Latitude on the web:http://www.google.com/mobile/latitude/Opening and joining Latitude1. Press HOME , and then tap > Maps.2.3.While viewing a map, press MENU and then tap Join Latitude.After you’ve joined Latitude and closed the application, you cando any of the following to open it from the Home screen:• Tap• Tap> Latitude.> Maps, press MENU, and then tap Latitude.
Using HTC FootprintsMaps and location 285HTC Footprints provides an easy way to record favorite places andrevisit those places. A footprint consists of a photo of a location suchas a restaurant, a sightseeing destination, etc., stored together with aprecise GPS position and other information about that location suchas the street address and phone number.The next time you want to visit the same place, simply access thefootprint. You can then dial the phone number or view the location inthe map.Adding a location as a footprint1. Press HOME , and then tap > Footprints.2.Tap Save to Footprints.3. You can:• Tap• Tap4. Tap Done.to take a picture and add it as a photo for the footprint.to fine tune the position of the footprint on the map.Before pressing Done, tap the photo to change the name, category, oraddress of the footprint, enter the phone and website, and add a voicememo to the footprint.
286 Maps and locationRevisiting a footprint1. While on Footprints, tap a category.2. Tap the footprint you want to revisit.3. Tap the information fields to get directions, share the footprint,call a stored phone number, and more.Editing or deleting a footprint1. While on Footprints, tap a category.2. Press and hold the footprint you want to edit or delete.3. Tap Edit or Delete on the options menu.Sharing your footprints1. Create a footprint. See “Adding a location as a footprint” earlier inthis chapter to find out how.2. Tap the footprint that you have just created.3. Tap Share, and then choose how you want to share the footprint.Deleting multiple footprints1. While on Footprints, tap a category.2. Press MENU, and then tap Delete.3. Select the footprints you want to delete, and then tap Delete.Exporting your footprintsBack up footprints by exporting them to the storage card. You canalso open exported footprints files in other applications such asGoogle Earth on your PC. To transfer files from your storage card toyour computer, see “Copying files to or from the storage card” in theGetting started chapter.
Maps and location 2871. While on Footprints, tap a category.2. Press MENU, and then tap Export.3. Select the footprints you want to export, and then tap Export.Press MENU and then tap Unmark all to deselect all the footprints.Exported footprints are saved as .kmz files in the Footprints folder onyour storage card. If you exported multiple footprints at one time, theyare saved together in one .kmz file.Importing footprintsBring back footprints you previously backed up to the storage cardto your phone. You can also import .kmz files that you saved in otherapplications, or use a photo as a footprint.1. While on Footprints, press MENU, and then tap Import.2. Do one of the following:• To import a saved footprint or another .kmz file from thestorage card, tap Footprints data, and then tap the file youwant to import. If a footprint on your phone is the same as theone you want to import, you’re asked whether you want tooverwrite it.• To import a photo, tap Photos, navigate to the photo youwant to import, and then tap the photo. You can then addFootprints information such as location and category.
288 Maps and locationUsing Car PanelEasily access footprints and other points of interest with Car Panel,and then start navigation to show you how to get there.Press HOME , and then tap > Car Panel.1 Select a footprint to set as a destination.16253 42 Use voice search to look for a destination.3 Search for a destination to go to. Checkthe places you’ve searched before, andthen choose one to set as your destination.4 Make a phone call.5 View your current location on a map.6 Get detailed driving text instructions onhow to get to your destination.
Using VZ NavigatorMaps and location 289VZ Navigator® tells you where you are and what’s nearby using Bingsearch. Transform your phone into a powerful navigation device soyou can discover destinations around town or around the globe.Press HOME , and then tap > VZ Navigator.For more information about VZ Navigator, visit:http://www.verizonwireless.com/vznavigator
More appsWatching videos on YouTubeUse the YouTube app to check out what’s popular on the online videosharingwebsite.1.2.• You need an active Wi-Fi or data connection to access YouTube.• The first time you use certain YouTube functions such as video sharing,sign in using your YouTube or Google Account, if you’re asked to do so.Press HOME , and then tap > YouTube.Scroll through the list of videos, and then tap a video to watch it.3. While watching a video, you can:• Turn your phone sideways or double-tap the screen to watchthe video in full screen.• Tap the video screen to pause, resume playback, or drag theslider to jump to a different part of the video.• Tap a tab to learn more about the video, see related videos,or check out what other viewers think. You can also slide yourfinger across the tabs to see if there are more tabs available.• Tap the thumbs-up or thumbs-down icon to add your videorating. Tap More to see other options.4. Press MENU, and then tap Home to return to the YouTube mainscreen.
Searching for videos1. On the YouTube main screen, press SEARCH .2.Enter a search keyword, and then tap .3. Scroll through the results and tap a video to watch it.More apps 291You also have the option to show results that were just recently posted.Tap All time, and then select a time period you want.Clearing the search history1. On the YouTube main screen, press MENU, and then tap Settings.2.Tap Clear search history, and then tap OK when prompted.Sharing a video linkShare a video by sending its link to your contacts.1.2.On the video’s watch screen, tap More > Share.Choose how you want to share the video link from the availableoptions.Capturing a video and sharing it on YouTube1. Press HOME , and then tap > YouTube.2.Tap .3. Presspressto start capturing video. When you are done capturing,again. Tap Done.4. Enter a title, description, and tags for your video.5. Set the privacy level.6. Tap Upload.
292 More appsReading news feedsDon’t get left behind with yesterday’s stories. Use the News app tosubscribe to news feeds that cover breaking news, sports, top blogs,and more. You can also get updates based on specific keywords youwant.Press HOME , and then tap > News.1 21 Subscriptions tab. Tap to list the channels you’ve subscribed to. To findout how to subscribe, see “Subscribing to news channels”.2 My Items tab. Tap to show links to your starred items and addedkeywords. See “Starring a story” and “Adding a keyword”.
Subscribing to news channels1. Press HOME , and then tap > News.2.3.On the Subscriptions tab, tap Add feeds.Do one of the following:More apps 293TapAny category(such as Blogs, Entertainment,Sports, and more)Search moreToChoose from popular news feeds.Enter a keyword to search the Web forrelated news feeds or enter the completeURL of a news feed to subscribe to.4. After selecting the channel or channels to subscribe to, tap Add.Reading a story1. Press HOME , and then tap > News.2.3.On the Subscriptions tab, tap a channel.Tap a story to read it. While reading the story, you can:TapToStar the story as a favorite.Share a link to the story from the available options.Go to the web page where the story is published.Go to the next or previous story in the channel.
294 More apps4. If you want to read the whole story, tap Read full article. Thisopens the story in the web browser. See “Using your phone’s webbrowser” in the Web browser chapter to learn how to navigatethe web page.Manually checking for new storiesOn the Subscriptions tab, press MENU, and then tap Refresh.Starring a storyStar your favorite stories to read them again later. Starred stories aredisplayed on the Starred tab. Do one of the following:• On a list of stories, tap• While reading a story, tapscreen.next to a story.near the top-right corner of theYou can remove the star from a story by tapping the star icon again.Adding a keywordEasily find stories that interest you by entering a search keyword. Storiesthat contain the keyword are grouped together on the Keywords tab.1.2.Press HOME , and then tap > News.On the My items tab, tap Keywords > Add keywords.3. Enter the keyword, and then tap Add.Your new keyword is displayed on the Keywords tab. Tap thekeyword to show the stories that contain that keyword.
More apps 295Changing update schedule and content settingsIn the News app, press MENU, tap Settings, and then do the following:TapAccounts & syncUpdate whenopenedUpdate scheduleNews contentMobile viewToManage sync options and general News settings.Update the content of the channels you’ve subscribed toevery time you open the News app.Choose a time interval when the channels you’vesubscribed to are updated. Select Manual to refresh thecontent only when you like.Choose how to read news stories by default: whether as asummary or as a full web page article.If you’ve selected to view the news content as a web pagearticle, choose whether to show the web page article inmobile or full version.Adding the News widgetRead snippets of stories that you have subscribed to right on theHome screen. To find out how to add this widget to your Homescreen, see “Personalizing your Home screen with widgets” in thePersonalizing chapter.
296 More appsWorking on documents, spreadsheets, andpresentationsNeed to tweak a report while you’re on the go? Use Quickoffice toeasily view, edit, or even create Microsoft Office Word (.doc) andMicrosoft Office Excel (.xls) files. You can also use it to view MicrosoftPowerPoint (.ppt) presentations and text (.txt) files on your phone.Press HOME , and then tap > Quickoffice.If you have a long file list, press MENU and then tap Sort to arrangeyour files by name or date. Press SEARCH to look for specific filenames.Viewing a document, spreadsheet, or presentation1. On the Quickoffice main screen, tap the file you want to open.2. While viewing a file, you can:• Slide your finger on the screen to pan or go through the pagesof the file.• Turn your phone left sideways to view the file in landscape mode.• To zoom in, spread your thumb and index finger across thescreen. To zoom out, pinch your thumb and index finger onthe screen.After you zoomed in on a PowerPoint slide, double-tap the slide to make itfit with the screen’s width.• Press MENU and then tap Worksheet to view otherworksheets in an Excel file.• Tap a URL link in a Word or PowerPoint file to open the webpage in the web browser.
More apps 297• When you open Word documents, Quickoffice reformats thetext to make it fit the screen’s width. Press MENU, and thentap View to switch between normal and reformatted modes.Quickoffice does not reflow text in tables.Editing a document or worksheet1. While viewing a document or worksheet, press MENU, and thentap Edit.2. Make your changes on the file.3. When done, press MENU > More, and then tap Save or Save as tokeep your changes.Creating a new document or worksheet1. On the Quickoffice main screen, press MENU, and then tap New.2. Choose a file type to create:• Word 97 - 2003 document• Excel 97 - 2003 workbook3. Start entering text.4. When done, press MENU > More, and then tap Save as to keepyour changes.
298 More appsKeeping track of your stocksUse the Stocks app to get the latest stock updates for stock quotesand market indices you follow.Press HOME , and then tap > Stocks.162 3 451 Tap an item to view from the list of stock quotes and market indices.2 Tap to update the stock information.3 Tap to add a stock quote or stock market index.4 Slide to other tabs to view up to two years of an item’s past tradeinformation.5 Tap to view related news for a selected item.6 View an item’s trade information, and as well as its price chart for aspecific period.
Adding a stock quote or stock market index1. On the Stocks main screen, tap .More apps 2992. Enter the stock quote or stock market index on the text field, andthen tap .3. On the results list, tap the stock quote or stock market index youwant to add.Changing the stock list order1. On the Stocks main screen, press MENU, and then tap Rearrange.2. Press and hold at the end of the item you want to move.When the row is highlighted in green, drag it to its new position,and then release.3. Tap Done.Deleting stock quotes and indices1. On the Stocks main screen, press MENU, and then tap Delete.2. Select the items you want to delete, and then tap Delete.Manually updating stock informationOn the Stocks main screen, press MENU, and then tap Update.Changing update schedule and color settingsDownloading stock information automatically may incur additional feesfrom Verizon Wireless.
300 More appsIn the Stocks app, press MENU, tap Settings, and then do thefollowing:TapUpdate when openedScheduled syncUpdate scheduleSet color for price raiseToUpdate the stock information every time you openthe Stocks app.Set automatic downloads of stock information.Choose a time interval for checking updates.Change the color for displaying stock priceincreases to either red or green, depending onwhat’s being used in your country.About the Stocks widgetUse the Stocks widget to instantly check stock updates right on yourHome screen. It comes in different looks and styles. To find out how toadd this widget to your Home screen, see “Personalizing your Homescreen with widgets” in the Personalizing chapter.
Listening to FM RadioMore apps 301Tune in and listen to chart-topping pop songs using your phone’s FMRadio app.You need to connect a headset first to the audio jack of your phone to useFM Radio. FM Radio uses the stereo headset as the FM radio antenna.Press HOME , and then tap > FM Radio.The first time you open FM Radio, it automatically scans for availableFM stations, saves them as presets, and plays the first FM station found.8127364 51 Drag to tune in to a frequency on the FM band.2 Tap to fine tune the radio frequency by -0.1 MHz.
302 More apps3 View the All presets list.4 Tap to search the FM band for the previous FM station”.5 Tap to search the FM band for the next FM station.6 Tap to change the name of the current station you are tuned into.7 Tap to fine tune the radio frequency by +0.1 MHz.8 Switch off and close FM Radio.Tuning in to an FM stationThere are several things you can do while you’re on the FM Radio screen:• Tapand then select a station you want to listen to.• Tap to go to the previous available FM station, or togo to the next available FM station.• Press the VOLUME UP and VOLUME DOWN buttons on theside of the phone to adjust the volume.• To repeat scanning and saving of FM stations, press MENU,and then tap Scan & Save. Press BACK to stop the autoscan.• Press MENU to mute the sound or to change the sound outputto Mono or Stereo.You can also switch the sound output between the Speakerand Headset.
Closing or turning off FM RadioTo close the FM Radio screen:More apps 303• Press BACK . FM Radio continues to run in the background,and you can still listen to the radio while using other apps onyour phone.To go back to the FM Radio screen, slide open theNotifications panel, and then tap FM Radio.To turn off completely and close FM Radio:• Tapon the upper-right corner of the FM Radio screen.Adding the FM Radio widgetUse the FM Radio widget to listen to your favorite FM stations right onyour Home screen. To find out how to add this widget to your Homescreen, see “Personalizing your Home screen with widgets” in thePersonalizing chapter.Recording your voiceDon’t just think out loud. Use Voice Recorder to quickly capture yourthoughts. You can also record your voice and set it as a ringtone.1.2.You need to have a microSD card on your phone to use Voice Recorder.Press HOME , and then tap > Voice Recorder.Hold the phone’s microphone near your mouth.3. Tap to start recording a voice clip.
304 More appsVoice Recorder can run on the background while you do other thingson your phone, except when you open other apps that also use audiofunctions. To go back to the Voice Recorder screen, slide open theNotifications panel, and then tap Voice Recorder.4. Tap to stop recording.5. Type a name for the voice clip and tap Save.6. To play back the voice clip, tap .7. To show options for sharing, deleting, or renaming the voice clip,press MENU.Sharing a voice clip1. On the Voice Recorder screen, tap .2.3.Press and hold the voice clip you want to share, and then tapShare.From the available options, choose how you want to share thevoice clip.Setting a voice clip as a ringtone1. On the Voice Recorder screen, tap .2.Press and hold the voice clip you want to set as a ringtone, andthen tap Set as ringtone.Renaming a voice clip1. On the Voice Recorder screen, tap .2.Press and hold the voice clip you want to rename, and then tapRename.3. Enter the name, and then tap Save.
Using FlashlightMore apps 305Never get caught in the dark again. Use the Flashlight app to turn onyour phone’s LED flashlight to shine a light wherever you need it.Press HOME , and then tap > Flashlight.• To adjust the brightness of the light, simply tap the onscreenpower button on the flashlight handle.• To switch flashlight modes, press MENU and then select Autoflash, SOS, or Manual.• To close the flashlight, press BACK .
306 More appsFinding and installing apps from Android MarketAndroid Market is the place to go to find new apps for your phone.Choose from a wide variety of free and paid apps ranging fromproductivity apps, entertainment, to games. When you find an appyou want, you can easily download and install it on your phone withjust a few taps of your finger.To access Android Market, you must first connect to the Inter<strong>net</strong> usingyour phone’s Wi-Fi or data connection and sign in to your GoogleAccount.Paid apps are currently only available in certain countries.Finding and installing an appWhen you install apps from Android Market and use them on yourphone, they may require access to your personal information (such asyour location, contact data, and more) or access to certain functions orsettings of your phone. Download and install only apps that you trust.• You need a Google Checkout account to purchase items on AndroidMarket. See “Creating a Google Checkout account” to set up a GoogleCheckout account if you do not have one.• Be cautious when downloading apps that have access to your phone’sfunctions or a significant amount of your data. You’re responsible for theresults of using downloaded apps on your phone.1. Press HOME , and then tap > Market.When you open Android Market for the first time, the Terms ofService window will appear. Tap Accept to continue.
More apps 3072. Do any of the following to find an app:ToBrowse featured appsBrowse apps bycategoriesDo thisScroll through the list of featured apps.Tap Apps or Games, and then tap a category.Under a category, you can filter the apps byTop paid, Top free or Just in.Search for an app Tap on the Android Market home screen,enter the name or type of app you’re looking for,and then tap to the right of the search box.3. When you find the app that you like, tap it and read itsdescription and user comments.4. To download or purchase the app, tap Free (for free apps) or theprice below Buy (for paid apps).The subsequent screen notifies you whether the app willrequire access to your personal information or access to certainfunctions or settings of your phone.5. If you agree to the conditions, tap OK to begin downloading andinstalling the app.If you selected a paid app, after tapping OK, you will beredirected to the Google Checkout screen to pay for the appbefore it’s downloaded to your phone.You can uninstall an app for a refund within a limited time after yourpurchase. To know more about the refund policy for paid apps, please visitthe Android Market Help site (http://market.android.com/support).
308 More appsCreating a Google Checkout accountYou must have a Google Checkout account associated with yourGoogle Account to purchase items from Android Market.To create a Google Checkout account, do one of the following:• On your computer, go to http://checkout.google.com.• The first time you use your phone to buy an app from AndroidMarket, follow the prompts onscreen to enter your billinginformation.When you’ve used Google Checkout once to purchase an app from AndroidMarket, the phone remembers your password, so you don’t need to enterit the next time. For this reason, you should secure your phone to preventothers from using it without your permission. See the Security chapter tolearn how to secure your phone.Opening an installed appDo one of the following:• If you see this icon ( ) on the status bar, open theNotifications panel, and then tap the app. See “Opening theNotifications panel” in the Getting started chapter.• Press HOME , and then tap > Market > My apps. On theMy apps screen, tap the app and then tap Open.• Press HOME , and then tap . On the All apps screen, locatethe app, and then tap it.
More apps 309Uninstalling an appYou can uninstall any app that you have downloaded and installedfrom Android Market.1.2.Press HOME , and then tap > Market > My Apps.Tap the app you want to uninstall, and then tap Uninstall.3. When asked, tap OK.4. Choose the reason for removing the app, and then tap OK.Getting helpIf you need help or have questions about Android Market, press MENU,and then tap Help. The web browser will take you to the AndroidMarket Help site.Sharing games and appsHaving fun with a game or app that you’ve downloaded from AndroidMarket? Share it instantly with your circle of friends.For your friends to link to the app and download it from Android Market,they must be using an Android phone.1. Press HOME , and then tap .2. Press MENU, and then tap Share.You’ll then see the list of games and apps that you downloadedand installed from Android Market.
310 More apps3. Tap an app, and then choose how to share it:BluetoothFacebookFriendStreamGmailMailMessagePeepSend the link using Bluetooth.See the Bluetooth chapter.Post the link to Facebook.See the Social chapter.Post the link to Facebook and Twitter.See the Social chapter.Send the link using your Gmail account.See the Email chapter.Send the link using your POP3/IMAP or ExchangeActiveSync email account.See the Email chapter.Send the link in a text message.See the Messages chapter.Share the link in Twitter.See the Social chapter.
More apps 311When your friends see the link in your sent message, email, or statusupdate, they can simply tap the link to go directly to the game or appin Android Market to download it.• While entering your status update in Friend Stream, you can also tapto choose from games or apps that you want to share in your social<strong>net</strong>works.• If you’ve already created a new text or email message, press MENU andthen tap Attach > App recommendation to choose from your list ofinstalled games and apps.
SecurityProtecting your SIM card with a PINAdd another layer of security for your phone by assigning a PIN(personal identification number).Make sure you have the default SIM PIN provided by Verizon Wirelessbefore continuing.1.2.Press HOME> MENU, and then tap Settings > Security.Tap Set up SIM card lock, then select Lock SIM card.3. Enter the default SIM card PIN, and then tap OK.4. To change the SIM card PIN, tap Change SIM PIN.Emergency calls can be placed at any time without requiring a PIN. See“Making an emergency call” in the Phone calls chapter for more details.Restoring a SIM card that has been locked outIf you enter the wrong PIN more times than the maximum number ofattempts allowed, your SIM card will become “PUK-locked”. You needa PUK code to restore access to the phone. This code may have beenprovided by Verizon Wireless when you received your SIM card.1.2.On the Phone dialer screen, enter the PUK code, and then tapNext.Enter the new PIN you want to use, and then tap Next.3. Enter the new PIN again, and then tap Next.
Protecting your phone with a screen lockSecurity 313Protect your personal information and prevent others from using yourphone without your permission by setting a screen lock password, aPIN, or a lock pattern.Your screen lock will be asked every time your phone is turned on orwhen it’s idle for a certain period of time.1.2.Press HOMETap Set up screen lock.3. Tap one of the following:> MENU, and then tap Settings > Security.NonePatternPINPasswordDisable the screen lock you’ve previously created.Set a screen lock pattern by following the onscreen instructions.Set a numeric password of at least four digits.Set an alpha-numeric password.4. On the Security screen, tap Lock phone after, then specify theidle time you can allow before the screen is locked.You can also clear the Use visible pattern on the Security screen if youdon’t want your screen lock pattern to display as you draw it onscreen.Changing your screen lock1. Press HOME > MENU, and then tap Settings > Security.2.3.Tap Change screen lock.Enter your current screen lock to confirm that you want tochange it.4. Choose a different screen lock type, then enter your new pattern,
314 SecurityPIN, or password.Or tap None if you don’t want to use a screen lock.Forgot your screen lock pattern?If you’ve forgotten your screen lock pattern, you have up to fiveattempts to try and unlock your phone. If this fails, you can unlock yourphone by entering your Google Account user name and password.1.2.3.4.5.On the unlock screen, enter your lock pattern.After the fifth attempt and you’re asked to wait for 30 seconds,tap OK.If the display goes off, press the POWER button to turn thedisplay back on, and then press the bar on the lock screen andslide your finger down to unlock the screen.Tap the Forgot pattern button in the lower right corner when itappears.Enter your Google Account name and password, and then tapSign in.You’ll then be asked to create a new screen lock pattern. If you nolonger want to do so, tap Cancel.
SettingsSettings on your phoneControl and customize phone settings on the Settings screen.Press HOME > MENU, and then tap Settings.PersonalizeWireless &<strong>net</strong>worksCallSoundChoose a scene, set the Home screen or Lockscreenwallpaper to use, apply a skin, and set sound options. Youcan also rename or delete a custom scene by pressing andholding a scene in Scenes.Set up your phone’s wireless connections, such as Wi-Fi andBluetooth, enable the Airplane mode, or set the options formobile <strong>net</strong>works, roaming, Wi-Fi hotspot, Virtual PrivateNetworks, and more.Set up call services such as voicemail, call forwarding, callwaiting, and caller ID.• Choose sounds to use for your phone ringtone andnotifications.• Adjust media playback volume. See “Adjusting thevolume” in the Getting started chapter.• Set to lower the ring volume when you move the phonewhen it’s ringing, make the phone ring louder when insidea bag or pocket, and turn on the spekerphone when youflip over the phone.• Turn on or off sound and vibrate features such as Audibletouch tones, Quiet ring on pickup, Pocket mode, and more.
316 SettingsDisplayAccounts &syncLocationSearchPrivacyConnect toPCSecurityDockPower saverApplicationsSet up display settings such as automatic screen orientation,brightness, screen timeout, and more.Log in or out of your social <strong>net</strong>work accounts, GoogleAccount, Exchange ActiveSync account, and VerizonWireless Backup Assistant acount. You can also managesynchronization and other settings for your accounts. See theAccounts and sync chapter for details.Select the sources to use when determining your location.Select items to include when you do a search on your phoneand set Google search options.Choose to automatically back up some settings on the phone(e.g. Wi-Fi passwords or Bookmarks) to Google servers usingyour Google Account so you can restore them when needed.• Set the default USB connection type to use whenever youconnect your phone to your computer.• Or, select the Ask me check box to set your pho<strong>net</strong>o always display the screen for selecting the USBconnection type. To find out more, see “Connecting yourphone to a computer” in the Getting started chapter.Set a screen lock, enable the SIM card lock, or manage thephone’s credential storage. See the Security chapter for details.If you purchased the car kit, choose the behavior when youmount your phone to the car kit.Turn on power saver to automatically switch to power savingmode when the battery level goes down to the level that youset. See “Optimizing your phone’s battery life” in this chapterfor details.Manage running applications, move applications to or fromthe storage card, and install or uninstall programs.
Settings 317SD & phonestorageDate & timeLanguage &keyboardAccessibilityVoice input &outputSoftwareupdateAbout phone•••Check the available storage card and phone memory.From this screen, be sure to unmount your microSD cardbefore you remove it from your phone.You can also do a factory reset. See the Update and resetchapter for more details.Set the date and time, time zone, and date or time format. Toturn off auto time synchronization and be able to manuallychange time zone settings, see “Setting the time zone, date,and time” in the Clock and Weather chapter.Set the operating system language and region. You can alsoset onscreen keyboard options.This option appears only after you’ve downloaded andinstalled an accessibility tool, such as a screen reader thatprovides voice feedback. You can turn accessibility functionsor services on or off.Set up the voice input options of your phone. Also, if you’veinstalled a text-to-speech (voice data) application, use this toset the text-to-speech settings.Enable or disable the automatic check feature for softwareupdates for your phone. You can also tap Check new tomanually check for software updates.View different information about your phone, such as themobile <strong>net</strong>work type, signal strength, battery level, batteryuse of individual applications, software version of your phone,and more. See “Checking information about your phone” inthis chapter.
318 SettingsChanging display settingsAdjusting the screen brightness manually1. Press HOME > MENU, and then tap Settings.2.Tap Display > Brightness.3. Clear the Automatic brightness check box.4.Drag the brightness slider to the left to decrease or to the rightto increase the screen brightness. Tap OK.Adjusting the time before the screen turns offAfter a period of inactivity, the phone screen turns off to conservebattery power. You can set the idle time before the screen turns off.1.2.Press HOMETap Display > Screen timeout.> MENU, and then tap Settings.3. Tap the time before the screen turns off.Turning automatic screen rotation offBy default, the screen orientation automatically adjusts depending onhow you hold the phone.Automatic rotation is not supported in all application screens.1. Press HOME > MENU, and then tap Settings.2. Tap Display, and then clear the Auto-rotate screen check box.
Settings 319Recalibrating the G-sensorRecalibrate the screen if you feel that the screen orientation does notrespond properly to the way you hold the phone.1.2.Press HOME> MENU, and then tap Settings.Tap Display > G-Sensor calibration.3. Place the phone on a flat and level surface, and then tap Calibrate.4. After the recalibration process, tap OK.Keeping the screen on while charging the phoneYou can keep the phone screen from turning off while you’re chargingthe phone.1.2.Press HOME> MENU, and then tap Settings.Tap Applications > Development.3. Select the Stay awake check box.Switching animation effects on or offYou can turn off the animation or enable only some animations whenswitching between screens.1.2.Press HOMETap Display > Animation.> MENU, and then tap Settings.3. On the options menu, select the animation setting you want.
320 SettingsChanging sound settingsSwitching between silent, vibration, and normal modes• To change back from silent to normal mode, simply press theVOLUME UP button.• To change back from vibration to normal mode, press theVOLUME UP button twice.• Press HOMEprofile.> MENU, and then tap Settings > Sound > Sound• You can also add the Profile widget to your Home screen. To findout how to add a widget, see “Personalizing your Home screenwith widgets” in the Personalizing chapter.Enabling or disabling audible selectionYou can choose to play a sound when you’re selecting items onscreen.1.2.Press HOME> MENU, and then tap Settings.Tap Sound, and then select the Audible selection check box.Choosing the notification soundYou can choose a default sound for your phone to play wheneverthere are new notifications.1.2.3.Press HOME> MENU, and then tap Settings.Tap Sound > Notification sound.Select your preferred notification sound in the list, and then tapOK.
Settings 321To use different sounds for different types of notifications, set thenotification sounds in the respective applications. For example, toset different sounds for received and sent text messages, open theMessages application, then press MENU and tap Settings.Turning on or off automatic ring volume adjustmentQuiet ring on pickupYour phone has a quiet ring feature that automatically lowers the ringvolume when you move your phone.1.2.Press HOME> MENU, and then tap Settings.Tap Sound, and then select or clear the Quiet ring on pickupcheck box.Turning on Pocket modeTo help avoid missing incoming calls when your phone is in yourpocket or bag, the pocket mode feature gradually increases the ringvolume and vibrates when you receive a call. When not in your pocketor bag, the phone will ring at the normal volume you set.1.2.Press HOME> MENU, and then tap Settings.Tap Sound, and then select or clear the Pocket mode check box.Switching to speakerphone automaticallyYou can switch to speakerphone by simply flipping over your phone.1.Press HOME> MENU, and then tap Settings.2. Tap Sound, and then select or clear the Flip for speaker check box.
322 SettingsChanging the phone languageWhen you turn your phone on for the first time, you’re asked tochoose the language you want to use for your phone. If you want,you can still change the phone language after you set up your phone.Changing the language adjusts the keyboard layout, date and timeformatting, and more.The languages available to choose from may depend on the version ofphone you have.1.2.Press HOME> MENU, and then tap Settings.Tap Language & keyboard > Select language.3. Tap the language and corresponding region you want to use.4. Press HOME to return to the Home screen. You may need towait a few seconds for the new language to be applied.Optimizing your phone’s battery lifeYou can set the phone to automatically switch to power saving modewhen the battery level reaches a certain level.1.2.Press HOMETap Power saver.> MENU, and then tap Settings.3. Select the Enable power saver check box.4.5.Tap Turn power saver on at, and then select when to switch topower saver mode.In the Power saver settings section, set and select the phonebehavior when the phone switches to power saving mode.
Checking the power usage of applications1. Press HOME > MENU, and then tap Settings.2. Tap About phone > Battery > Battery use.Settings 323Managing memoryChecking how much phone memory is available for use1. Press HOME > MENU, and then tap Settings.2.Tap SD & phone storage. The available phone memory isdisplayed in the Internal phone storage section.Checking the available storage card space1. Press HOME > MENU, press MENU, and then tap Settings.2.Tap SD & phone storage. The total and available storage cardspace is displayed in the SD card section.Clearing application cache and data1. Press HOME > MENU, and then tap Settings.2.3.Tap Applications > Manage applications.On the Manage applications screen, switch to the Running tab,and then tap the application whose cache and/or data you wantto delete.4. In the Application info screen, tap Clear data and/or Clear cache.
324 SettingsUninstalling third-party applicationsYou cannot uninstall applications that are preinstalled on the phone.1.2.Press HOME> MENU, and then tap Settings.Tap Applications > Manage applications.3. On the Downloaded tab, tap the application you want to uninstall.4. On the Application info screen, tap Uninstall.Moving applications to or from the storage cardMove applications that you’ve downloaded to the phone to thestorage card if your phone’s memory is getting low. Or, if your storagecard is getting full, you can also move applications that are on yourstorage card to the phone.1.2.You can only move applications that are not preinstalled on your phone.Press HOME> MENU, and then tap Settings.Tap Applications > Manage applications.3. On the Downloaded tab, tap the application you want to move.4.On the Application info screen, tap Move to SD card or Move tophone.
Checking information about your phoneSettings 3251.2.Press HOME > MENU, and then tap Settings.Tap About phone.3. Select one of the following:Tell HTCTurn Tell HTC on or off. When enabled, you’rehelping us know when your phone encounters atechnical problem.NetworkPhone identityBatteryHardwareinformationSoftwareinformationLegal informationCheck information about Verizon Wireless and itsservice status.Check information about your phone and the SIMcard you’re using.Check information about the battery such as itscurrent battery level, status, and what programsare using the battery.Check the Wi-Fi MAC and Bluetooth addresses.Check the version and other information about theAndroid platform being used by the phone. Youcan also check the version of the web browser.Read legal information from HTC and Google, andlicenses used by the phone.
Back up, update andresetBacking up your contactsYour phone features Verizon Backup Assistant, which automaticallybacks up your contacts to an online server. You must first create anaccount on the Verizon Wireless website.You can set up the Backup Assistant when you first turn on yourphone. See “Getting started” in the Basics chapter for details.If you did not set up Backup Assistant when you first turned on yourphone, you can set it up in Settings.Setting up Backup AssistantIf you did not set up Backup Assistant during when you first turned onyour phone, you can enable it in Settings.1.2.Press HOME> MENU, and then tap Settings.Scroll down the screen, and then tap Accounts & sync.3. Tap Backup Assistant.4.Follow the instructions on the screen to sign in to BackupAssistant and back up your contacts.Changing the backup schedule1. Press HOME > MENU, and then tap Settings.2. Scroll down the screen, and then tap Accounts & sync.
3.4.Tap Backup Assistant.Update and reset 327Tap Schedule and select a backup option from the menu.Manually backing up your contacts1. Press HOME > MENU, and then tap Settings.2.Scroll down the screen, and then tap Accounts & sync.3. Tap Backup Assistant.4. Tap Sync now.For more information on how to use Backup Assistant and to createa Backup Assistant account, go to: https://wbillpay.verizonwireless.com/vzw/nos/ba_nab/overview_def.jspUpdating the phone softwareFrom time to time, software updates for your phone may be available.Your phone can check and then notify you if there’s a new update. Youcan then download and install the software update using your phone’sWi-Fi or data connection.• Checking and downloading phone software updates may incur additionaldata transfer fees from Verizon Wireless.• Make sure your phone has a microSD card inserted. The update will bedownloaded to the microSD card.Depending on the type of update, the update may erase all yourpersonal data and customized settings, and also remove anyapplications you’ve installed. Make sure that you’ve backed up theinformation and files you want to keep.• When there is an update available, the Install system software
328 Update and resetupdate dialog box will appear onscreen. Select Install now andthen tap OK.• If you’re in the middle of a call and there’s an update available,you’ll receive an update notification. After you end the call, slideopen the Notifications panel (see “Opening the Notificationspanel” in the Getting started chapter). Then tap the updatenotification to download and install the software update.Wait for the update process to finish. When the update is finished, thephone will automatically reset.Checking for phone system software updates manually1. Press HOME > MENU, and then tap Settings.2.Tap Software update > Check new.Restarting or factory resetting your phoneRestarting your phone (soft reset)If your phone is running slower than normal, an application is notperforming properly, or your phone becomes unresponsive, tryrestarting your phone and see if that helps solve the problem.1.2.If the display is off, press the POWER button to turn it back on.Unlock your phone if the Lock screen is displayed. See“Unlocking the screen” in the Getting started chapter.3. Press and hold the POWER button, and then tap Restart.4. When asked to confirm, tap Restart.If you can’t restart the phone following the above steps, remove thebattery, wait for a few seconds, reinsert the battery, and then turn thephone on.
Update and reset 329Performing a factory reset (hard reset)If you’re passing your phone on to someone else or your phone has apersistent problem that cannot be solved, you can do a factory reset(also called a hard reset). This returns your phone to the state it was inbefore the first time you turned it on.Factory reset will not erase the data and files that are on the storage card.Factory reset is not a step to be taken lightly. It’ll permanentlydelete all your data and customized settings, and will remove anyapplications you’ve downloaded and installed. Be sure to back up anydata and files you want to keep before you do a factory reset.Performing a factory reset via settings1. Press HOME > MENU, and then tap Settings.2.3.Tap SD & phone storage > Factory data reset.On the Factory data reset screen, tap Reset phone, and then tapErase everything.Performing a factory reset using phone buttonsIf you can’t turn on your phone or access the phone settings, you canstill perform a factory reset by using the buttons on the phone.1.2.3.With the phone turned off, press and hold the VOLUME DOWNbutton, and then press-hold the POWER button.Wait for the screen with the three Android images to appear, andthen release the VOLUME DOWN button.Press VOLUME DOWN to select FACTORY RESET, and thenpress the POWER button.
Trademarks andcopyrightsCopyright © 2010 HTC Corporation. All Rights Reserved.The HTC logo, the HTC quietly brilliant logo, HTC ThunderBolt, HTC Sense,Footprints, HTC Sync, and HTC Care are trademarks and/or service marksof HTC Corporation.Copyright © 2010 Google Inc. Used with permission.Google, the Google logo, Android, Google Search, Google Maps, Gmail,Google Mail, YouTube, Android Market, and Google Talk are trademarks ofGoogle Inc.Google, the Google logo and Google Maps are trademarks of Google, Inc.TeleAtlas® Map Data ©2010. Street View Images ©2010 Google.Microsoft, Windows, Windows XP, Windows Vista, ActiveSync, and Outlookare either registered trademarks or trademarks of Microsoft Corporation inthe United States and/or other countries.Bluetooth and the Bluetooth logo are trademarks owned by Bluetooth SIG,Inc.Wi-Fi is a registered trademark of the Wireless Fidelity Alliance, Inc.microSD is a trademark of SD Card Association.Copyright © 2010 Adobe Systems Incorporated. All Rights Reserved.Java, J2ME and all other Java-based marks are trademarks or registeredtrademarks of Sun Microsystems, Inc. in the United States and other countries.Facebook is a trademark of Facebook, Inc.
Trademarks and copyrights 331Twitter is a trademark of Twitter, Inc., and is used under license.Flickr is a trademark of Yahoo! Inc.DLNA is a registered trademark, DLNA disc logo is a service mark, andDLNA Certified is a trademark of the Digital Living Network Alliance.All other company, product and service names mentioned herein aretrademarks, registered trademarks or service marks of their respectiveowners.HTC shall not be liable for technical or editorial errors or omissionscontained herein, nor for incidental or consequential damages resultingfrom furnishing this material. The information is provided “as is” withoutwarranty of any kind and is subject to change without notice. HTC alsoreserves the right to revise the content of this document at any timewithout prior notice.No part of this document may be reproduced or transmitted in any form orby any means, electronic or mechanical, including photocopying, recordingor storing in a retrieval system, or translated into any language in any formwithout prior written permission of HTC.
Index4G LTE 215AAccess point 216Adding a city to the Weatherscreen 212Adding a city to the World Clockscreen 208Airplane mode 86Alarm clock 208Alarms- changing the alarm sound 67Album (Gallery app) 255Android Market 306Answering an incoming call 75Apps- adding icons from the Homescreen 61- rearranging or hiding tabs 68- switching between recentlyopenedapps 43App Sharing 309Attachments- types of message attachments 120- viewing and saving messageattachments 126Auto focus 248, 253BBacking up contacts 326Backup Assistant 326Battery 28- charging 30- inserting 29- optimizing 322Bluetooth- Bluetooth received folder 243- changing phone name 235- connecting headset or car kit 236- receiving information 241- sending information 238- sending photo/video 251- sending photos or videos 261- sharing music 274- turning on or off 235Bookmarks 233Bottom cover- removing 24- replacing 24Browser 225CCalendar 188- widget 201Calendar events- creating 189
- deleting 196- editing 196- inviting guests to a Googlecalendar event 190- sending an Exchange ActiveSyncmeeting request 191- sharing a vCalendar 196- viewing 195Caller ID 75, 77Call history 81Calls- answering a call 75- ending a call 80- making a call 70- putting a call on hold 78- rejecting a call 75- switching between calls 78Call services 83Camera 244- secondary (front) camera 246car panel 288Charging the battery 30Chat invitations- accepting 163- inviting a friend in Google Talk 164Chatting in Google Talk 162Checking information about yourphone 325Checking notifications from social<strong>net</strong>works 161Checking weather 211Clock 202Clock widget (HTC) 202Conference call 79Index 333Connected media 275Connect to PC 44Contact groups 101- creating 101- deleting a group 103- editing a contact group 101- rearranging your contactgroups 103- Sending a message or email to agroup 102Contact information- editing 99- merging 91- sending 100Contacts- adding a new contact 89- backing up your contacts to thestorage card 97- importing from an ExchangeActiveSync account 91- importing from your SIM card 90Contacts list 94- filtering 96Conversations 98, 127Copying files to or from the storagecard 46Copying text 230DData connection 215Date and time 207Desk Clock 204
334 IndexEEditing text 112Effects (camera) 251Email- sending photo/video 251- sending photos or videos 260Emergency call 73Event reminders 197Exchange ActiveSync 176, 186Extended Home screen 37FFacebook- commenting photos 266- Facebook for Android 153- Facebook for HTC Sense 151- sharing photos 262- view photos 265Facebook for HTC Sense- sharing photo/video 251Face detection- manual capturing 248Factory reset 328Finger gestures 35Flashlight 305Flash settings (camera)- photo mode 247- video mode 249Flickr- commenting photos 266- sharing photos 263- viewing photos 265FM Radio 301Folders 62- creating a new folder 62- renaming a folder 62Footprints 285Friend Stream 157- checking notifications 161- commenting on and likingFacebook posts 160- Friend Stream widget 161GG-sensor 319Gallery 254Gmail/Google Mail- about 166- adding a signature 174- changing the settings 173- labeling a conversation 172- muting a conversation 173- reading emails 169- replying/forwarding emails 170- searching emails 171- sending an email 168- spam 173- star an email 171- using batch operations 174- viewing the Inbox 166Google Accounts 135Google Dictionary 232Google Latitude 284Google Maps 278Google Talk 162Google Translate 232Groups 101
HHome city 206Home page 226Home screen 37- adding folders 62- adding icons and shortcuts 61- adding widgets 59- changing the wallpaper 57- extended Home screen 37- personalizing with scenes 54- rearranging Home screen items 63- rearranging the home panels 64HTC Caller ID 77HTC Clock widget 202HTC Sync 138IInter<strong>net</strong> connection mode 45Inter<strong>net</strong> connections 215Inter<strong>net</strong> pass-through 45KKeyboard 106- adjusting touch input settings 114- changing to the landscapeonscreen keyboard 108- copying and pasting text 114- enabling multiple keyboardlanguages 108LLatitude 284Leap view 38Library (Music) 269Linking contact information 91Live wallpapers 57Locations- Footprints 285Location services 278Lock message 127Lock screen 53MMail app- about 176- all accounts 178- checking email 177- deleting conversation 170- deleting email 181, 182- different views of inbox 179- Exchange ActiveSync 176, 186- marking unread 181- moving 181, 182- POP3/IMAP account 176- quick browsing 180- reading and replying 184- selecting email messages 181- sending 182- setting priority 185- settings 187- sorting 180- switching folders 182- unified inbox 178Making calls 70Managing memory 323Maps 278Index 335
336 IndexMatched contacts suggestions 92Media volume 51Meeting request 186Memory 323Merging contact information 91Messages 117- about the Messages app 117- deleting a message 128- protecting a message 127- replying to a message 124- resuming a draft message 123- sending a multimedia message 120- sending a text message 118- settings 130- viewing a message 124microSD card 32Microsoft Exchange ActiveSync 176Missed call 81MMS 120- attaching files and information 120- creating a slideshow 122- settings 132Mobile <strong>net</strong>work connection 215Modem 222MP3 273Music 266- creating a playlist 270- sharing 274Muting the microphone 80My contact card- creating 88- sending your contactinformation 100NNews feeds 292Notification icons 40Notification sound 67, 320Notifications panel 42OOnline accounts 134Onscreen keyboard 106Optimizing your phone’s batterylife 322PPeep 153People- about 87- contact information andconversations 98- People screen 87- People widget 104Personalizing 54Phone- front, top, left, and back panels 21- phone dialer 70Photo- sharing 251- taking a photo 247Photo editing 258- adding effects 259- cropping 259- rotating 258Photos- commenting in your social<strong>net</strong>works 266
- editing 258- sending by Bluetooth 261- sending by email 260- sending by MMS 260- sharing on Facebook 262- sharing on Flickr 263- sharing on Picasa 264- viewing 256- viewing albums in social<strong>net</strong>works 265- zooming in or out 257Pinch 35Pocket mode 321POP3/IMAP 176Predictive text 109- Personal dictionary 110- setting a second language for thekeyboard 109PUK 312Push messages 126QQuick Lookup 49Quickoffice 296Quiet ring on pickup 321RRecalibrating the G-sensor 319Recent apps 43Recording- video 249Recording your voice 303Rejecting an incoming call 75Restarting 328Ringer volume 51Ringtone 65, 271- trimming 273SScenes 54- creating 56- deleting 56- renaming 56Screen lock- changing your screen lock 313- lock password 313- lock pattern 313- PIN 313Screen unlock pattern 313Search Anywhere 47- searching your phone and theWeb 47- setting search options 48Searching for a contact 96Security 312Selecting text 231Settings 315- alarm sound 210- calendar 199- camera 252- date and time 207- weather 213Setting up My contact card 88Setting up your phone for the firsttime 36Index 337
338 IndexSharing- photo 251- video 251- YouTube 291Shortcuts 61SIM card 28- copying a message to 127- inserting 25- removing 27- restoring a SIM card that has beenlocked out 312- SIM PIN 312Skins 58Sleep mode 52Slideshow 122SMS- composing and sending 118- settings 131Social <strong>net</strong>work accounts 136Social <strong>net</strong>works- sharing photo/video 251Sound sets- choosing a preset sound set 65- creating 66- customizing 66- deleting 68Speakerphone 79Speed dial 71Status icons 39Stocks 298Stopwatch 203Storage 323Storage card 28- copying files to or from 46- inserting 32- removing 33- removing while phone is on 33Switching between calls 78Switching your phone on or off 34TTalk 162Tethering 222Text- editing 112- entering text by speaking 112- entering text using the onscreenkeyboard 107- using predictive text input 109Timer 203Time zone 207Touch input settings 114Translating words 50Turning your phone on or off 34Tweeting on your phone 154Twitter 154- Twitter for HTC Sense 153- Twitter widget 157UUninstalling third-partyapplications 324Unlocking the screen 53Updating the phone software 327Using your phone as a modem 222
VvCalendar 196vCard 100Vibrate mode 51Video- capturing/recording 249- sharing 251Videos 290- sending by Bluetooth 261- sending by email 260- sending by MMS 260- sharing on Facebook 262- sharing on Flickr 263- sharing on YouTube 264- viewing 258Visual Voice Mail 84Voice Recorder 303Volume- adjusting the earpiece volume forcalls 51- adjusting the media volume 51- adjusting the ringer volume 51- adjusting via settings 51VPN 220WWallpaper 57, 251Weather 211Weather widget 214Web browser 225Wi-Fi 217Index 339Widgets 59, 295, 300, 303- adding 59- changing the widget settings 60World Clock 206YYouTube 264, 290- sharing video 251ZZooming (camera) 246