Creative tip FIMO „Scandinavian lanterns“ - LiveInternet
Creative tip FIMO „Scandinavian lanterns“ - LiveInternet
Creative tip FIMO „Scandinavian lanterns“ - LiveInternet

Create successful ePaper yourself
Turn your PDF publications into a flip-book with our unique Google optimized e-Paper software.
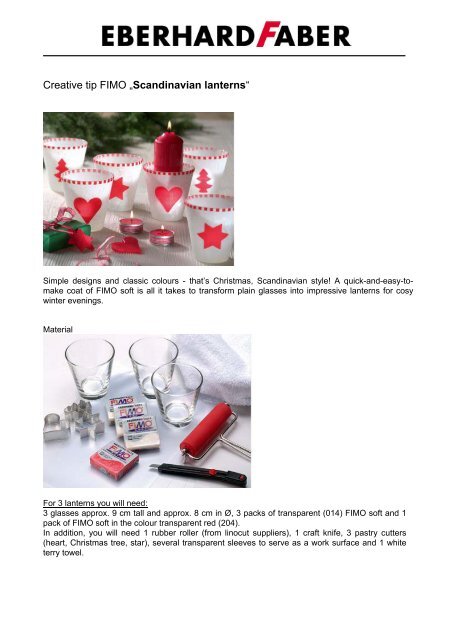
<strong>Creative</strong> <strong>tip</strong> <strong>FIMO</strong> „Scandinavian lanterns“Simple designs and classic colours - that’s Christmas, Scandinavian style! A quick-and-easy-tomakecoat of <strong>FIMO</strong> soft is all it takes to transform plain glasses into impressive lanterns for cosywinter evenings.MaterialFor 3 lanterns you will need:3 glasses approx. 9 cm tall and approx. 8 cm in Ø, 3 packs of transparent (014) <strong>FIMO</strong> soft and 1pack of <strong>FIMO</strong> soft in the colour transparent red (204).In addition, you will need 1 rubber roller (from linocut suppliers), 1 craft knife, 3 pastry cutters(heart, Christmas tree, star), several transparent sleeves to serve as a work surface and 1 whiteterry towel.
Step 1Using the rubber roller, roll out 1 block of transparent <strong>FIMO</strong> soft per glass to an approx. 1 mmthick sheet, making it slightly wider than the actual height of the glass. (Warm up the blocks of<strong>FIMO</strong> briefly before use in your hands!). Straighten the edges of the rolled-out sheets using thecraft knife. Then roll out the transparent red <strong>FIMO</strong> soft to a 1 mm thick sheet too.Step 2Now wrap the prepared sheets of transparent <strong>FIMO</strong> closely around the respective glasses. Cut offany overlapping bits of <strong>FIMO</strong> around the top and bottom of the glasses and at the joins using thecraft knife.
Step 3Smooth over any joins with your thumb so that there are no seams visible and each glass iscovered with a uniform coating of white <strong>FIMO</strong>.Step 4Firmly dab the towel all over the coated glass so that the structure of the towel gets left on thelayer of <strong>FIMO</strong>.
Step 5The coated glass is then decorated with a Christmas motif. Using the craft knife and ruler, cut anumber of approx. 5 mm wide strips out of the sheet of red <strong>FIMO</strong> and cut again to make smallsquares. Position these in regular intervals around the top edge of the glass and gently press ontothe surface. Using the pastry cutters, cut out 1 Christmas motif (star, Christmas tree or heart) foreach lantern, place on the glass and press on gently.Step 6Place the finished <strong>FIMO</strong> lanterns in a preheated oven for 20 minutes at 130°C to harden.Afterwards, carefully remove and allow to cool slowly – that’s it!
Tips and tricks:Wash your hands thoroughly with soap and water before beginning in order to avoid getting anydirt or dust on the white <strong>FIMO</strong> glass.Any bits of fluff on your finished glass can be scratched off with the craft knife before the glass isplaced in the oven to harden.If you have a pasta machine, you’ll find it a great help when it comes to rolling out <strong>FIMO</strong>. What’smore, it enables you to set the exact sheet thickness required.Sometimes, air bubbles form when coating the glass with the layer of <strong>FIMO</strong>. Prick them openbefore the hardening process using the craft knife and then smooth over the surface again.There are a total 7 transparent colours of <strong>FIMO</strong> soft available from well-stocked sales outlets. Soyou can create your lantern according to your very own personal taste!Idea, realisation, photo styling and text: Hufnagel-Design, Forchheim.Photos: Burger Studios Fuerth