Paint Book.indd - LiveInternet.ru
Paint Book.indd - LiveInternet.ru
Paint Book.indd - LiveInternet.ru
- No tags were found...

You also want an ePaper? Increase the reach of your titles
YUMPU automatically turns print PDFs into web optimized ePapers that Google loves.
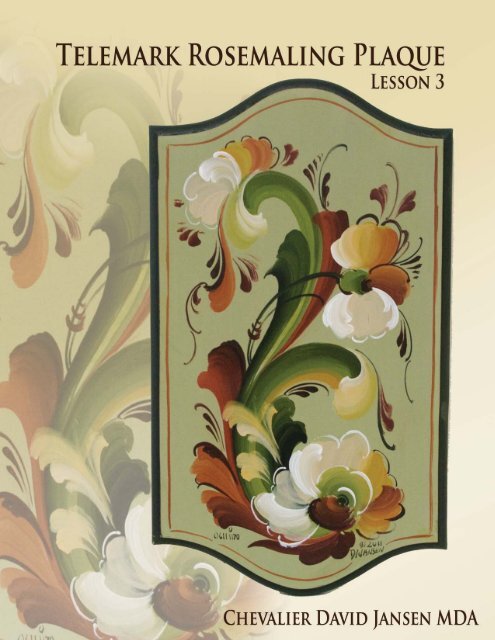
Lesson 3- Two Toned Strokes- TelemarkTraditional styles of Norwegian Telemark were not blended. Blending today seems to be such a large part of Decorativepainting, however it is not traditional to the older styles. Blending does add a very nice variation to the techniquehowever the interest within the scrolls comes from streaks of colors. Too much blending can cause the scrolls to loseinterest and become flat. What we must remember is that many older styles were not painted with long drying mediasuch as oil paint. The oldest media in Rosemaling was casein paint which had a very short drying cycle. Artists developeddecorative styles that worked with the limitations of the media.Traditional Telemark as a style was painted one tone as shown in lesson 2 or two tone which we will now show. Twotone stroke painting however is not blended. The artists of old would fully load one tone on the b<strong>ru</strong>sh to create theshapes, then load a second tone and over-stroke the light or dark side as needed. This second stroke would sometimescreate a harsh line in the middle of the scroll which was left for interest in the painting. Lines and movement within thescroll is proper as long as they move with the flow of the design.For this lesson we will again establish the main scrolls. The Root C is the most important. Flow all decoration andshapes off the Root C. We will use the same palette as the rest of the book, but there is no need to mix the blues, sincethey are not used in this design. You could however, replace the greens with the blues from lesson 2 if you want tocontinued the study using the same palette as lesson 2.For an overview of the lesson and visual demonstration of the techniques used in this lesson, please watch theshort video below.Video Player- Click the Screen to Play the VideoAfter you have pushed play, you can right click you mouse to watch in full screen mode on yourcomputer.31
Using 180 to 220 grit sandpaper, sand the edgesof your board to round any sharp areas.Place colors on palette according to the color mixyou desire.Mix colors well using a palette knife.Add at least an equal amount of Heritage Multi-Media MultiSurface Sealer.Mix color and MultiSurface Sealer well using apalette knife.Apply the Sealer/ color mix using your smallsponge or a soft b<strong>ru</strong>sh.
Using 180 to 220 grit sandpaper, sand the surfacelightly. Do not make too smooth.Give the surface a second coat of the base color tocover any sanding marks.Lesson 3- Two Toned Strokes Suggested PaletteRefer to Page 9 for detailed palette mixing inst<strong>ru</strong>ctions.Mix Base Colors first, then mix Toned ColorsBase Orange = 3 parts Hansa Yellow +1 part Naphthol Red LightBase Green = 4 parts Hansa Yellow +1 part Phthalo BlueBase Toned Yellow = 6 parts Hansa Y ellow +1 part Naphthol Red Light +ato Carbon BlackBase Brown = 2 part Naphthol Red Light +1 part Carbon BlackToned Dark Green = 2 parts Base Green1 part Base BrownToned Dark Red =Toned Red =1 part Base Brown1 part Naphthol Red Light1 part Red Violet1 part Base Brown4 parts Naphthol Red LightMedium White =1 part Titanium Whiteato Base Brownato Base Greenato Base YellowToned Orange =1 part Base Orangeato Base BrownAbbreviationsato= a touch of. Small amount added to a mix.Toned Yellow Green =4 parts Hansa Yellow1 part Base Greenato Base Brown33
Step 1 Transfer your design using transfer paperor sketch with chalk pencil.Step 2 Place mixed colors on palette and add alittle Extender Medium. Mix with palette knife.Step 3 Dress your # 6 Filbert in Extender Medium.Step 4 Fully load the filbert with the Light Greenmix. You want the color a little transparent.Step 5 Begin the top scroll. Pull towards you asyou slowly lift the pressure on the b<strong>ru</strong>sh.Step 6 Continue down the scroll allowing theb<strong>ru</strong>sh to come to the chisel edge.
Step 7 Begin the large Root C.Step 8 Make the Root C about the width of your# 6 Filbert.Step 9 Stroke the Root C from the other directionas well because it has 2 knobs.Step 10 Dress your # 6 Filbert in Dark TonedGreen and add the inside stroke to top scroll.Step 11 Add a second stroke of Dark TonedGreen to widen the inside stroke.Step 12 Feather the Dark Toned Green into theRoot C suing the chisel of the b<strong>ru</strong>sh.35
Step 13 Add the inside stroke to the Root C withDark Toned Green.Step 14 Widen this stroke with a second strokeof Dark Toned Green.Step 15 Add a little more Extender to the DarkToned Green to make it more transparent.Step 16 Stroke over the outside of the Root C toadd the second tone ( two tone scroll ).Step 17 Add this two toned stroke to the topscroll (Transparent Dark Toned Green )..Step 18 Add a stroke of Toned Base Yellow tothe inside of the Root C Scroll.
Step 19 Lighten Base Green with touch of TitaniumWhite, Yellow and overstroke scroll tops.Step 20 Dress b<strong>ru</strong>sh in Red and add red scrollsto the C scroll and S scroll.Step 21 Widen scroll with a second stroke, thenadd a stroke of Dark Red along one side.Step 22 Dress b<strong>ru</strong>sh in Orange and add topscroll.Step 23 Add additional Orange scrolls to the bottomC scroll.Step 24 Add Dark Red scrolls to shadow theOrange scroll.37
Step 25 Add Dark Red C scroll to shadow themain C scroll flower.Step 26 Add smaller Orange C stroke inside theDark Red stroke. This is the calyx of the flower.Step 27 Add a C stroke of Light Green for a calyxon the top flower.Step 28 Add first petals to this flower with TonedBase Yellow.Step 29 Add this two toned stroke to the centerpetal with Dark Red.Step 30 Add the bottom petal with MediumWhite.
Step 31 Lighten the Yellow petal with 2 strokesof Medium White.Step 32 Add a center petal to the bottom flowerwith Base Yellow.Step 33 Add a second petal with Toned Orange.Step 34 Shadow the toned Orange petals with astroke of Toned Red.Step 35 Add the light petals with Medium White.Use several strokes. Streaks are good.Step 36 Add the center calyx with Light Greenthen shadow with a stroke of Dark Green.39
Step 37 Add Medium White + White highlightstrokes to both flowers.Step 38 Add a shadow stroke of Black + DarkGreen.Step 39 Use this same color to shadow the insideof the S scroll.Step 40 Add Yellows, Oranges and MediumWhite + White Highlights to top S flower.Steps before beginning round b<strong>ru</strong>sh decoration.
Step 41 Add stems Black and the round b<strong>ru</strong>sh.Vary b<strong>ru</strong>sh pressure to vary line thickness.Step 42 Add additional accent stems with Black.Step 43 Use the tip of the round b<strong>ru</strong>sh for finelines. This will take practice.Step 44 White is used to decorate the light areasof the flowers.Step 45 Add small liner strokes with the tip ofthe round to add more interest.Step 46 Add additional white strokes as highlights.41
Step 47 Add Dark Red + touch Black decorationaround flowers.Step 48 Dark Red accents strokes. Use the overallphoto for placement.Step 49 Add additional light petals with MediumWhite.Step 50 Add Medium White + touch White highlightpetals to these new petals.Step 51 Add some Medium White + touch BaseYellow crossing strokes.Step 52 Lighten the yellow with a touch ofWhite and add a few strokes.