EMIS Period H Financial Reporting for Non-USAS Districts - Swoca
EMIS Period H Financial Reporting for Non-USAS Districts - Swoca
EMIS Period H Financial Reporting for Non-USAS Districts - Swoca

You also want an ePaper? Increase the reach of your titles
YUMPU automatically turns print PDFs into web optimized ePapers that Google loves.
<strong>EMIS</strong> <strong>Period</strong> H <strong>Financial</strong> <strong>Reporting</strong> <strong>for</strong> <strong>Non</strong>-<strong>USAS</strong> <strong>Districts</strong><br />
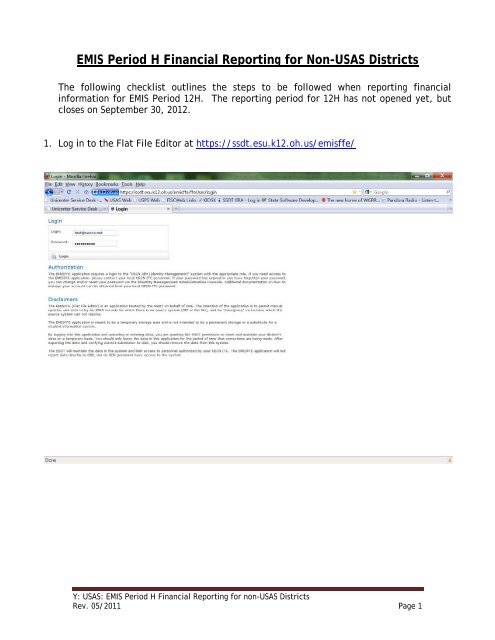
The following checklist outlines the steps to be followed when reporting financial<br />
in<strong>for</strong>mation <strong>for</strong> <strong>EMIS</strong> <strong>Period</strong> 12H. The reporting period <strong>for</strong> 12H has not opened yet, but<br />
closes on September 30, 2012.<br />
1. Log in to the Flat File Editor at https://ssdt.esu.k12.oh.us/emisffe/<br />
Y: <strong>USAS</strong>: <strong>EMIS</strong> <strong>Period</strong> H <strong>Financial</strong> <strong>Reporting</strong> <strong>for</strong> non-<strong>USAS</strong> <strong>Districts</strong><br />
Rev. 05/2011 Page 1
2. You will now be in the Main Menu.<br />
Y: <strong>USAS</strong>: <strong>EMIS</strong> <strong>Period</strong> H <strong>Financial</strong> <strong>Reporting</strong> <strong>for</strong> non-<strong>USAS</strong> <strong>Districts</strong><br />
Rev. 05/2011 Page 2
3. Begin by clicking on “Yearend Building In<strong>for</strong>mation – DB”. Then click “New<br />
YearendBuildingIn<strong>for</strong>mation”.<br />
Y: <strong>USAS</strong>: <strong>EMIS</strong> <strong>Period</strong> H <strong>Financial</strong> <strong>Reporting</strong> <strong>for</strong> non-<strong>USAS</strong> <strong>Districts</strong><br />
Rev. 05/2011 Page 3
4. Enter the data <strong>for</strong> each building IRN in your district.<br />
Y: <strong>USAS</strong>: <strong>EMIS</strong> <strong>Period</strong> H <strong>Financial</strong> <strong>Reporting</strong> <strong>for</strong> non-<strong>USAS</strong> <strong>Districts</strong><br />
Rev. 05/2011 Page 4
5. Scroll down the screen to enter all data. Below is a screen shot of the lower section of this<br />
record. Click “Create” when finished”. Click “Home” to return to the main menu.<br />
Y: <strong>USAS</strong>: <strong>EMIS</strong> <strong>Period</strong> H <strong>Financial</strong> <strong>Reporting</strong> <strong>for</strong> non-<strong>USAS</strong> <strong>Districts</strong><br />
Rev. 05/2011 Page 5
6. Next, click “<strong>Financial</strong> District In<strong>for</strong>mation – DD”.<br />
Click “New <strong>Financial</strong>DistrictIn<strong>for</strong>mation”. Enter a record <strong>for</strong> the Central Office. Click<br />
“Create” when finished.<br />
New this year: you need to enter the IRN number <strong>for</strong> your ITC (In<strong>for</strong>mation Technology<br />
Center). The IRN <strong>for</strong> SWOCA is 085571. Enter this number in the “Itc IRN” field.<br />
Y: <strong>USAS</strong>: <strong>EMIS</strong> <strong>Period</strong> H <strong>Financial</strong> <strong>Reporting</strong> <strong>for</strong> non-<strong>USAS</strong> <strong>Districts</strong><br />
Rev. 05/2011 Page 6
7. Next, click “<strong>Financial</strong> Building In<strong>for</strong>mation – DM” to enter the transportation, lunchroom<br />
and building square feet data. Enter a record <strong>for</strong> each building IRN in your district. Click<br />
“New <strong>Financial</strong>BuildingIn<strong>for</strong>mation”. Click “Create” when finished.<br />
Y: <strong>USAS</strong>: <strong>EMIS</strong> <strong>Period</strong> H <strong>Financial</strong> <strong>Reporting</strong> <strong>for</strong> non-<strong>USAS</strong> <strong>Districts</strong><br />
Rev. 05/2011 Page 7
8. Next, you will need to enter the current fiscal year data in all other QC records. Click<br />
“Cash QC”. Click “New Cash”. Click “Create” when finished.<br />
Click the drop down arrow to<br />
select Fund Class.<br />
After the data has been<br />
entered click either “Create”<br />
button.<br />
Y: <strong>USAS</strong>: <strong>EMIS</strong> <strong>Period</strong> H <strong>Financial</strong> <strong>Reporting</strong> <strong>for</strong> non-<strong>USAS</strong> <strong>Districts</strong><br />
Rev. 05/2011 Page 8
9. Next, click “Expenditure – QC”. Click “New Expenditure” and enter the required data.<br />
Click “Create” when finished.<br />
Click the drop down arrow and<br />
select the Y value if this is a<br />
“Debt Bond Retire Fund”.<br />
Y: <strong>USAS</strong>: <strong>EMIS</strong> <strong>Period</strong> H <strong>Financial</strong> <strong>Reporting</strong> <strong>for</strong> non-<strong>USAS</strong> <strong>Districts</strong><br />
Rev. 05/2011 Page 9
10. Next, click “Operational Unit – QC”. Then click “New OperationalUnit”. Click “Create”<br />
when finished.<br />
Y: <strong>USAS</strong>: <strong>EMIS</strong> <strong>Period</strong> H <strong>Financial</strong> <strong>Reporting</strong> <strong>for</strong> non-<strong>USAS</strong> <strong>Districts</strong><br />
Rev. 05/2011 Page 10
11. Next, click “Receipt – QC”. Then click “New Receipt. Click “Create” when finished.<br />
Y: <strong>USAS</strong>: <strong>EMIS</strong> <strong>Period</strong> H <strong>Financial</strong> <strong>Reporting</strong> <strong>for</strong> non-<strong>USAS</strong> <strong>Districts</strong><br />
Rev. 05/2011 Page 11
12. Next, click “Capital Assets – QC”. Click “New CapitalAssets”. You need to enter one<br />
record <strong>for</strong> each asset class such as land, building, equipment, vehicles, textbooks etc.<br />
Click “Create” when finished.<br />
Y: <strong>USAS</strong>: <strong>EMIS</strong> <strong>Period</strong> H <strong>Financial</strong> <strong>Reporting</strong> <strong>for</strong> non-<strong>USAS</strong> <strong>Districts</strong><br />
Rev. 05/2011 Page 12
13. Next, click “Civil Proceedings (Stmt R) – Case – QC”.<br />
Click “New CivilProceedingsCase”. Click “Create” when finished.<br />
Y: <strong>USAS</strong>: <strong>EMIS</strong> <strong>Period</strong> H <strong>Financial</strong> <strong>Reporting</strong> <strong>for</strong> non-<strong>USAS</strong> <strong>Districts</strong><br />
Rev. 05/2011 Page 13
14. Click “Civil Proceedings (Stmt R) – Description – QC”.<br />
Click “New CivilProceedingsDescription”. Click “Create” when finished.<br />
Y: <strong>USAS</strong>: <strong>EMIS</strong> <strong>Period</strong> H <strong>Financial</strong> <strong>Reporting</strong> <strong>for</strong> non-<strong>USAS</strong> <strong>Districts</strong><br />
Rev. 05/2011 Page 14
15. Next, click “Exhibit 1 – Cash Reconciliation – QC”. Click “New Exhibit1”. Click “Create”<br />
when finished.<br />
Y: <strong>USAS</strong>: <strong>EMIS</strong> <strong>Period</strong> H <strong>Financial</strong> <strong>Reporting</strong> <strong>for</strong> non-<strong>USAS</strong> <strong>Districts</strong><br />
Rev. 05/2011 Page 15
16. Click “Federal Assistance Programs – Detail – QC”.<br />
Click “New FederalAssistanceDetail”. Click “Create” when finished.<br />
Y: <strong>USAS</strong>: <strong>EMIS</strong> <strong>Period</strong> H <strong>Financial</strong> <strong>Reporting</strong> <strong>for</strong> non-<strong>USAS</strong> <strong>Districts</strong><br />
Rev. 05/2011 Page 16
17. Click “Federal Assistance Programs – Summary – QC”.<br />
Click “New FederalAssistanceSummary”. Click “Create” when finished.<br />
Note: The Federal Receipt Group relates to the following question:<br />
“Do you have $500,000 or more in Federal Expenditures this Fiscal <strong>Period</strong>?”<br />
The “D” option stands <strong>for</strong> Yes<br />
The “E” option stands <strong>for</strong> No<br />
Y: <strong>USAS</strong>: <strong>EMIS</strong> <strong>Period</strong> H <strong>Financial</strong> <strong>Reporting</strong> <strong>for</strong> non-<strong>USAS</strong> <strong>Districts</strong><br />
Rev. 05/2011 Page 17
18. After all records have been created click “Export data” from the main menu.<br />
Y: <strong>USAS</strong>: <strong>EMIS</strong> <strong>Period</strong> H <strong>Financial</strong> <strong>Reporting</strong> <strong>for</strong> non-<strong>USAS</strong> <strong>Districts</strong><br />
Rev. 05/2011 Page 18
19. The next screen will look like the example below. Select the H – July/<strong>Financial</strong> reporting<br />
period from the drop down arrow.<br />
Y: <strong>USAS</strong>: <strong>EMIS</strong> <strong>Period</strong> H <strong>Financial</strong> <strong>Reporting</strong> <strong>for</strong> non-<strong>USAS</strong> <strong>Districts</strong><br />
Rev. 05/2011 Page 19
20. Scroll to the bottom of this screen and verify that there check marks in only the DD, DM,<br />
and QC boxes. If there is a check mark in any other box just click on the box and remove<br />
the check mark.<br />
21. Next, click the “Export File” button to export and save the .seq file to your desktop.<br />
At this time, ODE has not opened the FY12 <strong>Period</strong> H Manifest in the Data<br />
Collector. The files that are created in the above processes will remain in your<br />
district database and can be uploaded when the manifest is available. We will<br />
notify all districts when this opens.<br />
Y: <strong>USAS</strong>: <strong>EMIS</strong> <strong>Period</strong> H <strong>Financial</strong> <strong>Reporting</strong> <strong>for</strong> non-<strong>USAS</strong> <strong>Districts</strong><br />
Rev. 05/2011 Page 20