HyperDeck Shuttle HyperDeck Studio - Fofic
HyperDeck Shuttle HyperDeck Studio - Fofic
HyperDeck Shuttle HyperDeck Studio - Fofic
- No tags were found...

Create successful ePaper yourself
Turn your PDF publications into a flip-book with our unique Google optimized e-Paper software.
Installation and Operation Manual<strong>HyperDeck</strong> <strong>Shuttle</strong><strong>HyperDeck</strong> <strong>Studio</strong>Mac OS X Windows March 2012
WelcomeWelcome to <strong>HyperDeck</strong>!Welcome to <strong>HyperDeck</strong>!We hope you share our dream for the television industry to become a truly creative industry by allowinganyone to have access to the highest quality video.Our range of <strong>HyperDeck</strong> disk recorders have made it easier and more affordable than ever to captureand play back full 10-bit uncompressed video. <strong>HyperDeck</strong> records directly to removable 2.5” Solid StateDisks (SSD’s) that are getting bigger, faster and more affordable every day. It’s incredible that you can nowrecord the most amazing quality SD and HD video on to something so small, and record and play an SSDthousands of times without any degradation in quality!You can bypass unwanted camera compression and record directly from HDMI or SDI cameras straightto SSD and even connect to any HDMI or SDI monitor for instant playback! SSD’s can also be mountedon any computer for immediate editing and fast transfer of your media. With no moving parts, SSD’s areunbelievably robust and can handle harsh conditions that would destroy conventional hard drives andvideotapes!If you need longer recording times for each SSD, then <strong>HyperDeck</strong> also records and plays back AppleProRes and Avid DNxHD files. These 10-bit quality codecs retain fantastic picture quality and increase therecording length of SSD’s by more than 5 times!This instruction manual contains all the information you need to start using your <strong>HyperDeck</strong> disk recorder.For uncompressed recording you need to use an SSD that supports the required data speed and we arecontinually adding details on our website of new SSD’s that we have tested.Please check the support page on our web site at www.blackmagic-design.com for the latest version ofthis manual and updates to the <strong>HyperDeck</strong> software. Keeping your software up to date will always ensureyou get all the latest features. When downloading software, please register with your information so wecan keep you updated when new software is released. We are constantly working on new features andimprovements, so we would love to hear from you!Grant PettyCEO Blackmagic Design
Contents<strong>HyperDeck</strong>414Getting StartedIntroducing <strong>HyperDeck</strong> 4Important Information about SSD Speeds 5Connecting SSD's to Your Computer 5Preparing SSD's for use with <strong>HyperDeck</strong> 6<strong>HyperDeck</strong> <strong>Shuttle</strong> 7<strong>HyperDeck</strong> <strong>Studio</strong> 9<strong>HyperDeck</strong> Utility 11Installing <strong>HyperDeck</strong> Utility 11Updating the Internal Software 11Choosing a Recording Format 12Recording with Timecode 13Playing Back Embedded Timecode 13Trigger Recording 13Using <strong>HyperDeck</strong>Using <strong>HyperDeck</strong> <strong>Shuttle</strong> 14212223RS-422 Machine Control 17Using <strong>HyperDeck</strong> <strong>Studio</strong> with NLE Software 18Avid Media Composer Presets 19Genlock 20How to Jog and <strong>Shuttle</strong> 20Installing the <strong>HyperDeck</strong> <strong>Shuttle</strong> Mounting PlateHelpHow to Install the <strong>HyperDeck</strong> <strong>Shuttle</strong> Mounting Plate 21Getting Help 22Blackmagic Design Online Support Pages 22Contacting Blackmagic Design Support 22Checking the Version Currently Installed 22How to Get the Latest Updates 22Developer InformationHow <strong>HyperDeck</strong> <strong>Shuttle</strong> Checks Your SSD 14Accessing Your Clips 14Recording Clips 14How to Play Back 15How to <strong>Shuttle</strong> 1530Supported RS-422 Commands for <strong>HyperDeck</strong> <strong>Studio</strong> 23RS-422 Status Bytes for <strong>HyperDeck</strong> <strong>Studio</strong> 29Warranty InformationUsing <strong>HyperDeck</strong> <strong>Studio</strong> 16How <strong>HyperDeck</strong> <strong>Studio</strong> Checks Your SSD 16Accessing Your Clips 16Recording Clips using 1 and 2 SSD's 16How to Play Back 17
4Getting Started<strong>HyperDeck</strong> <strong>Shuttle</strong><strong>HyperDeck</strong> <strong>Studio</strong>Introducing <strong>HyperDeck</strong><strong>HyperDeck</strong> disk recorders record uncompressed SD and HD video quality directly to low cost solid statedisks. Video playback can be viewed on an SDI or HDMI monitor or you can connect the SSD to a computerand edit directly from the SSD media itself. <strong>HyperDeck</strong> disk recorders have internal 3 Gb/s SATA ports whichare used with standard 2.5" SSD's.<strong>HyperDeck</strong> disk recorders have SDI and HDMI connectors making it easy to work with a huge range ofprofessional and consumer video equipment. SDI and HDMI connectors also support embedded audio.<strong>HyperDeck</strong> <strong>Shuttle</strong> is compact, affordable and battery powered so it’s perfect as a field recorder. <strong>HyperDeck</strong><strong>Shuttle</strong> bypasses your camera’s compression and records from SDI and HDMI directly into the highest qualityuncompressed video. The latest model can even record and play back in the DNxHD format if compressedvideo better suits your workflow or if you need to fit more video on an SSD.<strong>HyperDeck</strong> <strong>Shuttle</strong> Mounting Plate can be purchased if you want to secure your <strong>HyperDeck</strong> <strong>Shuttle</strong> to acamera rig with your choice of rail mounts, cold shoe mounts, articulated arms and more. You can also usethe plate to power your <strong>HyperDeck</strong> <strong>Shuttle</strong> from an external battery by attaching a V-Mount or Anton Bauerstyle battery plate.When you need more than a field recorder, <strong>HyperDeck</strong> <strong>Studio</strong> features dual SSD slots and automaticallycontinues recording onto the next SSD when one record disk fills. <strong>HyperDeck</strong> <strong>Studio</strong> features uncompressedvideo quality recording and playback, RS-422 deck control, genlock, jog and shuttle, an integrated LCD, andis affordable and easy to use. It can even record and play back in the Apple ProRes and Avid DNxHD formatsif compressed video better suits your workflow or if you need to fit more video on an SSD. <strong>HyperDeck</strong><strong>Studio</strong> is the broadcast deck for the 21st century!<strong>HyperDeck</strong> <strong>Studio</strong> is rack-mountable and is only 1 RU high and less than 4 inches deep. It's the perfect sizewhen space is tight such as in broadcast vans and fly away rack cases.
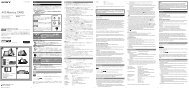
6Getting StartedPreparing SSD's for use with <strong>HyperDeck</strong>SSD’s used by <strong>HyperDeck</strong> must be HFS+ formatted. Simply connect the SSD to your computer via anexternal dock or cable adapter and format it as you would a regular disk. Make sure you check there’snothing important on your SSD as you will lose everything on it when you format it.Preparing SSD's on a Mac OS X computerThe Disk Utility application included with Mac OS X will format a drive in the Mac OS X Extended (Journaled)format, which is also known as HFS+.Step 1. Connect the SSD to your computer and dismiss any message offering to use your SSD for TimeMachine backups.Step 2.Step 3.Go to /Applications/Utilities and launch Disk Utility.Click on the disk icon of your SSD and then click the Erase tab.Use Disk Utility on Mac OS X to erase your SSD in theMac OS Extended (Journaled) format.Step 4. Set the Format to "Mac OS Extended (Journaled)", type a Name for the new volume and thenclick Erase. Your SSD will quickly be formatted and made ready for use with <strong>HyperDeck</strong>.Preparing SSD's on a Windows computerIf you’re using a Windows PC, use MacDrive software to create and read HFS+ formatted disks. MediaFourMacDrive can be purchased online from http://www.mediafour.com.Step 1.Step 2.Step 3.Step 4.Step 5.Step 6.Step 7.Install MediaFour MacDrive and restart your PC.Connect the SSD to your computer.Choose Start>Computer and right-click on your SSD.From the contextual menu, choose MacDrive>Format Mac Disk.Select the SSD in the MacDrive Disk Manager and choose Initialize disk>Initialize as GPT.Choose "Automatically create an HFS+ volume" and click "Initialize Disk".Once the format has been completed, close out of the MacDrive Disk Manager. Your SSD is readyfor use with <strong>HyperDeck</strong>.Use MacDrive software on Windows to initialize the SSD with aGPT and create an HFS+ volume.
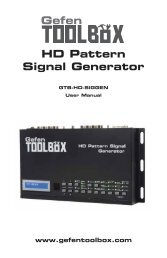
8Getting Started<strong>HyperDeck</strong> <strong>Shuttle</strong>9 101112 13 14 15 16 1718DISPVIDEOButtons9. Record<strong>HyperDeck</strong> <strong>Shuttle</strong> will instantly record the moment youpress the Record button, even if you’re playing back a clip.This means you’ll never miss a good take that’s happening.If the button flashes red, the SSD is too slow and is droppingframes.10. Previous ClipIf you hold down the Previous Clip, the clip will reverse at2x speed. Pressing the button again will increase the speedto 4x and 8x. If you want to resume playing back at normalspeed, just press the Play button. Or you can press the Stopbutton to pause when reversing.11. StopThe Stop button also switches <strong>HyperDeck</strong> <strong>Shuttle</strong> betweenplayback and video loop through mode.12. PlayWhen a clip is playing, pressing Play again will loop itcontinuously.13. Next ClipIf you hold down Next Clip, the clip will fast forward at 2xspeed. Pressing the button again will increase the speed to4x and 8x. If you want to resume playing back at normalspeed, just press the Play button. Or you can also press theStop button to pause when fast forwarding.14. DISPThis button isn’t currently used but will soon be enabled by asoftware update. You will be able to download this for free atwww.blackmagic-design.com15. Power On/OffThe Power button turns the <strong>HyperDeck</strong> <strong>Shuttle</strong> on or off. Toprevent someone from accidentally switching off the unit,you must hold the Power button down for 2 seconds to turnit off. If you’re running off the built-in batteries, the unit willturn itself off to conserve power after 8 minutes if you’re notrecording.Status Indicators16. VIDEOThe VIDEO indicator lights up when a video signal is detectedby <strong>HyperDeck</strong> <strong>Shuttle</strong>.17. SSDThe SSD indicator lights up in green when it is accessing acorrectly formatted SSD. If the SSD has not been formattedcorrectly, or fails to work, the SSD light will illuminate solidred until the SSD is removed.18. BatteryThe four green battery indicators display the internal batterycharge level. When all the LEDs go off, there’s approximately4 minutes of battery power left. So you should plug inyour external power source or switch to another charged<strong>HyperDeck</strong> <strong>Shuttle</strong>.
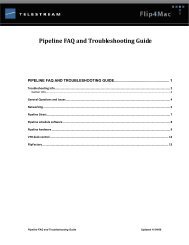
10Getting Started<strong>HyperDeck</strong> <strong>Studio</strong>13 14 15 16 17 18 19 20DISPINPUTREMSETJOG21 22 23 24 25 26 27 28INLOOP OUTOUT 1OUT 2MON OUTREF ININOUTSSD Slots+12V POWER REMOTE ETHERNET SD/HD/3GHD-SDI HDMI13. SSD Slot 114. SSD Slot 2Insert a 2.5" SSD in to an SSD slot until you feel the SSDpress in to place. The surround of the SSD slot lights in greenwhen it is accessing a correctly formatted SSD. If the SSD hasnot been formatted correctly, or fails to work, the SSD slotlight will illuminate solid red until the SSD is removed. Harddrives are not supported and should not be used. To removethe SSD, simply pull it out.Buttons and Controls15. DISPThis button isn’t currently used but will soon be enabled bya software update.16. Previous ClipPress once to go to the start of the current clip or press twiceto skip back to the start of the previous clip.17. RecordRecording commences the instant you press the recordbutton, even if you’re playing back a clip, so you’ll never missa good take that’s happening. If the button flashes red, theSSD is too slow and is dropping frames. To switch from oneSSD to the other while recording, press the record buttonfor 1 second.18. Next ClipPress to skip to the next clip.19. INPUTWhile the stop button is illuminated, press the INPUT buttononce to display the incoming video on the LCD. If you don’tsee the video you want, press the button again to switchbetween the HDMI and SDI inputs.20. REMPush REM to enable RS-422 remote control or to allowremote trigger recording via SDI.21. SETThis button isn’t currently used but will soon be enabled bya software update.22. ReversePress once to play in reverse at normal speed. Press again toreverse at 2x, 4x and 8x speeds.23. PlayPress once to play through all clips or press again to loop thecurrent clip.24. Fast ForwardPress once to play at 2x speed or press again to play at 4xand 8x speeds.25. StopStop works in all modes.26. JOGPress once to use the jog wheel to scroll through video orpress again to set the jog wheel to shuttle mode.27. LCDThe color LCD displays video format, timecode, audiometers, video preview, transport controls and the active SSD.28. Jog/<strong>Shuttle</strong> WheelUse with the JOG button to jog or shuttle forwards andbackwards.
13Getting StartedRecording with TimecodeWhen recording from HD-SDI video sources which provide embedded SMPTE RP 188 metadata, switchingon the option to "Use SDI video input timecode when recording" will record the embedded timecode fromthe video source instead of using timecode generated by your <strong>HyperDeck</strong>. It might be necessary to turn onthe RP 188 setting in your camera before <strong>HyperDeck</strong> will be able to capture the timecode. The LCD displayin <strong>HyperDeck</strong> <strong>Studio</strong> displays the RP 188 timecode while recording.<strong>HyperDeck</strong> <strong>Studio</strong> shows embedded SDI timecode on its display.Playing Back Embedded TimecodeIf you switch on the option to "Play back media timecode track to SDI output" when playing back highdefinition video, your <strong>HyperDeck</strong> will embed SMPTE RP 188 metadata allowing other video equipment todisplay or record the timecode.For example, when monitoring your video playback with a Blackmagic Design UltraScope, the videotimecode will appear in the Picture Display along with the video. Timecode is also commonly displayed onHD-SDI monitors but you will often need to find a menu setting to turn it on. The LCD display in <strong>HyperDeck</strong><strong>Studio</strong> also displays the RP 188 timecode during playback.Trigger Recording<strong>HyperDeck</strong> <strong>Shuttle</strong> and <strong>HyperDeck</strong> <strong>Studio</strong> support trigger recording so that when you press the recordbutton on an HD-SDI camera, <strong>HyperDeck</strong> will start recording without also having to press the record buttonon your <strong>HyperDeck</strong> disk recorder.To set up trigger recording for supported cameras:Step 1. You will need a camera which can trigger the "record" function of <strong>HyperDeck</strong> via HD-SDI.Cameras which support trigger recording via HD-SDI may include menu options such as "TriggerREC", "HD-SDI Remote I/F" or "SDI Remote Start/Stop Trigger".Step 2.In <strong>HyperDeck</strong> Utility, set Trigger recording to "When SDI start/stop is detected". The REM buttonmust also be pressed and illuminated on <strong>HyperDeck</strong> <strong>Studio</strong> to allow trigger recording.If your HD-SDI camera does not provide specific support for trigger recording, your <strong>HyperDeck</strong> can still beused for trigger recording by using record run timecode:Step 1.Go into your camera's timecode settings and change them from "free run timecode" to "recordrun timecode".Step 2. In <strong>HyperDeck</strong> Utility, set Trigger recording to "When SDI timecode runs". The REM button mustalso be pressed and illuminated on <strong>HyperDeck</strong> <strong>Studio</strong> to allow trigger recording.
15Using <strong>HyperDeck</strong>Step 6. If you don’t see your source video on the output, press the Stop button to switch <strong>HyperDeck</strong><strong>Shuttle</strong> between video input loop through and playback.Step 7. Press the Record button and <strong>HyperDeck</strong> <strong>Shuttle</strong> will start recording instantly. The SSD light willalso flash to indicate the SSD activity. Once you’ve finished recording, press the Stop button.If the Stop button starts flashing while recording, there are only 3 minutes of recording time lefton the SSD. Make sure you have another empty SSD ready so you don’t miss the next take.How to Play BackPlaying back a clip is simple and instantaneous. If you’re recording, press the Stop button once to stoprecording. Press it again to switch to playback. Then simply press Play.The controls of <strong>HyperDeck</strong> <strong>Shuttle</strong> work just like a CD player so pressing next clip will skip to the start of thenext clip and continue playing. Press previous clip once to go to the start of the current clip or press twice toskip back to the start of the previous clip.<strong>HyperDeck</strong> <strong>Shuttle</strong> can record 10 bit uncompressed QuickTime files on a fast SSD, or to a compressedformat if you have a slower SSD or want to fit longer high definition recordings on a single SSD. This meansit is possible to have uncompressed QuickTime files as well as compressed files on the same disk if you haveused the <strong>HyperDeck</strong> Utility software to change the recording format.Setting the recording format also sets the playback format so you will only be able to play back clips thatmatch the current recording format. Any other clips will be hidden which helps prevent slow SSD's frombeing accidentally used to play back high data rate uncompressed clips which they might not be fastenough to play.How to <strong>Shuttle</strong>If you’re reviewing a long clip and need to quickly shuttle to a particular section, just hold down the PreviousClip or Next Clip button. This will allow you to reverse or fast forward through the clip at 2x speed. To gofaster, press the Previous Clip or Next Clip button again and the speed will increase to 4x and then 8x. Onceyou’ve found the section you want to review, press Play and playback will resume at normal speed.
18Using <strong>HyperDeck</strong>You can remotely control <strong>HyperDeck</strong> <strong>Studio</strong> from a computer, instead of locally pushing buttons.Step 1.Step 2.Connect an RS-422 cable between your capture device and <strong>HyperDeck</strong> <strong>Studio</strong>.Press the REM button to enable remote deck control.You can now use your favorite NLE software, along with video capture hardware, to remotely capture, batchcapture and play back video with your <strong>HyperDeck</strong> <strong>Studio</strong>.Using <strong>HyperDeck</strong> <strong>Studio</strong> with NLE SoftwareAny non-linear editing software that supports video capture hardware, and RS-422 remote control, canbe used to capture, batch capture and play back video from <strong>HyperDeck</strong> <strong>Studio</strong> with frame accuracy.The RS-422 deck control functionality in your NLE software might be provided by the software itself or mightonly appear when you install the driver software for your video capture hardware.Device Control in Adobe Premiere Pro is usually provided by thedriver software for your video capture hardware and is enabled inPreferences > Device Control.Adobe Premiere Pro CS5.xCreate a project in Adobe Premiere Pro by following the documentation that accompanied your videocapture hardware. Device Control in Adobe Premiere Pro is usually provided by the driver software for yourvideo capture hardware and is enabled in Preferences > Device Control. If you don't see any option forRS-422 device control, quit out of Premiere Pro and reinstall the software drivers for your video capturehardware. Launch Premiere Pro again and the RS-422 device control option should now appear inPreferences > Device Control.Apple Final Cut Pro 7Create a project in Apple Final Cut Pro 7 by following the documentation that accompanied your videocapture hardware. Device Control in Apple Final Cut Pro 7 is usually provided by the driver software for yourvideo capture hardware and is enabled when you choose an associated Easy Setup. You can check the RS-422 configuration in Final Cut Pro > Audio Video Settings and then click on the Device Control Presets tab.If you don't see an RS-422 device control preset for your capture hardware, quit out of Final Cut Pro andreinstall the software drivers for your capture hardware. Launch Final Cut Pro again and the RS-422 devicecontrol presets should now appear in the Device Control Presets tab.Device Control in Apple Final Cut Pro 7 is usually provided by thedriver software for your video capture hardware and is enabledwhen you choose an associated Easy Setup.Apple Final Cut Pro XApple Final Cut Pro X does not support RS-422 device control and so cannot remotely control <strong>HyperDeck</strong><strong>Studio</strong>. However any QuickTime files recorded by <strong>HyperDeck</strong> <strong>Studio</strong> are fully compatible and can beimported in to Final Cut Pro X. When working with 10-bit uncompressed QuickTime movies, we recommendcreating a new project in Final Cut Pro X with the Audio and Render Properties set to Custom. This will allowyou to set the Render Format to Uncompressed 10-bit 4:2:2 which will avoid compression.
20Using <strong>HyperDeck</strong>GenlockThe REF IN port accepts bi-level and tri-level sync signals from a sync generator so you can lock your videoequipment to the same signal. Not everyone needs to use genlock but it is particularly important whenswitching between multiple video sources as is common in larger facilities.If you notice video flicker or tearing on the LCD when recording video, using a sync generator should help.Make sure your sync generator is set to the same video standard as the video you want to record with<strong>HyperDeck</strong> <strong>Studio</strong>. In contrast to conventional tape decks, <strong>HyperDeck</strong> <strong>Studio</strong> automatically detects thevideo standard so there is nothing to configure.If you're using <strong>HyperDeck</strong> <strong>Studio</strong> to record from a camera, the sync generator should be set to the samevideo standard as the camera.How to Jog and <strong>Shuttle</strong>If you’re reviewing a long clip and need to quickly shuttle to a particular section, press the reverse or fastforward button to play through the clip at 2x speed. To go faster, press the reverse or fast forward buttonagain and the speed will increase to 4x and then 8x. Once you’ve found the section you want to review, pressplay to resume normal playback.You can also use the Jog/<strong>Shuttle</strong> Wheel to shuttle to a particular section at variable speeds. The more youturn it forwards or backwards, the faster <strong>HyperDeck</strong> <strong>Studio</strong> will play through your video. Once you’ve foundthe section you want to review, press play to resume normal playback.If you want to slowly jog through your video, frame by frame, press the JOG button once to enable jogoperation. Turning the jog/shuttle wheel in the desired direction will then jog through your video. Pressingthe JOG button again will return the wheel to shuttle operation.
21Installing the <strong>HyperDeck</strong> <strong>Shuttle</strong> Mounting PlateThe contents of the box includes:You will need:x1<strong>HyperDeck</strong> <strong>Shuttle</strong>Mounting Platex1Hex Allen Key 2.5mm(not included)x4Socket Head ScrewsM3 x 10mmHow to Install the <strong>HyperDeck</strong> <strong>Shuttle</strong> Mounting Plate<strong>HyperDeck</strong> <strong>Shuttle</strong> Mounting Plate is an optional accessory which lets you secure your <strong>HyperDeck</strong><strong>Shuttle</strong> to a camera rig with your choice of rail mounts, cold shoe mounts, articulated arms and more.You can also use the plate to power your <strong>HyperDeck</strong> <strong>Shuttle</strong> from an external battery by attachinga V-Mount or Anton Bauer style battery plate. <strong>HyperDeck</strong> <strong>Shuttle</strong> Mounting Plate is available forpurchase from Blackmagic Design resellers. For easy installation, please follow these simple steps.Step 1. Peel back the rubber mat from all four corners of the base so you can just see the screws.Remove all four screws.Step 2.Step 3.Remove the base.Attach your <strong>HyperDeck</strong> <strong>Shuttle</strong> Mounting Plate using the supplied socket head screws.222111444333Step 1 Step 2 Step 3
22HelpGetting HelpThe fastest way to obtain help is to go to the Blackmagic Design online support pages and check the latestsupport material available for your <strong>HyperDeck</strong>.Blackmagic Design Online Support PagesThe latest manual, software and support notes can be found at the Blackmagic Support Center atwww.blackmagic-design.com/support.Contacting Blackmagic Design SupportIf you can't find the help you need in our support material, please use the "Send request" button, onthe support page for your <strong>HyperDeck</strong> model, to email a support request. Alternatively call your nearestBlackmagic Design support office at www.blackmagic-design.com/company.Checking the Version Currently InstalledTo check which version of <strong>HyperDeck</strong> Utility software is installed on your computer, open the AboutBlackmagic <strong>HyperDeck</strong> Utility window.• On Mac OS X, open Blackmagic <strong>HyperDeck</strong> Utility from the Applications folder. Select About Blackmagic<strong>HyperDeck</strong> Utility from the application menu to reveal the version number.• On Windows 7, open Blackmagic <strong>HyperDeck</strong> Utility from your Start menu. Click on the Help menu andselect About Blackmagic <strong>HyperDeck</strong> Utility to reveal the version number.How to Get the Latest UpdatesAfter checking the version of <strong>HyperDeck</strong> Utility software installed on your computer, please visit theBlackmagic Support Center at www.blackmagic-design.com/support to check for the latest updates. Whileit is usually a good idea to run the latest updates, it is a wise practice to avoid updating any software if youare in the middle of an important project.
23Developer InformationSupported RS-422 Commands for <strong>HyperDeck</strong> <strong>Studio</strong>0 - System ControlCommand Reply No Remote Notes0x00 0x0C Disable Acknowledge - Always Ignored0x00 0x11 DeviceTypeRequestNTSC: 0xF0E0PAL: 0xF1E024P: 0xF2E0Enabled0x00 0x1D Enable Acknowledge - Always Ignored1 - Slave Response0x20 0x00 Stop Acknowledge Disabled0x20 0x01 Play Acknowledge Disabled0x20 0x02 Record Acknowledge Disabled0x20 0x04 StandbyOff Acknowledge - Always Ignored0x20 0x05 StandbyOn Acknowledge - Always Ignored0x20 0x0F Eject Acknowledge - Always Ignored0x20 0x10 FastFwd Acknowledge Disabled0x21 0x11 JogFwd1 Acknowledge Disabled0x22 0x11 JogFwd2 Acknowledge DisabledTreated as N=1;Same as JogFwd10x21 0x12 VarFwd1 Acknowledge Disabled Uses <strong>Shuttle</strong>Fwd10x22 0x12 VarFwd2 Acknowledge Disabled0x21 0x13 <strong>Shuttle</strong>Fwd1 Acknowledge Disabled0x22 0x13 <strong>Shuttle</strong>Fwd2 Acknowledge Disabled0x20 0x20 Rewind Acknowledge Disabled0x21 0x21 JogRev1 Acknowledge Disabled0x22 0x21 JogRev2 Acknowledge DisabledTreated as N=1;Same as VarFwd1Treated as N=1;Same as <strong>Shuttle</strong>Fwd1Treated as N=1;Same as JogRev10x21 0x22 VarRev1 Acknowledge Disabled Uses <strong>Shuttle</strong>Rev10x22 0x22 VarRev2 Acknowledge DisabledTreated as N=1;Same as VarRev1
26Developer InformationSupported RS-422 Commands for <strong>HyperDeck</strong> <strong>Studio</strong>Command Reply No Remote Notes0x40 0x27 AudioOutRecall Acknowledge Disabled Always Ignored0x40 0x2D LostLockReset Acknowledge Disabled Always Ignored0x42 0x30 EditPreset Acknowledge Disabled Always Ignored0x44 0x31 PrerollPreset Acknowledge Disabled0x41 0x32 TapeAutoSelect Acknowledge Disabled Always Ignored0x41 0x33 ServoRefSelect Acknowledge Disabled Always Ignored0x41 0x34 HeadSelect Acknowledge Disabled Always Ignored0x41 0x35 ColorFrameSelect Acknowledge Disabled Always Ignored0x41 0x36 TimerModeSelect Acknowledge Disabled Always Ignored0x41 0x37 InputCheck Acknowledge Disabled Always Ignored0x41 0x3A EditFieldSelect Acknowledge Disabled Always Ignored0x41 0x3B FreezeModeSelect Acknowledge Disabled Always Ignored0x40 0x40 AutoModeOff Acknowledge Disabled0x40 0x41 AutoModeOn Acknowledge Disabledignored, Status bitrememberedignored, Status bitremembered0x40 0x42 SpotEraseOff Acknowledge Disabled Always Ignored0x40 0x43 SpotEraseOn Acknowledge Disabled Always Ignored0x40 0x45 AudioSplitOn Acknowledge Disabled Always Ignored0x42 0xF8 StillOffTime Acknowledge Disabled Always Ignored0x42 0xFA StdbyOffTime Acknowledge Disabled Always Ignored6 - Sense Request0x61 0x0A TimeCodeGenSenseRequest for Gen TC GenTCData EnabledRequest for Gen UB GenUBData Enabled Always IgnoredRequest for Gen TC/UB GenTCUBData Enabled Always Ignored0x61 0x0C CurrentTimeSense Always IgnoredCorrectedLTCTimeSense CorrectedLTCTimeData Enabled Always Ignored
27Developer InformationSupported RS-422 Commands for <strong>HyperDeck</strong> <strong>Studio</strong>Command Reply No Remote NotesVITCTimeSense VITCTimeData Enabled Always IgnoredSpecialTimSense CorrectedLTCTimeData Enabled Always IgnoredTimer1Sense Timer1Data EnabledUserBitsVITCTimeSense UserBitsVITCTimeData EnabledLTCUserBitsTimeSense LTCUserBitsTimeData EnabledVITCUserBitsTimeSense VITCUserBitsTimeData Enabled0x60 0x10 InDataSense InData Enabled0x60 0x11 OutDataSense OutData Enabled0x60 0x12 AInDataSense AInData Enabled0x60 0x13 AOutDataSense AOutData Enabled0x61 0x20 StatusSense StatusData Enabled0x60 0x2E SpeedSense SpeedData Enabled0x60 0x31 PrerollTimeSense PreRollTimeData Enabled0x60 0x36 TimerModeSense TimerModeData Enabled0x60 0x3E RecordInhibitSense RecordInhibitStatus Enabled7 - Sense Reply0x78 0x00 Timer1Data - -0x78 0x04 LTCUserBitsTimeData - -0x78 0x06 VITCUserBitsTimeData - -Current Time and00:00:00:00Current Time and00:00:00:00Current Time and00:00:00:000x74 0x06 VITCTimeData - - Current Time0x74 0x07 UserBitsVITCTimeData - - 00:00:00:000x74 0x08 GenTCData - - Current Time0x78 0x08 GenTCUBData - -Current Time and00:00:00:000x74 0x09 GenUBData - - 00:00:00:000x74 0x10 InData - -
30Warranty12 Month Limited WarrantyBlackmagic Design warrants that this product will be free from defects in materials and workmanship fora period of 12 months from the date of purchase. If a product proves to be defective during this warrantyperiod, Blackmagic Design, at its option, either will repair the defective product without charge for parts andlabor, or will provide a replacement in exchange for the defective product.In order to obtain service under this warranty, you the Customer, must notify Blackmagic Design of thedefect before the expiration of the warranty period and make suitable arrangements for the performanceof service. The Customer shall be responsible for packaging and shipping the defective product to adesignated service center nominated by Blackmagic Design, with shipping charges pre paid. Customershall be responsible for paying all shipping charges, insurance, duties, taxes, and any other charges forproducts returned to us for any reason.This warranty shall not apply to any defect, failure or damage caused by improper use or improper orinadequate maintenance and care. Blackmagic Design shall not be obligated to furnish service underthis warranty: a) to repair damage resulting from attempts by personnel other than Blackmagic Designrepresentatives to install, repair or service the product, b) to repair damage resulting from improper useor connection to incompatible equipment, c) to repair any damage or malfunction caused by the use ofnon Blackmagic Design parts or supplies, or d) to service a product that has been modified or integratedwith other products when the effect of such a modification or integration increases the time or difficultyof servicing the product. THIS WARRANTY IS GIVEN BY BLACKMAGIC DESIGN IN LIEU OF ANYOTHER WARRANTIES, EXPRESS OR IMPLIED. BLACKMAGIC DESIGN AND ITS VENDORS DISCLAIMANY IMPLIED WARRANTIES OF MERCHANTABILITY OR FITNESS FOR A PARTICULAR PURPOSE.BLACKMAGIC DESIGN’S RESPONSIBILITY TO REPAIR OR REPLACE DEFECTIVE PRODUCTS IS THEWHOLE AND EXCLUSIVE REMEDY PROVIDED TO THE CUSTOMER FOR ANY INDIRECT, SPECIAL,INCIDENTAL OR CONSEQUENTIAL DAMAGES IRRESPECTIVE OF WHETHER BLACKMAGIC DESIGNOR THE VENDOR HAS ADVANCE NOTICE OF THE POSSIBILITY OF SUCH DAMAGES. BLACKMAGICDESIGN IS NOT LIABLE FOR ANY ILLEGAL USE OF EQUIPMENT BY CUSTOMER. BLACKMAGIC ISNOT LIABLE FOR ANY DAMAGES RESULTING FROM USE OF THIS PRODUCT. USER OPERATES THISPRODUCT AT OWN RISK.© Copyright 2012 Blackmagic Design. All rights reserved. ‘Blackmagic Design’, ‘DeckLink’, ‘HDLink’, ‘Workgroup Videohub’, ‘Multibridge Pro’,‘Multibridge Extreme’, ‘Intensity’ and ‘Leading the creative video revolution’ are registered trademarks in the US and other countries. All othercompany and product names may be trade marks of their respective companies with which they are associated.