
Create successful ePaper yourself
Turn your PDF publications into a flip-book with our unique Google optimized e-Paper software.
UD180<strong>OWNERS</strong> <strong>MANUAL</strong>
UD180Owners Name:Address:Phone:Purchase Date:Purchase Location:Serial # : Located on backside of right axle clampSteer Tube Length:Bike Brand:Frame Size:Safety1.) NEVER REMOVE STEER TUBE FROM CROWN. THIS IS A PRESSED IN PART,REMOVING IT WILL RENDER BOTH CROWN AND STEERER INOPERABLE*.MAKESURE YOUR FORK CAPS AND ALL FORK HARDWARE (brake studs, pinch bolts,etc.) ARE TIGHT2.) DO NOT PERFORM ANY MODIFICATIONS OR ADJUSTMENTS THAT ARE NOTOUTLINED IN THIS <strong>MANUAL</strong>. SEE THE TUNING SECTION OF THE <strong>MANUAL</strong> FORMORE DETAILS.3.) INSPECT YOUR FORKS BEFORE EVERY RIDE. INSPECT THE CROWN, TUBES ANDAXLE SEAT AREAS FOR ANY SIGNS OF FATIGUE, BENDING, CRACKING OR OTHERDAMAGE. IF YOU NOTICE ANY TYPE OF DAMAGE, DO NOT RIDE ON THEM.RETURN THEM TO YOUR DEALER FOR A COMPLETE INSPECTION AND NECESSARYREPAIR OR WARRANTY STEPS. PLEASE REFER TO THE WARRANTY SECTION OFTHIS <strong>MANUAL</strong>.4.) PERFORM ALL RECOMMENDED MAINTENANCE ACCORDING TO THE MAINTENANCESECTION OF THIS <strong>MANUAL</strong>. FAILURE TO PERFORM MAINTENANCE COULDDRASTICALLY REDUCE YOUR FORKS LIFE AND PERFORMANCE.5.) WHITE BROTHERS RECOMMENDS THAT YOU WEAR PROPER SAFETY EQUIPMENTEVERY TIME YOU RIDE, INCLUDING A APPROVED BICYCLE HELMET. NEVER RIDEAT NIGHT WITHOUT LIGHTS!* IF SERVICE BECOMES NECESSARY OR REMOVAL OCCURS, PLEASE CALL WHITE BROTHERS CUSTOMER SERVICEFOR PRODUCT EVALUATION AND DIAGNOSIS.
and pulling out of damping rod. Inspect small o’ring on damping adjust needle assembly and replaceif damaged in any way. Also inspect o’ring on nylon seal head and replace if damaged in any way.NOTE: Readjusting damper shim stack is not recommended. If damping does not meet rider’srequirements, call the WB suspension service department for recommendations on valving adjustments.7.) Reassemble hydraulic damper assembly as follows: Place the spiral retainer guide over the inner legand Place piston ring guide pn FT180-5 into the retainer guide and Fill with WB RS67 shock oil 3”(75mm) below the top of the spiral retainer guide. Install damper rod assembly down through bothguides into fork leg and slow compress piston through oil. Stroke the shaft up and down in the oil toexpel air from the damping piston, push the damper shaft down further until oil comes out of thedamper shaft, at this point insert the needle into the shaft and screw in until the o-ring is just below theend of the shaft. Next remove piston ring guide. Then lift the shaft assembly up through the oil whileyou are lifting top up oil level to keep the piston submerged in oil, stop with the piston positioned justbelow circlip groove, carefully lower the nylon seal head into fork leg. Siphon of excess oil using WB pnFT180-6. You can then install the seal head and spiral retaining ring in one operation. You should heara positive click as the ring enters the groove. NOTE: It may require a tap or two on the seal head toolto seat the retainer fully home in it’s groove. This operation also charges the system under springpressure, stroke damper rod up and down fully to check for smooth damping action and to make suredamper rod returns to extended position after being compressed. Install 5mm nylon spacer on top offork leg.RIGHT FORK LEG (DAMPER SIDE) ASSEMBLY8) At this point clean all parts with a clean, non-abrasive rag. A mild grease cutting cleaner or solventmight make this an easier task.9) Once clean, inspect seals for tears or cracks. Next, inspect the fork tubes for wear, nicks or scrapes. Ifthere is noticeable play between fork legs and fork tubes, the DU bushes located inside the outer forkleg may require replacement. Consult White Brothers or your dealer if servicing or repair is necessary.10) If everything is free of problems, coat all parts with a light coating of White Brothers Suspension Lubeor other suitable, non-lithium grease. Also lube the DU bushings that are located inside fork outer legby dipping a socket extension in grease and applying the grease into the inside of the fork leg on theDU bushings.11) Install oil seals into lip of outer leg, then snap circlip into next lip, then wiper seal. Be careful not to foldseals (oil seal & wiper seal) when sliding outer leg onto inner leg. Then carefully slide outer fork legover inner fork leg making sure not to curl seal lips under during this process. Stroke outer fork leg tomake sure it is sliding smoothly over inner leg.12) Install 2mm nylon spacer step upward ,cone shaped compression bumper cone down, and auxiliaryspring, Note: The bottomer spacer should be firmly attached to the top cap.13) Add 20cc’s of 30w motor oil into fork at this time (figure 10). Before threading cap screw adjusterneedle all the way down, thread the fork cap tightly, press in springspacer into cap, then stuff o-ring with a flathead screwdriver intofigure 7cap. Screw cap onto leg. Stroke fork to check for smooth operation.Adjust damping needle out as needed once on the bike and youhave ridden it.LEFT FORK LEG (SPRING SIDE) DISASSEMBLY1) Unthread top fork cap (counterclockwise) utilizing a 25mm (1”)open end wrench or adjustable wrench. If fork stanchion isclamped in vise during this procedure use jaw pads to preventdamage to fork. Also avoid excessive clamping force to avoidcrushing fork stanchion (figure 4).2) Once top fork cap is loosened sufficiently that it is nolonger attached to fork stanchion, grasp lower fork legat axle seat and compress fork approximately 1”. Loosendummy rod from fork cap by inserting 9mm wrenchonto flats of dummy rod and turning counter clockwiseuntil cap can be removed from dummy rod (figure 7).6
3) Remove preload spring, auxiliary spring, jam nut, spring guide double,main spring, spring guide, any spring spacers, and spring guideseat from fork. Remove outer fork leg from inner leg. NOTE: Havepan under fork to catch small amount of oil that is in fork.4) To disassemble and inspect negative spring and dummy shaft system,remove circlip by unwinding from groove in a clockwise manner(a small pick or screwdriver works well for this operation)(figure 8).Dummy shaft system with negative spring and bumper can beremoved at this time (figure 9). Inspect rebound bumper for cracksor distortion, replace if necessary.5) Reinstall dummy shaft system into fork leg and install spiral lock circlipby winding back into its groove. Reinstall spring guide seat ontop of inner fork leg.figure 8LEFT FORK LEG (SPRING SIDE) ASSEMBLY6) At this point clean all parts with a clean, non-abrasive rag. A mildgrease cutting cleaner or solvent might make this an easier task.7) Once clean, inspect seals for tears or cracks. Next, inspect the forktubes for wear, nicks or scrapes. If there is noticeable play betweenfork legs and fork tubes, the DU bushes located inside the upperfork stanchion may require replacement. Consult White Brothers oryour dealer if servicing or repair is necessary.8) If everything is free of problems, coat all parts with a light coating ofWhite Brothers Suspension Lube or other suitable, non-lithiumgrease. Also lube the DU bushings that are located inside fork outerleg by dipping a socket extension in grease and applying the greaseinto the inside of the fork leg on the DU bushings.9) With fork laid over on its side (so dummy rod doesn’t fall into lowerfork leg), install into outer leg oil seal, circlip, and wiper seal.Then slide outer leg onto inner leg in the vise - Be careful not to foldseals (oil seal & wiper seal) when sliding outer leg onto inner leg.10) Then install spring guide seat flat side up, spring guide, spring, andupper spring seat.11) Next, thread jam nut loosely (by hand) down until there is 1/2”(13mm) of exposed thread to engage in top cap. Then installauxiliary spring.12) Then thread on cap on to jam nut. Tighten together the cap anddummy rod by holding the flat sides of dummy rod with 9mmwrench while rotating cap clockwise.13) Tip fork up and add 20cc’s of 30w motor oil into fork at this time(figure 10). Thread fork cap into outer fork leg and tighten fully.Stroke fork to check for smooth operation. Finish tightening cap with1” wrench.14) Reinstall fork legs into fork crowns as instructed in ForkInstallation section.figure 10inspectfigure 9REQUIRED TOOLSDESCRIPTION PART #UD180 SEAL BULLET 1.25" FT180-1UD180 SPIRAL RET. GUIDE FT180-2UD180 SHAFT SEAL BULLET FT180-3UD180 10MM CLAMP BLOCK FT180-4UD180 PISTON RING GUIDE FT180-5UD180 SPRL RET. INST/UPR FT180-6-2UD180 SPRL RET. INST/LWR FT180-6-37
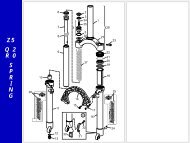
The UD180 Exploded ViewThe following illustration and parts table gives you the exploded view of the UD180DH fork. The parts table lists the part number for each individualpart in the fork and is the reference you will need if ordering replacement parts. See your local dealer to order the parts that you require.462552047481231 FORK CAP P23512 0-RING TOP CAP P30203 JAM NUT 97-41004 SPRING (AUX.) P32205 SPRING GUIDE (DOUBLE) P33006 SPRING, UD180 (STD.) 97-3507567 SPRING, UD180 (OPT) 97-35084549458 SPRING, UD180 (SOFT) 97-35099 SPRING GUIDE 97-355710 SPACER (5MM) AS REQUIRED 97-391411 SPACER (2MM) AS REQUIRED 97-391542012 SPRING GUIDE SEAT P332013 SPIRAL RETAINING RING P430044431067814 SPRING CARRIER P330515 NEGATIVE SPRING P320816 DUMMY ROD P202617 REBOUND BUMPER SPACER P332118 REBOUND BUMPER 97-33425019 WASHER, TOP NUT P410020 BOLT (M6) 97-852391342274140910111221 AXLE, UD180 97-367722 LEG ASSY. RH UD180 P151123 AXLE SPACER, UD180 97-3677-124 BOLT, AXLE CLAMP 97-920025 LEG ASSY, LH UD180 P151026 SPRING (FLOATING PISTON) 97-350027 0-RING P302128 PISTON (FLOATING) P201029 BOLT, DAMPER P40103830 HIGH SPEED SHIM (20X10X0.15) P200537511331 LOW SPEED SHIM (22X8X0.15) P200632 PISTON RING P300033 PISTON P20121434 CHECK VALVE (22X12X0.02) P200435 CHECK VALVE SPRING P2015521536 CHECK VALVE GUIDE P20145337 DAMPER ROD P202538 NEEDLE ASSY P2035365439 O-RING NEEDLE 97-14183534331640 SPACER, TOP OUT P333541 DAMPER SEAL 97-140942 SEAL HEAD P22003231302543 COMPRESSION BUMPER 97-334144 SPRING GUIDE, SINGLE P330145 SPRING SPACER P333046 FORK CAP P2350292247 UPPER CROWN P11512827262324571718192048 STAR NUT 1 1/8" 97-930149 CROWN ASSY UD180 P115050 OUTER LEG, UD 180 P156051 DU BEARING 97-98652 OIL SEAL P306053 C-CLIP P430154 WIPER SEAL 97-13502155 DUMMY ROD P2025-1856 UPPER SHAFT O-RING 97-141657 BOTTOMER SPACER P3322
dateservice performedMaintenance Logdateservice performedWARRANTY CLAIMSWhite Brothers forks are designed to enhance riding please and as such arewarranted to be free from defects in materials and workmanship for a period ofsix months from the date of purchase. On receipt of the forks by White Brothers,if they are found to be defective, White Brothers will determine replacement orrepair of the forks. This warranty is the sole and exclusive remedy. WhiteBrothers shall not be liable for any indirect, special or consequential damages.Warranty does not apply to any product that has been installed improperly oradjusted using methods not outlined in this manual. Warranty also does notcover forks that have been misused, or forks that are missing or have altered serialnumbers (located on the backside of the right fork stanchion). The forks arenot warranted against damage in the appearance of the fork or for modificationsnot outlined in this manual. This warranty does not cover breakage, bending, ordamage that may result from crashes, falls or abuse. Normal wear (i.e. seals,bushings, slider finish, etc.) and wear and damage caused by lack of propermaintenance is not included.A copy of the proof of purchase must be included with all warranties.Customers in the USA please contact your dealer for a Return AuthorizationNumber (RA#) before returning the forks. All forks returned for inspection mustbe sent freight paid to:WHITE BROTHERSA division of EKO Sport Inc.580 N. Westgate Dr.Grand Junction, CO 81505Phone (800) 999-8277 Fax (970) 241-3529http://www.whitebrotherscycling.com*Customers outside the USA please contact the dealer or distributor in your area