AEROTRAK Remote Optical Particle Counter Model 9303 Operation ...
AEROTRAK Remote Optical Particle Counter Model 9303 Operation ...
AEROTRAK Remote Optical Particle Counter Model 9303 Operation ...

You also want an ePaper? Increase the reach of your titles
YUMPU automatically turns print PDFs into web optimized ePapers that Google loves.
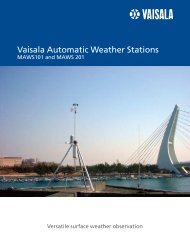
Handheld <strong>Particle</strong> <strong>Counter</strong>s<strong>AEROTRAK</strong> HandheldAirborne <strong>Particle</strong> <strong>Counter</strong><strong>Model</strong> <strong>9303</strong><strong>Operation</strong> ManualP/N 6002277, Revision BJanuary 2009
Handheld <strong>Particle</strong> <strong>Counter</strong>s<strong>AEROTRAK</strong> HandheldAirborne <strong>Particle</strong> <strong>Counter</strong><strong>Model</strong> <strong>9303</strong><strong>Operation</strong> ManualP/N 6002277, Revision BJanuary 2009SHIP TO/MAIL TO:TSI Incorporated500 Cardigan RoadShoreview, MN 55126-3996USAU.S.Technical Support:(800) 874-2811/(651) 490-2811Fax:(651) 490-3824E-mail address:aerotrak@tsi.comWebsite:http://www.tsi.comINTERNATIONALTechnical Support:(001 651) 490-2811Fax:(001 651) 490-3824
Manual HistoryThe following is a manual history of the <strong>AEROTRAK</strong> HandheldAirborne <strong>Particle</strong> <strong>Counter</strong>, <strong>Model</strong> <strong>9303</strong> <strong>Operation</strong> Manual (P/N6002277).RevisionDateA November 2008B January 2009ii
WarrantyPart Number 6002277 / Revision B / January 2009CopyrightAddressE-mail AddressLimitation of Warrantyand Liability(effective July 2000)Service PolicyTrademarks©TSI Incorporated / 2008-2009 / All rights reserved.TSI Incorporated / 500 Cardigan Road / Shoreview, MN 55126 / USAaerotrak@tsi.comSeller warrants the goods sold hereunder, under normal use and service asdescribed in the operator's manual, shall be free from defects in workmanship andmaterial for (12) months, or the length of time specified in the operator's manual,from the date of shipment to the customer. This warranty period is inclusive of anystatutory warranty. This limited warranty is subject to the following exclusions:a. Hot-wire or hot-film sensors used with research anemometers, and certain othercomponents when indicated in specifications, are warranted for 90 days fromthe date of shipment.b. Parts repaired or replaced as a result of repair services are warranted to be freefrom defects in workmanship and material, under normal use, for 90 days fromthe date of shipment.c. Seller does not provide any warranty on finished goods manufactured by othersor on any fuses, batteries or other consumable materials. Only the originalmanufacturer's warranty applies.d. Unless specifically authorized in a separate writing by Seller, Seller makes nowarranty with respect to, and shall have no liability in connection with, goodswhich are incorporated into other products or equipment, or which are modifiedby any person other than Seller.The foregoing is IN LIEU OF all other warranties and is subject to the LIMITATIONSstated herein. NO OTHER EXPRESS OR IMPLIED WARRANTY OF FITNESS FORPARTICULAR PURPOSE OR MERCHANTABILITY IS MADE.TO THE EXTENT PERMITTED BY LAW, THE EXCLUSIVE REMEDY OF THE USEROR BUYER, AND THE LIMIT OF SELLER'S LIABILITY FOR ANY AND ALL LOSSES,INJURIES, OR DAMAGES CONCERNING THE GOODS (INCLUDING CLAIMS BASEDON CONTRACT, NEGLIGENCE, TORT, STRICT LIABILITY OR OTHERWISE) SHALLBE THE RETURN OF GOODS TO SELLER AND THE REFUND OF THE PURCHASEPRICE, OR, AT THE OPTION OF SELLER, THE REPAIR OR REPLACEMENT OF THEGOODS. IN NO EVENT SHALL SELLER BE LIABLE FOR ANY SPECIAL,CONSEQUENTIAL OR INCIDENTAL DAMAGES. SELLER SHALL NOT BERESPONSIBLE FOR INSTALLATION, DISMANTLING OR REINSTALLATION COSTSOR CHARGES. No Action, regardless of form, may be brought against Seller morethan 12 months after a cause of action has accrued. The goods returned underwarranty to Seller's factory shall be at Buyer's risk of loss, and will be returned, if atall, at Seller's risk of loss.Buyer and all users are deemed to have accepted this LIMITATION OF WARRANTYAND LIABILITY, which contains the complete and exclusive limited warranty ofSeller. This LIMITATION OF WARRANTY AND LIABILITY may not be amended,modified or its terms waived, except by writing signed by an Officer of Seller.Knowing that inoperative or defective instruments are as detrimental to TSI as theyare to our customers, our service policy is designed to give prompt attention to anyproblems. If any malfunction is discovered, please contact your nearest sales officeor representative, or call TSI’s Customer Service department at 1-800-874-2811(USA) or +001 (651) 490-2811 (International).<strong>AEROTRAK</strong> and TRAKPRO are trademarks of TSI Incorporated. TSI and the TSI logo areregistered trademarks of TSI Incorporated. Microsoft and Excel are registeredtrademarks of Microsoft Corporation.iii
ContentsManual History ...................................................................... iiWarranty............................................................................... iiiSafety Information ................................................................viiLaser Safety ........................................................................... viiLabels ................................................................................... viiiDescription of Caution/Warning Symbols.............................. viiiCaution .............................................................................. viiiWarning ............................................................................... ixCaution or Warning Symbols................................................ ixGetting Help............................................................................ ixCHAPTER 1 Introduction and Unpacking..............................1-1Unpacking the <strong>AEROTRAK</strong> Handheld Airborne <strong>Particle</strong><strong>Counter</strong>..............................................................................1-1Optional Accessories ..........................................................1-3CHAPTER 2 Getting Started .................................................2-1Installing the Isokinetic Inlet .................................................2-1Providing Power.....................................................................2-2Installing the Battery..........................................................2-2To Use AC Power ................................................................2-3Quick Start ...........................................................................2-4CHAPTER 3 <strong>Operation</strong>..........................................................3-1Performing a Zero Check .......................................................3-2To Perform a Zero Check ....................................................3-3Warm-up Time ......................................................................3-4Main Menu and Basic <strong>Operation</strong> ...........................................3-4Main Menu.........................................................................3-4Basic <strong>Operation</strong>..................................................................3-5Settings Menu .......................................................................3-7Sample Menu ........................................................................3-8Buffer Menu ........................................................................3-10Utility Menu ........................................................................3-11CHAPTER 4 Data Handling ...................................................4-1USB Computer Communication ............................................4-1Installing Software ................................................................4-1Downloading Data.................................................................4-2Download Data...................................................................4-2Delete Data ........................................................................4-5v
Safety InformationThis section gives instructions to promote safe and properhandling of the <strong>AEROTRAK</strong> Handheld Airborne <strong>Particle</strong> <strong>Counter</strong>s.IMPORTANTThere are no user-serviceable parts inside the instrument. Refer all repairand maintenance to a qualified factory-authorized technician. Allmaintenance and repair information in this manual is included for use bya qualified factory-authorized technician.Laser Safety• The <strong>Model</strong> <strong>9303</strong> Handheld Airborne <strong>Particle</strong> <strong>Counter</strong> is aClass I laser- based instrument.• During normal operation, you will not be exposed to laserradiation.• Precaution should be taken to avoid exposure to hazardousradiation in the form of intense, focused, invisible light.• Exposure to this light may cause blindness.Take these precautions:• DO NOT remove any parts from the particle counter unlessyou are specifically told to do so in this manual.• DO NOT remove the housing or covers. There are no userserviceablecomponents inside the housing.WARNINGThe use of controls, adjustments, or procedures other than thosespecified in this manual may result in exposure to hazardous opticalradiation.vii
LabelsAdvisory labels and identification labels are attached to theoutside of the particle counter housing and to the optics housingon the inside of the instrument.1. Serial Number Label (backpanel)2. Laser Radiation Label(internal)3. European symbol for nondisposableitem. Itemmust be recycled.DANGER!INVISIBLE LASER RADIATIONWHEN OPEN. AVOID DIRECTEXPOSURE TO BEAMWARNING: NO USER SERVICABLEPARTS INSIDE. REFER SERVICINGTO QUALIFIED PERSONNELDescription of Caution/Warning SymbolsAppropriate caution/warning statements are used throughout themanual and on the instrument that require you to take cautionarymeasures when working with the instrument.!CautionCautionFailure to follow the procedures prescribed in this manual might result inirreparable equipment damage. Important information about the operationand maintenance of this instrument is included in this manual.viii<strong>AEROTRAK</strong> Handheld Airborne <strong>Particle</strong> <strong>Counter</strong>
!WarningWARNINGWarning means that unsafe use of the instrument could result in seriousinjury to you or cause damage to the instrument. Follow the proceduresprescribed.Caution or Warning SymbolsThe following symbols may accompany cautions and warnings toindicate the nature and consequences of hazards:Warns that uninsulated voltage within the instrument mayhave sufficient magnitude to cause electric shock.Therefore, it is dangerous to make contact with any partinside the instrument.Warns that the instrument contains a laser and thatimportant information about its safe operation andmaintenance is included in the manual.Warns that the instrument is susceptible to electro-staticdissipation (ESD) and ESD protection procedures should befollowed to avoid damage.Indicates the connector is connected to earth ground andcabinet ground.Getting HelpTo obtain assistance with this product or to submit suggestions,please contact Customer Service:TSI Incorporated500 Cardigan RoadShoreview, MN 55126 U.S.A.Fax: (651) 490-3824 (USA)Fax: 001 651 490 3824 (International)Telephone: 1-800-874-2811 (USA) or (651) 490-2811International: 001 651 490-2811E-mail Address: aerotrak@tsi.comWeb site: www.tsi.comSafety Informationix
CHAPTER 1Introduction andUnpackingThe <strong>AEROTRAK</strong> <strong>Model</strong> <strong>9303</strong> Handheld Airborne <strong>Particle</strong> <strong>Counter</strong>(particle counter) is a lightweight, handheld particle counter witha backlit LCD display. It operates on the included lithium-ionbattery or AC power.This model has a 0.1 CFM (2.83 L/min) flow rate and counts inuser-adjustable bin sizes of 0.3, 0.5/1.0/2.0/2.5, and 5 microns(center channel is selectable). Up to 1500 data sets can be storedand downloaded for analysis and reporting using the TRAKPROLite utility included with the device.Unpacking the AEROT RAK HandheldAirborne <strong>Particle</strong> <strong>Counter</strong>Carefully unpack the <strong>AEROTRAK</strong> Airborne <strong>Particle</strong> <strong>Counter</strong> fromthe shipping container and verify that all the items shown in thephotos below and listed in the following tables are present.Contact TSI immediately if items are missing or broken.<strong>Model</strong> <strong>9303</strong> <strong>AEROTRAK</strong> Airborne <strong>Particle</strong> <strong>Counter</strong> Parts ListQty. Item Description Part/<strong>Model</strong> Reference Picture1 <strong>AEROTRAK</strong>Airborne <strong>Particle</strong><strong>Counter</strong><strong>9303</strong>-011-1
Qty. Item Description Part/<strong>Model</strong> Reference Picture1 AC power adapterand countryspecificplugs7000211 Isokinetic inlet 7000031 Battery Pack 7000191 Computer cable,USB A to mini-B7000361 HEPA zero filter 7000051 TRAKPRO Litedata downloadutility CD (includesmanual)70013841 <strong>Operation</strong> andService Manual1 CalibrationCertificate6002277 (installed on CD)N/A1-2 <strong>AEROTRAK</strong> Handheld Airborne <strong>Particle</strong> <strong>Counter</strong>
Qty. Item Description Part/<strong>Model</strong> Reference Picture1 Quick Start Guide 6002238Optional AccessoriesThe following photo and table list optional accessories. If youordered optional accessories, make certain they have beenreceived and are in working order.Item Description Part/<strong>Model</strong> Ref.Stainless Steel Isokinetic 700004inletStainless Steel Isokineticprobe (used with tubing)7000020.1 cfm Barb Inlet Fitting 700020Tubing, Superthane 1/8-inchID x ¼-inch OD, Clear 100 FtBox700009Heavy Duty Carrying Case 700024 N/AIntroduction and Unpacking 1-3
CHAPTER 2Getting StartedThis chapter provides information to help you use the <strong>Model</strong> <strong>9303</strong>including:• Installing the Isokinetic Inlet• Providing Power• Quick StartInstalling the Isokinetic InletThe Isokinetic inlet smoothly accelerates air into the inlet of theinstrument. To install, simply screw the probe directly onto thethreaded inlet nozzle.Installing an Isokinetic Inlet2-1
Providing PowerThe <strong>Model</strong> <strong>9303</strong> may be powered using its internal rechargeablelithium-ion battery or through an AC power cord.Notes:• When using AC power, the battery is charging when the redLED next to the power connector is on.• Removing/changing the lithium-ion battery or disconnectingAC power does not cause the loss of data.• You should fully charge the battery before use.!!WARNINGThe battery supplied by TSI (700019) has built in protection againstexplosion and fire hazard. Do not use a substitute.WARNINGDo not use non-rechargeable batteries in this instrument. Fire,explosions, or other hazards may result.Installing the Battery1. The battery is shipped separately and has to be installedbefore use.2. Remove the battery cover on the back side of the handle with asmall, flat-blade screwdriver3. Connect the battery to the socket as shown below.4. Insert the battery with the connector at the top and replacethe battery cover. Make sure all wires are inside and notpinched in the cover. Do not over-tighten the screw.5. Fully charge the battery before use.2-2 <strong>AEROTRAK</strong> Handheld Airborne <strong>Particle</strong> <strong>Counter</strong>
To Use AC Power1. Remove the AC transformer parts from their package andidentify the appropriate plug for your needs. Plugs areavailable for all common countries.2. Remove the insert from transformer using the slide lock andtilt the insert out.3. Tilt the appropriate plug into the transformer receptacle.4. Make sure it locks into place.Getting Started 2-3
5. Plug the DC end of the transformer cord into the counter.6. Plug the AC end of the transformer cord into an AC outlet.7. The Power LED lights when the battery is charging. When thePower LED is off, the battery is fully charged.8. When the battery is charged, unplug the power supply.Quick StartThe best way to quickly get started is to refer to the printed“Quick Start Guide” included with your instrument. It will helpyou to quickly set up the instrument and begin sampling. Refer tothe sections below for more detailed information on configuringand running the instrument.2-4 <strong>AEROTRAK</strong> Handheld Airborne <strong>Particle</strong> <strong>Counter</strong>
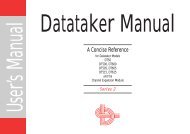
CHAPTER 3<strong>Operation</strong>The <strong>Model</strong> <strong>9303</strong> is controlled using the integral keys and thebacklit display.IsokineticInletBacklitDisplayKey PadPowerLEDDCAdapterSocketUSB PortTo turn on the instrument, press the On/Off key. A splash screenwill appear for three seconds, displaying the TSI logo, modelnumber, serial number, and firmware version number (see below).Left SoftKeyRight SoftKeyReturntoPreviousScreenUpOn/OffEnterDown3-1
<strong>Particle</strong> <strong>Counter</strong>MODEL: <strong>9303</strong>-01SERIAL: <strong>9303</strong>0837003REV: 2.10Splash ScreenThe instrument is ready for operation when the default screen(shown below) appears.0.3µm 01.0µm 05.0µm 0Loc # 001 0002/1500StoppedSTime 01:00 HTime 00:05RUNMENUDefault ScreenNote: To turn off the instrument, press and hold the On/Off keyfor 5 seconds. The instrument turns off.Performing a Zero CheckA zero check should be performed periodically. It should also beperformed before conducting any important testing orcertification.3-2 <strong>AEROTRAK</strong> Handheld Airborne <strong>Particle</strong> <strong>Counter</strong>
To Perform a Zero Check1. Turn on the instrument and wait until the default screenappears.2. Unscrew the Isokinetic probe if attached. The zero checkcannot be performed when the isokinetic probe is attached tothe instrument.3. Attach the zero filter to the inlet nozzle located on the top ofthe instrument by screwing the assembly onto the inlet of theinstrument.4. Refer to the section Main Menu and Basic <strong>Operation</strong> below toconfigure the instrument.5. Press the Run key and allow the instrument to purge for three5-minute samples with zero seconds hold time. If you have ahold time set with a filter, the pump stopping and starting canpush particles back into the optics causing counts.6. In accordance with JIS standards, there should be no morethan 1 particle counted at any size in the middle 5-minutesample.7. Remove the zero filter and put the inlet back on; theinstrument is now ready for operation.<strong>Operation</strong> 3-3
Note: If the instrument does not go to zero (1 particle isallowed), refer to Chapter 6, Troubleshooting, foradditional information.Warm-up TimeAn initial warm-up period of 15 minutes is recommended beforesampling with the <strong>Model</strong> <strong>9303</strong>. The warm-up period allows timefor the optics to reach a steady-state temperature. This will resultin more repeatable results. Neglecting the warm-up time mayresult in an overestimation of particle size (approximately 10percent). Neglecting the warm-up time will not have a significanteffect on particle concentration; therefore, a zero count can still beperformed without waiting for the warm-up period.Main Menu and Basic <strong>Operation</strong>Press Menu on the Default Screen to display the Main Menu.Main MenuMAIN MENUSettingsSample MenuBuffer MenuUtility MenuMain Menu3-4 <strong>AEROTRAK</strong> Handheld Airborne <strong>Particle</strong> <strong>Counter</strong>
From the Main Menu you can select other menus:MenuSettingsSampleDescriptionSet language, time and date, time and day format, andscreen settings.Set sample mode, cycle mode, sample time, hold time,cycle count, sample units, and channel 2 size.Buffer View the number of records stored in the <strong>Model</strong> <strong>9303</strong>,display buffer records, and clear the buffer.UtilityAdjust the pump speed, turn data logging on and off, andselect the sampling location.Each of these menus is described in the remainder of thischapter.Basic <strong>Operation</strong>This section explains the basic operation for using the keypad andstarting sampling.Using the KeypadLeft SoftKeyRight SoftKeyReturntoPreviousScreenUpOn/OffEnterDownUse the up and down keys to highlight a menu or a menu optionthen:• If left and right arrows (< >) appear at the bottom of thescreen, use the left and right soft keys to select the option youwant. Generally, there will be only 2 or 3 options. Soft keyschange function depending on the display above them. Forinstance, in the picture above, the left soft key is labeled RUNand the right soft key is labeled MENU. The center soft key isnot currently used.<strong>Operation</strong> 3-5
• If no arrows appear at the bottom, press the Enter key tobring up a secondary window from which you can make aselection or modify a setting.Use the up and down keys to perform operations such asincreasing a value. Use the right soft key and left soft keys tomove right and left.The ESC key always brings you back to the previous screen.Start SamplingTo start sampling, press the left soft key (below “RUN”). The<strong>Model</strong> <strong>9303</strong> begins collecting samples immediately if set tomanual mode or according to the parameters you have set forautomatic mode.0.3µm 190311.0µm 81865.0µm 4671Loc# 001 0026/1500Stime 00:45SamplingSTOPTo stop sampling at any time, press the STOP soft key.0.3µm 358001.0µm 141545.0µm 8237Loc# 001 0026/1500StoppedStime 01:00 HTime 00:05RUNMENU3-6 <strong>AEROTRAK</strong> Handheld Airborne <strong>Particle</strong> <strong>Counter</strong>
Settings MenuThe Settings Menu lets you set language (supported in future),current time and date, select the time and day format, and setcertain screen settings.SETTINGS MENULanguage EnglishSet Time 2:41:55 PMSet Date 09/12/08Time Format 12 hrDate Format MMDDYYBacklight On< >Settings MenuThe following table describes the options of this menu and theparameters you can set.<strong>Operation</strong> 3-7
Option Description ParametersLanguageSet TimeSet DateTime FormatDate FormatsBacklightUse < and > to set thelanguage in whichinformation is displayed.Press the Enter key to go toa secondary screen whereyou can set the current time.Press the Enter key to go toa secondary screen whereyou can set the current date.Use < and > to set the timeformat in which time isdisplayed (and saved in thesample records).Use < and > to set the dateformat in which the date isdisplayed (and saved in thesample records).Use < and > to set whetherthe backlight on the displayis on or off.Note that battery life isapproximately 15% less withthe backlight enabled.English(other languages may beoffered)Hours, minutes, secondsDay, month, year12 hr; 24 hrDD/MM/YY; MM/DD/YYOn – backlight is always onOff – backlight is always offSample MenuThe Sample Menu sets sample mode, cycle mode, sample time,hold time, cycle count, sample units, and channel 2 size.SAMPLE MENUSample Mode COUNTSCycle Mode AUTOSample Time 01:00Hold Time 00:30Cycle Count 010Sample Units LITERChan 2 Size 0.5µm< >Sample Menu3-8 <strong>AEROTRAK</strong> Handheld Airborne <strong>Particle</strong> <strong>Counter</strong>
The following table describes the options of this menu and theparameters you can set.Option Description ParametersSample Mode Use < and > to set the Concentration (see notesampling mode.below); countsCycle ModeSample TimeHold TimeCycle CountSample UnitsCannel 2 SizeUse < and > to set thesampling mode.Press the Enter key to go toa secondary screen whereyou can set the sampletime.Press the Enter key to go toa secondary screen whereyou can set the timebetween samples.Press the Enter key to go toa secondary screen whereyou can set the number ofsamples to take.Use < and > to set thesampling units.Use < and > to set the binsize for channel 2. (This isthe only channel that can beset to more than one value.)Manual – the counter will startwhen the RUN soft key ispressed and stop only when theSTOP soft key is pressed.Auto – the counter will startwhen the RUN soft key ispressed and turn on and offautomatically to follow thesample time, hold time andcycle count parameters below.Minutes and seconds up to99:59 (see note below)Minutes and seconds up to99:591-999Liter; cubic feet0.5, 1.0, 2.0, 2.5 µmNoteWhen concentration sample mode is used with short sample times(less than 30 seconds), the concentration may not be accurate due tothe poor counting and timing statistics associated with a short sample.<strong>Operation</strong> 3-9
Buffer MenuThe Buffer Menu lets you view the number of records stored in the<strong>Model</strong> <strong>9303</strong>, display buffer records, and clear the buffer.BUFFER MENU# of Records 0035/1500Show Buffer RecordClear BufferBuffer MenuThe following table describes the options of this menu and theparameters you can set.Option Description Parameters# of Records Shows the number or sample records Nonestored in the <strong>Model</strong> <strong>9303</strong>.Show BufferRecordClear BufferPress the Enter key to go to asecondary screen where you can selectthe record (by sample number) of therecord you want to view.Press the Enter key to clear all samplesin the buffer. You will be asked toconfirm your request.Any recordnumber (up to1500)None3-10 <strong>AEROTRAK</strong> Handheld Airborne <strong>Particle</strong> <strong>Counter</strong>
BUFFER RECORDRecord#: 0313Date: 12/27/08Time: 05:50:450.3µm 0005664730.5µm 0005345715.0µm 000072056Location: 111Sample Time: 01:00Hold Time: 00:00< >Example of a Buffer RecordUse the < and > softkeys to scroll through the records, Enter to goback one screen and ESC to go back to the Buffer Menu.NoteIf the buffer is filled to its capacity of 1500 records, the instrument willcontinue to count and save records but the next record after 1500 willbe saved in record number 1, then 2, etc. This way the most recent1500 records are always preserved.Utility MenuThe Utility Menu lets you adjust the pump speed, turn datalogging on and off, and select the sampling location.UTILITY MENUPump Speed 099Data Logging ONLocation 120Utility MenuThe following table describes the options of this menu and theparameters you can set.<strong>Operation</strong> 3-11
!CautionIf you turn Data Logging off, no data will be saved to the buffer.Option Description ParametersPump Speed Press the Enter key to go to a 0–255secondary screen where you canincrease or decrease the pumpspeed. (The pump may slow downwith age, or it may be necessary toincrease the speed if there are flowrestrictions – such as long tubing).Use a flowmeter to check the flowwhen taking critical measurements,and adjust the pump speed asnecessary.Data Logging Use < and > to turn data logging on ON; OFFand off.LocationsPress the Enter key to go to asecondary screen where you canselect a location number.0–2503-12 <strong>AEROTRAK</strong> Handheld Airborne <strong>Particle</strong> <strong>Counter</strong>
CHAPTER 4Data HandlingUSB Computer CommunicationMini USB PortThe <strong>Model</strong> <strong>9303</strong> is equipped with a USB-compatible cable foruploading and downloading information to a PC. The cable plugsinto the left side of the instrument as shown above.Installing SoftwareThe TRAKPRO Lite Data Transfer utility comes on a CD that loadssoftware and communications drivers for the particle counter.Installation consists of two parts:• Installation of TRAKPRO Lite software.Run “setup.exe” from the provided CD and follow on-screeninstructions.• Installation of FTDI Virtual Serial Port driver. This installationis executed transparently during the setup process and doesnot require user input. Once installation is finished drivers areready for use.Restart computer for changes to take effect. When <strong>Model</strong> <strong>9303</strong> isconnected and powered on, system will automatically locateinstalled drivers.4-1
Downloading DataTo transfer data from an instrument to a computer via the USBconnection for further analysis and report generation.Download Data• Make sure that <strong>AEROTRAK</strong> particle counter is attached to thecomputer and turned on.• Start the application. If the <strong>AEROTRAK</strong> particle counter is notconnected or discovered by the application, the followingmessage appears:• Make sure that the <strong>AEROTRAK</strong> particle counter is:1. Connected.2. Turned on (power with AC adapter if battery is low).3. In the main screen.4. No samples are running and pump is off.• Restart the application.When communication with <strong>AEROTRAK</strong> particle counter has beenestablished, the following screen appears:4-2 <strong>AEROTRAK</strong> Handheld Airborne <strong>Particle</strong> <strong>Counter</strong>
Once data is downloaded the main application screen will appear:1. There are two options for downloading data:• Download only user selected records:Hold down the CTRL key and use the mouse to click onthe records you want to retrieve. When you have selectedthe records, press the Get Selected button to retrieve onlythe selected records from the device.• Download all records:Press the Download All button to retrieve all the recordsfrom the device.2. After you press either the Get Selected or Download Allbuttons, the following dialog appears to allow you to selectthe folder where data will be saved:Troubleshooting 4-3
• To cancel the data transfer, select Cancel.• To accept the data transfer, enter file name in which youwant data stored and select Save.• Data is stored in a .CSV file that can be opened by mostspreadsheet programs such as Microsoft ® Excel ®spreadsheet software.Data record file opened in Microsoft Excel4-4 <strong>AEROTRAK</strong> Handheld Airborne <strong>Particle</strong> <strong>Counter</strong>
Delete DataIn order to delete data from the device click Delete Recordsbutton. The following warning will appear:If Yes is selected, TRAKPRO Lite software will erase data from thedevice and also from application memory.!WARNINGDeleting data is an irreversible operation. Download and save data beforedeleting in order to have a copy for future use.Troubleshooting 4-5
CHAPTER 5MaintenanceNoteThere are no user-serviceable parts inside this instrument. Opening theinstrument case may void the warranty. TSI recommends that you returnthe <strong>AEROTRAK</strong> Airborne <strong>Particle</strong> <strong>Counter</strong> to the factory for any requiredmaintenance or service not described in this manual.Maintenance ScheduleTSI recommends annual factory cleaning and calibration for the<strong>AEROTRAK</strong> Airborne <strong>Particle</strong> <strong>Counter</strong>. See Chapter 7, "ContactingCustomer Service" for service/calibration.Recommended Field Maintenance ScheduleItemZero checkFactory cleaning and calibrationCleaning the instrument enclosureFrequencyDaily (or as defined by application).Annually.As neededZero CheckThe zero check ensures that the instrument is properly assembledand free from leaks, residual particles and electronic noise. Pleasesee Chapter 3, “<strong>Operation</strong>” for detailed instructions on performingthe zero check.Cleaning the Instrument EnclosureTo clean the enclosure, dampen a lint-free cloth and gently wipethe surface until surface contamination is removed.5-1
CHAPTER 6TroubleshootingSymptom Possible Cause Corrective ActionCounts are too lowInstrument does notturn onInstrument is beingoperated outsidetemperature or relativehumidity specificationsInternal parts havebeen damagedbecause instrumentwas stored at atemperature greaterthan 122 °F (50 °C) orshipped with batteryinstalled and turned oncausing excessive heatInstrument hascontamination on theoptics due tocondensation orexcessive loadingLaser or pump isdamagedUnit is due forcalibrationOn/off switch is notbeing pressed properlyBattery is deadAC cord is not pluggedinto unitOperate instrumentwithin specificationsReturn to factory forserviceReturn to factory forserviceReturn to factory forserviceReturn to factory forservicePress and hold on/offswitch for one secondRecharge battery orconnect to AC powerConnect AC cord6-1
Symptom Possible Cause Corrective ActionInstrument does notmeet zero countspecification (
CHAPTER 7Contacting CustomerServiceThis chapter gives directions for contacting people at TSIIncorporated for technical information and directions for returningthe <strong>AEROTRAK</strong> Handheld Airborne <strong>Particle</strong> <strong>Counter</strong> for service.Technical Contacts• If you have any difficulty setting up or operating the<strong>AEROTRAK</strong> <strong>Model</strong> <strong>9303</strong>, or if you have technical orapplication questions about this system, contact anapplications engineer at TSI Incorporated, 1-800-874-2811(USA) or (651) 490-2811 or e-mail technical.service@tsi.com.• If the <strong>AEROTRAK</strong> <strong>Model</strong> <strong>9303</strong> does not operate properly, or ifyou are returning the instrument for service, visit our websiteat http://rma.tsi.com, or contact TSI Customer Service at 1-800-874-2811 (USA) or (651) 490-2811.International ContactsServiceTSI Instruments Ltd.Stirling RoadCressex Business ParkHigh Wycombe, BucksHP12 3RTUNITED KINGDOMTelephone: +44 (0) 149 4 459200Fax: +44 (0) 149 4 459700E-mail: tsiuk@tsi.comWeb: www.tsiinc.co.uk7-1
Technical SupportTSI GmbHNeuköllner Strasse 452068 AachenGERMANYTelephone: +49 241-52303-0Fax: +49 241-52303-49E-mail: tsigmbh@tsi.comWeb: www.tsiinc.deTSI Instruments Ltd.Stirling RoadCressex Business ParkHigh Wycombe, BucksHP12 3RTUNITED KINGDOMTelephone: +44 (0) 149 4 459200Fax: +44 (0) 149 4 459700E-mail: tsiuk@tsi.comWeb: www.tsiinc.co.ukTSI France Inc.Europarc Bât. D26, rue John Maynard keynesTechnopôle de Château-Gombert13013 MarseilleFRANCETelephone: +33 (0)4 91 952 190Fax: +33 (0)4 91 952 191E-mail: tsifrance@tsi.comWeb: www.tsiinc.fr7-2 <strong>AEROTRAK</strong> Handheld Airborne <strong>Particle</strong> <strong>Counter</strong>
Returning the AEROT RAK HandheldAirborne <strong>Particle</strong> <strong>Counter</strong> for ServiceVisit our website at http://rma.tsi.com or call TSI at 1-800-874-2811 (USA) or (651) 490-2811 for specific return instructions.Customer Service will need this information when you call:• The instrument model number• The instrument serial number• A purchase order number (unless under warranty)• A billing address• A shipping addressUse the original packing material to return the instrument to TSI.If you no longer have the original packing material, seal off anyports to prevent debris from entering the instrument and ensurethat the display and the connectors on the instrument front andback panels are protected.Troubleshooting 4-3
APPENDIX ASpecificationsAll specifications meet or exceed JIS B 9921. They are subject tochange without notice.Size Range 0.3–10 µmChannel Sizes 0.3 µm and 5.0 µm fixed; 0.5, 1.0, 2.0, or 2.5 µmselectable middle channel.Counting Efficiency 50% at 0.3 µm; 100% for particles > 0.45 µm (perJIS)Concentration Limits 2,000,000 particles/ft 3 at 5% coincidence lossLight SourceLaser diodeZero Count Level
Storage ConditionsIncluded AccessoriesOptional Accessories32° to 122°F (0° to 50°C) temperature and up to98% non-condensing relative humidityOperating manual on CD, power supply, battery,isokinetic inlet, purge filter, USB cable andTRAKPRO Lite data download softwareIsokinetic probe, sample tubing and carrying caseA-2 <strong>AEROTRAK</strong> Handheld Airborne <strong>Particle</strong> <strong>Counter</strong>
TSI Incorporated – 500 Cardigan Road, Shoreview, MN 55126 U.S.AUSA Tel: +1 800 874 2811 E-mail: aerotrak@tsi.com Website: www.tsi.comUK Tel: +44 149 4 459200 E-mail: tsiuk@tsi.com Website: www.tsiinc.co.ukFrance Tel: +33 491 95 21 90 E-mail: tsifrance@tsi.com Website: www.tsiinc.frGermany Tel: +49 241 523030 E-mail: tsigmbh@tsi.com Website: www.tsiinc.deIndia Tel: +91 80 41132470 E-mail: tsi-india@tsi.comChina Tel: +86 10 8260 1595 E-mail: tsibeijing@tsi.comContact your local TSI Distributor or visit our website www.tsi.com for more detailed specifications.P/N 6002277 Rev B Copyright © 2009 by TSI Incorporated Printed in U.S.A.