Smart Programmer - UK
Smart Programmer - UK
Smart Programmer - UK
- No tags were found...

You also want an ePaper? Increase the reach of your titles
YUMPU automatically turns print PDFs into web optimized ePapers that Google loves.
SEKOSMART- <strong>Programmer</strong>- Laundry systemCONTENTSPage1.0 THE CONTENTS OF THE PACKAGE 32.0 PRESENTATION 33.0 INITIALIZE THE PROGRAMMER INI 43.1 Reset RST 43.2 Setting the language LAN 43.3 Setting the autowash function AUW 53.3.1 Autowash-1 53.3.2 Autowash-2 63.3.3 Autowash-3 63.3.4 Autowash-4 73.4 Setting the work area WAR 74.0 ENTERING THE PARAMETERS PAR 84.1 Setting the flushing function FLU 84.2 Drainage solenoid valve DRA 84.3 Input signal filter FLT 94.4 Automation menu AUT 104.4.1 Dosage Automation DOS 104.4.2 Destainer Automation DES 114.4.3 Softener Automation SOF 115.0 PROGRAMMING 125.1 Programming instructions 125.2 Programming editor PRG 155.2.1 Scrolling through the lines 165.2.2 Entering a programming line 165.2.3 Changing the variables of an instruction 165.2.4 Eliminating a programming line 165.2.5 Entering or replacing a new instruction 166.0 PROGRAMMING MEMORY CARD COM 176.1 Sending data to the Memory Card Tx 176.2 Receiving the data in the programmer Rx 186.3 PaSsWord PSW 186.4 Consumption statistics STA 196.4.1 INItialize the statistics function INI 196.4.2 Viewing the statistics VIS 196.5 Trouble-shooting 207.0 EXAMPLES OF PROGRAMMING 217.1 Implementation of signal/formula 217.2 Frequently Asked Questions 228.0 ON/OFF PROGRAMMER 239.0 CONNECTING THE PROGRAMMER TO A PC OR TO THE CONSOLE 23<strong>Smart</strong> programmer Version 3.0 Code n° 0000136346 2
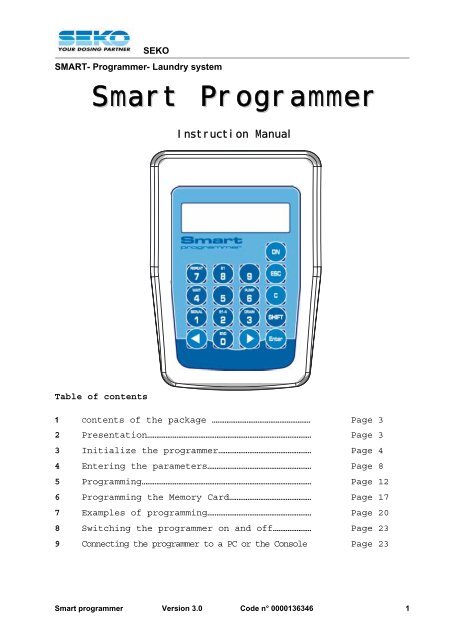
1Contents of thepackage2Presentation3INItialize theprogrammer4Entering theparameters5Programming6Programming theMemory Card7Examples ofprogramming8Switching theprogrammer onand off9Connecting theprogrammer to aPC or to theConsoleSEKOSMART- <strong>Programmer</strong>- Laundry system1.0 THE CONTENTS OF THE PACAGE• SMART programmer• 2 metres of cable for connecting the programmer to the control console• Instruction manual• <strong>Smart</strong>ware software (optional)• 9-pin serial cable (M-F), 1.8 metres long for connecting the programmer to a PC(optional)• 1 Program Memory Card• 2 Language Memory Card2.0 PRESENTATION• The SMART programmer can be used to store the parameters of two SMART systems,with their 20 washing programs each.• A single programmer can be used to program several SMART systems, since once thedata have been created or altered, they are transmitted to the SMART systems andstored in the Memory Cards.• Thanks to the Password, it is certain that nobody else will be able to access theprograms.• It is possible to obtain statistics concerning consumption, thanks to the counters thatmonitor the metering.• Thanks to the calibration function, it is possible to carry out the metering in grams, thusavoiding troublesome calculations.• The maximum number of programs that can be set is 20, each of which has 25 lines atdisposal.Power requirements:The programmer can be powered in three different ways;• By means of the 6x6 cable included in the supply, of the telephone cable type, to beconnected to the control console;• By means of a 9V battery (included)• By means of an external power-supply unit (OPTIONAL) .Specifications:- input: 230 VAC 50 Hz- output: 9 W- voltage supplied: 12 VDC- type of connector: see the diagram of the connector on the programmer.The keypad has 17 keys:[ON] for switching on (the programmer switches off automatically after 3minutes if it is left inactive)[0] to 9] for numerical entries[Enter]for selecting or confirming the various operations[ESC]for going back through the menus and for switching off the programmer.[SHIFT]this can be used to access the second function of a given key[3] and [4] for moving the cursor (the position of the cursor can be recognised bymeans of the flashing character)[C]This key is not active.When the programmer is switched on, the main menu appears on the display:SMART 1.0 (<strong>UK</strong>)<strong>Programmer</strong> languagePRG PAR COM INI<strong>Smart</strong> programmer Version 3.0 Code n° 0000136346 3
SEKOSMART- <strong>Programmer</strong>- Laundry system1Contents of thepackage2Presentation3INItialize theprogrammer• Reset• Setting thelanguage• Setting theAuto-washmode• Setting the workarea4Entering theparameters5Programming6Programming theMemory Card7Examples ofprogramming3.0 INITIALIZE THE PROGRAMMERBefore proceeding with the programming, select the INItialize Menu so as to be able to:- delete the work area that was set (RST = reset)- select the language (LAN = Language)- set the programming to AUTOWASH (AUW = autowash) instead of MANUAL- select a work area (WAR = work area)• From the main menu, select ”INI” and press the [Enter] key to confirm; the following messagewill appear on the display:INItializeRST LAN AUW WAR• Use the [3] and [4] keys to scroll to the menu you require.3.1 Reset (RST)• From the INItialize menu, select ”RST” or press [1]; then the following message will appear on thedisplay:ReSeT (n)No Yes The number between brackets indicates the work area that is active.• To initialise the programmer and delete the work area that was set, select “Yes” or press [2].• To proceed without initialising it, press ESC or select “No” or press [1].3.2 Setting the language (LAN) To choose a language, it is necessary to insert the Language Memory Card into theprogrammer.The language can be chosen only from among those stored in the Language Memory Card.• From the INItialize menu, select ”LAN” or press [2]; the following message may appear on thedisplay:Wrong Memory8Switching theprogrammer onand off9Connecting theprogrammer to aPC or to theConsole Make sure that the Memory Card that has been inserted is the Language Memory Card.• Otherwise, the following message will appear on the display of the programmer:LANguageIT <strong>UK</strong> SP FR The languages shown depend on those stored in the Language Memory Card.• To set the required language, select:IT ITALIAN<strong>UK</strong> ENGLISHSP SPANISHFR FRENCHDE GERMAN.<strong>Smart</strong> programmer Version 3.0 Code n° 0000136346 4
SEKOSMART- <strong>Programmer</strong>- Laundry system1Contents of thepackage2Presentation3INItialize theprogrammer• Reset• Setting thelanguage• Setting theAuto-washmode• Setting the workarea4Entering theparameters5Programming6Programming theMemory Card7Examples ofprogramming8Switching theprogrammer onand off9Connecting theprogrammer to aPC or to theConsole3.3 Setting the Autowash modeThe Autowash or Autostart setting is a mode that enables the SMART system to recogniseautomatically the metering program to be carried out, depending on the washing cycle that has beenselected by the user on the washing machine. This working mode is suitable for laundry machines withprogramming card or laundry machines with microprocessor. All both the applications must sendidentifying signals in order to start a particular program and carry on the following program phasesusing the signal coming from the drain valve.• From the INItialize menu, select ”AUW” or press [2]; the following message will appear on thedisplay:AUtoWash1 2 3 4 No• To set the required type of Autostart select :1 = AUTOWASH-1 or press key [1],2 = AUTOWASH-2 or press key [2],3 = AUTOWASH-3 or press key [3],4 = AUTOWASH-4 or press key [4],No or press the key [5]= Manual start-up of the programs.The default setting is No.3.3.1 Autowash-1• From the Autowash menu select ”1” or press [1]; the following message will appear on thedisplay:INItializeRST LAN AUW WAR• The programs follow the pre-defined pattern indicated below:Signal 1 Signal 2 Signal 3 Signal 4 Program Start(IN1) (IN2) (IN3) (IN4)1 2 4 8Active Not Active Not Active Not Active 1Not Active Active Not Active Not Active 2Active Active Not Active Not Active 3Not Active Not Active Active Not Active 4Active Not Active Active Not Active 5Not Active Active Active Not Active 6Active Active Active Not Active 7Not Active Not Active Not Active Active 8Active Not Active Not Active Active 9Not Active Active Not Active Active 10Active Active Not Active Active 11Not Active Not Active Active Active 12Active Not Active Active Active 13Not Active Active Active Active 14Active Active Active Active 15<strong>Smart</strong> programmer Version 3.0 Code n° 0000136346 5
SEKOSMART- <strong>Programmer</strong>- Laundry system1Contents of thepackage2Presentation3INItialize theprogrammer• Reset• Setting thelanguage• Setting theAuto-washmode• Setting thework area4Entering theparameters3.3.2 Autowash-2• From the autowash menu, select ”2” or press [2]; the following message will appear on thedisplay:INItializeRST LAN AUW WAR• The programs follow the pre-defined pattern indicated below:Signal 3 Signal 4 Signal 5 Program Start(IN3) (IN4) (IN5)1 2 4Active Not Active Not Active 1Not Active Active Not Active 2Active Active Not Active 3Not Active Not Active Active 4Active Not Active Active 5Not Active Active Active 6Active Active Active 75Programming6Programming theMemory Card7Examples ofprogramming8Switching theprogrammer onand off9Connecting theprogrammer to aPC or to theConsole3.3.3 Autowash-3• From the autowash menu, select ”3” or press [3]; the following message will appear on thedisplay:INItializeRST LAN AUW WAR• The programs follow the pre-defined pattern indicated below:Signal 2 Signal 3 Signal 4(IN2)(IN3) (IN4)Program start1 2 4Active Not Active Not Active 1Not Active Active Not Active 2Active Active Not Active 3Not Active Not Active Active 4Active Not Active Active 5Not Active Active Active 6Active Active Active 7<strong>Smart</strong> programmer Version 3.0 Code n° 0000136346 6
SEKOSMART- <strong>Programmer</strong>- Laundry system1Contents of thepackage2Presentation3.3.4 Autowash-4With this type of approach, it is possible to associate via the software the input signals with the programintended to be automatically activated.• From the autowash menu, select ”4” or press [4]; the following message will appear on thedisplay:Autowash Prg: 013INItialize theprogrammer• Reset• Setting thelanguage• Setting theAutowashmode• Setting thework area4Entering theparameters5Programming6Programming theMemory Card7Examples ofprogramming8Switching theprogrammer onand off9Connecting theprogrammer to aPC or to theConsole• Set the program number then press the [Enter] key; the following message will appear on thedisplay:Autowash Prg: 011 2 3 4 5 6 OK• Select the signals with which activate the chosen program moving the arrow on the signalnumber then press the [Enter] key to confirm the input that has been selected or press thesignal chosen using the programmer keyboard (the < sign will appear on the display next to theinput that was selected). To exit press [ESC]; to confirm the settings made and store themselect OK then press the [Enter] key.It is possible to enable/disable an input by pressing the key corresponding to the appropriatenumber:key 1: enables or disables input 1; the display will indicate 1
1Contents of thepackage2Presentation3INItialize theprogrammer4Entering theparameters• Setting theflushingfunction• Drainagesolenoid valve• Filtering of inputsignals• Automationmenu5Programming6Programming theMemory Card7Examples ofprogramming8Switching theprogrammer onand off9Connecting theprogrammer to aPC or to theConsoleSEKOSMART- <strong>Programmer</strong>- Laundry system4.0 ENTERING THE PARAMETERSThe SMART system has been designed for installing on any laundry machine, and there is therefore aset of parameters that have to be customised from one installation to another.Before entering a program in the programmer it is advisable to change these PARAMETERS.From this point onwards, "select" is understood to mean that the cursor has to be placed in the positionindicated and then that the [Enter] key must be pressed.• From the main menu, select ”PAR”; the following message will appear on the display:• The number between brackets indicates the work area that is active.4.1 Setting the flushing function• From the Parameters menu, select “FLU”; the following message will appear on the display:4.1.1 Select “AUT” and press [Enter]; the following message will appear on the display:• Enter the seconds (max 255) then press [Enter].4.1.2 Select “MAN” and press [Enter] to manage the flushing kit valve as pump number 8 “P8”. Thisoptions is used in order to control the hydraulic resistance of the plant after the installation. (seethe <strong>Smart</strong> manual par. 3.2.5) The time that is set is the time that will enable the solenoid valve of the flush kit to remainopen even after the pumps have stopped. The purpose of this is to clean the tubeconnected to the washing machine and the flushing flush kit. The default time is 020seconds.The programmer will return automatically to the Parameters menu.4.2 Drainage solenoid valvePARameters (n)AUT FLU DRA FLTFLUshingAut ManFLUshingSeconds 020This parameter enables the type of drainage solenoid valve of the machine to be set.• From the PAR menu, select “DRA” and press[Enter] or press [3] on the programmerkeyboards; the following message will appear on the display:DRAin TypeNo Nc• Select “NC” if LED IN6 (on the <strong>Smart</strong> control circuit) is on while the water is being drained outof the washing machine.• Select “NO” if LED IN6 is off during drainage. The default setting is ”No”.The programmer will return automatically to the Parameters menu.<strong>Smart</strong> programmer Version 3.0 Code n° 0000136346 8
SEKOSMART- <strong>Programmer</strong>- Laundry system1Contents of thepackage2Presentation3INItialize theprogrammer4Entering theparameters• Setting theflushing function• Drainagesolenoid valve• Input signalfilter• Automationmenu4.3 Input signal filterIn order to prevent the system from taking an incorrect signal into account, it is possible to enter afiltering time, with a maximum value of 255 seconds. In this way, all the signals lasting less than thetime that has been set will not be taken into consideration.• From the automation menu, select “FLT” or press [4]; the following message will appear on thedisplay:Imputs FiLTerSeconds 010• Replace the default value, that is to say 010, with the required time (max 255). Press [Enter] toconfirm the entry or [ESC] to retain the existing setting.The programmer will return automatically to the Parameters menu.5Programming6Programming theMemory Card7Examples ofprogramming8Switching theprogrammer onand off9Connecting theprogrammer to aPC or to theConsole<strong>Smart</strong> programmer Version 3.0 Code n° 0000136346 9
1Contents of thepackage2PresentationSEKOSMART- <strong>Programmer</strong>- Laundry system4.4 Automation MenuFrom the Parameters Menu, select “AUT” or press [1]; the following message will appear on thedisplay:AUTomationsDOS DES SOF3INItialize theprogrammer4Entering theparameters• Setting theflushing function• Drainagesolenoid valve• Filtering of inputsignals• Automationmenu5Programming6Programming theMemory Card7Examples ofprogramming8Switching theprogrammer onand off9Connecting theprogrammer to aPC or to theConsole4.4.1 Dosage AutomationTo set automation of the metering function, that is to say the possibility of assigning the metering valuesdirectly in grams rather than in seconds, avoiding the need for troublesome calculations, it is necessaryfirst of all to carry out the CALIBRATION of the pumps, proceeding as follows: WARNING: Close the water-delivery valve before carrying out the operations describedbelow. This will avoid DANGEROUS spillage of water or of products, or reduce them to aminimum. While the pumps are running, the solenoid valve opens and remains open for thetime set under AUT (see point 4.1).• From the control console, enter the PUMP PRIMING mode. Consult the SMART systemmanual (point 3.2.5).• Use [SEL] to select the pump to be calibrated.• Have a graduated container available in which to collect the product being metered. To do this,it is necessary to disconnect the delivery tube from the pumps by exerting pressure on themetal spring with a pair of pliers. WARNING: Remember to close the valve.• Press [START] to start the pump that has been selected. It will stop automatically after 10seconds.• Multiply the obtained cm 3 by the product density (e.g. 200 cm 3 dosed product ⇒ 200 cm 3x 1.1 g/cm 3 (density) = 220 grams /10 seconds) or weigh the product with a scale.• Note this information on the PROGRAMS sheet, in the appropriate place.• Repeat the above operations from point 2 for each pump in the system.Upon completion of the operation for checking the metering carried out by the pumps, press the [SEL]key and hold it down for over 3 seconds to return to the PROGRAM SELECTION mode.At this point it is possible to enter the data just acquired.• From the Automation menu, select “DOS” or press [1]; the following message will appear onthe display:DOSage autom.Pump 0 0000• Enter the number of the pump in the place of the “0” and confirm by pressing [Enter];• Enter the datum obtained from the CALIBRATION of the pump in the place of the “0000” andconfirm by pressing [Enter].• Repeat from point 1 for each pump.Press [ESC] to return to the Automation menu.A pump for which a calibration datum other than 0000 has been entered will run for a period of timecalculated automatically by the system.Instruction 6: PUMP 0¹0000²s 0000³sr will be altered in PUMP 0¹0000²g 0000³sr.<strong>Smart</strong> programmer Version 3.0 Code n° 0000136346 10
SEKOSMART- <strong>Programmer</strong>- Laundry system1Contents of thepackage2Presentation3INItialize theprogrammer4.4.2 Destainer AutomationIt is possible to carry out metering of the destainer only if the operator has enabled metering by meansof the appropriate key on the control console (see point 3.4 in the SMART System manual). WARNING: This key will enable the destainer pump to meter the product only for thewashing cycle that is about to take place. If the LED is on and the pump is running, furthermetering can be avoided by pressing the key. The LED will extinguish. If metering is currentlytaking place, it will not be stopped.• From the automation menu, select “DES”; the following message will appear on the display:4Entering theparameters• Setting theflushing function• Drainagesolenoid valve• Filtering of inputsignals• Automationmenu5Programming6Programming theMemory Card7Examples ofprogramming• By entering the number of the pump that will meter the destainer and then pressing [Enter] toconfirm, the DESTAINER key on the control console is enabled. The pump will only be able torun if the relevant LED is illuminated.• If 0 (the default value) is entered, the key will not have any function, the LED will always remainoff and the destainer pump will behave in the same way as the other pumps.4.4.3 Softner AutomationDEStainerPump 0autom.The principles indicated for destainer also apply to the softner. Proceed as already indicated forautomation of the softner function.From the Automation menu, select “SOF” or press [3]; the following message will appear on the display:SOFtner autom.Pump 08Switching theprogrammer onand off9Connecting theprogrammer to aPC or to theConsole<strong>Smart</strong> programmer Version 3.0 Code n° 0000136346 11
SEKOSMART- <strong>Programmer</strong>- Laundry system1Contents of thepackage2Presentation3INItialize theprogrammer4Entering theparameters5Programming-programminginstructions-programmingeditor6Programming theMemory Card7Examples ofprogramming8Switching theprogrammer onand off5.0 PROGRAMMINGINTRODUCTIONThe aim to be achieved is to synchronise the SMART system with the various steps through which thewashing machine runs, in order to be able to add the products exactly when they are needed (e.g.: inthe pre-wash stage, the wash stage, etc..).In order to do this, it is necessary, at the time of installation, to take the voltage signals (20 to 230VAC) from the solenoid valves, so as to define exactly the step in the washing cycle of the washingmachine. The following are various examples:1. The solenoid valve of the pre-wash or of the wash tray could signal the start of the meteringcycle.2. The drainage solenoid valve could signal the end of a step (e.g. end of the 3 rd rinse).At this point it will be possible to start drafting the program, taking the list of instructions at disposal intoaccount and remembering that each instruction occupies one of the programming line numbered from00 to 24. Each instruction has variables that can be customised (e.g. 0¹, 0 2 , etc.). The 25 lines atdisposal are sequential. First line 00 is executed, then line 01 and then the others, unless instructionsare given enabling some lines to be skipped (S1-2, S-1, REPEAT), until the line with the “END”instruction causing the end of the program is reached. Writing out the programming lines on the PROGRAMS sheet before entering them in theeditor is recommended.5.1 Programming instructionsFrom this point onwards, "acknowledgement of a signal" is understood to mean that the signal is activein the presence of voltage for a time exceeding the filtering time (FLT) that has been set (See point4.3).The number of the instruction is referred to the number of the key.Instruction: AUTOWASHIf the auto-wash function has been set, the first instruction of any program is automatically :Prg xx-00 WAITIN 1 2 3 4 5 6in which the input signals that the system expects to receive in order to start program xx are displayed.E.g. If AUTOWASH 1 has been set, line 00 of program 1 will be:Prg01-00 WAITIN 1 NB: This instruction can be neither altered nor deleted.9Connecting theprogrammer to aPC or to theConsoleSingle out the signals combination that identify the program to be run (see Auto-wash function).The following washing phases of the program must be managed by drain valve signal.Example: Set Autowash 1Pg 03-00 WaitIN 1 2P1 g (grams) sr (delay time)P2 g (grams) sr (delay time)P3 g (grams) sr (delay time)Drain 01P1P2………<strong>Smart</strong> programmer Version 3.0 Code n° 0000136346 12
SEKOSMART- <strong>Programmer</strong>- Laundry system1Contents of thepackage2Presentation3INItialize theprogrammer4Entering theparameters5Programming• Programminginstructions• Programmingeditor6Programming theMemory Card7Examples ofprogramming8Switching theprogrammer onand off9Connecting theprogrammer to aPC or to theConsoleInstruction 1: SIGNAL 0¹ (replace the variable 0¹ with input signal 1 to 6)Wait for the acknowledgement of a signal on terminals IN1 to IN6 coming from the laundry beforegoing on to the instruction on the next line.Example: Before going on to the instruction that starts the PUMP, it is possible to wait for the solenoidvalve of the wash tray connected to IN2 to be activated, so as to be sure that the products areintroduced after the wash step has been started.The instruction will be: SIGNAL 2.Instruction 2: S1-4 0 1 0 2 0 3 0 4 00 5 00 6 00 7This instruction allows the <strong>Smart</strong> to recognize the Laundry machine washing phase . This is helpfulwhen the end user decide to jump the pre-washing phase or to set the rinse aid phase only.<strong>Smart</strong> system recognize these signals and dose just the chemicals for that washing phase.(replace the variables 0 1 0 2 0 3 e 0 4 with input signals 1 to 6 and variables with programming lines00 5 00 6 00 7 with programming lines 00 to 24)The system waits for the signals to be recognised on terminals IN1 to IN6 :if the system recognises only 0 1 as active, it goes on to the instruction on the next line;if the system recognises only 0 2 as active, it goes on to the instruction on line 00 5 of the program.if the system recognises only 0 3 as active, it goes on to the instruction on line 00 6 of the program.if the system recognises only 0 4 as active, it goes on to the instruction on line 00 7 of the program.If two or more signals occur simultaneously, the order of priority of the inputs is as follows:HIGHLOW1 2 3 4Example: It is possible to check whether the machine will skip the pre-wash step and start from Washand therefore to avoid introducing the pre-wash products, introducing directly the Washproducts.Example It the pre-wash signal is connected to IN1, the Wash signal is connected to IN2 and the lineon which the pump for the Wash step is started is line 05,Then the instruction will be: S1-41 2 0 0 05 00 00Instruction 3: DRAIN 00¹ (replace the variable 00¹ with the number of drainage cycles 1 to 15)The system waits for the drainage to be carried out 00¹ times, and once this has been completed itgoes on to the instruction on the next line. The drainage can take place with or without voltage onthe IN6 terminals for a time in excess of the filtering time FLT.The drainage parameter DRA is selected as indicated under point 4.2Example: Products may be introduced during the third rinse. If the drainage is connected to dedicatedterminal IN6 , then 3 complete drainage cycles must be counted from the time when the Washproducts are introduced. The end of the third drainage corresponds to the beginning of thethird Rinse, as follows:The 1 st drainage is the one that ends the Wash step before starting the 1 st RinseThe 2 nd drainage is the one that ends the 1st Rinse before starting the 2nd RinseThe 3 rd drainage is the one that ends the 2nd Rinse before starting the 3rd RinseAt this point the products will be introduced .The instruction will be : DRAINAGE 03.Instruction 4: WAIT 0000¹ (replace the variable 0000¹with 0...2000 seconds)Waits for 0000¹ seconds then continues with the instruction for the next line.<strong>Smart</strong> programmer Version 3.0 Code n° 0000136346 13
SEKOSMART- <strong>Programmer</strong>- Laundry system1Contents of thepackage2Presentation3INItialize theprogrammer4Entering theparameters5Programming• Programminginstructions• Programmingeditor6Programming theMemory Card7Examples ofprogramming8Switching theprogrammer on andoff9Connecting theprogrammer to a PCor to the ConsoleInstruction 6: PUMP 0¹0000²s/g 0000³sr0¹ replace with pump n° 1 to 80000² replace with 0 to 255 (seconds) if the letter “s” is shown0 to 9999 (grams) if the letter “g” is shown (see point 4.4.1)0000³ replace with 0 to 2000 (seconds of delay).The system starts pump number 0¹, for 0000² seconds or until it has metered a quantity of product ingrams, then it goes on to the instruction in the next line (the system recognises the settingautomatically, and after 0000² it displays an s to indicate that the metering is in seconds or a g toindicate that the metering is in grams (see the MET parameter under point 4.4.1). The numbers 0000³srindicate the delay with which the pump has to start. WARNING: If more than one consecutive line is written with this instruction, they areexecuted at the same time, however the lines from the fourth onwards are not consideredsince it is not possible for more than three pumps to run at the same time!Example: 150 grams are required to be metered by pump 4 with a delay of 30 seconds. To do this, it isnecessary to make sure that CALIBRATION of PUMP 4 has been carried out and that thedatum has been entered under MET (see point 4.4.1).The instruction will be: PUMP 4 0150g 0030srInstruction 7: REPEAT 0¹ (replace the variable 0¹ with 1 to 6)REPEAT 0: The system skips to line 00. In practice it starts off again from the first instruction in theprogram. If the [DEST] (destainer) and [SOFT] (softener) keys have been enabled andactivated (see point 4.4.2/4.4.3 ), these will be de-activated and the associated LEDS willextinguish. Press the [DEST] (destainer) and/or [SOFT] (softener) keys again if you wishto enable metering during the next wash.The statistics counter for the program will not be incremented.REPEAT 1: The system skips to line 00. In practice it starts off again from the first instruction in theprogram. If the [DEST] (destainer) and/or [SOFT] (softener) keys have been enabled andactivated (see point 4.4.2/4.4.3 ), these will be de-activated and the associated LEDS willextinguish. Press the [DEST] (destainer) and/or [SOFT] (softener) keys again if you wishto enable metering during the next wash.The statistics counter for the program will be incremented.Example: It is possible to repeat the same program without having to select it each time. At the end ofthe program, enter the instruction REPEAT, which will replace END.Instruction 8: S-1 0¹ 00²replace the variables 0¹ with 1...6 (input signal)replace the variables 00² with 00…24 (programming line)The system checks but does not wait for the signal 0¹. If acknowledgement of the signal 0¹ doesnot take place, the system continues with the instruction on the next line, otherwise control passesto program line 00².N.B.: The instruction does not wait for the signal 0¹ to become active and simply monitors it. This meansthat execution of the program does not stop at this instruction but in any case follows one of the twopossible alternatives, that is to say either the next instruction or the instruction on line 00².Instruction 0: END<strong>Smart</strong> programmer Version 3.0 Code n° 0000136346 14
SEKOSMART- <strong>Programmer</strong>- Laundry systemThis instruction ends the wash program. Two dashes - - will appear on the control console. Thestatistics counter for the program will be incremented.<strong>Smart</strong> programmer Version 3.0 Code n° 0000136346 15
SEKOSMART- <strong>Programmer</strong>- Laundry system1Contents of thepackage2Presentation3INItialize theprogrammer4Entering theparameters5Programming• Programminginstructions• Programmingeditor5.2 Programming editorAfter writing out the instructions of the programming lines on the attached PROGRAMS sheet, it ispossible to enter them in the editor.• From the Main Menu, select “PRG”; the following message will appear on the display:PRoGram: 01The number between brackets indicates the work area that is active.• Enter the required program number from 01 to 20 then press [Enter].The program editor has now been entered; the following message will appear on the display:ProGram: 01EDT ERS CPY• Press EDT then [Enter]; the following message will appear on the display:Pg01-00EMPTY(n)(n)6Programming theMemory Card7Examples ofprogramming8Switching theprogrammer onand off9Connecting theprogrammer to aPC or to theConsole- 01 indicates the program number- 00 indicates the line number- EMPTY indicates an empty instruction• Press ERS then [Enter]; the following message will appear on the displayERaSe prg 01No Yes- NO indicates that the program is not being deleted.- YES indicates that the program is being deleted.• Press CPY then [Enter]; the following message will appear on the displayCoPY prg: 01To prg: 00- The program number that appears on the first line (e.g. 01) is the number that is copied into theprogram of the second line (In).<strong>Smart</strong> programmer Version 3.0 Code n° 0000136346 16
SEKOSMART- <strong>Programmer</strong>- Laundry system1Contents of thepackage2Presentation3INItialize theprogrammer4Entering theparameters5Programming• Programminginstructions• Programmingeditor6Programming theMemory Card7Examples ofprogramming8Switching theprogrammer onand off9Connecting theprogrammer to aPC or to theConsole5.2.1 Scrolling through the linesIt is possible to use the [3] and [4] keys to increment or decrement the number of the line in order toview the instruction entered on it.5.2.2 Entering a programming linePosition the cursor on the line on which you wish to enter a new instruction, press [SHIFT] then[Enter].All the lines starting from the one that has been selected up to line 23 will be shifted by one position,and the instruction that was on line 24 will be eliminated.Warning: If the instructions S1-4 and S1 have been used in the program, make sure that theline skips implemented by the program are still in order.5.2.3 Altering some variables of an instructionPosition the cursor on the line of the instruction in which a datum has to be altered, then press [Enter];the instruction that was entered will be shown on the display.Use the [3] and [4] keys to position the cursor on the variable to be altered *, alter it and then press[Enter] until the instruction on the next line appears. If this does not happen, check whether the dataentered were correct.If [ESC] is pressed, nothing is changed and the previous instruction will be viewed.5.2.4 Eliminating a programming linePosition the cursor on the line you with to delete and press [SHIFT] then [ESC].All the lines following the one that has been selected will be shifted back by one position and theinstruction EMPTY will appear on line 24. Warning: If the instructions S1-4 and S1 have been used in the program, make sure that theline skips implemented by the program are still in order.5.2.5 Entering or replacing a new instructionPosition the cursor on the line on which you wish to enter a new instruction; press [SHIFT] and then thekey corresponding to the instruction you wish to enter (written in black on the keypad). Use the [3] and[4] keys to position the cursor on the variable to be altered *, alter it and then press [Enter] until theinstruction appears on the next line. If this does not happen, check that the data entered were correct.If [ESC] is pressed, nothing changes and the previous instruction will be displayed.* for instruction 6 PUMP 0¹0000²s/g 0000³sr only, the first datum to be changed is 0¹. Press [Enter]soas to be able to change 0000²e 0000³.Once all the instructions of the program have been entered, press [ESC] to return to the Programsmenu.Proceed to enter the instructions for all the programs, then press [ESC] to return to the Main Menu.At this point, it is possible to proceed with sending the data from the programmer to the ProgramMemory Card (see Sending data to the Memory Card point 6.1).<strong>Smart</strong> programmer Version 3.0 Code n° 0000136346 17
SEKOSMART- <strong>Programmer</strong>- Laundry system1Contents of thepackage2Presentation3INItialize theprogrammer4Entering theparameters5Programming6Programmingthe Memory Card• Sending datato the MemoryCard• Receiving thedata in theprogrammer• PaSsWord• Consumptionstatistics• Troubleshootingguide7Examples ofprogramming8Switching theprogrammer onand off6.0 PROGRAMMING THE MEMORY CARDThe Program Memory Card is a memory card in which the programs and the metering statistics arestored. It can be unplugged and transported, which makes installation and maintenance of theequipment easy, event at remote sites and by non-technical personnel. The possibility of uploading thestatistical data on consumption directly to a Personal Computer (with the <strong>Smart</strong>Ware) provides anadvanced method for checking operation of the system and of the application.To insert Memory Card into the programmer or to remove it, it is necessary to carry out the followingoperations:- Switch off the programmer by pressing the [ESC] key and holding it down for about 3seconds.- Insert the Memory Card into the slot in the programmer or remove it.- Switch the programmer on again by pressing the [ON] key.6.1 Sending data to the Memory Card• Once the program has been completed, from the Main Menu select ”COM”; the followingmessage will appear on the display:COMunicationMEM PSW STA• From the Communications menu, select “MEM”; the following message will appear on thedisplay:MEMory cardRx Tx• To SEND the data from the programmer to the Memory Card, select “Tx” or press [2]; thefollowing message will appear on the display:PaSsWord0000To send all the data residing in the programmer to the Memory Card, enter the PaSsWord; if noPaSsWord has ever been set, digit “0000”.If you do not wish to send the data to the Memory Card, press the [ESC] keyWrong MemoryIf the display indicates see point 6.5.9Connecting theprogrammer to aPC or to theConsoleIf the display indicatesTransmissionWait …SMART 1.0 (<strong>UK</strong>)PRG PAR COM INIwait until the following is displayed:This confirms that the data transmission has been successfully completed.<strong>Smart</strong> programmer Version 3.0 Code n° 0000136346 18
SEKOSMART- <strong>Programmer</strong>- Laundry system1Contents of thepackage2Presentation3INItialize theprogrammer4Entering theparameters6.2 Receiving the data in the programmerTo RECEIVE the data residing in the Memory Card, select the Communications menu “COM“ thenselect the Memory Card menu “MEM”, then “Rx”; the following message will appear on the display:PaSsword0000Enter the PaSsWord; if no PaSsWord has never been set, type “0000”.If you do not wish to receive the data then press the key [ESC].Wrong MemoryIf the display indicates see point 6.55ProgrammingIf the display indicatesReceiveWait …wait until the following appears6Programmingthe Memory Card• Sending data tothe MemoryCard• Receiving thedata in theprogrammer• Password• Consumptionstatistics• Troubleshootingguide7Examples ofprogramming8Switching theprogrammer onand off9Connecting theprogrammer to aPC or to theConsoleThis confirms that receipt of the data has been successfully completed.6.3 PasswordSMART 1.0 (IT)PRG PAR COM INIThe password is always active, and therefore even if it has never been set it has a default value, whichis “0000”To change the PaSsWord, select “KEY” from the Communications menu; the following message willappear on the display:PaSsWord0000Enter the new PaSsWord, then confirm by pressing [Enter].To return to the Communications menu press [ESC].To activate the new key it is necessary to carry out a transmission (see point 6.1).Comunic. ErrorIf the display indicates see point 6.5 WARNING: It is not possible to change the PaSsWord without knowing the active one.When the following message appears on the display:PaSsWord0000Enter the four correct digits and press [Enter] to confirm. If they are correct, the operation will continue,otherwise the following message will be displayed for a few seconds:Wrong Memory<strong>Smart</strong> programmer Version 3.0 Code n° 0000136346 19
SEKOSMART- <strong>Programmer</strong>- Laundry system1Contents of thepackage2Presentation3INItialize theprogrammer4Entering theparameters5Programming6Programmingthe Memory Card• Sending data tothe MemoryCard• Receiving thedata in theprogrammer• PaSsWord• Consumptionstatistics• Troubleshootingguide7Examples ofprogramming8Switching theprogrammer onand off9Connecting theprogrammer to aPC or to theConsole6.4 Consumption statisticsFrom the Communications menu, select ”STA” or press [4]; the following message will appear on thedisplay:6.4.1 Initialize the statistics functionSTAtisticsVIS INIWith this command, when a new starting date for the calculations is entered, all the values referred tothe statistics will be reset.• From the Communications menu select “INI” or press [2]; the following message will appear onthe display:Statistic INIt.Date 00/00/00• Enter the current date (dd/mm/yy) then press [Enter] repeatedly until the following messageappears:Init. 00/00/00No Yes• To initialise the statistics function select “Yes” or press [2];• If you do not wish to initialise the function, press ESC or select “No” or press [1].Comunic. ErrorIf the display indicates see point 6.56.4.2 Viewing the statisticsThis command can be used to view the number of cycles carried out for each program, and the time forwhich each single pump was running:• From the Communications menu select: “STA” then “VIS”; the following message will appearon the display:Visual. 00/00/00Prg 01 0000• The following will be shown, in this order: the date on which the count started (dd/mm/yy), theprogram number and the number of times it has been run.• On pressing [4] , all the programs will be shown and then the following message will appearon the display:Visual. 00/00/00Pmp 1 0000:00:00• The data shown are, in order, the starting date of the count (dd/mm/yy), the pump number andits total running time.• Press [4] to view all the pumps, one after the other.• Press [ESC] repeatedly to return to the Main Menu.<strong>Smart</strong> programmer Version 3.0 Code n° 0000136346 20
SEKOSMART- <strong>Programmer</strong>- Laundry system1Contents of thepackage2Presentation3INItialize theprogrammer6.5 Trouble-shooting guideComunic. Error1) If the display indicates make sure that:• The control console is in the PROGRAM SELECTION mode;• The Memory Card has been inserted into the programmer correctly;Wrong Memory2) If the display indicates during transmission, make sure that:4Entering theparameters5Programming6Programmingthe Memory Card• Sending data tothe MemoryCard• Receiving thedata in theprogrammer• PaSsWord• Consumptionstatistics• Troubleshootingguide• The Memory Card that has been inserted is not the Language Memory Card.Wrong Memory3) If the display indicates while choosing a language, make sure that:• The Memory Card that has been inserted is the Language Memory Card.If the error message persists, contact Seko Italia S.p.A.7Examples ofprogramming8Switching theprogrammer onand off9Connecting theprogrammer to aPC or to theConsole<strong>Smart</strong> programmer Version 3.0 Code n° 0000136346 21
SEKOSMART- <strong>Programmer</strong>- Laundry system1Contents of thepackage2Presentation3INItialize theprogrammer4Entering theparameters5Programming6Programming theMemory Card7Examples ofprogrammingImplementing theprogramFrequently askedquestions8Switching theprogrammer onand off9Connecting theprogrammer to aPC or to theConsole7.0 EXAMPLES OF PROGRAMMINGFollowing are some examples of programming, provided for the purpose of highlighting the potential ofthe SMART system.7.1 Implementing the programLet us suppose that a washing machine has three rinsing steps, to which the signal of the drainage hasbeen connected to input IN6, the signal that is activated during the pre-wash is connected to input 1and the signal that is activated during the wash is connected to input IN2.It must also be possible to skip the pre-wash step.EXAMPLE n°1The washing machine carries out 3 rinsesMetering to be carried out:Pre-wash pump 1 50 g pump 2 60 gWash pump 1 80 g pump 2 90 g1° Rinse pump 3 50 gLast Rinse pump 5 40 gSet all the parameters (including automation of the metering function) as described under point 4.4.1.Enter the program editor: the following message will appear on the display,Pg 01-00 EMPTY**or ENDPress the keys as described in the Sequence of Keys column, starting from line 00.Sequence of Keys Line Instruction Explanation[SHIFT] [2] [1] [2] [4] [4] [4] [4] [Enter][Enter][SHIFT] [6] [1] [4] [4] [5][4] [4] [4] [3] [Enter][SHIFT] [6] [2] [4] [4] [6][4] [4] [4] [3] [Enter]Press [ESC] to exit from the editor and Send the data (see point 6.1).000102S1-41 2 0 0 04 00 00PUMP 1 0050g0030srPUMP 2 0060g0030sr[SHIFT] [1] [2] [Enter] 03 SIGNAL 2[SHIFT] [6] [1] [4] [4] [8] [Enter] [Enter] 04PUMP 1 0080g0000sr[SHIFT] [6] [2] [4] [4] [9] [Enter] [Enter] 05PUMP 2 0090g0000sr[SHIFT] [3] [0] [1] [Enter] 06 DRAINAGE 01[SHIFT] [6] [3] [4] [4] [5] [Enter] [Enter] 07PUMP 3 0050g0000sr[SHIFT] [3] [0] [2] [Enter] 08 DRAINAGE 02The system waits for signal 1 to be activated(before going on to the next line) or signal 2(before skipping to line 04).The system waits for 30 seconds and thenstarts pump 1 to meter 50 grams.The system waits for 30 seconds and thenstarts pump 2 to meter 60 gramsThe system waits for signal 2 to be activated,before going on to the next line.The system starts pump 1 to meter 80 grams.The system starts pump 2 to meter 90 grams.The system waits for one drainage cycle to beactivated, before going on to the next line.The system starts pump 3 to meter 50 grams.The system waits for two drainage cycles tobe activated before going on to the next line.[SHIFT] [6] [5] [4] [4] [4] [Enter] [Enter] 09PUMP 5 0040g0000srThe system starts pump 5 to meter 40 grams.[SHIFT] [0] [Enter] 10 END This instruction ends the program.<strong>Smart</strong> programmer Version 3.0 Code n° 0000136346 22
SEKOSMART- <strong>Programmer</strong>- Laundry system1Contents of thepackage2Presentation3INItialize theprogrammer4Entering theparameters7.2 Frequently Asked QuestionsIs it possible to make a connection to the drainage only ?Yes, it is possible. It is done by connecting the drainage to IN6 while a signal that is alwayspresent has to be connected to IN1 (e.g. insert a jumper from the power supply to input IN1).The first instruction of the programs will be SIGNAL 1, followed by the instruction PUMP0¹0000²s/g 0000³sr; to proceed from one stage to the next, reference will be made to thedrainage only.WARNING: the program will not wait for any signal from the washing machine and willstart as soon as the START key on the control console is pressed.If I do not know which water delivery signal will be activated, how should I proceed ?In the delivery-drainage mode, in order to carry out metering it is necessary for at least onesignal to be recognised on inputs IN1 to IN5.To do this, proceed as follows:5Programming6Programming theMemory Card7Examples ofprogrammingImplementing theprogramFrequently askedquestions8Switching theprogrammer onand off9Connecting theprogrammer to aPC or to theConsoleConnect the drainage to IN6. A signal that is always present must be connected to IN5 (e.g.insert a jumper from the power supply to input IN1). Then proceed with this program:Line Sequence of keys Instruction Explanation00 [SHIFT] [8] [1] [0] [5] [Enter] S-1 1 05 On recognising signal 1, thesystem skips to line 05, otherwiseit continues.01 [SHIFT] [8] [2] [0] [5] [Enter] S-1 2 05 On recognising signal 2, thesystem skips to line 05, otherwiseit continues.02 [SHIFT] [8] [3] [0] [5] [Enter] S-1 3 05 On recognising signal 3, thesystem skips to line 05, otherwiseit continues.03 [SHIFT] [8] [4] [0] [5] [Enter] S-1 4 05 On recognising signal 4, thesystem skips to line 05, otherwiseit continues.04 [SHIFT] [8] [5] [Enter] S-1 5 00 Signal 5 is always active, andtherefore the system skips to line 00to check the other signals.05 [SHIFT] [6] [1] [4] [4] [5][4] [4] [4] [3] [Enter]06 [SHIFT] [6] [2] [4] [4] [6][4] [4] [4] [3] [Enter]PUMP 1 0050g 00 The system waits for 30 secondsand then starts pump 1 to meter50 gramsPUMP 2 0060g 00 The system waits for 30 secondsand then starts pump 2 to meter60 grams07 [SHIFT] [3] [4] [1] [Enter] DRAINAGE 01 The system waits for a drainagecycle to take place.Continue to draft the program, re-checking signals 1 to 4 and entering the instruction S-1 5 08(it is no longer S-1 5 00 since the system does not have to return to line 00 ).It is advisable to carry out the check of the delivery of the water only in order to enable the startupof the program. During the subsequent steps of the wash, it is sufficient to refer to drainage.This is because in almost all washing machines, as soon as the drainage ends water isdelivered to the drum (the last drainage step is an exception to this rule).<strong>Smart</strong> programmer Version 3.0 Code n° 0000136346 23
SEKOSMART- <strong>Programmer</strong>- Laundry system1Contents of thepackage2Presentation3INItialize theprogrammer4Entering theparameters8.0 SWITCHING THE PROGRAMMER ON AND OFFTo switch on the programmer, press the [ON] key.To switch off the programmer, hold any keys except [ON] down for three seconds.9.0 CONNECTING THE PROGRAMMER TO A PC OR TO THE CONSOLEPC:If the programmer is connected to the serial port of a PC by means of a serial cable, it is possible tointerface the programmer with a normal PC using the <strong>Smart</strong>ware software supplied by Seko Italia .CONSOLE:It is possible to carry out all the operations described in the manual without removing the Memory Cardfrom the Console, and connecting the programmer in series. Remove the safety cap on the left side ofthe front of the console. Connect the telephone cable included in the supply (1.5 metres) between theprogrammer and the console.5Programming6Programming theMemory Card7Examples ofprogrammingImplementing theprogramFrequently askedquestions8Switching theprogrammer onand off9Connecting theprogrammer to aPC or to theConsole<strong>Smart</strong> programmer Version 3.0 Code n° 0000136346 24