Seko ProSpray Instruction Ma.. - UK
Seko ProSpray Instruction Ma.. - UK
Seko ProSpray Instruction Ma.. - UK

You also want an ePaper? Increase the reach of your titles
YUMPU automatically turns print PDFs into web optimized ePapers that Google loves.
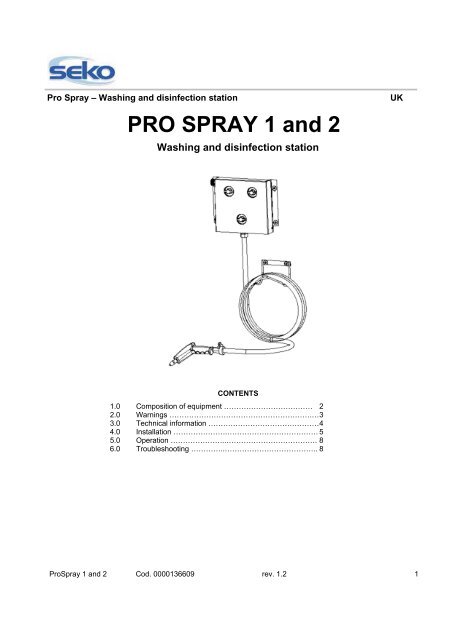
Pro Spray – Washing and disinfection stationPRO SPRAY 1 and 2Washing and disinfection station<strong>UK</strong>CONTENTS1.0 Composition of equipment ……………………………… 22.0 Warnings ………………………………………………….… 33.0 Technical information ……………………………………… 44.0 Installation ………………….………………………………. 55.0 Operation …………………..………………………………. 86.0 Troubleshooting …………..……………………………….. 8<strong>ProSpray</strong> 1 and 2 Cod. 0000136609 rev. 1.2 1
Pro Spray – Washing and disinfection station<strong>UK</strong>1.0 COMPOSITION OF EQUIPMENT1 Front Guard2 Rinse valve3 Control valve4 ¾” GHT ring nut5 Wall fixing guard6 Non-return valve7 Venturi Device8 Connections for suction hose ¼” ID – 3 / 8 ” OD<strong>ProSpray</strong> 1 and 2 Cod. 0000136609 rev. 1.2 2
Pro Spray – Washing and disinfection station<strong>UK</strong>2.0 WARNINGS READ THE FOLLOWING WARNINGS BEFORE PROCEEDING TO INSTALL OR DOMAINTENANCE WORK ON THE STATION.- <strong>Ma</strong>ke sure that the water supply pressure is between 20 (1,4 bar) and 90 PSI (6,2 bar).- <strong>Ma</strong>ke sure that the water supply temperature does not exceed 140°F (60°C).- The plumbing fittings in the station have been tested for use with the most common liquiddetergents mixed with water. Check that the detergent used is compatible with brass andpolypropylene.- Install the station near a connection point for the water supply.- Fit the guard to facilitate cleaning of surfaces and make the plumbing fittings accessible forreplacing dilution tips and routine maintenance. WARNING: BEFORE WORKING ON THE STATION UPSTREAM OF THE TAP, SHUT OFF THEWATER SUPPLY. Check the model of the equipment bought, when using the dosage calibration referencesindicated in this manual. WARNING: Always follow the necessary safety procedures, including the use of adequateprotection for the eyes, face, hands, and clothing. WARNING: When installing or carrying out maintenance on this equipment, always disconnectIt from the water supply. <strong>Seko</strong> is constantly striving to perfect all its products, and we therefore reserve the right tomake changes at any time without notice. Failure to abide by the standards laid down in this manual could result in damage to propertyor people, as well as damaging the equipment or compromising its operation. Only use hoses and spray pistols supplied by <strong>Seko</strong>. This unit is supplied without a non-return device. To prevent chemicals getting into the watersupply, install a suitable non-return device in compliance with local standards.<strong>ProSpray</strong> 1 and 2 Cod. 0000136609 rev. 1.2 3
Pro Spray – Washing and disinfection station<strong>UK</strong>3.0 TECHNICAL INFORMATIONPro Spray provides the following flow rates (the values shown in table 1 only apply when mixing one product at atime):Dynamic pressure upstream of the PRO SPRAY11.6 PSI (0.8 bar) 29.0 PSI (2 bar) 40.61 PSI (2.8 bar)Flow Rate in GPM 2.6 3.6 4.8Flow Rate in l/min 9.8 13.6 18.2Table 1 WARNING: OPENING BOTH THE CONTROL VALVES AT THE SAME TIME WILL LEAD TO ASLIGHT REDUCTION IN THE FLOW RATE AND MAY RESULT IN VARIATIONS IN THEPERCENTAGE OF PRODUCT MIXED.The degree of dilution required can be obtained by using one of the 15 calibrated nozzles supplied. The diameterof these nozzles decreases and they are color coded. Table 2 indicates the indicative degree of dilution for fluidswith varying viscosities.A degree of viscosity of 1 cps (centipoises) is typical for water, engine oil has an average viscosity of 75 cps, andthe approximate viscosity of most detergents used for washing dishes is 200 cps.Dilution ratio forTipsvarious degrees of viscosity1 cps 75 cps 200 cps# Color oz/Gal gr/l Ratio oz/Gal gr/l Ratio oz/Gal gr/l Ratio1 No tips 11.64 90.91 11:1 2.98 23.26 43:1 1.208 9.43 106:12 Grey 9.85 76.92 13:1 2.56 20.00 50:1 0.941 7.35 136:13 Black 9.14 71.43 14:1 2.37 18.52 54:1 0.928 7.25 138:14 Beige 7.11 55.56 18:1 2.10 16.39 61:1 0.914 7.14 140:15 Red 5.57 43.48 23:1 1.94 15.15 66:1 0.908 7.09 141:16 White 3.56 27.78 36:1 1.80 14.08 71:1 0.895 6.99 143:17 Blue 3.20 25.00 40:1 1.60 12.50 80:1 0.883 6.90 145:18 Tan 2.78 21.74 46:1 1.39 10.87 92:1 0.877 6.85 146:19 Green 1.83 14.29 70:1 1.22 9.52 105:1 0.810 6.33 158:110 Orange 1.32 10.31 97:1 1.00 7.81 128:1 0.624 4.88 205:111 Brown 1.07 8.33 120:1 0.80 6.25 160:1 0.516 4.03 248:112 Yellow 0.85 6.67 150:1 0.59 4.63 216:1 0.753 5.88 270:113 Aqua 0.62 4.88 205:1 0.43 3.33 300:1 0.343 2.68 373:114 Purple 0.43 3.33 300:1 0.34 2.65 378:1 0.277 2.16 462:115 Pink 0.24 1.89 530:1 0.23 1.78 563:1 0.183 1.43 698:1Table 2 – The dilution values given in this table are measured at a flow rate of4.23GPM (16 l/min) upply pressure of 40.61 PSI (2.8 bar), with a suctionheight of 5 feet (1,5 m).A nozzle is also provided that has a transparent colored tip without any hole that can be drilled to obtain acustomized degree of dilution.<strong>ProSpray</strong> 1 and 2 Cod. 0000136609 rev. 1.2 4
Pro Spray – Washing and disinfection station<strong>UK</strong>4.0 INSTALLATION WARNING: Before proceeding with installation read all the relevant paragraphs carefully.Pro Spray must be installed in a position in which it can easily be connected to the water supply, with the hosebracket not far from the station.Before finally fixing it in position check that the taps can be opened and closed easily, that exposed surfacescan be cleaned quickly, and finally that routine maintenance can be carried out on the filter and nozzles.4.1 Recommended installation layoutFigure 1: Fitting diagram- Fit the unit and the hose bracket on the wall using the wall plugs supplied in the pack (Fig 2).Figure 2: Fitting diagram<strong>ProSpray</strong> 1 and 2 Cod. 0000136609 rev. 1.2 5
Pro Spray – Washing and disinfection station<strong>UK</strong>Once the station has been installed all maintenance must be carried out by simply releasing the handles andthe front cover. The Pro Spray must not be removed from the wall (Fig 3)Figure 3: Sequence of steps for opening the station- Choose the appropriate dosing nozzle and fit it at the inlet to the non-return valve after removing the elbowconnector, as shown in Figure 4.Figure 4: Removing the dosing nozzles<strong>ProSpray</strong> 1 and 2 Cod. 0000136609 rev. 1.2 6
Pro Spray – Washing and disinfection station<strong>UK</strong>4.2 Plumbing connectionsFigure 5-1: Connecting the water supply hosesFigure 5-2: Connecting the water supply hosesN.B. The hose for the water supply connection must have a ¾” male thread in GHT at the outlet end.1) Insert the washer with the filter in the seating in the ring nut. (fig. 5-1)2) Take the water supply connection hose to the ring nut on the top left of the Pro Spray3) Turn the ring nut until the hose if gripped tightly. The washer must be compressed slightly, guaranteeingthat the connection is watertight. (fig. 5-2)4) Apply slight pressure to insert the suction hoses (¼” ID - ⅜“ OD – 6x9mm) (fig.6).5) Insert the washer in the rotating ring nut and screw on the rubber delivery hose (fig.6)<strong>ProSpray</strong> 1 and 2 Cod. 0000136609 rev. 1.2 7
Pro Spray – Washing and disinfection station<strong>UK</strong>5.0 OPERATIONFigure 6: Inserting the suction and delivery hoses- Rotate the required control knob and activate the valve in the pistol.- When high foam detergents are used, using the spray nozzle adds power to their action. The spraynozzle must be fitted at the pistol’s outlet using the relevant connector (fig 7).Figure 7: Fitting the spray nozzle6.0 TROUBLESHOOTINGProblem Cause RemedyThe rinse valve is closed. Open the rinse valve.The product valve is closed. Open the product valve.Clean or replace the filterFoot filter clogged.Clean or replace the tip.Tip clogged.The pressure must be at leastPressure too low.20 PSI (1,4 bar).Delivery hose loose.Tighten the ring nutNo fluid comes out of thepistolThe product is not sucked outof the containerToo much or too little productis sucked upThe product container fillswith water.Wrong dosing tip chosen.Non-return valve cloggedChoose the correct degree ofdilution as per Table 2Clean or replace the valve.<strong>ProSpray</strong> 1 and 2 Cod. 0000136609 rev. 1.2 8