1999 headshok moto fr owners manual.pdf
1999 headshok moto fr owners manual.pdf
1999 headshok moto fr owners manual.pdf
- No tags were found...

Create successful ePaper yourself
Turn your PDF publications into a flip-book with our unique Google optimized e-Paper software.
OWNERS MANUALHEADSHOK FORKS
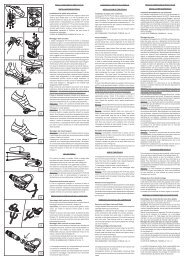
1998 HEADSHOK MOTO FR INSTRUCTIONSThe HeadShok Moto FR combines the versatility of a triple-clamp fork with thesuperior stiction-<strong>fr</strong>ee performance of all the HeadShok forks. Unlike the othertelescoping-blade suspension forks on the market, which use plastic or steelbushings to isolate the upper and lower sliding sections of the fork, the MotoFR’s suspension rolls up and down on needle bearings. These needle bearingsvirtually eliminate stiction that plagues bushing-type suspension forks.The Moto FR uses a combination Coil/MCU spring element located in one forkblade to provide 100mm of plush <strong>fr</strong>ont wheel travel. The other fork bladecontains the Moto FR’s hydraulic damper cartridge, with its five-positionDamping Dial.The Moto FR’s hydraulic damper cartridge has four separate damping circuits(high speed compression and rebound, low speed compression and rebound),allowing the suspension to react to small bumps differently than it does tolarge impacts. The high-speed damping circuits are adjustable, allowing therider to customize the ride of the bike to his or her liking.DAMPING DIALThe Moto FR’s slow speed damping can be adjusted via a five-position DampingDial while the bike is being ridden. A 90 deg. turn of the dial changes thedamping <strong>fr</strong>om fully open and plush to firm, reducing the bouncing sometimesinduced by hard pedaling in a climb.Note: This adjustment is biased toward the fork’s rebound damping. If the forkis compressed while the dial is turned all the way to the right (clock-wise), itwill rebound very slowly, or not at all, depending on spring preload. When theDamping Dial is turned back to the left (counter clockwise), the fork shouldrebound. This feature is designed into the system, to allow the rider to stiffenthe fork in a climb while simultaneously steepening the head tube angle.WARNING: Use great care and pay close attention to the road or trailin <strong>fr</strong>ont of you while turning the Damping Dial. Adjusting the fork canbe distracting, and it is possible to lose control of the bicycle if youreyes wander <strong>fr</strong>om the surface directly in your path. Also rememberthat your balance and steering control change as soon as you removeone hand <strong>fr</strong>om the handlebars. If you are at all unsure of your abilityto control the bike while adjusting the suspension fork, or if your areon a rough surface or a busy road, please stop before attempting toadjust the fork.2.
Initial SetupInstallation of fork in <strong>fr</strong>ame1. Begin with the fork assembled, but with the top crown removed. Theheadset cups should already be pressed into the <strong>fr</strong>ame.2. Install crown race on steerer tube.3. Insert the steerer tube into the head tube. Install upper parts of headset.4. Press a 1" star-fangled nut into the steerer tube.5. Install both <strong>fr</strong>ame bumpers on the stanchion tubes. Adjust the bumpersup or down so that the bumpers (and not the stanchions) contact the <strong>fr</strong>amewhen the handlebar is turned to either side.6. Install the top crown on top of the upper headset cup.7. Install the headset spacers and stem on top of the top crown.8. Use an Aheadset top cap specifically designed for a 1 1 /8" alloy steerertube. Complete the headset adjustment as usual. When the headset isadjusted, apply grease to steerer tube clamp bolts and tighten to 6-8 ft-lbs.Frame bumpers for stanchion tubesTo keep the aluminum stanchion tubes <strong>fr</strong>om hitting the <strong>fr</strong>ame, the Moto FRfork is equipped with <strong>fr</strong>ame bumpers that slide onto the stanchion tubes.These bumpers (part #105417) should be adjusted so that they contact the<strong>fr</strong>ame when the handlebar is turned in either direction. These bumpers willnot protect the <strong>fr</strong>ame or fork in all possible circumstances. Any damage tothe Moto fork or to a <strong>fr</strong>ame resulting <strong>fr</strong>om the fork hitting the <strong>fr</strong>ame is notcovered by warranty.Spring preloadThere are three different springs available for the Moto FR fork. Refer to thechart below to determine which spring suits you best.Bike size.....SmallMediumLargeExtra Largecomes with...GreenBlueBlueRedRider weight range Recommended spring Spring Kit code150 lbs. or less Green HD135/GRE140 - 200 lbs. Blue HD135/BLU190 lbs. or more. Red HD135/RED3.
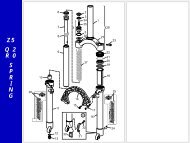
We recommend adjusting the preload of the Moto FR fork so that the suspension“sags in”, or compresses, 1/4” when the rider sits on the bike in aneutral, relaxed riding position. To adjust spring preload, begin by removingthe cap on the spring side of the fork (the side opposite the Damping Dial).Use a small screwdriver to pry the cap up. Insert a long 5mm Allen wrenchinto the hole, and turn the Allen screw within the fork clockwise to increasepreload or counter-clockwise to reduce preload.Head Tube Angle adjustmentOnce spring preload is set, the head tube angle may be adjusted. This is doneby changing the position of stanchion tubes within the fork’s triple clamps.1. Loosen outer caps of both stanchiontubes with pin-spanner wrench. Compressfork so that it is at the bottom of its travel.2. Loosen stanchion clamp bolts, and slidestanchion tubes up in the clamps until thebottom crown is 15mm <strong>fr</strong>om the <strong>fr</strong>ont tire(Fig.1). Mark the stanchions at this pointwith a marker or tape. This is the lowestsafe adjustment for the fork crown.3. Apply some grease to the threads ofthe outer caps and re-tighten into thestanchion tubes.4. From this point, slide the top and bottomcrowns up the stanchions until thedesired head tube angle is located. Usea Smart Level(tm) digital level or similardevice to determine the head tube angle.Fig.1 ▼2mm15mmRemember that the Moto FR fork is designed to be adjusted so that the forksags 1/4” to 3/8” when the rider sits on the bike. To compensate for this, setthe head tube angle with the bike unloaded, then slide the triple clamps upthe stanchion tubes 1/4” to 3/8” before tightening the stanchion clamp bolts.5. Apply grease to the threads of all 4 stanchion clamp bolts and tighten to6-8 ft-lbs.6. To do a final check of the bike’s head tube angle, begin by setting the preloadof both the <strong>fr</strong>ont and rear shocks. Check the head tube angle with therider seated on the bike.NOTE: The tops of the stanchions must be at least 2mm above the top crown(Fig.1).On some <strong>fr</strong>ames with long head tubes, it is impossible to get a desirable headtube angle and maintain this safe adjustment. In these cases, a special “dropdown”top crown must be used. The drop-down top crown is available throughCannondale/HeadShok dealers.4.
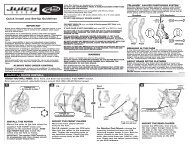
Damping Dial setup1. Turn tuning shaft clockwise untilit stops. Do not force the tuning shaft!Tightening the shaft with excessiveforce will damage the cartridge (Fig.2).2. Loosen set screw located in sideof Damping Dial. Install dial on tuningshaft, with ball plunger set intomachined groove in top of fork. Turndial clockwise to its stop.Fig.2 ▼Fig.3 ▼3. Press down firmly on DampingDial while tightening set screw inside of dial (Fig.3).3mmCheck the function of the suspensionfork in each of the five positions of theDamping Dial. When the dial is turnedall the way to the right (clock-wise),the fork’s rebound damping should bevery slow. Likewise, when the dial isturned to the left, the re-bound dampingshould be very quick. Please notethat the Moto FR fork is not designedto have a firm lock-out.**For explanation of the dial’s function, refer to the “Damping Dial” section atthe beginning of this booklet.Caution: Do not back the tuning shaft out more than one full turn <strong>fr</strong>om itsclockwise limit. Oil loss will occur if the shaft is loosened too far.MAINTENANCEWashingIMPORTANT: When washing the Moto FR fork, be very careful not to spraywater directly into the upper ends of the fork boots. The upper ends of the forkboots cover vent holes in the fork (Fig.4). Water must not be sprayed into thesevent holes, or damage to the fork’s needle bearings will result. If the forkrequires a thorough cleaning, the vent holes should be sealed first.To seal the vent holes, peel the hood up, exposing the filter. Cut the filter andremove (Fig.5). Seal the vent holes with tape, and repeat the process for theother stanchion before washing the fork. The filters should be washed separatelyand dried. To re-install, stuff the filter into the hood, making sure that itcovers the vent holes completely.The painted surfaces of the fork may be cleaned with mild detergent and water.If desired, a coating of wax may be applied.5.
Fig.4 ▼Hood(Flipped up)Fig.5 ▼HoodFilter is underhood.BootVent Hole(Seal beforewashing fork)Filter(Cut to remove)NOTE: The filtersmust be cut to beremoved, but theycan be reused.Boot/Seal InspectionIMPORTANT: Inspect the fork boots <strong>fr</strong>equently for cuts, tears, or broken zipties.If damage is found, do not ride the fork until the boot or zip-tie is replaced.The fork boots protect the needle bearings and bearing races <strong>fr</strong>omwater, dirt, and other contaminants. If a fork is ridden with a torn or unsealedboot, damage to the fork may result. Such damage is not covered underwarranty.Damper Cartridge Oil Change/Seal ReplacementThe oil in your fork’s damper cartridge should be replaced every 50 hours o<strong>fr</strong>iding, or at least once a year. The seals in the cartridge require less <strong>fr</strong>equentattention, and should be replaced every two years, or as needed. These proceduresrequire unique tools and substantial expertise with hydraulic suspensionsystems. Therefore, they should only be performed by an experiencedmechanic at an Authorized HeadShok Service Center.Needle Bearing LubricationThe needle bearings in the HeadShok suspension fork should be lubricatedat least once a year. This procedure requires partial disassembly of the suspensionfork, and therefore must only be performed by an experiencedmechanic at an Authorized HeadShok Service Center.Custom Tuning the High-Speed DampingThe high-speed (big impact) compression damping and rebound damping areboth adjusted by changing valve shims within the cartridge. Since this procedurerequires several unique tools and expertise with hydraulic suspension,it should only be performed by an experienced bicycle mechanic at an AuthorizedHeadShok Service Center. See your dealer for more information regardingthe fine-tuning of your HeadShok Moto FR suspension fork.6.
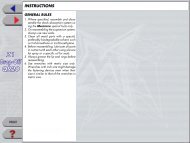
HEADSHOK WARRANTYAll HeadShok forks and their internal assemblies are warrantied against manufacturingdefects in materials and/or workmanship for a period of one year<strong>fr</strong>om the date of purchase.Not covered under warranty is damage resulting <strong>fr</strong>om improper adjustmentor maintenance, lack of maintenance, crashes, alterations, or use judged byHeadShok to be excessive or abusive.Please note:This booklet is meant to supplement, not replace, your bicycle owner’s <strong>manual</strong>.The bicycle owner’s <strong>manual</strong> contains valuable information regarding safeoperation, adjustment, and maintenance of your bicycle, as well as morecomplete warranty information. Please read the bicycle owner’s <strong>manual</strong> thoroughlybefore riding your bicycle, and keep it and this booklet for future reference.For warranty related questions, or for technical assistance with any proceduresin this booklet, contact HeadShok at one of the numbers listed below.U.S. and Canada: 888-HEAD-SHK (888-432-3745)Europe: (31) 5415-89898Japan: 0722-99-9399Australia: 612-9979-58517.
®cannondaleTCS/PCA-6/97 © Cannondale Corp. 1997 Georgetown, CT 068298.