

BooTENDS TnRoITIoNAL SuurTERs STEp TooI Box ... - Wood Tools
BooTENDS TnRoITIoNAL SuurTERs STEp TooI Box ... - Wood Tools
BooTENDS TnRoITIoNAL SuurTERs STEp TooI Box ... - Wood Tools
- No tags were found...

Create successful ePaper yourself
Turn your PDF publications into a flip-book with our unique Google optimized e-Paper software.
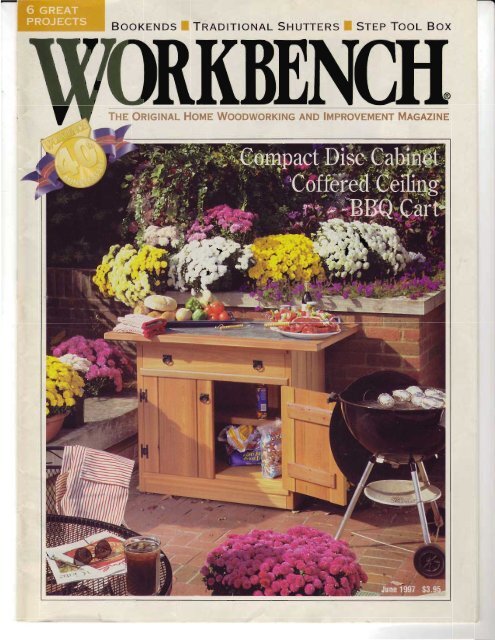
<strong>BooTENDS</strong> <strong>TnRoITIoNAL</strong> <strong>SuurTERs</strong> <strong>STEp</strong> <strong>TooI</strong> <strong>Box</strong>#rryrmliliRr- Horvrm WoonwonKtNG Rrqn lupRovHMHNr MncRzlnr
ffHOn,tEWRIGHT2O Curtom Shutterslnoking to add character andcharm to your home? You'll getthat and more foom threetraditional shutter designs.26Coffered CeilingTake several sheets ofdrywall, afew 2rr x 4rrs, and set aside aweekend or two to transform anyceiling in your home into anelegant showstopper.WOOPWORKING32 eeq Serving CartBuild this project and you'll bethe envy of every backyard chefin the neighborhood.WeExeND PRoJEcTs42co cabinerYou'll swear this is made out ofgranite. But it's not. Combining asimple design with a uniquematerial adds up to a beautifulorganizer for over 30 CDs.4SChssic BookendsSupport your best books in stylewith this easy project - anothermade with a granite look-alikematerial.WonxsHoP5ost"p Tool <strong>Box</strong>How many inconvenientripsback to the shop will you saveonce this handy toolbox/stepstool/bench is part of your homeimprovement kit?'S?'orkbencht lune 1997One of three designs: classic frame-and-panel shutters, page 20.More than just a ceiling, page 26. BBQ serving cart, page 32.CD storage with flair, page 42. Toolbox step saver, page 50.
Ift.\Q&AloUecric OutletsHow to tell them apart andget the one you need.Snop TlpsL4oraitatsander Jigfui instant stationary tool.Oven Tne FeNcEl TNorthern <strong>Wood</strong>s ShowSome fine craftsmanship from theMinnesota <strong>Wood</strong>workers' Guild.MRrenIALs4Gsytrtttetic StoneA new man-made product lookslike stone but machines like wood.Iru.DepTH REVIEW54Oemystiffing MotorsHow induction motors work.New <strong>Tools</strong>SSCrun man CuttersThese tools mean business.HoME Pnooucrs6l tnaomitable FinishWeiser lnck introduces atough-asnails brass finish.CnnrrsMANsHIP72C*u"d PanelsMarveling at the handworkof a long-lost master.fui innovative product made with newspapers and soy beans, page 46.Palm sander tip, page 14.Anvil cutters from Sears, page 58.Carvings reveal a centuriesold tale ofvengeance,page72.\Torkbench tJwre 1997
Taking StockThis is the third issue of the newWorkbench. Believe me, I've gottenmore than my share of mail these pastfew months. I'm excited that most ofyou like the changes and feel the magazineis heading in the right direction. Aletter from Chris Horn. a reader inBllthewood, SC, is typical of most of themail: "Kudos on the new Workbenchmagazine. I have to be honest. I had allbut decided not to renew my subscription, but changed my mind when the latestedition arrived. The old Workbenchhad changed a lot over the years, and,while its eclectic content was somewhatinteresting, I no longer found it satisfiiing.I love the newformat, especially thegreater focus on woodworking.Congratulations."On the other hand, we've receivedletters from several long-time subscriberswho are unhappy with thechanges. Some have wondered whythe magazine was changed at all.Krnfi:ilff Volun,tg 53 EDITORmarily a woodworkingmagazine that brings you avariety of both easy and challengingprojects. When I say woodworking Iinclude furniture, tips and techniques,and home improvement projects likedeck building, constructing a gardentool shed, and adding a dormer.What we're trying to do isimprove on what Workbenchhas been so that it serves yourneeds better. That meansmore detailed illustrations andphotography than ever before.More stepby-step informationto assure readers who areunfamiliar with a techniquethat they can successfullycomplete the project. Andfinally, more projects you canactually build with the toolsyou have.As many of you know, thisis not the first time Workbenchhas adopted a new look and shifted formats.In fact, the covers at left don'teven come close to showing all thechanges that have taken place over thepast 40 years. What the covers do say isthat change has always been part ofWorkbench's growth and success.Even more important than change,however, is the quality of Workbenchreaders. You are the magazine's mostvaluable resource, and the reason itgoes in the mail and on the newsstandevery two months. It's important thatyour voices are heard. Keep the letterscoming - good and bad - and we willwork hard to make every issue ofWorkbench better than the last.
Questions &Ans\MersElectical OufletsAt the local hardware store, theyhaue inexDensiuelectrical outletsin a bin, and also indiuiduallywrapped ones on the shelfthat cost seueraltimes as much. Are the inexbensiaeones safe?Brian GreeneLong Beach, CAr^H/&lElectrical outlets that lookidentical at first glance canactually have significant differencesthat explain the difference in price,according to my sources at IcvitonManufacturing. You may be comparingoutlets with different amperageratings, or even different grades ofelectrical outlets.The drawings show the subtle visibledifference between an outlet ratedfor a heavy-duty 20-amp circuit, andthe more common 15-amp variety.The 20-amp outlet is more expensivebecause of its beefier internal components,as well as the fact that it is lesscommonly used.You may be surprised to learn thatthere are different grades of electricaloutlets. Most manufacturers producethree grades: for residential, commercial,and industrial use. A residentialoutlet would not stand up to the punishmentan outlet endures in a hospital,chemical plant, or steel mill.That's why industrial units have nylonfaces and backs instead ofthe thermoplasticused on residential outlets.They also have heavy straps thatwon't bend after decades of hard use.But spending the extra money forindustrial strength simply isn't necessaryfor residential use.Your assurance of safety in electrical products is their listing by anindependent testing agency. In theUnited States, look for theUnderwriter's laboratories (UL) symbol.The Canadian counterpart of ULis the Canadian Standards Association(CSA), and in Mexico, it's NormalesOficial Mexicana (NOM). As long asthe electrical device carries theappropriate logo, it should be safewhen properly wired.You should match the rated capacityof the outlet to the breaker for thecircuit, and use the appropriate wiresize. For example, a 15-amp outletgoes on circuits with a 15-amp breakerand uses 14 gauge wiring. The 20-amp outlet gets paired with a 20-ampbreaker and utilizes 12 gauge wire.20-amp outletT-shaped slot.SHARE YOUR QUESTIONSIf you have a question about woodworking or home improvement we'd like to see if wecan answer it for you. Just write down your question and mail it to WORKBENCH Q&,\2200 Grand Ave., Des Moines, IA 50312. Please include your name, address and daytimephone number in case we have any questions for you. If you like, Fax us at (515) 283-2003or send a message to us at workbench@workbenchmag.com on the internet.6 W'orkbench t I'tne 1997Skip NC WrapFtr)l When the air+ond,itioning sealNlll san is ouer, some nei,ghborswrap their outdoor condenser uniE i,nplastic. Others don't. Who's right?Marh HugheyAtlantic City, NJWrapping up the condensercan trap moisture inside theunit. and accelerate rust and corrosion.l.eaving it open permits air tocirculate freely. So even though thecondenser may get wet during the offseason,it will dry quickly.But there are a couple of preventivemaintenance chores you can do everyautumn to prolong the life of yourcondenser unit. After disconnectingthe power, remove the metal shroudand clean out any leaves or debris. Toprevent water from pooling, makecertain that the drain pan holes andtubes are clear. Ifnecessary, unclogthem with a length of wire.Slippery StepsE[Iil I recently painted my backl\ttlEl porch and outdoor steps with asemi-gloss exterior paint, but now thetreads of the steps get dangerouslyslippery when wet. I don't like thelooks (or high price) of anti-slip tape.Any suggestions?Peggy SeraissKansas City, KSScuJf-sand the steps, mix asand-finish additive into vourpaint, and recoat the treads. Availableat most paint and hardware stores, theadditive is a dry, finetexhrred volcanicproduct compatible with either oil orlatex-base paints. Follow label directions(the usual proportion is eightounces of sand per gallon), mixing itthoroughly. Stirring the contents ofyour container every so often duringapplication makes certain that the sandremains evenly suspended in the paint.
-lHot Tilb Location-\)lWnat are the considerations IEl should weigh between |utttnga hot tub indoots, in my basement, forexample, as opposed to putting it outdoorson my patio?R. L. GuinanSanta Clara. CAPlacing a hot tub inside yourhouse will release a lot ofmoisture into the air, increasing yourhome's humidity.When your tub's top is off and thewater is hot, this humidity couldactually reach the point of condensingand dripping on the walls.Obviously, humidity won't be aproblem outdoors. An outdoor tubis much easier to drain, but you canexpect your tub to age faster due tothe sun and weather, and your electricbill will be substantially higher.Ultimately, the decision for thelocation of your hot tub will be basedon aesthetics and available space.A Fast, Accurate Way To Trim Doors7-\r r,, , ,W, hodLlllsome new carletEl installed, and now some of thedoors rub. How do I trim the doorswithout splintering the faces?J. BednarPlano, MYou'll get great results withthe jig shown in the drawing.It's easy to build and simple to use.Start with a l2r x 48r strip of 1/4rr thickhardboard. Glue and screw the hardboardto a straight ilr * 4rr fence rhat'salso 48rr long. Make sure the screwsare countersunk far enough so theywon't scratch your door.With the shoe of your circular sawagainst the jig's fence, trim the hardboard.Now the edge of the jig showsthe exact cutline your saw will make.To use the jig, first mark the endsof the line you want to cut on thedoor. Next, clamp the jig in place,aligning the edge of the hardboardwith the marks. Set your circular sawto cut only 1/to" deep into the door,and make an initial pass. This cutUndercutting ensuresconrete will anchor post.Make hole 3 times biggerthan post, and 6" deeperthan the frost line.scores the wood fibers to preventsplintering. Then set your blade toproject about r /ztt through the door,and trim it to size.You can make a cutting guide likethis to any length you want, or evenmake one for your router to use as adado jig. Just remember that the jig issized for a specific blade. That's whyit's a good idea to label the jig, so youdon't have to guess which blade tooick the next time vou want to use it.Setting PostsI set a wooden mailbox post inconcrete at my old house, but Ireally wasn't iwpressed with its sturdiness.I'm getting ready to build a fenceat our new house, and would like youraduice on how to get stronger results.Jim HollyN. Muskegon, MITo get a super-sturdy post, youneed to do some smart diggingand use the right concrete mix.Plan on making the top of the holethree times the diameter of the post(about a foot across for a 4rrr 4rr post,for example). Then, undercut the holeas shown in the drawing. This acts likea three-dimensional dovetail to lockthe post in place. Dig 6rr deeper thanthe frost line in your area (ask at yourhome center), and put in a few shovelfulsof gravel for drainage. Instead ofregular concrete, buy sacks of a fastsetting mk specially formulated forinstalling posts.<strong>Wood</strong> ThicknessYour articles sometimes referto wood in thicknesses like8/4. what does that ^r#iffirYluruPensacola, FLLumber is often designated by"quarters," which refers to thenumber of quarter inches in thethickness of the rough stock. Afterthe wood is surfaced, the lumber issold in the familiar thicknesses shownin the chart below.In writing, the thickness is shownwith a slash mark separating the twonumbers (8/ 4, for example) and withoutthe inch mark. In conversation,you say "eight-quarter" stock.Standard Hardwood Thicknesses:3/44/45/49/$tltlnn to25/szr11 /.-nL ILOr?Workbench t June 1997
Repairing Popped Nails In Your CeilingOur house is two years old, andthe nails in the ceiling in someareas &re fopping out, making noticeablebunr.bs in the texture. The textureis sfrayed on and uery rough. Do youhaue any suggestions for re|airing theholes and matching the texture? Iwould like to fix just the holes withoutpainting the whole ceiling.Carl AndersonSt. Louis. MOSteP2- [
Shop TipsDoor Hinge Routing JigI was installing new interior doors in afriend's house, and came up with thisjig for cutting hinge mortises with arouter and straight bit.Size the opening in the jig r/rcttlargerthan your hinge on all three sides.Place a s,/srr bushing (outside measurement) in your router, along with a 1/zrlstraight bit. The bushing can be purchasedat a tool supply store.Adjust the cutting depth of the bit tomatch the thickness of your hinge(usually about l/srr). As you move therouter within the opening, it will routthe mortise.If the hinge has square corners,clean up the mortise corners with achisel. Be sure to test out the jig onsome scrap wood (the same thicknessas the door) for size and depth.Sander CradleFor years, I've observed my inexperiencedshop student struggling to holda heavy orbital sander upside downwith one hand while running a smallpiece of wood over the sander with theother. At best, the job is uncomfortableand tedious; at worst, it's clumsyand ineffective. A few sandershave been dropped in the process.To fix the problem, I finallydesigned and built an extremely simplestand to cradle an inverted orbitalsander while performing small jobs.And the whole thing cost less than $2!I built my stand to accommodate aPorter-Cable Model 505, thesame model we've used fornear$ three decades. Theprimary parts include two horizontalarms, a vertical support block,and a flat base.The stand supports the sanderwithout creeping or excessivevibration. Adapt my drawing to fityour sander.Dich DornOelwein,IAFor consistency, you should maintainthe same router position everytime you use the jig - don't rotate therouter as you work. This method cancelsout the potential for error causedby a bushing that is not perfectly concentricwith the bit.Clamp standto workbench.Rubber feetFit cradlearms to yoursander.As you use the jig, move the routerclockwise to outline the mortise, thenremove the waste in the center.James A. JohnsonBrunswick, OHDriving StakesDriving wood stakes into dry soil isa tough job. If your soil has a highclay content, it can become a nearlyimpossible task.You can solve this problem by firsthammering a steel rod into theground to create a pilot hole. A pieceof cold-rolled steel rod (check atyour hardware store) about 34rr to illin diameter is ideal if you have anumber of stakes to drive. If you'redoing only a few holes, a length ofgalvanized pipe will substitute. Ripyour stakes slightly larger than thepilot hole for a snug fit.Laur'ie AubuchonLos Altos, CAS]|ARE Y0UR T|PS, JG$ AltD TDEASIfyou have a unique way of doing something, we'dlike to hear from you. Just write down your tip andmail it to WORKBENCH Shop Tips, 220$ Grand Ave.,Des Moines, IA 50312. Please include your name,address and daytime phone number in case we needto reach you. Ifyou like, Fax us at (515) 28$2003, oremal w at w orkb ercl @workbenchmag.com on theinternel We'll payyou $50$150 if we publish your tip.l0\Torkbench tfune 1997
Removing GlueI was refinishing an old chair, and raninto some trouble with the glue thatremained on the rung tenon and inthe socket in the leg.Fortunately, sone wood gluesremain water soluble, even aftermany years. I wrapped the glueencrustedtenon with a wet rag, andstuffed another rag in the socket.After about 20 minutes, I gentlyscraped away the softened glue withoutdamaging the underlying wood.The water will rnake the wood swellslightly, so let the parts dry thoroughlybefore regluing and completingthe repair.Allan KirchBirmingham, MITube StorageHere's a method for cappingtubes of caulk and adhesive thatprovides a storage system whilealso keeping the contents fresh.Screw eyeCaulk tube[IxnxrsHED To FrxrsHEDIx H,ILF THE TIuntrhNow wood finishing istwice as fast, twice as easy ffiwith Minwax@ Polyshades2That's because Polyshades@combines stain and polyurethanein one. Stain tt-radd rich color and enhance wood'snatural grain, and polyurethane fork":{If,MS-,^-^,^and af:,'Ji::l: "orecrionPolyshades comes in a varietyofcolors, and can be used overraw wood or even previouslyfinished wood, without havingto strip away the old finish. Polyshades.A beautiful finish in a lot less time.Sran & PorvuRHrHANE IN ONsMakes And Keeps <strong>Wood</strong> Beautiful"www.MINWM.comoMinwu and Pollshades are registered mdemarks. olheThompson.Minwu CompanySirnply turn an appropriatelysizedscrew eye or hook into thenozzle and hang the tube on a nailor pegboard fixture. This systemworks with tubes of all sizes, soyou'll need to buy an assortment ofscrew eyes. But their small cost isoffset by the savings in productsthat don't dry out- plus the convenienceof being able to easily findthe tube you need.Lare AustinS|ringfield, MODye Tracks I€akHere's an easy method for detectinga leak between the tank of a toiletand the bowl. After the last flush ofthe night, put some water-solubledye 0ike food coloring) into the toilettank. If the water in the bowl istinted in the morning, you have confirmedthe problem.To repair it, drain the tank byshutting off the water supply to thetoilet and then flushing. Uft the flapper ball to inspect the valve seat - itshould be smooth and clean. Wipe aplastic valve seat with a cloth; genflyscrub a metal one with a scouringpad. You may also need to replacethe flapper ball itself.AnthonyJ. RuggieriWest Warwick. RIMitor2s Note: This technique willhelp you detect leaks at other points.Carefully inspecthe tank bolts, thecoupling nut at the ball cock connection,and the gasket between thetank and bowl. A flashlight and mirrormake this task easier.
Marking Gauge Hammering HelpI took a piece of 1rlzrrthick hardwoodand made a markinggauge with fixed settings at thedimensions I use most often inthe shop: 3/s",1/2",:t7,rtr, and 1rr.In the February, 1997 QctA column, shim will cushion any stray hammerone reacler suggested putting a piece of blows without marring the rnoicling.cardboard against the wall to protect it Countersinking the nail into the moldingreleases the shir-n. Re-use a shin-rfrom hammer tracks when nailing r-nolclinginto place. I use a different methocl until it splits into pieces. Avoicl splittingto protect the rnolcling itself.harclwoocl rnolcling by drilling pilot holesBuy some inexpensive pine or cedar through the shim and nolding.shims at your home center, ancl nailJason Beersthrough a shim into the nrolding. TheParkuille, MOI cut all the rabbets 1/2" deep,using the dado blade in my lablesaw. For safety, I did all themachining on a l2ttlength ofstock, then cut the gauge free asthe final step.Philip BrazierBristol, EnglandSaw TuneupAll power equipment requiresperiodic maintenance for top performance.Here are sorne tune-upproceclures for the table saw:. Drive belts - check tension,and aligllr.rent between pulleys.Consult your owner's manual for;tdjustrnent instructions.. f'abletops and unpaintecl surfaces- wipe on a good coat offloor wax, then buff it off after cirying.'lhisprevents rust and keepssurfaces srnooth.r Fence ancl miter gauge -check with a square for parallel or90' angles between blacle, fence,and stops. Iiollow r.nanufacturer'sinstructions for adjustuients.. Gears and bearings - blowout dust to prevent them fromtightening up. Vacuuming alsohelps. When recommended, lightlyoil bearings or notor aftercleaning, or lubricate with powderedgraphite.Dwane WeberPahrunab. WThe Dual Purpose T2025'M Staple GunThat Attacks Almost Every Stapling robSHOOTS FLATCROWN STAPTES!mil t itlNt!ARRoW T2025 brlngs you one 0f the most lmportant advances In ,,.istaple gun technology in decades * lts Built-ln STAPLE HEIoHTI ADJUSTMENT OUIDE.'/Tne revotutlonary guide is ,/ ,easy.to use- Just !gg!'' '- JPosltron ano Your T2025 Wlll -,*-lnoot nound crown staples rQ s IibtgdyT'Hc;;;;:-'ff'Bi,riiiintiffii;"iffidtiid - E 3ffifl'il.1}i"''[1"'#ti:JiJ',l uiff.,Uf' I it'.'%el3fiHilif,'3'!fllllSilt\l i "\ | I I'. [:ff:d1",i'i,'J:,$'Jfll: i I I l''"'**l LlffiffiffiffiailSpendO 1997 ARROW FASTENER CO . INCit wisely.1r,..PFSHOOTS ROUNDCROWN STAPLESThe ARROW T2025 is available atHome Centers, Lumber Yards, and Hardwar€ Stores.!!aDjARRow FA'TENER coMpANy, rNc.,gg€e271 MA'HTLL srREET, sAoDLE aRooK N l.07665ARROW FASTENER {U,K.) ITD.,14 BARCLAY ROAD, CROYDON SURREY CROlJNJARDEL DISTRIBUTORS, INC.. SO5 METROPOLITAN BIVD. €AST. MONTREAL OUEBEC H1P 1X9r-!l'Patent PendingVorkbench t Jtrne 1997r3
Molding HelperI was installing some crown moldingrecenfly, and couldn't find a helper tohold up the end of a long piece.I solved the problem by attaching arubber ball to the end of a lrx 2rr. Get afirm rubber ball about 3rr or 4rr in diameter.Drive half the length of a 3rr screwinto the end of your lumber, thenscrew the ball into place (you mayneed to drilla pilot hole into the ball).The spring of both the 1rr' 2rr and theball held the molding gently butsecurely in position while I worked.In addition, this extra hand nevergets tired or needs a coffee break.Doug StewardPortland. ORUtility StandThis tool stand combines super-stabilitywhile using a minimum of floorspace. I have found that this standworks great for supporting a grinder,but you could adapt it to a variety ofother uses in your shop.Cut out fitsover nuls.72" x 5" Bolts,set in concretewith just under3/a" exposed.Vz" x2"- Bolts3/a" -Thickplywoodyr"Washers4" PVC pipe,cut to workingheight.Ductape allwheel openingsprior to fillingwith concrete.My boss introduced me to a clever littlesetup for hanging all kinds of small,lightweight shop items - brushes,extension cords, rolls oftape. It helpsorganize stuff that usually gets lost ina drawer or jammed on a peg.This system also takes advantageof the space that we tend to use theleast: the area over our heads. TheEilitoy's Note: Cutting PVC on a Table SawNotch endsand screw pipeto ceiling joists.The PVC pipe for the OverheadStorage tip needs a kerf, but ripping 2'round material can be dangerous. Resta board alongside the PVC and screwthem together. The board stabilizes thePVC while you cut a kerf.Saw blade Saw\Workbench t lune 7997t4Start with a discarded donut, theundersized spare tire and wheel thatcomes with many compact cars.basis of this rig is simply a piece of Using duct tape, seal all the openings2rr PVC plumbing pipe in which a in the wheel. Cut 4rr PVC pipe to yoursaw kerf has been cut lengthwise to working height. Thread two l/arr steelform a slot. Hooks were jury-rigged rods through holes near the bottomfrom spare hex nuts and coat hangers.Notches at the ends allowed me wheel. Using concrete, fiIl the wheelof the pipe, and center the pipe in theto screw the pipe to the ceilingjoists. and the PVC pipe.R.B. Himes Set three 1/2tt x stt bolts in the concrete,threads pointing up. Allow justVienna, OHa shade under 3/a" of each bolt toprotrude. Mount the bottom platformto these bolts. Finally, attachPVC pipethe upper plafform. Notice that thefenceupper plafform has an opening in thecenter to accommodate the bolts.Erwin V CohenOrlando, FL
OverThe FenceArt Meets Craft at Northern <strong>Wood</strong>sNorthern <strong>Wood</strong>s is the annual exhibitionof items crafted by members ofthe Minnesota <strong>Wood</strong>workers' Guild.The latest show, held October 17 to20,\996, served two purposes. First,it gave Guild members an opportunityto display and compare their work.Second, it gave the general public arare glimpse of the high-quality artand craftsmanship of the area's amateurand professional woodworkers.The canoe built by Don Grandbois ofMinneapolis earned the MostTechnically Accomplished award. Thecanoe, which is over 18 ft. long, ismade from aspen veneer with ash tim.The small photo is a detail of thehand carved design on the top of afive board bench crafted by PatJuettner of Eagan, an amateur woodworkerfor ten years. To give you anidea of the extraordinary level ofcraftsmanship at the Northern<strong>Wood</strong>s show, this impressiveentry did not win an award.On the other hand, RossPeterson of Hanover walkedaway with three awards for hissideboard - Best inShow, People'sChoice, and the PeerAward, given by fellowexhibitors.The subtle curvesin the top were bandsawnand then planedby hand. Ross hasworked as a structuraland ornamental ironworkerfor 17 years.Furnifure Classes in Scenic MaineThe Center for FurnitureCraftsmanship offers twenty-four differentworkshops in furniture makingand related woodworking skills,taqht by a faculty of outstanding professional craftsmen. located in thecoastal village of Rockport, Maine, thecenter is an ideal place to combinevacation with avocation.Courses vary in length from aweekend with finisher Bob Flexner toa 12-week intensive course co-taughtby the center's director, Peter Korn,and Lynette Breton, a professionalwoodworker with 2Gyears' experience.Most courses are one and twoweek workshops scheduled fromJune through October. The 12-weekintensive takes place in winter.This year, hro of England's mostrespected craftsmen will cross theAtlantic to give workshops at the center.Alan Peters will offer a two-week,intermediate/advanced level workshopon carcase consffuction with anemphasis on traditional hand skills.Master carver Chris foe will teachconsecutive week-long courses inornamental relief carving and incisedletter carving for novice and intermediate level carvers.Peter Korn, the center's director,is the author of the book Worki.ngwith <strong>Wood</strong>, published by TauntonPress. He writes, "The excitementwith which beginners approach themost mundane skills revitalizes myolvn sense of wonder at the miraclePeter Kom, fie dlrectorof fie Cenbr forFumltureCrafbmanshlp,demonsfabs he useof a spokeshave whllea sudont tll,abh€s.of craftsmanship. Practice is themost essential componento masteringcraftsmanship."Tuition is $430 for oneweek classes,$790 for twoweek. For further informationor aI997 workshop catalog,contact The Center for FurnitureCraftsmanship, 25 Mill St., RockporlME 04856, or phone (207)5945611.'W'orkbenchtJlune 1997r5
Habitat For Humanity Builds DreamsSince its founding in 1976, Habitat forHumanity International (HFHI) hasworked to eliminate poverty housingand homelessness wherever it can.So far. the group has been responsiblefor building approximately 40,000houses worldwide, providing safe andaffordable shelter to over 250,000lucky people.HFHI utilizes volunteer labor andtax-deductible donations of moneyand materials to build or renovatesimple, decent houses.A unique aspect of the program isthat the homeowner is considered apartner in the construction process.And these future homeowners investhundreds of hours of their own timeand sweat building their home andthe houses of others.The local Habitat affiliate sells thehome at no profit to the homeownerpartner.And a no-interest loan keepsthe mortgage reasonable. Themonthly payments from the home-Habitat for Humanityvolunteers work Inpartnership with thefuture homeownerto create safe andaffordable housing,owner go into a revolving Fund forHumanity to build more houses inthe community and worldwide.To find out more about Habitat forHumanity and to learn about projectsgoing on in your area, call (912)924-6935 or toll free at (800) HABITATSpringtime Seasonal InspectionNow that the weather has warmed upa bit, it's a good time to perform yourhome's annual exterior inspection.Maintaining your home's exterior isas important as spring cleaning andinterior household repairs.Detecting a potential problem earlyand correcting it will save you aggravationand money in the long run.ABTco of Roaring River, NC, a sidingmanufacturer, suggests the followingchecklist to help you with your annualexterior inspection:. Brick or concrete - seal any surfacecracks, and cut away any shootsgrowing into the wall.. Hardboard siding - caulk anyjoints that have opened up, andrepaint as needed.. Plyrvood siding - check for flakingpaint, exposed seams, andmildew. Recaulk and paint as necessary.Mildew needs to be thoroughlyremoved before painting.. <strong>Wood</strong> siding - scrape away anyloose paint, then prime and repaintexposed surfaces.. Synthetic stucco - look for signsof water penetration, especially on ornear ceilings, all around windows, atHome SafetyHome Safe and Sound is an appropriate'titlefor this free, public serviceguide with magazinequality articlesand illustrations. Each issue offersreadable and interesting articles ontopics like children's safety, homesecuritf and first aid.Reviewed by a board of nationalsafety experts, a typical editionmight include articles on home decoratingsafety, child-proofing yourhome, water purification, and safetyat school.Tb receive acopy of this tullcolor, 42 pageguide, send$1.50 for shipping and handlingto HomeSafe &Sound, FreeOffer, PO<strong>Box</strong> 6960,Villa Park, IL 60181.sills and floor lines.Also inspect roofs, gutters, downspouts,chimneys, windows anddoors. Required repairs should beperformed promptly.T6W'orkbench t fune 1997
Low-Cost Indoor/Outdoor PlansMany people know that the Western home and yard. And the reasonable<strong>Wood</strong> Products Association (W\4IPA) cost of the plans can't be beat - foris a source ofauthoritative informationon lumberbuilding materials.After all, W\ fPAis the largest association of lumbermanufacturers inthe United states.Its standard gradingrules assurelumber purchasersof consistent qualitywithin the variousgrades, regardlessof the mill thatexample, awooddeck design kit isonly 50 cents, andnone of the plansare more than$2.50 each.lndoor projectsinclude a roomdivider, a mobilebaking center, aworkbench. andstorage ideas foryour garage andother areas.Moving outdoors,you can getThe Westem <strong>Wood</strong> Producb Association offersproduced thelumber.But a lesser-a wide variety of plans for indoor and outdoorprojecb, A plan sheet for this gazebo is $2.plans for fences,planters, a doghouse.and arbors.known facet of the Association's opera- To get a full list of available plans,tion is its series of plan sheets that write to WWPA at Yeon Building, 522show you how to build a number of SW Fiflfi Avenue, Portland, OR oruseful and decorative projects for your call (503) 2243930.ONE.MANSAWMILLI\rrns fimberInto Cash!Ultraflush ToiletPressureflush toilets - long used incommercial buildings - are nowavailable for residential installation.The $316 Gerber llltraflush pichrredabove complies with Federal1.6 gallflush guidelines. But it offersadvantages over gravity toilets,including a larger water surface areaand more thorough flushing action.For more information, call GerberPlumbing Fixtures at (M7)67*6570.Sawmill goes right to the trees...turns outsmooth, true-cut lumber - even beginners getexcellent results.Just one man (no crew needed) can easily cut enough onweekends to save thousands of dollars over hieh lumbervardprices. Factory-Direct selling keeps prices lowf Easy t"r.r...made in U.S.A.1-800-942-4406extension SA30NameI AddressCity -PhoneUIIIIIIIIIIIIIIIIrrrrr-r---rr-rrlYES! YEsl neas6 rush lroo facls on TimbsKing Mills,TlllBERl(l{C, lNc. 1131 N ToppingAve.oept SA30, Kanss CiV M0 6112018 W'orkbench t June 1997I-lJIEA!5Y.TO.BUILD PROIECTSRigid Tie'Connectors for 1x2 or 2x2 lumber:. Simplify construction and require less woodr Add strength and rigidity. Make alignment easier. Eliminate toenailing or bolt & nut fasteningFor a free booklet of Home Projects plans,write Department WB or pick up a copy at anySimpson Strong-Tie' authorizedealer.@E@SIMPSON STRONG.TIE@ COMPANY INC.PO. <strong>Box</strong> 10789, Pleasanton, CA 94588On the Internet: http://www.strongtie.com
Traditional ShuttersYears ago, while on a uisit toNew England, I had the goodfortune to haae a tour guidewho is uery interestedhistori,chomes. We couered a lotof territory, and saw sometruly memorable architecture.Among the things that stuck withme the most was the widespreaduse of exterior shutters. Of course,the shutters on these old housesactually served a purpose at onetime. At night, or when bad weatherstruck, they were closed to helpkeep warm air in, and rain, snow,and wind out.Tbday, shutters aren't as common,and when they are used it'susually for decorative reasons only.For a long time I've been consideringadding shutters to myhome. I wanted to steer away fromthe louvered designs that are availableat most building supplystores. Instead, I came up with severaloptions, eventually decidingon a classic frame and raised paneldesign. You'll find two otheroptions that were in the runningon pages 24 and25.Design qnd <strong>Wood</strong> ChoicesWindow size determines the correctproportions for a shutter'sheight and width. So, except forthe stock thickness, the dimensionsof my shutters will probablybe different from what you build built look right at home with my sawn) cedar lumber that was actuallymilled as premium 5/a deckingfor your house. The techniques 32rlwide windows.and sequence for building them But if I had a wide picture window,material. I splurged on this premi-I would have kept the maxiummaterial not for looks, but forare the same, though.Height is easy - size your shuttersmum shutter width at 16rr. It's a longevity. Compared to plain-sawnso that they are as tall as thewindow opening, as shown in thephoto. But determining theirwidth takes a bit more thought.matter of personal taste, but Ithink that shutters much widerthan that can start to look clumsyand overwhelming.lumber, vertical-grain boards don'tmove as much with humiditychanges. Therefore, paint adheresbetter and joints are less likely toIn theory, each shutter should You'll need weather-resistant pop open. Because of the joinerybe half the width of the window's wood thafs atleast lrrthick. I selectedclear, vertical-grain (quarterommendfeatedinvolved in this project, I don't rec-opening - the l6rlwide shutters Ilumber.20\Torkbench tJune 1997
Frame & Panel Shutter Construction View0VERALL SIZE: 1" x 16" x 66"Panel3/q" x117/8" x117/a"Stile1 x2/2" x66"I-LEnd rail1" x5%" x12"- Middle rail1" x5Vz" x12"End Rail DetailY2"-)->li
For consistent grooves, keep steady pressureon the rails and stiles as they passover the 1/2" dado blade,Clamp a scrap wood face to the saw fenceto avoid having the blade score the fenceduring the tongue cutting operation.first (Figure 1). I always make testcuts in scrap material until I'mabsolutely sure the blade is centeredon the stock.Now clamp a protective woodface to the fence, and screw a pieceof straight scrap wood to the mitergauge to help prevent tearoutFigure 2). Once again, cut plentyof practice pieces to get the setupexactly right before machiningtongues on your rails.A Word From Our PonelAlthough I chose to make my shutterpanels from cedar, there aresome man-made materials worthyof consideration (see EngineeredPanel Options below). They mayrequire more work on the finishingend of the process, but they cansave time on the front end - giventheir size, you don't have to glue upnarrow boards.When it comes to adhesives youalso have a choice to make,although you should limit yourselfto water resistant adhesive sincethis is an exterior project. If youdon't mind the mixing hassle andthe cost, resorcinol or a two-partepoxy will assure that what youhave joined together, no storm shallput asunder. For those who don'texpect their adhesives to last a literaleternity, an exterior-grade yellowglue or one of the new onepartpollurethanes will work just fine.In my case, I used polyurethaneglue to join 3hil thick, narrow, verticalgrained cedar boards into panels.After sanding the panels, I gotready to cut them to size.With the procedure I'm about todescribe, you'll get great-fittingresults, no matter what size yourpanels are.First, clamp your rails and stilestogether and measure the openings.Add 7/attto eachmeasurement(both length and width), and cutyour panels to this size.R.oising rhe FieldThe next step is to outline theraised area of the panels, or"define the field" as the pros say.Raise your saw blade to 1/arr andset your fence, then cut the kerfsinto the front surface of your panels(Figure 3). You'll want to tweakthe saw settings for a perfect fit, soEngineered Panel OptionsTraditionally, frameand-panel constructionhas been used to accommodatemovement in solid woodpanels. But today many engineeredmaterials offer the dimensional stabilitythat solid wood panels lack.Marine plywood and some typesof Baltic or Finnish birch plywoodare suitable candidates for panelmaterial in your shutters. Whenyou go shopping for these products,specifr panels with no internalvoids and phenolic resin glue (ookfor telltale dark brown glue lines).There's also another alternativefor areas of the country that don'tsuffer from climate extremes orchronic high humidity. It's an exterior-gradeMDF (medium-densityfiberboard) called Medex, producedby the Medite Corp. ofMedford, Oregon.The company doesn't recommendMedex for raised panels orother projects that leave the coreexposed, but a spokesman said it'spossible to protect the materialagainst moderate climates andmodest moisture levels-To do this, first sand any standingfibers from the edges or bevels.Then seal those surfaces withepoxy, spar varnish, or an oil-basedpolyurethane. After a light scuffsanding, apply a primer coat on allsurfaces, followed by a top coat ofexterior oil-bas enamel. These arewise guidelines to follow for finishingthe marine plywood as well.The Medite Corp. spokesmanalso suggests rounding over anysharp corners, because the film ofany sealer or top coat along a sharpedge is more likely to crack.Working with Medex does haveone potential drawback. Like temperedhardboard, Medex is areconstituted panel made by compressingshredded wood fiberstogether with a binder resin.Machining it produces a very finedust that can irritate your skin andlungs. Always protect yourself byhooking up a dust collector to yourtable saw, wearing a long-sleevedshirt and a dust mask or respirator,and properly ventilating your shop.22'Workbench t June 1997
plan on making several practiceruns on scrap stock before cuttinginto your actual panels (see thePanel Detail on page 21).Beveling the panel edges is notdone just because ifs attractive.The angle of the cut also controlsthe depth the panel reaches in theframe grooves.Bulld a tall fence to support tE panels asyou cut fie 6o bevels, Set fte blade heightJust shy of the raised field,Before you go any further, however,build a 12tt -tallauxiliary fencefor the table saw to support thepanels during the cuts (Figure 4).Tilt your blade 6o, and make a testcut. Fit the beveled test panel edgeinto the groove of a rail or stile.Ideally, you want the panel edgeabout Trorr shy of the bottom of thegroove. Adjust the rip fence to finetunethe fit of the panel. It took mea few tries to get it just right.Even with a perfectly tuned saw,you'll probably have to sand blademarks and raised fibers off thebevels before you finish the panels.Putting lr All TogerherTo give your shutters the best possibleprotection against the elements,I recommend brushing onthe primer and the first coat ofexterior enamel paint beforeUslng a shndard saw blade, make four 1,6"deep cub to deflne the ralsed area of the assembly. This way you'll be surepanels, Refer to the detail for fence setting, to cover the places that will soonbe inaccessible.Before touching a brush to wood,however, dry fit all the parts andmark the tongueand-groove joints- priming and painting in theseareas will impair the glue bond.After priming and painting theseparate pieces, go ahead and gluethem together. Treat the shutterslike traditional floating panel assemblies,gluing only the frame jointsand leaving the panels unglued.When the glue has cured, I suggestyou caulk the seams aroundthe panels (Frgure 5). I caulkedboth the front and back of the shuttersto prevent water from seepinginto the grooves - a common placefor rot to occur. Silicone caulks provide the mostflexible bond, butyoucan't paint over them. Therefore, Iused a hybrid silicone/latex caulkthafs paintable. You can wipe thecaulk into an unobtrusive bead withthe tip of your finger and a wet rag(Frgure 6).Now you can apply the final coatof paint, and then mount the shutterson your house. Use stainlesssteel screws or corrosion-resistantdeck screws. The tannic acid in thecedar will react with ordinary steelscrews and leach black stains allover your fine woodwork.I also recommend using rubberor some other non-corrosive spacersto offset the shutters from thewall (see the Mounting Detail). Theair flow will help the back of theshutters dry out after a rain.Since you can't completely avoidhaving places where water will collect,the best thing is to plan for thedeluge and do your best to protectyour materials. That, and a littleluck, will rank your shutters withthe best in New England.tfMounting Detailj,n OrrApplyrng caulk to the panel seams will preventwater from reaching wlnenable areasof your shutte$ and causing them to rot.lmprove fie appearance of fie caulk by wettinga nag and dragging it along each seamunder fie light pressure of pur finger.#'10 x3Y2"Screw1IF.J--l {Spacer\Torkbench tfune 1997 23
F_16"__=NShiplapped ShuttersConstruction View0VERALL SIZE: 1" x 16" x 66"When I see these shutters, I can't help shiplapped pieces are flush with thethinking of Nantucket and other historic back of the stock.seafaring towns of the Northeast coast. As for the rabbets, all the shiplappedAnd it's more than the nautical name for pieces require the same treatnent, exceptthe overlapping joint - it's also because for the pieces located above a rail (seethis style is common in that area. Joinery Detail #2).The basic construction is similar to After machining the joints, switch to athe frame-and-panel shutters I made. All standard blade and chamfer the exposedthe tongues, grooves, and rabbets can edges (see the Chamfer Detail). Next,be completed with a table saw and a Yzrl prime and first coat the pieces, but staywide dado blade. The rails and away from the rail and stile joint areasshiplapped pieces are held to the stiles - raw wood is best for getting goodwith tongue-and-groove joints. You just glue adhesion.machine grooves in the rails and stiles, At assembly time, glue the rail andthen form a tongue on both ends of the stile joints, but leave the shiplappedrails and shiplapped pieces (see Joinery pieces unglued so they can float in theDetail #1). Note that the tongues on the grooves with changes in moisture.Jolnery Detdt #1 Sodoil st$thiFollowJoineryDetail #2Shiplapped piece3/t" x215/ta" x12"(See JoineryDetail #1)215/'rc"_tCenterrailNote: Thesemeasurementswill vary foryour windows.Joinery Detstt #2T37Aa"I+T/2"TI-.>1I1/ tlFollowJoineryDetail #1Cfer DetailShiplapped piece37a" y.17/16" x12"(See JoineryDetail #2)Tilt blade 45".Make sure bladedoes not nickthe tongue.FollowJoineryDelail#2End railEnd rail24'S7'orkbencht June 1997
l
A Coffered CeilingI had to pay my dentist a uisitrecently, and while standingin the lobby neraously waitingfor the eleuator before myappointment, I happened toglance up at the ceiling. Wow,was I ever impressed. This ceilinghad a pattern of shallow steps thatsurrounded a sunken panel. Theeffect was like a shadow box pictureframe.Unfortunately, the elevator didarrive and I had to face the hair-raising sounds of the dentist's drilland the feel of a lighter wallet.But, after my appointment, I spenttime studying the lobby ceiling(and getting some curious looksfrom the security guard while Iwas at it). By the time I left, I wasalready working on a plan toreproduce a basic variation of thisceiling in a home.Design VqriqtionsAs you can tell, the lobby ceilinghad an impact on me. In fact, itshattered my long held assumption that ceilings are just unremarkable,flat expanses of space. Ilearned later that this type of ceilinghas a name: coffered.The coffered ceiling I eventuallybuilt has two steps that differ inwidth but have the same amount ofdrop (see the Coffered CeilingConstruction View and the CeilingCross Section at right). If youchoose, you can vary any elementsof this design - the width of thesteps, the drop from one step toanother, even the number of steps.What IVe done is only an example.If you do consider changing thedesign, keep in mind one tip I26 W'orkbench tlune 1997
Coffered Ceiling Construction Viewlearned from a decorator friend.She told me that the most pleasingdesigns maintain the shape andproportions of the room. If yourroom is square, for example, makethe sunken panel square. If yourroom is rectangular, make thesunken panel area ofyour ceiling arectangle, keeping it proportionalwith the overall size of the room.I found it helpful to draw a planof the room to scale, and thensketch the ceiling layout. With adrawing, you can plan exacfly howwide and long to make each step.This is especially helpful if youhave an Lshaped or some otherirregularly-shaped roomBuilding A T-BraceBefore You BeginThere are lots of things to likeabout this ceiling, but one feafure IBuild each T:brace using staight2rr x 4rrs and some scrap hardboard.Cut the leg r/z' longer than theheight of your room, and cut thearm &ft.long. Trim the hardboardgusset to shape and join the threepieces together with consfuctionadhesive and drywall screws.knowyou'll appreciate is that all thematerials and tools are available atyour local building center. I do suggest,however, that you recruit ahelper - someone to lend a handhoisting the drywall into position.I also recommend building apair of T-braces to support the drywall(see Building A T-Brace). T-braces will relieve the strain onyour shoulders and give you morefreedom to drive screws into place.By the way, I highly recommendusing ls^rllong drywall screws forthis project. Years ago, I naileddrywall to a ceiling, only to havethe nails pop out over time. I can'tsay this will happen to everyone,but for me screws are insurance.The height ofyour braces is perfectfor installing drywall on theceiling. But you'll need to saw offthe bottom end of each leg as youwork your way onto the steps ofyour coffered ceiling. I suggestkeepnrg your braces r/ztt longerthan the height of the ceiling areayou are working on.\Torkbench tlune 1997 27
Joint one edge, then rip2" x 10"s into 1/z" wideandSVz" wide pieces.Finding theFirst JoistOnce the 2" x 10" stock has acclimated toyour house, joint one edge of each piece andrip them into widttts needed for the ceiling.Relioble LumberSuccessfully completing a projectlike this one depends on havingstraight, well-dried lumber. Anytwisted, cupped, or warped boardswill be difficult to install. And evenif you can straighten them out onthe day you build the coffered ceiling,chances are the stock will warpmore in the future, resulting incrooked edges on the ceiling steps.In my experience, 2rr 2rrs "and2rr x 4rrs are often warped. Eventhough dimensional stock in thesesizes is called for in this project, Ipurchased 2rr x 10rrs instead. Aftersetting them in the house for a coupleof weeks - so they had time toadjust to the temperature andhumidity levels - I jointed oneedge on each plank and rippedthem into the tr/zn and3\/z" widthsneeded for the project (Figure 1).This is the bestway I know of to getstraight stock that has less chanceof warping down the road.Finding joists behindrywall is easy with astud locator. The density of plaster, however,diminishes the usefulness of this tool.Locoting lhe JoistsFinding hidden joists can be a littletricky. Luckily, once you have thefirst joist located you should beable to find the rest by measuringin 16rr increments. I must warn youthat this is a general rule only.There's no telling how carefullyyour homebuilder measured outthe placement of each joist.To begin your detective work,make an educated guess as to thedirection the joists run in yourroom. There are no hard and fastrules to guide you here, unlessyou know which are the load-bearingwalls - joists run from oneload bearing wall to another.When I begin a project like this,I usually assume that the joists runacross the width of the room. I'mnot always right, but this seat-ofthe-pantslogic has proven truemore often than not.Having guessed at their generaldirection, use an electronic studlocator to find the first joist(Figure 2) . If you don't have one ofthese gizmos, or if you have plasterceilings and walls that confusethe stud locator, you'Il have tofind a ioist theTap the ceiling with a hammer tolocate a joist by sound, then drive anail until it hits solid wood.Continue driving nails, but closertogether,find the center andedges of the joist.old fashioned way: with a nail andhammer (see Finding the FirstJoist). Don't worry about puttingholes in the ceiling; they're easy tofix or cover up.After locating the center of onejoist, snap a chalk line along its fulllength, and extend the line forabout 8rr down the walls using apencil and a level. You need to addthe lines to the walls because theceiling line will not remain visiblefor long. Mark the wall lines with a'J," for joist.Now you can use the ceilingline as a reference for markingthe other joists at 16rr intervals.Again, extend the lines downthe wall each time and markthem with a'J." I do recommenddriving a nail into the ceiling ateach line to make sure a joist isactually there remember,nobody can guarantee that everyjoist was positioned perfectly.\Workbench tJtne 1997
Next, locate the wall studsaround the room using a studlocator or the hammer and nailprocedure. In this case, however,you won't have to snap chalk lines.But do draw a line about 8rr long atthe top of the wall to identify everystud location. Mark these lineswith an "S," for stud.Use T-braces to support the drywall used forcovering the original ceiling. Drive screwsevery 12", making sure to hithe joists.Before going any further, take alook at your original ceiling. If it's inbad shape, which was the case inmy dining room, simply cover theold drS,nvall or plaster with 3/srr drywall.There is no need to tear outthe old ceiling unless it has let loosefrom the joists, or the joists themselvesare in bad condition.Screwing up new dry'wall shouldsecure the original ceiling to thejoists (Figure 3). It also offers afringe benefit - the rows ofscrewheads conspicuously identifuthe joist locations.Moking the First StepTo make a coffered ceiling likemine, begin by snapping morechalk layout lines. Measure out191/ztt from each wall and snap aline. Then snap another line 311/2"from each wall. You can see wherethis is going by looking at theCeiling Cross Section on page 27.Now you can mount the framinglumber to the ceiling. I used constructionadhesive on all the framing,and 3rr drywall screws wherevera piece crossed a joist or stud.For any frame pieces that do notcross the joists or wall studs, you'Ilwant to use toggle bolts instead ofscrews to ensure a strong installation(see Installing Toggle Bolts).First mount 2rr x 4rrs to the wallsaround the room so they butt tightlyagainst the ceiling (Figure 4).Next. cut 2rr x 4rrs for the fulllength of the ceiling and installthem flush with the chalk line yousnapped l9r/z't from the wall(Figure 4 again). Cut more 2rr x 4rrsto fit between the lumber you justmounted and install them flush withthe other two chalk lines at 191/z'r.Follow the same procedure forinstalling lumber at the 311,/zrr lines,only this time use 2r r 2ts.Be sure to consider all the locationsthat dr1'wall joints will occur,and install additional 2n x 2r lumberat these points. I call thesepieces support bridges. Also, thewidest step in my ceiling is 18rr,which is about the maximum spanyou can expect from l/zrr-thickdry.wall without sagging. If yoursteps get any wider than this, besure to add extra supports at themiddle of the span.Once the initial framework is inplace you can begin cutting andinstalling the drywall for step one(Figure 5). As you're holding eachpiece of drywall in position, alwaysalign one edge with the edge of the2r x 2rs atthe 3lt /ztt line. These arethe edges that will remain exposedon your completed ceiling.Mount the framing lumber to the ceilingand walls with construction adhesive and3" drywall screws or toggle bolts.Installing Toggle BoltsScrew drywall to the first step frame. Also,be sure to add drywall to any supportbridges on the ceiling for the second step.To install the toggle bolts, firstdrill counterbored pilot holesevery 2-ft. in the frame pieces.Make sure the counterbores aredeep enough for the bolts toreach through the ceiling. Next,position the frame pieces on theceiling and mark thepilot hole locations.Drill r/ztt pilot holes inthe ceiling large enoughfor the folded toggles topass through. Spread constructionadhesive on theframing lumber, then slip thebolts into the pilot holes. Spin thetoggles onto the bolts, and securethe assemblies to the ceiling./a" Washer'Workbench t ]une 1997 29
NAlign 2" x 2"sfor the second stepwith the 2" x 4"sunderneath. =>4ryvOnce the drwvall is solidly inplace for step one, screw 2rr x 2rrson top of the 2'r x 4rrs at the !9r/ztlline (Figure 6). Be sure to align theback edge of each 2rr x 2rr with theedges of the 2rr' 4rrs underneath.Now cover step two with drywall.To wrap up this phase of the project,cut 2rr wide strips of drywalland cover the edges of each step(Figures 7 and 8).Toping DrywollWith the strips of drywall screwedinto place, nail metal dryrvall beadsover all the outside corners of thesteps, I recommend using 1t/4ttlongring or spiral shank nails forinstalling the beads, as the gripthese nails provide is better thanyou'll get from smooth shank nails.Until recently, my next stepwould have been applying beddingcompound to the corners -/:;4After completing the first step, install the framing lumber for the second step. You can seehow adding drywall in the bridge levels the first step with the wall framework.bedding compound is a mixturethat builds up thicker and driesfaster than ordinary joint compound.A professional taper, however,gave me a terrific tip onworking with metal beads. He coverseach edge of the metal beadwith fiberglass joint tape. Theadditional tape makes for astronger seam along edges thatoften crack over time. And thetape improves his ability to blendthe raised bead into the drywall.Cover all edges of the metalbeads as well as the remainingdrywall joints with fiberglasstape, including the inside cornersof all the steps.Now mix a batch of 90 minutejoint compound for your beddingcoat. This stuff hardens quickly,which allows you to apply a secondcoat in the same day. The one drawbackis that it's difficult to sand.Spread it over the joints with ataping knife or trowel, leavingbehind a smooth surface (Frgure9). To avoid too much sanding,you'll be better off applying two thincoats rather than one thick coat.Also, keep in mind that workingoverhead is very hard on yourshoulders, neck, and back, so ifyou're not used to this kind ofstrain, take your time and work inshort sessions.Table Saw For Narrow StripsInstead of struggling with a utility knife andstraightedge, you can cut narrow drywallstrips quickly and with less breakage usinga table saw and an inexoensive steelblade. A 71\q" circular saw blade is idealfor this operation.knife, then snapthe piooos bac*Cut nanow strips for covering the edges of Screw the strips of drywall to the edges ofeach step. The traditional method calls for the frames. Make sure the bottom edge ofusing a utility knife and a metal sfaightedge. each strip is flush with the step.30 \Torkbench tlune 1997
Coping The CoveTo begln coplno a Jolnt, hold fie moldlng at fte anglo ltwlll malnhln once lt's Installed, and cut tre end at atlso angle. Do not cut ilts plsc€ to lengh rlght aray.After nalllng mstal comer bead h fie steps, co,er alltre drywallJolnb and the edges ofthe mshil bsad wlfi flberglas tape. Use a towel or hptng krtfe h apply the beddlng coat,Sand the rough spots ofthe firstcoat with an 80 grit silicon carbidesanding screen. After cleaning upthe sanding dust, apply standardjoint compound (the stuff commonlyavailable in five gallon plasticbuckets from building centers)to all the joints for the second coat.Sand the second coat with a 120grit silicon carbide sandingscreen before applying a thirdcoat using the same standardjoint compound. Feather out thethird coat to blend the joints intothe drywall as best you can. Sandas necessary with the 120 gritscreens and fix any flaws beforemoving on to install the covemolding. I always use a S0Gwattwork light to search for imperfectionsin the final coat.Use caulk to flll gaps betweenfte molding and drywall.After Inshilllng fie cove moldlng, fill anygaps in the comers, or betrleen tre mold-Ing and drywall, wlfi palnhble latex caulk,Gove MoldingThe challenge when installing covemolding most often centers aroundthe joints. How do you get twomoldings to come together asseamlessly as possible?In this case. the answer is a techniquecalled coping. Coping thecove molding atthe corners makesfor great looking joints, and ifseasy to do (see Coping the Cove).Install one piece of cove molding(with square cuts at both ends)along an edge of step one. Securethe molding with 4d finishing nails.Now, working clockwise, cope thesecond piece of molding to butt upagainsthe first piece. Cut the otherend of the second piece to length.Nail the second piece to the stepand proceed with the third piece.The fourth piece is the fickiest,since it must be coped at both ends.Install all the molding, then fillany gaps in the joints, or betweenthe molding and the drywall, withpaintable caulk (Figure 10). Afterthe caulk dries, prime and paint theceiling and the moldings - thereare lots of opportunities for usingmore than one color on this projeclIt's hard to imagine how all thisbegan with a visit to my dentist. Iguess it just proves that inspirationfor home improvement projectscan come from the unlikeliestsources. tI-Cut along fie pruflled edge of fie mlhr, fllilng your cop-Ing saw a far degrees, Back cutUng remorcs wmd tratmlght Inhrfere wlfi fte flt of the Jolnt.You can reflne he coped proflle wltr flles and sandpaper.A half-rcund bastard flle, a mt-hllflle, and 100-grftsandpaper wlll all come In handy,Cut fte moldlng b lengh and secure lt h fie edges oftrc sbps wlh llnlshlng nalls. Use a nall set b bury trenall head belory fie surface, fien flllfie holes wlh putty.'WorkbenchtJune 19973l
BBa Serving CartNothing sa,ysummer like abackyard barbecue. Euen nou),if I shut my eyes, I can catchthe faint smell of briquettesand hickory chips, hear thecrackle of ice in a tall glass offreshly made lemonade, and tastethe butter dipped Iowa corn.My family always made a bigdeal out of backyard barbecues.And IVe managed to carrY on the32 Workbench tJwe 1997tradition. My grill is more thanadequate for the cooking I do, butone of my frustrations has beenthe lack of an outdoor workcenter.I've never had a suitable surfacefor food preparation, or evena good place to set the foodbefore it goes on the grill. Earlierthis spring, however, I decided tofiIl this gap by buildins a BBQserving cart.The cart I made is much morethan an on-deck circle for foodabout to go on the grill. It alsoserves as a storage cabinet for charcoal,wood chips, lighter fluid, cookingtools, and otherbarbecuing suPplies. Since ifs on wheels, the cartcan be rolled from the grill to thepicnic table with ease, and into thegarage during lousy weather.I don'twantyou to think this cartisn't made for the outdoors, though.The construction allows for the naturalexpansion and contraction ofthe wood, and the use of waterresistantpo$urethane glue ensuresthe durability of the carfs joinery.
BBQ Serving Cart Construction View0VERALL SIZE: 303/e,, , 4gs7r,, x 36,,DrawerFor details, see theDrawer Construction,- View on page 39,Top webframeTile6"x6"Top assemblyBack assemblyFor details, see theFor details, see theTile Top Construction Viewon page 40. --.. Back Assembly ConstructionView on page 35. -.,Side assemblyFor details, see theSide Assembly ConstructionView on page 34.Middleweb frameFront toe kickDoorFor details, see theDoor Construction Viewon page 38.T \Screw#Bx1%"Cedar plugs3/a" dia. x3/a"Note: The wrought iron hardwareused in the BBQ Serving Cart can beordered from Crown City Hardware,1 -800-950-1 047.Hinges.. .......#988-FPulls.... ......#1022-lChoosing MqferiolsThe right glue and constructiontechniques will prolong the cart'slifespan, but selecting the properwood is just as important.During the early planning of thisproject, redwood was my wood ofchoice. After a call to a local lurnberyardfor pricing, I realized I hadbetter come up with a new firstchoice. Sticker shock led me to #2cedar. Although it is not as durableas redwood, Western Red Cedar isnaturally resistant to decay and canbe finished to look a lot like redwood.If left unfinished, the cedarwill age to an attractive grey color.Although #2 cedar contains knots, Ipurchased plenty of it/q,t and 2xlumber so that I could cut aroundthe worst of them. If you are evenmore pennlnvise than I am, you canbuild the cart using treated pine.I'm sure one feature caught youreye right away when you first sawthe BBQ cart: the tile top. Tile willwithstand lots of abuse from theweather while providing an idealsurface for setting food, dishes,and utensils. I also think the tile isattractive. I hope you do too.Contrary to what you maybelieve, laying tile is a rather simpleprocess. The top for my BBQ cartVlhat You'll NeedLumber35 bd. ft. of 34rr thick #2 W. Red Cedar60 bd. ft. of 2rr thick #2 W. Red Cedar4 bd. ft. of |r thick #2 W. Red CedarHardware(2) Roller catches(50)#8 x 11lzrr Flathead deck screws(25)#8 x ll,/arr Flat head deck screws(4) 3rr Casters (2 swiveling/2 non-swiveling)(4) Wrought iron bail pulls(2) Pairs of wrought iron hinges - "H" style(2) 3/4" Aluminum angles - 24tt long(4) Shelf support pins - tTutt shaft(28) Tile squares - 6rr x 6rlis sized to fit 6rr ' 6rr tile with just thecorrect amount ofgap around eachtile for the grout. If you choose tileof a different size, you may have toalter the size of the top slightly.Workbench t June 1997 33
Web Frame Consfruction ViewStile Groove DetailChamferc0rner\- RailslY2" x1Y2" x17Y4"Rout 7+" deep chamfer on this edge.Note: Do not chamfer back edge orcorners of middle web frame.---'--- Rear stile1%" x3lz" x34lz"3A" t- -+1 V \,,,,-Tr"RouI%"deep chamferon this edge./- Frontstile1lz" x3lz" x34Vz"'lVz"x1/2" x17%"Rail Tenon DetailTY \ ,,-v" rY3/r"34Building Web FrqmesThe best way to begin building theBBQ cart is by making the internalframes. I've often heard cabinetmakerscall frames without panelsof this type "web frames," althoughI don't know why (see the WebFrame Construction View).In this project, the web framesserve many important functions.Primarily, they act as the skeletonthat holds the cabinet together. Inaddition, they support the floor,separate the drawer from thedoors, and become an attractivedetail on the exterior of the cart.Because the web frames are identical,I built all three at the sametime. I always try to take the timesavingadvantage of as many commonmachinery set-ups as possible.Cut stock for the web frame railsand stiles to size, then cut a grooveinto each stile with your table sawand ar/2" dado blade (see the StileGroove Detail).Machine the tenons using a 3/a"dado blade (see the Rail TenonDetail). Be sure to clamp a protectivewood face to the fence duringthis procedure, and support thestock with the miter gauge.When you've completed thetenons, glue up the frames. Take along look at each one for squareness- any inaccuracy will affectevery upcoming step of this project.'WorkbenchtJl.;ne 1997The Sides ond BockThe construction of the cart's sidesand back is unique (see the SideAssembly Construction View andthe Back Assembly ConstructionView). In a nutshell. the narrowboards are fastened tightly to theweb frames. These I call the stiles.The wide boards, or panels, inbetween the stiles are allowed tofloat and adjust for changes in seasonalmoisture. The constructionprovides the same advantages as aframe-and-panel assembly.Once the cart is completed,however, the side and back looklike they're made with tongue-andgroovepaneling, because all edgesare flush and chamfered.Just as you did with the webframes, begin constructing thesides and back by cutting the piecesto size. Tb avoid gluing up stock forthe panels, I found wide boards.After cutting the lumber, mockupeach side and back assemblyand label the pieces. This will helpyou organize the machining stepsSide Assemblv Consfruction ViewSide stile - rear1lz" x3lz" x333/q"Side stile - middle1lz" x3lz" x333/t" tNote 7+"deep chamfered edges.N.fl-i-="-\-'.-\\ NllSide Panels, 3/4" xS3/4" x333/4"Side stile - front1lz" x3Vz" x333/q"{177-r'7--7-}.N
Back Assembly Construction Viewgrooved along its entire lengttr tojoin the side assemblies to the backBack panelsassembly and rear toe kick (Frgure3/q" x6Y2" x 30" \2). You can machine these grooveswith your router, a shrr sfaight bit,mand an edge guide. Using the sameset up, you can also rout a shortgroove in the front stile of each sideNote: Thistongue fitsassembly for the front toe kick.groove in rearlieil-rAfter completing the grooves,side stile.return to your table saw, with thetlrrr dado blade still installed, andcut rabbets along the edges ofl,r :I ll ruote'rrnisl,;i ll tonsuefits each panel to form the 3/srr thick| | | , ll oroove in reartongues (see the Side Assemblysidesti'e Construction View and the BackAssembly Construction View).[i\Yi,ll[L-J A Few More DetoilsNote 7+"deep chamfered edges.To support the web frames, I cut.t.t\\\\TrN JrTT-r7-7\ nTr77-n-, rabbets and dadoes in the stiles.NNCutting the rabbets and most of thedadoes is easily done on the tableyet to come - I hope I'm not the saw with a dado blade @gure 3).only one who has ever made a cutin the wrong board.Now install a 3/arr dado blade inyour table saw and prepare to cutgrooves in the edges of all the stiles(Figure 1). Be sure to note that thegrooves aren't centered. Somestiles require only one groove whileothers need a groove in each edge.But for the dadoes in the rear stilesof each side assembly that will support the middle web frame, I recommendusing a router (Figure 4).This way, you can avoid cutting intothe panel grooves. Hog out thewaste with your router, keepingabout l,/ro" away from the layoutlines. Finish the dado with a chisel.In addition to the grooves in the I routed Y+rr deep, 45o chamfersTo cut offset (non-centere$ grooves in the edges of the stiles, there are a few on many edges of the cart. Chamferstiles, you need to make both passes with more grooves to complete. The rear the top front edge, the top backthe same face of the stock against the fence. stile of each side assemblv must be edge, and corners of each webframe (except for the back edge ofthe middle web frame). In addition,chamfer the front edges of the backand side assembly pieces (see theConstruction Views).Use router to cut dadoUse a 3/e" straight bit to rout 1/2" deep fulllength grooves in the rear side stiles, andshort grooves in the front side stiles.dado in front andmiddle side stiles.Cut rabbeb at the too of each side stile.Then cut fie dado for the middle web framein only the front and middle side stiles,-!)'i;;,*67'?To form the dadoes in the rear side stilesfor the middle web frame, rout outhe bulkof the waste, then chisel to the layout lines.'\V'orkbencht June 199735
Carcase Conshuction ViewBack assemblyYou need to cut the middle web frame 11/e" smaller than the top and bottom web frames.Rip it to size on your tablesaw, removing the stock from the rear of the frame.Side Installation DetailScrew panels toweb trame trominside carcase.Groove fortrontoe kick.Groove for back paneland rear toe kick.- Rout dado in rearside stiles for middleweb frame.Rip back edge ofmiddle web frame.Reveal Detail\#8x1Y2". FHWS' Screw stiles toweb frames fromoutside carcase.Drill pilot holes and 3/a"counterbores 3/a" deep.The Side AssemblyYou'll enjoy the next phase of thisproject since this is when the cartbegins to take shape. But beforeyou rush ahead, rip ll,/sil off theback edge of the middle web frame(Figure 5). This will allow you toinstall the back assembly correctly.Now you can begin joining theside stiles to the middle and bottomweb frames (see the SideInstallation Detail). Bear in mindas you position the stiles that,except for the back edge of themiddle web frame, the web framesstick out :1,/s" in both the front andback (see the Reveal Detail).Spread glue in each of the sidestile dadoes and clamp them intoposition on the web frames. Next,drill counterbored pilot holes in thestiles and loosely drive the screws.Use deck screws or stainless steelscrews to prevent rusting. Theloose screws allow you to maneuverthe stiles a bit while sliding the panelsinto place. After installing thepanels, seat the screws in the stiles.To firmly hold the panels in place,while still allowing them to movewith changes in seasonal moisfure,I screwed them at the center only.Working from inside the assembly,drill pilot holes through the webframes into the panels. Be sure touse a stop collar on the bit to preventan unsightly accident.The Bock AssemblyUnlike the side assembly pieces,which overlap the top web frameand go all the way to the floor, theback assembly pieces are shorterand butt into the top and bottomweb frames (see the BackInstallation Detail).Aside from this, all aspects of theback assembly installation are thesame as the side assembly installationyou just completed. As before,add a little glue to the dadoes in theback stiles and clamp them intoposition on the middle web frame.Drill the counterbored pilot holesand loosely screw the stiles down.Now slide the panels into the stilegrooves - the panels at each end36Workbench t June 1997
-tBack Installation DetailTop web frame will rest inrabbets. Screw the sideassemblies to thetop web frame..,,z.Slide PanelsInIo grooves.......- Position backstiles and lightlyscrew toweb frames.Turn the cart uoside-down to install the frontand back toe kicla. Test-fit, then glue andclamo to the frames.Note: Back assemblybutts into bottomweb frame.slide into the grooves in the rearside stiles. Now drive the stilescrews the rest of the way andmove on to secure the panels.You can improve the cart's stabilityby adding the top web frame.Spread glue in the side stile rabbetsand slip the top web frame intoplace. Drill counterbored pilotholes in the stiles and drive thescrews, then work from inside thecart to secure the panels. You don'thave to do anything along the back.The Toe Kicks ond FloorBelow the bottom web frame sits apair of toe kicks - one for the frontof the cart and one for the back (seethe Carcase Construction View).To make the toe kicks, first cutFloor Construction Viewv'/-- Completedside assemblyscrewed toweb frames.stock to size, then machine atongue at both ends of each piece(Figure 6). Follow the table sawprocedure you used when cuttingtongues on the web frame rails.Chamfer the front end of eachtoe kick, then turn the carcaseupside-down and spread glue inthe grooves as well as on the bottomweb frame. Ease the toe kicksinto position and clamp them tothe bottom web frame.Installing the BBQ cart floorwas a bit unusual since I had to cutthe ends of each piece to fit aroundthe side stiles (see the FloorConstruction View).Before fitting the pieces in thecarcase, however, I suggestmachining shiplap joints on theRear floor board34" x7" x34/2" --.edges of each floor board (see theShiplap Detail). The shiplaps preventgaps from appearing as theboards shrink during the course ofa year. You will not want to gluethese joints together.Now cut the boards to lengthand notch the ends to fit aroundthe side stiles (see the FloorNotching Detail). I cut the notcheswith a saber saw.Position the floor boards in thecarcase, and drill a countersunkpilot hole about t/ztt from the endof each board (see the FloorNotching Detail again). Drivescrews to secure the boards to thebottom web frame.You can now drill counterboredpilot holes and screw the backstiles to the floor (Figure 7).I hid the screws in all the stilesby filling the counterbores withcedar plugs. I made my own plugsusing a drill press and a'l11'r plugcutter. After gluing in the plugs,sand them flush with the surface.Front floor board3/4" x6" x34y2" >Shiplap Detailg%/ / /l/{/// tMiddle floor board3/4" x7" x34Y2''Floor Notching DetailDrive screws through counterbored holes inthe rear stiles into the floor. Fill the counterboreswith shop-made 3/s"-dia. plugs.Workbench tJrne 1997 37
Shelf Conshuction ViewAdding rhe ShelfFortunately, making the shelf forthis cart is a little easier than makingthe floor - the shelf doesn'tneed to be notched.I glued up stock for the shelf andadded a piece of trim to its frontedge (see the Shelf ConstructionView). The trim strengthens theshelf so it can carry a load withoutsagging. After cutting the shelf tolength, chamfer the front edges.Now lay out and drill the 1/+rlholes in the stiles for the shelf suoportpins (Figure 8).Building the DoorsThe doors are constructed muchlike the side and back assemblies.I didn't have boards wide enoughDoor Construction ViewIrim/34" x1/2" x33"for the door panels, so I glued uptwo boards edge to edge.After cleaning up the panels, cutthem to width (see the DoorConstruction View). Cut stock towidth for the stiles as well. For themoment, however, leave all thesepieces a little bit long.Next, using your table saw andr/zt' dado blade again, machine thetongue-and-groove joints (see theTongue-and-Groove Joint Detail).The stiles and panels are heldtogether with braces. By rabbetingtheir ends, the braces fit snuglyagainst the stiles and panel of eachdoor (see the Rabbet Detail). Useyour table saw and 1/zrr dado bladeto cut the rabbets as you did earlieron the side assembly stiles.Tongue-and-Groove DetailPanelStileNDrill 1/c" shelf peg holes 3/6" deep starting10" off the floor, A 1/+" pegboard templatemakes accurate spacing easy.Wrap up the preliminary stepsfor the doors by routing chamferson the braces, stiles, and panels(see the Door Construction View).Assemble the doors much asyou did the side and back assemblieson the web frames. Butt thedoor stiles into the rabbets in thebraces, and drill countersunk pilotholes. I-oosely drive the screws,and add the panels. Screw eachpanel at its center to each brace.Insrolling the DoorsI-aying the cart on its back makesdoor installation a cinch. The cart'sfloor acts as a door stop at the bottom,and I clamped a temporarystop to the middle web frame to support the top of the doors (Figure 9).Ideally, the doors should haverAo" gaps all around. Trim them tosize. Once they're situated, screwin your wrought iron hinges andbail pulls. Then remove the temporarydoor stop, and install rollercatches to hold the doors shut.IY2"I4-rA-'Wfi fie cart on ib bac( clamp a temporarys'top b fie middle web frame. Fit fie doors witrr/ro" gaps all around, hen inshll fie hinges.38\Workbench t lune 1997
Side DetailDrawer Consffuction ViewDrawerside\s/a"-I l113Aa"---.,"/ I ,."Back3/q" x4x31/2"Rabbet Detail>ylT 3/+' DrawersideScrews#8 x1Y2"..-Bottom%" x18/z" x30lz"(plywood)3/q" x3/q,' x1g3/t"(aluminum angle)Y2"Bottom Groove DetailI%TButt each drawer slide against the back ofthe cart and drill three holes that align withthe center of each side stile.Installing the slides 11/2" above the middleweb frame will allow 1/e" of clearanceunderneath the drawer.Building the DrowerI've found the drawer handy forstoring hot pads, spatulas, andother outdoor cooking supplies. Imade the drawer face, front, back,and sides with cedar, and used 7+rlthick exterior grade plyvood for thebottom (see the DrawerConstruction View). The joints arerabbets rein-forced with screws -about as simple as I could get.Use the measurements shownabove as a guide. To get the bestfit, yours will probably be a littledifferent. Be sure to make thedrawer lr narrower than the openingto allow for the drawer slides.Cut all your pieces to size exceptthe bottom and the face. Then,using a standard saw blade, cut agroove in each side for the drawerslides (see the Sicie Detail).Install a r/qtt dado blade to cut rabbets at the ends of the sides (makeseveral passes), and grooves for thebottom (see the Rabbet Detail andthe Bottom Groove Detail).Clamp the drawer parts togetherand measure for the drawer bottom.Now add the bottom to theassembly. While you have everythingtogether, drill countersunkpilot holes at the rabbet joints forthe screws.Disassemble the drawer so youcan apply glue to each rabbetjoint.Then reclamp the drawer assemblyand start the screws. Be sureto square up the drawer beforedriving the screws all the way.Instolling the DrowerAlthough my drawer slides appearunconventional, they work great forthis application. They won't rust,bind, or cost you an arm and a leg.You can purchase 34" aluminumangle at most hardware stores.Cut the aluminum to length witha hacksaw, and use a file to softenany sharp edges. Drill three countersunkscrew holes into eachstrip, locating the holes so theymeet the side stiles (Figure 10).Screw the aluminum to the stilesmaking sure they remain consistentlyLr/zu above the web frame(Figure 11). This way, you'll getabout l/srr of clearance betweenthe bottom of the drawer and theweb frame.Completing the DrowerThe only missing piece of thedrawer is the face. Measure yourdrawer opening and cut the face soyou get ar/rc" gap all around.With the drawer box in the carcase,temporarily secure the faceto it using double-faced carpettape. The tape gives you some flexibilityfor adjusting the face beforeyou drill pilot holes and screw theface to the box (see the DrawerConstruction View again).Wrap up your work on the drawerby installing the wrought ironbail pulls. Iater, after you apply a finish,rub paste wax on the slides andin the grooves - the drawer willfloat in and out like a charm.Workbench tJl.;ne 1997 39
Tile Top Construction ViewMachine tenonson rails. .--rMachine tongueon all plywood edges.{Caster DetailsSwivelFixedForm a tongueeach block, and glue fieminto fie comers of the bottom web frame.Screw the casters to the blocks and frame.expensive non-swiveling casterson the other end. Be sure to usecasters that raise the cabinet atleast r /ztt off the ground.Tb attach the casters, you mustfirst make and install supportblocks (Figure 12).By machining atongue on the blocks you can gluethem into the grooves in the bottom web frame. With this joint theblocks will easily carry the weightof the cart. When positioning theswivel casters, make sure they canrotate 360" before driving thescrews (see the Caster Details).Building rhe Tile TopEvery successful tile job beginswith a solid, dependable base. Imade the core of my base from twopieces of exterior grade plywood -a 3/+r thick upper panel and a r/+t'thick subpanel (see the Tile TopConstruction View). And, toAdding Blocks for CastersOne of the features I like mostabout this BBQ cart is its portability.By putting it on casters I can improve its appearance, I surroundedthe plywood with a cedar frame.move it conveniently around mypatio, or into the garage when the Cut plywood for the upper panel,weather looks bad.and rip enough cedar for the frame.Since swivel casters are expensive,I mounted them to one end of dado blade to rip the grooves in theNext, use your table saw and a 1/zrrthe cart only, and installed less frame pieces (see the Frame JointPlow 72" groovein rails and stiles,Upper panel3/q" x253/e" x435/e"(plywood)Detail). After plowing the grooves,clamp a protective wood face to thesaw fence and cut the rabbets onthe edges of the upper panel. Thisoperation forms the 1/ztt-thicktongues on the plywood that fit intothe grooves in the frame.Once the tongues are formed,you can measure the plyvood toget an accurate length for the railsand stiles. Cut them to length,then reinstall the dado blade andmachine the tenons on the ends ofthe rails.Glue the rails and stiles to theupper panel, checking the assemblyfor square as you tighten theclamps. Once the frame is assembled,you can easily get an accuratemeasurement for the sub-panel.Glue and screw the sub-panel tothe underside of the upper panel.Because this assembly will becovered with tile, I chose to screw itto the cart from above (Figure 13).This provides the most strength incase people lift the cart by the top.FinishingThere are lots of outdoor wood finishes,and most will give you fineresults. But whatever product youchoose, you can expect to redo itevery few years. I applied severalcoats of Flood CWF OutdoorFinish. According to the buildingcenter staff, I should apply anothercoat next year, and then a coatevery two years after that.But this cart will serve up a lotof delicious meals before it needsits next coat of finish. tffi-%" x243/sx425/a"Frame Joint DetailPlywood Joint DetailUpper panel.-tub-panelMake sure the base for the tile is centered0n the cart. Drill countersunk pilot holes,then drive screws into the top web frame,40 Workbench tl:une 1997
LayngTheTileTechnically speaking, laying tilerequires a different set of skillsfrom the rest of the BBQ cart project.So far, youVe exercised yourwoodworking muscles, but nowyou need to switch gears.Begin by spacing tiles along oneend and one side of the base(Figure 1). You can buy spacers ifyou want, although I used a rulerto lay out my tiles. Check your layoutwith a framing square to keepthe pieces in each branch of the"I-l' square to each other. Onceyou have the tiles evenly spaced,draw reference lines so you canreposition the tiles after spreadingthe adhesive.Before going any further, protectthe cedar frame by covering itwith masking tape.The next stepis messy, so the few minutes youspend now will definitely save youftom some aggravation later.Set your tlles along two edges of the base,Use a framlng square h keep fie layoutsquare as you space the flles evenly.Spreoding MorlorNow, using a special notched trowel,spread a Vsrr-thick layer of "thinsef'mortar on the plywood in theoutlined "U' area (Figure 2). Asmall trowel will come inhandy for reachinginto corners. Youcan buy thetrowels andmortar from your local tile supplier.After spreading the mortar, usethe notched edges of your trowelto create ridges in the mortar. Theridges provide a better bondingand leveling surface for your tile.Now lay the tiles into the mortar,and use a slight twistingmotion as you apply pressure.Typically, you have about l/rhourworking time.Spread out more mortar for afew more tiles, and press the tilesinto position (Figure 3). WorkProtect fte fame wih hpe, fien spread themortar wlft fie trowel. Form ddges in themortar wittr fie notched edges of the trowel.your way across the base, then letyour mortar set up for about 48hours after placing the last tile.Filling with GroutThe grout makes even more of amess than the mortar, so be surethe masking tape is still coveringthe top of the frame.Mix the grout powder with alatex additive, and spread it ontothe tile with a float. (Both the additiveand the float are available fromyour tile supplier.) Force the groutinto the spaces, working diagonallyacross the tiles (Figure 4).When you're finished spreadingthe grout, wipe off the excess with asponge and clean water (Figure 5).You'll want to clean the tiles severaltimes as the grout begins to cure.Allow another 48 hours dryingtime, then use an old toothbrushto apply a sealer on the grout lines.This is important given that thetiles will be outside. Once the sealerdries, the cart is ready for yourfirst cookout.tffiPlace tp tles into the moftr wlh a smallamount of pressure. Once fie "L" is covered,eontinue workingsmall areas,After the mortar serh, fill the gaps withgrout. Force the grout into the gaps bypushing fie float diagonally across the tile,As the grout dries, wipe off fie exces witra sponge and clean water. Repeatthismany times to clear away the dried film.\Torkbench tJune 19974r
CompnctDisc CabinetLi,ke most people who grew uplistening to music on ainylalbums, I dug in rny heelswhen compact disc recordingsentered the scene. Eaentually,the great sound CDs ffir won42me over. Now, myalbum collectionsits in cardboard boxes, waiting forJudgment Day, while I have stacksof CDs in need of a good home.It would have been simpleenough to go out and buy one ofthedozens of ready-made CD racks,butlike mostwoodworkers I'm constantlyseduced by the song thatgoes, 'hey, I can make this myself!"So, going enthusiastically forwardlike I always do, I began'WorkbenchtJune 1997sketching out ideas. The cabinet Idesigned and built holds over 30CDs, and multiples of this cabinetcan be stacked to create evenmore storage space. Although Idid not intend for my project tohang from the wall, you could easily adapt it for this purpose. If youdo mount the cabinet on the wall, Irecommend using heavy-duty wallanchors to support the weight -the cabinet is deceptively heavy.To complement its high-techcontents, my cabinet sports somenew technology of its own. Forparts of the project I used a biocompositematerial made withrecycled newspapers, soy proteinbinders, and natural colorants.Called Environ, it comes in a varietyof colors, some having the mottledlook of granite. It machineslike hardwood, and holds a routededge beautifully. If you're interestedin learning more about thismaterial, take a look at SyntheticStone on page 46.On the other hand, if you're notinterested in trying out someEnviron, but still want to build thisCD cabinet, you can substitute anyhardwood and still end up with agreat-looking cabinet.Mochining the EnvircnMaking the top and bottom comesfirst in this project, and they arethe pieces I thought were perfectfor my e:rperiment with Environ(see the Compact Disc CabinetConstruction View). I think theresult supports my hunch.
Compact Disc Cabinet Constuuction View0VERALL SIZE:7" x 16" x 7"Top3/4" x7" x17"(Environ)Rout %e"chamfers.Plane l40"chamfers.Side3/q" xd/2" xd/q"(Cherry)NOTE Cut one'l4Vz" x17"piece for the top andbottom combined.Bottom3/a" x7'x17u(Environ)BackVt" xd/t" x14Vt"(Hardboad)lftxlz"RHWSSide9/l'xllz" x61/+"1/+" xg/t" (Cherry)Rubber bumpersAs I was getting underway, itoccurred to me that machining thetop and bottom combined as onepiece would be more efficient(Frgure 1). Cut your Environ tosize, then chuck a Vlrr sfraight bitin your plunge router. Attach anedge guide to the router base andplow the two grooves in the panel.These grooves will be used to jointhe top and bottom to the sides.Now rip the panel into twopieces 7Va'rwide and use the samebit to rout a rabbet along the backedge ofeach piece (Figure 2). Therabbets will house the back of thecabinet. Make sure the rabbetmeets the grooves with squarecorners. If necessary, clean upthese intersections with a chisel.For the curved front edges onthe top and bottom, I wanted awide, gentle arc. Working with acompass, and then a small trammelset, proved to be inadequate.Neither of them gave me theradius I was after without requiringunreasonable steps - I thinkthe trammel beam might havereached across the sfreet into myneighbors' living room, and finepeople though they are, they'renot that neighborh Instead I usedCombinedpanol fortop andbottom,, yt\_>trK_ICut one panel for fie comblned slze 0f fie hp and bothm, then use yourouter b plowout he groo,es, Afhr completing he grooves, rlp fie panel inh pieces 7118" wide.Since tp rabbet In fie bp and bothm areshpped at each end, pu'llwant h use arouter h do fte machinlng.'\?'orkbencht llone 1997 43
Building The JigI wouldn't call myself a stickler,but having the top and bottommatch perfectly was important tome. Tb guarantee their uniformity,I made a jig for shaping thecurved front edge of each piece.#6 x 17+" FHWSShape the arc by bending a piece of flexiblewood (or a mehl straightedge) between twofinishing nails. Position the nails 20" apart.an old millwork trick: bending aflexible piece of wood between twofinishing nails. You can use thistechnique to lay out the arcsdirectly on the workpieces, or youcan make a routing jig to haveabsolute consistency (see BuildingThe Jig). The jig is especiallyhandy if you plan on building severalofthese CD cabinets.Once you have the jig made, setthe top into position and trace thearc onto it. Do the same for thebottom. Now carefully cut just outsidethe lines with a band saw.This will remove most of the wasteso you can make a light, chatterfreepass with the router.To make the router pass, put thetop into the jig. Make sure the topis all the way in the jig, touching allthree cleats. Next, with a bearingguidedflush-trim bit chucked inyour router, trim the remainingwaste off the front edge of thepiece (Figure 3). Repeathis procedurewith the bottom.Clamp the jig to your workbench, slip thetop or bottom into position, and rout itsfront edge with a flush-trim bit,Choosing SidesEnviron's faux-granite appearancehas a great look, but I wanted toadd a little contrast by using solidcherry for the sides.Cut the sides to size, then formthe tongues centered on both endsof each piece (Figure 4). Clampinga wood face to the fence will preventthe blade from cutting intothe fence. The tongues will fit intothe grooves in the top and bottom.Check to see that the tongues fitthe grooves - you want the fit to besnug, but not tight. Next you'll needto cut a rabbet along the back edgeof the sides for the back (Figure 5).Unlike the stopped rabbets in thetop and bottom, these rabbets gofrom end to end.The front of each tongue needsto be cut away to form a shoulder(Figure 6). For safety, support thesides with the miter gauge duringthe cuts.To blend with the curve of thefront edge on the top and bottom,I chose to bevel the front edge ofeach side (Figure 7). Replace thedado blade with a standard sawblade, tilt the blade 13o, and setthe fence so the blade splits theinside corner of each piece.Besides cutting the back fromI/+rr tempered hardboard, the lastmachining step is routing chamferson the top and bottom panels(Figure 8). I also used a handplane to form similar chamfers onthe front edges ofthe sides.And there you have il five easypieces for one CD cabinet.Form tonguesthe ends of the sidesusing a 1/4" dado blade. Be sure to protectthe fence by clamping on a wood face.Leave the table saw setup unchanged to,,1xtlo" x1la" nabbet along the backinsidedge of each side.After completing the tongues and rabbet,raise the blade to 1/2", and stand each sideon edge to cuthe front shoulder.44W'orkbench t June 1997
Gefting to the FinishNormally, at this stage of the gameI'd be ready to glue everything up,then apply the finish. FinishingEnviron, however, takes some exfracare, so I recommend finishing thepieces for the CD cabinet separately before gluing them together.Like many composite panels,Environ is more porous than mostsolid woods, especially at itsedges. This makes it harder to geta good build up with a top coat.Most common finishes will soak inand leave a low sheen surface.Since I wanted a high gloss finishthat makes the material look likepolished granite, I had to jumpthrough a few hoops (seeFinishing Secrets For Environ).I finished the cherry sides with acoat of cherry oil stain, then severalcoats of General Finishes wipingvarnish. The hardboard back gottwo coats of flat black paint.Finol AssemblyOnce all the finish had thoroughlycured, I checked to see that none ofit had dried on any of the gluingsurfaces, like the tongue-andgroovejoints and the rabbetjoints.For the front edge of the sides to match thecurved top and bottom, rip a 13" bevel withthe blade splitting the inside corner.Finishing Secrets For EnvironThe secret to getting a shiny high mends calling them for the namegloss finish on Environ, according of a dealer near you. I usedto Bob Smith at Phenix Sadoplast on the Environ for theBiocomposites, is a high-solids CD cabinet and the Bookends. Butvarnish. Bob uses a high-solids I frankly don't think I would useacrylic finish that's roll-coated on this product again. I don't thinkand cured with ultraviolet light. that this finish built up much fasterWhile thats fine for a big professionalthan standard finishes to warrantshop, it's not a very its high price plus the hassle ofgood solution for small-time users mixing the catalystlike me and you. For a price, If you're not after a high glossPhenix can supply Environ with look for your projecl you can stickthe acrylic finish already applied to using conventional finishingto the face. Of course, you'll still products. Standard varnish orhave to deal with the edges. But polyurethane will work finethey also suggested a couple on Environ, but you willother solutions.need to apply five or six,-r.coats. Environ is so T:-polyurethane product with 657r porous that it soaks upI experimented with a two partsolids called "Sadoplasl" It's made the first few coats ofby Chemcraft International finish as fast as you can(800) 724-6839. Chemcraft recom-brush them on.Chuck a 45o chamfering bit in youroutertable and chamfer the front edges and bothends of the top and bottom panels.I did pause here, thinking this was you pre-finish the cabinet parts likea little baclcward - usually I'm I did, you'll want to take extra carescouting for excess glue that will when clamping the pieces together.I used scraps of soft cloth underinterfere with my finish.After cleaning up a few spots, I wood clamp pads, and clamped theset about assembling the cabinet. pieces with only light pressure.Yellow (aliphatic resin) glue performsfairly well on Environ, but while the glue dries is easy if youHolding the back in the rabbetsthe manufacturer recommends drive a few brads - screws wouldusing one-part polyurethane adhesivesto get the best results. mount the cabineto a wall.be a better idea if you plan toPolyurethane adhesives form a For now, a pair of these cabinetshard, stable glue line, and they has solved my CD storage problems.But I just got a notice in theexpand as they cure, filling poresin the material. You'll have to allow mail offering me 10 CDs for aa little more clamping time than penny, so I don't think my victorywith yellow glue, though. And, if over clutter will last long. tffiWhatever finish you choose,apply an equal number of coatson all surfaces.Otherwise, warpingmay occur, givingyour cabinet someunwanted curves.
tsqiSynthetic StoneThe experiments were notgoing well. And if you hadheard what the Rho-Deltagroup was up to, you wouldn'thaae been surprised. They wereattempting to make structurallumber out of shredded newspapers.It sounds like a fraternityprank - the loony scheme of abunch of crackpots with too muchtime on their hands.But you might have started totake them seriously when you realizedthat Rho and Delta are theGreek letters for R and D, short forresearch and development. Ifs anappropriate name for agroup of scientists,all former professors fromMankato State University, workingto turn clever ideas into businesses.46 W'orkbench tlune 1997Mike Reibel, a RhoDelta member,saw some possibilities amidthese experiments. Instead of callingit a failed structural material, hereasoned, lefs call it a successfuldecorative product. He also suggestedadding soy flour as a binder.As a former engineering andphysics teacherwho also has farmingin his background, Mike ownsa unique perspective on developing environmentally-friendly, agriculturally-basedproducts.Further tests proved the value ofhis ideas. Food-grade soy flourhelped produce a durable panelwithout relying on a toxic bindingagent that includes formaldehyde(remember that smell from yourhigh school biology lab?). This fibreakthrough gave birth to a prod- €uct named Environ, and a new com- !pany, Phenix Biocomposites.Mix, Mosh & MoldEnviron is composed mainly ofrecycled newspapers and foodgradesoy flour. The panels areavailable in ten rich colors andthicknesses ranging from Vsrr toil. Virfuallv all the raw materials
for Environ are collected or harvestedwithin 50 miles of thePhenix manufacturing plant in St.Peter, Minnesota.After making sure the newspapersmeet the company's compositionand cleantness standards, apulverizing mill transforms yesterday'snews into a fluff that lookslike cellulose insulation. Ink is notremoved from the paper since thatwould require harsh bleachingchemicals that are hazardous touse and can generate toxic waste.The edible soy flour is blendedwith the newspaper pulp, then aprecisely brewed soup is added.The recipe for the soup consists ofwater, dyes, and other ingredients,including a wax that keeps the particlesfrom sticking to the press.To achieve the granite look, twoseparately dyed batches areblended, partially dried, and eventuallyreach the press. There,pressure and heat forms a pair of3-ft. x Gft. panels.Once the Environ exits the press,it dries slowly to reach an equilibriummoisture content of 6% to 10%.This is equivalent to the moisturelevel of kiln-dried hardwoods.Growing A MqrketThe story of Environ is much morethan engineering, chemisfy, andphysics. It is also a successtory inmarketing, forboth the rawmaterialsand the finished product.For example, the farmers whogrow the soybeans that go intoEnviron are more than suppliers -they're also members of a coopthat owns part of the Phenix manufacturingoperation. When the companysells more product the marketfor their soybeans increases.And on the distribution side,Phenix constantly searches for creative ways to use Environ. Thematerial has become popular formaking plaques and awards, interiorsigns, store fixtures, statuebases, pens, desk and table tops,and even flooring accent stips.To meet current demand, 50employees work two shifts in aEach of the tuo coollng racls plclc up and holds firee sheeb of Envlron afhr they exlt fiepres, The next steps - surface sandlng and edge trlmmlng - produce unlform panels.40,000 square foot building, manufacturingone million square feet ofpanels per year.But construction is alreadyunderway for a 150,000 square footplant, and additional productioncapacitywill take a quantum leap to45 million square feet per year -equivalento covering 355 miles oftwo lane Interstate highway.Not all of the production will beEnviron, however. Phenix will beginmanufacturing a panel to competewith medium-density fiberboard,and is poised to begin marketingnew floor tiles based on Environtechnology. There's also a solid surfaceproduct made with recycledplastics under developmenlPutfing Envircn To WorkGiven the newspaper content ofEnviron, ifs no surprise that itmachines a lot like lumber.Although Environ is 1% timesharder than oak, it can easi$ besawed, drilled, routed, and sanded.Join it to itself or solid wood withscrews, nails, dowels, biscuits, orglue. You can use yellow glue(aliphatic resin), but polyurethaneadhesive is recommended.Envlron ls flnlsh-sanded wlth 18o-gritpaper. A3-ft. x6-ft. panel goes$roughfils sandlng shtlon wery 30 seconds,Environ has about the samestructural strength as mediumdensityfiberboard, but its mainfeature is good looks, not brawn.One of the quirks of Environ is itsaroma. Although it doesn't have thenose-burning sting of formaldehyde, it has an earthy scent that fillsthe workshop. But Phenix is e:
Classic BookendsBuilding the compact disccabinet ga,ae me the chance toget acquainted with Enairon. Iliked the result so much that Iimmediately b egan thinkingabout another project usingthis material. It didn't take longbefore I lsalizgd how perfectly thefaux granite appearance would befor a pair ofbookends. So I decidedto draw up a simple design that Icould complete in a day or two.The design I settled on calls forgluing four pieces of Environ into alaminated block (see the BookendConstruction View). This stack providesthe weight that a good pair ofbookends must have to be effectivefor supporting the world's great literafure.Or, in my case, a collection48 $?'orkbench tlune 1997of home improvement guides andthe Far Side cartoon series.Screwing a registration block tothe bottom edge of the top piecemakes it easy to align the otherthree pieces (Figure 1). For a goodbond, I brushed polyurethane glueonto the mating faces, thenclamped the stack between a pair ofUse a compass todraw a half-circlearc on your book€ndlamination.plywood cauls. I wasn't worriedabout clamping dents, becauseEnviron's a hard material, but thecauls helped spread the clampingpressure more evenly. I did myglueup one evening so I couldwork on the bookends the next day.Starting out the following morning,I removed the registrationblock and used a compassto lay out a semicircle(Figure 1). Then I bandsawedthe block to shape.Don't toss the corner cut-Scnap wood screwed to the hp plece in the lamination helps align the stack during theglueup, and supporb the compass whlle pu draw the arc,f(-117/stt --------------->1T57/s"l
Bookends Construction View0VERALL S|ZE: 51/2" x 4" x73/rc"Rout a covealong the edgesof thd arc.Bookend lamination3/q" x53/t" x5"NoTE: Cut four pieces57ystt x117/et and laminatethem togetherbegin project.Bases7o" x4,, x'lz"N0TE: Cut a piece4" x113/+" and routthe edges, Then cut twobase pieces to length,Rout fie curued edges with a 1/2"-radiuscove bit, making a couple of shallow passesto avoid any tear out.Bandsawthe laminationinto twoquarter-rounds.#8x'li2"| -A l) FHWSttal-,A-l%Lay out two quarter-rounds of equal lengft,then use a miter gauge to ensure squareband saw cub.%Non-skidtapeoffs into the tash - they're readymadesanding blocks (Figure 2).After smoothing the curved faceof the lamination, rout a shallowcove along those edges (Figure 3).Now you can use a band saw tocut two equally sized quarter circlesfrom the block (Figure 4). Amiter gauge will help guide the cutso the surfaces are reliably square.Save the cutoffsfor use assanding blocks.Sand the bookends thoroughly,then set them aside and beginwork on the bases. I cut one longpiece of Environ for the two bases,and routed a classical profile alongall four edges (Figure 5). Next, Icut the two bases to length.Drilling four countersunk pilotholes into each assembly is thefinal machining step (Figure 6).Afterward, you can glue and screweach base to the quarter-rounds.Finishing the bookends to ahigh gloss was a time-consumingprocess. Even with two coats ofsanding sealer, I had to brush onfive or six coats ofvarnish - I lostcount - to get the build-up I neededto rub out to a high-gloss luster.(Also see Finishing Secrets ForEnviron on page 45.)To give the bookends a littlemore staying power, I added a fewSand fie curue shrting witr 80-gdt paperand finishing witr 22}-grft.Tape fie paperh short sfips of non-skid tape to thefie block or use an adhesive-baclad sheet, underside of each base. tFRont fie combind base piece wih fie decorativebft of your choice, { used a co,e-andbeadbi$. Then, cut fie tan bases h lengh.Drill countersunk pilot holes before gluingand screwing a base to each quarter-roundbookend. Use #8 x 1 1/2" screws.\Torkbench tJ:une 199749
Handy Step Tbol <strong>Box</strong>When I read an article recently site.Butthat'sawasteoftime.AndThe Right MoteriolsI just have more to trip over.Thankfully, I finally came upwith a solution that has made thisproblem a lot easier for me to handle.I call it the step tool box. It'sbig enough to hold the tools andhardware I need for on-site homeabout what fhysici,sK callchaos theory, I couldn't helpbut wonder if someone coinedthe phrase during a homeimprouement project. It canbe as simple as hanging a ceilingfan, installing a bath faucet, or justnailing up some molding, but oddsare the tool or fastener I need willbe the one I leftbehind in the shop.The obvious answer is to haulevery tool I might need to the job50 Vorkbench tlune 1997improvement jobs, and gives me ahandy place to sit or stand whileI'm working. I also like to use it asa plafform for holding stock whileI'm cutting or drilling.Best of all, building the step toolbox doesn't require much time,material, or money.This is a utility project that's likelyto get kicked around a bit, sothere's no sense using priceyhigh-grade lumber.My "pine will do fine" motto forshop fixtures works here, butsince you'll be counting on thestep tool box to support yourweight occasionally, stay awayfrom boards with large, looseknots or any other serious defects.I started by cutting the bestmaterial for the sides. You can cutpieces from alt x 12n and rip themto width, or glue up the panels from
Step Tool <strong>Box</strong> Consfruction View0VERALL SITE:14112" x 15" x 20"Chamfer top --"after assembly'.-Non-skid tape__ Top'l%" x9Yz" x17"Removable bin;Strikeplate- Bulletgl catch Side;Drawer runner%" x%" x9%"Side3/q" x9lz" x'143/q".'- Raill- vt'*13a" x'r6iChesthandleFinger pullDrawerFor details, see theDrawer ConstructionView on page 53.Side Detail'1"Foot1Yz"lL2"fnarrower boards. Even though it'sa little more work, I like the secondmethod. My preference is to ripquartersawn sections from wideboards, and glue them into panels(see the Pro Tip at right). Due tothe orientation of the tree's growthrings in the board, quartersawnpanels are less likely to shrink,swell, or cup as much fromchanges in humidity than plainsawnboards of the same width.While you're at it, cut enoughquartersawn stock for the shelf aswell. In fact, you can also make apanel from 2x stock for the top followingthe same method. Simpleedge to edge butt joints will workx3" x14lz"#8x1Y2" /FHWSShelfs/q" x9/2,,x17"What You'Il NeedLumber8 bd. ft. of ilrx lltt Pin.5 bd. ft. of 2rr x $rr Pi12 sq. ft. of Yarr HardboardHardware(40)#8,. 11lzrr Flathead screws(2) Chest Handles(2) Bullet Catches - 12mm(5) Lin. ft.. of 2ttNon-skid tapefine for gluing up all of these narrowboards into panels. I preferusing standard yellow carpenter'sglue for this kind of joinery.Don't make the mistake of wipingup the glue squeeze out with awet rag. You'll only make a mess.Instead, let the glue dry to a rubberyconsistency, then remove itwith a scraper or chisel. Sand thepanels after the glue hardens, thenput the shelf and top aside. Fornow, concentrate your effort on theside panels (see the Side Detail).Get ready for the next step byoutfitting your table saw with ar/ar dado blade. You need thedado blade to cut narrow slots for,tChamfer edgesand ends of feetSTEP TooL BoXA kit has been assembled for this projectthat includes the bullet catches withstrikes and escutcheon pins, chest handles,screws and non-skid adhesive tape.Ordcrnumber3303l00....... ..$15.95To Order Call (8OO) 311-3994Grain Makes a DifferenceThe most stable, waro resistant boards haveannual rings that are perpendicular to thesurface. This grain orientation, called quartersawn,makes boards that are less influencedby changes in moisture than plainsawnlumber. Quartersawn boards usuallyshow a very straight, parallel grain figure.Quartersawn board\-.. \Workbench t June 19975r
lnstall a 1/c" dado blade in your table sawand plow a dado in each side for the drawerrunners. Make sure the hardboard fih,SlJibh to a %" dado blade and make severalpases h cut fie wide dado at tp topend of each slde. Then cuthe shelf dadoes.the drawer runners in each side(Figure 1). After you finish thedrawer runner dadoes, exchangethe r/+' dado blade for ar/zttbladeand cut the rabbets and the shelfsupport dadoes (Figure 2).Moking the FeetI recommend making the feet fromone piece of 2rr x 8rr stock (see theFeet Construction View). Rip the2rr x 8rr to 61,/srr wide, then crosscutthe blank to 141/ztt tong,Begin by laying out the feet onyour stock. Next, form the curvedends of the instep using a drillpress and s/err bit (Figure 3). Afterdrilling the holes, equip your tablesaw with ^zlnu dado blade, and cutthe wide dado for the foot-to-sidejoints (Figure 4).Rip your stock in half to createthe two feet, and nibble away theremaining instep waste (Figure 5).Layout the 45' corners (see theFoot Detail), and cut them withyour table saw (Figure 6). Sandthe feet thoroughly and rout achamfer along the outside edges.Feet Construction ViewBore 5/s"holeAssemblyBefore glue starts flowing, take afew minutes to dry fit the jointsand to drill countersunk pilot holeswhere required for the screws.With a project this small theassembly really happens all atonce. Spread glue in the side paneldadoes for the shelf, slip the shelfinto position, and drive the screws.Now put glue in the side panel rabbetsand add the top.Glue and screw the feet to thebox, then cut the two rails and fitthem into the assembly. Drill countersunkpilot holes and secure therails with glue and screws.Adding the rails to the shelf createsa storage well big enough tohold a cordless drill, jigsaw,router, or other tools you mightneed to carry to ajob site.A Plqce For EverythingAt this point, the step tool box isready to function as a tool carrierand a plafform. But you don't yethave suitable storage for hardwareand other small items. Adding theFoot Detail45'Lay out the feet on a 61/8"-wide blank, thenbore 5/s" diameter holes firough the stockto form the curve at the ends of the instep.Use a3A" dado blade tomachine /2" deep x 972"wide dado.Ttrvo"l10,,_ ___NY2uTTo form the wide dado, first make twopasses to define fie ends of fie dado, thenremove fte waste between the first cub.Rip the two feet from the blanK ften standthe pieces up and cut away the waste thatremainsthe insteps,Turn your miter gauge '[5o and make thecorner cub on each foot. Chamfer theends and edges of the feet witrr a router.52'Workbench tJune 1997
Bin DetailDrawer Consfruction ViewBin frontyrr, .11s7s,,x147/aollBin dividerVq" x15/e" x2Y2"Bin side3A" x15/a" x2Yz"Front3/q', x2/2,'x163/e,,:#6x ltFHWS)Finger pully4" x3/4" x3''\--igoito1n%" x83/+" x'155/a"Rabbet DetailBottom Rabbet DetailGroove DetailBullet Catch Detailrabbet to 1t---i\=..1tL '! Drawerdrawer bottom. I tZa,' frontstorage drawer, with its removablebin, will take care of that.Simple rabbet joinery is all that'sneeded forthe drawer corners (seethe Rabbet Detail). As for the bottom,normally I'd support it ingrooves in the drawer walls. But forthis drawer I just rabbeted the sidesand fronts to get the greatest depth(see the Bottom Rabbet Detail) -don't worry, this is plenty strong.Cut the drawer sides and frontsto size and complete the rabbets.Then glue and screw the drawertogether, and cut the hardboardbottom to fit.Once the bottom is installed withglue and nails (you'll need to drillpilot holes in the hardboard), cutthe groove in each side for thedrawer runners (see the GrooveDetail). Next. cut hardboard for thefinger pulls and the drawer runnersas well. Glue the runners into thestep tool box sides. As for the fingerpulls, glue and screw them to thebottom edge ofeach drawer front.The drawer is designed to openfrom either side of the step toolbox, a convenient feature thatrequires a pair of spring-loaded bul-Iet catches. Drill a pilot hole in eachdrawer front and screw in thebullet catches (see the Bullet CatchDetail). Mount the strike plates tothe underside ofthe top.Building the removable bininvolves the same simple rabbetand dado joinery you've used in therest of this project (see the BinDetail). Tb get the r/ztt stock for thebin, you can resaw it or plane itfrom thicker stock. You can alsopurchase r/2" thick molding stockfrom many lumberyards.Make the bin just as you did thedrawer. The only difference is theadditional dadoes needed for thehardboard dividers, and the use ofbrads for holding the rabbetjointsinstead of screws.Wropping UpNow all that's left to do is to checkthe fit of the drawer. If all goeswell, rout a chamfer around thetop of the step tool box. Give theproject a final sanding, and applyeither polyurethane or regular varnishfor a tough, protective shell.As finishing touches, I mountedcarrying handles on the step toolbox sides, and applied non-skidtape to the top and feet.All it takes is one trial run toprove what a handy problemsolverthe step tool box is.Although I admit it has had a coupleof unfortunate side-effects.For starters, I have fewer excusesfor being disorganized - I justhate to give those up. Second, I'vehad to muster some self-disciplineand return the step tool box to myshop whenever I complete a job.Failing to put tools back wherethey belong, I've discovered, leadsme back to my original problem -the chaos of hardware-filledcoffee cansand forgottentools.tffi
f*st, *l .u* 1..,ii{ffirffI i'ryryDemystifying MotorsIntely, I'ue noticed that mywoodworker's brain is a lot likemy shop - more than a littleunkempt, and always too smallfor euerything I try to fi,t insideit. Euen though some things getless than their due attention. I didnotice when the motor on my oldtable saw suddenly "retired" a fewweeks ago.A replacement motor was inorder, but I've always been a littleconfused by the fine print of motorratings and features. After I didsome digging, though, I found areliable set of standards and featuresthat can tell me whether I'mgetting my money's worth. And Ialso began understanding thebasic principles of a single-phaseinduction motor - the kind thatpowers most small-shop woodworkingmachinery.Wild HorsesThe first thing I discovered wasthat the horsepowe rating is thesprint 100 meters on level groundsound-bite of motor specifications. in ten seconds. If he tries to coverNot only does it present an incompletepicture of a motor's quality,it's not always subject to a fixed,independent standard of interpretation.Some manufacturers makeoptimistic claims that don't necessarilyhold up in the shop. Evenworse, this lone number obscurestwo key factors: the motor's abilityto increase its output in responseto the demands made on it, andthe potential for damage if thosedemands repeatedly exceed themotor's intended use.For a sort of reverse analogy,picture a track athlete who canthe same distance up a steepincline at the same pace, he'll haveto develop additional muscle,heart, and lung capacity. Morerealistically, he'Il have to negotiate54-Workbench tlune 1997
Induction Motor BasicsIf youVe ever noticed the way poleson magnets repel and attract eachother, you're already halfivay tounderstanding howinductionmotors work.lnductionmotors rely ontwo types ofmagnets * afreespinningpermanent magnet (the rotor), anda fxed electromagnet (the stator).The stator, a metal cylinderwrapped with windings of copperwire, needs electical current passing through it to become magneticallycharged. Inside the stator areits magnetic poles - stations thattansmit current to the rotor. Thereare usually two or four poles, somotimes six, always arranged in pairsmounted opposite each other.The rotor resembles a squirrelcage, and has no direct connectionto a source of elecbical current.Supported on a bearing-mountedsteel shaft, it nests inside the stator.As electrical current flowsthrough the stator windings, thepoles become magneticallycharged, one negative and one positive in each pair. In response, therotor will make a partial revolutionas its "poles"(the bars in its cage)the grade at a slower pace.An induction motor is differentfrom the runner in two ways.First, the motor's speed is fixedby the number of poles in the statorand by the pulse cycle of theelectrical source. Therefore, itcan't slow down to compensatefor the increased load. Second,the motor can generate additionallorque simply by drawing morecurrent, an option the sprinterdoesn't have.So far it sounds good - themotor can beef up instantly whenit's got a bigger job to do. Butthere's a catch. The motor won'tsustain that power level continuouslywithout generating excessiveheat, the culprit in most motorfailures. This is one of the mostbasic tradeoffs in motor performance,and defines the differencebetween a "continuous-duty" rating(power that can be safely generatedfor extended periods) and a"maximum developed horsepower"rating (a peak level the motorcan generate only intermittentlywithout overheating). The peakhorsepower can be two to threetimes higher than the continuoushorsepower. I think of that burst ofpower as a team of wild horsesthat can pull your wagon out of asteep ravine, but isn't necessaryfor a steady trip cross-country.The bottom line is this: if arepel the like charge and seek theopposite charge in the stator poles.Theoretically, the rotor shouldstop turning once the unlikecharges find each othet but theequilibrium doesn't last. Since thisis an AC motor (alternating current),the currentflow is changingdirection repeatedly, reversingthe charge of each stator polefrom negative to positive and backagain. This generates a rotatingmagnetic field inside the stator,and the constantly changing polarityboth pushes and pulls the rotorin hot pursuit as it produces itsown current. It's sort of like a dogchasing its own tail, except themotor won't get dizry and crashinto your coffee table.machinery or motor manufacfurerphrases horsepower claims withthe word "Develops . . . ." it's a virtualcertainty that the numbergiven is not a continuous-duty ratingand shouldn't be comparedwith one.In any event, the motor's amperagerating, shown on the nameplate,is a more reliable indicator.It states the actual current draw ofthe motor at a given voltage leveland temperature rise.Essentially, horsepower ratingsindicate what's coming out of amotor. Amperage ratings revealwhat's going into it (electrical current),with higher numbers indicatinga more powerful motor.Rotor andshaft assemblyThese are called inductionmotors because the current in therotor is "induced" or generated bythe stator's rotating magneticfield, not provided through wiringor another direct connection.The speed is fxed by the numberof poles in the stator and thecycle frequency (per second) ofthe alternating current. With the6$cycle power in the U. S., a twopolemotor will turn one completerevolution for each full pulse cycle,or 3,600 times per minute. Underload, the speed actually drops toaround 3,450 rpm. The same currentpulse will turn a four-polemotor only half a revolution, yieldinga noload speed of 1,800 rpmand a rated speed of 1,725 rpm.'Workbenchrlune 7997 55
Heovy MetolThough other factors are involved,what best determines a motor'sactual power output and resistanceto temperature rise are theamounts of iron and copper in itsrotor, stator, and windings. Thesematerials conduct current and actas a thermal sink for the heat createdby the flow of electricity.If youVe ever overfed a piece ofwood into a blade or cutter, youknow it's possible to stall a motor byexceeding its torque limit. Butbetween that abrupt limit and themotor's normaload range, there's awide expanse where continuedpeak demand will create more heatthan the motor is designed to withstand.Every time a motor gets inthat elevated temperature range,the coating of clear enamel insulationon the copper windingsdegrades. If the periods of overheatingare frequent or severe, theinsulation can eventually melt oreven burn, ruining the motor.Better-quality motors have adequately sized windings that offer awider margin of protection againstheat damage. They also have someform of thermal overload protection.These devices act like circuitbreakers that trip an overheatedmotor off and can't be reset until itcools down. <strong>Wood</strong> shop motorsFrame size (Mountingplate and rotor shaftsize/position)HorsepowerratingVoltageoptionsAmperageratingMotorspeedPulse cycle ofincoming cunent(per second)Service factor(Retlects built-in overloadcapacity; e.g. 1.25= 25o/omargin above normal rating.)7 .413.5-3.7should have only manual (pushbutton)thermal protectors. Automaticresettypes can turn machines onagain without any warning.Checking ReferencesThe nameplate reveals a lot abouta motor, but the warranty can alsobe a clue to quality. Sometimesthere's fine print there about themotor's intended application or anexclusion for commercial use. Ifyou're shopping for equipment,Used in portable and bench top powertools, universal motors pack more punch per poundthan induction motors, but aren't designed to withstand long run times, Power ratings arein amps; any horsepower ratings are likely to be for peak hp, not continuous.Fulload efficiency(look for 50-80% efficiencyvarieswith motor size)nr'l'fi-,Wiring diagramsfor low andhigh voltagelnsulation classDuty rating @ 40"C.(104'F.) ambienttemperatureAmperage draw@ service factor overloadask specifically about the warrantyon the electricals, since it may differfrom the coverage on themachine itself.Also, look for independent certification.Most U.S. manufacturerscomply with National ElectricalManufachrrers Association (NEMA)standards, so there's less room forstretching performance claims.North of the border, look for theCanadian Standards Association(CSA) symbol.In addition, check for a certificationstamp from UnderwritersLaboratories. UL listing meansthat an electrical product has metthat agency's standards for safedesign and operation. They don'ttest motors for actual power output,but by running them both atand beyond their rated amps andmeasuring the temperature rise,they answer the question indirectly.If the motor maintains itsrated amperage under a continuousload and stays within the designatedtemperature range, thetest confirms that the output is acontinuous horsepower rating.Translation: There's room for themotor to run intermittently athigher peak levels, without dangerouslyoverheating. tF56\Torkbench t}une 1997
Your Ten Point Checklist:Choosing An Elecffic MotorAlthough you should expecto seehigher price tags on better-qualitymotors and the machines equippedwith them, it's not always as simpleas 'You get what you pay for."lI If you're comparing horsepowerbetween motors ormachines, make sure both ratingsare for continuous-duty use, notmaximum developed horsepower.Zl Ignore guideline #1, sort of.For a clearer picture of the motor'soutput, check the amperage andfull load efficiency ratings on thenameplate. The higher the amperagenumber, the more powerfulthe motor is.E *" motor should have it'sown thermal overload protectionto safeguard against damage fromoverheating, even if the machine'son/off. switch is also protected.The reset function should be manualonly, never automatic.A Determine whether themotor is rated for continuous oronly intermittent use. Intermittentdutymotors are designed for runtimes under 60 minutes, and willlikely have shorter service livesthan industrial-quality motors.They're fine for home shop use ifyou let them rest between toughworkouts. Don't be confused bythe nomenclature - an intermittent-dutymotor can still have acontinuous-horsepower rating,even though the insulation, windings,and air circulation won't beon par with those of a continuousdutymotor.E o rEFC (totally enclosed,fan-cooled) motor housing willcost more but will fare better in awood shop. You'll pay less for anopen, drip-proof enclosure, butwood dust can accumulate insideand interfere with the motor'sinternal switches, electrical contacts,and even bearings.Explosion-proof motors have totallysealed housings so the electricalarcs inside can't ignite vapors.Except for use in dedicated finishingrooms or spray booths, theirextra cost usually isn't warranted.The best motors featuresealed, prelubricated ball bearingson both the load end (where thepulley mounts) and idler end ofthe rotor shaft. Less expensivemotors will have ball bearings onthe load end only and a metalsleeve bearing downstream.look for a capacitor-start,induction-run motor, the mostcommon for wood shop applications.Usually housed in a smallpiggyback enclosure on the motor,the capacitor shifts the phase ofthe incoming current and feeds aseparate starter winding. As themotor comes up to speed, an internalcentrifugal switch opens, shuttingoff current to the starter winding.Avoid split-phase motors.Their low starting torque makesthem too anemic for use in woodworkingmachines.E t*" sure the motor's framesize and baseplate are compatiblewith the mounting plate on yourmachine. In the United States, theNational Electrical ManufacturersAssociation (NEMA) sets standards,but imported motors willoften have equivalent sizes.IZ This mav seem obvious. butmake sure the motor's rpm rating(either I,725 or 3,450) is appropriatefor the machine. Drill presses,lathes, and band saws typically getthe slower motors, while tablesaws, jointers, and planers runwith the higher-speed powerplants.Check the manual or askthe tool manufacturer.Illll Check the nameplate for theinsulation class rating, stated as theletter A, B, H, or [, in ascendingorder ofresistance to heal Class Binsulation is adequate for most shopmotors; a Class A rating may indi.cate that the motor is designed forintermittent use only.Thanks to Baldor Mobrs and Drfues, Marafion Electlc Mfg. Corp, and ttre AmerlcanAssoclaton for Vocatonal Insfucdonal Materlals for heh help wlh thls story.\Torkbench tJune 1997 57
New<strong>Tools</strong>Sears Craftsman Utility CuttersMaking straight cuts in a variety oftough materials is an easy job forthese Sears Utility Cutters. You canuse them for square cuts on rope,vinyl tile, garden hose, carpet,leather, and many other materialsaround the home. In the garden, youcan cut flowers and prune branches.Unlike using a utility knife, this tooloffers more control. And that meansfaster, more dependable results.The cutters are available in twosizes - with2r/zr or 37/stt blades.And one of the best features is thatyou never have to sharpen theblades. Three Phillips head screwsallow you to quickly replace theblade and the plastic anvil. A metalloop on the padded handles keepsthe spring-loaded cutters safely shutfor convenient storage.The large size retails for $24.99,and the small cutters are $19.99 atSears stores. A package of threereplacement blades and one anvil isless than $10.Weller Self-IgnitingTorchTo light an ordinary propane torch,you hold the cylinder in one hand,turn the valve with your otherhand, and strike the sparklighterwith your (oops, ran out ofhands).With the Weller self-ignitingtorch, you can forget about matches,lighters, or sparklighters. Onefinger on the push-button switchfires up the torch for soldering,sweating pipes, paint removal, andmany other jobs. It burns propane,propylene, and MAP The WellerQuickFire torch (without gas) isabout $15 at hardware stores.DeWalt Debuts Feature-Packed <strong>Tools</strong>DeWalt's new power tool lineupincludes four machines with innovativefeatures designed to producemore accurate results in the shopand on the job site.For example, DeWalt engineeredits l2r/2il heavy-duty thickness planerto minimize snipe - the scallopedcut that usually occurs at each end ofa planed board. An extra-rigid headthat resists deflection plus largeinfeed and ouffeed tables help accomplishthis goal.The 20rrvariablespeed (300 to1750 strokes per minute) scroll sawutilizes a double parallelink arm systemto minimize vibration whileimproving the quality of the cut. Italso feafures a convenient no-toolblade change system. The machinedtable tilts 45' right and left.The double bevel sliding compoundmiter saw also does a rightand left tilt that enables you to cutbevels in either direction - a featurethat really comes in handy when58 W'orkbench tJune 1997you're working with long pieces oftrim. At 90', the saw has a crosscutcapability of 12rr. The extra-highfence lets you hold trim pieces vertically,including molding up to 512rr.The 10rr table saw is perhapsthe most interestingtool in the entire group.The tabletop measures agenerous 261 /ztt, t9r / +tt,but its cast aluminumconstruction keeps thewetght of the saw atonly 64 pounds. Eventhough it's portable forjob site use, this tool hasbig capabilities. Thefence is supported by apatented pair of rack-and-pinion telescopingrails with a ripping capacityof.24r/zr to the right of the blade and16rr on the left side.The planer, scroll saw, and mitersartr are scheduled for release inMay, 1997, with the table saw followingin July, 1997.?I
Veritas Flat-BobPlumb bobs are almost alwaysround, and that creates a problemwhere they are most commonlyused - next to a wall. The plumbbob rolls around endlessly, andholds the string so far from the wallthat it's virtually impossible to knowwhere to mark.The Veritas Flat-Bob solves thoseproblems with a design that's certainto give you more accurateresults in rough and trim carpentry,wallpapering, and plumbing.To use the Flat-Bob, unwind asmuch of the braided nylon string asyou need from the windlass, andhang it from a nail. The 33/arr longABS plastic body has a flat brassinsert that hugs the wall and centersquickly. Then make a pencilmark on the wall through the slot inthe body.And the folks at Veritas didn'tstop when they had a tool thatworked well. They also made it easyto store. When you're finished usingit, rewind the string and snap thewindlass into the slot in the Flat-Bob's body. There's even a tip coverthat protects the brass point fromdamage in your toolbox.The Flat-Bob retails for $g.gS. toorder, call Veritas/he Valley <strong>Tools</strong>at (800)871-8158.Pole ScrapersWhen I first heard about Red Devil'sPole Scrapers, I'll have to admit that Iwas skeptical. I liked the idea of havingboth my feet planted firmly onthe ground while scraping paint outsideor removing wallpaper. Yet atthe same time, the idea of a puttyknife on a stick seemed a bit silly.But when I got my hands on thesetools, I changed my mind fast.Comparing a putty knife to theseheavy-duty scrapers is like comparinga skateboard to a 4" 4 pickuptruck. The beefy 3rr-wide blades aremade of thick high-carbon steel withalmost zero flex. The highly-polishedfinish looks great, and is also practical- the material you are scrapingwon't stick, and clean-up is easy.You can choose a flat scraper(about $lt) or one with a bend in theblade (about $fZ). .I]tre bentversionis handy for overhead work, likescraping peeling paint from soffits.The black plastic handles aretapped to accept a threaded broomhandle or extension pole. For durability,a metal ferrule reinforces thisconnection point. Finger indentationson the handles give you a non-slipgrip when you work without a pole.Red Devil Pole Scrapers are availableat hardware and paint stores, orcall (800) 4A-DEVILGrinder Also Handles Sanding JobsSmall hand-held grinders are widelymisunderstoo due to their name.You probably associate a grinderwith metal work, yet these underappreciatedtools are capable ofmuch more work in your shop.As sanders, they provide unparalleledpower for carving and contouringcurved surfaces. Why tediouslychisel a chair seat, for example,when you can sculpt it better with agrinder and coarse sandpaper?Bosch has a new enffy in the rapidlygrowing field of portable grinders.It is designed for easy handling andoperation, and its 7-amp motor hasat 11,000 rpm.The grinder featuresa paddle switch with asoft-grip acfuator forbetter control andcomfort. The two position side handlegives you a variety of workingpositions to suit the job at hand.With precision-made heat-treatedgears and a ball-bearing motor ratedat 1.4 hp, this grinder is designed forlong life.The Bosch model 1346A PaddleSwitch Grinder retails for about $89at hardware stores and home centers.For more information. callBosch at (800) 301-8255.\.;r&Workbench tlune 1997
ew Bits Hit the ThrgetVermont American has inkoduced fastcuttinghole saws with a plug-ejectingarbor, plus a new line of drill bits especiallyengineered for use with cordlessdrills. I tested them both, and gotimpressive results.Whenever I've installed deadboltlocks in the past, I always checked thatthere were no children around. And itwasn't for just the usual safety concerns- I also wanted to make sure that theydidn't expand their vocabulary by hearingme curse at the wooden plug thatalways got stuck inside the hole saw.Vermont American's new hole sawsand arbor have upgraded my lockinstallationperformance from a marginal"R" rating to a family-friendly "G".The bimetal hole saw cuts aggressivelyand has deep gullets that help ejectchips for faster and cooler cutting.But the real star of this show is thePlug Out arbor that fits all standard holesaws. When you cut the hole, it acts likea standard arbor. But when you're finishedcutting theplug, you put themetal cup of thesaw into the hole,slightly wedging itagainst the wall ofthe hole. Then,switch your drillinto reverse, andthe left-handedthreads on thearbor shaft push theplug clear of the bit.VermontAmerican'sSidewinder drill bitsfeature an additionalclearance relief machined along the bifsshaft. That reduces friction againstheside of the hole - which means moreholes per battery charge. Sizesrange from l/ra't totlru nr/ursteps. The bits are available at hardwarestores, or call VermontAmerican at (704) 7317464.Wrenches Self-Adjust, Grip TightlyIt seems that quite a few inventorsare obsessed with creating the ultimateself-adjusting wrench. And mostof the time, their ideas nearly work.But every so often, I discover atool, like the Pop Pro wrench, that's asolid performer. To use it, you openthe jaws with your thumb, then letthe spring-loaded mechanism closeon the flats of the nut or bolt - SAEor metric.The harder you push on thewrench's handle, the tighter the jawsgrip. The Pop Pro Wrench handlessquare and hex heads from l/arr to7 f ttt, and the larger Industrial Pop Proself-adjusts from s/s" 1o 15lrtt. Bothare covered by a lifetime warranty.Order directly from SK Enterprisesby calling (914) 562-1111. The smallwrench is $23.95; the large size is$4z.gs;plus shipping.Vermont Amerlcanhole saws cut fast,and the Plug Out arboruses your drlll'sreversing power toelecthe wood fromthe cup. The Sldewinderbit (below)gfues you more holesper battery charge.Snips Work FastWhen I needed to make long cutsin tough materials like sheet metalor vinyl siding, I had to choosebetween the longblades of tinner'ssnips and the morepowerful cuttingaction of compoundactionsnips.The new Multi-Master long bladesnips from Wiss com-i:bine the best of these \two tools. The 3rlblades are twice aslong as those on ordinarycutters. And youretain the mechanicaladvantage of compoundaction. which multipliesyour hand's force byfive times.The Wiss Multi-Master snips retail forabout $17 at hardwarestores and home centers.W'orkbench t June 1997
Home ProductsBrass That Doesn't TarnishEngineers at Weiser lnck haveapparently found a new solution tothe tarnishing problem that hasalways plagued door hardware. Inthe past, there was little a homeownercould do to maintain the brightfactory-finish. Use and the elementsinevitably wore off the clear coatingthat was faditionally employed toprotect the metal. The result was tarnishing,flaking, and pitting.But now, Weiser uses a new technologyto bond a finish to its solidbrass hardware. The company claimsthat the finish becomes virtuallyinseparable from the product.The bonding process, called LowTbmperature Arc Vapor Deposition,was developed to protect the SpaceShuttle during reentry into theearth's atmosphere, when temperaturescan reach several thousanddegrees. I-aboratory tests show thatthe finish - called Weiser InckBrilliance - is so tough that thecompany offers a lifetime warrantyon its bright appearance as well asthe components of the lock.Another benefit is the environmentalfriendliness of the process. Thecompany says that no volatile organiccompounds are used, and no hazardousor toxic wastes are produced.The finish is shown here on thePrestige Aurora Entryset, whichretails for less than $100. It has alever-operated handleset and matchingil deadbolt. For more informationand the names of local dealers,call Weiser at (800) 677-5625.Cabinets Have Old-Southwest CharmThe bleached-white pine doors ofCanac's Mesa cabinets are sandblastedto simulate years of weathering bythe wind and desert sand.This design is one of five new cabinetstyles in Canac's NativeAmerican collection. Three of thestyles are made of pine; the othersare maple. The available colors alsoecho the theme of the AmericanSouthwest. With names such asAdobe, Buckskin, and StagecoachGreen, the colors help carry the cabinets'rusticimage.The choices continue with doorhardware and drawer construction.One option - hammered hardware- has a hand-worked antique lookthat complements the appearance ofthe cabinets. And you can selecteither all metal drawers or woodendrawers with metal glides.When you look past their weatheredexterior, you see that these cabinetsfeature modern constructionmethods (without face frames) andrugged European hinges.To obtain more information andthe location of the nearest Canacshowroom, call (800) 22G2248.Flex-O-LinerIfyou everwanted to create awater garden or fountain but wereskeptical about the labor andexpense of excavating your yard,try a Flex-O-Liner in a woodenhalf barrel. The inexpensive (lessthan $25) plastic insert measures23rr at the base, is 15'r high, and itspleated sides automatically adjustfor a custom fit in your barrel. Callthe Henta Corporation toll free at(800) 4734682.When you rub your hand over the solid pinefronb of these Canac cabineh, you'll feel ftegrain of the wood exposed by sandblasting.\Workbench tJtne 1997
Portable GrillGives You BBQ To GoThe Kingsford Barbecue Bucket lets you haveyour food to go. lt features durable porcelain onsteel construction for resistance to rust and heat.S4rether you're setting up a tailgateparty, grilling burgers at a picnicsite, or fixing dinner at the campground,you'll appreciate the convenientfeatures built into theKingsford Barbecue Bucket.To get this grill going, you simplylight a crumpled sheet of newspaperplaced in the vented base. Thisfunctions like a flue, directing theheat upward to quickly ignite thecharcoal without the hazard orexpense of lighter fluid.The base, which also serves as anash collector, stows away inside thebucket for easy transport. And asturdy handle makes carrying thegrill an easy one-handed job. The14rr dia. grill is large enough tocook food for a family of four. TheBarbecue Bucket sells for less than$40. For more information or thename of a local dealet call the manufacturer.Porcelain MetalsCorporation, at (800) 58*4745.Iittle GeneratorThe compact design and lightweight (22 pounds) of the newColeman Powermate 1000 generatormake it easy to take power virtuallyanywhere you go.The generator has an output of850 watts. That's enough to runequipment such as lights, a TV set,Pocket Doors Increase Usable SpaceWhetheryou're building a newhouse or remodeling your currenthome, you should check out theadvantages offered by sliding interiordoors that disappear into pocketsinside your walls.Pocket doors eliminate swingrngdoor arcs, and that space savingsmeans that you can actually usemore of the floor area in yourrooms and hallways. You can use apocket door to create a grandentrance between a dining roomand kitchen, or to gain valuablespace in bathrooms and bedrooms.Pocket Door Frame Kits fromL. E. Johnson Products provideyears of maintenancefree operation,and can be installed by the doit-yourselfer. Track, header, andmounting hardware is included.You provide the door - either newor a recycled swinging door. Kitsfor standard-size doors range from$66$72. For a free brochure, callL. E. Johnson at (800) 837-5664.Podct dmrs elimlnate fte dead space required bysrryinging doors, This increaseusable floor areamadmizes your options for ananging fumlture.A portable generator, such as the Powermate1000,is handy for recreational use, emergencies,and those times when you needpower beyond the reach of an extension cord.or a compact refrigerator. It willalso power many of your portableelectric tools. But don't plan to useit for heavy-duty electric tools -850 watts will handle tools rated upto only 7.1 amps.The generator also provides 70amps of 12-volt DC power that youcan use to jumpstart a vehicle witha dead battery.An automatic throttle on the generatoradjusts engine speed to produceonly the level of powerrequired. As a result, the generatoris quieter and uses less fueLProtective circuitry detects overloadand reverse polarity situations,and cuts power to prevent damageto electrical equipment.The list price for the Powermate1000 generator is $449. For moreinformation, contact Coleman at(800) 4451805.62 \Torkbench tltne 1997
Nl|W l|1'I IHE WEBPoint your browser to:http ://www. aug usthome.comMetallic l^aminates Are a Hot LookWilsonart International has a line of32 metal laminates that can createdramatic looks and decorativeaccents. Designed primarily for verticalinterior applications, the sheetsrange from highly polished brassand mirror-look chrome to bronzeand black aluminum. A variety ofgeometric and irregular textures addfurther visual appeal.Some residential uses includedecorative edging and accents, cabinetry,appliance fronts, backsplashesin kitchens and bathrooms, andwall covering.All of the metallics can be cut andmachined with standard woodworkingequipment. A protective thermosettingresin protects the metalagainst damage from oxidation,humidity, and abrasion.The mirror-look metallic panelshave several advantages over glassmirrors - including lighter werghtand shatter resistance.\ uptol6-DFAWERSCall Wilsonart's Customer ServiceHofline at (800) 433-3222 to request acopy of their l2-page DecorativeMetals brochure. It illustrates the fullrange of available colors and textures,as well as examples of uses inboth commercial andresidential settings.w00D, WATER& FIRE...A RELAXII{G BLEND...Increase drawer storage with thisbeautiful, top quality, solid wood,dust proof, underbed dresser. Fitsunder any mattress. Shipped UPSORDER 48 PAGE CATALOG 6340o lle t{oll olen lools I'il||one com[acl, allodable n|achlne, Work on wood-and metal or plastic, Easy and lun to use, Built to last a lifetimeWOODSvepnsHgirl0holsinl34" Lathe Drill press12" Table saw Fouter12" Disc sander ShaoerHorizontal boringMETALLatheMitlDrilll -800-345-6342Ask for Dept. WBW,0Smithy fftlHllfi i&8st;il'WRELESSDRIVEWAYAIARMA bell rings in your house anytimesomeone walks or drives into your place.- Free Literature -A complete line of wirelessecurity equipment.DAKOTA ALERT, INC.BOX 130, ELK POINT, SD 57025Ph: 605-356-2772Beautiful, hand selected cedar, still waterand a gentle warming lire in your Snorkel stoveare all you'll need to enjoy a relaxing soak,gazing at the evening stars in your Snorkel HotTub.Affordable hottubbing can become an everynight pleasure. Once you haveyourtub... theevening stars are free!SnorkelStoveCompany ! Yes,send me FREE Information<strong>Wood</strong> Fired Hol TubsDepl. [ts 9754421 66thAvenue SoulhSeanle,|,1/A981 08 city- state-ziphflpltnJl'J.snoftel.mm\Torkbench tJune 199763


![Til]tl](https://img.yumpu.com/45878240/1/190x245/tiltl.jpg?quality=85)


