A4LDE 2300 remove & instal - Ford Scorpio
A4LDE 2300 remove & instal - Ford Scorpio
A4LDE 2300 remove & instal - Ford Scorpio
- No tags were found...

You also want an ePaper? Increase the reach of your titles
YUMPU automatically turns print PDFs into web optimized ePapers that Google loves.
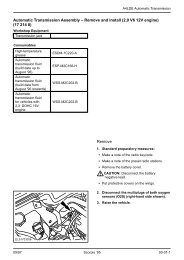
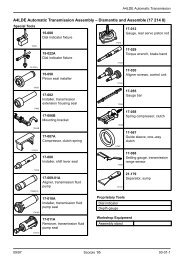
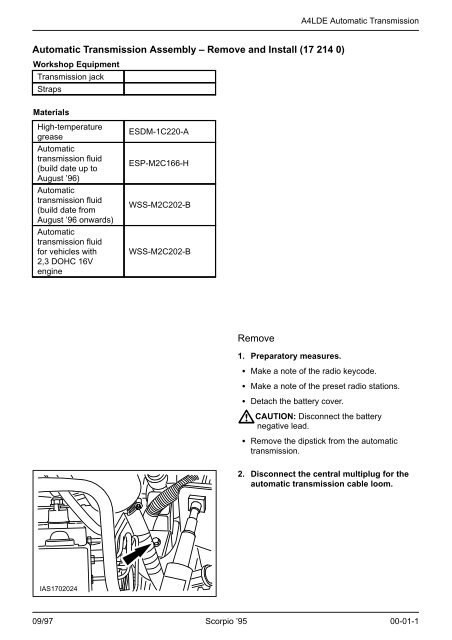
<strong>A4LDE</strong> Automatic TransmissionAutomatic Transmission Assembly – Remove and Install (17 214 0)Workshop EquipmentTransmission jackStrapsMaterialsHigh-temperaturegreaseAutomatictransmission fluid(build date up toAugust ’96)Automatictransmission fluid(build date fromAugust ’96 onwards)Automatictransmission fluidfor vehicles with2,3 DOHC 16VengineESDM-1C220-AESP-M2C166-HWSS-M2C202-BWSS-M2C202-BRemove1. Preparatory measures. Make a note of the radio keycode. Make a note of the preset radio stations. Detach the battery cover.CAUTION: Disconnect the batterynegative lead. Remove the dipstick from the automatictransmission.2. Disconnect the central multiplug for theautomatic transmission cable loom.IAS170202409/97 <strong>Scorpio</strong> ’95 00-01-1
<strong>A4LDE</strong> Automatic Transmission3. Remove the three-part heat shield of theexhaust manifold.4. Detach the two vacuum hoses.PZS210602915. Detach the exhaust gas recirculation(EGR) valve.1 Disconnect the vacuum hose.2432 Unscrew the pipe from the exhaust manifold.3 Unscrew the mounting from the exhaustmanifold.4 Detach the EGR valve from the bracket.PZS21060306. Disconnect the multiplug of the heatedoxygen sensor (HO2S).Separate the cable tie.IAS210603109/97 <strong>Scorpio</strong> ’95 00-01-2
<strong>A4LDE</strong> Automatic TransmissionNOTE: Slacken the bolt only.7. Detach the bracket of the oil dipsticktube.Withdraw the oil dipstick.PZS17020378. Detach the catalytic converter from theexhaust manifold.PZS21060349. Raise the vehicle.10. Detach the engine undershield.11. Remove the front axle crossbrace.PZS21060382PZS21060393112. Remove the catalytic converter and thefront exhaust pipe.1 Separate the exhaust system.Remove the gasket.2 Disconnect the HO2S plug.Separate the cable tie.3 Detach the front exhaust mounting from thetransmission crossmember.09/97 <strong>Scorpio</strong> ’95 00-01-3
<strong>A4LDE</strong> Automatic Transmission2CAUTION: The driveshaft is finely balanceusing bolts of different lengths. Mark the<strong>instal</strong>lation position of the driveshaft andbolts.17. Detach the driveshaft from the reardifferential.NOTE: There is no transverse brace on vehiclesfrom 01/96 onwards.S150100311 Detach the transverse brace from the rearaxle.2 Detach the driveshaft.18. Detach the driveshaft centre bearing.1 Slacken the bolts.212NOTE: There are spacer washers between thefloor assembly and the centre bearing.2 Remove the bolts.3 Turn the two brackets 90.NOTE: Escaping oil.PZS2106063319. Withdraw the driveshaft from theautomatic transmission.Seal the opening with auxiliary plugs.09/97 <strong>Scorpio</strong> ’95 00-01-5
<strong>A4LDE</strong> Automatic Transmission3120. Remove the starter motor.1 Disconnect the starter motor wiring.2 Detach the bracket from the cylinder block.3 Remove the bolts.2PZS210604321. Remove the bracket from the automatictransmission oil dipstick tube and groundlead.Unclip the automatic transmission wiringloom.PZS210604522. Remove the oil pipe bracket.PZS210604409/97 <strong>Scorpio</strong> ’95 00-01-6
<strong>A4LDE</strong> Automatic Transmission1223. Detach the oil pipes from thetransmission.1 Return pipe.2 Feed pipe.Seal the openings.PZS210606724. Remove the torque converter from theengine drive plate (four nuts).PZS21060461NOTE: Support the transmission with atransmission jack.25. Detach the transmission crossmember.1 Detach from the body.2 Detach from the automatic transmission.2PZS2106064NOTE: Secure the automatic transmission tothe transmission jack using a strap.26. Lower the automatic transmission usingthe transmission jack until thetransmission sump lies completely flat onthe transmission jack.IAS170203409/97 <strong>Scorpio</strong> ’95 00-01-7
<strong>A4LDE</strong> Automatic Transmission27. Remove the selector rod from theactuating lever.Secure the selector rod to the body withadhesive tape.IAS210606528. Remove the flange bolts on theright-hand side of the transmission.PZS170202129. Remove the flange bolts on the left-handside of the transmission.WARNING: The torque converter can dropout of the automatic transmission.30. Separate the transmission from theengine and lower it carefully.PZS1702022InstallIAS170253831. Fit the guide sleeves from the automatictransmission flange in the engine flange.32. Align the adaptor plate on both guidesleeves.Fix the adaptor plate in place with a littlehigh-temperature grease (ESDM-1C220-A).33. Apply a thin layer of high-temperaturegrease (ESDM-1C220-A) to the bore forthe torque converter locating spigot.09/97 <strong>Scorpio</strong> ’95 00-01-8
<strong>A4LDE</strong> Automatic TransmissionANOTE: The hub of the torque converter mustengage fully with the drive gear of the oil pump.34. Check the <strong>instal</strong>lation depth of the torqueconverter:Installation depth ”A” between the converterassembly flange and the torque converterbore is 9 mm.J170120235. Locate the automatic transmission torqueconverter and engine drive plate inposition.1 Torque converter2 Engine drive plate21PZS2106570NOTE: Secure the transmission to thetransmission jack with a strap.36. Locate the transmission in position withthe transmission jack and insert theflange bolts.PZS170253937. Fit the selector rod to the actuating lever.Remove the adhesive tape.IAS210606509/97 <strong>Scorpio</strong> ’95 00-01-9
<strong>A4LDE</strong> Automatic Transmission38. Tighten the flange bolts on the right-handside.44 NmIAS170252139. Tighten the flange bolts on the left-handside.44 NmIAS170252236 Nm 262 Nm1NOTE: Attach the ground lead.40. Attach the transmission crossmember.1 To the automatic transmission.2 To the body. Remove the strap. Remove the transmission jack.PZS210656444 Nm41. Fit the torque converter to the enginedrive plate (four nuts).PZS210654609/97 <strong>Scorpio</strong> ’95 00-01-10
<strong>A4LDE</strong> Automatic Transmission25 Nm242. Fit the oil pipes to the transmission.1 Return pipe2 Feed pipe25 Nm1PZS210656743. Attach the bracket for the oil pipes.44 NmPZS210654444. Fit the driveshaft to the automatictransmission.NOTE: There are spacer washers between thefloor assembly and the centre bearing.45. Fit the driveshaft centre bearing loosely.PZS210654049 NmS15015032166 NmCAUTION: The driveshaft is finelybalanced using bolts of different lengths.Note the marks showing the <strong>instal</strong>lationposition of the driveshaft and bolts.46. Attach the driveshaft to the rear axle.1 Attach the driveshaft to the rear axle flange.NOTE: There is no transverse brace on vehiclesfrom 01/96 onwards.2 Attach the transverse brace.09/97 <strong>Scorpio</strong> ’95 00-01-11
<strong>A4LDE</strong> Automatic Transmission47. Align the driveshaft centre bearing free ofstrain and tighten the bolts.21 NmPZS210656321 Nm1248. Fit the exhaust system heat shields.1 Nine nuts.2 Two clipsIAS210606149. Fit the rear part of the exhaust system.Attach the rubber insulators.PZS210606044 Nm50. Fit the oil dipstick tube bracket of thetransmission and ground lead.Attach the automatic transmission wiringloom.IAS210654509/97 <strong>Scorpio</strong> ’95 00-01-12
<strong>A4LDE</strong> Automatic Transmission44 Nm351. Install the starter motor.1 Tighten the bolts.2 Fit the bracket to the cylinder block.3 Connect the starter motor.1IAS2106543244 Nm47 Nm52. Locate the catalytic converter, the frontexhaust pipe and a new gasket inposition.53. Lower the vehicle.54. Tighten the catalytic converter to theexhaust manifold.IAS210653447 Nm47 Nm55. Raise the vehicle.56. Fit the front exhaust mounting to thetransmission crossmember.57. Fit the front exhaust pipe to the rearexhaust pipe with a new gasket.58. Connect the HO2S multiplug.Secure the cable with a cable tie.IAS210653959. Fit the front bracket of the catalyticconverter.24 NmPZS210654209/97 <strong>Scorpio</strong> ’95 00-01-13
<strong>A4LDE</strong> Automatic Transmission60. Fit the bracket to the catalytic converterand the transmission.47 Nm44 NmIAS2106541NOTE: The lug should point to the front.61. Fit the front axle crossbrace.62. Attach the engine undershield.80 NmIAS210653863. Lower the vehicle.64. Connect the HO2S multiplug.Secure the cable to the heater coolant hosewith cable ties.PZS210653165. Fit the bracket for the oil dipstick tube.Insert the oil dipstick.24 NmPZS170253709/97 <strong>Scorpio</strong> ’95 00-01-14
<strong>A4LDE</strong> Automatic Transmission3 75 NmPZS2106530424 Nm 123 Nm266. Fit the EGR valve.1 Fit the EGR valve to the bracket.2 Fit the exhaust mounting to the exhaustmanifold.3 Bolt the exhaust pipe to the exhaustmanifold.4 Attach the vacuum hose to the EGR valve.67. Fit the three-part heat shield. Fit the parts loosely in the sequenceshown. Tighten the screws.68. Fit the two vacuum hoses.13PZS2106529269. Attach the central multiplug to thetransmission wiring loom.IAS170202409/97 <strong>Scorpio</strong> ’95 00-01-15
<strong>A4LDE</strong> Automatic Transmission70. Finishing operations: Check the routing of the cables and securewith cable ties. Insert the oil dipstick into the transmission. Connect the battery negative lead. Attach the battery cover. Check the automatic transmission fluidlevel and top up as required. Reprogramme the preset radio stations. Reset the clock. Carry out a road test to enable the PCM(EEC V) to collect data. Check the fluid levels and rectify asnecessary.09/97 <strong>Scorpio</strong> ’95 00-01-16