A4LDe 12V Cologne - Ford Scorpio
A4LDe 12V Cologne - Ford Scorpio
A4LDe 12V Cologne - Ford Scorpio

You also want an ePaper? Increase the reach of your titles
YUMPU automatically turns print PDFs into web optimized ePapers that Google loves.
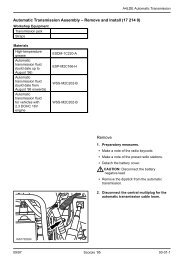
A4LDE Automatic TransmissionS21020572 23 1NOTE: There are spacer washers between thefloor and the centre bearing.11. Remove the driveshaft centre bearing.1 Slacken the bolts.2 Remove the bolts.3 Turn both brackets through 90.12. Remove the driveshaft. Pull driveshaft out of the automatictransmission and remove it. Close off the transmission with auxiliaryplugs.NOTE: Unscrew the ground cable (one nut).13. Detach the transmission crossmember.Lower the automatic transmission with thetransmission jack.ELS170300114. Remove the oil dipstick tube (one bolt).IAS210407209/97 <strong>Scorpio</strong> ’95 00-01-4
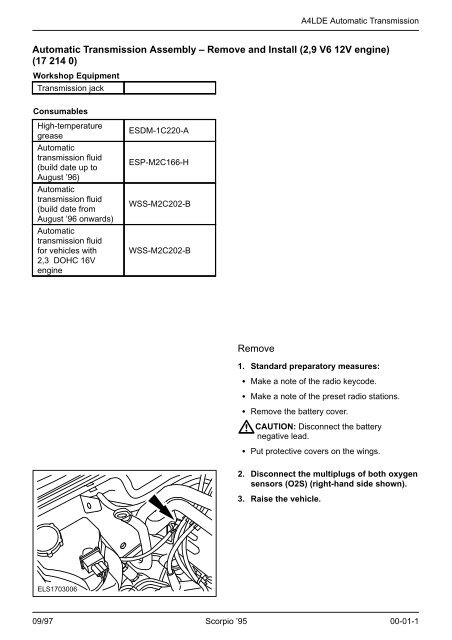
A4LDE Automatic Transmission215. Detach the oil pipes from thetransmission.1 Return pipe2 Feed pipe1IAS17030022316. Release the vacuum line.1 Disconnect the vacuum line from the throttlepressure diaphragm.2 Unclip the vacuum line at the bottom.3 Unclip the vacuum line at the top.1ELS170300417. Disconnect the vehicle speed sensor(VSS) multiplug.1 Slide it out of the retainer.2 Disconnect the VSS multiplug.1 2IAS170301209/97 <strong>Scorpio</strong> ’95 00-01-5
A4LDE Automatic Transmission42518. Detach the automatic transmission wiringloom.1 Unclip the wiring loom.2 Release the kickdown solenoid multiplugfrom the bracket.IAS1703005313 Unhook the kickdown solenoid cable ballsocket.4 Detach the kickdown solenoid with thebracket (three bolts).5 Disconnect the reversing lamp/transmissioninhibitor switch multiplug.19. Disconnect the transmission control unitmultiplug.20. Detach the selector rod from thetransmission.Remove the clip.IAS170300321. Detach the engine undershield.IAS210208309/97 <strong>Scorpio</strong> ’95 00-01-6
A4LDE Automatic Transmission22. Remove the starter motor.1 Disconnect the starter motor.2 Remove the two bolts.1ELS2104098223. Release the torque converter. Remove the rubber cover. Remove the four bolts.24. Remove the bolt from the transmissionadaptor plate.IAS170300725. Unscrew the three transmission flangebolts on the left-hand side.IAS170300826. Unscrew the two transmission flangebolts on the right-hand side.Unscrew and remove two transmissionflange bolts. Remove the bracket for the oilpipes.ELS170300909/97 <strong>Scorpio</strong> ’95 00-01-7
A4LDE Automatic TransmissionWARNING: The torque converter can dropout of the automatic transmission.27. Detach the vent hose from thetransmission. Separate the transmission from the engineand lower it slightly with the transmissionjack. Take the vent hose out of the two clips andpull it off.ELS170301028. Lower the transmission with thetransmission jack.Install29. General note.Renew the self-locking nuts.230. Align the adaptor plate.1 Fit the guide sleeves.2 Align the adaptor plate.3 Apply high-temperature grease(ESDM-1C220-A) to the bore for the torqueconverter spigot.131ELS210458731. Fit the transmission vent hose.Raise the transmission, connect the hoseand clip it into the two clips.ELS170301009/97 <strong>Scorpio</strong> ’95 00-01-8
A4LDE Automatic Transmission32. Align the torque converter and driveplate.1 Drive plate2 Torque converter33. Apply high-temperature grease(ESDM-1C220-A) to the bore for thetorque converter spigot.S21055681234. Install the automatic transmission.Move the transmission into position.2335. Secure the transmission flange bolts onthe left-hand side.1 Bolt.2 Bolt with ground lead.3 Bolt with wiring clamp.44 Nm1IAS170350836. Secure the transmission flange bolts onthe right-hand side.Attach the bracket for the oil pipes.44 NmELS170350937. Secure the torque converter (four bolts).Fit the rubber cover.38. Screw on the transmission adaptor plate.44 Nm11 NmIAS170350709/97 <strong>Scorpio</strong> ’95 00-01-9
A4LDE Automatic Transmission39. Install the starter motor.1 Secure the starter motor.2 Connect the starter motor.21 44 NmELS210459812340. Fit the vacuum line.1 Clip the vacuum pipe in at the top.2 Clip the vacuum pipe in at the bottom.3 Connect the vacuum hose to the throttlepressure diaphragm.ELS1703004123 Nm41. Fit the transmission oil pipes.1 Return pipe2 Feed pipe223 NmIAS170300242. Fit the oil dipstick tube (one bolt).44 NmIAS210457209/97 <strong>Scorpio</strong> ’95 00-01-10
A4LDE Automatic Transmission43. Connect the multiplug to thetransmission control unit.IAS17035032 1345IAS170350544. Fit the transmission wiring harness.1 Connect the reversing lamp/transmissioninhibitor switch multiplug.2 Fit the kickdown solenoid with the bracket.Screw in the bolts.3 Clip the wiring loom in place.4 Connect the kickdown magnet multiplug andfit it in the bracket.5 Hook the ball socket of the kickdownsolenoid cable in place.45. Push on the VSS connector and positionit correctly in the bracket.12IAS170351209/97 <strong>Scorpio</strong> ’95 00-01-11
A4LDE Automatic Transmission36 NmELS170350162 NmNOTE: Secure the ground lead with the nut.46. Attach the transmission crossmember. Raise the transmission using a transmissionjack. Fit the bolts. Remove the transmission jack.47. Lower the vehicle.2ELS170351331NOTE: It should be possible, with the kickdownsolenoid tightened, to turn the kickdown lever0,3 - 0,8 mm anticlockwise.48. Adjust the cable of the kickdownsolenoid. Connect the battery negative lead. Switch on the ignition, depress theaccelerator pedal fully and fix it there. Raise the vehicle.1 Turn the kickdown lever anticlockwise until itreaches the stop and hold it in this position.2 Push the kickdown solenoid forwards untilthe cable is under slight tension.3 Push back the solenoid approx. 0,5 mm(with the kickdown lever at the stop) andtighten the bolts (x3).2ELS1701574149. Fit the selector rod and adjust it. Move the selector lever in the vehicle toposition ”D”.1 Move the selector lever on the transmissionto position ”D” (two clicks from the rear stop).2 Slacken the clamp bolt. Slide the selector rod onto the selector lever. Tighten the clamp bolt. Secure the selector rod with the clip.09/97 <strong>Scorpio</strong> ’95 00-01-12
A4LDE Automatic TransmissionNOTE: A spacer washer must be placedbetween the floor assembly and the centrebearing in each case.50. Fit the driveshaft. Pull the auxiliary plugs out of thetransmission. Guide the driveshaft into the transmission. Attach the centre bearing to the floorassembly (do not tighten the bolts yet).S210205849 NmS15015032166 NmCAUTION: The driveshaft is finelybalanced using bolts of different lengths.Note the marks showing the installationposition of the driveshaft and bolts.51. Install the driveshaft (continued).1 Attach the driveshaft to the rear axle flange.NOTE: There is no transverse brace on vehiclesfrom 01/96 onwards.2 Attach the transverse brace.52. Align the centre bearing free of strain andtighten it.S210255821 Nm153. Fit the two heat shields (new nuts, twoclips).1 Clips2 Nuts2ELS170351509/97 <strong>Scorpio</strong> ’95 00-01-13
A4LDE Automatic TransmissionInstall complete exhaust system47 Nm54. Attach the right-hand exhaust flange tothe exhaust manifold.Route the HO2S cable upwards.IAS210458447 Nm55. Attach the left-hand exhaust flange to theexhaust manifold.Route the HO2S cable upwards.IAS2104583IAS170301809/97 <strong>Scorpio</strong> ’95 00-01-14
A4LDE Automatic Transmission56. Hook the exhaust system into therubber insulators.57. Attach the exhaust mounting to thetransmission crossmember.47 NmELS170351758. Attach the front axle crossbrace(left-hand side shown).S210153180 Nm59. Fit the engine cover.Lower the vehicle.IAS210208309/97 <strong>Scorpio</strong> ’95 00-01-15
A4LDE Automatic Transmission60. Push on both HO2S connectors(left-hand side shown).61. Check the automatic transmissionfluid according to the specifications(see VSTM).ELS170350662. Standard finishing operations: Check the fluid levels and rectify asnecessary. Check the routing of the wiring and secureit with cable ties. Take off the protective covers. Connect the battery negative lead. Fit the battery cover. Enter the radio keycode. Reprogramme the preset radio stations. Reset the clock. Carry out a road test to allow the PCM(EEC V) to collect data. Check the fluid levels after the road testand correct them as necessary.09/97 <strong>Scorpio</strong> ’95 00-01-16