Built to Grow Crib Drawer Assembly Instructions ... - Stanley Furniture
Built to Grow Crib Drawer Assembly Instructions ... - Stanley Furniture
Built to Grow Crib Drawer Assembly Instructions ... - Stanley Furniture

You also want an ePaper? Increase the reach of your titles
YUMPU automatically turns print PDFs into web optimized ePapers that Google loves.
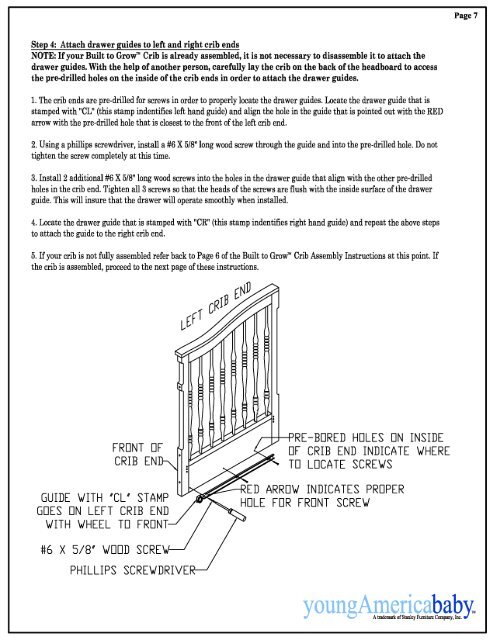
Page 7Step 4: Attach drawer guides <strong>to</strong> left and right crib endsNOTE: If your <strong>Built</strong> <strong>to</strong> <strong>Grow</strong>tm <strong>Crib</strong> is already assembled, it is not necessary <strong>to</strong> disassemble it <strong>to</strong> attach thedrawer guides. With the help of another person, carefully lay the crib on the back of the headboard <strong>to</strong> accessthe pre-drilled holes on the inside of the crib ends in order <strong>to</strong> attach the drawer guides.1. The crib ends are pre-drilled for screws in order <strong>to</strong> properly locate the drawer guides. Locate the drawer guide that isstamped with "CL" (this stamp indentifies left hand guide) and align the hole in the guide that is pointed out with the REDarrow with the pre-drilled hole that is closest <strong>to</strong> the front of the left crib end.2. Using a phillips screwdriver, install a #6 X 5/8" long wood screw through the guide and in<strong>to</strong> the pre-drilled hole. Do nottighten the screw completely at this time.3. Install 2 additional #6 X 5/8" long wood screws in<strong>to</strong> the holes in the drawer guide that align with the other pre-drilledholes in the crib end. Tighten all 3 screws so that the heads of the screws are flush with the inside surface of the drawerguide. This will insure that the drawer will operate smoothly when installed.4. Locate the drawer guide that is stamped with "CR" (this stamp indentifies right hand guide) and repeat the above steps<strong>to</strong> attach the guide <strong>to</strong> the right crib end.5. If your crib is not fully assembled refer back <strong>to</strong> Page 6 of the <strong>Built</strong> <strong>to</strong> <strong>Grow</strong>TM <strong>Crib</strong> <strong>Assembly</strong> <strong>Instructions</strong> at this point. Ifthe crib is assembled, proceed <strong>to</strong> the next page of these instructions.FRONT OFCRIBWITH 'CL' STAMPGUIDEGOES ON LEFT CRIB ENDWITH WHEEL TO FRONT'RE—BORED HOLES ON INSIDEOF CRIB END INDICATE WHERETO LOCATE SCREWSOW INDICATES PROPERFOR FRONT SCREW#6 X 5/8' WOOD SCRE'PHILLIPS SCREWDRIVEIbabyA trademark of <strong>Stanley</strong> Furaitare Company, Inc.