DEMOJM—Quick Start Guide - Freescale
DEMOJM—Quick Start Guide - Freescale
DEMOJM—Quick Start Guide - Freescale

You also want an ePaper? Increase the reach of your titles
YUMPU automatically turns print PDFs into web optimized ePapers that Google loves.
Flexis Microcontroller Series<br />
DEMOJM<br />
Cost-effective USB development<br />
• Quick <strong>Start</strong> <strong>Guide</strong><br />
• Lab Tutorials<br />
• CodeWarrior ® Manual<br />
• Getting <strong>Start</strong>ed DVD
<strong>DEMOJM—Quick</strong> <strong>Start</strong> <strong>Guide</strong><br />
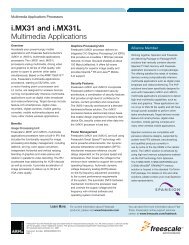
Introduction<br />
DEMOJM is a cost-effective kit targeting quick<br />
microcontroller evaluation. The kit includes a<br />
DEMOJM base board, a red MCF51JM128<br />
daughter card and a green MC9S08JM60<br />
daughter card. The included kit can first be used<br />
to demonstrate the features of the MC9S08JM60<br />
devices, starting with an on-chip USB device<br />
controller and transceiver. Then, move to<br />
MCF51JM128 with an on-chip USB On-The-Go<br />
(OTG) dual-role controller. The USB features are<br />
supported in hardware through a dedicated USB<br />
mini-AB connector and in software through the<br />
included complimentary USB-LITE stack<br />
by CMX.<br />
This Quick <strong>Start</strong> <strong>Guide</strong> includes two sections<br />
and is designed to get you ready to develop your<br />
next USB application using the MC9S08JM60<br />
and MCF51JM128 within minutes.
<strong>DEMOJM—Quick</strong> <strong>Start</strong> <strong>Guide</strong><br />
Quick <strong>Start</strong> <strong>Guide</strong> for MC9S08JM60<br />
Step-by-step instructions<br />
Please take a look at the DEMO9S08JM60 Labs document (DEMO9S08JM60LAB)<br />
included in the “Training” section of the DVD to learn more about the key USB benefits<br />
that JM60 gives your application.<br />
STEP<br />
1<br />
Install CodeWarrior ®<br />
for Microcontrollers<br />
and JM60 Service Pack<br />
CodeWarrior is a powerful tool designed<br />
to help you maximize your time to market.<br />
The CodeWarrior Service Pack will install<br />
the appropriate support files for the<br />
MC9S08JM60 to the existing CodeWarrior<br />
installation. CodeWarrior installation is a<br />
one-time required step before connecting<br />
the board to your computer.<br />
1. Insert provided DVD into computer and a menu<br />
will appear.<br />
2. Click on appropriate board and “Install<br />
CodeWarrior.”<br />
3. Follow the on-screen instructions until<br />
installation is complete.<br />
4. Return to DVD menu and click on “Install JM60<br />
Service Pack.”<br />
5. Follow the on-screen instructions until<br />
installation is complete.<br />
Once installation is complete, take advantage<br />
of several CodeWarrior tutorials that will<br />
walk you through various development<br />
tool features, such as “C Programming,”<br />
“Assembly Programming,” “Using<br />
Processor Expert” and more. Simply open<br />
CodeWarrior via the “Programs><strong>Freescale</strong><br />
CodeWarrior>CW for Microcontroller<br />
V6.x>CodeWarrior IDE.exe” path. Click “Run<br />
Getting <strong>Start</strong>ed Tutorial” from the startup<br />
dialog, select a tutorial and follow the onscreen<br />
instructions.<br />
STEP<br />
2<br />
Install USB-LITE Stack by CMX<br />
for MC9S08JM60<br />
USB-LITE stack by CMX for MC9S08JM60<br />
is a complimentary stack with the<br />
appropriate JM60 USB device mode<br />
low-level drivers and top-level HID class<br />
and CDC class examples. To exercise<br />
the various USB examples packaged<br />
with the stack follow the step-by-step<br />
DEMO9S08JM60 Labs document<br />
(DEMO9S08JM60LAB) included in the<br />
“Training” section of the DVD. Stack<br />
installation is a one-time required step<br />
before developing with this software.<br />
1. Insert provided DVD into computer and a menu<br />
will appear.<br />
2. Click on “8-bit Flexis JM60” under “Install<br />
Complimentary <strong>Freescale</strong> USB-LITE by CMX”.<br />
This will launch the stack installer.<br />
3. Follow on-screen instructions until installation<br />
is complete.
STEP<br />
3<br />
Install PEMICRO Embedded<br />
Multilink Toolkit<br />
PEMICRO Embedded Multilink Toolkit<br />
includes graphical utilities that run<br />
on your computer and help speed up<br />
your development. These utilities take<br />
development beyond the hardware and<br />
interact with the target microcontroller over<br />
the same USB multilink reference design on<br />
the board that allows you to debug using<br />
CodeWarrior. Best of all, you can debug<br />
your microcontroller in CodeWarrior while<br />
simultaneously using one of the following<br />
utilities: Logic Analyzer, Serial Grapher,<br />
Terminal Window and Accelerometer Demo<br />
Grapher. PEMICRO Embedded Multilink<br />
Toolkit install is a one-time required step.<br />
1. Insert provided DVD into computer and a menu<br />
will appear.<br />
2. Click on “Install PEMICRO Toolkit.” This will<br />
launch the toolkit installer.<br />
3. Follow the on-screen instructions to complete<br />
installation.<br />
For more information on PEMICRO<br />
Embedded Multilink Toolkit read the<br />
DEMOJM User Manual (DEMOJMUM.pdf)<br />
included in the “Documentation” section of<br />
DVD. For new and upgraded utilities to the<br />
PEMICRO Embedded Multilink Toolkit, visit<br />
www.pemicro.com.<br />
STEP<br />
4<br />
Connect Board to Computer<br />
USB driver installation is a one-time<br />
required step, to be completed after<br />
CodeWarrior installation.<br />
1. Remove DEMOJM base board and green<br />
MC9S08JM60 daughter from anti-static bags.<br />
2. Plug in the green daughter card to DEMOJM<br />
base board aligning pin 1 arrows.<br />
3. Connect provided A to B gray USB cable from<br />
a free USB port on your computer to the USB<br />
connector on the board.<br />
4. Operating system will recognize your board<br />
as new hardware and will prompt you to<br />
install the USB drivers. Choose recommended<br />
option to install the software automatically.<br />
USB drivers for your board were pre-loaded in<br />
CodeWarrior installation.<br />
5. Follow on-screen instructions until all USB<br />
driver installations are complete. The green<br />
USB LED on-board should illuminate.
<strong>DEMOJM—Quick</strong> <strong>Start</strong> <strong>Guide</strong><br />
STEP<br />
5<br />
Test Board by Running<br />
Quick <strong>Start</strong> Application<br />
Now that you have successfully completed<br />
the software and hardware setup, test your<br />
board by running the Quick <strong>Start</strong> Application<br />
pre-loaded in the microcontroller’s on-chip<br />
flash memory.<br />
The programmed application is the HID class<br />
software included in the complimentary<br />
USB-LITE stack by CMX for MC9S08JM60.<br />
The HID class software includes several<br />
examples (mouse, keyboard, etc.) with the<br />
default example, turning your board and<br />
making it a simple HID mouse by exercising<br />
the JM60 on-chip USB 2.0 full-speed device<br />
controller and transceiver. The example takes<br />
control of your computer’s mouse cursor and<br />
moves it continuously in a back and forth<br />
motion following USB enumeration.<br />
1. Turn the SYSTEM POWER switch to the “on”<br />
position. The red POWER LED will illuminate and<br />
the application will start.<br />
2. Connect provided A to mini-B black USB cable<br />
from a free USB port on your computer to the<br />
mini-AB USB connector on the board.<br />
3. Your computer will recognize the MC9S08JM60<br />
as an HID mouse device and begin installation<br />
(no user interaction needed). When hardware<br />
installation is complete, the MC9S08JM60 will<br />
control your mouse cursor by moving it back<br />
and forth.<br />
4. Now that your board is functional, try out the<br />
labs discussed in the DEMO9S08JM60 Labs<br />
document (DEMO9S08JM60LAB) included in<br />
the “Training” section of the DVD. These labs<br />
will guide you step by step through the all the<br />
HID and CDC class examples included in the<br />
complimentary USB-LITE stack by CMX for<br />
MC9S08JM60.
Quick <strong>Start</strong> <strong>Guide</strong> for MCF51JM128<br />
Step-by-step instructions<br />
Please take a look at the DEMO51JM128 Labs document (DEMO51JM128LAB) included<br />
in the “Training” section of the DVD to learn more about the key USB benefits that JM128<br />
gives your application.<br />
STEP<br />
1<br />
Install CodeWarrior for<br />
Microcontrollers and JM128<br />
Service Pack<br />
CodeWarrior is a powerful tool designed<br />
to help you maximize your time to market.<br />
The CodeWarrior Service Pack will install<br />
the appropriate support files for the<br />
MCF51JM128 to the existing CodeWarrior<br />
installation. CodeWarrior installation is a<br />
one-time required step before connecting<br />
the board to your computer.<br />
1. Insert provided DVD into computer and a menu<br />
will appear.<br />
2. Click on appropriate board and “Install<br />
CodeWarrior.”<br />
3. Follow the on-screen instructions until<br />
installation is complete.<br />
4. Return to DVD menu and click on “Install<br />
JM128 Service Pack.”<br />
5. Follow the on-screen instructions until<br />
installation is complete.<br />
Once installation is complete, take<br />
advantage of several CodeWarrior<br />
tutorials that will walk you through<br />
various development tool features,<br />
such as “C Programming,” “Assembly<br />
Programming,” “Using Processor Expert”<br />
and more. Simply open CodeWarrior via the<br />
“Programs><strong>Freescale</strong> CodeWarrior>CW for<br />
Microcontroller V6.x>CodeWarrior IDE.exe”<br />
path. Click “Run Getting <strong>Start</strong>ed Tutorial”<br />
from the startup dialog, select a tutorial and<br />
follow the on-screen instructions.<br />
STEP<br />
2<br />
Install USB-LITE Stack by CMX<br />
for MCF51JM128<br />
USB-LITE stack by CMX for MCF51JM128<br />
is a complimentary stack with the<br />
appropriate JM128 USB OTG dual-mode<br />
low-level drivers and top-level HID class<br />
and CDC class examples. To exercise<br />
the various USB examples packaged<br />
with the stack follow the step-by-step<br />
DEMO51JM128 Labs document<br />
(DEMO51JM128LAB) included in the<br />
“Training” section of the DVD. Stack<br />
installation is a one-time required step<br />
before developing with this software.<br />
1. Insert provided DVD into computer and a menu<br />
will appear.<br />
2. Click on “32-bit Flexis JM” under “Install<br />
Complimentary <strong>Freescale</strong> USB-LITE by CMX.”<br />
This will launch the stack installer.<br />
3. Follow on-screen instructions until installation<br />
is complete.
<strong>DEMOJM—Quick</strong> <strong>Start</strong> <strong>Guide</strong><br />
STEP<br />
3<br />
Install PEMICRO Embedded<br />
Multilink Toolkit<br />
PEMICRO Embedded Multilink Toolkit<br />
includes graphical utilities that run<br />
on your computer and help speed up<br />
your development. These utilities take<br />
development beyond the hardware and<br />
interact with the target microcontroller over<br />
the same USB multilink reference design on<br />
the board that allows you to debug using<br />
CodeWarrior. Best of all, you can debug<br />
your microcontroller in CodeWarrior while<br />
simultaneously using one of the following<br />
utilities: Logic Analyzer, Serial Grapher,<br />
Terminal Window and Accelerometer Demo<br />
Grapher. PEMICRO Embedded Multilink<br />
Toolkit install is a one-time required step.<br />
1. Insert provided DVD into computer and a menu<br />
will appear.<br />
2. Click on “Install PEMICRO Toolkit.” This will<br />
launch the toolkit installer.<br />
3. Follow the on-screen instructions to<br />
complete installation.<br />
For more information on PEMICRO Embedded<br />
Multilink Toolkit read the DEMOJM User<br />
Manual (DEMOJMUM.pdf) included in the<br />
“Documentation” section of DVD. For new and<br />
upgraded utilities to PEMICRO Embedded<br />
Multilink Toolkit, visit www.pemicro.com.<br />
STEP<br />
4<br />
Connect Board to Computer<br />
USB driver installation is a one-time<br />
required step, to be completed after<br />
CodeWarrior installation.<br />
1. Remove DEMOJM base board and the red<br />
MCF51JM128 daughter card from<br />
anti-static bags.<br />
2. Plug in the red daughter card to DEMOJM base<br />
board aligning pin 1 arrows.<br />
3. Connect provided A to B gray USB cable from<br />
a free USB port on your computer to the USB<br />
connector on the board.<br />
4. Operating system will recognize your board<br />
as new hardware and will prompt you to<br />
install the USB drivers. Choose recommended<br />
option to install the software automatically.<br />
USB drivers for your board were pre-loaded in<br />
CodeWarrior installation.<br />
5. Follow on-screen instructions until all USB<br />
driver installations are complete. The green<br />
USB LED on-board should illuminate.
STEP<br />
5<br />
Test Board by Running Quick<br />
<strong>Start</strong> Application<br />
Now that you have successfully<br />
completed the software and hardware<br />
setup, test your board by running the<br />
Quick <strong>Start</strong> Application pre-loaded in the<br />
microcontroller’s on-chip flash memory.<br />
The programmed application is the<br />
HID class software included in the<br />
complimentary USB-LITE stack by CMX<br />
for MCF51JM128. The HID class software<br />
includes several examples (mouse,<br />
keyboard, etc.) with the default example<br />
turning your board and making it a simple<br />
HID mouse by exercising the JM128<br />
on-chip USB 2.0 OTG controller.<br />
The example takes control of your<br />
computer’s mouse cursor and moves<br />
it continuously in a back and forth<br />
motion following USB enumeration.<br />
1. Turn the SYSTEM POWER switch to the “on”<br />
position. The red POWER LED will illuminate<br />
and application will start.<br />
2. Connect provided A to mini-B black USB cable<br />
from a free USB port on your computer to the<br />
mini-AB USB connector on the board.<br />
3. Your computer will recognize the MCF51JM128<br />
as an HID mouse device and begin installation<br />
(no user interaction needed). When hardware<br />
installation is complete, the MCF51JM128 will<br />
control your mouse cursor by moving it back<br />
and forth.<br />
4. Now that your board is functional, try out the<br />
labs discussed in the DEMO51JM128 Labs<br />
document (DEMO51JM128LAB) included in<br />
the “Training” section of the DVD. These labs<br />
will guide you step by step through the all the<br />
HID (device & host), CDC, and Mass Storage<br />
examples included in the complimentary<br />
USB-LITE stack by CMX for MCF51JM128.<br />
For more information on PEMICRO Embedded<br />
Multilink Toolkit read the DEMOJM User<br />
Manual (DEMOJMUM.pdf) included in the<br />
“Documentation” section of DVD. For new and<br />
upgraded utilities to PEMICRO Embedded<br />
Multilink Toolkit, visit www.pemicro.com.
<strong>DEMOJM—Quick</strong> <strong>Start</strong> <strong>Guide</strong><br />
Accelerometer<br />
Demo Grapher<br />
This utility will graph data from the<br />
virtual serial port on the DEMOJM<br />
board. The state of the on-board threeaxis<br />
accelerometer can be sampled by<br />
the microcontroller’s analog-to-digital<br />
converter channels and results can be<br />
graphed by transmitting over the virtual<br />
serial port using the microcontroller’s<br />
serial communication interface.<br />
Virtual Serial Port<br />
The DEMOJM board has the capability<br />
of implementing a virtual serial port<br />
on the PC. This allows the PC to send<br />
and receive serial data via the serial<br />
communication pins of P&E’s Embedded<br />
Multilink design. Using jumper J4, this<br />
virtual serial port may be configured<br />
to connect to the SCI port on the<br />
JM60 or JM128 processor.<br />
<strong>Freescale</strong> USB-LITE<br />
Stack by CMX<br />
<strong>Freescale</strong> is providing a comprehensive<br />
USB software solution through a<br />
complimentary USB stack. The<br />
<strong>Freescale</strong> USB-LITE stack by CMX<br />
enables USB device/host/OTG modes<br />
of operation. The USB stack supports<br />
several HID (device & host), CDC,<br />
and Mass Storage projects. The<br />
complimentary stack also interfaces<br />
with CodeWarrior Development Studio,<br />
providing a productive, comprehensive<br />
development environment for designing<br />
embedded applications.
<strong>DEMOJM—Quick</strong> <strong>Start</strong> <strong>Guide</strong><br />
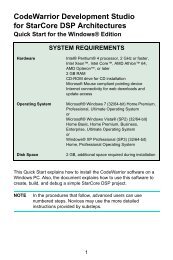
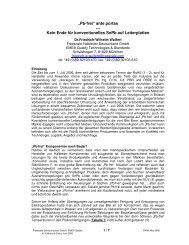
Get to Know the DEMOJM Board<br />
Switch<br />
External<br />
Power<br />
Connector<br />
Pemicro<br />
Embedded<br />
Multilink USB<br />
Connector<br />
CAN port<br />
Mini-AB USB Connector<br />
Figure 1. DEMOJM baseboard with MC9S08JM60 daughter card<br />
LEDs<br />
Push Buttons<br />
Speaker<br />
Potentiometer<br />
MC9S08JM60<br />
Daughter Card<br />
Accelerometer
<strong>DEMOJM—Quick</strong> <strong>Start</strong> <strong>Guide</strong><br />
<strong>Freescale</strong> and the <strong>Freescale</strong> logo are trademarks or<br />
registered trademarks of <strong>Freescale</strong> Semiconductor,<br />
Inc. in the U.S. and other countries. All other product<br />
or service names are the property of their respective<br />
owners. © <strong>Freescale</strong> Semiconductor, Inc. 2008<br />
Agile Number: 926-21876 / REV A<br />
Document Number: DEMOJMQSG / REV 0<br />
Learn More: For more information about<br />
the JM family, please visit<br />
www.freescale.com/flexis.