DRM101, Blood Pressure Monitor Using the Flexis QE128 Family ...
DRM101, Blood Pressure Monitor Using the Flexis QE128 Family ...
DRM101, Blood Pressure Monitor Using the Flexis QE128 Family ...

You also want an ePaper? Increase the reach of your titles
YUMPU automatically turns print PDFs into web optimized ePapers that Google loves.
<strong>Blood</strong> <strong>Pressure</strong> <strong>Monitor</strong><br />
<strong>Using</strong> <strong>the</strong> <strong>Flexis</strong> <strong>QE128</strong> <strong>Family</strong><br />
Design Reference Manual<br />
Devices Supported:<br />
MC9S08<strong>QE128</strong><br />
MCF51<strong>QE128</strong><br />
MPR083<br />
MR2A16A<br />
MC9S08JM60<br />
MC13202<br />
MPXV5050<br />
Document Number: <strong>DRM101</strong><br />
Rev. 0<br />
07/2008
How to Reach Us:<br />
Home Page:<br />
www.freescale.com<br />
E-mail:<br />
support@freescale.com<br />
USA/Europe or Locations Not Listed:<br />
Freescale Semiconductor<br />
Technical Information Center, CH370<br />
1300 N. Alma School Road<br />
Chandler, Arizona 85224<br />
+1-800-521-6274 or +1-480-768-2130<br />
support@freescale.com<br />
Europe, Middle East, and Africa:<br />
Freescale Halbleiter Deutschland GmbH<br />
Technical Information Center<br />
Schatzbogen 7<br />
81829 Muenchen, Germany<br />
+44 1296 380 456 (English)<br />
+46 8 52200080 (English)<br />
+49 89 92103 559 (German)<br />
+33 1 69 35 48 48 (French)<br />
support@freescale.com<br />
Japan:<br />
Freescale Semiconductor Japan Ltd.<br />
Headquarters<br />
ARCO Tower 15F<br />
1-8-1, Shimo-Meguro, Meguro-ku,<br />
Tokyo 153-0064, Japan<br />
0120 191014 or +81 3 5437 9125<br />
support.japan@freescale.com<br />
Asia/Pacific:<br />
Freescale Semiconductor Hong Kong Ltd.<br />
Technical Information Center<br />
2 Dai King Street<br />
Tai Po Industrial Estate<br />
Tai Po, N.T., Hong Kong<br />
+800 26668334<br />
support.asia@freescale.com<br />
For Literature Requests Only:<br />
Freescale Semiconductor Literature Distribution Center<br />
P.O. Box 5405<br />
Denver, Colorado 80217<br />
1-800-441-2447 or 303-675-2140<br />
Fax: 303-675-2150<br />
LDCForFreescaleSemiconductor@hibbertgroup.com<br />
Information in this document is provided solely to enable system and<br />
software implementers to use Freescale Semiconductor products. There are<br />
no express or implied copyright licenses granted hereunder to design or<br />
fabricate any integrated circuits or integrated circuits based on <strong>the</strong><br />
information in this document.<br />
Freescale Semiconductor reserves <strong>the</strong> right to make changes without fur<strong>the</strong>r<br />
notice to any products herein. Freescale Semiconductor makes no warranty,<br />
representation or guarantee regarding <strong>the</strong> suitability of its products for any<br />
particular purpose, nor does Freescale Semiconductor assume any liability<br />
arising out of <strong>the</strong> application or use of any product or circuit, and specifically<br />
disclaims any and all liability, including without limitation consequential or<br />
incidental damages. “Typical” parameters that may be provided in Freescale<br />
Semiconductor data sheets and/or specifications can and do vary in different<br />
applications and actual performance may vary over time. All operating<br />
parameters, including “Typicals”, must be validated for each customer<br />
application by customer’s technical experts. Freescale Semiconductor does<br />
not convey any license under its patent rights nor <strong>the</strong> rights of o<strong>the</strong>rs.<br />
Freescale Semiconductor products are not designed, intended, or authorized<br />
for use as components in systems intended for surgical implant into <strong>the</strong> body,<br />
or o<strong>the</strong>r applications intended to support or sustain life, or for any o<strong>the</strong>r<br />
application in which <strong>the</strong> failure of <strong>the</strong> Freescale Semiconductor product could<br />
create a situation where personal injury or death may occur. Should Buyer<br />
purchase or use Freescale Semiconductor products for any such unintended<br />
or unauthorized application, Buyer shall indemnify and hold Freescale<br />
Semiconductor and its officers, employees, subsidiaries, affiliates, and<br />
distributors harmless against all claims, costs, damages, and expenses, and<br />
reasonable attorney fees arising out of, directly or indirectly, any claim of<br />
personal injury or death associated with such unintended or unauthorized<br />
use, even if such claim alleges that Freescale Semiconductor was negligent<br />
regarding <strong>the</strong> design or manufacture of <strong>the</strong> part.<br />
Freescale and <strong>the</strong> Freescale logo are trademarks of Freescale<br />
Semiconductor, Inc. All o<strong>the</strong>r product or service names are <strong>the</strong> property of <strong>the</strong>ir<br />
respective owners.<br />
© Freescale Semiconductor, Inc. 2008. All rights reserved.<br />
<strong>DRM101</strong><br />
Rev. 0<br />
07/2008
Chapter 1<br />
Preface<br />
1.1 Preface . . . . . . . . . . . . . . . . . . . . . . . . . . . . . . . . . . . . . . . . . . . . . . . . . . . . . . . . . . . . . 1-1<br />
1.2 Audience . . . . . . . . . . . . . . . . . . . . . . . . . . . . . . . . . . . . . . . . . . . . . . . . . . . . . . . . . . . . 1-1<br />
1.3 Suggested Reading . . . . . . . . . . . . . . . . . . . . . . . . . . . . . . . . . . . . . . . . . . . . . . . . . . . . 1-1<br />
Chapter 2<br />
Introduction<br />
2.1 Intended Functionality . . . . . . . . . . . . . . . . . . . . . . . . . . . . . . . . . . . . . . . . . . . . . . . . . . 2-1<br />
2.2 Solution Benefits . . . . . . . . . . . . . . . . . . . . . . . . . . . . . . . . . . . . . . . . . . . . . . . . . . . . . . 2-1<br />
2.3 Quick Start . . . . . . . . . . . . . . . . . . . . . . . . . . . . . . . . . . . . . . . . . . . . . . . . . . . . . . . . . . . 2-2<br />
2.3.1 SMAC GUI Setup . . . . . . . . . . . . . . . . . . . . . . . . . . . . . . . . . . . . . . . . . . . . . . . 2-3<br />
2.3.2 Sensor Reference Board Setup . . . . . . . . . . . . . . . . . . . . . . . . . . . . . . . . . . . . 2-4<br />
2.3.3 BPM Setup . . . . . . . . . . . . . . . . . . . . . . . . . . . . . . . . . . . . . . . . . . . . . . . . . . . . 2-5<br />
2.4 <strong>Using</strong> <strong>the</strong> <strong>Blood</strong> <strong>Pressure</strong> <strong>Monitor</strong> . . . . . . . . . . . . . . . . . . . . . . . . . . . . . . . . . . . . . . . . . 2-9<br />
2.5 Navigation . . . . . . . . . . . . . . . . . . . . . . . . . . . . . . . . . . . . . . . . . . . . . . . . . . . . . . . . . . . 2-9<br />
2.6 Sending Data to a PC . . . . . . . . . . . . . . . . . . . . . . . . . . . . . . . . . . . . . . . . . . . . . . . . . 2-14<br />
Chapter 3<br />
Hardware Description<br />
3.1 Introduction . . . . . . . . . . . . . . . . . . . . . . . . . . . . . . . . . . . . . . . . . . . . . . . . . . . . . . . . . . 3-1<br />
3.2 Operating Environment . . . . . . . . . . . . . . . . . . . . . . . . . . . . . . . . . . . . . . . . . . . . . . . . . 3-1<br />
3.3 <strong>Flexis</strong> MC9S08<strong>QE128</strong> and MCF51<strong>QE128</strong> Microcontrollers . . . . . . . . . . . . . . . . . . . . . 3-1<br />
3.3.1 MC9S08<strong>QE128</strong> Microcontroller . . . . . . . . . . . . . . . . . . . . . . . . . . . . . . . . . . . . 3-2<br />
3.3.2 MCF51<strong>QE128</strong> Microcontroller . . . . . . . . . . . . . . . . . . . . . . . . . . . . . . . . . . . . . 3-2<br />
3.4 MPR083 Proximity Sensor . . . . . . . . . . . . . . . . . . . . . . . . . . . . . . . . . . . . . . . . . . . . . . . 3-2<br />
3.5 MR2A16A Asynchronous Magnetoresistive RAM . . . . . . . . . . . . . . . . . . . . . . . . . . . . . 3-3<br />
3.6 MC9S08JM60 Microcontroller . . . . . . . . . . . . . . . . . . . . . . . . . . . . . . . . . . . . . . . . . . . . 3-3<br />
3.7 MC13202 ZigBee Transceiver . . . . . . . . . . . . . . . . . . . . . . . . . . . . . . . . . . . . . . . . . . . . 3-4<br />
3.8 MPXV5050 <strong>Pressure</strong> Sensor . . . . . . . . . . . . . . . . . . . . . . . . . . . . . . . . . . . . . . . . . . . . . 3-4<br />
3.9 OSRAM Pictiva OLED Display OS128064PK27MY0B00 . . . . . . . . . . . . . . . . . . . . . . . 3-4<br />
3.10 PCB Layout . . . . . . . . . . . . . . . . . . . . . . . . . . . . . . . . . . . . . . . . . . . . . . . . . . . . . . . . . . 3-5<br />
3.10.1 Mechanical Characteristics . . . . . . . . . . . . . . . . . . . . . . . . . . . . . . . . . . . . . . . . 3-6<br />
Chapter 4<br />
Embedded Software Description<br />
4.1 Introduction . . . . . . . . . . . . . . . . . . . . . . . . . . . . . . . . . . . . . . . . . . . . . . . . . . . . . . . . . . 4-1<br />
4.2 Software Design Goals . . . . . . . . . . . . . . . . . . . . . . . . . . . . . . . . . . . . . . . . . . . . . . . . . 4-1<br />
4.3 Software Architecture . . . . . . . . . . . . . . . . . . . . . . . . . . . . . . . . . . . . . . . . . . . . . . . . . . 4-1<br />
4.4 Software . . . . . . . . . . . . . . . . . . . . . . . . . . . . . . . . . . . . . . . . . . . . . . . . . . . . . . . . . . . . . 4-2<br />
4.4.1 <strong>Blood</strong> <strong>Pressure</strong> Measurement . . . . . . . . . . . . . . . . . . . . . . . . . . . . . . . . . . . . . 4-2<br />
4.4.2 Capacitive Touch . . . . . . . . . . . . . . . . . . . . . . . . . . . . . . . . . . . . . . . . . . . . . . . 4-2<br />
4.4.3 MRAM Storage . . . . . . . . . . . . . . . . . . . . . . . . . . . . . . . . . . . . . . . . . . . . . . . . . 4-4<br />
4.4.4 OLED Display . . . . . . . . . . . . . . . . . . . . . . . . . . . . . . . . . . . . . . . . . . . . . . . . . . 4-4<br />
<strong>Blood</strong> <strong>Pressure</strong> <strong>Monitor</strong> Design Reference Manual, Rev. 0<br />
Freescale Semiconductor -I
4.4.5 USB Communication . . . . . . . . . . . . . . . . . . . . . . . . . . . . . . . . . . . . . . . . . . . . 4-4<br />
4.4.6 Voice Generation . . . . . . . . . . . . . . . . . . . . . . . . . . . . . . . . . . . . . . . . . . . . . . . 4-4<br />
4.4.7 ZigBee Communication . . . . . . . . . . . . . . . . . . . . . . . . . . . . . . . . . . . . . . . . . . 4-5<br />
Chapter 5<br />
Customizing <strong>the</strong> <strong>Blood</strong> <strong>Pressure</strong> <strong>Monitor</strong><br />
Appendix A<br />
Schematics<br />
Appendix B<br />
Bill of Materials<br />
<strong>Blood</strong> <strong>Pressure</strong> <strong>Monitor</strong> Design Reference Manual, Rev. 0<br />
-II Freescale Semiconductor
Chapter 1<br />
Preface<br />
The revision history table summarizes changes contained in this document.<br />
Date Revision Level Description Page Number<br />
11/12/07 Rev. 0 First Draft<br />
1.1 Preface<br />
This design reference manual provides all guidelines and considerations used in <strong>the</strong> development of <strong>the</strong><br />
blood pressure monitor (BPM) reference design. It contains descriptions of <strong>the</strong> hardware, <strong>the</strong> software<br />
architecture, <strong>the</strong> packages employed in <strong>the</strong> implementation, and <strong>the</strong> application-specific software<br />
developed for creating <strong>the</strong> system.<br />
1.2 Audience<br />
This document is intended for application developers who wish to learn how to set up <strong>the</strong> blood pressure<br />
monitor reference design, as well as those who wish to use a specific part of this reference design and<br />
append it to <strong>the</strong>ir own application.<br />
1.3 Suggested Reading<br />
• MC9S08<strong>QE128</strong> reference manual<br />
• MC9S08JM60 data sheet<br />
• MR2A16A data sheet<br />
• MPR083 data sheet<br />
• MC13202 data sheet<br />
• Application note AN3500 – <strong>Blood</strong> <strong>Pressure</strong> <strong>Monitor</strong> <strong>Using</strong> <strong>Flexis</strong> <strong>QE128</strong><br />
• Application note AN3415 – OLED Display Driver for <strong>the</strong> HCS08 <strong>Family</strong><br />
• Application note AN2250 – Audio Reproduction on HCS12 Microcontrollers<br />
Additional documentation may be found at www.freescale.com.<br />
<strong>Blood</strong> <strong>Pressure</strong> <strong>Monitor</strong> Design Reference Manual, Rev. 0<br />
Freescale Semiconductor 1-1
Preface<br />
<strong>Blood</strong> <strong>Pressure</strong> <strong>Monitor</strong> Design Reference Manual, Rev. 0<br />
1-2 Freescale Semiconductor
Chapter 2<br />
Introduction<br />
2.1 Intended Functionality<br />
The blood pressure monitor (BPM) reference design shows how to implement a system that can measure<br />
arterial blood pressure values. The system demonstrates control, data retention, analog acquisition, and<br />
connectivity functions, as well as <strong>the</strong> ability to interface with a user. These are achieved by using several<br />
Freescale devices.<br />
This reference design serves only as a proof of concept for this application and is not authorized for use in<br />
safety-critical applications such as a U.S. Food and Drug Administration (FDA) class 3 application.<br />
Manufacturers and designers who incorporate Freescale (FSL) technology must have all necessary<br />
expertise in <strong>the</strong> safety and regulatory ramifications involved in <strong>the</strong> application of this design, and <strong>the</strong>y are<br />
solely responsible for all legal, regulatory, and safety-related requirements concerning <strong>the</strong>ir products and<br />
<strong>the</strong> use of Freescale devices in safety-critical applications.<br />
2.2 Solution Benefits<br />
The BPM reference design elements can be referenced for later development as:<br />
• USB communication using <strong>the</strong> MC9S08JM60 as a bridge<br />
• 2.4 GHz communication using <strong>the</strong> MC13202 ZigBee transceiver<br />
• MRAM communications<br />
• Use of MRAM to store user data<br />
• MRAM driver to access MRAM memory<br />
• User display using an OLED display<br />
• User interface using <strong>the</strong> MPR083 proximity sensor<br />
• Audio feedback using two timer pulse-width modulator (TPM) modules<br />
The main benefit from this solution is that developers are able to take any piece of hardware and/or<br />
software and reuse it for <strong>the</strong>ir own applications, thus enhancing <strong>the</strong> design cycle and providing faster<br />
development time.<br />
<strong>Blood</strong> <strong>Pressure</strong> <strong>Monitor</strong> Design Reference Manual, Rev. 0<br />
Freescale Semiconductor 2-1
Introduction<br />
Motor Control<br />
Air Chamber<br />
OLED<br />
(OS128064PK27MY0B00)<br />
128 x 64 Pixels<br />
2.3 Quick Start<br />
Valve<br />
DC Motor<br />
(Air Pump)<br />
Power Stage<br />
USB<br />
Connector<br />
(Type B)<br />
Batteries<br />
SPI (3)<br />
GPIO (3)<br />
TPM (1)<br />
Power Stage<br />
MPXV5050GP<br />
(<strong>Pressure</strong><br />
Sensor)<br />
High Pass<br />
Filter<br />
MC9S08JM60<br />
(8-Bit MCU)<br />
Power<br />
Supply<br />
(3.3, 12 V)<br />
ADC (1)<br />
MC9S08<strong>QE128</strong><br />
MCU<br />
(80-Pin LQFP)<br />
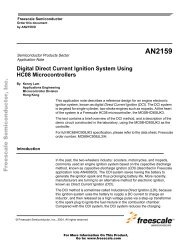
Figure 2-1. <strong>Flexis</strong> BPM Reference Design Block Diagram<br />
This section sets up <strong>the</strong> system and explains <strong>the</strong> BPM reference design and how to use it. The reference<br />
design consists of:<br />
• The BPM system<br />
• A cuff<br />
• A PC software interface<br />
• A 1321x-SRB (sensor reference board) for ZigBee communication<br />
<strong>Blood</strong> <strong>Pressure</strong> <strong>Monitor</strong> Design Reference Manual, Rev. 0<br />
MC13202<br />
(ZigBee<br />
Transceiver)<br />
MPR083<br />
(Capacitive<br />
Touch)<br />
MR2A16A<br />
(MRAM)<br />
Low Pass<br />
Filter (RC)<br />
Audio<br />
Amplifier<br />
(TBA820M)<br />
PCB<br />
Antenna<br />
Electrodes<br />
(5)<br />
Speaker<br />
2-2 Freescale Semiconductor<br />
SCI (2)<br />
ADC (1)<br />
TPM (1)<br />
SPI (4)<br />
Ctrl (2)<br />
GPIO<br />
GPIO (1) (39)<br />
I 2 C (2)
<strong>Blood</strong> <strong>Pressure</strong> <strong>Monitor</strong> Design Reference Manual, Rev. 0<br />
Introduction<br />
The next subsections contain <strong>the</strong> general steps needed to properly set up and run <strong>the</strong> BPM reference design.<br />
2.3.1 SMAC GUI Setup<br />
Install <strong>the</strong> PC software, which enables <strong>the</strong> user to download data from <strong>the</strong> system onto a computer. Make<br />
sure that <strong>the</strong> user on <strong>the</strong> computer has administrative privileges to perform this installation.<br />
1. First double-click on <strong>the</strong> Freescale SMAC GUI installer.<br />
This will open <strong>the</strong> installation screen.<br />
2. Click on <strong>the</strong> Next button. Now you will see a window that shows <strong>the</strong> installation route where <strong>the</strong><br />
GUI will be installed. Please note that you cannot change <strong>the</strong> destination folder for <strong>the</strong> program,<br />
but you can see how much space will be required by <strong>the</strong> installation and how much free space <strong>the</strong><br />
system has.<br />
3. Click on <strong>the</strong> Next button to continue.The system will now install <strong>the</strong> necessary files into your<br />
system. At <strong>the</strong> end of <strong>the</strong> installation you should see a window saying that <strong>the</strong> installation has been<br />
completed.<br />
4. You will <strong>the</strong>n be prompted to install <strong>the</strong> USBIO driver package. This package installs <strong>the</strong> USB<br />
drivers onto your computer.<br />
Freescale Semiconductor 2-3
Introduction<br />
5. Obey <strong>the</strong> instructions to install <strong>the</strong>se drivers.<br />
6. After <strong>the</strong> program has finished installing <strong>the</strong> driver, you will see <strong>the</strong> Installation Complete window.<br />
7. After <strong>the</strong> USBIO driver package installation is complete, you will be asked to install <strong>the</strong> Freescale<br />
ZigBee/802.15.4 MAC COM device driver set. It is important that <strong>the</strong> user also install this driver<br />
so that <strong>the</strong> system will work properly.<br />
After <strong>the</strong>se three drivers are installed, <strong>the</strong> SMAC GUI will work properly with <strong>the</strong> computer.<br />
2.3.2 Sensor Reference Board Setup<br />
1. Attach <strong>the</strong> sensor reference board (SRB) when <strong>the</strong> power switch is in <strong>the</strong> OFF position.<br />
2. Turn on <strong>the</strong> SRB. If necessary, install <strong>the</strong> new USB hardware on your computer.<br />
3. Click on Next.<br />
4. Your system will <strong>the</strong>n find <strong>the</strong> necessary files and install <strong>the</strong> USB device on your PC. After <strong>the</strong><br />
installation has finished you will see a screen that says “Completing <strong>the</strong> Found New Hardware<br />
Wizard.”<br />
<strong>Blood</strong> <strong>Pressure</strong> <strong>Monitor</strong> Design Reference Manual, Rev. 0<br />
2-4 Freescale Semiconductor
5. After it has installed, you will <strong>the</strong>n be asked to install <strong>the</strong> COM device:<br />
<strong>Blood</strong> <strong>Pressure</strong> <strong>Monitor</strong> Design Reference Manual, Rev. 0<br />
Introduction<br />
6. Click on Next.<br />
7. Your system will <strong>the</strong>n install <strong>the</strong> necessary DLL files. After <strong>the</strong>y have been installed you will see<br />
a screen that says “Completing <strong>the</strong> Found New Hardware Wizard.”<br />
8. After <strong>the</strong> hardware has been installed you will be able to use <strong>the</strong> SRB with <strong>the</strong> <strong>Blood</strong> <strong>Pressure</strong><br />
<strong>Monitor</strong> Demo.<br />
2.3.3 BPM Setup<br />
NOTE<br />
Please note that you must install both USB component devices for each<br />
sensor reference board that you connect to your computer. O<strong>the</strong>rwise <strong>the</strong> PC<br />
will not be able to communicate with <strong>the</strong> SRB.<br />
1. Select <strong>the</strong> desired <strong>Flexis</strong> MCU and place it into <strong>the</strong> BPM reference design socket. Select<br />
MC9S08<strong>QE128</strong> for down-ramp measurement or MCF51<strong>QE128</strong> for up-ramp measurement.<br />
2. Power on <strong>the</strong> BPM reference design.<br />
3. Connect <strong>the</strong> USB connector to <strong>the</strong> BPM reference design. After it is connected, <strong>the</strong> PC will see that<br />
a new hardware device has been found and will ask you if you want to install its driver.<br />
Freescale Semiconductor 2-5
Introduction<br />
4. Install <strong>the</strong> new hardware driver onto <strong>the</strong> PC.<br />
<strong>Blood</strong> <strong>Pressure</strong> <strong>Monitor</strong> Design Reference Manual, Rev. 0<br />
2-6 Freescale Semiconductor
<strong>Blood</strong> <strong>Pressure</strong> <strong>Monitor</strong> Design Reference Manual, Rev. 0<br />
Introduction<br />
5. From <strong>the</strong> Windows Start menu, run <strong>the</strong> Freescale SMAC GUI. When it starts, you will see this<br />
screen:<br />
Freescale Semiconductor 2-7
Introduction<br />
6. Within <strong>the</strong> Freescale SMAC GUI, click on <strong>the</strong> <strong>Blood</strong> <strong>Pressure</strong> <strong>Monitor</strong> icon. This icon will open a<br />
new window with <strong>the</strong> blood pressure monitor’s previously stored graphs.<br />
The application is now running. It is possible to use <strong>the</strong> arrow keys to navigate through <strong>the</strong> system menus<br />
and configure <strong>the</strong> settings. The user can set <strong>the</strong> audio on or off as well as enable and disable USB and<br />
wireless connectivity.<br />
<strong>Blood</strong> <strong>Pressure</strong> <strong>Monitor</strong> Design Reference Manual, Rev. 0<br />
2-8 Freescale Semiconductor
2.4 <strong>Using</strong> <strong>the</strong> <strong>Blood</strong> <strong>Pressure</strong> <strong>Monitor</strong><br />
<strong>Blood</strong> <strong>Pressure</strong> <strong>Monitor</strong> Design Reference Manual, Rev. 0<br />
Introduction<br />
When a user plugs in <strong>the</strong> blood pressure monitor, a splash screen with <strong>the</strong> Freescale logo will appear. The<br />
logo will scroll in from <strong>the</strong> right, and after it reaches <strong>the</strong> center scroll down and leave <strong>the</strong> OLED display.<br />
While this is happening, <strong>the</strong> pressure sensor stabilizes and auto-calibrates itself according to <strong>the</strong><br />
atmospheric pressure. After <strong>the</strong> splash screen has exited, a home screen will appear. Here <strong>the</strong> user is able<br />
to navigate and use <strong>the</strong> blood pressure monitor demo.<br />
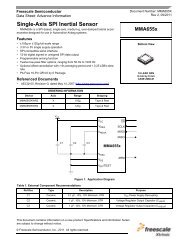
2.5 Navigation<br />
The home screen contains an icon of a heart with <strong>the</strong> word “Start” under it, and an icon of a folder, with a<br />
hammer and screwdriver, that has <strong>the</strong> word “Options” under it. Whichever item is selected will have a<br />
larger size than <strong>the</strong> o<strong>the</strong>r, and <strong>the</strong> words under <strong>the</strong> image will appear inside a yellow box, resembling a<br />
highlight. This highlighting is used on all screens to indicate a selected item.<br />
Figure 2-2. Home Screen with Start Selected<br />
Movement within <strong>the</strong> options can be done by pressing <strong>the</strong> buttons on <strong>the</strong> board. The left and right buttons<br />
switch between <strong>the</strong> Start and Options items, and <strong>the</strong> center button acts as an enter button.<br />
If <strong>the</strong> user selects <strong>the</strong> start option, <strong>the</strong> device will begin taking a blood pressure measurement.<br />
Freescale Semiconductor 2-9
Introduction<br />
After <strong>the</strong> blood pressure measurement is finished, a screen will come up showing <strong>the</strong> blood pressure<br />
measurement taken by <strong>the</strong> system. If audio is enabled, <strong>the</strong> user will hear <strong>the</strong> measured values through a<br />
small speaker within <strong>the</strong> <strong>Blood</strong> <strong>Pressure</strong> <strong>Monitor</strong>.<br />
By pressing <strong>the</strong> up and down buttons, <strong>the</strong> user can see <strong>the</strong> historical measurement data of <strong>the</strong> systolic<br />
pressure, diastolic pressure, and pulse rate. After users are finished, <strong>the</strong>y can press <strong>the</strong> center button to<br />
return to <strong>the</strong> home screen.<br />
By selecting <strong>the</strong> Options menu, <strong>the</strong> user will now be able to modify more advanced features of <strong>the</strong> blood<br />
pressure monitor. Navigation within <strong>the</strong> Options menu is done using <strong>the</strong> up and down buttons. The user is<br />
also able to return to <strong>the</strong> home screen by pressing <strong>the</strong> left button. Within <strong>the</strong> Options menu, a user has <strong>the</strong><br />
ability to change <strong>the</strong> settings seen here:<br />
Language: <strong>the</strong> blood pressure monitor can be set to present user data in English, Spanish, French, and<br />
German. Choose one, and <strong>the</strong> system will show commands and deliver audio feedback in <strong>the</strong> selected<br />
language.<br />
<strong>Blood</strong> <strong>Pressure</strong> <strong>Monitor</strong> Design Reference Manual, Rev. 0<br />
2-10 Freescale Semiconductor
<strong>Blood</strong> <strong>Pressure</strong> <strong>Monitor</strong> Design Reference Manual, Rev. 0<br />
Introduction<br />
After <strong>the</strong> user selects a language, <strong>the</strong> blood pressure monitor will return to <strong>the</strong> Options menu and display<br />
<strong>the</strong> items in <strong>the</strong> new selected language. Users can also return to <strong>the</strong> Options menu without modifying <strong>the</strong><br />
default language by pressing <strong>the</strong> left button.<br />
Audio: pressing <strong>the</strong> center button when <strong>the</strong> Audio item is selected will toggle <strong>the</strong> audio preferences of <strong>the</strong><br />
blood pressure monitor. Users can see whe<strong>the</strong>r or not <strong>the</strong> audio is on by <strong>the</strong> state of <strong>the</strong> speaker icon on <strong>the</strong><br />
left. Here is an example of how <strong>the</strong> icons look when <strong>the</strong> audio is on and when it is off:<br />
Figure 2-3. Audio Feedback On<br />
Figure 2-4. Audio Feedback Off<br />
Memory: within this menu, <strong>the</strong> user will have <strong>the</strong> ability to manipulate <strong>the</strong> options associated with data<br />
logging. There is also <strong>the</strong> ability to view past measurements in a graphical format. To return to <strong>the</strong> Options<br />
menu, press <strong>the</strong> left button.<br />
The first option allows users to enable measurement storage to MRAM. When storage is enabled, <strong>the</strong> latest<br />
measurement taken on <strong>the</strong> blood pressure monitor will be stored. The blood pressure monitor can store up<br />
to five readings (sets of measurements) on <strong>the</strong> system at a time.<br />
Figure 2-5. Save Option On<br />
Freescale Semiconductor 2-11
Introduction<br />
Figure 2-6. Save Option Off<br />
The second option clears all data stored on <strong>the</strong> MRAM.<br />
The third option enables users to load and view <strong>the</strong> historical data that has been taken by <strong>the</strong> blood pressure<br />
monitor in <strong>the</strong> same format as when a measurement was taken.<br />
By selecting this option and pressing <strong>the</strong> center button, <strong>the</strong> user will see <strong>the</strong> past systolic pressures that<br />
have been taken.<br />
Here <strong>the</strong> user can press <strong>the</strong> up and down buttons to change between <strong>the</strong> systolic pressure, diastolic<br />
pressure, and heart rate. To leave this mode, <strong>the</strong> user must press <strong>the</strong> center button to return to <strong>the</strong> Options<br />
menu.<br />
Connectivity: in this menu, users can adjust <strong>the</strong> ability of <strong>the</strong> blood pressure monitor to send data using<br />
ei<strong>the</strong>r <strong>the</strong> USB connection on <strong>the</strong> board, and/or <strong>the</strong> wireless ZigBee chip on <strong>the</strong> board. Users can see which<br />
communication modes are enabled by seeing <strong>the</strong> icon on <strong>the</strong> left of <strong>the</strong> screen, <strong>the</strong> same as with <strong>the</strong> audio<br />
icon.<br />
<strong>Blood</strong> <strong>Pressure</strong> <strong>Monitor</strong> Design Reference Manual, Rev. 0<br />
2-12 Freescale Semiconductor
Figure 2-7. USB and Wireless Connectivity On<br />
Figure 2-8. USB and Wireless Connectivity Off<br />
<strong>Blood</strong> <strong>Pressure</strong> <strong>Monitor</strong> Design Reference Manual, Rev. 0<br />
Introduction<br />
To return to <strong>the</strong> Options menu, press <strong>the</strong> left button.<br />
Periodical Measurements: this enables measurements for <strong>the</strong> blood pressure monitor at specified intervals<br />
of 5, 10, 15, and 20 minutes. After <strong>the</strong> user selects an option, <strong>the</strong> blood pressure monitor will return to <strong>the</strong><br />
Options menu. It is also possible to return to <strong>the</strong> Options menu without making changes. The blood<br />
pressure monitor will begin to take periodic measurements based on <strong>the</strong> time interval that has been<br />
selected.<br />
Figure 2-9. Periodic Measurements<br />
Freescale Semiconductor 2-13
Introduction<br />
2.6 Sending Data to a PC<br />
When <strong>the</strong> blood pressure monitor is connected to <strong>the</strong> PC through USB, <strong>the</strong> user can download <strong>the</strong> last five<br />
measurements taken from <strong>the</strong> system. To do this, <strong>the</strong> user needs to open <strong>the</strong> <strong>Blood</strong> <strong>Pressure</strong> window from<br />
<strong>the</strong> Home Automation user interface. In <strong>the</strong> new window that opens, <strong>the</strong> user can click on <strong>the</strong> download<br />
button on <strong>the</strong> top right of <strong>the</strong> screen. The user interface will <strong>the</strong>n begin to download <strong>the</strong> last five<br />
measurements from <strong>the</strong> blood pressure monitor.<br />
<strong>Blood</strong> <strong>Pressure</strong> <strong>Monitor</strong> Design Reference Manual, Rev. 0<br />
2-14 Freescale Semiconductor
<strong>Blood</strong> <strong>Pressure</strong> <strong>Monitor</strong> Design Reference Manual, Rev. 0<br />
Introduction<br />
After it has finished, <strong>the</strong> last five measurements will be displayed in a table and graphed on <strong>the</strong> screen.<br />
This feature allows users to connect <strong>the</strong> blood pressure monitor to a PC and retrieve past patient<br />
measurements.<br />
Freescale Semiconductor 2-15
Introduction<br />
<strong>Blood</strong> <strong>Pressure</strong> <strong>Monitor</strong> Design Reference Manual, Rev. 0<br />
2-16 Freescale Semiconductor
Chapter 3<br />
Hardware Description<br />
3.1 Introduction<br />
The design for <strong>the</strong> BPM PCB was made with <strong>the</strong> intention of isolating <strong>the</strong> different blocks of <strong>the</strong> system<br />
to avoid letting coupling noise into <strong>the</strong> lines of <strong>the</strong> instrumentation amplifier. The power is segmented<br />
through <strong>the</strong> use of 0 Ω resistors for debugging. These resistors can be replaced by ferrite cores to suppress<br />
EMI and noise coming from <strong>the</strong> different portions of <strong>the</strong> board. Ground distribution was implemented<br />
using a star configuration.<br />
Ano<strong>the</strong>r feature of <strong>the</strong> board is <strong>the</strong> test socket which eases <strong>the</strong> change between <strong>the</strong> S08 and <strong>the</strong> ColdFire<br />
device.<br />
This section provides <strong>the</strong> technical descriptions for <strong>the</strong> Freescale BPM system, and for <strong>the</strong> Freescale<br />
components used in <strong>the</strong> reference design. These Freescale components are:<br />
• <strong>Flexis</strong> MC9S08<strong>QE128</strong> Microcontroller<br />
• <strong>Flexis</strong> MCF51<strong>QE128</strong> Microcontroller<br />
• MPR083 Proximity Sensor<br />
• MR2A16A Asynchronous Magnetoresistive RAM<br />
• MC9S08JM60 Microcontroller<br />
• MC13202 ZigBee Transceiver<br />
• MPXV5050 <strong>Pressure</strong> Sensor<br />
• OSRAM Pictiva OLED Display OS128064PK27MY0B00<br />
3.2 Operating Environment<br />
• Input voltage: 9 VDC<br />
• Input current: 800 mA minimum, 1 A maximum<br />
• Operating temperature: 0 to +65 °C<br />
• Operating humidity: 90% RH maximum for T A 40 °C<br />
3.3 <strong>Flexis</strong> MC9S08<strong>QE128</strong> and MCF51<strong>QE128</strong> Microcontrollers<br />
The <strong>Flexis</strong> <strong>QE128</strong> microcontrollers are Freescale’s revolutionary 8-bit and 32-bit compatible devices.<br />
They offer unprecedented compatibility, and have a common set of on-chip peripherals and development<br />
tools. They maintain pin-to-pin compatibility, which enables a developer to create one common hardware<br />
platform and use that platform for more than one product with different computing capabilities.<br />
<strong>Blood</strong> <strong>Pressure</strong> <strong>Monitor</strong> Design Reference Manual, Rev. 0<br />
Freescale Semiconductor 3-1
Hardware Description<br />
<strong>Flexis</strong> <strong>QE128</strong> features:<br />
• Up to 50 MHz CPU frequency from 3.6 V to 2.1 V, and 20 MHz CPU frequency at 2.1 V to 1.8 V,<br />
across a temperature range of –40 °C to 85 °C<br />
• 128 KB flash and 8 KB RAM<br />
• Peripheral clock enable register, to disable clocks to unused modules<br />
• Enhanced 24-channel, 12-bit analog-to-digital converter (ADC)<br />
3.3.1 MC9S08<strong>QE128</strong> Microcontroller<br />
The MC9S08<strong>QE128</strong> MCU is a highly integrated member of Freescale’s 8-bit family of microcontrollers<br />
that is based on <strong>the</strong> high-performance, low-power consumption HCS08 core. The MC9S08<strong>QE128</strong> MCU<br />
includes a background debugging system and on-chip, in-circuit emulation (ICE) with real-time bus<br />
capture, providing a single-wire debugging and emulation interface. It also features a programmable 16-bit<br />
timer/pulse-width-modulation module that is one of <strong>the</strong> most flexible and cost-effective of its kind. The<br />
compact, tightly integrated MC9S08<strong>QE128</strong> MCU delivers a versatile combination of Freescale<br />
peripherals along with <strong>the</strong> advanced features of <strong>the</strong> HCS08 core, including extended battery life with<br />
maximum performance down to 1.8 V, industry-leading flash, and innovative development support.<br />
MC9S08<strong>QE128</strong> features:<br />
• Support for up to 32 interrupt/reset sources<br />
• New MMU allows access of up to 4 MB through paging<br />
• New linear address pointer to access all memory on <strong>the</strong> MCU<br />
• SET/CLR/TOGGLE registers on 16 pins (PTC and PTE)<br />
3.3.2 MCF51<strong>QE128</strong> Microcontroller<br />
The MCF51<strong>QE128</strong> microcontroller extends <strong>the</strong> low end of <strong>the</strong> ColdFire family with up to 128 KB flash<br />
memory and a 24-channel, 12-bit analog-to-digital converter (ADC). The 32-bit <strong>QE128</strong> includes up to<br />
3.3 V supply voltage, a 50.33 MHz CPU core, and three timers for improved motor control.<br />
MCF51<strong>QE128</strong> features:<br />
• Implements ColdFire V1 instruction set revision C<br />
• Support for up to 30 peripheral interrupt requests and seven software interrupts<br />
• Single-wire background debug interface<br />
• 16 bits of Rapid GPIO connected to <strong>the</strong> CPU’s high-speed local bus with set, clear, and toggle<br />
functionality<br />
3.4 MPR083 Proximity Sensor<br />
The MPR083 is an IIC-driven capacitive touch sensor controller, optimized to manage an 8-position<br />
rotary-shaped capacitive array. This device can accommodate a wide range of implementations through<br />
three output mechanisms and many configurable options.<br />
<strong>Blood</strong> <strong>Pressure</strong> <strong>Monitor</strong> Design Reference Manual, Rev. 0<br />
3-2 Freescale Semiconductor
<strong>Blood</strong> <strong>Pressure</strong> <strong>Monitor</strong> Design Reference Manual, Rev. 0<br />
Hardware Description<br />
Freescale Semiconductor’s MPR083 proximity-capacitive touch sensor controller is designed to detect <strong>the</strong><br />
state of capacitive touch pads. The MPR083 offers designers a cost-efficient alternative to mechanical<br />
rotary switches for control panel applications.<br />
The MPR083 uses an IIC interface to communicate with <strong>the</strong> host which configures <strong>the</strong> operation, and an<br />
interrupt to advise <strong>the</strong> host of status changes. The MPR083 also includes a piezo sounder drive which<br />
provides audible feedback to simulate mechanical key clicks.<br />
MPR083 features:<br />
• 1.8 V to 3.6 V operation<br />
• 150 µA average supply current<br />
• 35 µA low power mode<br />
• Variable low power mode response time (10 ms–10 s)<br />
3.5 MR2A16A Asynchronous Magnetoresistive RAM<br />
The MR2A16A is a 4,194,304-bit magnetoresistive random access memory (MRAM) device organized as<br />
262,144 words of 16 bits. The MR2A16A is equipped with chip enable (E), write enable (W), and output<br />
enable (G) pins, allowing for significant system design flexibility without bus contention. Because <strong>the</strong><br />
MR2A16A has separate byte-enable controls (LB and UB), individual bytes can be written and read.<br />
MRAM is a nonvolatile memory technology that protects data in <strong>the</strong> event of power loss and does not<br />
require periodic refreshing. The MR2A16A is <strong>the</strong> ideal memory solution for applications that must<br />
permanently store and retrieve critical data quickly.<br />
MR2A16A features:<br />
• Single 3.3 V power supply<br />
• Commercial temperature range (0 °C to 70 °C)<br />
• Flexible data bus control — 8-bit or 16-bit access<br />
• Equal address and chip-enable access times<br />
• Automatic data protection with low-voltage inhibit circuitry to prevent writes on power loss<br />
• All inputs and outputs are transistor-transistor logic (TTL) compatible<br />
• Full nonvolatile operation with 10 years minimum data retention<br />
3.6 MC9S08JM60 Microcontroller<br />
The MC9S08JM60 series MCUs are members of <strong>the</strong> low-cost, high-performance HCS08 family of 8-bit<br />
microcontroller units (MCUs). The JM family features a fully-compliant full-speed USB 2.0 device<br />
peripheral, which enables users to connect to a PC or any o<strong>the</strong>r USB host.<br />
MC9S08JM60 features:<br />
• 48 MHz CPU frequency<br />
• 2.7 V to 5.5 V operating voltage<br />
• 60 KB of on-chip flash<br />
Freescale Semiconductor 3-3
Hardware Description<br />
• 4 KB of on-chip RAM<br />
• USB 2.0 Full Speed (12 Mbps) with dedicated on-chip 3.3 V regulator; supports control, interrupt,<br />
isochronous, and bulk transfers; supports endpoint 0 and up to six additional endpoints; endpoints<br />
5 and 6 can be combined to provide double buffering capability<br />
3.7 MC13202 ZigBee Transceiver<br />
The MC13202 is a short-range, low-power, 2.4 GHz industrial, scientific, and medical (ISM) band<br />
transceiver. The MC13202 contains a complete packet data modem which is compliant with <strong>the</strong> IEEE<br />
802.15.4 standard PHY (physical) layer. This allows <strong>the</strong> development of proprietary point-to-point and star<br />
networks based on <strong>the</strong> 802.15.4 packet structure and modulation format.<br />
Combined with an appropriate microcontroller (MCU), <strong>the</strong> MC13202 provides a cost-effective solution<br />
for short-range data links and networks. Interface with <strong>the</strong> MCU is accomplished using a four-wire serial<br />
peripheral interface (SPI) connection and an interrupt request output which allows for <strong>the</strong> use of a variety<br />
of processors.<br />
MC13202 features:<br />
• 2.0 V to 3.4 V power supply range<br />
• Operating temperature range of –40 °C to 85 °C<br />
• Buffered transmit and receive data packets for simplified use with MCUs<br />
• Three power-down modes for power conservation<br />
• Two internal 16-bit timer comparators<br />
• Programmable frequency clock output for use by MCU<br />
• Seven general-purpose input/output (GPIO) signals<br />
3.8 MPXV5050 <strong>Pressure</strong> Sensor<br />
The MPX5050/MPXV5050G series piezoresistive transducer combines advanced micromachining<br />
techniques, thin-film metallization, and bipolar processing to provide an accurate high-level analog output<br />
signal that is proportional to <strong>the</strong> applied pressure.<br />
MPXV5050 features:<br />
• 2.5% maximum error over 0 °C to 85 °C<br />
• Ideally suited for microprocessor-based or microcontroller-based systems<br />
• Temperature compensated over –40 °C to +125 °C<br />
• Patented silicon shear stress strain gauge<br />
3.9 OSRAM Pictiva OLED Display OS128064PK27MY0B00<br />
OLED displays are a self-emissive technology that normally requires less power than LCD backlights.<br />
These displays only consume power if a pixel is turned on. This feature makes OLED displays ideal for<br />
battery-powered applications. The specific OLED being used in this application is a 128 x 64 pixel display<br />
<strong>Blood</strong> <strong>Pressure</strong> <strong>Monitor</strong> Design Reference Manual, Rev. 0<br />
3-4 Freescale Semiconductor
<strong>Blood</strong> <strong>Pressure</strong> <strong>Monitor</strong> Design Reference Manual, Rev. 0<br />
Hardware Description<br />
driven through a serial port. The OLED has a 4-bit grayscale display that enables each OLED pixel to turn<br />
on at 16 different levels of luminance.<br />
3.10 PCB Layout<br />
The top and bottom layers of <strong>the</strong> PCB are show here. Gerber files are available for download at<br />
www.freescale.com.<br />
Figure 3-1. Top Layer<br />
Freescale Semiconductor 3-5
Hardware Description<br />
3.10.1 Mechanical Characteristics<br />
Figure 3-2. Bottom Layer<br />
3.10.1.1 Conductor Width and Clearances<br />
The PCB is a rectangle with a size of 6.45 inches by 4 inches with a thickness of 0.064 inch.<br />
The trace widths and clearances for power lines and signal lines are in this table:<br />
Lines that carry more current, such as <strong>the</strong> collector lines for <strong>the</strong> Darlington transistors, have a width of 15<br />
mm. When line widths were determined, current values and copper thickness were taken into account.<br />
Standard drill sizes were used for guaranteed manufacturability and ease of production.<br />
3.10.1.2 Trace Angles<br />
Class Width Clearance<br />
Regular signals 10 10<br />
Power 20 10<br />
One source of RFI is an abrupt change of direction in a PCB track, which effectively looks like impedance<br />
discontinuities and will radiate accordingly. For HCMOS designs it is important to ensure that 90-degree<br />
track-direction changes do not occur. Also, from <strong>the</strong> mechanical point of view, a 90-degree angle is more<br />
likely to be detached from <strong>the</strong> board.<br />
<strong>Blood</strong> <strong>Pressure</strong> <strong>Monitor</strong> Design Reference Manual, Rev. 0<br />
3-6 Freescale Semiconductor
3.10.1.3 Placement<br />
<strong>Blood</strong> <strong>Pressure</strong> <strong>Monitor</strong> Design Reference Manual, Rev. 0<br />
Hardware Description<br />
When components in <strong>the</strong> board were situated, <strong>the</strong> interfaces with <strong>the</strong> outer casing and <strong>the</strong> connections to<br />
<strong>the</strong> outputs of <strong>the</strong> system were taken into consideration. The pressure sensor was placed near <strong>the</strong> entry<br />
point coming from <strong>the</strong> cuff. Special care was taken to isolate <strong>the</strong> RF section of <strong>the</strong> board to avoid noise<br />
coupling into <strong>the</strong> transmitter. The board has different mounting holes for assembly to <strong>the</strong> casing and <strong>the</strong><br />
OLED of <strong>the</strong> system.<br />
Figure 3-3. Top Placement and Labeling<br />
Freescale Semiconductor 3-7
Hardware Description<br />
3.10.1.4 Labeling<br />
Figure 3-4. Bottom Placement and Labeling<br />
All parts are outlined in <strong>the</strong> board, as well as <strong>the</strong> different supply and GND signals. Two LEDs indicate<br />
<strong>the</strong> power status of <strong>the</strong> 3.3 V supply (digital, analog, and RF sections) and <strong>the</strong> 12 V supply (for <strong>the</strong> OLED<br />
and <strong>the</strong> audio amplifier).<br />
The figures in this chapter and Table 3-1 show <strong>the</strong> labeling of <strong>the</strong> supplies and <strong>the</strong> signals to which <strong>the</strong>y<br />
correspond:<br />
Table 3-1. Signals<br />
Name Signal<br />
3.3 V General 3.3 V supply for <strong>the</strong> digital, RF, and analog blocks<br />
3.3 V_D Supply for <strong>the</strong> digital block (<strong>Flexis</strong> and JM60 MCUs)<br />
3.3 V_Z Supply for <strong>the</strong> RF block<br />
3.3 V_A 3.3 V supply for <strong>the</strong> analog blocks (instrumentation amplifier and MPR083 device)<br />
GND_D Digital ground<br />
GND_Z RF ground<br />
GND_A Analog ground<br />
GND_M Motor block ground<br />
<strong>Blood</strong> <strong>Pressure</strong> <strong>Monitor</strong> Design Reference Manual, Rev. 0<br />
3-8 Freescale Semiconductor
Chapter 4<br />
Embedded Software Description<br />
Here is a description of all <strong>the</strong> software modules in <strong>the</strong> blood pressure monitor demo.<br />
4.1 Introduction<br />
The purpose of <strong>the</strong> blood pressure monitor is to indicate <strong>the</strong> pulse pressure (<strong>the</strong> systolic pressure minus <strong>the</strong><br />
diastolic pressure) of a patient. This is implemented through <strong>the</strong> use of a cuff wrapped around <strong>the</strong> patient’s<br />
arm, and measuring <strong>the</strong> pressure and pressure differential of that cuff while air is put into or out of <strong>the</strong><br />
system. Moreover, <strong>the</strong> blood pressure monitor must be able to perform many o<strong>the</strong>r functions, such as:<br />
• Display information<br />
• Provide audio feedback<br />
• Keep statistical records<br />
• <strong>Using</strong> USB or ZigBee communications, send statistical feedback to a PC for fur<strong>the</strong>r analysis<br />
4.2 Software Design Goals<br />
The software design pursues <strong>the</strong>se goals:<br />
• Modularity — The software must be completely modular and with as little cohesion as possible.<br />
This modularity should be reflected in ease if making changes, if adding new functionalities and<br />
modules, or if modifying existing ones.<br />
• Interoperability — Modules must not have any blocking functions. This makes it possible to allow<br />
o<strong>the</strong>r modules to be kept up-to-date.<br />
4.3 Software Architecture<br />
The software architecture on <strong>the</strong> blood pressure monitor was designed in this way: application software<br />
can be found on <strong>the</strong> main.c file; from here, <strong>the</strong> main() routine can call different services and hardware<br />
features. Services will have direct contact with hardware on <strong>the</strong> MCU. The hardware has a hardware<br />
abstraction layer that eases migration to ano<strong>the</strong>r MCU. The real time clock (RTC) can be seen as a complex<br />
driver which can service o<strong>the</strong>r functions, and is used as <strong>the</strong> system clock. All modules that depend on<br />
time-triggered functions take <strong>the</strong>ir time base from <strong>the</strong> RTC.<br />
<strong>Blood</strong> <strong>Pressure</strong> <strong>Monitor</strong> Design Reference Manual, Rev. 0<br />
Freescale Semiconductor 4-1
Embedded Software Description<br />
The fact that each module has its own .c file simplifies <strong>the</strong> process of adding and eliminating modules in<br />
<strong>the</strong> code.<br />
4.4 Software<br />
4.4.1 <strong>Blood</strong> <strong>Pressure</strong> Measurement<br />
The blood pressure measurement is part of <strong>the</strong> hardware independent layer of <strong>the</strong> application. This module<br />
is set up to work as a state machine that is called from <strong>the</strong> main loop. When a measurement is not being<br />
taken, <strong>the</strong> system is in an IDLE state — when a measurement starts, <strong>the</strong> state machine is changed. It <strong>the</strong>n<br />
enables <strong>the</strong> pressure sensor, RTC, and TPM modules. Next, <strong>the</strong> system begins to inflate <strong>the</strong> cuff according<br />
to <strong>the</strong> necessary measurement. Whenever a measurement is being taken, <strong>the</strong> RTC takes an ADC<br />
measurement of <strong>the</strong> cuff pressure and of <strong>the</strong> high pass filter every 1 ms. This measurement is what is used<br />
by <strong>the</strong> blood pressure state machine to adjust <strong>the</strong> level of inflation by controlling <strong>the</strong> motors, using a TPM<br />
module in <strong>the</strong> MCU. After <strong>the</strong> measurement finishes, <strong>the</strong> system disables all unused modules and goes<br />
back to <strong>the</strong> IDLE state.<br />
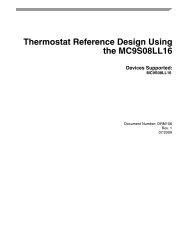
4.4.2 Capacitive Touch<br />
The sensor is controlled using a state machine which runs in <strong>the</strong> application’s main loop. It is called<br />
periodically and is non-blocking. This state machine uses <strong>the</strong> hardware abstraction layers that manage <strong>the</strong><br />
IIC and KBI modules of <strong>the</strong> microcontroller. This figure shows <strong>the</strong> state machine being used:<br />
<strong>Blood</strong> <strong>Pressure</strong> <strong>Monitor</strong> Design Reference Manual, Rev. 0<br />
4-2 Freescale Semiconductor
Configure Idle<br />
ClearError<br />
Fault detected<br />
ReadFault<br />
No fault<br />
detected<br />
KBI interrupt<br />
detected<br />
ReadFIFO<br />
FIFO is empty<br />
<strong>Blood</strong> <strong>Pressure</strong> <strong>Monitor</strong> Design Reference Manual, Rev. 0<br />
Embedded Software Description<br />
FIFO is not<br />
empty yet<br />
Initially, <strong>the</strong> MPR083 is configured to work with interrupts, so <strong>the</strong> IRQ output of <strong>the</strong> sensor can wake <strong>the</strong><br />
MCU when needed (using a KBI pin). After <strong>the</strong> configuration has been written <strong>the</strong> state machine enters an<br />
idle state, during which it checks for a KBI interrupt, generated by a touch event in <strong>the</strong> sensor.<br />
After a touch is detected, <strong>the</strong> state machine starts reading <strong>the</strong> FIFO register in <strong>the</strong> MPR083. Because <strong>the</strong><br />
FIFO register can store up to 30 touch-event values, it is read until it empties, and <strong>the</strong> last value is <strong>the</strong> one<br />
used. The value of <strong>the</strong> electrode pressed is stored in a global variable and ano<strong>the</strong>r variable is used to know<br />
if <strong>the</strong> key was pressed or released.<br />
The fault register in <strong>the</strong> sensor is used to determine if one or more electrodes were shorted to V DD or V SS .<br />
After a fault is asserted, <strong>the</strong> sensor electrodes will no longer be scanned until <strong>the</strong> fault is cleared.<br />
That is why after reading <strong>the</strong> FIFO register, <strong>the</strong> program reads <strong>the</strong> fault register, checking for errors. If no<br />
error is detected, <strong>the</strong> state machine enters <strong>the</strong> idle state again. O<strong>the</strong>rwise, if a fault is detected, <strong>the</strong> state<br />
machine goes to an error-clearing state. This is <strong>the</strong> procedure used to clear <strong>the</strong> fault:<br />
1. Stop <strong>the</strong> electrode scanning by writing <strong>the</strong> configuration register (stop mode).<br />
2. Clear <strong>the</strong> fault condition by writing <strong>the</strong> fault register.<br />
3. Start <strong>the</strong> electrode scanning again by writing <strong>the</strong> configuration register (run mode).<br />
After <strong>the</strong>se steps are done, <strong>the</strong> state machine enters <strong>the</strong> idle state again, checking for any o<strong>the</strong>r electrode<br />
touch event.<br />
Freescale Semiconductor 4-3
Embedded Software Description<br />
4.4.3 MRAM Storage<br />
The system uses MRAM to store data. To do this, <strong>the</strong> MCU dedicates eight complete ports for MRAM use.<br />
The MRAM is part of <strong>the</strong> hardware independent layer and is used by <strong>the</strong> voice generator module to read<br />
raw audio to reproduce. The MRAM is also used by <strong>the</strong> blood pressure monitor to store <strong>the</strong> last five<br />
readings.<br />
4.4.4 OLED Display<br />
The OLED display driver was taken directly from application note AN3415. In this application note, all<br />
<strong>the</strong> necessary steps are taken to enable, initialize, and use <strong>the</strong> OLED display.<br />
The system uses an SPI port to send commands and data to <strong>the</strong> OLED display. The system also controls<br />
<strong>the</strong> 12 V power source that powers up <strong>the</strong> display and can <strong>the</strong>refore save power by powering down <strong>the</strong><br />
OLED display. The main modification implemented to this driver was a 200 ms delay between each<br />
display refresh. This delay was added using a counter incremented by <strong>the</strong> RTC interrupt. The main state<br />
machine for <strong>the</strong> demo dictates which screen to display and which language to use.<br />
4.4.5 USB Communication<br />
USB communication is done using a HC9S08JM60 that acts as a bridge between <strong>the</strong> PC and <strong>the</strong> <strong>Flexis</strong><br />
microcontroller. The communication to <strong>the</strong> HC9S08JM60 is done through an SCI port. All data requests<br />
are initiated by <strong>the</strong> PC and relayed by <strong>the</strong> HC9S08JM60. Whenever <strong>the</strong> <strong>Flexis</strong> device receives a new<br />
request through an SCI interrupt, it checks to see if USB communication is enabled, and if so, it will return<br />
<strong>the</strong> requested data back through <strong>the</strong> SCI.<br />
The program implemented on <strong>the</strong> HCS08JM60 is a simple application: <strong>the</strong> MCU waits to receive data<br />
through <strong>the</strong> USB or SCI ports, <strong>the</strong>n places that data into <strong>the</strong> o<strong>the</strong>r bus.<br />
4.4.6 Voice Generation<br />
All voice commands are initiated by <strong>the</strong> OLED state machine, and are fur<strong>the</strong>r updated through interrupts<br />
when <strong>the</strong> sampling timer overflows. Voice generation is done using two TPM modules: one channel is used<br />
to set <strong>the</strong> sample rate of <strong>the</strong> audio, and <strong>the</strong> o<strong>the</strong>r channel is used to create a PWM frequency. This PWM<br />
frequency is <strong>the</strong>n passed through <strong>the</strong> audio filter, where it becomes a fixed amplitude which is sent to <strong>the</strong><br />
speaker. The frequency is repeated over and over until a new sample is taken from an audio file, <strong>the</strong>n this<br />
new sample value is placed in <strong>the</strong> fast frequency. The timing for <strong>the</strong>se signals appears like this:<br />
0x80 0x40 0xC0<br />
The arrows indicate each time <strong>the</strong>re is a sampling interrupt. At that moment, <strong>the</strong> system reads <strong>the</strong> audio<br />
file to set <strong>the</strong> PWM frequency for <strong>the</strong> audio generation. This PWM frequency will remain in effect until<br />
<strong>the</strong> next sampling interrupt. This process continues until <strong>the</strong> end of <strong>the</strong> audio file has been reached. At that<br />
point, <strong>the</strong> system stops <strong>the</strong> PWM generation.<br />
<strong>Blood</strong> <strong>Pressure</strong> <strong>Monitor</strong> Design Reference Manual, Rev. 0<br />
4-4 Freescale Semiconductor
<strong>Blood</strong> <strong>Pressure</strong> <strong>Monitor</strong> Design Reference Manual, Rev. 0<br />
Embedded Software Description<br />
To generate <strong>the</strong> audio, <strong>the</strong> system uses files stored in <strong>the</strong> MRAM. These are raw audio files using an 8-bit<br />
sample size with an 8 kHz sampling rate. This sampling rate provides audio with about <strong>the</strong> same quality<br />
as a telephone. It is important to note that this process can be done at a much higher sampling rate that will<br />
generate full audio. The only change required is for <strong>the</strong> system to have enough memory to be able to store<br />
<strong>the</strong> larger audio files.<br />
4.4.7 ZigBee Communication<br />
ZigBee communication on <strong>the</strong> blood pressure monitor is done through an SPI interface to <strong>the</strong> MC13202<br />
and six separate I/O ports, including <strong>the</strong> IRQ pin. The IRQ pin signals when <strong>the</strong> transceiver has<br />
information that it needs to send to <strong>the</strong> MCU. The transmission of measured data through ZigBee is done<br />
within <strong>the</strong> OLED state machine whenever <strong>the</strong> system is displaying measured data. The state machine will<br />
check to see if ZigBee communication is enabled — if so, it will <strong>the</strong>n place <strong>the</strong> systolic pressure in <strong>the</strong><br />
ZigBee transmission buffer, send that buffer through <strong>the</strong> SPI to <strong>the</strong> transceiver, <strong>the</strong>n ask <strong>the</strong> transceiver to<br />
transmit <strong>the</strong> buffer. This procedure is <strong>the</strong>n repeated for <strong>the</strong> diastolic pressure and pulse rate that were taken<br />
at <strong>the</strong> same time. Due to <strong>the</strong> fact that all ZigBee communications are initiated by <strong>the</strong> blood pressure<br />
monitor, whenever <strong>the</strong> system is not sending messages <strong>the</strong> transceiver is disabled, as well as all peripherals<br />
related to <strong>the</strong> transceiver for <strong>the</strong> MCU.<br />
Freescale Semiconductor 4-5
Embedded Software Description<br />
<strong>Blood</strong> <strong>Pressure</strong> <strong>Monitor</strong> Design Reference Manual, Rev. 0<br />
4-6 Freescale Semiconductor
Chapter 5<br />
Customizing <strong>the</strong> <strong>Blood</strong> <strong>Pressure</strong> <strong>Monitor</strong><br />
You can use any part(s) of <strong>the</strong> blood pressure monitor to suit your application needs. For example, if you<br />
wish to communicate an application with an MRAM, only add <strong>the</strong> MRAM.h file into <strong>the</strong> code, and declare<br />
<strong>the</strong> address and data ports as well as <strong>the</strong> control bits.<br />
Likewise, <strong>the</strong> OLED display can also be taken and added into any application. The OLED.c file contains<br />
all <strong>the</strong> necessary functions to use <strong>the</strong> OLED display. If you wish to use <strong>the</strong> OLED display in ano<strong>the</strong>r<br />
application, add <strong>the</strong> OLED.h file into <strong>the</strong> code, change <strong>the</strong> pin declarations of <strong>the</strong> SPI, <strong>the</strong> OLED reset pin,<br />
<strong>the</strong> 12 V enable pin, and <strong>the</strong> data/command pin.<br />
<strong>Blood</strong> <strong>Pressure</strong> <strong>Monitor</strong> Design Reference Manual, Rev. 0<br />
Freescale Semiconductor 5-1
Customizing <strong>the</strong> <strong>Blood</strong> <strong>Pressure</strong> <strong>Monitor</strong><br />
<strong>Blood</strong> <strong>Pressure</strong> <strong>Monitor</strong> Design Reference Manual, Rev. 0<br />
5-2 Freescale Semiconductor
Appendix A<br />
Schematics<br />
<strong>Blood</strong> <strong>Pressure</strong> <strong>Monitor</strong> Design Reference Manual, Rev. 0<br />
Freescale Semiconductor A-1
Schematics<br />
<strong>Blood</strong> <strong>Pressure</strong> <strong>Monitor</strong> Design Reference Manual, Rev. 0<br />
A-2 Freescale Semiconductor
<strong>Blood</strong> <strong>Pressure</strong> <strong>Monitor</strong> Design Reference Manual, Rev. 0<br />
Schematics<br />
Freescale Semiconductor A-3
Schematics<br />
<strong>Blood</strong> <strong>Pressure</strong> <strong>Monitor</strong> Design Reference Manual, Rev. 0<br />
A-4 Freescale Semiconductor
<strong>Blood</strong> <strong>Pressure</strong> <strong>Monitor</strong> Design Reference Manual, Rev. 0<br />
Schematics<br />
Freescale Semiconductor A-5
Schematics<br />
<strong>Blood</strong> <strong>Pressure</strong> <strong>Monitor</strong> Design Reference Manual, Rev. 0<br />
A-6 Freescale Semiconductor
<strong>Blood</strong> <strong>Pressure</strong> <strong>Monitor</strong> Design Reference Manual, Rev. 0<br />
Schematics<br />
Freescale Semiconductor A-7
Schematics<br />
<strong>Blood</strong> <strong>Pressure</strong> <strong>Monitor</strong> Design Reference Manual, Rev. 0<br />
A-8 Freescale Semiconductor
<strong>Blood</strong> <strong>Pressure</strong> <strong>Monitor</strong> Design Reference Manual, Rev. 0<br />
Schematics<br />
Freescale Semiconductor A-9
Schematics<br />
<strong>Blood</strong> <strong>Pressure</strong> <strong>Monitor</strong> Design Reference Manual, Rev. 0<br />
A-10 Freescale Semiconductor
<strong>Blood</strong> <strong>Pressure</strong> <strong>Monitor</strong> Design Reference Manual, Rev. 0<br />
Schematics<br />
Freescale Semiconductor A-11
Schematics<br />
<strong>Blood</strong> <strong>Pressure</strong> <strong>Monitor</strong> Design Reference Manual, Rev. 0<br />
A-12 Freescale Semiconductor
Appendix B<br />
Bill of Materials<br />
QTY<br />
Reference<br />
Designator<br />
Value Package Description Type<br />
1 ANT1 F_Antenna f_antena PCB F Antenna for ZigBee PCB<br />
4 BH1, BH2, BH3, BH4 MTG C280-130T Mounting Hole 0.130 Inch Oth<br />
1 BT1 9 V skt_bat_54x29mm_th Holder Batt 9 V Univ Plastic<br />
PC<br />
5 C3, C6, C14, C21,<br />
C22<br />
10 C4, C7, C8, C9, C12,<br />
C19, C29, C31, C33,<br />
C52<br />
10 μF CC3216 Cap Tant 10 μF 16 V 20%<br />
SMD<br />
0.1 μF CC0805 Cap 0.1 μF 16 V Ceramic<br />
X7R 0805<br />
4 C10, C41, C50, C51 1.0 μF 3216-18 Capacitor Tant 1.0 μF 16 V<br />
20% SMD<br />
2 C11, C23 0.01 μF CC0805 Cap 10000 pF 50 V Ceramic<br />
Chip 0805<br />
3 C13, C15, C16 4.7 μF CC3216 Cap Tant 4.7 μF 16 V 20%<br />
SMD<br />
1 C17 68 μF CC7343-43 Cap Tant 68 μF 16 V 10%<br />
Loesr SMD<br />
1 C18 22 μF CC3216 Cap Tant 22 μF 16 V 20%<br />
SMD<br />
1 C20 39 pF CC0805 Cap 39 pF 50 V Ceramic Chip<br />
0805 SMD<br />
2 C24, C37 220 μF cce63x55 Cap 220 μF 16 V Elect MVE<br />
SMD<br />
2 C25, C35 0.33 μF CC0805 Cap 0.33 μF 16 V Ceramic<br />
X7R 0805<br />
1 C26 33 μF CC3216 Cap Tant 33 μF 6.3 V 20%<br />
SMD<br />
2 C27, C28 22 pF CC0805 Cap 22 pF 50 V Ceramic Chip<br />
0805 SMD<br />
2 C30, C49 4.7 μF CC2012-12 Cap Tant 4.7 μF 10 V 20%<br />
SMD<br />
3 C32, C34, C38 100 μF cce63x55 Cap 100 μF 16 V Elect MVA<br />
SMD<br />
<strong>Blood</strong> <strong>Pressure</strong> <strong>Monitor</strong> Design Reference Manual, Rev. 0<br />
Freescale Semiconductor B-1<br />
Oth<br />
Cap<br />
Cap<br />
Cap<br />
Cap<br />
Cap<br />
Cap<br />
Cap<br />
Cap<br />
Cap<br />
Cap<br />
Cap<br />
Cap<br />
Cap<br />
Cap
Bill of Materials<br />
QTY<br />
Reference<br />
Designator<br />
Value Package Description Type<br />
1 C36 220 pF CC0805 Cap Ceramic 220 pF 50 V<br />
NP0 0805<br />
1 C39 47 μF CCE63X57 Cap 47 μF 16 V Elect MVE<br />
SMD<br />
1 C40 0.22 μF CC0805 Cap Ceramic .22 μF 50 V<br />
X7R 0805<br />
3 C42, C43, C44 0.1 μF CC0603 Cap 0.1μ F 50 V Ceramic<br />
Y5V 0603<br />
2 C45, C47 8.0 pF CC0603 Cap 8.0 pF 50 V Ceramic<br />
0603 SMD<br />
1 C46 1.0 pF CC0402_25 Cap 1.0 pF 50 V Ceramic<br />
0402 SMD<br />
1 C48 10 pF CC0402_25 Cap 10 pF 50 V Ceramic<br />
0402 SMD<br />
1 C53 470 pF CC0603 Cap Ceramic 470 pF 50 V<br />
X7R 10% 0603<br />
1 DS1 OS128064PK27MY0B00 os12806_4_th Display OLED 128 X 64<br />
2.7 Inch Yellow<br />
1 D1 MBR120LSFT1 SOD-123 Diode Schottky 40 V 1 A<br />
SOD123<br />
1 D2 Yellow LED_0603_C1 LED Amber SS Type Low Cur<br />
SMD<br />
1 D3 MBR130LSFT1G SOD-123 Diode Schottky 30 V 1 A<br />
SOD123<br />
1 D4 Green LED_0603_C1 LED Green SS Type Low Cur<br />
SMD<br />
2 D5, D6 BAT54HT1 SOD323 Diode Switch SW 75 V<br />
500 mA SOT323<br />
1 F1 MFU0805FF00500P100 fuse_2x1p4 Fuse 0.50 A 0805 VFast SMD Oth<br />
1 IC1 MC13202FC qfn32_5x5 IC TXRX RF 2.4 GHz<br />
32-QFN<br />
2 J1, J7 HDR_2X3 HDR203 Conn Header 6 Pos<br />
0.100 Inch Str Gold<br />
4 J2, J3, J9, J10 HDR_1X2_M HDR102 Conn Header 2 Pos<br />
0.100 Inch Str Tin<br />
1 J4 SFV30R-1STE1LF con_30_sm_ra Conn FPC/FFC 30 Pos<br />
.5 mm R/A SMD<br />
1 J5 CON PWR 2.1MM TH PJ-202B Conn Pwr Jack 2.1 X 5.5 mm<br />
High Cur<br />
1 J6 USB_TYPE_B CON_USB_RA Conn USB Rt Ang Recpt<br />
Type B<br />
<strong>Blood</strong> <strong>Pressure</strong> <strong>Monitor</strong> Design Reference Manual, Rev. 0<br />
B-2 Freescale Semiconductor<br />
Cap<br />
Cap<br />
Cap<br />
Cap<br />
Cap<br />
Cap<br />
Cap<br />
Cap<br />
Oth<br />
SC<br />
SC<br />
SC<br />
SC<br />
SC<br />
IC<br />
Con<br />
Con<br />
Con<br />
Con<br />
Con
QTY<br />
Reference<br />
Designator<br />
1 J8 MJ1-3510-SMT con3_jack_5x15_sm Conn Jack Mono 3 Pos<br />
3.5 mm SMD<br />
<strong>Blood</strong> <strong>Pressure</strong> <strong>Monitor</strong> Design Reference Manual, Rev. 0<br />
Bill of Materials<br />
1 J11 SMA CON_SMA_8363 Conn Sma Jack Straight PCB Con<br />
1 L1 6.0 μH IND_CDRH6D28 Power Inductor 6.0 μH 2.25 A<br />
SMD<br />
3 L2, L3, L10 2.2 μH ind_2016 Inductor 2.2 μH 20% 0806<br />
SMD<br />
2 L4, L5 HI1812V101R-10 IND_ISC_1812 Ferrite 8 A 125 Ω 1812 SMD Ind<br />
2 L6, L9 1.8 nH ind_0402 Inductor Hi Freq 1.8 ±0.3 nH<br />
0402<br />
2 L7, L8 3.9 nH IND_0402 Inductor Hi Freq 3.9 ±0.3 nH Ind<br />
2 Q1, Q2 MJD122T4 DPAK Trans Darl NPN 100 V 5 A<br />
DPAK<br />
1 Q3 MMBT2484L SOT23 Trans GP SS NPN 30 V LN<br />
SOT23<br />
1 Q4 BC857AL SOT23 Trans GP SS PNP LN 50 V<br />
SOT23<br />
3 R3, R4, R20 1 k RC0805 Res 1.00 kΩ 1/8 W 1% 0805<br />
SMD<br />
1 R5 820.0 k RC0805 Res 820 kΩ 1/8 W 1% 0805<br />
SMD<br />
1 R6 510 Ω RC1206 Res 510 Ω 1/4 W 1% 1206<br />
SMD<br />
1 R7 3.3 k RC0805 Res 3.30 K Ω 1/8 W 1% 0805<br />
SMD<br />
1 R8 200 k RC0805 Res 200 kΩ 1/8 W 1% 0805<br />
SMD<br />
2 R9, R19 150 k RC0805 Res 150 kΩ 1/8 W 1% 0805<br />
SMD<br />
1 R10 18.0 k RC0805 Res 18.0 kΩ 1/8 W 1% 0805<br />
SMD<br />
1 R11 330 Ω RC0805 Res 330 Ω 1/8 W 1% 0805<br />
SMD<br />
6 R12, R13, R14, R15,<br />
R33, R35<br />
Value Package Description Type<br />
0 Ω RC0805 Res 0.0 Ω 1/8 W 5% 0805<br />
SMD<br />
1 R16 24.0 k RC0805 Res 24.0 kΩ 1/8 W 1% 0805<br />
SMD<br />
2 R17, R21 1.0 M RC0805 Res 1.00 MΩ 1/8 W 1% 0805<br />
SMD<br />
Freescale Semiconductor B-3<br />
Con<br />
Ind<br />
Ind<br />
Ind<br />
SC<br />
SC<br />
SC<br />
Res<br />
Res<br />
Res<br />
Res<br />
Res<br />
Res<br />
Res<br />
Res<br />
Res<br />
Res<br />
Res
Bill of Materials<br />
QTY<br />
Reference<br />
Designator<br />
1 R18 5.1 k RC0805 Res 5.10 kΩ 1/8 W 1% 0805<br />
SMD<br />
1 R22 1.5 k RC0805 Res 1.50 kΩ 1/8 W 1% 0805<br />
SMD<br />
2 R23, R24 33 Ω RC0603 Res 33.0 Ω 1/10 W 1% 0603<br />
SMD<br />
1 R25 56.2 Ω RC0805 Res 56.2 Ω 1/8 W 1% 0805<br />
SMD<br />
1 R26 5.0 k pot3_3296y Pot 5.0 kΩ Thumbwheel<br />
Ceramic ST<br />
1 R27 309.0 Ω RC0805 Res 309 Ω 1/8 W 1% 0805<br />
SMD<br />
1 R28 10 k RC0805 Res 10.0 kΩ 1/8 W 1% 0805<br />
SMD<br />
1 R29 120 Ω RC0805 Res 120 Ω 1/8 W 1% 0805<br />
SMD<br />
1 R30 1.0 Ω RC1210 Res Anti-Surge 1.0 Ω 5%<br />
1210<br />
3 R31, R32, R43 4.7 k RC0805 Res 4.70 kΩ 1/8 W 1% 0805<br />
SMD<br />
1 R34 100 k RC0805 Res 100 kΩ 1/8 W 1% 0805<br />
SMD<br />
7 R36, R37, R38, R39,<br />
R40, R44, R45<br />
1.0 M RC0603 Res 1.00 MΩ 1/10 W 1%<br />
0603 SMD<br />
1 R41, R42 0 Ω RC0603 Res 0.0 Ω 1/10 W 5% 0603<br />
SMD<br />
1 R46 909 k RC0603 Res 909 kΩ 1/10 W 1% 0603<br />
SMD<br />
5 SW1, SW2, SW3,<br />
SW4, SW5<br />
Value Package Description Type<br />
Electrode e_button Electrode Square 1 cm Bttn<br />
1 U1 PPR081 qfn16_8mm IC<br />
1 U2 QFPSOCKET80_0.65MM QFP80_PSOC_65MM_EN<br />
P<br />
<strong>Blood</strong> <strong>Pressure</strong> <strong>Monitor</strong> Design Reference Manual, Rev. 0<br />
Con 80 Skt Th 0.65 mm Sp<br />
Au<br />
1 U2 MC9S08<strong>QE128</strong>CLK qfp80_sq IC MCU 8-Bit 3.3–5 V<br />
LQFP80<br />
1 U2 MCF51<strong>QE128</strong>CLK qfp80_sq IC MCU 32-Bit 3.3–5 V<br />
LQFP80<br />
1 U3 25 6k x 16-bit 3.3 V tsop44_t2 IC Mem MRAM 256 K X 16<br />
35 nS Async 3.3 V TSSOP44<br />
B-4 Freescale Semiconductor<br />
Res<br />
Res<br />
Res<br />
Res<br />
Res<br />
Res<br />
Res<br />
Res<br />
Res<br />
Res<br />
Res<br />
Res<br />
Res<br />
Res<br />
Con<br />
IC<br />
IC<br />
IC
QTY<br />
Reference<br />
Designator<br />
1 U4 LM2621MM so8_umax IC Low Input Step-Up<br />
DC-DC8-MSOP<br />
1 U5 LD1085D2T33 d2pak IC LDO Positive Reg 3.3 V<br />
D2PAK<br />
<strong>Blood</strong> <strong>Pressure</strong> <strong>Monitor</strong> Design Reference Manual, Rev. 0<br />
Bill of Materials<br />
Value Package Description Type<br />
1 U6 LM324ADR2G soic14 IC Opamp Quad Low Power<br />
14SOIC<br />
1 U7 MPXV5050GP 8PINS_2p54_SM IC Press Sensor 0–50 kPa<br />
5 V Case 1369-01<br />
1 U9 TBA820M pdip8_300 IC Audio Amp 1.2 W 8-Dip IC<br />
1 U10 MC9S08JM60CFGE tqfp44 IC MCU 8-BIt 60K Flash<br />
2.7–5.5V LQFP44<br />
1 X1 16 MHz xtal3_2x2_5mm_4p Crystal 16.000000 MHz SMD<br />
8 pF<br />
1 Y1 12 MHz XTL2_HCM49 Crystal 12.000 MHz 18 pF<br />
Fund SMD<br />
1 Z1 2400 MHz 50Ω XFMR_HHM1525_2x1_25<br />
mm_6P<br />
Cer Microwave Filter 2.4 MHz<br />
50 Ω BalunmFmF<br />
Freescale Semiconductor B-5<br />
IC<br />
IC<br />
IC<br />
IC<br />
IC<br />
Xtal<br />
Xtal<br />
Xtal
Bill of Materials<br />
<strong>Blood</strong> <strong>Pressure</strong> <strong>Monitor</strong> Design Reference Manual, Rev. 0<br />
B-6 Freescale Semiconductor