MSD 12 AMP PRO-MAG GENERATOR - MSD Pro-Mag.com
MSD 12 AMP PRO-MAG GENERATOR - MSD Pro-Mag.com
MSD 12 AMP PRO-MAG GENERATOR - MSD Pro-Mag.com

You also want an ePaper? Increase the reach of your titles
YUMPU automatically turns print PDFs into web optimized ePapers that Google loves.
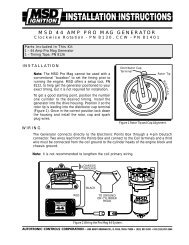
<strong>MSD</strong> <strong>12</strong> <strong>AMP</strong> <strong>PRO</strong>-<strong>MAG</strong> <strong>GENERATOR</strong>Chevrolet: PN 8108, PN 8139, PN 8149Ford: Tall Housing; PN 8138, PN 8137Short Housing; PN 8136, PN 8135Band Clamp Mount:Clockwise, PN 8150Counterclockwise, PN 8160Note: These Instructions are for the installation of the <strong>12</strong> Amp <strong>Pro</strong>-<strong>Mag</strong> Generator andrelated <strong>com</strong>ponents only.Note: On engines equipped with block mounted starters, a 16 volt battery is re<strong>com</strong>mended.MOUNTINGThe Electronic Points Box can be mounted in any position,except upsidedown. It should be kept clear of direct engineheat sources such as the exhaust. Before mounting thebox make sure the wiring harness and coil wire reach thegenerator.The Box is supplied with four ¾” vibration mounts. Thesemounts are designed for lower levels of vibration over along interval of time such as experienced in circle trackracing. Use a 3/16” drill bit with these mounts (Figure 1).These vibration mounts are available separately as PN8823.If your application experiences severe vibrations for a shortduration, such as tire shake from drag racing, PN 8822Figure 1 Mounting the Points Box.Vibration Mounts are required. These are 1” mounts andare designed for extreme conditions. These are supplied with <strong>Pro</strong> <strong>Mag</strong> Generators PN 8150and PN 8160 and require a ¼” bit for installation.Note: To ensure a good ground path from the Electronic Points Box, a ground wire shouldbe routed from the Points Box to the cylinder head of the engine. Use a #10 ring lugconnector with 16 gauge wire (Figure 3). The wires should be connected betweenthe Box and the retaining screw.INSTALLING THE <strong>GENERATOR</strong>The <strong>MSD</strong> <strong>Pro</strong> <strong>Mag</strong> cannot be used with the conventional“Buzzbox” to set the timing prior to running the engine.Position the number one cylinder to your desired timing.This will give you a good area to start the engine andcheck the timing. <strong>MSD</strong> offers a setup tool, PN 8<strong>12</strong>2, forthe PN 8150 and PN 8160 generators.Note: The <strong>Pro</strong> <strong>Mag</strong> fires when the rotor tip is leading intothe distributor cap terminal (Figure 2).When the generator is positioned at or near your deisredtiming, lock down the housing and install the rotor, capand spark plug wires.Figure 2 Rotor Tip and Cap Alignment.AUTOTRONIC CONTROLS CORPORATION • 1490 HENRY BRENNAN DR., EL PASO, TEXAS 79936 • (915) 857-5200• FAX (915) 857-3344
2 INSTALLATION INSTRUCTIONSWIRINGThe <strong>Pro</strong>-<strong>Mag</strong> is equipped with matching connectors and plugs directly into the ElectronicPoints Box and the Kill Switch. The 4-Pin connects to the Generator and the 2-Pin connectsto the Kill Switch (Figure 3).When routing the wiring harness make sure the wires are not pulled tight to the point ofbeing stressed. Also, take care to route them away from direct engine heat sources andsharp edges. If the connectors do not mate together, check for bent or mislodged terminalpins. Do not force the connectors together!TACHOMETERSFigure 3 Wiring the <strong>12</strong> Amp <strong>Pro</strong> <strong>Mag</strong>.<strong>MAG</strong>NETO TACHSThere are two style <strong>Mag</strong>neto Tachs offered; Voltage triggered and Inductive triggered. Bothcan be used with the <strong>MSD</strong> <strong>Pro</strong> <strong>Mag</strong> but wire differently.Voltage Triggered <strong>Mag</strong> Tachs:Connect the tach signal wire tothe Orange wire of the Kill Switch.The tach ground connects to theBlack wire of the Kill Switch(Figure 4).Figure 4 Wiring a Voltage Triggered Tach.AUTOTRONIC CONTROLS CORPORATION • <strong>12</strong><strong>12</strong>0 1490 HENRY ESTHER LAMA, BRENNAN SUITE DR., 114, EL EL PASO, TEXAS 79936 ••(915) 857-5200 • FAX (915) 857-3344
INSTALLATION INSTRUCTIONS 3Inductive Triggered: Inductive magneto tachs will require the <strong>MSD</strong> Adapter, PN 8114. Thisprovides a wire loop for the inductive pickup of the tachometer (Figure 5).Figure 5 Wiring an Inductive Triggered Tach.STANDARD ELECTRONIC TACHS<strong>MSD</strong> offers a <strong>Mag</strong>neto Tach Converter, PN 8132, that converts the <strong>Pro</strong> <strong>Mag</strong>’s trigger signalso most automotive tachs can be used (Figure 6). A <strong>12</strong> volt source is required.ACCESSORIESFigure 6 Wiring a Tachometer with PN 8132.TWO STEP MODULE SELECTORThe Soft Touch Rev Control built into the Electronic Points Box can be used with a TwoStep Module Selector, PN 8739, to give you two different rev limits. <strong>MSD</strong> also offers a ThreeStep Module Selector, PN 8737, for three rev limits. Note: A <strong>12</strong> volt source is required.By connecting the Two Step to a trans brake or switch, you can have a low rpm limit to useon the starting line for consistent holeshots. When the switch is released the rev limit switchesto the high limit for overrev protection. Figure 7 shows a Two Step installation.Figure 7 Wiring a Two Step.AUTOTRONIC CONTROLS CORPORATION • <strong>12</strong><strong>12</strong>0 1490 HENRY ESTHER BRENNAN LAMA, SUITE DR., 114, EL EL PASO, TEXAS 79936 • •(915) 857-5200 •• FAX FAX (915) 857-3344
RPM ACTIVATED SWITCH<strong>MSD</strong> offers a <strong>Mag</strong>neto RPM Activated Switch, PN 8957, that will <strong>com</strong>plete or open the groundcircuit of an accessory such as a solenoid or light. This can be used in a variety of applications(Figure 8). Note: A <strong>12</strong> volt source is required.Figure 8 Wiring an RPM Activated Switch.ServiceIn case of malfunction, this <strong>MSD</strong> <strong>com</strong>ponent will be repaired free of charge according to the terms ofthe warranty. When returning <strong>MSD</strong> <strong>com</strong>ponents for service, <strong>Pro</strong>of of Purchase must be supplied for warrantyverification. After the warranty period has expired, repair service is charged based on a minimum andmaximum charge.Send the unit prepaid with proof of purchase to the attention of: <strong>Pro</strong> <strong>Mag</strong> Service Department,Autotronic Controls Corporation, <strong>12</strong><strong>12</strong>0 Esther Lama, Suite 114, El Paso, Texas 79936.When returning the unit for repair, leave all wires at the length in which you have them installed. Besure to include a detailed account of any problems experienced, and what <strong>com</strong>ponents and accessoriesare installed on the vehicle.The repaired unit will be returned as soon as possible after receipt, COD for any charges. (GroundShipping is covered by warranty). All units are returned regular UPS unless otherwise noted. For moreinformation, call the <strong>MSD</strong> Customer Service Line (915) 857-5200. <strong>MSD</strong> technicians are available from 8:00a.m. to 5:00 p.m. Monday - Friday (mountain time).Limited WarrantyAutotronic Controls Corporation warrants <strong>MSD</strong> Ignition products to be free from defects in materialand workmanship under normal use and if properly installed for a period of one year from date ofpurchase. If found to be defective as mentioned above, it will be replaced or repaired if returned prepaidalong with proof of date of purchase. This shall constitute the sole remedy of the purchaser and the soleliability of Autotronic Controls Corporation. To the extent permitted by law, the foregoing is exclusiveand in lieu of all other warranties or representations whether expressed or implied, including any impliedwarranty of merchantability or fitness. In no event shall Autotronic Controls Corporation be liable forspecial or consequential damages.AUTOTRONIC CONTROLS CORPORATION • 1490 HENRY BRENNAN DR., EL PASO, TEXAS 79936 • (915) 857-5200 • FAX (915) 857-3344FRM19888 Created 09/98 Printed In U.S.A.