Tadao M5 Cyborg manual - Mcarterbrown.com
Tadao M5 Cyborg manual - Mcarterbrown.com
Tadao M5 Cyborg manual - Mcarterbrown.com

You also want an ePaper? Increase the reach of your titles
YUMPU automatically turns print PDFs into web optimized ePapers that Google loves.
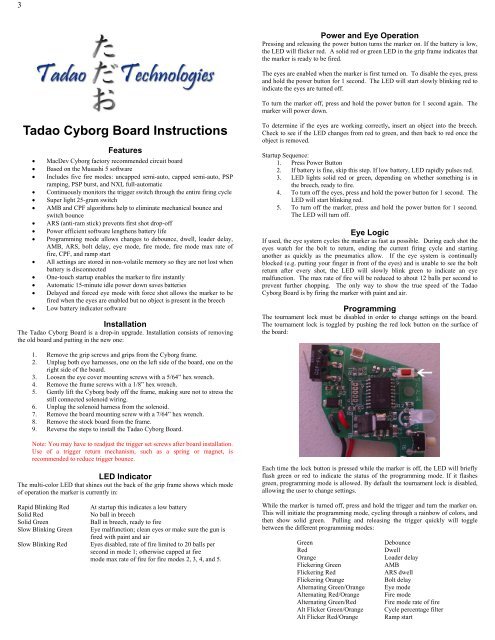
3Power and Eye OperationPressing and releasing the power button turns the marker on. If the battery is low,the LED will flicker red. A solid red or green LED in the grip frame indicates thatthe marker is ready to be fired.The eyes are enabled when the marker is first turned on. To disable the eyes, pressand hold the power button for 1 second. The LED will start slowly blinking red toindicate the eyes are turned off.To turn the marker off, press and hold the power button for 1 second again. Themarker will power down.<strong>Tadao</strong> <strong>Cyborg</strong> Board InstructionsFeatures• MacDev <strong>Cyborg</strong> factory re<strong>com</strong>mended circuit board• Based on the Musashi 5 software• Includes five fire modes: uncapped semi-auto, capped semi-auto, PSPramping, PSP burst, and NXL full-automatic• Continuously monitors the trigger switch through the entire firing cycle• Super light 25-gram switch• AMB and CPF algorithms help to eliminate mechanical bounce andswitch bounce• ARS (anti-ram stick) prevents first shot drop-off• Power efficient software lengthens battery life• Programming mode allows changes to debounce, dwell, loader delay,AMB, ARS, bolt delay, eye mode, fire mode, fire mode max rate offire, CPF, and ramp start• All settings are stored in non-volatile memory so they are not lost whenbattery is disconnected• One-touch startup enables the marker to fire instantly• Automatic 15-minute idle power down saves batteries• Delayed and forced eye mode with force shot allows the marker to befired when the eyes are enabled but no object is present in the breech• Low battery indicator softwareInstallationThe <strong>Tadao</strong> <strong>Cyborg</strong> Board is a drop-in upgrade. Installation consists of removingthe old board and putting in the new one:To determine if the eyes are working correctly, insert an object into the breech.Check to see if the LED changes from red to green, and then back to red once theobject is removed.Startup Sequence:1. Press Power Button2. If battery is fine, skip this step. If low battery, LED rapidly pulses red.3. LED lights solid red or green, depending on whether something is inthe breech, ready to fire.4. To turn off the eyes, press and hold the power button for 1 second. TheLED will start blinking red.5. To turn off the marker, press and hold the power button for 1 second.The LED will turn off.Eye LogicIf used, the eye system cycles the marker as fast as possible. During each shot theeyes watch for the bolt to return, ending the current firing cycle and startinganother as quickly as the pneumatics allow. If the eye system is continuallyblocked (e.g. putting your finger in front of the eyes) and is unable to see the boltreturn after every shot, the LED will slowly blink green to indicate an eyemalfunction. The max rate of fire will be reduced to about 12 balls per second toprevent further chopping. The only way to show the true speed of the <strong>Tadao</strong><strong>Cyborg</strong> Board is by firing the marker with paint and air.ProgrammingThe tournament lock must be disabled in order to change settings on the board.The tournament lock is toggled by pushing the red lock button on the surface ofthe board:1. Remove the grip screws and grips from the <strong>Cyborg</strong> frame.2. Unplug both eye harnesses, one on the left side of the board, one on theright side of the board.3. Loosen the eye cover mounting screws with a 5/64” hex wrench.4. Remove the frame screws with a 1/8” hex wrench.5. Gently lift the <strong>Cyborg</strong> body off the frame, making sure not to stress thestill connected solenoid wiring.6. Unplug the solenoid harness from the solenoid.7. Remove the board mounting screw with a 7/64” hex wrench.8. Remove the stock board from the frame.9. Reverse the steps to install the <strong>Tadao</strong> <strong>Cyborg</strong> Board.Note: You may have to readjust the trigger set screws after board installation.Use of a trigger return mechanism, such as a spring or magnet, isre<strong>com</strong>mended to reduce trigger bounce.LED IndicatorThe multi-color LED that shines out the back of the grip frame shows which modeof operation the marker is currently in:Each time the lock button is pressed while the marker is off, the LED will brieflyflash green or red to indicate the status of the programming mode. If it flashesgreen, programming mode is allowed. By default the tournament lock is disabled,allowing the user to change settings.Rapid Blinking RedSolid RedSolid GreenSlow Blinking GreenSlow Blinking RedAt startup this indicates a low batteryNo ball in breechBall in breech, ready to fireEye malfunction; clean eyes or make sure the gun isfired with paint and airEyes disabled, rate of fire limited to 20 balls persecond in mode 1; otherwise capped at firemode max rate of fire for fire modes 2, 3, 4, and 5.While the marker is turned off, press and hold the trigger and turn the marker on.This will initiate the programming mode, cycling through a rainbow of colors, andthen show solid green. Pulling and releasing the trigger quickly will togglebetween the different programming modes:GreenRedOrangeFlickering GreenFlickering RedFlickering OrangeAlternating Green/OrangeAlternating Red/OrangeAlternating Green/RedAlt Flicker Green/OrangeAlt Flicker Red/OrangeDebounceDwellLoader delayAMBARS dwellBolt delayEye modeFire modeFire mode rate of fireCycle percentage filterRamp start
When the LED is lit for the desired setting, press and hold the trigger until theLED goes out. When you release the trigger, the LED will blink to show thecurrent setting. For example, if the current setting for debounce is 5, the LED willblink green 5 times. Once the LED stops blinking, you have 2 seconds to beginentering the new setting.To enter the new setting, pull the trigger the desired number of times. For example,to set the debounce to 2, you must pull the trigger 2 times. Every time you pull thetrigger the LED will light. After all settings have been changed, turn the markeroff, using the power button.Programming ExampleIf you want to set the dwell to 10, you should:1. Make sure the marker is powered off and the tournament lock isdisabled.2. Push and hold the trigger and press the power button to turn on themarker.3. The LED goes through a rainbow, and then shows green. This is thedebounce mode.4. Quickly pull and release the trigger 1 time to switch to the dwell mode.The LED will show red.5. Pull and HOLD the trigger until the LED turns off.6. Release the trigger. The LED will blink out the current setting.7. When the LED stops blinking, enter the new setting by pulling thetrigger 10 times.8. Wait until the LED turns back on, indicating programming has been<strong>com</strong>pleted.9. Turn the marker off.SettingsDebounce – The Musashi software features a hybrid debounce scheme that usesmicrocontroller cycles to debounce the pull of the trigger and ½ ms timeincrements to debounce the release. This results in a very effective debouncealgorithm that does not hinder the user at any setting. At low debounce settings,however, it may cause the marker to read switch bounce as additional pulls, falselygenerating shots or near full-automatic fire. The setting ranges from 1 to 50 and isdefaulted at 10.Dwell – The amount of time the solenoid is energized each time the marker isfired. The default is 10 ms. The range is 5 to 20 ms. Too low of a dwell may leadto inconsistency or drop off. Too high of a dwell can cause bad air efficiency.Loader Delay – Adds a slight delay after the eye has seen a ball and the bolt iscycled, causing the gun to fire. If not using force fed loaders, it may be necessaryto increase this setting to prevent chopping. A setting of 1 means no loader delay,which is the fastest. The default is 2 and may be set from 1 to 25.AMB – Allows the user to adjust the anti-mechanical bounce feature. Mechanicalbounce occurs with the <strong>Cyborg</strong> due to the kick generated during each shot and cancause the marker to “run away,” firing even after the trigger has been released.AMB helps stop markers from going full-automatic when the trigger is pulled veryslowly. The default is 2 and may be set from 1 to 5 (1 being off). AMB is onlyused in fire modes 1 and 2 (semi-automatic unlimited and capped). In the PSP orNXL modes AMB is disabled.ARS Dwell – Amount of dwell time added for an ARS (anti-ram stick) shot. Therange is from 1 to 10 additional milliseconds of dwell. The default is 1, whichturns ARS off. This feature may not be necessary with the <strong>Cyborg</strong>. It is onlynecessary if the user is experiencing a low first shot. ARS is only used if the<strong>Cyborg</strong> is left sitting idle for more than 20 seconds. The next shot will then have aslightly higher dwell time to make sure the ram breaks free and there is no lowshot. Be aware that a high ARS dwell setting will lead to a much higher velocityfirst shot.Bolt Delay – This setting determines how long the eyes are ignored after the dwelltime ends. Some delay is necessary to allow the bolt to get far enough forward sothe eye system does not mistake a small gap between a paintball and the bolt facefor a bolt return. The default is 10 ms and may be set from 1 to 20 ms. Highersettings will reduce the maximum capable rate of fire, while lower settings maylead to skipped or blank shots because the bolt does not have enough time to blockthe eyes on its forward stroke.ball is present in the breech or a force shot is utilized. The user can fire a force shotby holding down the trigger for ½ second.Fire Mode – Included are five different fire modes (default is 1):1. Semi-automatic, unlimited rate of fire2. Semi-automatic, adjustable rate of fire3. PSP ramping, adjustable rate of fire4. PSP burst, adjustable rate of fire5. NXL full-automatic, adjustable rate of fireSetting 1 is normal semi-automatic with an unlimited rate of fire while the eyes areenabled. When the eyes are turned off, the max rate of fire is set to 20 balls persecond.Setting 2 is semi-automatic with a capped rate of fire. It limits the maximum ballsper second that can be fired. The cap is set by the Max ROF setting.Setting 3 is the first PSP fire mode that works as follows:• The first 3 shots of a string are semi-automatic.• After the 4 th shot the marker will add shots as long as the user firesfaster than the ramp start setting. For example, if the ramp start settingis 5, then the user must pull 5 times per second or faster for thesoftware to add additional shots.• If the trigger is released, the marker will stop firing immediately.• If the trigger is not pulled again within 1 second of release, the 3-shotsemi-automatic count starts over.Setting 4 is the second PSP fire mode that works as follows:• The first 3 shots of a string are semi-automatic.• After the 4 th shot the marker will fire 2 or more shots per pull as long asthe user continually pulls and releases the trigger.• If the trigger is released, the marker will stop firing immediately.• If the trigger is not pulled again within 1 second of release, the 3-shotsemi-automatic count starts over.In normal operation, continually pulling the trigger faster than 5 to 6 pulls persecond will effectively give the user full-automatic at the max rate of fire. If theuser stops shooting then resumes within 1 second, the marker will return to themax rate of fire. If the user stops shooting for more than 1 second, the next 3 shotswill be semi-automatic. On the 4 th shot it will resume a faster fire rate.PSP ramping and PSP burst differ in that PSP ramping requires the user tomaintain the ramp start rate of fire for software assistance, whereas the PSP burstmode will fire at least 2 shots per pull, regardless of rate of fire. Some playersprefer multiple shots every time they pull the trigger after the initial 3 semiautomaticshots, while others like to shoot 1 ball at a time until they achieve acertain rate of fire.Setting 5 is the NXL full-automatic fire mode. It functions similarly to the PSPfire modes except, after the 3 rd semi-automatic shot, the user may pull and hold thetrigger for the marker to fire in full-automatic.Fire Mode Max ROF – The maximum rate of fire setting only applies to the 2 nd ,3 rd , 4 th , and 5 th fire modes. The max rate of fire is adjustable from 14 to 20 balls persecond in ¼ balls per second increments. It also has an unlimited setting. Thedefault is 4, which is roughly 14.75 balls per second. Oscillator inconsistenciesfrom chip to chip make it impossible to time perfectly, so the only true way tocheck rate of fire is to use a Pact Timer or ballistic chronograph. The red radarchronographs <strong>com</strong>monly found at fields are NOT reliable.Setting BPS Setting BPS Setting BPS1 14.0 9 16.0 17 18.02 14.25 10 16.25 18 18.253 14.5 11 16.5 19 18.54 14.75 12 16.75 20 18.755 15.0 13 17.0 21 19.06 15.25 14 17.25 22 19.257 15.5 15 17.5 23 19.58 15.75 16 17.75 24 19.7525 20.026 Unlimitedw/eyes onEye Mode – This setting selects the eye mode. Setting 1 is delayed. In delayedmode the eyes will watch for a ball up to ½ second after the trigger is pulled. After½ second the marker will fire whether or not a ball is in the breech. If set to 2 (thedefault), the eye mode is forced. In forced mode the marker will not fire unless a2
Cycle Percentage Filter (CPF) – The cycle percentage filter allows adjustment ofthe point within the current firing cycle that a new buffered shot is allowed.Almost all electronic paintball markers allow a single shot to be buffered in theevent the user is fast enough to release the trigger and pull again during the currentfiring cycle. The CPF setting is adjustable from 1 to 10. Setting 1 turns the CPFoff, allowing buffered shots at any point in the firing cycle. Setting 2 through 10sets the percentage of the firing cycle that must pass before shots may be buffered:1 CPF turned off2 10% of the firing cycle must pass before a buffered shot is allowed3 20%4 30%5 40%6 50%7 60%8 70%9 80%10 90%A higher CPF setting results in less unintentional bounce. For instance, it ispossible that if your debounce setting is border line, you can fire the marker a fewtimes, then hold it loosely and allow it to brush against your finger, going fullautomatic.Since most switch bounce from either a low debounce setting ormechanical bounce occurs almost immediately after the trigger is released, CPFcan be very effective in eliminating falsely generated trigger activity.Ramp Start – The ramp start setting is only used for the PSP ramping fire mode(mode 3). It sets the minimum pulls per second that must be maintained for thesoftware to add shots, or ramp up to the maximum rate of fire setting. The defaultis 5 and is adjustable from 4 to 12 pulls per second.Additional FeaturesForce Shot (while in forced eye mode only) – In the event the eyes are enabled,the breech is empty, and the user wants to fire a clearing shot, a force shot can beinitiated by pulling and holding the trigger for ½ second. This is useful with forcefedloaders that sometimes push a ball slightly into the detents where the eyes areunable to see it. After force firing, the next ball will load, and operation willcontinue as normal.A tip for setting the debounce, AMB, and CPF – This only applies to semiautomaticfire modes (modes 1 and 2) since AMB is disabled in the PSP firemodes or NXL mode.Example Setting Profiles:1. Tournament legal semi-automatic (NPPL)a. Fire mode 1 or 2 (semi-auto unlimited or capped)b. Debounce 5-20c. AMB 2d. CPF 2-5e. Loader delay set to match your loader (1-4 for Halo, 4-10for gravity feed)2. PSP X-Ball, CFOA, Millenniuma. Fire mode 5 or 6 (PSP ramping or PSP burst)b. Max rate of fire set to 3-5, depending on Pact Timerreadings. To be safe, use setting 3 (14.5 balls per second).c. Debounce 5-20d. Ramp start 5 or higher if using PSP rampinge. Loader delay set to match your loader (1-4 for Halo, 4-10for gravity feed)3. NXLa. Fire mode 7 (NXL full-automatic)b. Max rate of fire set to 3-4, depending on Pact Timerreadings. To be safe use setting 3 (14.5 balls per second).c. Debounce 5-20d. Loader delay set to match your loader (1-4 for Halo, 4-10for gravity feed)4. Ludicrous Speed (absolute fastest/bounciest)a. Any fire modeb. Max rate of fire set to 26 (unlimited)c. Debounce 1d. AMB 1 if using semi-automatice. CPF 1f. Ramp start 4 if using PSP rampingg. Loader delay 1Additional Informationwww.tadaotechnologies.<strong>com</strong>Debounce, AMB, CPF setup steps, while using air (no paint):1. Turn AMB and CPF off (set both to 1).2. Starting at debounce 1-3, raise the debounce setting a notch at a timeuntil excessive trigger bounce goes away. The goal is to have one pull,one shot, regardless of rate of fire. Do NOT slow pull test for bounceduring this phase. Instead, pull the trigger rapidly or walk it, listeningfor double or triple fires.3. When it appears that it is only one shot, one pull for solid trigger pulls,try the slow pull test. Holding the marker steady, slowly pull thetrigger and see if multiple shots can be generated from the single pull.4. Increase the CPF setting a notch at a time until the slow pull bouncestarts to disappear. An additional test is to fire a few rounds quickly,then hold the trigger right on the activation point to see if the markerwill run away.5. If you reach setting 10 with CPF and the marker can still be slow pulledto fire full-automatic, then your debounce setting is probably too low.Go back to step 2.6. AMB should not be used, if possible, since it is not as transparent to theuser as CPF. Even a CPF setting of 10 will not be noticed by the user.3