Best Practices for Implementing Salesforce CRM - Cloud Experts
Best Practices for Implementing Salesforce CRM - Cloud Experts
Best Practices for Implementing Salesforce CRM - Cloud Experts

Create successful ePaper yourself
Turn your PDF publications into a flip-book with our unique Google optimized e-Paper software.
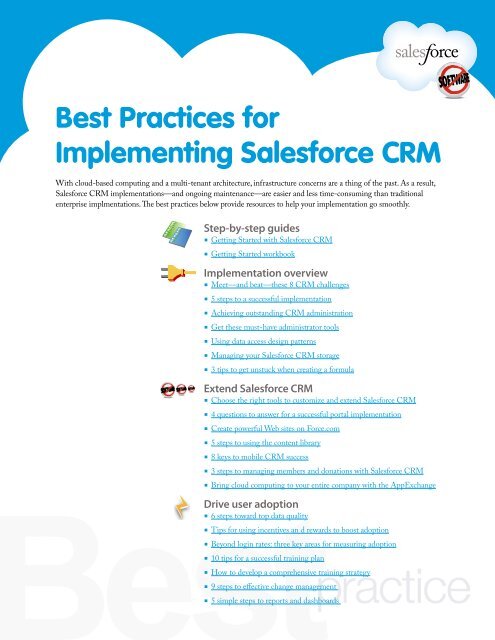
<strong>Best</strong> <strong>Practices</strong> <strong>for</strong><strong>Implementing</strong> Sales<strong>for</strong>ce <strong>CRM</strong>With cloud-based computing and a multi-tenant architecture, infrastructure concerns are a thing of the past. As a result,Sales<strong>for</strong>ce <strong>CRM</strong> implementations—and ongoing maintenance—are easier and less time-consuming than traditionalenterprise implmentations. The best practices below provide resources to help your implementation go smoothly.Step-by-step guides▪ Getting Started with Sales<strong>for</strong>ce <strong>CRM</strong>▪ Getting Started workbookImplementation overview▪ Meet—and beat—these 8 <strong>CRM</strong> challenges▪ 5 steps to a successful implementation▪ Achieving outstanding <strong>CRM</strong> administration▪ Get these must-have administrator tools▪ Using data access design patterns▪ Managing your Sales<strong>for</strong>ce <strong>CRM</strong> storage▪ 3 tips to get unstuck when creating a <strong>for</strong>mulaExtend Sales<strong>for</strong>ce <strong>CRM</strong>▪ Choose the right tools to customize and extend Sales<strong>for</strong>ce <strong>CRM</strong>▪ 4 questions to answer <strong>for</strong> a successful portal implementation▪ Create powerful Web sites on Force.com▪ 5 steps to using the content library▪ 8 keys to mobile <strong>CRM</strong> success▪ 3 steps to managing members and donations with Sales<strong>for</strong>ce <strong>CRM</strong>▪ Bring cloud computing to your entire company with the AppExchangeDrive user adoption▪ 6 steps toward top data quality▪ Tips <strong>for</strong> using incentives an d rewards to boost adoption▪ Beyond login rates: three key areas <strong>for</strong> measuring adoption▪ 10 tips <strong>for</strong> a successful training plan▪ How to develop a comprehensive training strategy▪ 9 steps to effective change management▪ 5 simple steps to reports and dashboards
Sales<strong>for</strong>ce <strong>CRM</strong>Getting Started Guide
Sales<strong>for</strong>ce <strong>CRM</strong> Getting Started GuideContentsINTRODUCTION ................................................................................................................................................................................................ 1SECTION 1: PLAN AND PREPARE .................................................................................................................................................................... 1SET YOUR GOALS .................................................................................................................................................................................................. 2DEFINE YOUR PROCESS ....................................................................................................................................................................................... 3DECIDE WHICH REPORTS YOU NEED .............................................................................................................................................................. 4TRAIN THE ADMINISTRATOR ............................................................................................................................................................................. 5NOTIFY THE END USERS ...................................................................................................................................................................................... 5SUMMARY AND CHECKLIST: PLAN AND PREPARE ....................................................................................................................................... 5SECTION 2: SET UP SALESFORCE <strong>CRM</strong> ........................................................................................................................................................... 7SET UP YOUR COMPANY PROFILE .................................................................................................................................................................... 7DEFINE THE ROLE HIERARCHY .......................................................................................................................................................................... 8SUMMARY AND CHECKLIST: SET UP SALESFORCE <strong>CRM</strong> ............................................................................................................................. 8SECTION 3: MAKE SALESFORCE <strong>CRM</strong> YOUR OWN ................................................................................................................................... 10CUSTOMIZATION TIPS & TRICKS .................................................................................................................................................................... 10WHAT CAN YOU CUSTOMIZE? ....................................................................................................................................................................... 10TO LEAD OR NOT TO LEAD? ............................................................................................................................................................................ 11SUMMARY AND CHECKLIST: MAKE SALESFORCE <strong>CRM</strong> YOUR OWN.................................................................................................... 12SECTION 4: READY, SET, GO ............................................................................................................................................................................ 13ADD USERS .......................................................................................................................................................................................................... 13IMPORT DATA ..................................................................................................................................................................................................... 13TRAIN END USERS ............................................................................................................................................................................................. 15GO LIVE ................................................................................................................................................................................................................ 16SUMMARY AND CHECKLIST: READY, SET, GO.............................................................................................................................................. 16SECTION 5: MAKE SALESFORCE <strong>CRM</strong> A SUCCESS ..................................................................................................................................... 18ENCOURAGE USER ADOPTION ...................................................................................................................................................................... 18LEVERAGE THE APPEXCHANGE ..................................................................................................................................................................... 19INTEGRATE OUTLOOK AND EMAIL ............................................................................................................................................................... 19MANAGE DATA QUALITY ................................................................................................................................................................................. 20JOIN THE COMMUNITY ................................................................................................................................................................................... 21MANAGE RELEASES .......................................................................................................................................................................................... 21SUMMARY AND CHECKLIST: MAKE SALESFORCE <strong>CRM</strong> A SUCCESS ...................................................................................................... 21GUIDE
Sales<strong>for</strong>ce <strong>CRM</strong> Getting Started GuideIntroductionThis guide takes you through the steps of getting up and running with Sales<strong>for</strong>ce <strong>CRM</strong>. Along the way,you’ll find checklists and links to resources such as training segments, <strong>Best</strong> Practice documents, and tipsheets. Also be sure to take advantage of the associated workbook, which will help you to come up withand track important decisions.Section 1: Plan and PrepareOne of the best investments you can make in your Sales<strong>for</strong>ce <strong>CRM</strong> success is to have a clear plan. Just likeyou wouldn’t build a house without a blueprint, you don’t want to start with Sales<strong>for</strong>ce <strong>CRM</strong> without aplan. A plan will help you to communicate with everyone, to do things in the right order, identify keyresources, and know when you’re done.As you plan and prepare to get Sales<strong>for</strong>ce <strong>CRM</strong> up and running, complete the following steps (in order):1. Build your team2. Define and prioritize your goals3. Define your process4. Map your process to Sales<strong>for</strong>ce <strong>CRM</strong> functionality5. Define the fields you need6. Define the reports you need7. Train your administrator8. Communicate with your usersTo help jumpstart your implementation, you can use the worksheets in the Getting Started Workbook tocome up with and document your decisions. Download this document and treat it as a work in progress thatyou return to as you complete the steps in this guide.Build your teamTo a small business with limited resources, the term “project team” may sound intimidating. It doesn’t haveto be—just make sure you cover the following roles:• An executive sponsor• Someone to get the application up and running• Someone to manage Sales<strong>for</strong>ce <strong>CRM</strong> day to day• A power user who really knows your company’s business processesThe executive sponsor lends influence to the project by becoming its champion. Having that person’s fullsupport and participation—from the planning stage until the go-live date and beyond—is absolutelycritical.The person who’s the designated administrator usually gets Sales<strong>for</strong>ce <strong>CRM</strong> up and running and thenmanages it day to day. A technical background isn’t necessary, but it may be helpful.And to make sure you meet the needs of your end users, it is essential to involve key power users in theplanning process.GUIDE 1
Sales<strong>for</strong>ce <strong>CRM</strong> Getting Started GuideGet a good administratorSystem administration with cloud computing is much easier than with traditional software. Setting up,customizing the application, maintaining it, training users, and “turning on” the new features that becomeavailable with each release—it’s all just a few clicks away.The administrator is one of the most important roles when it comes to success, even though it is notnecessarily a full-time position. In the initial stages of your project, the role will require more concentratedtime (approx 50%). After go live, managing Sales<strong>for</strong>ce <strong>CRM</strong> day to day will require much less time(approx 10–25%).Find the right person <strong>for</strong> the job and continue to invest in that person’s professional development. Here aresome qualities to look <strong>for</strong> in an administrator:• A solid understanding of your business processes• Knowledge of the organizational structure and culture to help build relationships with key groups• Excellent communication, motivational, and presentation skills• The desire to be the voice of the user in communicating with management• Analytical skills to translate requested changes into customizationsDocument your key players It’s time to pick your team. Go to the Getting Started Workbook and fill in the Your Project Teamworksheet to track the people who’ll play key roles.Set your goalsIn addition to a clear destination, it helps to break down the journey into manageable steps.Setting your goals includes three key steps:1. Define the company’s vision2. Define the goals that support this vision3. Prioritize and document your requirementsDefine the company’s visionEvery successful <strong>CRM</strong> project starts with a clear vision of where you want to be as a result of the project.It’s essential that your key executives are involved in defining this vision, that you document the vision,and that it is understood by everyone. Go to the Getting Started Workbook to review sample vision statements. Then come up with and recordyour vision in the Your Vision Statement worksheet. This statement should be a key component of futurecommunication with your users.Define goals <strong>for</strong> each groupNext, decide which concrete goals support your vision. Keep in mind that different groups are likely tohave different goals. For example:• Executives want to improve sales and track top per<strong>for</strong>mers or customer issues• Sales managers want better visibility into their pipelines and reports that summarize key in<strong>for</strong>mation• Sales reps want to get the sales materials they need and cut down on administrative work• Sales<strong>for</strong>ce <strong>CRM</strong> provides various reports to help measure whether you’ve reached your goals. Go to the Getting Started Workbook and complete the Your Business Goals worksheet.GUIDE 2
Sales<strong>for</strong>ce <strong>CRM</strong> Getting Started GuidePrioritize and document your requirementsMost people—and most organizations—want to take on more than they can handle at any one time. Clearlydefining and then prioritizing your goal will make it easier to decide what to put off, should that becomenecessary. And having some early “wins” is essential: when people see the value of Sales<strong>for</strong>ce <strong>CRM</strong> firsthand, they’re more likely to support adding additional features. Go to the Getting Started Workbook and complete the Your Business Priorities worksheet.Define your processTo define your process, it’s important to first understand key Sales<strong>for</strong>ce <strong>CRM</strong> terms. You’ll also want toclarify what happens at each step—what inputs are needed, who does what, and how to measure the results.Sales<strong>for</strong>ce.com provides resources to help you define your process, including a Business Process worksheet<strong>for</strong> defining key aspects of that process.Sales<strong>for</strong>ce <strong>CRM</strong> terminologyHere are the basic Sales<strong>for</strong>ce <strong>CRM</strong> terms you’ll need to know:• Leads – A lead is anyone who may be interested in your products or services; <strong>for</strong> example, someone youmet at a conference or who filled out a Web <strong>for</strong>m.• Opportunities – An opportunity is a possible deal you want to track. By adding an opportunity, youbuild a “pipeline” you can use <strong>for</strong> <strong>for</strong>ecasting.• Accounts – An account is an organization, individual, or company that you want to track. An accountcan include customers, competitors, and/or partners and stores in<strong>for</strong>mation such as names, addresses, andtelephone numbers.• Contacts – Contacts are the individuals associated with the accounts you’re tracking. For each contact,you can store in<strong>for</strong>mation such as phone numbers, titles, and roles in a deal.What’s a typical process?For most businesses, defining a basic sales process includes gathering the following in<strong>for</strong>mation:• Generating leads – Where do leads come from? How do they get into Sales<strong>for</strong>ce <strong>CRM</strong>? What happensnext? What in<strong>for</strong>mation do you want to measure about leads?• Optimizing lead flow – How do you manage open leads? How do you check <strong>for</strong> duplicates? How doyou work through leads? How do you measure conversion and top per<strong>for</strong>mers?• Closing deals – How do you manage the sales funnel? How do you bring new customers into Sales<strong>for</strong>ce<strong>CRM</strong>? How can you measure top deals, closed business by the month, and month-to-date trending?Create your process overviewThe goal of this step is to come up with a visual overview of your process. You can use sales<strong>for</strong>ce.com’sdefault processes to stimulate discussion. Because everyone uses the Opportunity process <strong>for</strong> turning leadsinto customers, it’s a good place to start. Go to the Getting Started Workbook, complete the Business Process worksheet, and use it as input <strong>for</strong>the next step. Go to Administration Essentials: Customization: Creating a Business ProcessGUIDE 3
Sales<strong>for</strong>ce <strong>CRM</strong> Getting Started GuideA sample Sales process looks like this:Discuss the sample process with the project team and modify it to fit your organization. For example, if youdon’t work with partners, remove that step from the sample process.• Start at the point where a lead is qualified as an opportunity.• On a whiteboard, draw each step as you ideally want the in<strong>for</strong>mation to flow.Map your process to Sales<strong>for</strong>ce <strong>CRM</strong>The next step is to map your ideal process to Sales<strong>for</strong>ce <strong>CRM</strong>. In particular, pay attention to the names yougive to your data elements and the fields in Sales<strong>for</strong>ce <strong>CRM</strong>. For example, you may call a customer“Company,” while the corresponding field in Sales<strong>for</strong>ce <strong>CRM</strong> is “Account.”To start the mapping process, review the fields associated with the Opportunity process—which includesthe fields <strong>for</strong> Leads, Accounts, Contacts, and Opportunities—and answer the following questions:• Do you need all the fields? Review the fields and decide which can be removed.• Do you need to rename standard fields so they make more sense; <strong>for</strong> example, to change “Company” to“Account”?• Do you need new fields that are unique to your business? Go to the Getting Started Workbook and review the worksheets related to the Leads, Accounts,Contacts, and Opportunities fields. Use them to track the mapping of fields.Decide which reports you needThinking about what in<strong>for</strong>mation you want to capture and pull out of the system is a critical step be<strong>for</strong>e youbegin customizing the application. The system is only as good as the in<strong>for</strong>mation you can report from it.Decide which reports you need to generate based on the goals you defined earlier. Sales<strong>for</strong>ce.com providesdozens of standard reports. Here are a few of the most commonly used reports:• Active Accounts – See current accounts• Account Owners – See who owns what accounts• Lead Lifetime – Track the life of a lead from creation to closure• Leads by Source – Find out the most- and least-effective lead sources• Opportunity Pipeline – See upcoming opportunities, in the current stage• Stuck Opportunities – See which opportunities are not moving <strong>for</strong>ward.• Closed Opportunities – See won opportunities• Quarterly Forecast Summary – See commit amounts, best-case amounts, and pipeline by quarterGUIDE 4
Sales<strong>for</strong>ce <strong>CRM</strong> Getting Started Guide• Contact Role Report – See contacts involved in current dealsYou can modify these standard reports or create your own from scratch. Go to the Getting Started Workbook and revisit your goals. Determine whether the standard reports aresufficient or if you need to build custom reports.Train the administratorInvesting in your administrator is a great way to ensure success.Sales<strong>for</strong>ce.com offers both self-paced training and classroom training. The self-paced training classes areavailable with your licenses around the clock, at no charge. The administrator needs to complete the following, launch the following free courses from the OnlineCourses list:• Getting Started with Sales<strong>for</strong>ce <strong>CRM</strong> Sales• Administration Basics: Setting Up Sales<strong>for</strong>ce <strong>CRM</strong>In addition, the 4-day classroom course Administration Essentials is available at cities across the country.Depending on your implementation, you may want to consider getting help with more technical aspects,such as data migration. For more in<strong>for</strong>mation, contact Sales<strong>for</strong>ce.com Consulting.Notify the end usersWith clear goals set, you can now engage your users. Sooner is better <strong>for</strong> user adoption. And user adoptionis critical <strong>for</strong> success.You don’t want Sales<strong>for</strong>ce <strong>CRM</strong> to come as a surprise to users. Instead, start building enthusiasm and keepyour users updated as your go-live date approaches. For the highest impact, these communications shouldcome from your executive sponsor. Here are some approaches that have worked <strong>for</strong> other customers:• Build anticipation by enlisting the help of your marketing staff in treating the Sales<strong>for</strong>ce <strong>CRM</strong>implementation like a product launch.• Focus on two or three aspects of Sales<strong>for</strong>ce <strong>CRM</strong> that will make your users’ lives easier.• Reach out to users who seem particularly enthusiastic and give them a role in helping other users onceyou’re “live.”• Sponsor contests and offer incentives to help build excitement.One of the best ways to get people on board is to get them involved. Give them a voice and be sure tolisten. Make changes based on their feedback and communicate the difference their input made on theproject’s launch.Summary and checklist: plan and prepareCareful preparation and planning will help make the remaining steps in implementing Sales<strong>for</strong>ce <strong>CRM</strong>go smoothly.At this point, you’ve learned about the following tasks and documented your decisions in theGetting Started Workbook.Progress checklist Identify key team members Define your <strong>CRM</strong> vision Define your business goals and prioritiesGUIDE 5
Sales<strong>for</strong>ce <strong>CRM</strong> Getting Started GuideSection 2: Set up Sales<strong>for</strong>ce <strong>CRM</strong>This section helps you take the next steps by setting up your basic company in<strong>for</strong>mation in Sales<strong>for</strong>ce<strong>CRM</strong>. These settings include:• Company Profile – Verifies your date display, language, and fiscal year definition• User Profiles – Assigns a set of permissions to particular users• Organization-Wide Settings – Defines basic access permissions on the file level• Role Hierarchy – Defines how data rolls up in reports and which roles can see and report on the data ofother roles To prepare <strong>for</strong> these tasks, please complete the Administration Basics: Setting Up Sales<strong>for</strong>ce <strong>CRM</strong>training segment.Set up your company profileThe company profile defines basic settings related to time zones, language, and how the fiscal year isdefined. You can leave the default settings as is; however, it’s important to know where to find and changethis in<strong>for</strong>mation, if necessary.• Company Profile – These settings use your locale <strong>for</strong> setting local time, your default language, and thedefault currency.• Fiscal Years – The fiscal year definitions are used in reporting, opportunities, and <strong>for</strong>ecasting. Thedefault fiscal year setting is a 12-month calendar year, with the first day of the fiscal year starting on anyfirst day of the month. However, you can choose custom fiscal year periods.Understanding profilesA profile is a collection of settings and permissions that defines how users with a particular profile accessrecords, how they see their data, and what they can do in the application. For Group and ProfessionalEdition, you can use the standard Sales<strong>for</strong>ce profiles but you can’t create custom profiles. Still, it’simportant to understand profiles and how they work together with the organization-wide defaults and therole hierarchy.The most important profiles include:• System Administrator – Can configure and customize the application• Standard User – Can run reports and create and edit records• Read Only – Can run and export reports and view—but not edit—recordsWhen you add users as you prepare to go live, you will assign one of these profiles to each user.Define the organization-wide defaultsThese settings determine the default level of data access <strong>for</strong> different types of in<strong>for</strong>mation:• Private – Users can access (view and edit) their in<strong>for</strong>mation and that of those below them in the rolehierarchy.• Public Read Only – Users can view all data, but can edit only their in<strong>for</strong>mation as well as that of thosebelow them in the role hierarchy.• Public Read Write – Users can view and edit all data.For smaller organizations, we recommend granting at least Public Read Only access to create acollaborative working environment.GUIDE 7
Sales<strong>for</strong>ce <strong>CRM</strong> Getting Started GuideExamplesTo allow all users to see everyone’s Accounts, but not everyone’s Opportunities, set access <strong>for</strong> Accountrecords to Public Read Only and <strong>for</strong> Opportunities records to Private.To allow the operations team to calculate commissions, they need to see Opportunities. However, you don’twant them to edit the Opportunities. To allow read-only access, set Opportunities records to Public ReadOnly.Define the role hierarchyThe role hierarchy looks similar to an org chart, but it has a different purpose. Because the role hierarchy isbased on who needs to work with what data to their job, role hierarchies usually have fewer layers and thepeople at the top are not necessarily those at the top of the org chart.The person in the top role has full access (view and edit) to his or her data, as well as the data of anyonelower in the hierarchy. Two common ways to set up a role hierarchy are by region or by product.Note that, if there is a conflict, the role hierarchy overrides the settings in the organization-wide defaults.There are three basic steps to setting up a successful role hierarchy:1. Define the basic roles, such as sales representative, director of sales, and CEO. It’s not necessary to createindividual roles <strong>for</strong> each title; the idea is to simply define a hierarchy that gives users in higher-level rolesaccess to the in<strong>for</strong>mation entered by users in lower-level roles.2. Build the role hierarchy based on how in<strong>for</strong>mation should roll up <strong>for</strong> reporting and on who should see whatdata.3. Assign individual users to the roles.ExampleIn this sample hierarchy, data access works like this:• The CEO/CFO roles have complete access (view, edit, and report) to all data in the organization.• The regional directors (Western, Eastern, and International) have access (view and edit) to their data andto the data of the sales reps below them. They do not have access to each others’ data.• The users at the lowest level have access (view, edit, and report) only to their data.Summary and checklist: set up Sales<strong>for</strong>ce <strong>CRM</strong>In this section, you learned how to define the basic Sales<strong>for</strong>ce <strong>CRM</strong> settings <strong>for</strong> your company. At thispoint, you should:Progress Checklist Know how to set your company profile Know how to set the fiscal yearGUIDE 8
Sales<strong>for</strong>ce <strong>CRM</strong> Getting Started Guide Define user profiles Define organization-wide defaults <strong>for</strong> basic data access Define role hierarchy to determine who has access to dataResource Summary• Administration Basics: Setting Up Sales<strong>for</strong>ce <strong>CRM</strong>GUIDE 9
Sales<strong>for</strong>ce <strong>CRM</strong> Getting Started GuideSection 3: Make Sales<strong>for</strong>ce <strong>CRM</strong> Your OwnWhen you sign on with Sales<strong>for</strong>ce <strong>CRM</strong>, it’s ready to use as is. But you can also easily modify (customize)Sales<strong>for</strong>ce <strong>CRM</strong> so it’s a good fit <strong>for</strong> your business and your users. In fact, the more you customize theapplication to fit your users, the more com<strong>for</strong>table they will be and the more they’ll use it. For that reason,customization can do great things to boost your adoption rates.In this section, you’ll learn about customization and get links to step-by-step procedures <strong>for</strong> makingSales<strong>for</strong>ce <strong>CRM</strong> your own.• Customization tips and tricks• What can you customize?• Fields• Page layouts• Reports• Should you use leads?• Capturing leads from your Web siteCustomization tips & tricksCustomizing Sales<strong>for</strong>ce <strong>CRM</strong> is so easy that people tend to create lots of fields that end up not being used.For that reason, it’s important to take a step back be<strong>for</strong>e you dive in. Here are the top five things to thinkabout be<strong>for</strong>e starting to customize:1. Think be<strong>for</strong>e you build – Start with the end in mind by knowing your end goal. Think about what in<strong>for</strong>mationyou want to pull out of the system and then make sure you have the fields to match. At the end of the day,Sales<strong>for</strong>ce <strong>CRM</strong> is only as good as what’s in your reports.2. Ask <strong>for</strong> input – Talk to your users to find out what’s critical <strong>for</strong> them to know. Then capture that in<strong>for</strong>mation torun your business.3. Seed and grow – Start with the basic fields you need and then identify new fields that could make your businessrun even better. This approach ensures you don’t turn off your users.4. Run reports – Run reports about 1 month after you go live to find out which fields are not being used. Use theopportunity to survey users about what could be improved.5. Make changes on the fly – In response to feedback, make changes immediately to gain instant credibility. Makesure you communicate any changes because users don’t like it when anything that affects their work happens“magically.”What can you customize?You can customize many different Sales<strong>for</strong>ce <strong>CRM</strong> components; however, most customers customize threethings:• Fields• Page layouts• ReportsCustomizing fieldsBecause fields hold the data you want to capture and report on, it’s important to make sure you have fields<strong>for</strong> important data elements and that those fields have names that make sense to your users.Here are common approaches to customizing fields:GUIDE 10
Sales<strong>for</strong>ce <strong>CRM</strong> Getting Started Guide• Modify the standard Sales<strong>for</strong>ce <strong>CRM</strong> fields. Sales<strong>for</strong>ce <strong>CRM</strong> provides commonly used fields <strong>for</strong>standard records such as Accounts, Contacts, Opportunities, and Leads. For example, you could add thevalue “Lukewarm” to the existing values “Cold,” “Warm,” and “Hot” <strong>for</strong> the Rating on the Accountfield.• Create fields from scratch. If you need a field that doesn’t already exist, you can easily create a customfield. For example, you could add a field called “Product Name” to your Opportunity record.• Do both! Combine standard fields and custom fields to create the best experience <strong>for</strong> your users. It’swhat most successful customers do.Customizing page layoutsPage layouts define how your fields—standard and custom—look to your users and which fields arerequired; that is, they can’t be saved unless the user enters a value. You’ll want to customize your layoutsso that they’re attractive and easy to use. It may be tempting to create many required fields to <strong>for</strong>ce users toenter data; however, keep in mind that user satisfaction tends to suffer when there are too many requiredfields.Here’s what you can do to customize page layouts:• Remove unnecessary fields• Change field locations• Create new sections• Determine if filling in a field is required be<strong>for</strong>e saving For additional in<strong>for</strong>mation, see Administration Essentials: Customization: Creating a Page LayoutCustomizing reportsOne of the great things about Sales<strong>for</strong>ce <strong>CRM</strong> is that it’s easy to generate reports with the in<strong>for</strong>mationthat’s most important to you. With a large number of standard reports available out of the box, you can bereporting in no time.In the planning process, you decided what in<strong>for</strong>mation you wanted to pull from Sales<strong>for</strong>ce <strong>CRM</strong> based onyour current business needs. Then you customized the application based on those needs. Once you’veadded the custom fields to Sales<strong>for</strong>ce <strong>CRM</strong>, it’s time to re-evaluate if you have all the in<strong>for</strong>mation youneed to pull the proper reports. Now you’re ready to start creating your reports.Here’s what you can do with reports:• Customize the standard reports to better fit your business needs.• Create custom reports from scratch, which involves deciding which fields they contain, how they’re laidout, sorting, date ranges, and charting options. For more in<strong>for</strong>mation about customizing reports, see Administrator Essentials: Analytics: Creating aCustom ReportTo lead or not to lead?An important step in setting up Sales<strong>for</strong>ce <strong>CRM</strong> is to decide whether or not to use Lead functionality.Leads are a critical part of the sales cycle of most businesses, and Sales<strong>for</strong>ce <strong>CRM</strong> includes a lot of veryuseful Lead functionality. Some companies decide not to use Lead functionality because it requires anadditional step to turn a prospect into an Opportunity. What’s right <strong>for</strong> you depends on your businessprocesses.Leads are unique among Sales<strong>for</strong>ce <strong>CRM</strong> records because they come with special functionality, including:GUIDE 11
Sales<strong>for</strong>ce <strong>CRM</strong> Getting Started Guide• Lead conversion – A benefit of using Leads in Sales<strong>for</strong>ce <strong>CRM</strong> is that it creates a separate area in whichyou can keep in<strong>for</strong>mation in any kind of <strong>for</strong>mat to track anyone who ever expressed interest. Thisapproach keeps a clean distinction between Leads and Contacts, so you don’t have to worry about “dirty”data or duplicates. And remember, if you don’t use Leads, you can’t run an analysis of how Leadsconvert or the best channels <strong>for</strong> creating Leads.• Reports – Available reports show conversion rates, the time required to convert a Lead, and those Leadchannels that are the best per<strong>for</strong>mers when it comes to bringing in deals.• Merging Leads – This functionality is critical because Leads are meant to be a holding area <strong>for</strong> allprospects. Be<strong>for</strong>e converting the Leads to Opportunities, you can merge duplicates to ensure high-qualitydata and record all Lead activity.• Web-to-lead – Getting Leads from multiple channels is critical to any business. By using the Web-to-Lead functionality, you can easily create <strong>for</strong>ms that capture Leads from your Web site. To learn more about Leads, see the Getting the Most From Your Leads resource.Capturing Leads from your Web siteIf you decided to use Leads, it makes sense to also evaluate the Web-to-Lead functionality. You probablyhave a Web site that lets prospects contact you about your product or service.To make the most of your Web site:• Customize Sales<strong>for</strong>ce <strong>CRM</strong> to use Web-to-Lead functionality to capture Leads when prospects fill in a<strong>for</strong>m.• Bring that in<strong>for</strong>mation right into Sales<strong>for</strong>ce <strong>CRM</strong>.Setting up this functionality is simple. You decide which fields to include on the Web-to-lead <strong>for</strong>m, create aURL as a landing page (such as a “thank you” page), and click a button to generate the HTML code. YourWeb master will jump <strong>for</strong> joy when you deliver HTML code that’s ready to deploy immediately. To start capturing leads from your Web site, go to Setup -> Customize -> Leads -> Web-to-Lead. Forstep-by-step instructions, see the Tips and Hints <strong>for</strong> Lead Administration resource.Summary and checklist: make Sales<strong>for</strong>ce <strong>CRM</strong> your ownThis section was all about adapting Sales<strong>for</strong>ce <strong>CRM</strong> to match the way you do business. At this point, youshould know how to:Progress Checklist Customize fields Customize page layouts Customize reports and documenting changes using the your Reports worksheet Decide whether to use leads Set up the Web-to-lead functionalityResource Summary• List of commonly used fields• Administration Essentials: Customization: Creating a Page Layout• Administrator Essentials: Analytics: Creating a Custom Report• Getting the Most From Your Leads• Tips and Hints <strong>for</strong> Lead AdministrationGUIDE 12
Sales<strong>for</strong>ce <strong>CRM</strong> Getting Started GuideSection 4: Ready, Set, GoWhen you have Sales<strong>for</strong>ce <strong>CRM</strong> set up the way you want it, you’re ready to add users. And then there’s thefinal task be<strong>for</strong>e you’re ready to go live—importing your data into Sales<strong>for</strong>ce <strong>CRM</strong>.To help you, Sales<strong>for</strong>ce <strong>CRM</strong> includes wizards to walk you through the process and provide some tipsalong the way. This step is probably the most complex task in getting up and running. For that reason, youmay want to look into getting help from a sales<strong>for</strong>ce.com partner or from Sales<strong>for</strong>ce.com Consulting.When the data import is complete, you’re ready to train your users and announce that Sales<strong>for</strong>ce <strong>CRM</strong> isready <strong>for</strong> business.These are the task you’ll need to complete be<strong>for</strong>e you go live:• Add users• Import your data• Train your users• Send the go-live announcementAdd usersAdding users in Sales<strong>for</strong>ce <strong>CRM</strong> is a fairly easy. In Section 2, you learned about profiles and set up yourorganization’s role hierarchy. When you add users, you associate actual users with those profiles so theycan log in and access the data that’s appropriate <strong>for</strong> them.Adding users serves three important purposes:1. Once you add users, you can import data and automatically associate that data with thecorrect users.2. By associating roles and profiles with all users, you can determine how they see data, what they can do in theapplication, and how their data rolls up.3. When you add a user, Sales<strong>for</strong>ce <strong>CRM</strong> uses that user’s record to generate an invitation to log into theapplication.Tip: If you want to delay notifying users, be sure to uncheck the “Generate new password and notify userimmediately” checkbox when you go through the process of adding users. You can edit the user recordsand generate usernames and passwords whenever you’re ready <strong>for</strong> users to actually log in. For more in<strong>for</strong>mation, see the training segment Administrator Essentials: Security and Access: Create aNew UserImport dataMost companies already have Account and Contact in<strong>for</strong>mation stored somewhere—usually in ACT!,Goldmine, or Microsoft Outlook as well as in spreadsheets, on sticky notes, or in the heads of their salesreps. Getting that in<strong>for</strong>mation out of Outlook and off those sticky notes and into Sales<strong>for</strong>ce <strong>CRM</strong> is one ofthe most important steps in the implementation process.Although you could collect all of these resources and enter them one by one, it’s obviously not efficient toenter hundreds or even thousands of records by hand. Sales<strong>for</strong>ce <strong>CRM</strong> provides a step-by-step data importwizard that walks you through the process of importing Leads, Accounts, and Contacts—and gives somehelpful hints along the way. For more an overview of this process, see the training segment Administration Essentials: DataUtilities: Import Accounts and ContactsGUIDE 13
Sales<strong>for</strong>ce <strong>CRM</strong> Getting Started GuidePrepare to import your data<strong>Best</strong> practices <strong>for</strong> importing your data include having a well thought-out plan, properly preparing the data,and doing a test run.PlanComplete the Business Process Review – Importing Data worksheet in the Getting Started Workbook. Itcontains the following in<strong>for</strong>mation:• Your data sources: Is your data in Outlook, ACT!, or spreadsheets?• A list of fields in your current data records.• A mapping between your current fields and the Sales<strong>for</strong>ce <strong>CRM</strong> fields. For instructions on exporting data from external sources see Exporting Contacts from GoldMine andExporting Contacts from ACT! For instructions on importing Contacts, see the following resources:• Importing Contacts from Outlook• Importing Contacts from Gmail• Importing Contacts from ACT!Prepare your dataStarting with clean data really pays off. We highly recommend you “scrub” your data be<strong>for</strong>e importing itinto Sales<strong>for</strong>ce <strong>CRM</strong>. Remember: “Garbage in, garbage out.”Here are some tips <strong>for</strong> preparing your data:• The Sales<strong>for</strong>ce <strong>CRM</strong> import wizard was designed to work with Microsoft Excel. If necessary, exportyour data from any other data sources to Excel first.• Now is a good time to standardize naming and clean up your data. For example, set standards <strong>for</strong>company names (such as International Business Machines instead of IBM) or the way countries are listed(USA instead of United States). Take time to weed out “dirty” data and de-duplicate people who may bein the system multiple times.• Review your Excel file to see if you missed any critical data <strong>for</strong> which you haven’t created custom fields.For example, if your sales reps are tracking the number of employees at each account, you’ll need a fieldto store that in<strong>for</strong>mation in Sales<strong>for</strong>ce <strong>CRM</strong>.• Map your data columns to the Sales<strong>for</strong>ce <strong>CRM</strong> field names. For example, the Company field inMicrosoft typically maps to the Account field in Sales<strong>for</strong>ce <strong>CRM</strong>. Consider renaming the columnheaders in your Excel file so they match the field names in Sales<strong>for</strong>ce <strong>CRM</strong> exactly. This step willsimplify the mapping step in the wizard.• Wherever possible, assign the correct owners to Records. If you don’t have all the Records assigned, thedefault owner is the administrator who per<strong>for</strong>ms the import.Test the importTest a small sample—approximately 5 to 10 records—be<strong>for</strong>e going ahead with the full import.When you analyze the test results, try this approach:• Build a custom report or custom view that lets you see at a glance whether the data is laid out correctly.• Open a Record and compare it against the import file. Confirm that the Record’s fields show what youwant them to show.GUIDE 14
Sales<strong>for</strong>ce <strong>CRM</strong> Getting Started Guide• Validate the test results with selected stakeholders or power users.• Make changes to the import file or make changes to Sales<strong>for</strong>ce <strong>CRM</strong> based on the test results. Forexample, data could import incorrectly because it was mapped originally to the wrong field.• Delete the test records and test again after you’ve made your changes. Repeat this process until you’resure the data was imported accurately and that it is displayed correctly in the reports and views yourusers will see.Import your final dataOnce your test results meet your expectations, you’re ready to import your file or files.Here are a few suggestions <strong>for</strong> importing data:• Consider importing data during non-working hours – If the system is live <strong>for</strong> some groups be<strong>for</strong>eothers, this approach helps avoid confusion.• Give yourself some cushion <strong>for</strong> error – Don’t try to import your data the day be<strong>for</strong>e sales training, <strong>for</strong>example.• Validate your data – Run key reports and display important screens to make sure all the data wasimported into the fields where it belongs and in the <strong>for</strong>mat you want. Review the tip sheet Importing Your Organization’s Data.Train end usersYou’ve done your homework to follow a clear plan, set up, and customize Sales<strong>for</strong>ce <strong>CRM</strong>, and you’vescrubbed and imported your data. Now, it’s time to train your users.Don’t be intimidated by planning your training. Keep it simple and to the point. The last thing you want todo is overwhelm your users—the point is to engage them.Depending on the complexity of your implementation, your training can range from 1 to 4 hours. Breakingthe training into 2 days is another option that may work better <strong>for</strong> your users. Ideally, you’d hold thistraining onsite in a conference room and ask everyone to bring their laptops <strong>for</strong> the training. Right be<strong>for</strong>e training, generate usernames and passwords <strong>for</strong> everyone who will attend. To generateusernames and passwords, edit the user records and select the “Generate new password and notifyimmediately” checkbox to automatically send an email to each user with his/her login in<strong>for</strong>mation.Follow these steps to create a successful training plan:1. Overview & expectation setting – Remember that you may have been involved in the whole rollout, but yourusers haven’t. Provide a short overview of what Sales<strong>for</strong>ce <strong>CRM</strong> is, why you chose this application, and whatexpectations you have <strong>for</strong> them. This is a great opportunity <strong>for</strong> your executive sponsor to get involved. He orshe can present this in<strong>for</strong>mation to provide credibility and support. Having the sponsor present at the trainingalso shows how important Sales<strong>for</strong>ce <strong>CRM</strong> is to your company.2. Rein<strong>for</strong>ce your process & terminology – Create at least one slide on each new process you’re rolling out.Companies often use the rollout of a new system to also communicate new processes. For example, you mayhave a new Opportunity process or you may start using Leads. Don’t <strong>for</strong>get to create a terminology slideexplaining the new Sales<strong>for</strong>ce <strong>CRM</strong> lingo. Many companies ask their users take the following free courses as aprerequisite to their own training classes (scroll downand launch).• Getting Started with Sales<strong>for</strong>ce <strong>CRM</strong> Navigation• Getting Started with Sales<strong>for</strong>ce <strong>CRM</strong> Sales• Getting Started with Reports and DashboardsGUIDE 15
Sales<strong>for</strong>ce <strong>CRM</strong> Getting Started Guide3. What’s in it <strong>for</strong> me – It’s important to focus on how Sales<strong>for</strong>ce <strong>CRM</strong> will benefit your users’ work lives: lessadministrative work, easier reporting, a clear view of their funnel, and easy <strong>for</strong>ecasting.4. Hands-on training with real-life scenarios and data – Providing hands-on training and taking the time toclean your data be<strong>for</strong>e training will get you these benefits:• For your users – It makes the training session more “real.” Seeing their actual data and walking throughreal-life scenarios will give them a great idea of daily life with Sales<strong>for</strong>ce <strong>CRM</strong>.• For you – It gives you an opportunity to get real-time feedback and further clean the data, if necessary.5. If it’s not in Sales<strong>for</strong>ce <strong>CRM</strong> it doesn’t exist – Take this position when training your users (as harsh as it maysound). This is where it’s helpful to have an executive sponsor deliver this section to stress its importance.6. How users will be measured – Having a clear set of metrics in place gives users an idea of how they will bemeasured: <strong>for</strong> example, they need to review and make all changes to their data by x date, the sales manager(s)need to be able to view their funnel in the application by x date or all pipeline reports will be pulled from theapplication by x date. This is another section best delivered by the executive sponsor.7. Contests and incentives – Your users will be more motivated if you kick things off with a contest andincentives. Consider creating a contest such as 1st user to create 15 new Accounts in Sales<strong>for</strong>ce <strong>CRM</strong> wins a$500 prize or 1st user to generate a pipeline report out of Sales<strong>for</strong>ce <strong>CRM</strong> wins an iPod. Money is usually thebest motivator <strong>for</strong> sales users, but other prizes like iPods or iPhones work well too. You can even create a leaderboard in the application to generate some healthy competition.8. Q&A – Definitely leave time in your session <strong>for</strong> question and answers. Although this step seems basic, it’s veryimportant to make your users feel that you have time to answer their questions and get feedback.9. Takeaways – Create a tip sheet with the top things you want your users to take away from the training:terminology, new process flow, and step-by-step instructions <strong>for</strong> creating an Opportunity. Bonus points if youlaminate the tip sheet so users can easily post the list next to their computers. See “10 Tips <strong>for</strong> a Successful Training Plan” and take advantage of the following sample trainingtemplate: Sales<strong>for</strong>ce Training Session.Go liveNow that your users are trained, you’re ready to flip the switch and go live. Send an email to the companycongratulating everyone on the project team, as well as the users who attended the training. Include theone-page training guide, if you created one. Remind everyone that Sales<strong>for</strong>ce <strong>CRM</strong> is the system of recordfrom this point <strong>for</strong>ward, make yourself available <strong>for</strong> questions, and provide follow-up training if necessary.Once Sales<strong>for</strong>ce <strong>CRM</strong> is live, you’ll want to make sure you set up the application to attract usage. The loginrate is important, but it doesn’t really show whether users are using the application to its fullest potential.Here are some questions to ask:• Are users consistently using the tools provided to them?• Are users sporadic?• Do you notice a spike in use after training that then falls dramatically 3–4 weeks later?• Are your users showing “quantity” activities (i.e., number of Opportunities) as well as “quality” activities(i.e., pipeline velocity)?A great resource <strong>for</strong> tracking all these metrics is the Adoption Dashboard. It’s available <strong>for</strong> free and canhelp determine what you want to measure when it comes to adoption. For more in<strong>for</strong>mation, see step 5:Make Sales<strong>for</strong>ce <strong>CRM</strong> a Success.Summary and checklist: ready, set, goCongratulations. Sales<strong>for</strong>ce <strong>CRM</strong> is now ready <strong>for</strong> prime time! At this point, you know how to:Progress Checklist Add usersGUIDE 16
Sales<strong>for</strong>ce <strong>CRM</strong> Getting Started Guide Prepare <strong>for</strong> data import Export data to Excel Test the import to Sales<strong>for</strong>ce <strong>CRM</strong> Import the data Validate the data Train users Announce that Sales<strong>for</strong>ce <strong>CRM</strong> is liveResource Summary• Administrator Essentials: Data Utilities: Import Accounts and Users• Administrator Essentials: Security and Access: Create a New User• Exporting Contacts from GoldMine• Exporting Contacts from ACT!• Importing Your Organization’s Data• Importing Contacts from Outlook• Importing Contacts from Gmail• Importing Contacts from ACT!• Sales<strong>for</strong>ce <strong>CRM</strong> Training Session template• “ 10 Tips <strong>for</strong> a Successful Training Plan”• Getting Started with Sales<strong>for</strong>ce <strong>CRM</strong> Navigation• Getting Started with Sales<strong>for</strong>ce <strong>CRM</strong> Sales• Getting Started with Reports and Dashboards• Adoption DashboardGUIDE 17
Sales<strong>for</strong>ce <strong>CRM</strong> Getting Started GuideSection 5: Make Sales<strong>for</strong>ce <strong>CRM</strong> a successNow that you’re up and running with Sales<strong>for</strong>ce <strong>CRM</strong>, you’re ready <strong>for</strong> the next steps that will make it ablowout success and take your sales process to the next level.Here’s what to do next:• Encourage user adoption• Increase user adoption with additional functionality• Manage data quality• Join the community• Manage releasesEncourage user adoptionThe key to increasing user adoption is supporting users and being responsive to their needs, tracking usagetrends over time, and actively encouraging adoption. Understanding what works and what doesn’t iscritical, both immediately after going live and over the long term.Here are some key steps you can take to increase adoption:• Support users• Measure adoption• Encourage adoptionSupport usersSupporting users is an ongoing process. It involves getting user feedback, training the users, and identifyinguser champions who’ll help their co-workers day to day.Here are some ideas <strong>for</strong> user support:• Conduct a survey – The AppExchange includes several survey tools you can use to let users expresstheir likes and dislikes. Use surveys periodically to sample user opinions—and then act on them.• Encourage user champions – Identify users who are enthusiastic about Sales<strong>for</strong>ce <strong>CRM</strong> and encouragethem to help others. Use their success to help inspire others.• Address problems quickly & publicly – Consider any problems an early warning. Fix problems andmodify the application based on feedback immediately. Communicate to users how the problems weresolved and how their feedback directly affected the application.• Offer refresher training – Additional or “refresher” training doesn’t have to be <strong>for</strong>mal; just make sureit’s appropriate <strong>for</strong> each user group. For example, sales managers and sales reps will have different issuesand will need different refresher sessions.Measure adoptionBe<strong>for</strong>e you can improve adoption, you have to measure it. Then you can use incentives to activelyencourage adoption.Use the adoption dashboards available through the AppExchange to track login activity and new recordsadded by users. The most common measurement of adoption is the log-in rate, but it can’t be the onlymeasure. For a more detailed analysis of usage and adoption, consider these measurements:• Object ownership – Track how many Accounts, Contacts, Activities, and Opportunities each usercreates. Use these measurements to quickly identify reps who are not using Sales<strong>for</strong>ce <strong>CRM</strong> correctly.GUIDE 18
Sales<strong>for</strong>ce <strong>CRM</strong> Getting Started Guide• Key per<strong>for</strong>mance indicators (KPIs) – Get more targeted monitoring with KPIs. Good choices includeOpportunities won, Opportunities lost, Loss by competitor, Average deal size, Sales stage duration,Forecast accuracy, and Productivity.Encourage adoptionMany customers find offering incentives to users can have a big payoff. Here are a few suggestions <strong>for</strong>encouraging user adoption:• Identify and reward the strongest adopters. For example, reward those who created the most Reports orActivities or added the most new Contacts. One company gave away iPods to the strongest adopters.• Communicate about new product features that will help users in their daily work.• Take the approach, “If it isn’t in Sales<strong>for</strong>ce <strong>CRM</strong>, it doesn’t exist.”• Tie adoption to compensation.• Mandate both timeliness and data quality. Reps must enter prospects and early-stage Opportunitiesimmediately, not just be<strong>for</strong>e closing the deal. Otherwise, you lose the advantage of early visibility andwon’t be able to measure close ratios.Increase user adoption with additional functionalityIn addition to encouraging adoption with support and incentives, providing features that make users’ liveseasier can play a huge role in adoption. For example, users love Sales<strong>for</strong>ce <strong>CRM</strong>/Microsoft Outlookintegrations because they don’t have switch between applications. This feature also lets you capture datapreviously trapped in your reps’ personal computers. Here’s are some changes that get great results:• Leverage the AppExchange• Integrate Microsoft Outlook and Gmail• Provide productivity tools such as templates and dashboardsLeverage the AppExchangeBusinessWeek magazine called the AppExchange “The eBay of Business Applications.” Here, you’ll findhundreds of applications that work together with Sales<strong>for</strong>ce <strong>CRM</strong> to increase productivity—includingdashboards <strong>for</strong> sales activity, lead and opportunity management, quote generators, and much more. Go to www.appexchange.com and check it out!Integrate Outlook and emailTo make users more productive, Sales<strong>for</strong>ce <strong>CRM</strong> is tightly integrated with Microsoft Outlook. This utilityper<strong>for</strong>ms several important functions that help Sales<strong>for</strong>ce <strong>CRM</strong> and Outlook work hand-in-hand:• Email integration – Add emails from Outlook to a Contact or Lead record inside Sales<strong>for</strong>ce <strong>CRM</strong>.Sales<strong>for</strong>ce <strong>CRM</strong> will look up the Contact based on an email match and give you the option to associate itwith an Opportunity as well. This functionality helps you catalog important emails and provides atremendous boost to effective collaboration.• Address book integration – When sending an email from Outlook you can look up a Contact frominside Sales<strong>for</strong>ce and add it to the To line of your email.• Contacts and calendar synchronization – Force.com <strong>for</strong> Microsoft Outlook lets you select whichContacts and calendar events you want to synch with Sales<strong>for</strong>ce <strong>CRM</strong>. You can automate synching atscheduled intervals; a dynamic icon indicates whether a record is up to date.GUIDE 19
Sales<strong>for</strong>ce <strong>CRM</strong> Getting Started Guide To integrate Outlook with Sales<strong>for</strong>ce <strong>CRM</strong>, you first have to install Force.com <strong>for</strong> Microsoft Outlook.For more in<strong>for</strong>mation, go to Force.com <strong>for</strong> Microsoft Outlook. For additional tips, see Using Force.com <strong>for</strong> Microsoft Outlook and Administering Force.com <strong>for</strong>Microsoft OutlookProvide templates and dashboardsUsers love templates and dashboards because they boost productivity, help track progress, andcommunicate key business in<strong>for</strong>mation in a way that’s easy to understand. Dashboards are great <strong>for</strong>visualizing complex in<strong>for</strong>mation and keeping everyone on the same page—and on their toes. Get yourteams to identify their key per<strong>for</strong>mance indicators (KPIs). Then build dashboards that show, in real time,how they’re per<strong>for</strong>ming.Email templates are easy to set up and use. With these templates, users can send out consistent, highquality,personalized HTML or text emails. For best practices and instructions on email templates, see Turbo-Charge Customer Communicationswith Email Templates and Tips <strong>for</strong> Using HTML Email Templates. For additional tips on how to increase adoption and ensure success, see “A <strong>CRM</strong> Champion’s Guide toAdoption.”Manage data qualityFor a <strong>CRM</strong> implementation to be successful, you’ve got to be able trust the data. Here are somesuggestions <strong>for</strong> maintaining data quality.• Search be<strong>for</strong>e you create – Teach users to search be<strong>for</strong>e creating Records to reduce data duplication.Duplicated data is inevitable, but searching first can help keep it to a manageable level.• Standardize naming conventions – Rein<strong>for</strong>ce standardized naming conventions <strong>for</strong> company namesand addresses. For example, is it U.S.A., USA, or US? Is it Acme or Acme LLC?• Merge records – Although having duplicate records may be inevitable, having a process to keep on topof duplicates is key. Within Sales<strong>for</strong>ce <strong>CRM</strong>, you can merge duplicate Lead, Account, and Contact datawith easy-to-use wizards.• Use the Excel connector – Get bi-directional access to Sales<strong>for</strong>ce <strong>CRM</strong> from Excel spreadsheets. Usethe connector to import records from Excel directly into Sales<strong>for</strong>ce <strong>CRM</strong>. You can also per<strong>for</strong>m massupdates, which can be very handy <strong>for</strong> data-cleansing projects. Although this tool is easy to install andeasy to use, you need to be careful any time you’re manipulating large amounts of live data.• Set up data quality dashboards – Set up a data quality dashboard to highlight when fields are leftblank. For example, use a dashboard that indicates the number of times the field “main competitor” wasleft blank. Or track overdue tasks or the last time a Record was updated.• Adopt partner solutions – Check out solutions on the AppExchange that can be to help improve dataquality. For example, Ringlead and DemandTools both automatically de-duplicate your manually createdLeads, Web <strong>for</strong>ms, and uploaded Lists. For best practices and additional tips on data quality, see “6 Steps Toward Top Data Quality” andManaging Data Quality. For more training on the Excel connector, see Managing Data <strong>for</strong> Administrators: Advanced Tools andConcepts: Using the Excel Connector For more in<strong>for</strong>mation using the Excel connector, see How to Upload Data into Sales<strong>for</strong>ce <strong>CRM</strong> and theExcel Connector Documentation.GUIDE 20
Sales<strong>for</strong>ce <strong>CRM</strong> Getting Started GuideNote: The Excel connector is an open source tool and is not a supported product. If you have questions,please use the documentation and check out the Force.com Discussion boards on the Excel Connector.Join the communitySales<strong>for</strong>ce <strong>CRM</strong> users may belong to different communities based on their interests and roles, includingbusiness users, developers, and administrators. Sales<strong>for</strong>ce.com provides Web sites where all types of userscan find in<strong>for</strong>mation, share ideas, respond to and rate content, and ask questions.In addition, sales<strong>for</strong>ce.com supports local user groups across the country and around the world. Join fellowusers at local meetings and attend “cloud tours” near you, special events, and sales<strong>for</strong>ce.com’s yearlymega-event: Dream<strong>for</strong>ce.Check out and join these community sites:• Sales<strong>for</strong>ce.com Community – You’re reading this in<strong>for</strong>mation so we know you found theSales<strong>for</strong>ce.com Community site. Explore the wealth of resources. See the most popular content and castyour vote. Participate in discussion <strong>for</strong>ums, contribute to the IdeaExchange to see your ideas become partof Sales<strong>for</strong>ce <strong>CRM</strong>, and find out about local user groups and events inyour area.• Developer community – The developer community is <strong>for</strong> the technically inclined. Here you’ll find wikis<strong>for</strong> all aspects of the Force.com plat<strong>for</strong>m, downloads of popular books, and the chance to get a freeDeveloper Edition account.Manage releasesOne of the biggest advantages of Sales<strong>for</strong>ce <strong>CRM</strong> is that you get about 100 new features <strong>for</strong> the Force.complat<strong>for</strong>m and the Sales<strong>for</strong>ce <strong>CRM</strong> applications several times a year—all without much ef<strong>for</strong>t on your part.And, unlike with traditional software, your customizations are never lost.When new releases become available, consider this approach:1. In<strong>for</strong>m yourself with the following resources:• The Release Preview <strong>for</strong> an overview of new features• Release Notes <strong>for</strong> details, including installation instructions• A Webinar in which you’ll hear from the product team from each area2. Identify the three most promising features:• Use the vision and goals you defined earlier to select the features you want to activate• Get input from your users to narrow your short list• Sign up <strong>for</strong> the pre-release program to get your own test environment to try them out3. Communicate about any changes:• Send an email and talk to your users• Consider mini training sessions to get everyone up to speed• Consider using some of the adoption techniques discussed earlierSummary and checklist: make Sales<strong>for</strong>ce <strong>CRM</strong> a successYour adoption rates should be increasing and now you’re ready to expand Sales<strong>for</strong>ce <strong>CRM</strong> with additionalfeatures, available in Sales<strong>for</strong>ce <strong>CRM</strong> or from external partners. As your business grows, you also maywant to explore the capabilities of the Sales<strong>for</strong>ce <strong>CRM</strong> Enterprise Edition and Sales<strong>for</strong>ce <strong>CRM</strong> UnlimitedEdition.GUIDE 21
Integrating sales<strong>for</strong>ce.com applications and Oracle e-Business SuiteAt this point, you know how to:Progress Checklist Collect user feedback Respond to user feedback Measure adoption trends Encourage user adoption with incentives Add functionality to boost productivity and adoption Define a strategy <strong>for</strong> maintaining data quality Join the Sales<strong>for</strong>ce.com Community Define a strategy <strong>for</strong> managing releasesResource Summary• The AppExchange• Force.com <strong>for</strong> Microsoft Outlook• Using Force.com <strong>for</strong> Microsoft Outlook• Turbo-Charge Customer Communications with Email Templates• How to Upload Data into Sales<strong>for</strong>ce• Managing Data <strong>for</strong> Administrators: Advanced Tools and Concepts: Using the Excel Connector• Excel Connector Documentation• A <strong>CRM</strong> Champion’s Guide to Adoption• The IdeaExchange• The Sales<strong>for</strong>ce <strong>CRM</strong> community at Sales<strong>for</strong>ce.com Community• The developer community at developer.<strong>for</strong>ce.comFor more in<strong>for</strong>mationContact your account executive tolearn how we can help you accelerateyour <strong>CRM</strong> success.WP_Getting-Started_Guide_2010-03-05
Sales<strong>for</strong>ce <strong>CRM</strong>Getting Started Workbook
Sales<strong>for</strong>ce <strong>CRM</strong> Getting Started WorkbookContentsCONTENTS.......................................................................................................................................................................................................... 1WELCOME TO SALESFORCE <strong>CRM</strong> .................................................................................................................................................................. 1BUILD YOUR TEAM ........................................................................................................................................................................................... 2DEFINE YOUR VISION ....................................................................................................................................................................................... 3SET YOUR GOALS .............................................................................................................................................................................................. 4DOCUMENT YOUR PAIN POINTS ..................................................................................................................................................................................... 4CLARIFY YOUR GOALS ..................................................................................................................................................................................................... 5PRIORITIZE YOUR GOALS ................................................................................................................................................................................................. 6DEFINE YOUR PROCESS ................................................................................................................................................................................... 7IDENTIFY KEY ASPECTS OF YOUR BUSINESS PROCESS ........................................................................................................................................................ 7DOCUMENT YOUR PROCESS DIAGRAM ........................................................................................................................................................................... 8DEFINE THE FIELDS NEEDED FOR YOUR PROCESS .............................................................................................................................................................. 9DEFINE YOUR LEAD FIELDS .............................................................................................................................................................................................. 9DEFINE YOUR LEAD FIELDS (CONTINUED) ...................................................................................................................................................................... 10DEFINE YOUR ACCOUNT FIELDS ................................................................................................................................................................................... 11DEFINE YOUR CONTACT FIELDS..................................................................................................................................................................................... 12DEFINE YOUR OPPORTUNITY FIELDS ............................................................................................................................................................................. 13DEFINE NEEDED REPORTS ............................................................................................................................................................................. 14PREPARE TO IMPORT DATA........................................................................................................................................................................... 15WORKBOOK
Sales<strong>for</strong>ce <strong>CRM</strong> Getting Started WorkbookWelcome to Sales<strong>for</strong>ce <strong>CRM</strong>This collection of worksheets will support your planning process, document your decisions, and speed upyour implementation by helping you to:• Build your team• Define your vision• Define and prioritize your goals• Define key aspects of your processes and diagram the process flow• Define fields associated with your processes• Decide which reports you need• Prepare to import data into Sales<strong>for</strong>ce <strong>CRM</strong>WORKBOOK 1
Sales<strong>for</strong>ce <strong>CRM</strong> Getting Started WorkbookBuild Your TeamUse this worksheet to identify the people who’ll be critical to making Sales<strong>for</strong>ce <strong>CRM</strong> a success at yourcompany.My Project TeamRole Name Role Description Team Member NameExecutive SponsorProject OwnerAdministratorPower UserLends influence to the project by becoming the champion.Sets the business vision <strong>for</strong> the implementation.Guides the project to successful completion. Understandsall business process and maps process to the Sales<strong>for</strong>ce<strong>CRM</strong> implementation.Gets the application up and running and manages it dayto day.Serves as liaison to the users to ensure the applicationmeets day-to-day needs.WORKBOOK 2
Sales<strong>for</strong>ce <strong>CRM</strong> Getting Started WorkbookDefine Your VisionUse these sample <strong>CRM</strong> vision statements as a basis <strong>for</strong> discussion. Then come up with your own.“Build and maintain long-term relationships with valuable customers by creating personalizedexperiences across all touch-points and by anticipating customer needs and providing customizedoffers.”“Customer loyalty is our highest priority.”“Provide the highest level of personalized service <strong>for</strong> all customers and give customers thecommunication channels they want”My Vision StatementWORKBOOK 3
Sales<strong>for</strong>ce <strong>CRM</strong> Getting Started WorkbookSet Your GoalsThis section includes worksheets to help you define and prioritize your company’s goals, including:• Documenting current pain points• Clarifying your business goals• Prioritizing those goalsRemember that different groups will have different goals. In general, executives, sales manager, and salesreps share similar goals across different companies.Document Your Pain PointsAs a preliminary step, capture the issues various internal groups face.See the second table <strong>for</strong> an example and delete when it is no longer needed.Pain PointMy Pain PointsGroupPain PointNeed better pipeline visibilitySample Pain PointsSalesGroupDifficult to quantify why deals are lost to key competitorsLeads tracked via email are being droppedUnable to track <strong>for</strong>ecasted revenue from all profit centersDifficult to prioritize top customer issuesHow to identify top per<strong>for</strong>mers in every groupCan’t keep track of incoming IT requestsSalesSalesManagementManagementManagementOther group (such as IT)WORKBOOK 4
Sales<strong>for</strong>ce <strong>CRM</strong> Getting Started WorkbookClarify Your GoalsAfter identifying the main pain points, define your goals in terms of the hoped-<strong>for</strong> solutions <strong>for</strong> each targetgroup. Also define how those goals can be measured. After you complete the step related to defining yourbusiness process, return to the last item in this worksheet to complete it.See the second table <strong>for</strong> sample business goals and delete when it is no longer needed.My Business GoalsWhat does the executive team hope to get out of Sales<strong>for</strong>ce <strong>CRM</strong>?How are these goals measured?What do the managers hope to get out of Sales<strong>for</strong>ce <strong>CRM</strong>?How are these goals measured?What are the goals of your end users?How are these goals measured?••••••Sample Business GoalsWhat does the executive team hope to get out of Sales<strong>for</strong>ce <strong>CRM</strong>? • Identify top per<strong>for</strong>mers• Identify top customers• Capture leads from the Web site• Know why key deals are lostHow are these goals measured? • Dashboard to highlight top per<strong>for</strong>mers• Dashboard to display top deals and winrates• % increase in leadsWhat do the managers hope to get out of Sales<strong>for</strong>ce <strong>CRM</strong>? • Better visibility into the pipeline• Better understanding of why key dealsare lost• Increased close rates• Relevant reports <strong>for</strong> top management• Make sure leads aren’t droppedHow are these goals measured? • 100% of deals are shown in Sales<strong>for</strong>cepipeline reports• Increase closed rate by • Reduce dropped leads from to What are the goals of your end users? • Easy access to collateral• Work online and offline• Accomplish administrative tasks moreeasily• Get credit <strong>for</strong> workHow are these goals measured? • Document consistency• Increase effectiveness by %• Activity reporting and dashboards• Low employee attritionWORKBOOK 5
Sales<strong>for</strong>ce <strong>CRM</strong> Getting Started WorkbookPrioritize Your GoalsUsing the completed Business Goals worksheet, copy and paste each of the goals you defined into theappropriate priorities in the My Business Priorities worksheet.See the second table <strong>for</strong> an example of how to prioritize business goals.My Business PrioritiesMust haveImportantNice to have•••Sample Business PrioritiesMust have • Identify top per<strong>for</strong>mers• Know why key deals are lost• Get better visibility into pipeline• Increase close rates• Create relevant reports <strong>for</strong> top management• Get credit <strong>for</strong> workImportant • Identify top customers• Know why key deals are lost• Easy access to collateral• Accomplish administrative tasks more easilyNice to have • Capture leads from the Web site• Make sure leads tracked via email aren’t dropped• Work online and offlineWORKBOOK 6
Sales<strong>for</strong>ce <strong>CRM</strong> Getting Started WorkbookDefine Your ProcessThis section includes the following resources:• A questionnaire to help define key components of your business process• A placeholder <strong>for</strong> your business process diagram (just duplicate to create additional process diagrams)• Worksheets to help you define the fields you need <strong>for</strong> the commonly used sales process (Lead fields,Account fields, Contact fields, and Opportunity fields).Identify Key Aspects of Your Business ProcessModify this worksheet to include the key components associated with your business process.Companies:For which of the following do you want to trackdata?Profiles:What key characteristics do you use to profileor segment your customers?Contacts:What are the characteristics that define thecontacts you interact with?Partners:What types of partners do you work with?How do they help uncover opportunities <strong>for</strong>your business?Sales Funnel:List the stages in your sales cycle and thepercentage of closing certainty at each stage.Documentation:What materials do you send to customersduring the sales cycle?List the 5–10 documents you use mostfrequently.1.2.3.4.5.Competition:Do you track competitive wins and losses?List your competitors and check the reasonsyou lose business to or win business fromthem.1.2.3.4.5.My Business Process QuestionnaireProspectsCustomersPartnersVendorsCompetitorsIndustryNo. of employeesRevenueTitleRole Value Added Resellers Original Equipment Manufacturers Indirect Sales Channel Implementers/Installers Lead – 10% Qualified – 20% Presentation – 50% Proposal – 75% Closed Won – 100% Closed Lost – 0% Email templates PDF documents Proposals Quotes OtherPriceFeature Value propositionCompany viabilityTime to valueOtherWORKBOOK 7
Sales<strong>for</strong>ce <strong>CRM</strong> Getting Started WorkbookDocument Your Process DiagramAfter reviewing the sample Sales<strong>for</strong>ce processes and mapping out your own, include a sketch of thatprocess below.My Business Process DiagramWORKBOOK 8
Sales<strong>for</strong>ce <strong>CRM</strong> Getting Started WorkbookDefine the Fields Needed <strong>for</strong> Your ProcessUse the following worksheets to identify which standard Sales<strong>for</strong>ce fields and picklist values fit yourprocess. Also define which additional custom fields you need <strong>for</strong> each of the screens involved with mostsales processes, including the Lead fields, the Account fields, the Contact fields, and the Opportunitiesfields.Note: The * symbol means a field is required.• Use the Want Field? column to check those fields you want to use.• Use the Custom Field choices at the end of the table to note additional fields. Add rows as needed.Define Your Lead FieldsMy Lead FieldsStandard Field Name Data Type Values Want Field?AddressAddressAnnual RevenueCurrency(18,0)CampaignLookup(Campaign)Company*Text(80)DescriptionLong Text Area(32000)Do Not CallCheckboxEmailEmailEmail Opt OutCheckboxFaxFaxFax Opt OutCheckboxIndustry Picklist AgricultureApparelBankingBiotechnologyChemicalsCommunicationsConstructionConsultingEducationElectronicsEnergyEngineeringEntertainmentEnvironmentalFinanceFood & BeverageGovernmentHealthcareHospitalityInsuranceMachineryManufacturingMediaNot For ProfitOtherRecreationRetailShippingTechnologyTelecommunicationsTransportationUtilitiesLead OwnerLookup(User, Queue)Lead Source Picklist AdvertisementEmployee ReferralExternal ReferralPartnerPublic RelationsSeminar – InternalSeminar – PartnerTrade ShowWebWORKBOOK 9
Sales<strong>for</strong>ce <strong>CRM</strong> Getting Started WorkbookDefine Your Lead Fields (continued)Standard Field Name Data Type Values Want Field?Lead Status*PicklistWord of mouthOtherContactedOpen (Default)Qualified (Converted)UnqualifiedMobilePhoneName*NameSalutation Picklist Mr.Ms.Mrs.Dr.Prof.No. of EmployeesNumber(8,0)PhonePhoneRating Picklist HotWarmColdTitleText(80)WebsiteCreated By*Last Modified By*Last Transfer DateURL(255)Lookup(User)Lookup(User)DateCustom Field Name Data Type ValuesWORKBOOK 10
Sales<strong>for</strong>ce <strong>CRM</strong> Getting Started WorkbookDefine Your Account FieldsMy Account FieldsStandard Field Name Data Type Values Want Field?Account Name*Account NumberAccount OwnerAccount SiteAnnual RevenueBilling AddressDescriptionEmployeesFaxText(80)Text(40)Lookup(User)Text(80)Currency(18,0)AddressLong Text Area(32000)Number(8,0)FaxIndustry Picklist (see previous)Ownership Picklist PublicPrivateSubsidiaryOtherParent AccountLookup(Account)PhonePhoneRating Picklist HotWarmColdShipping AddressAddressSIC CodeTicker SymbolText(20)Content(20)Type Picklist ProspectCustomerFormer CustomerPartnerCompetitorVendorVARWebsiteURL(255)Created By*Last Modified By*Lookup(User)Lookup(User)Custom Field Name Data Type ValuesWORKBOOK 11
Sales<strong>for</strong>ce <strong>CRM</strong> Getting Started WorkbookDefine Your Contact FieldsMy Contact FieldsStandard Field Name Data Type Values Want Field?AccountAssistantAsst. PhoneBirthdateContact OwnerDepartmentDescriptionDo Not CallEmailEmail Opt OutFaxFax Opt OutHome PhoneLast-Stay-In-Touch RequestDate*Last-Stay-In-Touch Save Date*Lookup(Account)Text(40)PhoneDateLookup(User)Text(80)Long Text Area(32000)CheckboxEmailCheckboxFaxCheckboxPhoneDate/TimeDate/TimeLead Source Picklist AdvertisementEmployee ReferralExternal ReferralPartnerPublic RelationsSeminar - InternalSeminar - PartnerTrade ShowWebWord of mouthOtherMailing AddressAddressMobileName*PhoneNameSalutation Picklist Mr.Ms.Mrs.Dr.Prof.Other AddressAddressOther PhonePhoneReports ToTitleCreated By*Last Modified By*PhonePhoneLookup(Contact)Text(80)Lookup(User)Lookup(User)Custom Field Name Data Type LengthWORKBOOK 12
Sales<strong>for</strong>ce <strong>CRM</strong> Getting Started WorkbookDefine Your Opportunity FieldsMy Opportunity FieldsStandard Field Name Data Type Values Want Field?Account Name*Amount*Campaign SourceClose Date*DescriptionExpected Revenue*Lookup(Account)Currency(16,2)Lookup(Campaign)DateLong Text Area(32000)Currency(16,2)Forecast Category Picklist PipelineOmitted<strong>Best</strong> CaseCommitClosedLead Source Picklist AdvertisementEmployee ReferralExternal ReferralPartnerPublic RelationsSeminar - InternalSeminar - PartnerTrade ShowWebWord of mouthOtherNext StepText(255)Opportunity Name*Opportunity OwnerPrivateProbabilityQuantity*Text(80)Lookup(User)CheckboxPercent(3,0)Number(16,2)Stage* Picklist ProspectingQualificationNeeds AnalysisValue PropositionId. Decision MakersPerception AnalysisProposal/Price QuoteNegotiation/ReviewClosed WonClosed LostType Picklist Existing BusinessNew BusinessCreated By*Lookup(User)Last Modified By*Lookup(User)Custom Field Name Data Type LengthWORKBOOK 13
Integrating sales<strong>for</strong>ce.com applications and Oracle e-Business SuitePrepare to Import DataUse this worksheet to identify the following key in<strong>for</strong>mation about your data, in preparation <strong>for</strong> importingit into Sales<strong>for</strong>ce <strong>CRM</strong>. If necessary, add rows to accommodate additional data sources.ExcelMy Record TypesSource Record Type Needs Cleaning File SizeACT!GoldMineOutlookPDAFor More In<strong>for</strong>mationContact your account executive tolearn how we can help you accelerateyour <strong>CRM</strong> success.WP_Getting-Started_Workbook_2010-03-05
Meet—and beat—these 8 <strong>CRM</strong> challengesGetting any new business solution up and running can be a challenge. By choosing a cloud-based solutionsuch as Sales<strong>for</strong>ce <strong>CRM</strong>, you’ll find that the implementation process—and ongoing maintenance—is mucheasier than with traditional software solutions. Still, there are some red flags to look out <strong>for</strong>.We’ve identified the 8 most common issues when it comes to implementing<strong>CRM</strong>. Make sure you have these bases covered and you’ll be on your wayto success.1. Lack of strategic vision2. No project team3. No clear business process4. Not knowing how to measure success5. No change management process6. Inadequate training7. Dirty data8. Not getting helpAbstractGet a jump-start on implementing <strong>CRM</strong>! Usethese tips to avoid common pitfalls and get yourimplementation started on the right foot.By: Nancye MichaelianLet’s explore in more detail at how you can address each of these challenges—and how we can help.Challenge #1: Define your strategic visionEvery successful <strong>CRM</strong> project starts with a clear vision of what you want to accomplish. That vision willdrive your strategies and decisions at every step of your implementation. What are your business goals? Tobuild long-term relationships, create customer loyalty, increase sales? Your goals should be clear—toeveryone in your organization.To help with this process, use the Sales<strong>for</strong>ce <strong>CRM</strong> Getting Started Workbook to capture and communicateyour vision statement. It’s one of the Getting Started resources on the Sales<strong>for</strong>ce.com Community site. Useit as a work in progress to come up with and document all the important decisions about your application.
Meet—and beat—these 8 <strong>CRM</strong> challengesChallenge #2: Ramp up a project teamTo achieve your vision, it helps to have a project team or steering committee that includes majorstakeholders. It’s a common mistake to assign a single project owner and expect that person to deliver afinished product. To be successful, you need the buy-in and participation of people with variousperspectives and skills, including stakeholders from all business units. That way, you can avoid manycommunication and adoption problems be<strong>for</strong>e they start.If you’re a small business, this task may sound a little daunting, but it doesn’t have to be. Just make sureyou cover the following roles: executive sponsor, project owner, administrator, and a power user.Use the Sales<strong>for</strong>ce <strong>CRM</strong> Getting Started Workbook to document your team as it grows and evolves.Challenge #3: Define your business processTo get the most from Sales<strong>for</strong>ce <strong>CRM</strong>, you’ll want to make it work the way you do. To do that, it’s criticalto define your business process so you can prioritize which features, reports, and customizations you want.As you work to define your process, be aware of too much complexity. If there are too many fields,picklists overflowing with values, or poorly organized page layouts, your users will be overwhelmed,unproductive, and frustrated. Keep it simple and get feedback from prospective users be<strong>for</strong>e you launch—and all along the way as you refine and build out your application.Always keep the following usability goals in mind:• Match your business process• Simpler is better• Organization is everythingFor more in<strong>for</strong>mation on defining your process, go to the Rollout Guide and then to Plan>Define yourProcess. Document your own process in your MySales<strong>for</strong>ce.com Workbook.Challenge #4: Define successAs with everything in life, it helps to reach your goals if you track your progress along the way. So far,we’ve discussed the importance of having a vision, goals, and a business process that can meet those goals.Along the way, you also need to track those measures that show you’re moving toward your goal.What should you measure? How do you know you’re on track—and that you’re staying on track? That’swhere key per<strong>for</strong>mance indicators (KPIs) come in. KPIs will show the areas in which the project is meetingyour goals. They’ll also help to identify whether you need change course.Common KPIs include the following:• Closed sales QTD (quarter to date)• Key opportunitiesBEST PRACTICE 2
Meet—and beat—these 8 <strong>CRM</strong> challenges• Top 5 sales reps• Lead conversion rate• Completed activitiesIn addition to such quantitative metrics, also define goals <strong>for</strong> adoption rates, per<strong>for</strong>mance, and continuouseducation. Here’s a dashboard that can serve as a great starting point <strong>for</strong> tracking and reaching your goals.Challenge #5: Manage changeChange is a given. You may find that 6 months after you go live, your application no longer meets somebusiness needs. For example, territories are realigned, an account has too many unused fields, or you mightwant to add a great new feature.Because Sales<strong>for</strong>ce <strong>CRM</strong> is so easy to change, you’ll need a process to manage these changes, so theydon’t interfere with your business process or undermine your business strategy. Creating a changemanagement plan helps keep your organization’s vision, strategy, and goals closely aligned. Althoughchange management is most critical <strong>for</strong> complex implementations, customers of all sizes should have achange strategy. Here’s a change management example you can use to help manage your changes.Challenge #6: Train and train againAlthough we’ve won lots of awards <strong>for</strong> our easy-to-use interface, training is still crucial. In particular, youwant to be sure users make the most of the customizations that affect their day-to-day jobs.Training is one of the most important things you can do to improve adoption and en<strong>for</strong>ce your businessprocess. Be sure to train users initially and rein<strong>for</strong>ce that training periodically. It’s also a good idea tocreate training resources to support your specific implementation, such as newsletters, brown-bag sessions,and tips of the week. Many customers create an Education Web tab to manage their training resources.Be sure to use sales<strong>for</strong>ce.com’s resources to help you train your users and manage your training:• Free online training• A free resource <strong>for</strong> tracking course completion statistics (Setup | Manage Users | Training History)• <strong>Best</strong> Practice document “10 tips <strong>for</strong> a successful training plan”BEST PRACTICE 3
Meet—and beat—these 8 <strong>CRM</strong> challengesChallenge #7: Clean your data—and keep it cleanA huge benefit of a <strong>CRM</strong> application is that you get complete visibility into your pipeline, so you can doaccurate <strong>for</strong>ecasting and make good decisions. Dirty data frustrates your users and dooms that goal.To clean your data and keep it clean, you need a plan. Sales<strong>for</strong>ce.com can help with free and low-cost toolsas well as with some great advice. Check out:• The tools in the Integration and Data Management/Data Cleansing section of the AppExchange• <strong>Best</strong> Practice document “6 steps toward top data quality” <strong>for</strong> achieving and maintaining data qualityChallenge #8: Know where to get helpBecause your success is our success, we’ve created many resources to help you at every stage of yourimplementation.• The Sales<strong>for</strong>ce.com Community site, where you’ll find instructions and resources to support yourproject, best-practice in<strong>for</strong>mation, links to Dream<strong>for</strong>ce sessions, YouTube video demonstrations, blogs,and more—free• Training and certification <strong>for</strong> all types of users• Free and fee-based customer support offerings• Consulting servicesEnjoy the journeyYou can save money, time, and tempers by avoiding the common pitfalls addressed in this paper and bytaking advantage of sales<strong>for</strong>ce.com’s resources. And remember—Sales<strong>for</strong>ce <strong>CRM</strong> will always be a work inprogress. As your business changes, so should your <strong>CRM</strong> application.Also, if your company needs a feature that’s not part of our application, use the ideas functionality ofSales<strong>for</strong>ce <strong>CRM</strong> to let us know. Remember: Our customers drive our product roadmap.Good luck!For More In<strong>for</strong>mationContact your account executive to learnhow we can help you accelerate your<strong>CRM</strong> success.BP_MeetBeatChallenges _2010-03-08
5 steps to a successful implementation• One or more trainers – Trainers need to identify relevant materials from sales<strong>for</strong>ce.com or developcustom training materials (such as quick-reference guides). You’ll need materials both <strong>for</strong> the initialimplementation to on-board new users and once the application is live, <strong>for</strong> remediation or <strong>for</strong> newfunctionalitySet realistic goalsYour Sales<strong>for</strong>ce <strong>CRM</strong> implementation will be an ongoing, living process. To get the most from yourinvestment, it’s important to roll out functionality early and often. Start with small goals that track againstyour overall vision. We recommend that you “crawl, walk, run” by keeping your goals simple andattainable and then adding to your achievements.• Define how Sales<strong>for</strong>ce <strong>CRM</strong> fits into your overall corporate mission. For example, you may want tofocus on collaboration or pipeline management and <strong>for</strong>ecasting.• Define initial objectives that align with your vision and can be expanded once you deploy.• Prioritize and document your requirements. Gather requirements from your business and end users andmap them to the objectives and overall vision. For example, your users may want to “track tasks andevents,” so make sure that functionality will be available.Understand your dataWhether you’re moving from another <strong>CRM</strong> application or simply tracking customer in<strong>for</strong>mation inapplications such as Lotus Notes and spreadsheets, you’ll already have existing data. Data always becomesa bottleneck if it’s not reviewed and cleaned early in a project.Most customers underestimate the ef<strong>for</strong>t it takes to clean up, map, and load data. Data shouldn’t be loadeduntil your system is set up, including setting up your role hierarchy, sharing model, and sharing rules.By taking the time to understand your data during the planning stage, you can help define critical questionssuch as “Are we tracking crucial data?” and “What else should we be tracking?” For more in<strong>for</strong>mationabout the importance of data quality, see the <strong>Best</strong> Practice “6 steps toward top data quality.”Understand your dataWhether you’re moving from another <strong>CRM</strong> application or simply tracking customer in<strong>for</strong>mation inapplications such as Lotus Notes and spreadsheets, you’ll already have existing data. Data always becomesa bottleneck if it’s not reviewed and cleaned early in a project.Most customers underestimate the ef<strong>for</strong>t it takes to clean up, map, and load data. Data shouldn’t be loadeduntil your system is set up, including setting up your role hierarchy, sharing model, and sharing rules.By taking the time to understand your data during the planning stage, you can help define critical questionssuch as “Are we tracking crucial data?” and “What else should we be tracking?” For more in<strong>for</strong>mationabout the importance of data quality, see the <strong>Best</strong> Practice “6 steps toward top data quality.”Choose an implementation approachThe two most widely used approaches are the “waterfall” and “scrum” methodologies. Waterfall is thetraditional, phased, sequential approach that may lead to a drawn-out implementation timeline. The scrumapproach is to constantly build and deliver small units of functionality and revisit and refine them with eachcycle.Sales<strong>for</strong>ce.com uses the more iterative scrum approach <strong>for</strong> its development. With our regular releases(spring, summer, winter) we deliver new enhancements as soon as we have a baseline of functionality andthen build and refine the functionality based on user feedback and use cases. For example, our quotingmodule was first delivered as a pilot with limited functionality. We added additional functionality in thenext release as a beta release. In the next release, we added even more features and made it generallyBEST PRACTICE 2
5 steps to a successful implementationavailable. We’ll continue to add additional features as customers use quoting and let us know what theywant.Decide which approach suites your business. Many enterprise customers start with the waterfall approach<strong>for</strong> the initial release and then start using a more agile approach, scheduling regular major (<strong>for</strong> example,quarterly) and minor (<strong>for</strong> example, monthly or bi-monthly) releases.Build a project timelineOnce you’ve chosen an implementation approach and prioritized all requirements, you can build the projecttimeline. Every timeline needs to include the time required to design, build, and deploy. Prioritization ofrequirements is also key to ensure any “must-haves” are included in the first phase or rollout.If you use a scrum approach, your timeline will consist of short iterations of the design, build, anddeployment phases <strong>for</strong> a smaller set of requirements. With the waterfall approach, the design and buildphase includes all requirements prioritized <strong>for</strong> the initial deployment. For both approaches, consider whattasks can be done in parallel, such as cleaning, mapping, and loading data.For both approaches, consider each requirement and estimate the ef<strong>for</strong>t required to implement it. Forexample, determine whether you can meet the requirement with out-of-the-box functionality or businessprocesses (low ef<strong>for</strong>t) or whether custom development or integration is required (high ef<strong>for</strong>t). Use thatin<strong>for</strong>mation to determine how long it will take to implement each requirement.Note that your timeline may be driven by additional factors, such as when your current system may becomeunavailable or a new fiscal year. Such considerations are a big reason why it’s important to understand yourgoals, objectives, and must-have requirements.Step 2: Set up and customize Sales<strong>for</strong>ce <strong>CRM</strong>Once you define your requirements, understand your data, and choose an implementation method, you’reready to set up and customize Sales<strong>for</strong>ce <strong>CRM</strong>. We recommend you keep the initial implementation simpleand use the “click-not-code” built-in configuration tools, rather than using Force.com code (Apex) and thepages functionality of the Force.com plat<strong>for</strong>m. As you get experience with the application and feedbackfrom your users, consider how to enhance the application with those tools.Define early how to customize the application. For example, if you need multiple record types <strong>for</strong> an objectand field-level security, identifying that need helps as you create new custom fields and associate them tothe correct record type, page layout, and security level in the wizard.Be careful not to over-configure. For example, one customer created many new fields on its contacts page,which meant users had to scroll—a lot. As a result, they didn’t fill out many fields and the company hadstart over with designing that page.Here’s a suggested approach <strong>for</strong> setting up and customizing Sales<strong>for</strong>ce <strong>CRM</strong>:• Define the security settings – Include the organization wide-defaults, roles, and user profiles. Test thosesettings by logging in with different roles and profiles. Make sure each user type can see, create, and editin<strong>for</strong>mation as needed, that the fields are in the right order, and that critical fields are required. Anotherimportant step is mapping all the roles to the users who will be added to the system, to ensure all usersare associated with the correct roles when you go live.• Customize the application – Create custom fields, page layouts, custom objects, custom tabs, rules, andother application customizations based on the design <strong>for</strong> each requirement to meet the business needs.• Create your reports – We recommend that you start with the standard reports and customize them asneeded to show the in<strong>for</strong>mation you defined in the planning stage. You can easily customize reports toinclude any custom fields you need.BEST PRACTICE 3
5 steps to a successful implementationStep 3: Deploy Sales<strong>for</strong>ce <strong>CRM</strong>The timeline you defined in the planning stage should define the deployment phases and associatedschedule. At the first stage, your task is to get your instance of Sales<strong>for</strong>ce <strong>CRM</strong> “production ready” bycreating and adding users, loading your data, and training users.It’s important to communicate early and often, so users know about coming changes. Communicationshould come from the executive sponsor and focus on both the benefits to the company and what’s in it <strong>for</strong>the users. Build excitement and set expectations. As the deployment draws nearer, outline the deploymentplan, including when users will be trained and how they’ll be supported.Add usersBe<strong>for</strong>e loading your production data, first load all users. You can load users manually, one at a time, orwith the data loader functionality. We recommend you first load all users and data in a sandboxenvironment be<strong>for</strong>e loading the final set of data into your production environment. (Unlimited Editionincludes sandboxes; <strong>for</strong> all other editions, you can purchase sandboxes <strong>for</strong> an additional fee. Please contactyour account executive <strong>for</strong> more in<strong>for</strong>mation.)If you load users with the data loader, the password notification is not automatically sent out. That’s good,because you don’t want to send out passwords until users have been trained and you’re ready <strong>for</strong> them tolog in. If you add users manually, you can select whether the user is notified.Import dataBecause data is loaded at a specific time, the transition will be easier if the data load is as close todeployment as possible. Be sure you schedule enough time to map and test the data. Here’s a summary ofthe steps involved in importing data:1. Plan your data import2. Prepare your data3. Test the import4. Execute the import5. Validate your dataNote: If users are still entering data into an existing system after the initial data load but be<strong>for</strong>e the go-liveor cutover, there may be a set up “delta” data set. You’ll need to import or manually load that data andincorporate it into any training exercises.Train end usersIf you have a sandbox environment, you can train end users around the same time you load your data. Use asubset of data—or data developed specifically <strong>for</strong> training—and plan training with hands-on exercises asclose as possible to the go-live date. The sooner users can begin to use the application, the better; that waythey can get immediate help in response to any questions.Once users are trained and using the app, make sure they understand the support process. Define a contact<strong>for</strong> answering questions. And don’t <strong>for</strong>get about the power users. What if they can’t see their data?Schedule regular support sessions <strong>for</strong> the first week or two; that’s when you’ll get the most questions. Also,post links to training, job aids, quick reference guides, and where to get help—<strong>for</strong> example, on your homepage.Sales<strong>for</strong>ce.com provides free online free training <strong>for</strong> end users. Also check out the following <strong>Best</strong> Practicedocuments: “10 tips <strong>for</strong> a successful training plan” and “ How to develop a comprehensive trainingstrategy.”BEST PRACTICE 4
5 steps to a successful implementationStep 4: Encourage adoptionOnce you’re up and running, it’s critical to get your users on board. To do so, it’s important that yousupport your users, measure adoption, and encourage adoption.User adoption begins with executive sponsorship. For the initial deployment, the sponsor mustcommunicate clear expectations as well as enthusiasm. Usually, a combination of “carrots” and “sticks”works well, such as a mandate that “If it’s not in Sales<strong>for</strong>ce <strong>CRM</strong>, it doesn’t exist.” Use exception reportsand dashboards to track usage and then use that in<strong>for</strong>mation to understand where you need encouragementor en<strong>for</strong>cement.Measuring adoption is critical, both immediately after go-live and over time. Set up usage reports and useadoption dashboards to track progress right from the start. You’ll find adoption dashboards on theAppExchange. Use these dashboards to track login activity and new records added by users—both are agood start in ensuring users are logging in and beginning to use the application.Also, check out Chapter 5 in the Getting Started Guide and the following <strong>Best</strong> Practice documents:“Beyond login rates; Three key areas <strong>for</strong> measuring adoption” and “Tips <strong>for</strong> using incentives and awards toboost adoption.”Step 5: Manage releasesOnce Sales<strong>for</strong>ce <strong>CRM</strong> is live, a new cycle of planning begins <strong>for</strong> the next phase, as you make availablenew functionality to add value and respond to user requests. Release management should begin as soon aspossible after the initial deployment. This approach will also let end users know that you’re addressing theirneeds and requests. For more in<strong>for</strong>mation, refer to the Release Management <strong>Best</strong> <strong>Practices</strong> Guide.SummaryAlthough Sales<strong>for</strong>ce <strong>CRM</strong> is easy to get up and running, proper planning and preparation is essential <strong>for</strong> asuccessful implementation. Start by securing executive sponsorship so you have support when buildingyour project team and communicating with the end users. Set up and customize the application so it works<strong>for</strong> your company’s unique needs. And continually revisit and optimize the application, build and refineyour metrics, and always keep your end users and overall vision in mind.To support you in this process be<strong>for</strong>e, during, and after your implementation, sales<strong>for</strong>ce.com makes anumber of resources available. In addition to the Getting Started Guide and associated workbook, wesuggest you explore the following:• <strong>CRM</strong> Community, where you can participate in the conversation• Blogs and discussion <strong>for</strong>ums• User groups near you• Current Webinars, to get in<strong>for</strong>mation right from the experts• Ideas functionality, to suggest new products, promote favorite enhancements, interact with productmanagers and customers, and preview upcoming releasesFor More In<strong>for</strong>mationContact your account executive to learnhow we can help you accelerate your<strong>CRM</strong> success.
5 steps to a successful implementation• Answers functionality, to get answers to your burning questions from customers, partners, productspecialists, and sales<strong>for</strong>ce.com employeesBEST PRACTICE 6BP_StepstoSuccessfulImp_2010-05-17
Achieving outstanding <strong>CRM</strong> administrationBecause sales<strong>for</strong>ce.com takes care of many traditional administration tasks, system administration is easierthan ever be<strong>for</strong>e. Setting up, customizing the application, training users, and “turning on” the new featuresthat become available with each release—all are just a few clicks away. The person responsible <strong>for</strong> thesetasks is your Sales<strong>for</strong>ce <strong>CRM</strong> administrator. Because this person is one ofthe most important resources in making your implementation a success,it’s important to carefully choose your administrator and to continuallyinvest in his or her professional development. You can also choose to havesales<strong>for</strong>ce.com handle administrator tasks <strong>for</strong> you.Note: Larger enterprise implementations often use a role called BusinessAnalyst or Business Application Manager as well, particularly <strong>for</strong>planning the implementation and ensuring adoption once the solution islive. Although the most common customization tasks don’t require coding,you may want to consider using a professional developer <strong>for</strong> some customdevelopment tasks, such as writing Force.com code (Apex), developing custom user interfaces withForce.com pages (Visual<strong>for</strong>ce), or completing complex integration or data migration tasks.In many ways, the administrator fills the role played by traditional IT departments: answering userquestions, working with key stakeholders to determine requirements, customizing the application to appealto users, setting up reporting and dashboards to keep managers happy, keeping an eye on availability andper<strong>for</strong>mance, activating the features in new releases, and much more. This paper will help you to makeimportant choices when it comes to administering your Sales<strong>for</strong>ce <strong>CRM</strong> application, including:• Finding the right person(s)• Investing in your administrator(s)• Providing adequate staffing• Getting help from sales<strong>for</strong>ce.comAbstractWith software as a service (SaaS), systemadministration is much easier than withtraditional on-premises software. Still, it’scritical that you fill the role of administrator—with one of your employees or by usingsales<strong>for</strong>ce.com’s services.By: Sylvia LehnenFind the right administratorWho would make an ideal Sales<strong>for</strong>ce <strong>CRM</strong> administrator? Experience shows that successful administratorscan come from a variety of backgrounds, including sales, sales operations, marketing, support, channelmanagement, and IT. A technical background may be helpful, but is not necessary. What matters most isthat your administrator is thoroughly familiar with the customization capabilities of the application andresponsive to your users. Here are some qualities to look <strong>for</strong> in an administrator:
Achieving outstanding <strong>CRM</strong> administration• A solid understanding of your business processes• Knowledge of the organizational structure and culture to help build relationships with key groups• Excellent communication, motivational, and presentation skills• The desire to be the voice of the user in communicating with management• Analytical skills to respond to requested changes and identify customizationsInvest in your administratorInvesting in your administrator will do wonders <strong>for</strong> your Sales<strong>for</strong>ce <strong>CRM</strong> solution. With an administratorwho is thoroughly familiar with Sales<strong>for</strong>ce <strong>CRM</strong>, you’ll ensure that your data is safe, your users areproductive, and you get the most from your solution.Sales<strong>for</strong>ce.com offers both self-paced training and classroom training <strong>for</strong> administrators. For a list of free,self-paced courses, go to Sales<strong>for</strong>ce.com Training & Certification. To ensure that your administrator isfully trained on all aspects of security, user management, data management, and the latest Sales<strong>for</strong>ce <strong>CRM</strong>features, enroll your administrator in Administration Essentials (ADM201). The price of this courseincludes the cost of the certification that qualifies your administrators to become Sales<strong>for</strong>ce.com CertifiedAdministrators. For experienced administrators, sales<strong>for</strong>ce.com offers the Advanced Administration(ADM301) course.Provide adequate staffingThe number of administrators (and, optionally, business analysts) required depends on the size of yourbusiness, the complexity of your implementation, the volume of user requests, and so on. One commonapproach <strong>for</strong> estimating the number of administrators you need is based on the number of users.Number of usersAdministration resources1 – 30 users < 1 full-time administrator31 – 74 users 1+ full-time administrator75 – 149 users 1 senior administrator; 1 junior administrator140 – 499 users 1 business analyst, 2–4 administrators500 – 750 users 1–2 business analysts, 2–4 administrators> 750 users Depends on a variety of factorsIn addition to the user base, also consider the points below:• In small businesses, the role of the administrator is not necessarily a full-time position. In the initialstages of the implementation, the role requires more concentrated time (about 50 percent). After go-live,managing Sales<strong>for</strong>ce <strong>CRM</strong> day to day requires much less time (about 10–25 percent).• If you have several business units that use Sales<strong>for</strong>ce <strong>CRM</strong> solutions—such as sales, marketing, support,professional services, and so on—consider using separate administrators <strong>for</strong> each group, to spendbetween 50–100 percent of their time supporting their solutions.• Another common practice <strong>for</strong> large implementations is to use “delegated administrators” <strong>for</strong> specifictasks such as managing users, managing custom objects, or building reports.BEST PRACTICE 2
Achieving outstanding <strong>CRM</strong> administration• If you operate in multiple geographic regions, consider using one administrator <strong>for</strong> each major region,such as North America, EMEA, and APAC. To decide how to classify regions, consider whether theyhave a distinct currency, language, business processes, and so on, and train your administrators in themulticurrency and multilanguage features. Also appoint a lead analyst or administrator who willcoordinate the various regions.• If you need customization beyond the metadata (click not code) capabilities of Sales<strong>for</strong>ce <strong>CRM</strong> or wantto develop new applications, you may also need a developer to create, test, and implement custom code.For More In<strong>for</strong>mationContact your account executive to learnhow we can help you accelerate your<strong>CRM</strong> success.BP_AdminResourcing_2009-04-24
Get these must-have administrator toolsAs a Sales<strong>for</strong>ce <strong>CRM</strong> administrator, it’s your job to keep Sales<strong>for</strong>ce <strong>CRM</strong> humming, your data safe andclean, your users productive, and your managers happy with easy ways to monitor the business. Andbecause Sales<strong>for</strong>ce <strong>CRM</strong> is always growing and changing, it’s important tokeep up with new releases.It’s a challenging job, but there are lots of tools to help you in thefollowing areas:• Ensuring data quality• Making yourself and your users productive• Staying on top of releases• Providing insight into your businessAbstractSales<strong>for</strong>ce <strong>CRM</strong> has dozens of tools to helpadministrators do their jobs. This documenthighlights the best.By Nancye MichaelianKeep your data cleanAccording to industry analysts, maintaining data quality is an ongoing ef<strong>for</strong>t. But with Sales<strong>for</strong>ce <strong>CRM</strong>,there are tools to help you out. Here’s a summary of what you can do in 3 key areas related to data quality.1. Keep data clean – Because data can be captured from different sources or entered manually,duplication is an ongoing challenge. Ask your reps to search <strong>for</strong> records be<strong>for</strong>e they create newones to reduce data duplication. Standardize naming conventions <strong>for</strong> company names andaddresses. For example, decide whether to use U.S.A., USA, or US. However, although you canreduce duplicate data, some duplication is inevitable. That’s why we recommend you automatedata cleansing with data cleansing tools, such as those on the AppExchange.2. En<strong>for</strong>ce data entry standards – Use default values, define required fields, set up data validationrules, and define workflow field updates to make sure users enter the data you need, the way youneed it. For example, you can create a data validation rule on an opportunity that ensures that thevalue <strong>for</strong> a custom discount field doesn’t exceed a certain percentage. Click to find out more aboutdata validation.3. Monitor data quality – Set up dashboards to monitor the quality of the in<strong>for</strong>mation users enter.For example, you can set up such dashboards to highlight when fields are left blank, to trackoverdue tasks, or to track when records are updated.For more in<strong>for</strong>mation about data quality, link to the <strong>Best</strong> Practice “6 steps toward top data quality.”
Get these must-have administrator toolsMake everyone productiveAs the administrator, there’s a lot you can do to make everyone’s job easier—including your own.Productivity tools <strong>for</strong> administrators include resources you can use to efficiently manage users,processes, and tasks:• Import wizard – Use these wizards to easily import comma-separated (CSV) data files—such asaccounts, contacts, leads, solutions, and custom objects—into Sales<strong>for</strong>ce <strong>CRM</strong> records. Use thesewizards <strong>for</strong> imports or updates of less than 50,000 records.• Force.com data loader – If you need to import more than 50,000 records, or if your data sets arecomplicated, use this tool. For example, if your sales territories change, you may need to transfer largedata sets without limitations.• Workflow – Automate your company’s business processes with workflow actions such as email alerts,task updates, field updates, and outbound messaging.• Formula fields – Use custom <strong>for</strong>mula fields to create specific calculations tailored to specific businessneeds. For example, you can create a <strong>for</strong>mula field on an opportunity that calculates the expected numberof days left to the close date of that opportunity.• Public groups – To simplify record sharing and synchronization, create groups of users that fit aparticular role or share a territory.• Account/sales teams – Create account teams that work together on an account and define eachmember’s role. You can also create sales teams that work together on sales opportunities. A typical salesteam might include an account manager, a sales representative, and a pre-sales consultant. With teams,you can see at a glance who’s working on a specific account or opportunity.• Process visualizer – Use this tool to get a visual representation of your approval process so everyoneunderstands each part of the process at a glance.• Profile management – Create lists of profiles and use them to compare profile settings, print profilelists, and make mass updates across multiple profiles.Productivity tools <strong>for</strong> end users help them communicate more efficiently with customers and prospects,find in<strong>for</strong>mation more easily, and access the application while they’re on the road. Note that access to thesetools depends on the user’s profile.• Integration with Lotus Notes/Outlook – Set up desktop integration so users don’t have to switchapplications when working with Lotus Notes and Outlook. Individual users can download this toolwithout the administrator’s help.• Email templates – Set up email templates to en<strong>for</strong>ce high-quality, standard communications—and tosave your reps time and headaches. Both users and administrators can create templates.• Tagging – Set up tagging to make finding in<strong>for</strong>mation fast and intuitive.• Opportunity genius – Enable this feature to help reps find opportunities that are similar to their dealsand were closed successfully.BEST PRACTICE 2
Get these must-have administrator toolsManage releases effectivelyThree times a year, sales<strong>for</strong>ce.com releases new features and functionality <strong>for</strong> all applications and theForce.com plat<strong>for</strong>m. It’s up to you to decide which features you want to make available to your users. Foreach release, you’ll find the following release-specific resources on the Community site:• Release Preview – Get an overview of upcoming features.• Release Notes – Get details about the new features.• Release Webinars – Watch presentations about specific features.• Release training – Check out the online training modules.• Tech Talk series – When there’s a new release, this series features product managers explaining thelatest features. Plus, it’s your chance to get any questions answered.You may also have change requests to customize your app or to create new apps. For such requests, youhave the following tools:• Use the Metadata API to access to code and data schema. The Metadata API was designed to managecustomizations and to build tools that can manage the metadata model, rather than the data itself. Thistool is very helpful if you use the Force.com plat<strong>for</strong>m.• Use the Force.com IDE to create, modify, test, and deploy powerful Force.com applications. The IDEprovides a com<strong>for</strong>table environment <strong>for</strong> programmers familiar with integrated developmentenvironments. Developers can code, compile, test, and deploy their code from within the IDE.• Use the Force.com sandbox to create a snapshot of your production environment. With the sandbox, youcan develop, test, and train without interrupting daily business activities on your production system.• Use the Code Share directory to collaborate with other developers who build open-source apps.Give managers unprecedented insight into your businessTo support your users and managers, put the in<strong>for</strong>mation they need at their fingertips with reports anddashboards. Both are built on the analytics that are part of Sales<strong>for</strong>ce <strong>CRM</strong>. You can also browse theanalytic applications on the AppExchange.To get started, talk to your managers to find out what they want to measure and what key per<strong>for</strong>manceindicators (KPIs) define success. For example, your managers may want to measure any or all of thesemetrics: number of leads, number of leads at a certain status, lead conversion rates, opportunities in thepipeline and <strong>for</strong>ecast, or trending. When you define what metrics to highlight, it’s important to have welldefinedbusiness objectives that support your company’s vision.You can display analytics as reports or dashboards. Reports typically summarize data in tables and help youget an overview of per<strong>for</strong>mance over time. Dashboards show important company metrics as graphics.Because this in<strong>for</strong>mation is displayed in real time, dashboards are great <strong>for</strong> an immediate view of thecurrent situation.BEST PRACTICE 3
Get these must-have administrator toolsSales<strong>for</strong>ce.com provides a number of ready-made reports and dashboards. You can customize these orcreate your own. For more in<strong>for</strong>mation or assistance, download and print the Reports and Dashboardtip sheets.For More In<strong>for</strong>mationContact your account executive to learnhow we can help you accelerate your<strong>CRM</strong> success.BP_HowWeUseChangeMan_2010-03-19
Using data access design patternsData access, or record sharing, is the process by which users can see records within a single object, such asthe account object, or within child objects, such as the opportunity object. Data access also determineswhich records are returned in searches, displayed in views, and shown in reports.The design process <strong>for</strong> all implementations, regardless of size or scope,starts with defining which records users are permitted to see. It’s a crucialstep because a <strong>CRM</strong> system is a tool <strong>for</strong> making operational the data youstore about your business relationships. When users have access to theright data, they can work faster and more accurately. When they don’t,they waste time trying to find important in<strong>for</strong>mation—even worse, theysee sensitive data not appropriate to their job function.This document is an ideal starting point if you’re implementing a large,enterprise-level system. Be<strong>for</strong>e you design, re-design, or implementSales<strong>for</strong>ce <strong>CRM</strong>, be sure you understand all your data access options.AbstractProperly controlling access to sensitivein<strong>for</strong>mation in your system is vital to <strong>CRM</strong>success. Start with this document tounderstand all your options <strong>for</strong> sharing settings,role hierarchy, sharing rules, and territorymanagement.By Tad TravisDesign data access with clicks, not codeSales<strong>for</strong>ce <strong>CRM</strong> includes powerful, configurable functions <strong>for</strong> controlling access to records. Below are the9 most important functions, listed in the order you should consider them during your design process. Pleasenote: Your data management options depend on your edition of Sales<strong>for</strong>ce <strong>CRM</strong>.1. Profile – For each object, set users’ read, create, edit, and delete permissions by controlling theirprofile assignment. To see records in an object, a user’s profile must have at least read access.2. Record ownership – Every record must be owned by a licensed sales<strong>for</strong>ce.com user or by a queue(<strong>for</strong> cases).3. Sharing settings / organization-wide defaults – Use these settings to define the data accessmodel, which defaults to “always-on” rules <strong>for</strong> seeing records <strong>for</strong> each object.4. Role hierarchy – Use the hierarchy to define your organization in a tree-like structure; it’sessential to data access because it defines who can see data owned by other users.5. Grant access via hierarchies – Enable default “always-on” rules <strong>for</strong> manager-level access tospecific objects.6. Sharing rules – In restricted access models, use to enable “always-on” exception rules <strong>for</strong> wideraccess by classes of users, <strong>for</strong> a specific object.7. Manual sharing – Record owners can use manual sharing to give read and edit permissions tousers who would not have access to the record otherwise.8. Account and sales teams – An account team is a team of users that work together on a singleaccount; a sales team is a group of users that work on a single opportunity.9. Territory management – Use to provide access to account records depending on a user’sassignment to one or more territories. This option is relevant to companies that maintain large,geographically dispersed sales teams and manage large account record volumes/
Using data access design patternsTogether, these functions define your data access model, described on the next page.The functions are interdependent, meaning that when users retrieve records, each component is evaluatedprogressively, in real time. Each time a user queries the system, Sales<strong>for</strong>ce <strong>CRM</strong> evaluates the meta-datarules underlying each component, returning only those records that meet the filtering criteria. For anexcellent example of the how these rules are sequenced and evaluated, see the model in Help and Training.For detailed in<strong>for</strong>mation on configurable profiles, org-wide defaults, the role hierarchy, and sharing rulessettings, please see the Tips and Hints document in Help and Training. This document will also help youunderstand the sequence of actions the system takes to determine real-time access to records.You’ll notice that reporting is not included in this list. Data access and reporting are two different things.You need to account <strong>for</strong> all record access components be<strong>for</strong>e you can build reports, otherwise users won’tbe able to see the appropriate records in their reports or views. Field-level settings are also not included inthis list; however, more in<strong>for</strong>mation on field-level security is available in Help and Training.The remainder of this document explores the most important design considerations <strong>for</strong> enterpriseimplementations: your data access model, sharing settings (default org-wide object defaults), the rolehierarchy, sharing rules, and territory management.About data access modelsBe<strong>for</strong>e configuring your system, it’s a best practice describe your high-level data access requirements in the<strong>for</strong>m of a data access model. The model is an abstraction, but it’s a useful tool <strong>for</strong> describing what kinds ofrecords certain classes of users can access. There are 3 types of data access models. Each model is definedby the default sharing model, which you configure with the organization-wide defaults and recordownership rules. Review these options to determine the best fit <strong>for</strong> your company.Many other apps can also make your marketing campaigns sing!1. Private access model – Users are prohibited from accessing most account, contact, opportunity,activity, and custom object records of other users, even in their departments. If you want theserestrictions, a private model is best.RequirementsYou want to restrict access to accounts, contacts, opportunities, andcases among users who per<strong>for</strong>m similar job functions. For example,reps in two different districts can’t view each other’s opportunities.You plan to use the partner portal. A private model will preventinadvertently exposing sensitive records to partner users.You have large data volumes. A private model will help restrict thenumber of records returned in searches, views, and reports.You plan to use territory management.Not many large companies—except possibly financial services firms—use a fully private sharing modelbecause it has a significant impact on the data returned in reports and searches. So consider all yourbusiness requirements be<strong>for</strong>e proceeding with this model.2. Public access model – If you have no restrictions on accounts, contacts, opportunities, activities,cases, or custom object access, then a public model is best. This model results in immediateproductivity improvements because it saves data retrieval time and makes it easier <strong>for</strong> colleaguesto collaborate.3. Hybrid access model – In this model, users have unlimited access to most standard objects, butare restricted from accessing records not directly related to their job functions. Most enterpriselevelcompanies use a hybrid model.BEST PRACTICE 2
Using data access design patternsIf it’s obvious that a public model meets your needs, then configure your per-object organization-widedefaults with either Public Read/Write or Public Read Only settings (see the next section <strong>for</strong> anexplanation). But if you decide a private or hybrid model is appropriate <strong>for</strong> your organization, review allthe configuration considerations below.Defining organization-wide defaults and record ownershipYour first step in setting a private or hybrid model is to configure your organization-wide defaults andrecord ownership rules. The organization-wide defaults specify the default, always-on level of access to arecord. These defaults can be set separately <strong>for</strong> accounts (including assets and contracts), activities,contacts, campaigns, cases, leads, opportunities, calendars, price books, and custom objects. For mostobjects, organization-wide defaults can be set to Private, Public Read Only, or Public Read/Write. SeeSharing Model Fields <strong>for</strong> your options.Every record must by “owned” by a licensed sales<strong>for</strong>ce.com user or a queue (<strong>for</strong> cases), as shown in theseexamples:Account recordOpportunity recordCase recordRecord ownership has two important implications on the data access model. First, it determines defaultread/write access, meaning that record owners can always read and edit records they own. Second,ownership also drives the default reporting functions on the account and opportunity reports.How do these functions work together? Below is an example of a typical hybrid model.Object Sharing setting Record owner ExplanationAccounts Public Read Only Jessica Cho (CEO) No record viewing restrictionsContacts Controlled by Parent Wendy West (AE)Activities Controlled by Parent Wendy West (AE) Activities public if associatedwith public object; otherwise,they’re privateOpportunities Private Cindy Central (AE) Accessible only to record ownersand users above them in the rolehierarchyCasesPublicRead/Write/TransferTier 2 Escalation QueueAny user can view and edit casesBusiness plan(child to account)Private Cindy Central (AE) Accessible only to record ownersand users above them in the rolehierarchyFor a detailed definition of the sharing setting values, please see Help and Training.BEST PRACTICE 3
Using data access design patternsDefining the role hierarchyThe role hierarchy is the third component of the data access model. It’s as important as sharing rules <strong>for</strong>determining record access in private or hybrid models. Users are assigned to a branch in the role hierarchyto give them the proper default access to records owned by other users.Users at any given level in the hierarchy can view, edit, and report on all data owned by or shared withusers below them in the hierarchy, regardless of the organization’s sharing model. This approach ensuresthat managers can always access the same data as their employees, regardless of the organization-widedefault settings.Your role hierarchy usually mirrors your sales organization structure or your support center structure, but itneed not match your organization chart exactly. For examples of common role hierarchy design patterns,see the table below.ExampleDescriptionOperations users need access to all records, so theyare assigned to the same node as the CEO. Users whoneed access to the greatest number of records,regardless of object, should be assigned to a role nearthe top of the hierarchy. This requirement oftenresults in a role hierarchy that puts analysts aboveSVPs, but that’s a perfectly acceptable design.Users in the CFO node own confidential records suchas contracts and business development plans, so theyhave their own role node. These users can accessprivate records owned by sales users via sharing rules.To grant the SVP Customer Service and Supportaccess to all sales-related records, sales & marketingroll up to customer service and support.Every user must be assigned to a role or his/her datawill not display in opportunity reports, <strong>for</strong>ecast rollups,and other displays based on roles.The sales organization uses both direct and indirect(channel) sales roles because each group submitsindependent sales <strong>for</strong>ecasts.Representatives can only be assigned to a singleregional sales team.Members of the East Team can view all theopportunities owned by users with the East role, butWest Team users cannot view those roles, thanks tothe role hierarchy.It’s also common to create a separate role <strong>for</strong> eachunique sales territory within each sales region.For additional configuration in<strong>for</strong>mation about role hierarchy functions, see Help and Training.Role hierarchy design considerationsBecause the role hierarchy is so critical to your data access design, be sure to address the considerations inthe following table be<strong>for</strong>e moving <strong>for</strong>ward.Research shows that customers who are trained by sales<strong>for</strong>ce.com achieve a 52 percent higher adoptionrate. Be sure to take advantage of the free training available from the Help & Training links in yourapplication and on the Sales<strong>for</strong>ce.com Community Web site.BEST PRACTICE 4
Using data access design patternsConsiderationDesign trade-off: too much vs. too little abstractionCustomized <strong>for</strong>ecasting hierarchy is cloned from therole hierarchyWhen territory management (TM) is deployed, therole hierarchy and TM both govern record accessGrant access using hierarchies is always enabled onall standard objectsGrant access using hierarchies must be enabled on allcustom objects displayed in the customer or partnerportalsExceptions to role hierarchy accessThis means that….The greater the number of roles, the greater the change managementburden. Too few roles and your reports don’t have the rightgranularity or it will be more difficult to implement contentworkgroups. There is no mathematical function that calculates theright number of roles <strong>for</strong> your organization, so be prepared todevelop your roles iteratively.If you plan to use customized <strong>for</strong>ecasting, your role hierarchyshould mirror your sales or support organization. Updates to yourrole hierarchy do not update your customized <strong>for</strong>ecasting hierarchy.Users at the top of the role hierarchy will have access to accountsand opportunities, even if opportunities are private and access isproscribed by TM. In the case of overlapping rules, the mostpermissive setting wins.In a private data access model, users at the top of the role hierarchywill have access to accounts and opportunities. By default, usersin different branches of the hierarchy cannot see one another’sopportunities.This setting is necessary to prevent exposing sensitive records toportal users. Additionally, restrict access by portal users using newsharing rules that include the setting “roles and internalsubordinates.”Use sharingSharing: managing exceptions to the rulesIf you set the organization-wide sharing defaults to Public Read Only or Private on some objects, you candefine rules that give additional users access to records they do not own.Sharing rules can only be used to grant additional access, not to restrict access to records beyondrestrictions originally specified with the sharing model through organization-wide defaults. You can createsharing rules that are based on the record owner or on the record’s field values.To provide additional access, sales<strong>for</strong>ce.com provides 4 classes of sharing functions to manage always-onand one-off exceptions to your private sharing model.1. Sharing rules – You can use sharing rules to automatically grant selective record access todefined sets of users, based on record ownership or on the record’s field values. You can define upto 100 owner-based sharing rules <strong>for</strong> each object. Sharing rules are ideal <strong>for</strong> granting broad typesof access. Records owned by internal roles, territories, public groups, queues, and portal roles canbe shared with internal roles, customers, or portal users. Sharing rules are also important <strong>for</strong>granting granular record access, where records owned by a specific role can be shared morebroadly with internal roles.Note: Sharing rule permissions depend on your edition. See Help and Training <strong>for</strong> additionalin<strong>for</strong>mation.2. Manual sharing – Because it’s often difficult to define every sharing rule users need, manualsharing is ideal <strong>for</strong> allowing one-off record access to classes of users who would not have accessin any other way. Manual sharing isn’t automated; record owners must manually share each recordthat requires wider access.Sharing rules address the following typical scenario: An APAC sales representative owns thebusiness relationship with an international manufacturer, which has subsidiary companies in theU.S. and Germany. A local U.S. representative finds a new opportunity with the U.S. subsidiary,which is required to get funding approval from the parent company. To drive the deal, the U.S.BEST PRACTICE 5
Using data access design patternsrepresentative grants read-write access on her opportunity to her APAC counterpart. For morein<strong>for</strong>mation on configuring manual sharing, see Help and Training.3. Account teams and sales Teams – Account teams give users the freedom to set default accountteams that include those employees who normally work together on an account. Users canautomatically add default account teams to all accounts. Sales teams can do the same whileworking on opportunities.4. Apex managed sharing – Apex managed sharing lets developers use Force.com code (Apex) toprogrammatically share custom objects. When you use Apex managed sharing to share a customobject, only users with the Modify All Data permission can add or change the sharing on thecustom object’s record. Also, the sharing access is maintained across record owner changes. Formore in<strong>for</strong>mation on Apex managed sharing, see the Force.com Apex Code Developer’s Guide.You can use all these methods <strong>for</strong> the following sharing options: public groups, personal groups, users,roles, roles and subordinates, roles and internal subordinates, internal and portal subordinates, territories,and territories and subordinates. See Help and Training <strong>for</strong> definitions and usage recommendations.Sharing design considerationsSharing rules makes it possible to be flexible when assigning record access; be sure to review the followingconsiderations be<strong>for</strong>e adding sharing rules to your system.ConsiderationOpportunity and case access when accounts areprivateContact accessControlling access to associated child recordsApex sharing reasonsThis means that….When sharing an opportunity or case, users must have at least readaccess to the associated account (unless you’re sharing a case via acase team). If you also have privileges to share the account, usersare automatically given read access to the account. If you don’thave privileges to share the account, you must ask the accountowner to give the users read access.Contact access is not available when the organization-wide default<strong>for</strong> contacts is set to Controlled by Parent.For sharing rules that specify access <strong>for</strong> associated object records,the given access level applies only to that sharing rule. Forexample, if an account sharing rule specifies Private as the accesslevel <strong>for</strong> associated contacts, a user may still have access toassociated contacts via other means, such as the organization-widedefaults, the “Modify All Data” or “View All Data” administrativepermission, or the “Modify All” or “View All” object permission.If using Apex sharing reasons, select a reason <strong>for</strong> the share so usersand administrators understand the source of the sharing. For morein<strong>for</strong>mation about sharing reasons, see Creating Apex SharingReasons.Territory Management: automate account accessTerritory Management (TM) is the final component of the data access model. TM is designed to automatehow large volumes of account records are assigned to users, thanks to declarative business rules triggeredby account record attributes such as zip code, industry, revenue, or another custom field relevant to yourbusiness.Why use TM?With TM, you immediately gain these benefits:• Assign account records to territories with declarative business rules and explicit assignments –Automate account record access to expand a private access model• Organization management – Manage complex and frequently changing sales organization structuresBEST PRACTICE 6
Using data access design patterns• Alignment and re-alignment – Get support <strong>for</strong> transferring users between territories, with the option toretain opportunities• Forecasting – Get multiple <strong>for</strong>ecasts per user, based on territory membership• Reporting – Gain the option to create territory-based sales reportsIn addition to controlling access to accounts <strong>for</strong> users in each territory, you can control users’ access to theopportunities and cases associated with those accounts, regardless of who owns the records. For morein<strong>for</strong>mation, see Territory Fields.Is TM right <strong>for</strong> you?TM is not appropriate <strong>for</strong> everyone. Don’t deploy TM unless your organization meets most of theserequirements:• Automated assignment – You need to mass-assign or automatically assign account records using onlyaccount criteria to expand a private sharing model• Re-organization – Your organizational structure is complex or changes frequently• Alignment and re-alignment – You need to automate the territory re-alignment (user-to-territory andterritory-to-account) process and also maintain explicit territory-to-account alignment conditions• Forecasting – You need to submit <strong>for</strong>ecasts at the territory level, not at the user level• Reporting – You need territory-specific reports, not user- or role-specific reportsTypical companies that implement TM already have a mature territory management process, as is often thecase in the pharmaceutical, technology, and media industries. If your company doesn’t have such a process,we recommend that you deploy TM only after you considered all its functions and are sure it meets yourneeds. For more help deciding whether TM is right <strong>for</strong> you, see this <strong>Best</strong> Practice: “4 steps to deciding ifTerritory Management is right <strong>for</strong> you.”In addition, TM only governs the assignment of accounts and the standard objects that have a master-detailrelationship to accounts, opportunities, and contacts. For example, opportunities are included in TM, butleads and activities are not. That means that, if you have private records such as “Business Plan” that arechildren to accounts, access to those records is not automatically granted via territory associations.Finally, TM can only be enabled in your instance if you have a full-copy sandbox. Contact Support ifyou’re not certain whether you purchased or activated a sandbox.Additional in<strong>for</strong>mation is available in these resources:• Territory Management FAQ• Tips & Hints <strong>for</strong> Working with Territories• Deploying Territory ManagementBEST PRACTICE 7
Using data access design patternsTM functional considerationsOnce you enable TM it can’t be disabled, so evaluate the following features be<strong>for</strong>e proceeding:FeatureDynamic account-to-territory assignmentsExplicit account-to-territory assignmentUser-to-territory assignmentsA user can be assigned to >1 territoryA territory can have >1 userTerritory hierarchy granularityRole hierarchy vs. territory hierarchyAccount ownershipInheritance of opportunitiesRe-alignment modeling and “what-if” analysisAPI accessThis means that….Drive re-alignments and new record assignments using declarativebusiness rules, not code.If you use “named accounts” ownership or have ownership ruleexceptions, you can use TM to directly assign accounts to users viaeach user’s association with a territory.Assignments are explicitly declared in the TM system.You can implement pods, overlays, and temporary territorycoverage functions.You can implement pods and shared territories.The hierarchy is an exact re-creation of your sales organization.If you implement TM, your territory hierarchy governs your defaultrecord access in a private sharing model, which means you cansimplify your role hierarchy with fewer roles.But territory management doesn’t supersede the role hierarchy. Themost permissive setting wins.Account ownership doesn’t have the same significance because TMdetermines default record access in a private sharing model. Mostcustomers revert ownership to a single default record owner in thiscase.In some cases, opportunities automatically inherit the territory valueassigned to the account.You cannot define more than one territory alignment, butassignments can be tested using the “Preview Account Assignment”function in sandbox.Territories are exposed to the API, so you can load territories froma .csv file. Additional API functions are included in Help &Training.Lastly, because of the scope of this functionality and its impact on record access, we highly recommendthat you consult with a TM expert from an implementation partner be<strong>for</strong>e proceeding.Summary: <strong>Best</strong> practices <strong>for</strong> designing your data access modelBecause the record access model is so important, plan to spend sufficient time on analysis and design.Below are several recommendations and best practices, gleaned from the most complex implementations.• Define your business requirements – Every complex implementation has complex requirements.Create a list of the most important business needs, written as business requirements, as shown in theexamples below.BEST PRACTICE 8
Using data access design patternsRequirementsAccounts owned by Americas Inside Sales Representatives must beaccessible by all other Americas Direct Sales Representatives;otherwise the accounts are private to all other users.Opportunities owned by Global Account Managers must beaccessible to all Direct Sales Users.Business Plan records are only editable by the owner of the recordand managers above the owner in the role hierarchy.Customer Service Representatives must be able to access allaccount and contact records, even if the account is owned by a userwho is not in the CSR’s region.• Define use cases – Although use cases can be challenging to write, they are absolutely necessary toexplain your conceptual data access model to others. Use cases are also important <strong>for</strong> getting useracceptance and <strong>for</strong> creating system testing scripts• Analyze your requirements and use cases – After analyzing both, you can determine your data accessmodel (private, public model) and whether you should deploy TM• Design your default object sharing settings <strong>for</strong> each object in your system• Design sharing rules – Determine which exception requirements can be satisfied with sharing rulesversus one-off methods such as account teams or sharing• Design your territory hierarchy – Include your sales organization structure and user-to-territoryassignments• Design your territory assignment rules <strong>for</strong> automated account-to-territory assignmentsUse an iterative design and build process. Complex businesses typically have complex requirements andrules, so it’s common to not get everything right the first time. Design iteratively, test as you go, and beprepared to make adjustments.If you’re already running your business in Sales<strong>for</strong>ce <strong>CRM</strong>, you may need to make immediate changes toyour access model. Despite the urgency, never test these changes in production to avoid inadvertentlyexposing private records to users.If you have questions about other implementation best practices, please go to the Sales<strong>for</strong>ce.com AnswersCommunity, where you can get input from other sales<strong>for</strong>ce.com usersFor More In<strong>for</strong>mationContact your account executive to learnhow we can help you accelerate your<strong>CRM</strong> success.BP_DataAccessModel _2010-03-18
Managing your Sales<strong>for</strong>ce <strong>CRM</strong> storageAs our customers’ applications mature and grow more complex, so do their storage needs. As of the Winter’09 release, storage options have increased substantially, as shown in the summary table below.Your storage is split into two buckets: file storage and data storage. Filestorage holds attachments, anything in the Documents tab, and anything inthe content library. Data storage holds everything else—all your records,including all tasks, activities, accounts, opportunities, custom objectrecords, and so on.In this document, you’ll find out:• About storage limits by edition• How to view your storage usage• How to make the most of your storage• About AppExchange apps related to storage managementAbstractUnderstand your storage limits, learn to makethe most of your storage, and find out aboutyour options <strong>for</strong> expanding storage.By Jason Suen & Nigel YoungStorage limits by editionThe amount of storage <strong>for</strong> both files and data depends on your edition, as shown in the table below.Group Edition Professional/Enterprise Edition Unlimited EditionData storage 1GB across all users 20MB/user or 1GB minimum 120MB/user or 1GB minimumFile storage 1GB across all users 600MB/user or 1GB minimum 600MB/user or 1GB minimumMany customers ask just how many records can be stored in 1GB. The answer is about 500,000 records. Asannounced at Dream<strong>for</strong>ce 2009, the content library functionality of Sales<strong>for</strong>ce <strong>CRM</strong> will be made availableto all customers, but (as of the publication of this document) it has not been determined whether additionalstorage will be made available as well.View your storage usageClick Setup | Administration Setup | Data Management | Storage Usage to get a breakdown of your usageby object, user, and individual files. You’ll also see the difference between file storage and data storageusage, as shown in the graphic on the next page.
Managing your Sales<strong>for</strong>ce <strong>CRM</strong> storageStrategies <strong>for</strong> making the most of your storageYou have several options <strong>for</strong> managing your data so you don’t exceed your storage usage limits, includingpurchasing additional storage, using mass-delete tools or applications to delete records and attachments,and storing attachments locally.Purchase additional storageYou can purchase and immediately activate additional storage—data storage in 50MB and 500MB blocks;file storage in 1GB and 10GB blocks. Contact your account executive <strong>for</strong> additional in<strong>for</strong>mation.Mass delete recordsWhich tools or applications you can use depends on the number of records you want to delete, the types ofrecords to be deleted, and your edition of Sales<strong>for</strong>ce <strong>CRM</strong>.Examples of records you might want to mass delete include:• Dead opportunities or opportunities with no activity in the past 12 months• Unconverted leads with no activity in the past 12 months• Accounts with no activity in the past 3 years• Archived tasks and events older than 5 years• Closed cases older than 5 years• Expired solutionsNote: Be<strong>for</strong>e mass deleting with any of the following tools, we recommend that you archive a copy of thedata to be deleted, in case you need to restore those records later. Also, always test mass deletions on asmall sample of test records first.We also recommend that you request a weekly export of your data <strong>for</strong> backup. This service is includedwith Enterprise and Unlimited Editions and is available <strong>for</strong> purchase with Professional Edition. Pleasecontact your account executive <strong>for</strong> more in<strong>for</strong>mation.The following tools are available <strong>for</strong> mass deleting records:• You can delete up to 250 records at a time, including accounts, leads, activities, contacts, cases,solutions, and products. Go to Setup | Administration Setup | Data Management | Mass Delete Records.BEST PRACTICE 2
How to get big results with a small budget• For Enterprise and Unlimited Edition customers, there’s a free AppExchange tool your can install intoyour Sales<strong>for</strong>ce <strong>CRM</strong> org. This application adds custom buttons to list views so you can mass delete theobjects mentioned above plus campaigns, opportunities, opportunity products, contracts, and assets.• You can mass delete standard and custom object data using the Excel Connector (Professional,Enterprise, and Unlimited Editions) or the Apex Data Loader (Enterprise and Unlimited Editions). Bothtools can be used to create extract files in Excel. You can sort and filter that file—typically by Date orCreate Date—and use it to mass delete the records.• Because the Excel Connector has a limit of about 67K records per worksheet, you may needto use multiple worksheets.• The Apex Data Loader can delete up to 50,000 records at a time. You may need to usemultiple extract files <strong>for</strong> very large data volumes.Note: If you plan to extract and delete an extremely high volume of records (> 250,000), we suggest yourequest a data export and let sales<strong>for</strong>ce.com generate the extract files <strong>for</strong> you.The Apex Data Loader’swizard helps guide youthrough a powerful massdata editing toolDelete attachmentsAs with deleting records, you options depend on the size of your attachments and your edition.• View your storage usage to see your largest attachments and drill down on those you want to delete. Goto Setup | Administration Setup | Data Management | Storage Usage.• Enterprise and Unlimited Edition customers can download the Attachment Manager app from theAppExchange to view, sort, filter, and delete multiple attachments.• Create lists with attachments with the Excel Connector and Apex Data Loader. These tools do notsupport the extraction of attachments, but you can use them to create lists of attachments to be deleted inbulk.Note: You cannot use these tools to archive attachments to be deleted: We recommend the weekly exportservice to extract attachments <strong>for</strong> archiving.Store attachments locallyConsider storing files locally on your computer or in a network folder and creating a custom link that pointsto that folder or file. For example, you could create a custom link on the account page layout that points tothe network folder in which account-related files are stored. Of course, the user needs the appropriateconnectivity and authority to access your network while using Sales<strong>for</strong>ce <strong>CRM</strong>.BEST PRACTICE 3
How to get big results with a small budgetNeed more options? Check out the AppExchangeYou’ll find additional options <strong>for</strong> increasing your storage on the AppExchange, ranging from cloud storageservices to integrations between Sales<strong>for</strong>ce <strong>CRM</strong> and your network drives. Check out the following options<strong>for</strong> cloud storage and network drives:• Appirio <strong>Cloud</strong> Storage – Recommended <strong>for</strong> customers with high storage needs, this app lets yousecurely expand storage right from the Sales<strong>for</strong>ce <strong>CRM</strong> interface by creating a link between Sales<strong>for</strong>ce<strong>CRM</strong> and Amazon S3. There’s also a version <strong>for</strong> Professional Edition customers.• S-Drive – Another service that uses Amazon S3’s secure cloud storage, this application creates storagespace on secure, hosted servers that can be integrated with Sales<strong>for</strong>ce <strong>CRM</strong>. This tool works withProfessional, Enterprise, Unlimited, and Developer Editions.• External attachments – With this app, you can easily attach and access attachments directly fromrecords in Sales<strong>for</strong>ce <strong>CRM</strong>. This free app is available <strong>for</strong> Enterprise and Unlimited Edition customers.• FTP Attachments – Use this app to store attachments on your servers, including FTP, S3, and even harddisk. This tool, which also includes versioning capabilities, works with Professional, Enterprise,Unlimited, and Developer Editions.BEST PRACTICE 4
Managing your Sales<strong>for</strong>ce <strong>CRM</strong> storageSummaryWith the increases in storage, most customers will have plenty of room <strong>for</strong> their records and files.However, if you still need to expand your storage capabilities, this table summarizes your options:ProfessionalEditionEnterprise Edition/Unlimited EditionAdditionalcost?Data volumeGENERALPurchase additional storage Yes Yes Yes HighWeekly data export service(<strong>for</strong> archiving)No Yes Yes AnyRECORDSManual deletions Yes Yes No LowMass-delete records Yes Yes No MediumMass-delete application No Yes No MediumMass deletions and archiving usingExcel ConnectorMass deletions and archiving usingData LoaderYes Yes No HighNo Yes No HighATTACHMENTSManual deletionsMass deletions using AttachmentManager applicationMass deletions using Excel ConnectorMass deletions using Data LoaderStore locally/access via custom linkDocument management applicationson the AppExchangeYes Yes No LowNo Yes No MediumYes Yes No HighNo Yes No HighYes Yes No Medium/HighVaries Yes Varies Medium/HighFor More In<strong>for</strong>mationContact your account executive to learnhow we can help you accelerate your<strong>CRM</strong> success.BP_Storage _2010-03-08
3 tips to get unstuck when creating a <strong>for</strong>mulaIf you can write a <strong>for</strong>mula in Excel, you can write one in Sales<strong>for</strong>ce. However, if you ever need help, hereare 3 tips to help find a solution:1. Check a reference2. Write it down, then break it up3. Ask the communityTip 1: Check a referenceThe following references explain how to use <strong>for</strong>mulas and give you ideas on how to get started:AbstractSales<strong>for</strong>ce administrators—Have you evergotten stuck creating a <strong>for</strong>mula? Here are 3 tipsto help solve your problem.By Terrence Hall• Help and Training – Click Help & Training on any Sales<strong>for</strong>ce page and type in the <strong>for</strong>mula functionyou want to use. You’ll get a description of how to use the function as well as some examples.• Formula cheat sheet – If you’re not sure which <strong>for</strong>mula function to use, print this two-page cheat sheet,which lists common functions in groupings.• Useful validation rules – Don’t reinvent the wheel, modify it. Look at examples of validation rules,ranging from ensuring valid postal codes to preventing reps from being too generous with discounts onquotes. When you find a validation rule you like, customize the <strong>for</strong>mula to suit your needs.Tip 2: Write it down, then break it upIf your <strong>for</strong>mula gets too complicated, start from the beginning and break up it up into smaller steps.For example, let’s say you want to assign a rating of Hot, Warm, or Cold to a lead, based on a scoreassigned by marketing. In addition, you want to display the rating as an image. To accomplish this task,you’ll use IF and IMAGE functions <strong>for</strong> your <strong>for</strong>mula.1. First, start by using comment tags ( /* */ ) to spell out the basics. Don’t <strong>for</strong>get to add the dateand your name <strong>for</strong> future reference.
3 tips to get unstuck when creating a <strong>for</strong>mulaBetween the comment tags /* */,state the <strong>for</strong>mula’s goal2. You’ll use two IF statements in this <strong>for</strong>mula. To get the first IF statement to work, useplaceholders <strong>for</strong> the hot image and <strong>for</strong> the second IF statement. Then click Check Syntax to makesure there are no problems with your <strong>for</strong>mula. If everything is OK, you’ll get the message “Nosyntax errors in merge fields or functions”; if not, the message will explain the type of error.Use placeholders <strong>for</strong> the Hot imageand second IF statements.Write your first IFstatement.Check your <strong>for</strong>mula be<strong>for</strong>e you move on.BEST PRACTICE 2
3 tips to get unstuck when creating a <strong>for</strong>mula3. Once the first IF statement works, plug in the second IF statement, replacing the placeholder <strong>for</strong>“When not Hot.” Click Check Syntax again to check your work.Put in the second IFstatement and remove itsplaceholderThe <strong>for</strong>mula works! Now all you have to do is add the IMAGE functions to display the graphics. Again,don’t <strong>for</strong>get to check your <strong>for</strong>mula by clicking Check Syntax.Replace the imageplaceholders with theIMAGE functionsCheck your <strong>for</strong>mula be<strong>for</strong>e you move on.BEST PRACTICE 3
3 tips to get unstuck when creating a <strong>for</strong>mula4. Test your <strong>for</strong>mula by changing the lead scorecard on a lead. See whether the images change fromHot, Warm, and Cold when you put in a lead scorecard of 8, 6, and 4 respectively.Edit the Lead Scorecard to 8,then 6, and finally to 4 to watchthe images change.Tip 3: Ask the CommunityIf you find you need help in creating a <strong>for</strong>mula and want another opinion, check out the Force.comDiscussion Board: Formulas & Validation Rules Discussion to see if someone has had a similar problem. Ifnot, become a member of the developer community and post a question of your own.For More In<strong>for</strong>mationContact your account executive to learnhow we can help you accelerate your<strong>CRM</strong> success.BP_CreateFormula_2010-08-19
Choose the right tools to customize andextend Sales<strong>for</strong>ce <strong>CRM</strong>Sales<strong>for</strong>ce <strong>CRM</strong> comes with an easy-to-use user interface, lots of features, a wide range of standard reports,and many ready-made extensions. But to get the most from your implementation, you’ll want to customizeyour application so it works in a way that’s right <strong>for</strong> your industry, your company, and your users.For an individual user, that could mean tracking key accounts. For your company, it could mean changingthe names of fields and tabs to reflect the terminology familiar to your users,creating custom reports that roll up in<strong>for</strong>mation to suit your managers, oreven creating new applications that extend the value of Sales<strong>for</strong>ce <strong>CRM</strong>,such as a credit-checking application.There are several ways to adapt your application so it meets your businessneeds exactly. Each approach requires different technologies—anddifferent skills. Here are the three main approaches:1. Out-of-the-box configuration2. Pre-developed enhancements and applications3. Custom enhancements and applicationsThe figure below gives an overview of available tools and the skills needed to use them.AbstractMake the most of Sales<strong>for</strong>ce <strong>CRM</strong> bycustomizing it to your needs.Ranging from point-and-click tools tosophisticated development environments, thereare tools <strong>for</strong> every need—and every level oftechnical expertise.By Pat CameronNote: General availability <strong>for</strong> VM<strong>for</strong>ce is planned <strong>for</strong> 2011.Approach #1: Use out-of-the-box configurationEven non-technical users (with the appropriate permissions) can personalize the Sales<strong>for</strong>ce <strong>CRM</strong>application, either <strong>for</strong> their own use or <strong>for</strong> everyone in the organization.We call this approach “clicks, not code” because you can use it to configure various application buildingblocks—including the data model, the user interface, and the underlying business logic—withoutprogramming. For example, you can customize user interface components or use workflow tools toautomate your business processes. And our security architecture already includes profiles with permissions,field-level security, sharing rules, and a role hierarchy.
Choose the right tools to customize and extend Sales<strong>for</strong>ce <strong>CRM</strong>With these tools, you can quickly respond to changing business requirements without technical skills thatmay be in short supply. In general, we recommend using the configuration options be<strong>for</strong>e creating customcode. Even experienced programmers can work faster than when coding from scratch.Below are some tips to keep your configuration manageable over time:• Limit the number of profiles – Profiles determine the user permissions <strong>for</strong> available functionality,including the partner and the customer portals. By setting up different profiles <strong>for</strong> various user groupssuch as end users, support users, and administrators, you can efficiently control user access. However,we recommend you limit the number of profiles that must be maintained.• Limit the number of sharing rules – Use sharing rules to make automatic access exceptions <strong>for</strong> specificgroups defined by your organization-wide defaults; <strong>for</strong> example, to allow greater access <strong>for</strong> particularusers. Because sharing rules depend on role definitions (as well as public groups and queues), they tendto change over time. Again, we recommend keeping sharing rules to a minimum to avoid ongoingmaintenance.• Limit the number of custom fields – Use custom fields to capture keyin<strong>for</strong>mation <strong>for</strong> your business. We recommend you carefully evaluate theneed <strong>for</strong> any given field and its benefits to various groups. Having toomany custom fields can confuse users and lead to maintenance headaches.• Limit the number of page layouts – Page layouts can quickly grow out ofcontrol if not managed properly. Page layouts are useful <strong>for</strong> standardizingbusiness across business units; there<strong>for</strong>e, be on the lookout <strong>for</strong> a largenumber of layouts—it can mean that units aren’t using a standard process.The more layouts, the more work it is to respond to change requests.You can extendSales<strong>for</strong>ce <strong>CRM</strong>with hundreds oftools and customapplicationsavailable from theAppExchange.Note: Automation capabilities created with validation rules andassignment rules are generally kept in check by your process management’s logical flow. Still, if youhave a large numbers of automation rules you need to track how they influence each other.To configure Sales<strong>for</strong>ce <strong>CRM</strong> optimally, we recommend you train the users who’ll have that responsibility.At the end of this paper, you’ll find a list of training options.Approach #2: Use pre-developed enhancements and applicationsIn addition to configuring Sales<strong>for</strong>ce <strong>CRM</strong>, you can extend the application with hundreds of tools andcustom applications available from the AppExchange, sales<strong>for</strong>ce.com’s online marketplace <strong>for</strong> cloud-basedapplications. For example, Force.com Labs created free dashboards—<strong>for</strong> sales, marketing, adoption, andservice & support—that provide real-time snapshots of your business.These apps were built by sales<strong>for</strong>ce.com, individual developers, and sales<strong>for</strong>ce.com partners. All are preintegratedwith the Force.com plat<strong>for</strong>m and certified to be secure. Some of these apps are free; others areavailable <strong>for</strong> a fee.Users can use the AppExchange to browse <strong>for</strong>, test-drive, and install applications with no or minimal ef<strong>for</strong>t.In essence, it’s an easy way to get features to enhance your application or get new applications withouthaving to build them. Partners can use the AppExchange to make the apps they develop available tothousands of sales<strong>for</strong>ce.com customers.Here are some of the advantages of using the AppExchange:• Get missing functionality – Get features to enhance your application—or get new applications—without having to build them. Most apps are ready to go, although some might need a little tweaking.BEST PRACTICE 2
Choose the right tools to customize and extend Sales<strong>for</strong>ce <strong>CRM</strong>• Extend the business benefits of Sales<strong>for</strong>ce <strong>CRM</strong> to more of your departments and employees –Take advantage of specialized applications developed by the “long tail” of the software developmentworld to address your business needs beyond sales and customer service.• Leverage the integration power of native Internet technologies – Partners can use Web services andservice-oriented architectures (SOAs) to deliver virtual application suites <strong>for</strong> various businessrequirements across industries. Such suites offer better modularity and easier integration than traditionalsuites.So check out the AppExchange to see what applications are available be<strong>for</strong>e developing your own. Whenconsidering available applications, just keep a few limitations in mind:• “Unmanaged” packages can’t be upgraded – The AppExchange includes both managed andunmanaged packages. Managed packages include support <strong>for</strong> all application components and can beupgraded. In contrast, unmanaged packages, which are usually free, can’t be upgraded. However, they’reuseful as templates or basic building blocks <strong>for</strong> an application. They’re also a great way to learn how tobuild on the plat<strong>for</strong>m.• Beware of object limits – Applications may include custom objects or tabs that exceed your edition’sobject limit. Note that objects and tabs in “Aloha” apps don’t count toward the limit.• Beware of edition requirements – An application may include features not available <strong>for</strong> your edition.Approach #3: Develop enhancements and applicationsYou can use the Force.com plat<strong>for</strong>m to develop, package, and instantly deploy applications, without anyinfrastructure. If you need an application that isn’t already on the AppExchange—or if you want tocustomize beyond the capabilities of the configuration tools—the development tools on the Force.complat<strong>for</strong>m are right <strong>for</strong> you.Note: A study per<strong>for</strong>med by IDC compared time, cost, quality, and ROI of application development on theForce.com plat<strong>for</strong>m compared to traditional on-premises plat<strong>for</strong>ms. The study found that applicationdevelopment required 76 percent less time—and companies could reduce their 3-year TCO by 54 percent,saving $560,000 per application. For details, see the IDC white paper “Force.com <strong>Cloud</strong> Plat<strong>for</strong>m DrivesHuge Time to Market and Cost Savings.”Custom development on Force.com is well suited <strong>for</strong> data and process-centric applications <strong>for</strong> individualdepartments or across an enterprise. You can quickly build applications based on the following types ofrequirements on Force.com:• Relational data• Forms• Reporting and analytics• Workflow and approvals• Call scripts and multi-step page flows• Audit and compliance• Data security and sharingThe remainder of this paper describes the tools <strong>for</strong> custom development on Force.com:• Force.com pages (Visual<strong>for</strong>ce) <strong>for</strong> creating flexible user interfaces and navigation• Force.com sites <strong>for</strong> running your Intranet, corporate websites, or syndicated content on other websitesBEST PRACTICE 3
Choose the right tools to customize and extend Sales<strong>for</strong>ce <strong>CRM</strong>• Force.com code (Apex) <strong>for</strong> adding custom business logic to system events such as button clicks andrecord updates as well as general programming tasks that require close integration with Force.complat<strong>for</strong>m services• Java with VM<strong>for</strong>ce (planned <strong>for</strong> general availability in 2011) <strong>for</strong> any kind of programming task.Click here to find out how to get started on Force.com.Developing custom user interfaces with Force.com pages (Visual<strong>for</strong>ce)With Force.com pages, you can create user interfaces (UIs) that look just like the standard Sales<strong>for</strong>ce <strong>CRM</strong>user interface—or are completely different and unique to suit your company’s needs. For example, you cancreate user interfaces <strong>for</strong> mobile devices, wizards, other multi-step processes, or data-specific rules. Thisflexibility can greatly improve adoption and ease of use.Force.com pages is a component-based UI framework that extends standard Web technologies such asHTML, JavaScript, and CSS with markup tags that represent coarse- or fine-grained user interfacecomponents, such as a field or a section of a page. Force.com pages gives you pixel-level control of the UIwhile making it easy to bind it to the business logic, data model, and other Force.com plat<strong>for</strong>m services.Force.com pages includes more than 60 built-in components plus tools <strong>for</strong> creating custom components.You’ll need trained developers to use Force.com pages—both <strong>for</strong> developing the initial pages and <strong>for</strong>maintaining them—although anyone familiar with HTML may be able to fulfill standard requests.Sales<strong>for</strong>ce.com continues to enhance Force.com pages functionality. Note that, as of Winter ’11, someaspects of standard Sales<strong>for</strong>ce <strong>CRM</strong> page layouts—such as inline field editing on detail pages—are not yetsupported in Force.com pages.Developing data-driven websites with Force.com sitesWith Force.com sites, you can create public websites and applications that integrate with your Sales<strong>for</strong>ceorganization, without requiring users to log in. As a result, you can display any in<strong>for</strong>mation stored inSales<strong>for</strong>ce <strong>CRM</strong> on public websites.Because any sites you build are hosted on Force.com servers, there is no data integration requirement. Andbecause the sites are built natively with Force.com code, the application automatically validates anyincoming data. You can also have users log in from your public site to a specialized portal, monitorbandwidth and request time usage <strong>for</strong> each site, track and display changes, and integrate with GoogleAnalytics to track number of visits, page views, time spent on the site, and more. Click here <strong>for</strong> morein<strong>for</strong>mation about Force.com sites functionality.For ideas on what you can develop with Force.com sites, visit the Sites Gallery.• Create an ideas site – Host a public <strong>for</strong>um <strong>for</strong> sharing and voting on topics related to your company orits products• Publish support FAQs – Provide a public website where customers can search <strong>for</strong> solutions• Create a store locator tool – Help customers find your stores in their areas• Publish an employee directory – Add an employee directory to your company’s intranet that’srestricted by IP range• Create a recruiting website – Post job openings and let visitors submit applications and resumes online• Publish a product catalog – Display your company’s products—including model numbers, currentprices, and product images—by pulling them dynamically from your dataBEST PRACTICE 4
Choose the right tools to customize and extend Sales<strong>for</strong>ce <strong>CRM</strong>As you work with Force.com sites, be aware of these considerations:• Public access permission settings control what public users can do on each site. Be sure to take extraprecautions when setting these permissions, including access to standard and custom objects.• Use login settings to let users register <strong>for</strong> and log in to your portal from your public Force.com site. Notethat self-registration is available only <strong>for</strong> customer portals, not <strong>for</strong> partner portals.• During your organization’s maintenance <strong>for</strong> major releases your sites will be unavailable.Developing custom business logic with Force.com code (Apex)Force.com code is an object-oriented programming language with domain-specific classes and methods. Itwas designed to integrate tightly with the Force.com database layer and other plat<strong>for</strong>m services and toexecute efficiently and safely in our multitenant cloud-based architecture.Because Force.com code uses a familiar Java-like syntax, seasoned developers will get up to speed quickly.And because Force.com code supports the common stored procedure and database programming idioms,it’s easy to write data-centric logic, such as triggers, that execute be<strong>for</strong>e or after records are inserted,updated, or deleted.With Force.com code, you can:• Attach custom logic to the fundamental database operations so that it executes whenever the operationexecutes, regardless of whether the operation originates in the UI or from the Web services API.• Modularize logic into Force.com classes that can be called from other Force.com classes and triggers, toreuse and standardize code.• Expose Apex classes as Web services that can be invoked from external systems, either publically orthrough secure access methods.• Create custom controller logic that works in conjunction with Force.com pages to manage userinterface behavior. For example, a Force.com controller can manage the flow from page to page inresponse to user input in a multi-step wizard.• Per<strong>for</strong>m complex validations across multiple objects. For example, if the user changes the stage on anopportunity, you can specify that the record must includes line items, at least one contact role, and atleast one quote be<strong>for</strong>e the record can be saved.• Create complex business processes not supported by workflow. For example, when a user creates alead record, you may want to check <strong>for</strong> duplicate leads. If you find dupes, you can prevent the recordfrom being saved.• Create custom transactional logic (database operations that affect multiple objects as a logical unit ofwork, not just with a single record or object). For example, if you build a custom work-order process,you may want to check that all child work orders are completed be<strong>for</strong>e updating the parent work order.• Per<strong>for</strong>m long-running calculations or business processes in an asynchronous or batch execution mode.These operations run in the Force.com service and can be initiated on demand or scheduled to run on arecurring basis through a job scheduler.• Integrate with external Web services using intuitive frameworks such as XMLStream, HTTP Classes,and WSDL2Apex.• Develop and execute test methods alongside your business logic that ensure your code continues towork as intended throughout the entire life cycle.BEST PRACTICE 5
Choose the right tools to customize and extend Sales<strong>for</strong>ce <strong>CRM</strong>Because Force.com code runs natively within Force.com and is tightly integrated with the Force.complat<strong>for</strong>m, dependency in<strong>for</strong>mation is maintained to ensure integrity when you change setup andcompatibility with all future Sales<strong>for</strong>ce <strong>CRM</strong> upgrades. As you work with Force.com code, be aware of aset of “governor limits” on certain operations. These limits were designed to ensure efficient and safeoperation in our multitenant architecture. Be sure to familiarize yourself with the recommended bestpractices <strong>for</strong> coding solutions that scale within these limits.Click here to find out more about Force.com code (Apex).Develop Java with VM<strong>for</strong>ceIn April 2010, sales<strong>for</strong>ce.com and VMWare announced VM<strong>for</strong>ce, a joint ef<strong>for</strong>t to enable Java and Springbasedapplications to run on the Force.com cloud infrastructure. Planned <strong>for</strong> general availability in 2011,VM<strong>for</strong>ce will let Java developers write Sales<strong>for</strong>ce <strong>CRM</strong> extensions and custom applications using thepopular Eclipse-based SpringSource Tool Suite (STS) development environment and then run them in thecloud.VM<strong>for</strong>ce will provide a rich set of APIs, services, and components to make it easy to access data inForce.com and leverage plat<strong>for</strong>m services ranging from full-text search, to analytics, to mobile access.For customers with significant investments in Java software assets and development skills, VM<strong>for</strong>ce willprovide a compelling bridge that carries these investments <strong>for</strong>ward while taking advantage of thecapabilities of the Force.com cloud plat<strong>for</strong>m.For more in<strong>for</strong>mation, visit http://www.vm<strong>for</strong>ce.com/Available resourcesSales<strong>for</strong>ce.com provides training and consulting resources to customize and extend Sales<strong>for</strong>ce <strong>CRM</strong>.Check out the following training options <strong>for</strong> administrators and developers on configuration tools andForce.com development tools. There’s free virtual training as well as the following comprehensive courses:• ADM201: Administration Essentials (5 days)• ADM301: Advanced Administration (5 days)• DEV401: Building Applications with Force.com (5 days)• DEV531: Introduction to Object-Oriented Programming with Force.com Code (Apex) (5 days)• DEV501: Force.com Code and Force.com Page Controllers (5 days)For more in<strong>for</strong>mationContact your account executive to learnhow we can help you accelerate your<strong>CRM</strong> success.BP_DevelOptions_2010-12-02
4 questions to answer <strong>for</strong> a successfulportal implementationYou decided to roll out a customer or partner portal. You’re excited about improving your customerexperience, making self-service possible, reducing channel conflict, and strengthening your onlinepresence. So where do you start?From our experience, customers who successfully implement a portal startby answering the following 4 questions:1. How can we get it right the first time?2. What are common roadblocks to avoid?3. How can we offer more in our portal to increase its value?4. How will we measure return on investment (ROI)?As we take you through these questions, we’ll share lessons learned from twocustomers—one of the largest open-source companies in the world, which implemented a partner portal,and a medical records management company that built a customer portal.As with any technology project, the planning and preparation stage is often the most intensive and timeconsuming.Investing in this stage will pay big dividends—you’ll save time and ensure you reach yourgoals. Here are a few things to consider when you’re at the whiteboard.Question #1: How can we get it right the first time?Getting it right requires that you involve the right people, clearly define your priorities, and supplementyour own resources, if necessary.• Get the right people early on – Building the project team should be the first order of business. Alsomake sure you have executive involvement from the start to help shape the vision. Use this vision todefine your objectives, your priorities, and the metrics you’ll use to measure success.• Define your priorities – Be clear about what you want to accomplish. For example:• Do you have a target case resolution time?• Do you want to reduce the number of inbound customer service calls by 15%?• Are you looking to have partners contribute 30% of your overall revenue this year?AbstractRolling out a customer or partner portal involvescareful planning and execution.This document will help orient you be<strong>for</strong>e youdive into a portal implementation.By: Jason SuenDefining such management-level metrics will help with creating your processes and building reports.These high-level metrics will be critical in defining your operational metrics, as discussed in “How willwe measure ROI?” on the next page.
4 questions to answer <strong>for</strong> a successful portal implementation• Get the expertise you need – Once your internal team is in place, make sure there are no gaps in yourimplementation expertise. You have several options—remote guidance or on-site support, delivered bySales<strong>for</strong>ce.com Consulting or our implementation partners. These organizations can help make sureyou’re on the right path from the start.Both of our example companies brought in consulting partners to make their projects successful. Prior todoing so, their progress was slowed by stalls and blunders. Both companies give substantial credit to onsiteexperts <strong>for</strong> their projects’ success.Question #2: What are common roadblocks to avoid?Common challenges include complexity, managing change requests, training partners, and keeping up withwhat those partners want.• Keep access rules simple – In most cases, less is more. Just as with your initial <strong>CRM</strong> rollout, determinethe levels of user access, record types, and the custom fields and tabs you need.Initially, the software company mapped out the individual requirements and access needs <strong>for</strong> eachpartner as well as <strong>for</strong> the different access tiers of users at each reseller. The result was dozens of differentpartner profiles. As you can imagine, this approach was very complicated to implement and even moretime-consuming to maintain. The company revisited that arrangement and turned dozens of profiles intoa just a handful, without sacrificing the user experience.• Manage changes – During the early pilot phases, there are bound to be dozens of updates, tweaks, andchanges. It’s a great opportunity <strong>for</strong> soliciting user feedback and making changes in an organized way.For example, you can use the ideas functionality of Sales<strong>for</strong>ce <strong>CRM</strong> to solicit user feedback and vote onchanges. And consider creating custom objects or a special case record type to log change requests.As you define your change request process, keep in mind that Sales<strong>for</strong>ce <strong>CRM</strong> includes a setup audittrail to track changes made in your system. Go to Setup | Security Controls | View Setup Audit Trail toget started.• Train <strong>for</strong> high adoption – Building a training plan <strong>for</strong> your partners—or public documentation <strong>for</strong> yourcustomers—will bring adoption rewards. For more in<strong>for</strong>mation about setting up a training plan, see the<strong>Best</strong> Practice document “10 tips <strong>for</strong> a successful training plan.”One highlight of the software company’s implementation was the creation of custom documents andtraining plans <strong>for</strong> its global partners. The company wanted to increase partner participation from 30% to80%, which it achieved in just a few months. The company credits training, increased collaboration, andtransparency <strong>for</strong> achieving these results.• Don’t <strong>for</strong>get your users – To continue your change management process, be sure to keep in touch withwhat users want. The medical records company used this approach with great success. By walking thehalls and interviewing end users (both internal employees and customers), it gathered valuable feedbackthat helped reduce data input errors by 17% and case turnaround time by 15%. With that feedback, thecompany was able to improve the overall process as well as specific fields and page layouts that affectusers every day.Question #3: How can we extend the portal’s value?As you design your portal, don’t <strong>for</strong>get about the hundreds of AppExchange applications—both free and<strong>for</strong> a fee—<strong>for</strong> virtually any area of your business. Looking <strong>for</strong> a survey tool? You can find a pre-built appto poll your customers about their portal experience. Want to create documents based on in<strong>for</strong>mation yourcustomers and partners provide? There’s an app <strong>for</strong> almost anything you can think of.The medical records company took advantage of partner apps to listen to its customers by integratingsurveys into its portal. In addition, the company turned its portal into a revenue-generating machine byBEST PRACTICE 2
4 questions to answer <strong>for</strong> a successful portal implementationusing a payment processing app. Because apps from the AppExchange are pre-integrated, they’re a fast andeasy option to make your portal more valuable to your customers.If you find yourself in uncharted waters with no existing apps, remember that the Force.com plat<strong>for</strong>mincludes lots of tools to customize your app or build new apps. Check out Developer Force to find out justwhat you can do.Question #4: How will we measure ROI?After you roll out the portal, train your users, and enhance functionality based on user feedback and appsfrom the AppExchange, it’s time to measure the results of your ef<strong>for</strong>ts. By using familiar dashboards, youcan compare the initial metrics you defined with the data you capture as the portal is used.To get accurate ROI numbers <strong>for</strong> your sales or customer service organization, establish per<strong>for</strong>mancebenchmarks be<strong>for</strong>e your implementation. These benchmarks should reflect the priorities you outlined inyour vision and in the planning stage, discussed on page 1.Here are some common metrics <strong>for</strong> customer portals:• Case resolution times, case age• Cases closed per rep, # of self-closed cases• Average case response time (time spent in New status)• Cost per case ($ spent on portal support resources/number of cases resolved through portal)• # of escalationsFor partner portals, try these metrics:• # of deals registered by partner• Pipeline generated by partner• Average age of deals by partner• Closed business by partner• Cost per partner (marketing support, funding requests)Together with custom training and high-touch engagements, the software company used dashboards to helpkeep its partners on their toes. By using leaderboards that showed the comparative per<strong>for</strong>mance of itspartners, the company met its goal of increasing channel sales from 40% to 60% of its total sales.BEST PRACTICE 3
4 questions to answer <strong>for</strong> a successful portal implementationSummary and additional resourcesFor large projects such as portal implementations, getting started on the right foot and learning from othersuccessful projects is critical. One way to accomplish that goal is to make sure you have the properresources within your team—or getting help from sales<strong>for</strong>ce.com or its partners. You’ll find that you’llsave time, money, and avoid having to re-implement areas that went wrong.If you’re ready to look into the finer points of implementing a portal, check out these resources:• Customer Portal Implementation Guide• PRM Learning Center, where you’ll find a Getting Started guide, implementation tips, roles, and lots ofPRM tricksFor More In<strong>for</strong>mationContact your account executive to learnhow we can help you accelerate your<strong>CRM</strong> success.BP_PortalImplement_2010-03-08
Create powerful Web sites on Force.comEveryone loves great Web sites—and every company wants them. However, building and running suchsites can be complicated and expensive. With Force.com sites functionality, you can build and run public,unauthenticated Web sites on the Force.com cloud plat<strong>for</strong>m. You don’t have to worry about running a datacenter to host your servers or maintain multiple software applications. Plus, building applications onForce.com is 5 times faster, at about ½ the cost of traditional software plat<strong>for</strong>ms.By using the Force.com pages functionality and leveraging the data in yourSales<strong>for</strong>ce account, you can build sites users can access through a customWeb address known as a custom domain. This document describescommon use cases <strong>for</strong> the sites functionality, the skills needed to buildthem, and best practices and considerations.Build your own sites: Use casesSome types of sites are well suited <strong>for</strong> Force.com sites capabilities, butothers are not as good a fit. Here are some common use cases:• Corporate or intranet Web sites that display in<strong>for</strong>mation to visitors. Such sites are the easiest to build,even with limited HTML knowledge. You can use the free CMSForce content management applicationfrom the AppExchange to help build your pages. These sites are the easiest to create and only containstatic pages. However, they’re not as flexible as the example sites below.• Store locators or product catalogs that capture or push in<strong>for</strong>mation to your visitors. Because suchinteractive sites leverage Force.com pages functionality and Force.com code (Apex), they’re moreflexible, but you’ll need a developer or your IT department to build them.• Insurance applications or event management applications that integrate with your Sales<strong>for</strong>ce account.Such sites not only to capture or push in<strong>for</strong>mation to visitors, but bring data into the application. Forexample, when your visitors fill out applications or sign up <strong>for</strong> events, that in<strong>for</strong>mation is automaticallypushed into Sales<strong>for</strong>ce <strong>CRM</strong>. Because building such sites uses the pages functionality and Force.comcode, you’ll need development resources.For examples of such Web sites, please visit the Sites Gallery.Other types of sites are not a good fit <strong>for</strong> the sites functionality, including sites with heavy bandwitdhrequirements. Because such sites use large file uploads, downloads, or require heavy processing, whichmake them bump up against daily bandwidth limits, they’re not good candidates.For more in<strong>for</strong>mation about these limits, please view the Sites <strong>Best</strong> <strong>Practices</strong> page.AbstractUse Force.com sites functionality to build andrun public, unauthenticated Web sites on theForce.com cloud plat<strong>for</strong>m. Learn aboutcommon use cases, needed skills, andconsiderations.By Alexis Segars
Create powerful Web sites on Force.com<strong>Best</strong> practices and considerationsWhen building sites on Force.com, keep the following considerations in mind:• Content – Because your sites will be available to the public, don’t publish anything inappropriate orconfidential.• Testing – Test your site <strong>for</strong> every type of visitor and any kind of demand. Although your site mayper<strong>for</strong>m well on a test with 10 people, it could fail if thousands visit. Also, test different browsers toensure all visitors have the same experience.• Per<strong>for</strong>mance and daily limits – Sales<strong>for</strong>ce.com imposes some limits on your sites pages. Make sureyou’re aware of these limits so your visitors’ experience is not degraded by poor per<strong>for</strong>mance. Refer tothe Caching, Per<strong>for</strong>mance, and Daily Limits page <strong>for</strong> more in<strong>for</strong>mation.• Schema design – This design influences database management and in<strong>for</strong>mation retrieval. Well-writtenqueries and careful schema design are key <strong>for</strong> top per<strong>for</strong>mance, especially <strong>for</strong> high-traffic sites. Alsoconsider indexing your design schema to optimize data retrieval.• Site design – When building your site, take into account whether you’re porting an existing site orbuilding a new site. Porting existing sites may affect the site’s appearance.• Web authentication – If you need password protection or visitor authentication, build your site using acustomer or partner portal to prevent access to protected content.Additional resourcesFor additional considerations, best practices, and in<strong>for</strong>mation about Force.com, please review the followingresources:••••Introduction to SitesImplementation GuideForce.com CookbookDeveloper<strong>for</strong>ce Sites page• CMSForce: Native Force.com Content Management ApplicationFor More In<strong>for</strong>mationContact your account executive to learnhow we can help you accelerate your<strong>CRM</strong> success.BP_Sites_2010-06-08
5 steps to using the content libraryMake sure everyone in your organization always has the latest sales presentations, collateral, and otherdocuments right at their fingertips. The content library license is included in all editions at no additionalcost. As the administrator, you can control how users can take advantage of this feature in yourorganization.To get up and running with the content library, make sure it is enabled <strong>for</strong>your organization, using the options from Setup ➤ Customize ➤Sales<strong>for</strong>ce <strong>CRM</strong> Content ➤ Settings. Then follow these five steps:1. Create workspaces and workspace permissions2. Organize materials3. Integrate with other Sales<strong>for</strong>ce applications4. Migrate content5. Launch your contentAbstractWant to go beyond simply finding documents?Would you like to collaborate with otherbusiness areas? And wouldn’t it be great tomake the most of your institutional knowledgeby sharing content?Follow these recommendations to set you up<strong>for</strong> success as you roll out the content library.By Andi MiachelsStep 1: Create workspaces and workspace permissionsWorkspaces determine who can access documents, and workspace permissions determine who can do whatto those documents. As you get started with the content library <strong>for</strong> your organization, define the followingin<strong>for</strong>mation <strong>for</strong> workspaces:• Determine the number of workspaces – Create as many workspaces as you need and organize thembased on any classification, such as department name, job function, or team. You can also set up contentto be owned by a single workspace but shared with multiple workspaces.• Set workspace permissions – You can define any permissions you want each workspace member tohave in addition to simply viewing content. When you define user permissions, it’s key to balancecontent access with security considerations.• Start with a “Sales Content” workspace – Use this workspace to store official sales materials and givemarketing and sales operations users “author” permissions. Sales representatives should have “view”(and potentially “comment/tag”) permission. If your organization uses Google Docs, encourageworkspace members to add their Google docs to a workspace.• Add a second “Marketing” or “Sales Collaboration” workspace – Give marketing a “draft room” tocollaborate on materials be<strong>for</strong>e sharing them with the sales team. And let that team share its ownin<strong>for</strong>mal materials, such as RFP responses.• Enable groups – To simplify user administration, use existing public groups or create new groups usingyour company’s role hierarchy. Add individual users as needed and decide which users or groups can seewhat content.
5 steps to using the content libraryStep 2: Organize materialsStreamline the user experience of searching and navigating by clearly defining tagging rules, consistentlyclassifying content, and creating custom fields and content types that are relevant to your organization.• Determine what types of tags make sense <strong>for</strong> your organization – You can use open, guided, orrestricted tagging:• Open tagging – Lets users enter any tags they want• Guiding tagging – You suggest tags to choose from or let users add their own• Restricted tagging – Lets users choose only from the suggested (guided) tagsIn general, avoid using too many tags. Because the search engine will help users find specific content andbecause tags help users browse and subscribe, excessive tagging will create confusion.• Ensure content is classified consistently – Work with your contributors to define consistent tag names.By establishing tag names from the outset, you can avoid tags such as “channel” and “channels” in thesame workspace.• Create custom fields and content types – You can use content types to manage multiple custom fieldsto represent different types of content. Think of content types as “record types <strong>for</strong> documents.”You can define which content types can be used in each workspace. Use the standard fields <strong>for</strong> basicorganization: Author, File Type, Tag, Workspace, and any custom fields relevant to your business orbusiness process. If you use the Related Content lists on Sales<strong>for</strong>ce objects, align your custom contentfields with the standard and custom fields on the objects to increase the accuracy of a “find content”search.Step 3: Integrate the content library with other Sales<strong>for</strong>ce applicationsWhen you integrate the content library with other applications, users won’t have to change applications toget their work done.• Provide access to the content library from other applications – Expose selected content tabs in otherapplications to make it easy <strong>for</strong> users to find content from any application.• Recommend content based on record data – You can suggest relevant content based on specific fieldson commonly used Sales<strong>for</strong>ce objects. As a result, you’ll eliminate the need to search <strong>for</strong> content whenreps have already given you key in<strong>for</strong>mation and also improve the chances of their using the rightin<strong>for</strong>mation.• Associate content with specific records – You can link files as you publish them to records inSales<strong>for</strong>ce as long as those files consist of generic content that’s not private to a record. Be sure toestablish logical connections between data and documents, such as campaigns and any underlying assets.In addition, be sure to align your categorization model in the content library with your data model in<strong>CRM</strong> and other areas.Step 4: Migrate existing contentWhen you move materials into the content library, take the opportunity to “clean house” and determinewhat materials to keep, who should own the materials moving <strong>for</strong>ward, and how the materials fit into thenew classification structure.BEST PRACTICE 2
5 steps to using the content library• Follow these steps <strong>for</strong> your migration plan:1. Create an inventory of all existing content2. Remove outdated materials and identify new content owners3. Develop a “straw man” approach to organizing content4. Upload a sample piece of content <strong>for</strong> end users to test5. Complete the final migrationStep 5: Launch content to your organizationA well-designed rollout is your key to success, so be sure to cover all your bases in advance:• Confirm sponsorship, training, and tactics – It’s crucial to get the support of your executives so theycan put their weight behind the rollout. Once you have executive sponsorship, train your users to helpthem see the value of the application and become productive quickly. Also, use the right combination of“carrots” and “sticks” to drive usage.• Highlight valuable content - To highlight valuable content and make it easier to find, mark it as“featured” on the content details page. Featured content is assigned a higher priority in search resultsthan similar content and it appears on the Workspaces tab <strong>for</strong> easy access. To use this feature, be sure tocheck the Feature Content option when you set up users’ workspace permissions.For More In<strong>for</strong>mationContact your account executive to learnhow we can help you accelerate your<strong>CRM</strong> success.BP_Content_2010-08-14
8 keys to mobile <strong>CRM</strong> successGiving your field sales, service, and executive teams mobile access to Sales<strong>for</strong>ce is one of the easiest ways<strong>for</strong> your team to get instant, added value from Sales<strong>for</strong>ce. You’ll boost productivity, improve data quality,and help make sure that being out of the office doesn’t mean being out of the loop.What’s the best approach <strong>for</strong> getting your people, your processes, and your devices ready to go mobile? Tostart, it’s important to know sales<strong>for</strong>ce.com has two mobile products: Sales<strong>for</strong>ce’s mobile capabilities <strong>for</strong>your <strong>CRM</strong> needs and soon, Chatter Mobile <strong>for</strong> collaboration. Follow these8 tips and you’ll be well on your way to mobile success.1. Leverage mobile collaboration (Chatter Mobile) – The rise ofsocial networking Web sites like Facebook and Twitter havechanged the way users access in<strong>for</strong>mation, and this shift is rapidlyextending to the enterprise. Products like Sales<strong>for</strong>ce Chatter giveenterprise users a way to share and follow relevant people andrecords in an environment that’s trusted and secure. Mobile access toone’s “feed” is key to keeping employees across the organizationcontinually in<strong>for</strong>med and productive no matter where they go.2. Use newer devices – Whenever possible, give your team the latest mobile devices. Sales<strong>for</strong>ce <strong>CRM</strong>’smobile functionality supports the most current iPhone and BlackBerry® devices. Once available,Chatter Mobile will also work on iPad and Android devices. If you’re not sure whether your device issupported, consult our supported devices list. Or download our mobile apps to test on your device.3. Identify key mobile use cases (the Sales <strong>Cloud</strong>’s mobile capabilities) – You’ve put lots of thoughtinto customizing your core business processes to meet your organization’s needs. Why should yourmobile solution be different? Be<strong>for</strong>e you get started, identify clear and simple mobile use cases withobvious benefits. Start by defining tasks and processes your users will need in the field, such as:• Logging phone calls, emails, and visits on the fly• Processing orders or updating customer cases in real timeAbstractMobile access to Sales<strong>for</strong>ce is one of easiestways to get the most from your Sales<strong>for</strong>ceinvestment.To get started right, follow the tips in thisdocument. It’s an approach that’s yielded greatresults <strong>for</strong> hundreds of customers.By: Joshua Schneyer• Accessing content in Sales<strong>for</strong>ce like presentations or brochures and <strong>for</strong>warding them to customersConsider running a quick pilot on easy-to-deploy Mobile Lite <strong>for</strong> useful insight about which mobileuse cases are key to your business.4. Less is more (the Sales <strong>Cloud</strong>’s mobile capabilities) – Mobile users rarely need access to all thedata and features in Sales<strong>for</strong>ce. Be selective about which applications and data you make available.Users on the go tend to use a small subset of data and repeat the same tasks over and over, such aslogging calls and emails and updating opportunities or cases that relate to their territories.
8 keys to mobile <strong>CRM</strong> successLimit available data fields to what’s relevant <strong>for</strong> certain users and avoid the common trap ofdownloading every record a user might need. Instead, use the application’s intelligent filteringcapabilities to store only relevant records on the device at any given time.5. Train your users – As with any new application, it’s important to show users how to use it—andhow they’ll benefit. Ask users to watch the Getting Started with Mobile Access videos or attendtraining be<strong>for</strong>e giving them mobile access.6. Choose the right version (the Sales <strong>Cloud</strong>’s mobile capabilities) – Sales<strong>for</strong>ce offers two mobileversions: Mobile Lite, which is free across all editions, and the full version, which is free <strong>for</strong>Sales<strong>for</strong>ce <strong>CRM</strong> Unlimited Edition users (or available via an add-on license <strong>for</strong> other editions).• If your users only need basic mobile access to standard tabs like Contacts, Leads, andOpportunities, try Mobile Lite. It’s free and you can enable it <strong>for</strong> your org with one click.• If your mobile use cases include use of custom objects, Force.com pages (Visual<strong>for</strong>ce), or thirdpartyapps from the AppExchange, you’ll probably want to use the full version of mobile.• Different users have different needs. Consider a hybrid approach where mobile users withadvanced needs are set up on the full version and those with basic needs receive Mobile Lite.7. Work with your IT department – Be sure to work with your IT department to accommodaterestrictions or requirements related to mobile devices. For example, if your BlackBerry devicesconnect through your corporate firewall, there may be security and communications requirements.8. Take advantage of our resources – Mobile access to Sales<strong>for</strong>ce can become one of your mostpowerful business tools, but there are a few extra moving parts. Sales<strong>for</strong>ce.com provides a range offree resources to jump-start your mobile deployment, including live Q&A Webinars, how-to videos,implementation guides, and tip sheets. To get started, check out these resources:• Mobile <strong>for</strong> the Sales <strong>Cloud</strong> Web site• Getting Started with Mobile video• Mobile Community blog• Supported Devices listOf course, feel free to contact your account team <strong>for</strong> recommendations <strong>for</strong> your specific needs.SummaryMobile access to Sales<strong>for</strong>ce is one of easiest ways to enhance the value of your Sales<strong>for</strong>ce investment.Be<strong>for</strong>e you start, have clear goals that define what you want people to be able to do from the field. For thebest per<strong>for</strong>mance, make sure you have newer mobile devices. To prepare, define clear use cases and trainyour users. As you roll out mobile features, start with a standard configuration (Mobile Lite) and improvethe application based on user feedback as you expand access and capabilities. Consider providing allemployees—not just those working outside the office—with mobile access to Chatter <strong>for</strong> enhanced, realtimecollaboration and communication. Finally, be sure to take advantage of the resources provided bysales<strong>for</strong>ce.com.For More In<strong>for</strong>mationContact your account executive to learnhow we can help you accelerate your<strong>CRM</strong> success.BP_MobileSuccess_2010-08-25
3 steps to managing members and donations withSales<strong>for</strong>ce <strong>CRM</strong>Although donations and members are the lifeblood of your organization, it’s often hard to know muchabout them. Knowing your members and keeping critical in<strong>for</strong>mation about your relationships with them ina single place helps get those critical donations—and grow healthier and deeper relationships.With the tools in Sales<strong>for</strong>ce <strong>CRM</strong>, you can quickly boost membershipdevelopment and donations. For example, by generating reports based ondonation history, you can create targeted campaigns to reach out to at-riskmembers. 211 San Diego, an organization that provides referrals to morethan 5,000 health and service programs in the community, credits raising$600,000 to the ability to track donations and improve communicationswith Sales<strong>for</strong>ce <strong>CRM</strong>.AbstractFind out how to enhance your fundraisingcampaigns and build stronger relationships withyour members.By Lindsey AndersonThis document covers the 3 steps to using Sales<strong>for</strong>ce <strong>CRM</strong> to increase the sophistication of yourfundraising activities and member management, without a significant investment:1. Prepare <strong>for</strong> success2. Get up and running3. Step it upStep 1: Prepare <strong>for</strong> successWhen we asked our most successful nonprofits what they did right, they said it was the up-front investmentin planning that made all the difference. Your Sales<strong>for</strong>ce <strong>CRM</strong> implementation will grow and evolve overtime, but planning will always be the critical backbone that ensures your success.• Review your process – Can you clearly describe your process <strong>for</strong> getting new members? Do you knowand track all your donation sources? Have you identified what in<strong>for</strong>mation you want to give to yourmembers—and when? It’s important that you clearly understand these processes so you can duplicatethem in Sales<strong>for</strong>ce <strong>CRM</strong>. Use this guide to map your processes to prepare <strong>for</strong> using Sales<strong>for</strong>ce <strong>CRM</strong> tostep up your fundraising.• Clean your data – Be<strong>for</strong>e you think about mass emailing those contacts that have been in your Excelspreadsheets <strong>for</strong> years, get rid of all those duplicates. Your relationships can only be as good as the datayou have about your contacts. Check out the tools on the AppExchange to clean up your data, such asDemandTools, which discounts its products <strong>for</strong> nonprofit organizations.• Keep it simple – Start with just the fields you need and identify new fields and processes as you becomefamiliar with the application. Start with the basics—Donation amount, Stage, and Posting date are criticalin<strong>for</strong>mation you’ll want to track. You can add other fields in the future. The fewer hoops that are neededto log a donation or in<strong>for</strong>m a member about a capital campaign, the more likely it is your members andusers will adopt the process. More sophisticated uses will become obvious as your organization evolves.
9 steps to effective change managementStep 2: Get up and runningThis section describes the standard tools you can use to improve the results of your fundraising andrelationship-building ef<strong>for</strong>ts. You can find more in<strong>for</strong>mation about them in Help & Training.• Dashboards and reports – To get started, use standard reports such as the LYBUNT and SYBUNTreports included in the Nonprofit Starter Pack. You can also use the report wizard to create customreports to track your donations, both over time and in relationship to specific goals. Once you have thereports you need, don’t <strong>for</strong>get to save them to a folder and make that folder accessible to the people whoneed the reports.• Campaigns – Campaigns help identify the people you want to reach and then track the results of yourappeals. Campaigns can take many <strong>for</strong>ms, from targeted email solicitations to invitations to events. Youcan create targeted campaigns based on various attributes so you can customize your appeals based ondonation trends, geographical location, or membership type. By linking prospects to campaigns you cantrack prospects over time, using customized campaign member status values. Campaigns can also helpdetermine how effective various activities are in reaching your goals.• Opportunity and donation stages – The donation object (record) is the standard opportunity object,renamed <strong>for</strong> nonprofit organizations. This object includes a Stage field <strong>for</strong> tracking long-termmembership and donation trends and sending out targeted communications based on the stage. You canalso assign specific activities <strong>for</strong> your staff to follow up and create a complete record of all activitiesassociated with a donation or pledge.• Email templates – Once you set up segmented campaigns with different goals, you can customize youremail templates to send inexpensive, focused communications to the people targeted in each campaign.Use the merge fields to make these communications more personal and add attachments such as yourannual report to remind donors of your mission. For more in<strong>for</strong>mation about setting up email templates,see the <strong>Best</strong> Practice “Turbo-charge customer communications with email templates .”If Sales<strong>for</strong>ce <strong>CRM</strong>’s daily email limits (1,000 emails per day per user or 2,000 per account) aren’tenough, explore the mass email marketing tools available on the AppExchange, such as VerticalResponse.Step 3: Get a sponsorAfter you define your processes and start using the standard tools, review what’s working, what isn’t, andwhat else you’d like to do. Then check out the following resources to extend your success in yourfundraising and membership activities.• Browse the AppExchange – You’ll find a number of tools that can dramatically increase theeffectiveness of your fundraising, including the donated and discounted applications available tononprofits. Ranging from e-commerce solutions you can use to integrate online donations into yourSales<strong>for</strong>ce <strong>CRM</strong> account to apps that let you customize direct mailings from Sales<strong>for</strong>ce <strong>CRM</strong>, thesesolutions can be the secret sauce of your fundraising success. CongaMerge, eGiving, and VerticalResponse all focus on various aspects of the fundraising process.BEST PRACTICE 2
9 steps to effective change management• Consider a partner – As your fundraising success with Sales<strong>for</strong>ce <strong>CRM</strong> grows, so will your needs. Besure to explore our partners with the expertise to manage complex fundraising ef<strong>for</strong>ts with additionaltools built on the Force.com cloud plat<strong>for</strong>m.• Review your processes – Once you have a sophisticated donor plat<strong>for</strong>m, remember that one of thebiggest perks of Sales<strong>for</strong>ce <strong>CRM</strong> is its flexibility. Be sure to periodically schedule time to review andevaluate your processes, campaigns, and reports. Innovating as you go will help you build a strongerdonor and member community.SummaryBy creating innovative, flexible, and familiar donation and member management processes in Sales<strong>for</strong>ce<strong>CRM</strong>, you’ll increase your ability to achieve your mission. Here are some additional resources to help youbecome even more effective:• Check out this session that showcases best practices in donor and member management.• Get connected with other nonprofit users who manage their donations and members in Sales<strong>for</strong>ce <strong>CRM</strong>.• Review these videos to learn more about specific fundraising examples you can manage in Sales<strong>for</strong>ce<strong>CRM</strong>, using the Nonprofit Starter Pack.For More In<strong>for</strong>mationContact your account executive to learnhow we can help you accelerate your<strong>CRM</strong> success.BP_3Steps-DonorMemberManage_2010-04-15
Bring cloud computing to your entire companywith the AppExchangeWelcome to the AppExchange, the world’s first marketplace <strong>for</strong> business applications that run in the cloud.It’s been called the “eBay of business software” by Forbes magazine because it brings application sellersand buyers together.If you’re a developer or a company that builds cloud computingapplications delivered as a service, the AppExchange lets you reachthousands of potential customers and benefit from sales<strong>for</strong>ce.com’s reachand resources. You can make any applications you create available on theAppExchange <strong>for</strong> free.If you’re a customer, you can use the AppExchange to expand thefunctionality of Sales<strong>for</strong>ce <strong>CRM</strong>, with popular applications to integrateyour campaigns with keyword marketing, email and direct mail solutions,and contract and proposal management, to name just a few. But that’s notAbstractWith hundreds of applications—ranging fromdashboards that extend Sales<strong>for</strong>ce <strong>CRM</strong> tofull-featured Financials applications—sales<strong>for</strong>ce.com’s AppExchange makes findingand deploying new applications fast, easy, andsecure.By: Sara Varni Brightall. Many of the solutions on the AppExchange are enterprise-grade apps that go far beyond <strong>CRM</strong>. Theseapplications bring the benefits of cloud computing to all departments in your company, including finance,HR, and IT. Many of these apps are free, others are fee-based. All of them give you the benefits of cloudcomputing.What’s different about the AppExchange?To answer that question, consider the traditional process of selecting a new business application. First, youresearch available apps in publications and at trade shows. Then you narrow down the pool of potentialvendors. You create an RFP, send it out, and evaluate the responses. You invite the short list of vendors togive demonstrations. You do a pilot and, with luck, the pilot is successful and you license the software andstart the implementation process.Compare that process to getting apps from the AppExchange, where everything you need to discover,evaluate, and test applications is in one place. You can compare available apps side by side. See what othercustomers say about them. Try them out. And then install them with a few clicks and you’re ready to go.This paper describes the 5 steps to getting apps <strong>for</strong> your business needs.
Bring cloud computing to your entire company with the AppExchangeStep 1: DiscoverThe AppExchange makes it easy to find and evaluate applications. You can search <strong>for</strong> apps by keyword orbrowse various categories, including native apps built on the Force.com plat<strong>for</strong>m, the most popular apps,newly added apps, and apps our staff particularly likes. You can also save up to 3 apps to create a side-bysidesummary of important features <strong>for</strong> easy comparison. Forget exactly how you found an app? TheRecently Viewed Apps area makes it easy to find it again. Want more? The Apps tab further categorizesapps by type, industry, and other attributes such as whether the apps are free or fee based, how they rated,whether they’re supported, and so on.Step 2: EvaluateThere are three steps to evaluating an app: finding out all you can about it, trying it yourself, and possiblygetting advice.The AppExchange makes the first two steps easy. First, you can display a summary of any app <strong>for</strong>important in<strong>for</strong>mation at a glance. You can even display up to 3 summaries side by side <strong>for</strong> easycomparison. You can also play demos, view screenshots, get technical details, and read customer reviews tobenefit from the experience of other customers. Then try it yourself—just click the Test Drive button.Finally, talk to your account executive or Customer Success Manager (CSM) to get their recommendations.Step 3: CustomizeAn important key to the success of any kind of application is user adoption. The key to user adoption, inturn, is making sure the application works the way your users do. Adjusting the application to the needs ofyour users typically requires changes to the user interface, such as deleting unnecessary fields, changingfield names, or adding tabs.Making such changes is easy with sales<strong>for</strong>ce.com’s point-and-click tools. One great thing aboutcustomizations: Unlike with traditional on-premises software, your customizations aren’t lost duringupgrades or new releases. Note that the same limits that apply to your edition—such as the number ofcustom objects you can have—apply to any apps you install from the AppExchange.BEST PRACTICE 2
Achieving outstanding <strong>CRM</strong> administrationStep 4: IntegrateIntegration—making different applications work together and share data—has been one of the biggestchallenges in IT. Because all apps on the AppExchange are pre-integrated with Sales<strong>for</strong>ce <strong>CRM</strong>, there areno integration issues. Instead, your new apps simply work. What’s more, just as with customizations, you’llnever have to recode integrations with new releases.Step 5: DeployOne of the benefits of the cloud is that deploying apps doesn’t require a massive IT rollout, with the need toconfigure individual machines, upgrades, and versions. As with Sales<strong>for</strong>ce <strong>CRM</strong>, the IT infrastructure istaken care of. And <strong>for</strong> apps that were built on and run on the Force.com plat<strong>for</strong>m, you also get the sameper<strong>for</strong>mance and reliability.In Sales<strong>for</strong>ce <strong>CRM</strong>, every org is ready <strong>for</strong> apps from the AppExchange. Although anyone can try anAppExchange app, installation is limited to Sales<strong>for</strong>ce <strong>CRM</strong> administrators, who are trained on the securityaspects of deploying new applications. We suggest that you download apps to a production or sandboxenvironment be<strong>for</strong>e making them available to all users. We also recommend that you train your users onhow to get the most from your new app.For More In<strong>for</strong>mationContact your account executive to learnhow we can help you accelerate your<strong>CRM</strong> success.BP_AppExchange_2009-04-24
6 steps toward top data qualityIndustry analysts point the finger at bad data as one of the top three reasons why <strong>CRM</strong> projects fail.Because bad data leads to misleading, incomplete, and confusing in<strong>for</strong>mation, it lowers adoption—anothermajor reason why <strong>CRM</strong> projects fail.Accurate in<strong>for</strong>mation and reports are the life blood of an effective sales<strong>for</strong>ce. Without it, management doesn’t have the data to make gooddecisions, sales reps don’t have the tools to turn leads into customers, andthe company will find it difficult to reconcile <strong>CRM</strong> data with data in othersystems. The result? Lost opportunities and revenue, frustrated users andcustomers, and a lack of user adoption.How to boost data qualityTo ensure consistently high data quality, you’ll need to train your users, create and implement a dataqualityprocess, and use available technologies to automate the process whenever possible. Here’s a 6-stepapproach that’s working <strong>for</strong> many of our customers.Step 1: Profile your dataData profiling is all about understanding your data. You should know where your data comes from:spreadsheets, backend systems, or sticky notes all over reps’ desks. Take an inventory of your data thatincludes the following in<strong>for</strong>mation:• List your data sources and the names of the fields in which data is stored.• Note any potential problems with your data. Do you have automated quality checks be<strong>for</strong>e a new recordcan be saved? Are all fields mapped correctly? For example, the in<strong>for</strong>mation in the Company field inMicrosoft applications usually belongs in the Account field in Sales<strong>for</strong>ce <strong>CRM</strong>.• In Sales<strong>for</strong>ce <strong>CRM</strong>, make sure there’s no duplicate in<strong>for</strong>mation between objects (such as Accounts,Opportunities, and Contacts) and fields (such as State, City, and so on).Step 2: Control your dataData control is about achieving data accuracy and ensuring the right users have access to the rightin<strong>for</strong>mation, which also means blocking access, as needed. To control your data, you first need to “clean” itby removing duplicates and errors, and then set up processes and use technologies to keep it clean.• Use automated routines or tools to clean your data. You’ll find several of these tools on theAppExchange.AbstractDon’t let bad data undermine your Sales<strong>for</strong>ce<strong>CRM</strong> project—or your success as a company.Get your data under control with the 6-stepapproach outlined in this paper.By: Oliver Demuth
6 steps toward top data quality• Prioritize your data cleanup ef<strong>for</strong>t. First, fix data that’s highly visibly and frequently used, such asaddresses and emails. Fix business-specific in<strong>for</strong>mation next, such as Opportunity types and stages.Finally, remove any duplicate fields; <strong>for</strong> example, don’t repeat Account in<strong>for</strong>mation in the Contactobject.• Get your users to fix their data. You can help by using Sales<strong>for</strong>ce <strong>CRM</strong>’s validation rules to alert userswhen data records are incomplete or don’t con<strong>for</strong>m to data-quality standards.• Use exception reports and data-quality dashboards to remind users when their Accounts and Contacts areincorrect or incomplete. Scheduling a Dashboard Refresh and sending that in<strong>for</strong>mation to managers is agreat way to encourage compliance.Another data-control challenge is making sure that data ownership and sharing works <strong>for</strong> yourorganizational structure.• Review your profiles and role hierarchy and make sure the hierarchy, teams, and groups are kept up todate.• Meet frequently with management to keep up with organizational changes.• Define the Create, Read, Update, and Delete (CRUD) rights <strong>for</strong> each profile to ensure users can workwith data, as needed.Step 3: Integrate your dataMost organizations have data in more than one system. Whenever there’s duplicated data in severalsystems, it’s easy <strong>for</strong> in<strong>for</strong>mation to get out of synch. One way to avoid this problem is to integrate yoursystems so that updates in one system automatically update the others, resulting in a single source of“truth” and making it easier <strong>for</strong> end users to access in<strong>for</strong>mation.• Integration was once a huge headache. No more. Sales<strong>for</strong>ce.com offers native connectors to Oracle andSAP systems <strong>for</strong> easy integration of customer-master records. And the Force.com API can be used <strong>for</strong>any integration scenario. There are also dozens of integration partners ready to help with any integrationneed.• It’s easy to learn about and access the Sales<strong>for</strong>ce <strong>CRM</strong> data model with our Web Services APIDevelopers Guide.• When designing your integration, evaluate your business applications to determine which one will serveas your system of record (or “master”) <strong>for</strong> the synchronization process. The system of record can be adifferent system <strong>for</strong> different business processes.• Integrate your order entry and fulfillment applications with Sales<strong>for</strong>ce <strong>CRM</strong> <strong>for</strong> a 360-degree view ofyour customers.Step 4: Augment your dataTo make your <strong>CRM</strong> system even more valuable, augment your data with in<strong>for</strong>mation that will give yoursalespeople and managers an edge. For example, a number of third-party organizations such as Dun &Bradstreet and Hoover’s provide valuable in<strong>for</strong>mation your reps can use to prepare <strong>for</strong> sales calls. Alsomake the most of internal market intelligence, such as purchasing patterns or competitive analyses.• To understand what data is valuable, survey your sales and marketing users to see what they want themost.• Check the AppExchange to find partner solutions that can augment your data with external in<strong>for</strong>mation.• Get internal in<strong>for</strong>mation about your customers’ behavior and buying patterns. Then evaluate whether thisin<strong>for</strong>mation would be helpful to your reps.BEST PRACTICE 2
6 steps toward top data qualityStep 5: Monitor your dataAchieving high-quality data isn’t a one-shot ef<strong>for</strong>t, but requires ongoing vigilance. Establishing policies,processes, and tools <strong>for</strong> monitoring data is crucial to maintaining data quality.• Define a centralized process <strong>for</strong> mass data loads and data-cleansing projects. Both the Force.complat<strong>for</strong>m and the AppExchange have tools that can help with importing and cleansing data.• Use Workflow, Validation Rules, and Force.com code (Apex) to en<strong>for</strong>ce critical business processes.• Create reports and dashboards to monitor data quality. Be sure to leverage free data-quality dashboardsavailable on the AppExchange. By making data quality widely visible, you help make it everyone’sresponsibility.Step 6: Assign ownership, train users, and commit to a data-quality processUsers need to know the importance of data integrity and how to do their part in any data-quality initiative.In training users, show them how data quality directly affects their work. It’s also a good idea to assignultimate responsibility <strong>for</strong> each region’s data to a super user, geographic lead, or other business owner.The Bottom LineBad data is bad <strong>for</strong> business. Achieving and maintaining high-quality data requires vigilance, goodprocesses, and a little help from technology—including the features in Sales<strong>for</strong>ce <strong>CRM</strong>, tools from theForce.com plat<strong>for</strong>m, and solutions from our partners on the AppExchange.For More In<strong>for</strong>mationContact your account executive to learnhow we can help you accelerate your<strong>CRM</strong> success.BP_DataQuality_2010-04-20
Tips <strong>for</strong> using incentives and rewardsto boost adoptionHow can you get users onboard with Sales<strong>for</strong>ce <strong>CRM</strong>? How can you get them to realize its value andencourage them to use it? Try incentive and reward programs—they’re a proven way to engage andmotivate people. Incentives can take different <strong>for</strong>ms, including recognition, cash, points, or actual rewards.For example, one customer gives away iPhones to the strongest adopterseach quarter. Another hands out monthly Starbucks coffee cards to thosewho convert the most leads.• Measure usage – Be<strong>for</strong>e you can reward usage, you need to knowwho’s doing what, how often, and how well. To get that in<strong>for</strong>mation, goto the AppExchange and download some of the free adoptiondashboards created by sales<strong>for</strong>ce.com. The most popular of these are theadoption dashboards and a sales activity dashboard.AbstractUser adoption is key to making Sales<strong>for</strong>ce<strong>CRM</strong> a success. To ensure high rates of useradoption you need a long-term strategy, withongoing ef<strong>for</strong>ts to drive adoption.Find out how to make incentives and rewardspart of your adoption strategy.By: Nancye Michaelian• Tie compensation to usage – One of the strongest measures to boostadoption is to tie usage to compensation. Build use of Sales<strong>for</strong>ce <strong>CRM</strong> intoyour job descriptions and per<strong>for</strong>mance evaluations. And adopt the mantra, “If it’s not in Sales<strong>for</strong>ce<strong>CRM</strong>, it doesn’t exist.” It’s an easy way to make sure user behavior aligns with your business objectives.• Ensure data quality – In addition to requiring that users enter data into Sales<strong>for</strong>ce <strong>CRM</strong>, be specificabout both timeliness and quality. For example, reps should enter prospects and early-stage opportunitiesimmediately, rather than waiting until just be<strong>for</strong>e closing a deal to enter data. Use picklists and validationrules to en<strong>for</strong>ce these standards. You can also use the free data quality analysis dashboards to analyze thequality of the data your team enters.• Make adoption fun – Decide what behavior you want to reward most—such as proposals or on-sitedemos—and then reward the top per<strong>for</strong>mers as part of a game or contest.• Create a reward points program – One way of encouraging and tracking progress is to give peoplepoints. For example, a 90 percent login rate <strong>for</strong> the month could earn 10 points. Users can cash inaccumulated points on a special Web site (www.incentivemarketing.org/). Or start by giving users acertain numbers of points and then subtracting points when they do something wrong, such as notentering required in<strong>for</strong>mation.• Monthly newsletters – Start a monthly newsletter with tips that rein<strong>for</strong>ce your business processes andhighlight success stories. You could include a quiz—<strong>for</strong> example, have users guess who has the largestpipeline this quarter, what campaign generated the most revenue, and so on. Get it right and get a prize.
Turbo-charge customer communications with email templates• Make a game of it – Because your implementation is a work in progress, it’s important to keep usersengaged. A great way to do that is to make training creative and fun with games such as Tic Tac Toe(divide into teams and ask questions about functionality until someone wins), Jeopardy (createcategories on different topics, divide into groups of 2 or 3, highest points win), and Poker Hand (get acard <strong>for</strong> asking and answering questions … the best poker hand wins the pot).• Engage the team spirit – Break user groups into teams and have them meet at regular intervals(<strong>for</strong> example, quarterly) to get their feedback and suggestions. Use the application’s ideas or casesfunctionality to track feedback and then let your admin judge the best ideas. The winning team getsdinner, tickets to sporting events, or something similar.• Reward mentorship – Assign team mentors, then reward the mentors of those teams that get goodresults. Try lunches with the executives, where they can get visibility <strong>for</strong> themselves and their teams.• Use peer pressure – Let’s face it—sometimes rewards just don’t do the trick. In such cases, you can usedisincentives to get people to comply. For example, a “wall of fame–wall of shame” page, whichhighlights those at the top and bottom of the leader board, can be a strong motivational tool. A real-lifeexample of this approach comes from a customer who created a dashboard called “Clean Your Room” todiscourage negligence such as stuck opportunities, pushed opportunities, and accounts with no recentactivity.For More In<strong>for</strong>mationContact your account executive to learnhow we can help you accelerate your<strong>CRM</strong> success.BP_EncourageAdoption_2009-07-09
Beyond login rates: three key areas <strong>for</strong> measuringadoptionNow that your Sales<strong>for</strong>ce <strong>CRM</strong> application is implemented and set up <strong>for</strong> your business needs, it’s time <strong>for</strong>your users to dive in and start using it. But how do you know if your users are really getting the most fromSales<strong>for</strong>ce <strong>CRM</strong>? The best way to tell is to proactively measure adoption rates.Tracking user logins is a good start, but it’s not enough. Because it can beconfusing to figure out what to measure, you need to develop a frameworkof key per<strong>for</strong>mance indicators (KPIs). To come up with these metrics, werecommend involving key stakeholders—managers, senior managers, andexecutives—to determine KPIs based on business benefits and desiredprocess per<strong>for</strong>mance. If you don’t define and regularly monitor KPIs byincorporating the reports and dashboard features in Sales<strong>for</strong>ce <strong>CRM</strong>, youmay find that adoption, consistent usage, and data quality will suffer.AbstractUser adoption is key to making Sales<strong>for</strong>ce <strong>CRM</strong>successful. To make sure you stay on track, youneed to be proactive about measuring adoption.This document outlines three key areas <strong>for</strong>measuring user adoption.By: Matt JadhavIf you haven’t done so already, check out the AppExchange <strong>for</strong> adoptiondashboards to track login activity and new records added by users.Choosing adoption metricsConsider these three key areas when choosing metrics to measure user adoption:1. Usage2. Data quality3. Business per<strong>for</strong>mance1. UsageYour first measurement of adoption—and a basic indicator of success—is login rates. You also need toensure that users are actively and consistently updating data and creating new contacts, opportunities,and/or cases, depending on their roles in the organization.Below is a list of suggested baseline metrics to track usage. Which metrics to use and how often to trackthem depends on your unique requirements, but we’ve provided some guidelines to get you started:Usage metricUsers logged in – last 7 daysUsers not logged in by last name – last 7 daysUsers never logged inAccounts created by owner role – last 120 daysOpportunities created by owner role – last 60 daysContacts created by owner role – last 120 daysActivities completed – last 60 daysAccounts last modified by owner – last 120 daysNeglected opportunities by role – next 60 daysOpen tasks by assigned role – current and previousFrequencyWeeklyWeeklyWeeklyMonthlyMonthlyMonthlyMonthlyMonthlyMonthlyQuarterly
How to measure and increase customer loyalty2. Data qualityData quality is a valuable metric <strong>for</strong> measuring adoption. Looking at critical fields and making sure userscomplete them correctly is important. If certain fields are not filled out, or are filled out incorrectly, it maycompromise user adoption. Designing a protocol to ensure users fill out all fields in a consistent andaccurate manner creates strong data integrity and reliability, which translates into higher user confidenceand adoption.Below is a list of suggested baseline metrics to get you started in tracking data quality:Data quality metricOpportunities with a close date – last 60 daysStage opportunities are enteredProspect accounts missing # employees – last 60 daysLead rating on converted leadsAccounts with all key fields populatedAccounts missing rating fieldKey, non-required fields filled outFrequencyMonthlyMonthlyMonthlyMonthlyMonthlyMonthlyMonthly3. Business per<strong>for</strong>manceUsage should also reflect business per<strong>for</strong>mance and compliance. Ensure that your users are not just loggedin, but are using the application in a way that enhances business effectiveness. For example, measuring thetypes of calls, as well as the level at which calls actually close the deal, is more effective than justmeasuring the number of calls. You should also build analytics that will uncover patterns and trends thattrack per<strong>for</strong>mance levels and identify trouble areas.Business per<strong>for</strong>mance metricPipeline by owner or owner roleMonthly sales trendsActivity type by assigned ownerWin ratio <strong>for</strong> current and previous fiscal yearOpen leads by owner role – open not contactedDeal type by owners winning – current and previousquartersDeal type by owners losing – current and previousquartersFrequencyMonthlyMonthlyQuarterlyQuarterlyQuarterlyQuarterlyQuarterlySuccessful adoption is critical to your <strong>CRM</strong> success. It gives you an overall sense of your organization’shealth from the top down. As you gain experience with adoption metrics, you can prioritize those areaswhere you need to focus, adjust, and improve. Whether you’re just rolling out Sales<strong>for</strong>ce <strong>CRM</strong> or haveused it <strong>for</strong> a while, drive up your user adoption rates to get the most from your solution.For More In<strong>for</strong>mationContact your account executive to learnhow we can help you accelerate your<strong>CRM</strong> success.BP_MeasureAdoption _2009-12-07
10 tips <strong>for</strong> a successful training planHaving a terrific training plan is a huge step toward getting Sales<strong>for</strong>ce <strong>CRM</strong> off to a great start. After all,user adoption is the single most important ingredient in success. With more than 1.5 million users ravingabout Sales<strong>for</strong>ce <strong>CRM</strong>, our customers confirm the importance of training when it comes to adoption.We’ve talked to those customers—across industries and around the world—to come up with the following10 best practices <strong>for</strong> creating a successful training plan:1. Set expectations – To your users, Sales<strong>for</strong>ce <strong>CRM</strong> is all new, soyour first task is to give them an overview and to set expectations—what they can expect from the application and what you expect fromthem. If possible, involve your executive sponsor in this presentationto highlight his or her support and the importance of Sales<strong>for</strong>ce<strong>CRM</strong> to your company.AbstractGet an overview of the key ingredients thatwill make your training plan a success.By: Erica Kuhl2. If it’s not in Sales<strong>for</strong>ce <strong>CRM</strong>, it doesn’t exist – It’s a good idea to set this expectation right away—otherwise, you lose key advantages such as giving managers visibility into the pipeline and doingaccurate <strong>for</strong>ecasting. Have your executive sponsor deliver this training segment as well to show thatyou mean it.3. Be clear about how users are measured – Have clear metrics to let users know how they’ll bemeasured. For example, set target dates by which users must make changes, managers must reviewthe funnel, and when pipeline reports will be pulled. Other metrics include how often users log on andhow many objects they create. We suggest that your executive sponsor also deliver this segment.4. Answer “What’s in it <strong>for</strong> me?” – Don’t just make demands—get people excited as well. The bestway to do so is to show how Sales<strong>for</strong>ce <strong>CRM</strong> will make life easier—<strong>for</strong> example, with lessadministrative work, easier reporting, around-the-clock access, a clear view of the sales funnel, oreasy <strong>for</strong>ecasting. Ask one or more respected power users to deliver this training segment.5. Provide hands-on training with real-life scenarios and data – Don’t make users figure out howhypothetical data applies to them. One way to get people excited is to let them see their data in theapplication, to show firsthand what Sales<strong>for</strong>ce <strong>CRM</strong> can do <strong>for</strong> them. Be sure you clean your data anddevelop day-in-the-life scenarios your users will recognize as theirs.6. Rein<strong>for</strong>ce your processes – Treat Sales<strong>for</strong>ce <strong>CRM</strong> as an opportunity to roll out more effectiveprocesses that make life easier <strong>for</strong> users. For example, introduce a new Opportunity process that usesthe application’s Lead functionality to get leads directly from the Web and into the application.
10 tips <strong>for</strong> a successful training plan7. Help users learn the lingo – Create cheat sheets with Sales<strong>for</strong>ce <strong>CRM</strong> terminology, simpleoverviews of your processes, and step-by-step summaries of the most important processes. These jobaids will serve as handy, easy-to-use references. Also consider giving users a head start by using thefree online course as a training prerequisite.8. Offer incentives – Motivate your users to dive right in with contests, incentives, and a littlecompetition. For example, you could award a $500 prize to the first users to create 15 new Accountsor generate a pipeline report. Money is a great motivator <strong>for</strong> sales users, but so are prizes such asiPods or iPhones. You can also use a leader board in the application to show how individual userscompare in adoption to generate some healthy competition.9. Get feedback – Be sure to leave time <strong>for</strong> Q&A and ask people <strong>for</strong> their opinions. To get off to a goodstart, it’s important to clear up any confusion and to find out what’s on your users’ minds. Make it apriority to try to incorporate feedback into the application—and then be sure to communicate thosechanges to show users that they have a say in how the application works.10. Provide follow-up training. Some people think you train users once and you’re done. But successfultraining isn’t a one-shot ef<strong>for</strong>t. Be sure to follow up after a few weeks because by then, your userswill have a new set of questions. A great way to provide follow-up training is to recruit enthusiasticusers to follow up with their peers and use what they find out to create highly targeted mini-training<strong>for</strong> various user groups.Providing great training isn’t difficult, but it does require planning, ef<strong>for</strong>t, and an ongoing commitment.Use these tips to help you create and execute a training plan that works!For More In<strong>for</strong>mationContact your account executive to learnhow we can help you accelerate your<strong>CRM</strong> success.BP_TrainingPlan _2009-12-07
How to develop a comprehensive training strategySurvey after survey shows that training is one of the top things you can do to make Sales<strong>for</strong>ce <strong>CRM</strong> asuccess. Whether your company is large or small, whether your business processes are complex or simple,training has a huge effect on user adoption and user productivity.How should you proceed? The <strong>Best</strong> Practice document “10 tips <strong>for</strong> asuccessful training plan” gives a quick overview of suggestions you won’twant to miss. This document provides a more comprehensive framework<strong>for</strong> all your training needs and takes you through the topics related to thefollowing stages:• Developing a training strategy• Developing your curriculum• Deploying and delivering your trainingAbstractTraining is one of the most importantinvestments you can make. Find out how todo it right.By Andi MichaelsTraining strategyTraining MethodologyCurriculum developmentDeploy trainingTraining leadInstructional designerInstructors• Business objectives, KPIs, andWIIFM• Trainng approach• Curriculum design anddevelopment• Scheduling training delivery• Trainng evaluation and feedback• Post-deployment support structure• Adoption recommendations• Assumptions and risks• Audience analysis• Curriculum design approach• Tracks• Deliverables• Facilitator guides• Participant guides• Quick reference cards• Presentation decks• Train-the-traner• Power user trainng• Leadership training• End-user training• Ongoing/new hire traning• On-site training• Virtual training• e--learning• Brown bag sessions• Blended approachesTraining environment (sandbox vs. production, data migration and set up, integration)Adoption dashboards (What to measure and how to train to it?)
How to develop a comprehensive training strategyDevelop a training strategyThe training strategy summarizes the overall plan. It captures business objects, documents keyrequirements and pain points, identifies challenges, and outlines the types of training as well as the actualtraining delivery schedule.It’s critical to get involved early in any Sales<strong>for</strong>ce <strong>CRM</strong> project to understand the overall goals of theimplementation—and to learn about your users’ challenges and pain points. At this stage, designate atraining lead to work with the project team. As you develop your strategy, keep the following pointsin mind:• Organizational readiness and communication planning• As soon as possible, create a communication plan that specifies what in<strong>for</strong>mation will be sent andwhen. At a minimum, you should tell users what changes will come, why, and when.• Consider the different roles and business units. Do you need specific materials and training <strong>for</strong> eachaudience? Also, if you’re working with a global deployment, be sure to consider cultural differences.• Be creative in your messages: Consider using your marketing department to make it something userslook <strong>for</strong>ward to. Think about where users are located to determine what approach works best from adelivery perspective. Can you leverage the Internet? Can you take advantage of upcoming nationalsales meetings?• As you plan, don’t <strong>for</strong>get to include “what happens after training?” Include a post-deploymentsupport plan that identifies what users will be measured on and where they can go <strong>for</strong> help. Plan incontinued support; <strong>for</strong> example, brown-bag sessions and monthly tips &tricks emails are excellentways to keep users engaged and provide ongoing training.• Training environmentWork with the project team early to discuss what environment you can use to train your users. Forexample, does your organization have a sandbox environment or do you need to train in the productionenvironment? Also consider the following issues:• Ask the project team what data can be made available <strong>for</strong> training. If you can’t get actual data or allthe data, ask to get data that’s as close to “real life” as possible so you can use the most powerful andrelevant examples. Try to find the “wow” factor by including key reports and dashboards that showhow life will get better with Sales<strong>for</strong>ce <strong>CRM</strong>.• Do you need to consider integration points with back-end systems, such as automatically populatingaccount in<strong>for</strong>mation from an SAP system? If you’re using a sandbox environment, is it set up? Makethe training experience as true to the user’s actual work experience as possible.• User adoptionYou should focus on adoption from the start. Decide early what metrics to measure; it will influence howyou plan your training. Also determine early on whether users are willing to adopt and make sure youhave management support to en<strong>for</strong>ce use of the system, if required.• To track adoption, take advantage of the free Adoption Dashboards on the AppExchange to followadoption trends and intervene if necessary. This in<strong>for</strong>mation lets you track whether users are using theapp and using it correctly—and helps you better coach users, as needed. You can tweak thesedashboards to meet your specific needs.• Consider implementing a super-user program to provide additional support toward your adoptiongoals. Citrix used per<strong>for</strong>mance managers to help with training delivery and provide additionalassistance after go-live.BEST PRACTICE 2
How to develop a comprehensive training strategyDevelop your curriculumStart with an audience analysis to make sure you develop the right materials <strong>for</strong> the right users. At thisstage, designate an instructional designer to develop your training materials. Then decide what yourdeliverables will be. And always keep in mind this burning question: “What’s in it <strong>for</strong> me?” Yourcurriculum should answer that question.As you develop your training materials, keep these considerations in mind:• Make the most of existing materials. Get an inventory and make that in<strong>for</strong>mation available to yourinstructional designer.• Successful training tends to be scenario-based, rather than focusing on features and functions. Try tofollow the work processes of your users to make the training relevant.Your materials should match the learning style of your users. The following materials are tried-and-trueapproaches:• Facilitator guides – Include detailed instructor notes on what to emphasize, details of timing, and soon. Be sure to map these guides to your participant guides.• Participant guides – Provide end-to-end, detailed training documentation. Interactive, hands-onexercises are a great way to provide realistic training.• Quick reference cards – Give users something to use when they’re on the job. Use the cards duringtraining <strong>for</strong> reference and consider publishing them online later.• Slide shows – Use such presentations to give your users the big picture. And remember: Keep itsimple!Deploy and deliver your trainingAs you get ready to start training, consider what type of training you need, how many users must be trained<strong>for</strong> each role, and how many days until the application is ready to go-live. Based on this in<strong>for</strong>mation,decide how many instructors you need. Be sure your instructors have training experience. Ideally, theyshould also have experience in the user role they’ll be teaching.Depending on your user roles, consider any combination of the following types of training:• Prerequisite training – Create awareness and excitement with simple 5–10-minute “teaser” recordingsthat explain what’s coming, project goals, and of course, “What’s in it <strong>for</strong> me?” Consider using aninspirational video clip of a popular executive, or someone else people admire, to discuss how Sales<strong>for</strong>ce<strong>CRM</strong> will make life better.• Train-the-trainer – If you have internal trainers and need to train many users, this is an effectiveapproach in which you train those trainers to deliver the materials you developed.• Leadership training – Regardless of the size of your company and your management team, adoption isalways higher when management promotes Sales<strong>for</strong>ce <strong>CRM</strong> by showing they have the necessaryknowledge to hold their teams accountable.• End-user training – Hands-on training is perfect <strong>for</strong> making training personal, relevant, and interactive.The ideal classroom size is 1 instructor to 15–20 participants. If it’s not possible to present “live,”interactive, on-site training, use virtual training and turn over the mouse to give participants hands-onexperience with a demo scenario that gets them involved and active.BEST PRACTICE 3
How to develop a comprehensive training strategy• Brown-bag sessions – Use these <strong>for</strong>mal or in<strong>for</strong>mal sessions to keep the conversation going. You cananswer questions, follow up on training topics, discuss new features, or whatever makes sense <strong>for</strong> yourbusiness and your users.For More In<strong>for</strong>mationContact your account executive to learnhow we can help you accelerate your<strong>CRM</strong> success.BP_TrainMethodology_2010-03-26
9 steps to effective change managementYour users have lots of ideas and requests <strong>for</strong> functionality. And sales<strong>for</strong>ce.com releases new features threetimes a year (see “6 steps to making the most of each release”). Because you can’t do everything at once,how can you make sure you focus on those product enhancements that most effectively drive user adoptionand have the biggest impact on your organization—and your users’ day-to-day jobs?Here are 9 steps toward a successful change management and product release strategy:1. Get a strategy2. Collect input3. Get a sponsor4. Define scope and impact5. Prioritize6. Configure and test7. Communicate and train users8. Deploy9. Follow upAbstractBy continually enhancing your application,you’ll improve adoption, broaden usage, andimprove your user’s overall experience.To make sure you’re making those changesthat will have the biggest impact on yourbusiness, you need a product release strategythat will “bubble up” those enhancements thatwill keep your application—and your users—per<strong>for</strong>ming at their peak.By Sharon BartolStep 1: Get a strategyA core tenet <strong>for</strong> initial releases is “keep it simple.” You can always add features and process improvementsafter the application is live. And let’s be honest—not every request should be incorporated into yourdeployment. The scope and level of ef<strong>for</strong>t may be too great, the request may not align with your businessgoals, or the change may have a negative impact on some users.To determine which user requests—and/or seasonal release features—you’ll implement, you need astrategy. Part of that strategy is to identify which changes can be made quickly and easily, and which needto be reviewed and approved by your change management group. Below is an example of a releasemanagement strategy that categorizes changes into three types of releases, depending on whether they canbe made quickly or should be scheduled <strong>for</strong> future releases. In most cases, features from the seasonalreleases are quick to implement and could be released immediately.
9 steps to effective change managementStep 2: Collect inputThere are lots of ways to get feedback from your user community—the important thing is that youdo it! Here are some features of Sales<strong>for</strong>ce <strong>CRM</strong> that will help:• Use the ideas functionality of Sales<strong>for</strong>ce <strong>CRM</strong> to create a two-way communication channel between yourchange management group and your user community. Users love it—they can always see the latest statusof their ideas; <strong>for</strong> example, Under Consideration, Approved, or Rejected.• Use the case object to capture internal enhancement requests. You can collect all the in<strong>for</strong>mation youneed to evaluate the request. Then use the built-in report and dashboard functionality to monitor thenumber, type, and frequency of specific requests.Step 3: Get a sponsorHaving an engaged executive sponsor is key to an effective change management process. The sponsor willhelp guide the change management group by defining the process and establishing strategic objectives. Thesponsor should also contribute to the communication plan and help define the message to your users todrive adoption.Step 4: Define scope and impactOnce you have a list of enhancement ideas, determine the level of ef<strong>for</strong>t, scope, and impact of each idea.For global or cross-functional deployments, it’s critical to align processes between functional areas. Theseprocesses should be reviewed by the change management group to avoid negatively affecting otherfunctional areas.This step also provides an excellent opportunity to engage with your users. It’s a good idea to scope out theproposed features with a specific use case in mind and to shadow your users’ day-to-day routines to predictthe effects of any changes.Step 5: PrioritizeIncorporating every enhancement request and idea is just not feasible. That’s why defining the overallimpact is important in helping the change management group and sponsor decide which enhancements toimplement, which to target <strong>for</strong> a later date, and which to reject. To make those decisions, consider using thevoting capabilities of sales<strong>for</strong>ce.com’s ideas functionality to give users a voice in this process.BEST PRACTICE 2
9 steps to effective change managementStep 6: Configure and testDepending on your Sales<strong>for</strong>ce edition, you’ll have access to one or more sandbox environments with acopy of your production data. You can use the sandbox to configure and test any enhancements andchanges be<strong>for</strong>e deploying them to your production environment. This step is critical to a smooth andsurprise-free deployment.Step 7: Communicate and train usersDon’t derail your new release by not having a communication or training plan. Set employee expectationsabout the upcoming changes, such as when they’ll happen and how users will be trained. And be sure toanswer the question, “What’s in it <strong>for</strong> me?”• Take advantage of your sandbox environment to provide a real-life training environment <strong>for</strong> your users.Depending on the complexity of your release, you have several training options, including online trainingfrom sales<strong>for</strong>ce.com and the release notes. For complex implementations, consider hands-on classroomtraining. For very simple implementations, an email notification or FAQ document may be enough.Check out all the training options available through sales<strong>for</strong>ce.com.Step 8: DeployOnce your new release is configured and tested and your users are trained, it‘s time to push your newrelease to your production environment.• Use the Eclipse IDE to manage configuration changes.• Use a browser and Eclipse <strong>Cloud</strong> Deploy to manage Force.com code (Apex), schema, Force.com pages(Visual<strong>for</strong>ce), and other changes between your sandbox and production environments.If you’re not sure which option is right <strong>for</strong> you, check with a technical resource at sales<strong>for</strong>ce.com.Step 9: Follow upFinally, measure the success of your new release and identify areas you can enhance in the future. Afteryou deploy, reconnect with your power users or survey a broader base of your user community to start thecycle again. This approach helps to keep your releases fresh and timely—you’ll always deliver thosefeatures that will make the biggest difference to your user community.For More In<strong>for</strong>mationContact your account executive to learnhow we can help you accelerate your<strong>CRM</strong> success.BP_ChangeMan_2010-04-15
5 simple steps to reports and dashboardsReports and dashboards show how you per<strong>for</strong>med in the past and what’s happening at the moment—they’re key to driving success and adoption <strong>for</strong> any <strong>CRM</strong> project. The in<strong>for</strong>mation provided by reports anddashboards is especially important in today’s environment, where it’s critical to be proactive, rather thanreactive, in your approach. You want to be able to spot trends and act on them immediately.For example, a sales organization wants to know which deals were lost, which competitors are gainingground, and whether the average time to close is increasing or decreasing.For a customer service organization, it’s important to track the averagedays or time to close and satisfaction. And marketing organizations wantto track campaign effectiveness and ROI.To make the most of Sales<strong>for</strong>ce <strong>CRM</strong>’s reporting capabilities, it’simportant to plan carefully and then follow these 5 proven steps to makingreports and dashboards part of your business process:1. Know what keeps your executives up at night2. Capture the right data3. Build your reports4. Build your dashboards5. Use data to change behavior and drive resultsAbstractTo track and improve business per<strong>for</strong>mance,you need reports that show trends as well asreal-time dashboards <strong>for</strong> up-to-the minutein<strong>for</strong>mation about your business. Sales<strong>for</strong>ce<strong>CRM</strong> makes it easy to create both.By Leahanne MerrittStep #1: Know what keeps your executives up at nightFinding answers to critical business questions and making good decisions is vital to executives—and totheir companies’ success and competitive position:• Ask questions and start at the top – When designing reports and dashboards, first define what yourexecutives—your CEO; the VPs of Sales, Marketing, Support; and your channels—need to know to runtheir business. What are their key metrics? What behaviors do they want to encourage?• Align metrics with your company vision – Take your business objectives, determine the metrics thatmeasure those objectives, and map those metrics to the capabilities of Sales<strong>for</strong>ce <strong>CRM</strong>. For example, if<strong>for</strong>ecasting and tracking large deals are important to the VP of Sales, make sure you understand the keydata points that give insight into those tasks and the best frequency <strong>for</strong> reporting that data. Or if your VPof Marketing needs to track response rates, sales, trials, meetings, or campaign awareness, you need tocapture that data at the campaign, campaign member, lead, and opportunity level to return meaningfulmetrics.Tip: Salespeople thrive on competition. If you make it possible to track their progress in relation to theirpeers, your overall adoption rates will go up.
5 simple steps to reports and dashboardsStep #2: Capture the right dataYour reports and dashboards are only as good as the data behind them—planning is the key to capturingand displaying the correct metrics. Identify your sources early. Consider working backwards: plan yourreports first and then configure the application by adding custom fields, <strong>for</strong>mulas, and so on.If your marketing team wants to see campaign effectiveness over time, <strong>for</strong> example, you’d want to trackwhich campaigns lead to leads, opportunities, and closed/won deals. Every week, you could use snapshotreports on lead status by campaign and opportunity status by campaign to show how many leads andopportunities were received and converted from each campaign.• Manage what you measure – Pick a limited number of key per<strong>for</strong>mance indicators (KPIs) or metrics. Athird-party survey of the number of metrics used by CEOs showed that 52 percent use 5–10 metrics tomanage their entire business.• Limit the number of reports/dashboards – Focus on those tied to specific business objectives.• Develop a clear, concise naming strategy – That approach will make report and dashboard folders easyto find. Use labels that are meaningful to your users; <strong>for</strong> example “MW Sales Team,” “Premier/GoldSupport Analysts,” or “Converted Leads <strong>for</strong> Verticals Team.” For dashboard folders, start with the word“Dashboard” (Dashboard – MW Sales Team,” “Dashboard – Premier/Gold Support Analysts”).• Determine security and access <strong>for</strong> the report and dashboard folders and give users access based on theirjob functions or roles.Step #3: Build your reportsMost customers start with a current report tracked in Excel or Access and use it as a baseline. As you beginto build reports in Sales<strong>for</strong>ce <strong>CRM</strong>, there are several resources to help you get started.• Start with out-of the-box reports. Sales<strong>for</strong>ce.com offers standard reports across all standard objects.You can use these reports as the basis <strong>for</strong> your custom reports.• Understand the three different report types and how they’re used:• Tabular reports are the simplest and fastest way to return your data in a simple list view <strong>for</strong>mat.Keep in mind that tabular reports can’t be used to create dashboard components.• Summary reports return your data with subtotals and other summary-level in<strong>for</strong>mation.Summary reports are great <strong>for</strong> showing average dollar values <strong>for</strong> closed won opportunities bysalesperson or number of cases by status by support representative.• Matrix reports show data summaries against both horizontal and vertical criteria; <strong>for</strong> example,total sales per sales rep per year by quarter.• Bookmark the Analytics blog on the Sales<strong>for</strong>ce.com Community Web site. Check back on a regular basis(especially prior to each release) <strong>for</strong> tips, tricks, and use cases <strong>for</strong> new analytics features and productenhancements.Step #4: Build your dashboardsWhen you finish planning after asking all the right questions and building your reports, you’re ready tobuild your dashboards. The key to building dashboards your VPs, managers, and users can’t live without isto match the dashboard metrics to a compelling business metric.• Understand the different dashboard <strong>for</strong>mats and what type of data is best displayed in each <strong>for</strong>mat:• Horizontal bar/vertical column charts are great <strong>for</strong> showing geographical data, stage or statusin<strong>for</strong>mation, or any data that’s part of a single grouping.BEST PRACTICE 2
5 simple steps to reports and dashboards• Pie and donut charts are useful <strong>for</strong> displaying data that shows proportions of a total, such as thenumber of leads by lead source.• One of the newest chart types, the funnel, is best used <strong>for</strong> showing ordered picklists such asopportunity stage, case status, or lead stage.For more in<strong>for</strong>mation, go to Help & Training and search on chart types.• Don’t reinvent the wheel! Go to the AppExchange, download the free, pre-built dashboards—such as theLead and Opportunity Management dashboard—created by Force.com Labs, and customize them to meetyour business needs. Use these dashboards to track and measure adoption, sales productivity, campaigns,lead generation, and service and support.Step #5: Use data to drive behavior and produce resultsReports and dashboards are designed to be iterative—it’s important to keep them current and relevant. Tosuccessfully roll out business metrics, good communication is key. Make it easy <strong>for</strong> your users to find,view, and access the dashboards relevant to them. Use the schedule refresh feature to ensure your users seethe most recent data. And use schedule and email reports and dashboards to remind your users that theirbusiness-critical metrics are in Sales<strong>for</strong>ce <strong>CRM</strong>.• Manage from the top down – Encourage managers to run <strong>for</strong>ecast calls directly from their dashboards.Many customers also have the following mandate <strong>for</strong> sales: “If it’s not in Sales<strong>for</strong>ce, it doesn’t exist.”This directive proves to be extremely motivating <strong>for</strong> salespeople.• Include adoption and data quality metrics – Include a dashboard component that tracks faulty data,such as all accounts without an industry, contacts without valid email addresses, or leads with a status of“qualified” that haven’t been converted. Again, publishing such metrics can be extremely motivating.• Engage your user community – Don’t make the mistake of tracking such metrics only at the executivelevel—make sure your users see the same metrics on their personal dashboards. What do your users wantto see? What will help them do their jobs faster and smarter? Those are the metrics that matter. Forexample, you could create reports and dashboards that rank salespeople by top deal or top salespeopleper quarter.For More In<strong>for</strong>mationContact your account executive to learnhow we can help you accelerate your<strong>CRM</strong> success.BP_5steps2reports-dashboards_2010-06-08