Picture Frame Moldings - Woodsmith Woodworking Seminars
Picture Frame Moldings - Woodsmith Woodworking Seminars
Picture Frame Moldings - Woodsmith Woodworking Seminars
Create successful ePaper yourself
Turn your PDF publications into a flip-book with our unique Google optimized e-Paper software.
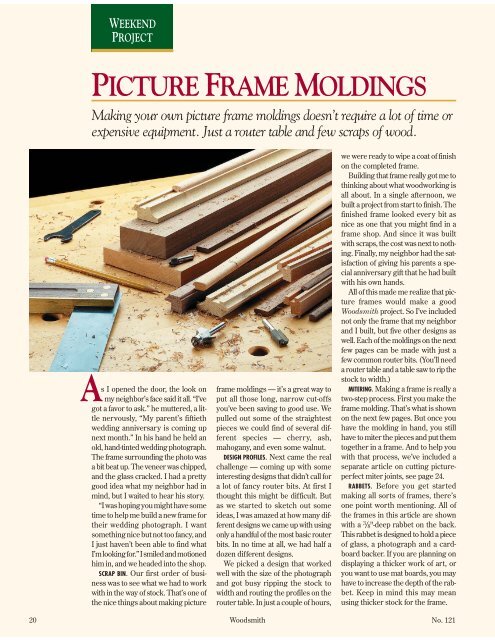
WEEKENDPROJECTPICTURE FRAME MOLDINGSMaking your own picture frame moldings doesn’t require a lot of time orexpensive equipment. Just a router table and few scraps of wood.As I opened the door, the look onmy neighbor’s face said it all. “I’vegot a favor to ask.” he muttered, a littlenervously, “My parent’s fiftiethwedding anniversary is coming upnext month.” In his hand he held anold, hand-tinted wedding photograph.The frame surrounding the photo wasa bit beat up. The veneer was chipped,and the glass cracked. I had a prettygood idea what my neighbor had inmind, but I waited to hear his story.“Iwashopingyoumighthavesometime to help me build a new frame fortheir wedding photograph. I wantsomething nice but not too fancy, andI just haven’t been able to find whatI’mlookingfor.”Ismiledandmotionedhim in, and we headed into the shop.SCRAP BIN. Our first order of businesswas to see what we had to workwith in the way of stock. That’s one ofthe nice things about making pictureframe moldings — it’s a great way toput all those long, narrow cut-offsyou’ve been saving to good use. Wepulled out some of the straightestpieces we could find of several differentspecies — cherry, ash,mahogany, and even some walnut.DESIGN PROFILES. Next came the realchallenge — coming up with someinteresting designs that didn’t call fora lot of fancy router bits. At first Ithought this might be difficult. Butas we started to sketch out someideas, I was amazed at how many differentdesigns we came up with usingonly a handful of the most basic routerbits. In no time at all, we had half adozen different designs.We picked a design that workedwell with the size of the photographand got busy ripping the stock towidth and routing the profiles on therouter table. In just a couple of hours,we were ready to wipe a coat of finishon the completed frame.Building that frame really got me tothinking about what woodworking isall about. In a single afternoon, webuilt a project from start to finish. Thefinished frame looked every bit asnice as one that you might find in aframe shop. And since it was builtwith scraps, the cost was next to nothing.Finally, my neighbor had the satisfactionof giving his parents a specialanniversary gift that he had builtwith his own hands.All of this made me realize that pictureframes would make a good<strong>Woodsmith</strong> project. So I’ve includednot only the frame that my neighborand I built, but five other designs aswell. Each of the moldings on the nextfew pages can be made with just afew common router bits. (You’ll needa router table and a table saw to rip thestock to width.)MITERING. Making a frame is really atwo-step process. First you make theframe molding. That’s what is shownon the next few pages. But once youhave the molding in hand, you stillhave to miter the pieces and put themtogether in a frame. And to help youwith that process, we’ve included aseparate article on cutting pictureperfectmiter joints, see page 24.RABBETS. Before you get startedmaking all sorts of frames, there’sone point worth mentioning. All ofthe frames in this article are shownwith a 3 / 8"-deep rabbet on the back.This rabbet is designed to hold a pieceof glass, a photograph and a cardboardbacker. If you are planning ondisplaying a thicker work of art, oryou want to use mat boards, you mayhave to increase the depth of the rabbet.Keep in mind this may meanusing thicker stock for the frame.20 <strong>Woodsmith</strong> No. 121
Accent Strip <strong>Frame</strong>An easy way to dress up an otherwiseordinary-looking frameis to use a contrasting wood asan accent. In this frame, a mushroom-shapedaccent strip isglued into a groove that is routeddown the center of the frame.The main part of this frame isjust a piece of 3 / 4"-thick stockwith an 1 / 8" cove routed alongeach edge, see Step 1. Then agroove for the accent strip and arabbet for the glass and pictureare routed, see Steps 2 and 3.The accent strip is just a 3 / 8"-thick piece of bullnose moldingwith a “tenon” that fits into thegroove in the frame. This tenonis actually a hair shorter thanthe depth of the groove in orderto prevent it from bottoming outand creating a gap where theaccent strip and frame meet.Because the accent strip is sosmall and narrow, it would bedifficult (and possibly dangerous)to rout the profile after theblank is cut to size. To solve thisproblem, just rout the profile onthe edge of a wider piece ofstock, then rip the inlay strip tosize, see Steps 4 through 6.1Using a !/4”-dia. core box bit,rout a !/8” cove along bothedges of the frame blank.4To create the bullnose profileon the accent strip, roundover both edges of a wide blank.2Hold the frame blank tightagainst the fence while routinga groove down the center.5Two passes with a straightbit create the shoulders ofthe “tenon” on the accent strip.3Before starting on the accentstrip, rout a rabbet in theframe for the glass and picture.6Switching to the table saw,cut the accent strip from theblank and glue it to the frame.Wide Accent StripFor a larger frame, the width ofboth the frame and the accentstrip is increased. And to varythe appearance and lighten thelook of the frame, two sizes ofcoves are routed along the edgesof the frame, see Steps 1 and 2.Placing the larger cove onthe outside edge of the moldinggives the frame more of athree-dimensional look. Thismakes it appear less massiveand cumbersome without sacrificingstrength.Here again, the groove for theaccent strip is routed with astraight bit. But this time, thegroove is centered between thetwo coves. It’s not centered onthe workpiece, see Step 3. Keepthis in mind when setting thefence on your router table.3The groove for the accentstrip is centered between thethe two coves, not the blank.1After cutting the frame blankto width, rout a !/2” covealong the outside edge.4Before starting on the accentstrip, rout a rabbet in theframe for the glass and picture.2On the inside edge of theblank, rout a !/4” cove, usingeither a core box bit or a cove bit.5The edges of the accent stripare shaped on a wide blankbefore cutting the piece free.No. 121 <strong>Woodsmith</strong> 21
Single Bead ProfileWhen making a piece of furniture, Ioften use “built-up” molding. This isjust two or more simple pieces ofmolding that are stacked together tocreate a wider profile.The same technique can also beused to make picture frame moldings.But instead of stacking the pieces oneon top of the other, you simply “stack”them side by side.In this case, I added a simple beadmolding alongside a cove molding. Iused walnut for both the bead moldingand the cove molding, see photo.But you could use two different typesof wood for a contrast.I made the coved piece first by routinga stepped roundover along oneedge and a cove along the other, seeSteps 1 and 2. The roundover createsa shadow line that will help to set offthe bead molding, making it standout a little more. Then the rabbet forthe glass and picture is routed on theinside bottom edge, see Step 3.To make the bead molding, justrout an 1 / 8" roundover along bothsides of a blank made from 1 / 4"-thickstock, see Step 4.Finally, the bead molding is simplyglued to the cove molding. The trickhere is to keep both pieces flush alongthe bottom. And to do this, it helps tohave a nice flat surface to work onwhile gluing the pieces together. (Iused the top of my table saw.)1The first step is to create asmall, stepped roundover onthe outside edge of the frame.2The !/4” radius cove can bemade with core box bit or acove bit with a bearing.3Before starting on the beadmolding, rout a rabbet in theframe for the glass and picture.4The bead molding is madeby routing a roundoveralong two edges of a thin strip.SHOP TIPA rubber trowel(used for groutingceramic tile)makes a greatpush block forrouting profileson narrow stock.Double Bead ProfileFor a larger picture frame, here’s awider molding profile that uses twobeads — one on the inside and anotheridentical one on the outside of theframe. The bead moldings sandwicha flat, wide piece of wood that makesup the main portion of the frame.Because of its simple, symmetricaldesign, this frame is verystraightforward in construction. Itstarts as a single blank, cut to width.(I used ash.) A small roundover witha shoulder is routedalong the topedges of theblank, see Step 1.The next stepis to make thebead molding.This is identical tothe molding used in the frameabove. I chose cherry this time tocreate a contrast between the beadsand main part of the frame, seephoto at top of page.After gluing the beads to the sideof the frame, a rabbet for the glassand picture is routed, see Step 3.1Rout a small roundover along boththe inside and outside edges ofthe main frame piece.2To create the bead molding forthe frame, rout a !/8” roundoveron both sides of a !/4”-thick blank.3After gluing the bead molding tothe edges of the frame, rout arabbet along the inside edge.22 <strong>Woodsmith</strong> No. 121
Veneered <strong>Frame</strong>Building up a frame out of differentspecies of wood is one way to createa molding profile with a “two-tone”effect. But another way is to simplyveneer the surface of a blank beforeyou rout the edges. Routing the edgesnot only creates a profile, it exposesthe wood underneath the veneer tohighlight the profile all the more.The key is to select a veneer andwood for the frame that look goodtogether but aren’t too close in coloror appearance. For this firstframe, I used a figured mahoganyveneer on a maple frame.To make trimming the veneer easier,I glued it to an oversize blank.Then after the glue is dry, rip the blankdown to its finished width. Now youcan rout the coves along the edges ofthe veneered side, see Step 1.To complete the frame, just rout arabbet along the bottom edge for theglass and picture, see Step 2.1First veneer the face of a wideblank and rip it to width. Thenrout a small cove along both edges.Two-Piece Veneered <strong>Frame</strong>The veneering technique described inthe frame above doesn’t have to beused exclusively on flat frames. Tocreate a frame with more depth, youcan veneer two pieces of wood of differentthicknesses and then fit themtogether, see photo above right.2After routing the coves, flip thepiece over and rout a rabbet inthe frame for the glass and picture.To make this frame, simply veneera blank and cut it to width. Then cuta cove along one edge and a rabbetalong another edge for the glass andpicture, see Steps 1 and 2.The second piece of the frame fitsaround the outside edge of the first.This piece is veneered and cut towidth. A roundover is routed alongthe outer top edge, and a cove is routedalong the inside top edge, see Steps3 and 4. Then a rabbet is routed on theinside of the workpiece to allow it tofit over the first piece, see Step 5. W1After veneering a #/4”-thick frameblank and ripping it to width, routa small cove along one edge.2After routing the cove, flip thepiece over and rout a rabbet inthe frame for the glass and picture.3For the second piece, rout astepped roundover on one edgeof a veneered, 1!/8”-thick blank.4On the opposite edge of theblank, rout a small cove profile,using a !/2”-dia. core box bit.5Finally, cut a shallow rabbet alongthe inside edge to allow the pieceto fit over the first frame piece.No. 121 <strong>Woodsmith</strong> 23


