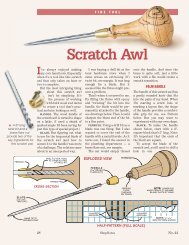
Curved-Lid Tool Chest, Pt. 3 - Woodsmith Woodworking Seminars
Curved-Lid Tool Chest, Pt. 3 - Woodsmith Woodworking Seminars
Curved-Lid Tool Chest, Pt. 3 - Woodsmith Woodworking Seminars

You also want an ePaper? Increase the reach of your titles
YUMPU automatically turns print PDFs into web optimized ePapers that Google loves.
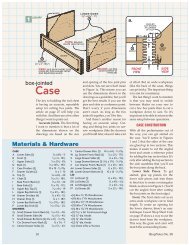
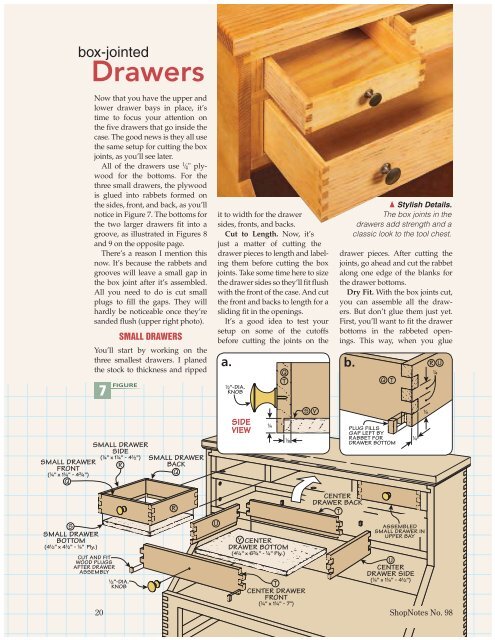
ox-jointedDrawersNow that you have the upper andlower drawer bays in place, it’stime to focus your attention onthe five drawers that go inside thecase. The good news is they all usethe same setup for cutting the boxjoints, as you’ll see later.All of the drawers use 1 ⁄ 4 " plywoodfor the bottoms. For thethree small drawers, the plywoodis glued into rabbets formed onthe sides, front, and back, as you’llnotice in Figure 7. The bottoms forthe two larger drawers fit into agroove, as illustrated in Figures 8and 9 on the opposite page.There’s a reason I mention thisnow. It’s because the rabbets andgrooves will leave a small gap inthe box joint after it’s assembled.All you need to do is cut smallplugs to fill the gaps. They willhardly be noticeable once they’resanded flush (upper right photo).SMALL DRAWERSYou’ll start by working on thethree smallest drawers. I planedthe stock to thickness and ripped7 FIGURE SIDEit to width for the drawersides, fronts, and backs.Cut to Length. Now, it’sjust a matter of cutting thedrawer pieces to length and labelingthem before cutting the boxjoints. Take some time here to sizethe drawer sides so they’ll fit flushwith the front of the case. And cutthe front and backs to length for asliding fit in the openings.It’s a good idea to test yoursetup on some of the cutoffsbefore cutting the joints on the{ Stylish Details.The box joints in thedrawers add strength and aclassic look to the tool chest.drawer pieces. After cutting thejoints, go ahead and cut the rabbetalong one edge of the blanks forthe drawer bottoms.Dry Fit. With the box joints cut,you can assemble all the drawers.But don’t glue them just yet.First, you’ll want to fit the drawerbottoms in the rabbeted openings.This way, when you gluea. b.R U!/2"-DIA.KNOBQTQT!/4S V!/4SMALL DRAWERSIDE(!/4" x 1!/4" - 4!/2") SMALL DRAWERSMALL DRAWERRBACKFRONT(!/4" x 1!/4" - 4#/4")QQVIEW!/4!/8PLUG FILLSGAP LEFT BYRABBET FORDRAWER BOTTOM!/4SSMALL DRAWERBOTTOM(4!/2" x 4!/2" - !/4" Ply.)CUT AND FITWOOD PLUGSAFTER DRAWERASSEMBLYRUV CENTERDRAWER BOTTOM(4!/4" x 6#/4" - !/4" Ply.)CENTERDRAWER BACKTASSEMBLEDSMALL DRAWER INUPPER BAYUCENTERDRAWER SIDE!/2”-DIA.(!/4" x 1!/4" - 4!/2")KNOBTCENTER DRAWERFRONT(!/4" x 1!/4" - 7")20 ShopNotes No. 98
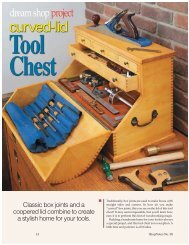
same orientation during the fittingprocess. Now it’s just a matter oftaking a little time to tweak the fitof each wedge to get perfect jointlines between each other and thesides of the case.The next step is to dry-assembleeach stave with its two matingwedges. Then you transfer theangle of the wedge onto the endof the stave to rip their bevelededges. Once that’s done, you canglue and sand each stave assemblybefore moving on. Just be sure totake it easy and check the fit oftento avoid problems later on.11 FIGURE CASE FRONTDDFRONT VIEWC CLID FRONT1!/16" CONTINUOUSHINGEa.HINGELID FRONT C CDDLIDSIDEb.HINGEWITHSCREWSa.C CDDLID SIDECASEDIVIDERNOTE: WITH LIDFRONT FLUSH TOFRONT OF CASE,SIDE POINTMUST FIT HEREStep-by-Step: Trim and FitTAPE HOLDS ASSEMBLYFOR FITTING TO CASECHECK FORGAPS ANDSAND TO FITAt this point, all that’s left to do is take care of the final detailsof fitting and assembling the lid of the tool chest.You’ll start by fitting all the wedged side pieces together (Step1). Then you’ll mate them up with their staves to rip the bevels(Steps 2 and 3). Now is a good time to check the fit with the caseand with the other stave assemblies, keeping them in the sameorder as before. Then you can glue and clamp each stave assembly(Step 4), using a scrap block to keep things square. Finally,some careful sanding will guarantee a good fit (Step 5).1Completing an Arc. Fitting the four wedges for each sideof the lid means aiming for tight joints between them. Usetape to keep everything together as you work.STRAIGHT EDGEa. a.LIDSTAVESTAVEWASTEPUSHBLOCKLIDSTAVEPUSHBLOCKEND VIEWTILT BLADETO MATCHLAYOUT LINELIDWEDGELID STAVE2EXTEND LINE OF WEDGEEDGE ACROSS ENDOF STAVE WITH PENCILSIDEVIEWMarking the Bevels. Using the mating wedges, transferthe bevel angle to the staves. These marks will serve asguidelines for setting the tilt of your saw blade.3Ripping Bevels. With a push block, rip the bevels oneach side of the stave, being careful to check the fenceposition before each cut. Stay close to the layout line.CLAMP ACROSS ASSEMBLYTO DRAW JOINTS TIGHT4NOTE: CUT SCRAP PIECE TOLENGTH TO HOLD ASSEMBLYSQUARE WHILE CLAMPINGSquare Glue-Up. After applying glue, a spacer helpskeep the assembly square as you apply clampingpressure to draw the box joints tight.5NOTE: A FEW LAYERSOF TAPE EQUAL TO THETHICKNESS OF SANDPAPERACT AS A SPACER SANDPAPERSanding the Staves. Carefully sand the edges of thestaves fl ush with the wedges. Be careful not to sand thewedges in order to maintain a good joint line.www.ShopNotes.com 23